Tag Archives: PreSonus Audio
Friday Tips: Humbucker to Single-Coil Conversion with EQ
Humbuckers are known for a big, beefy sound, while single-coil pickups are more about clarity and definition. If you want the best of both worlds, you can warm up a soldering iron, ground the junction of the humbucker’s two coils, and voilà—a single coil pickup. But there’s an easier way: use the Pro EQ, which gives the added benefit of not losing the pickup’s humbucking characteristics.
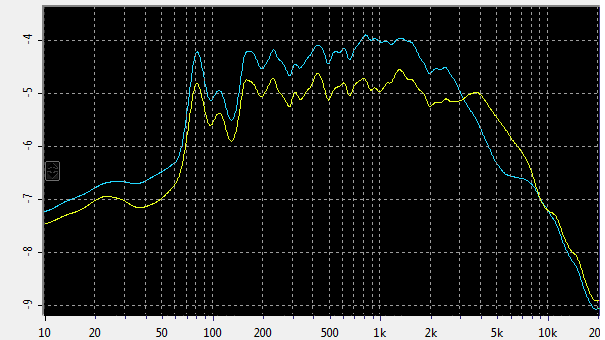
Fig. 1: Humbucker and single-coil response compared.
The main difference between humbucker and single coil pickups is the frequency response. The blue line in Fig. 1 shows a humbucker’s spectral response, while the yellow line shows the same humbucker split for single-coil operation. Unlike the single-coil’s response, which is essentially flat from 150 Hz to 3 kHz, the humbucker has a bump in the 500 Hz to 2 kHz range that contributes to the “beefy” sound. Starting at 3 kHz the humbucker response drops off rapidly, while the single coil produces more high-frequencies than the humbucker from 3 kHz to 9 kHz.
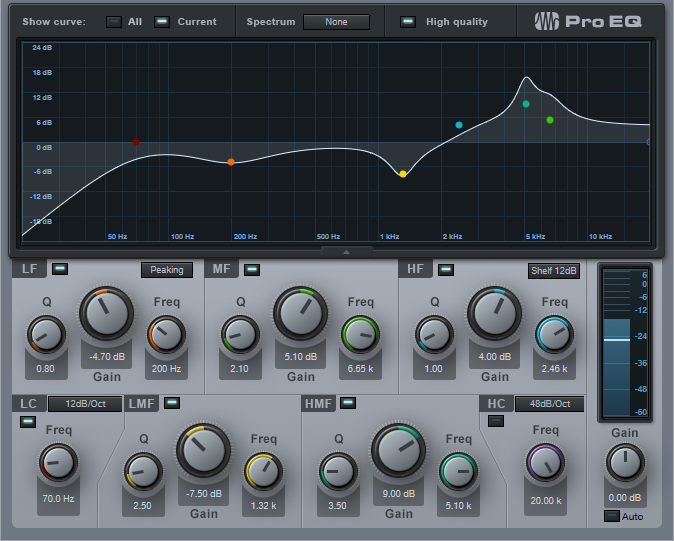
Fig. 2: Bridge humbucker to single-coil conversion EQ curve.
Fig. 2 shows an equalizer curve that modifies a bridge humbucker for more of a single-coil response. Of course different humbucker and different single-coil pickups sound different, so this kind of EQ-based “modeling” is an inexact science. However, I think you’ll find that the faux single-coil sound delivers the distinctive, glassy character you want from a single-coil pickup. Feel free to tweak the EQ further—you can come up with variations on the single-coil sound, or “morph” between the humbucker and single-coil characteristics.
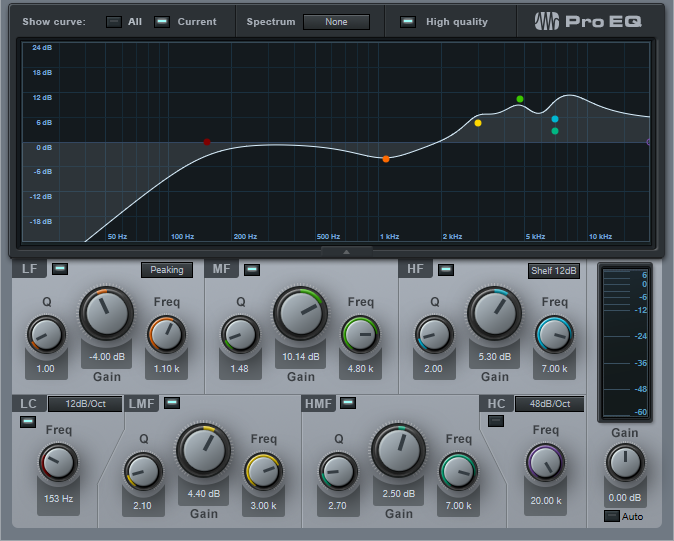
Fig. 3: Neck humbucker to single-coil conversion EQ curve.
The difference between a neck humbucker and single-coil response isn’t as dramatic, but the curve in Fig. 3 replicates the neck single-coil character, and provides yet another useful variation for your guitar tone.
The bottom line is that you don’t need to break out a soldering (or void your guitar’s warranty) to make your humbucker sound more like a single-coil type—all you need is the right kind of EQ.
Friday Tips: Rhythmic Reverb Splashes
Summer may be over in the northern hemisphere, but we can still splash around. This is one of those “hiding in plain sight” kind of tips, but it’s pretty cool.
The premise: Sometimes you don’t want reverb all the time, so you kick up the send control to push something like a snare hit into the reverb for a quick reverb “splash” (anyone who’s listened to my music knows this is one of my favorite techniques). The reverb adds a dramatic emphasis to the rhythm, but is short enough that it doesn’t wear out its welcome—listen to the audio example, which demos this technique with Studio One’s Crowish Acoustic Chorus 1 drum loop.
However, although this technique is great with drums, it also works well with rhythm guitar, hand percussion, synths, you name it… even kick works well in some songs. I’m not convinced about bass, but aside from that, this has a lot of uses.
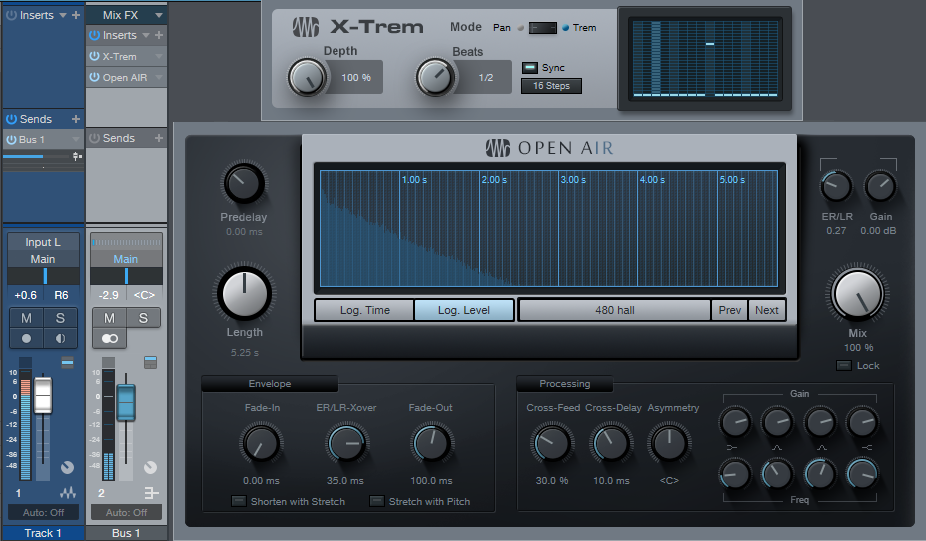
Studio One offers an easy way to produce regular splashes automatically (like on the second and fourth beats of a measure, where an emphasizing element hits). Insert X-Trem before the reverb, select 16 Steps as the “waveform,” click Sync, and choose your rhythm. The screenshot shows Beats set to 1/2 so that the reverb splash happens on 2 and 4, which in the case of the audio example, adds reverb to the snare on 2, and to the closed high-hat on 4.
And that’s pretty much it. Because the reverb is in a bus, set Mix to 100%. The 480 Hall from Halls > Medium Halls is one of my faves for this application, but hey… use whatever ’verb puts a smile on your face.
Friday Tips: What’s a Phase Meter—And Why Should I Care?
I’ve always appreciated Studio One’s analytics—the spectrum analyzer, the dynamic range meter in older versions and the more modern LUFS metering in Studio One 4, the K-Scale meters based on Bob Katz’s research, the strobe tuner, and the ability to stretch the faders in the Mix view when you want to couple high resolution with long fader travel. But I wonder if the Phase Meter and its companion Correlation Meter get the props they deserve, so let’s look at what this combo can do for you.
Phase Meters—Not Just for Mixdowns!
Most people consider a tool like the Phase Meter as being only for checking final mixes. However, one very useful technique is putting it in the master output bus, and soloing one track at a time (remember, you can Alt+click on a track’s Solo button for an “exclusive solo” function). This gives some insights into the phase, level, and stereo spread of individual tracks in a way that’s more revealing than just looking over panpots.
Correlation Meter Basics
In brief, the Correlation meter (the bar graph at the Phase meter’s bottom) indicates a stereo signal’s mono compatibility. This was of crucial importance when mastering for vinyl, because it could indicate if there were out-of-phase audio components in the audio that could possibly cause the stylus to jump out of its groove. These days, it’s largely a stereo world but it’s still important to check for mono compatibility—after all, when listening to speakers, you don’t have perfect stereo separation. You’ll usually monitor correlation in the master bus, but for individual tracks, it can indicate whether (for example) a signal processor is throwing a track’s left and right channels out of phase.
The Correlation meter reading spans the range between -1 (the right and left channels are completely out of phase, with no correlation) and +1 (the right and left channels are identical, and correlate completely). With most mixes, the bar graph will fluctuate between 0 and +1.
Mono Readings
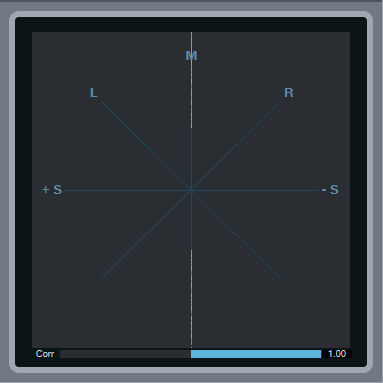
If the Phase meter displays a single vertical line, then the left and right channels are identical, and the track is mono. The Correlation bar graph meter at the bottom confirms this with its reading of 1.00, which means the left and right channels correlate completely—in other words, they aren’t just similar, but identical.
Left and Right Readings
If there’s a single, diagonal line on the L axis, that means that all the signal’s energy is concentrated in the left channel. Similarly if there’s a single, diagonal line on the R axis, then all the signal’s energy is concentrated in the right channel. If you pan a track where the left and right channels are identical (as shown by the Correlation meter displaying 1.00), then the line will move from one channel to the other.
Stereo Signals
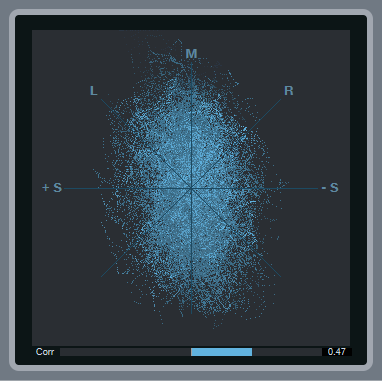
With stereo, you’ll see an excellent visual representation of how much the signal extends into the stereo field. The vertical size indicates the level. As you pan the signal left or right, the stereo field will become narrower around the line that moves from left to right until at one extreme or the other, you’ll see only a diagonal line on the L or R axis.
Note the correlation meter is showing +0.47. This means that there’s about an equal amount of similarity between the left and right channels as there are differences, but nothing is out of phase.
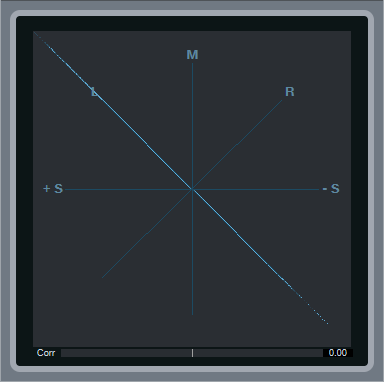
Mid-Side Encoded Audio

With Mid-Side encoded audio, you’ll see amplitude around the L and R axes, as well as along the M axis. Because the L signal is the center and the R signal the sides, you’ll see a lot more level along the L axis. Also, note the Correlation meter setting of 0.00—this means that there’s no similarity between the right and left channels, which is what you’d expect with a Mid-Side encoded signal.
Binaural Pan Signal

Studio One’s Binaural Pan processor widens the stereo image so that there’s much more energy in the right and left sides than in the center; this image shows what happens when you set the widening to maximum. Compare this to the reading for stereo signals—you can see that in this case, the energy extends further out to the right and left. Furthermore, the Correlation meter shows that there are no significant similarities between the right and left channels, which is a result of the Binaural Pan processor being based on Mid-Side processing.
Phase Issues
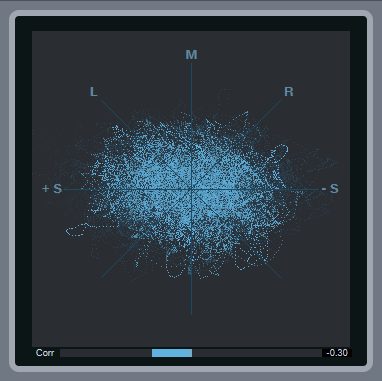
Here, the Correlation meter shows a negative number, which means there are out-of-phase elements within the stereo mix. Occasional negative blips aren’t a problem, but if the Correlation meter spends a substantial amount of time to the left of 0, then there’s a phase issue that will interfere with mono compatibility.
Friday Tips: Create the “Barberpole” Audio Illusion
The Shepard Tone (aka Barberpole) is an audio illusion where a tone always seems to keep rising (or falling). You may have heard it before—to build tension in music by Swedish House Mafia, Beatsystem, Data Life, and Franz Ferdinand, as the sound effect for the endless staircase in Super Mario 64, for the sound of constant acceleration for the Batpod in The Dark Knight and The Dark Knight Rises, at the end of Pink Floyd’s “Echoes” from the Meddle album, or in the soundtrack for the film Dunkirk in sections where the goal was to produce a vibe of increasing intensity. Check out the audio example, and you’ll hear how the tone just goes on forever.
Thanks to Studio One’s Tone Generator, it’s easy to produce a Shepard Tone loop—just follow the step-by-step instructions, in a song with the tempo set to 120 BPM.

- Insert the Tone Generator in the Input L+R insert section so that you can record its tone, and edit the Tone Generator generator’s settings as shown in the screen shot. The goal is the longest possible sine wave sweep from 20 Hz to 22 kHz.
- Start recording, then click the Tone Generator’s On button. After recording the file, trim the beginning and end respectively to just before and just after you can hear a tone, and add a short fade in and fade out.
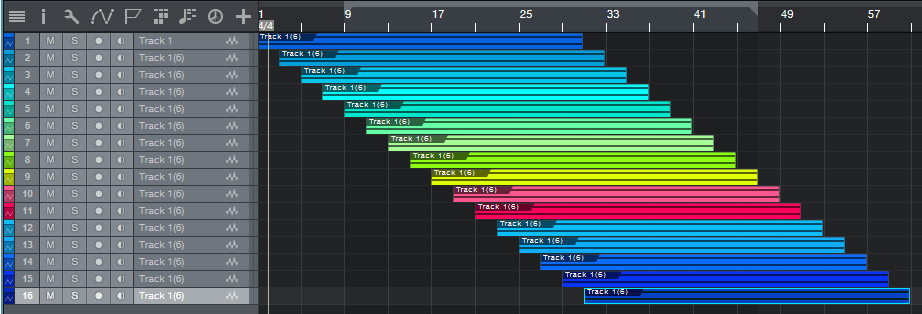
- As shown above, copy the track, and offset each track’s beginning by two measures compared to the track above it. Keep copying and offsetting until the start of the last track is at the same measure as the end of the first track.
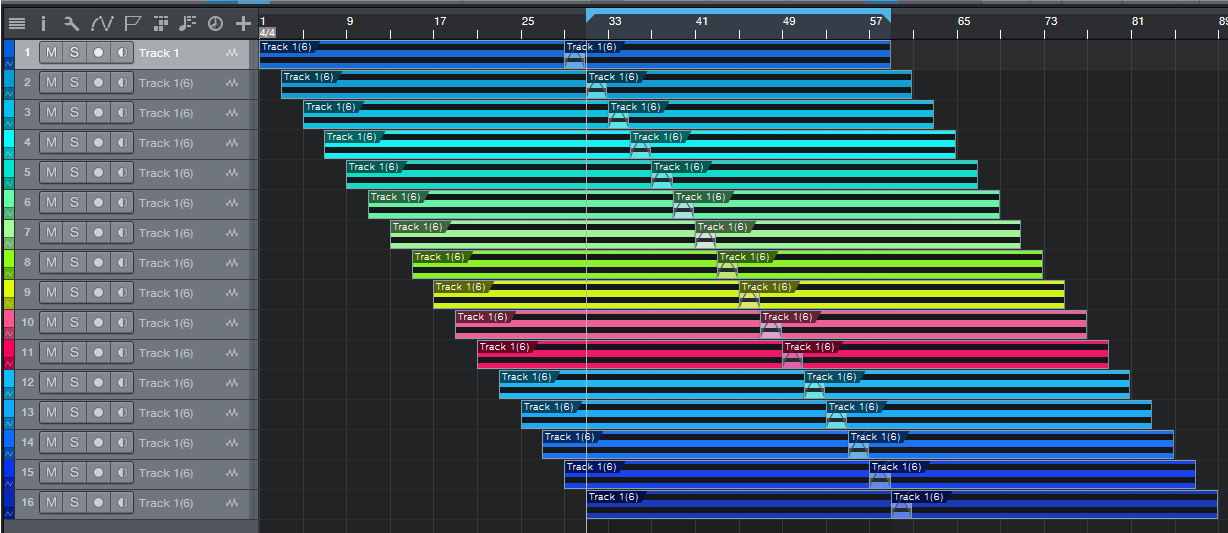
- Now select all, and drag the entire group to the right so that there’s a bit of an overlap between the two groups. Select everything, then type X to turn the overlap into a crossfade with a linear curve. Next, create a loop that extends from the start of the lowest track to the end of the highest track.
- Choose Song > Export Mixdown, set the Export Range to Between Loop, and under Options, check Import to Track and Close After Export. Solo the mixed track, and play it—you’ll hear a continuously rising tone. Now we need to turn it into a loop.

- Follow the instructions in the July 27 Friday Tip of the Week on how to create pads that loop perfectly. The above screen shot shows the basic concept; Track 1 shows the first steps. Copy the clip, move the copy to the right so it overlaps the last four measures of the original clip, and then crossfade the overlap with a linear crossfade.
- Track 2 in the screen shot shows the next step. Bounce the two clips together, then split at the end of measure 4 to remove the first four measures, and at the end of the crossfade to remove everything after the crossfade. Loop the section that remains, and you have your never-ending upward Shepard Tone, as a glitchless loop. Note that when you bring it into a project, don’t stretch it to conform to tempo—there is no tempo. And if you want it to go on forever…just keep typing D!
Bonus Tips:
- I recommend adding a Pro EQ—reduce the high frequencies somewhat with the HC (High Cut) filter, and boost the low frequencies with a bit of a shelf, to increase the illusion’s effectiveness.
- The “classic” Shepard Tone requires that the tones be one octave apart. However, offsetting them by 2 measures at 120 BPM seems close enough.
Studio One 4 User, James Reynolds, at the Top of the Charts!
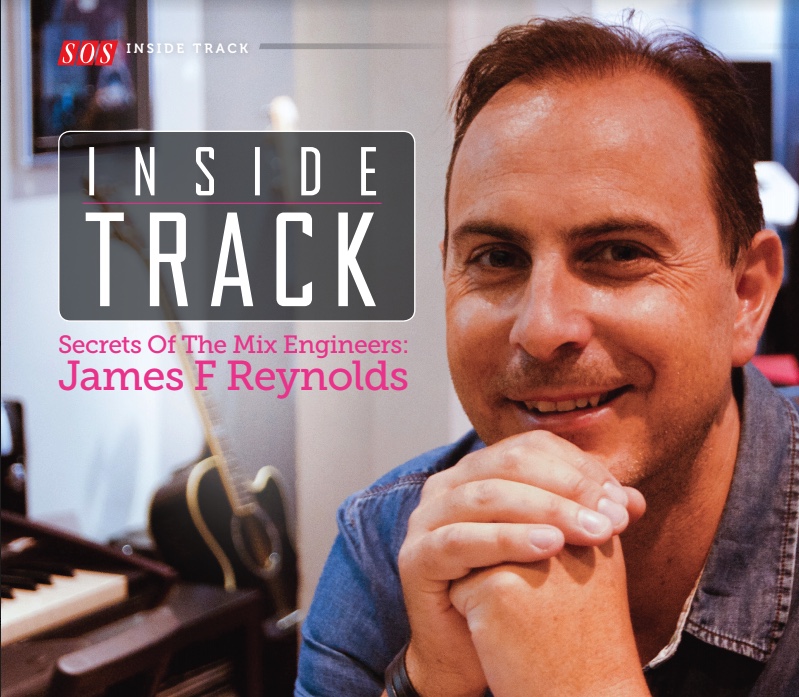
Currently sitting in the no.1 and no.2 slot on the USA iTunes Charts are two songs mixed by mix engineer, music producer and songwriter James Reynolds who also is a Studio One user!

As a huge fan of the DAW, Reynolds worked with us on the development of the new Studio One 4, and it’s his go-to DAW for many reasons.
Reynolds was recently interviewed for Sound on Sound Magazine. Check out some of the article here. Here are just a few things he had to say about Studio One:
“I was on Cubase for a while, and then I switched to Logic. I stayed in Logic for a long time, rather than moving to Pro Tools, because I found Logic more creative. But when I discovered Studio One I really liked it, and today it is absolutely perfect!”
“Pro Tools and Studio One are very similar, because Studio One is designed to make it very easy to convert to for Pro Tools users, who would find it a piece of cake. Where it differs is in the drag‐and‐drop workflow, which is super‐fast. You have a sidebar with all your plug‐ins listed in your folders, and you just pull a plug‐in on the channel or the bus, and it will set up the routing for you. It is designed to be super‐quick. It has also taken a leaf out of Ableton’s book, so all your samples can be previewed real‐time and will automatically loop in time. Plus it has gone next level, for example in that you can create splits of your plug‐in signals within your channels. So let’s say you have a lead vocal, and you want to do a parallel bus for it within that channel, you do the split inside the plug‐in, and this gives you a lot of control very easily. It is all very well thought‐out and the automation is fantastic, and so is the MIDI.”
Click here to read more
Here’s more on what he has to say on Studio One. He’s basically the expert.
One more thing…. BTS’s latest release “IDOL” mixed by James, now holds the record for the biggest music video debut in YouTube’s history with over 45 million views in the first 24 hours! So that’s awesome.
Huge congrats to James and we’re so stoked for your success! Keep up with his success here.
Join the Studio One family here!
Friday Tip of the Week – Trolling for Slices
So there you are, with your shiny new Impact XT virtual instrument. You want to populate the pads with some fun drum sounds, and although you like the included kits, you’re itching to get creative and come up with some kits of your own. Fortunately, it’s easy to use Audioloops to populate your Impact XT with a custom selection of drum sounds.
Open the Browser, and under Loops, look for files with the .audioloop suffix. The reason why .audioloop files stretch elegantly is because the loop is cut into slices, with each slice representing an individual “block” of sound—kick, snare, clap, kick and cymbal hitting at the same time, snare and high-hat hitting at the same time…whatever.
When you expand an .audioloop, you’ll see each slice listed individually. Some have only one or two slices, but others—for example, the Combo Beat loops under Electronic > Drums > Loop (Fig. 1)—are rich sources of slices.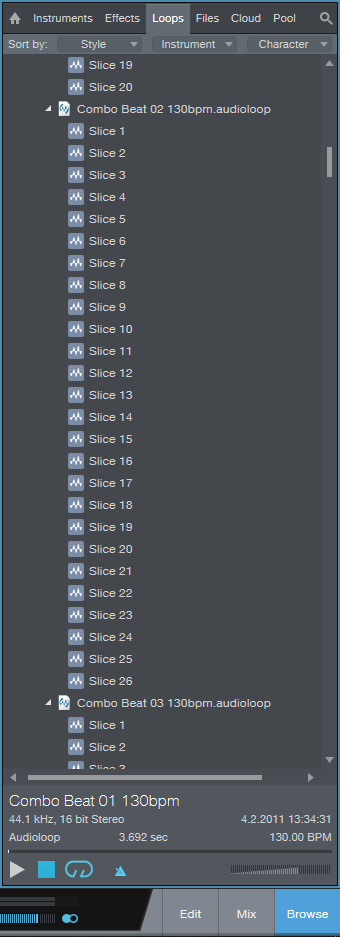
Figure 1: The Browser’s Loop tab is loaded with slices, just waiting to be used with Impact XT to create custom kits.
Next, open up Impact XT. To audition the slices, toward the bottom of the browser turn off the loop and metronome options, select a slice, and then click on the Play > button. Click on various slices and when you hear something you like, drag it over to an Impact XT pad (Fig. 2). You won’t have to click the Play button again to audition slices until after you drag a slice over.

Figure 2: Drag slices over to Impact XT pads.
The real fun begins when you start to use Impact XT’s sound-shaping options. For example in Figure 2, one of the kick slices has been dropped in pitch, truncated, filtered, and given a new Amp decay setting to sound more like an explosion. Note that the pad’s name will be the same as the .audioloop, so if you’re using multiple slices from the same .audioloop, rename the pad to avoid confusion (right-click on the pad and choose Rename).
And remember, you’re not limited to dragging over slices from the Browser—you can split any file in the Edit window at the Bend markers, and drop those slices into Impact XT.
Sure, Impact XT comes with a lot of preset, ready-to-go kits when you just want to load something and start grooving. But you might be surprised how doing a little mixing and matching with the Browser slices can create something new and different—and each new pad sound is only a click + drag away.
It’s #PreSonusFamFriday with Alexandra Medina!
Bringing back a blog favorite this season… #PreSonusFAMFriday! If you’re not familiar with the series, catch up here.
Up first is Alex Medina! She’s in charge of making sure everything gets paid for here at PreSonus. She’s also in charge of baking up all kinds of tasty treats for the office. We are coworkers but we’re also her certified taste testers and let’s just say, Betty Crocker WHO?!
Here’s more on Alex and her favorite PreSonus product the Eris 3.5s!

How long have you worked for PreSonus?
8 Months.
What’s your official job title?
Accounts Receivable and Credit Manager.
What do you love about your job?
I love the people I work with. Also, I pretty much get to talk to everyone we do business with and its awesome when they share the latest things they are working on with our products or tell me stories about how our products made their lives easier. I enjoy checking out the youtube links they send. I get introduced to all kinds of new music.
What was the first 8 track, cassette, CD or digital download you purchased?
Salt-N-Pepa “Push It.” Odd choice maybe but I heard it in a movie and it just stuck so I downloaded it same day. Remember when ring back tones were a thing? This was totally mine.
Who’s your go to band or artist when you can’t decide on something to listen to?
When that happens I turn on Spotify and listen to the new releases. You never know what you will come across.
What’s your go to Karaoke song?
Journey, “Don’t Stop Believing.”
Everyone has a side gig, what’s yours? OR when you’re not at PreSonus, what are you up to?
I’m in the Air National Guard so sometimes I’m working there., or I’m off on some new adventure with my son. Toddlers are never boring!
What instruments do you play?
I dabble in rock band… the drums… on easy. Plus it’s color coded so…
Why did you choose the Eris 3.5s as your favorite?
They are very satisfying for the size and price. I just needed some small speakers that wouldn’t clutter my desk and these work great. Almost too well, the sound is crystal clear no matter how high I turn them up, which usually isn’t the case with speakers this size. I feel people always like to talk about the big flashy and fancy products, so I wanted to give the little guys some love too!
Anything else you want to share?
Ummm PreSonus rocks and GEAUX SAINTS! #WHODAT
Learn more about one of the best selling monitors on the market, the Eris 3.5s HERE!
Friday Tip: Back to the 60s with Preverb
Reverse audio was a common technique back in the days when doing it was a challenge (flipping tape reels over, recording, flipping them back). Now that reverse audio is easy to do, it’s uncommon…go figure. But let’s revive reverse audio with preverb—reverb that swells up to a sound, instead of decaying after it. We’ll first look at a method that requires having some silence before the clip to which you want to add preverb, then cover what to do if the clip starts at the beginning of a song. Note: the screen shot shows each step, but you’ll end up with only the two yellow clips to create preverb—the other clips are for illustration only (i.e., you don’t need to keep copying the clip).

Step 1. Start by copying the clip or track to which you want to add preverb. Use the Paint tool to draw a silent section in front of the copied clip that’s equal to or longer than the anticipated reverb decay tail you’ll add in the next step, then bounce the silent part and the copied clip together. Tip: Consider rolling off some of the low end on the copy so the kick is less prominent. Kicks don’t get along with reverb all that well, and preverb is no exception.
Step 2. Select the bounced clip and type Ctrl+R, or right-click and choose Audio > Reverse Audio. Insert your reverb of choice (the Open Air 480 Hall preset from Halls > Medium Halls is a good place to start) into the copied/reversed track or clip, then set the reverb’s Mix control to 100% for an all-wet mix.
Step 3. After your reverb sound is as desired, right-click on this clip and choose Mixdown Selection. This clip contains only the reverb sound.
Step 4. Reverse this clip, and now you’ll preverb when you play it along with the original clip. You can also try nudging the preverb left or right to play with the timing—for example if the reverb has pre-delay, the kick and reverberated kick might argue with each other.
To add preverb before the entire song starts so that the preverb leads up to the first sound, select all tracks and shift them to the right to open up a few measures at the song’s beginning. Now you can extend the copy of the track or clip you want preverbed to the project start so it includes silence. Continue by copying the original track, reversing, and following the steps detailed previously to add preverb, then shift the tracks back to the their original position.
To hear preverb in a musical context, go to https://store.cdbaby.com/cd/craiganderton and click on the free preview of song 2, “The Gift of Goodbye.” The preverb is on the guitar solo toward the middle of the song and then occurs again at the end, during the fadeout.
Friday Tip: Reverb Chord Progressions? Why Not!
The more I play with Harmonic Editing, the more I find it can do things I never expected. Check this out…
One very useful Studio One feature is being able to record a track output into another track’s input. I take advantage of this sometimes by recording effects like reverb or envelope filter (set to effect sound only) into a track. This allows using Inspector features like transpose and delay, as well as have easier control during the mix.
So imagine my surprise when I set the reverb-only track to follow the Chord Track—and ended up with a tuned reverb chord progression! The following audio example gets the point across. The first four measures have the original reverb sound, the second four measures have the reverb processed by the Chord Track…pretty amazing.
There’s one caution: The only Follow chords mode that works for this is Universal. The Tune Mode doesn’t seem to matter, so I just use Default.
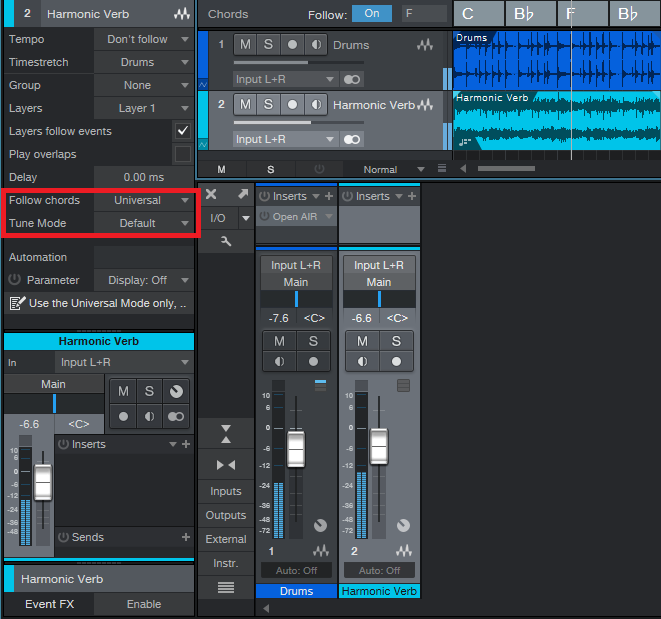
Extra bonus coolness tip! Drums can follow the Chord Track, again in Universal Mode, for a “drumcoded” effect (i.e., similar to drums “vocoding” something like a pad). Although there’s no way to do a wet/dry balance of the melodic and non-melodic components, you can copy the track, have only the copy follow the Chord Track, and adjust the mix between the dry and Chord-Track-following track.
The mind boggles.
The Latest Banging Add-Ons in the PreSonus Shop!

Click here for more!
New from PreSonus – Tom Brechtlein Drum Loops
Get Tom Brechtlein’s Drums HERE!