Tag Archives: PreSonus Audio
Friday Tips – Why Mono Matters for Mixing
With the ideal mix, the balance among instruments is perfect, and you can hear every instrument (or instrument section) clearly and distinctly. However, getting there can take a while, with a lot of trial and error. Fortunately, there’s a simple trick you can use when setting up a mix to accelerate the process: Start your mix with all channel pan sliders set to center (Fig. 1).
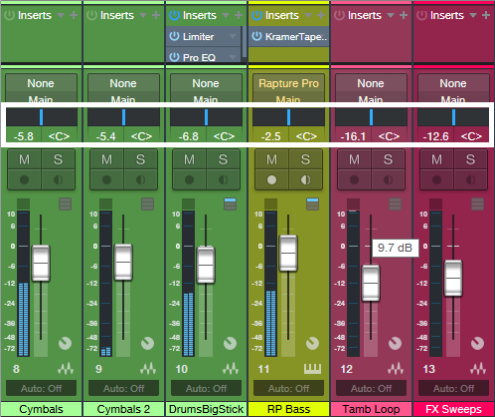
Figure 1: All the pan sliders (outlined in white) are set to center for a reason.
With stereo tracks, changing the track interleave to mono isn’t adequate, because it will throw off the channel’s level in the mix. Instead, temporarily add a Dual Pan set for the -6dB Linear Pan Law, and center both the Left and Right panpots (fig. 2). Now your stereo track will appear in the mix as mono.

Figure 2: Use the Dual Pan, set to the -6dB Linear pan law, to convert stereo channels temporarily to mono when setting up for a mix.
Analysis Time
Now listen carefully to your mix. Are all the instruments distinct? Monitoring in mono will reveal places where one instrument might mask or interfere with another, like kick and bass, or piano and guitar (depending on the note range).
The solution is to use EQ to carve out each instrument’s rightful place in the frequency spectrum. For example, if you want to prioritize the guitar part, you may need to reduce some of the piano’s midrange, and boost the regions above and below the guitar. For the guitar, boost a bit in the region where you cut the piano. With those tweaks in place, you’ll find it easier to differentiate between the two.
For kick/bass issues, the usual solution is to increase treble on one of them—with kick, this brings out the beater sound and with bass, string “zings” and pick noises. Another option is to add saturation to the bass, while leaving the kick drum alone. If the bass is playing relatively high notes, then perhaps a boost to the kick around 50-70 Hz will help separate the two.
Keep carving away, and adjusting the EQ until all the instruments are clear and distinct. Now when you start doing stereo placement, the sound will be open, with a huge soundstage and a level of clarity you might not obtain otherwise—or which might take a lot of tweaking to achieve.
We’re Not Done with Mono Just Yet…
Okay, now you have a great stereo mix. But it’s also important to make sure your mix collapses well to mono, because you have no control over the playback system. It might play from someone’s smartphone, and sounds mostly mono…or play back over speakers that are close to each other, so there’s not real good stereo separation. Radio is another possibility where the stereo might not be wonderful.
Some processors, especially ones that control stereo imaging with mid-side processing, may have phase or other issues when collapsed to mono. Short, stereo delays can also have problems collapsing to mono, and produce comb-filtering-type effects. So, hop on over to the main bus, and click the Channel Mode button to convert the output to mono (Fig. 3).
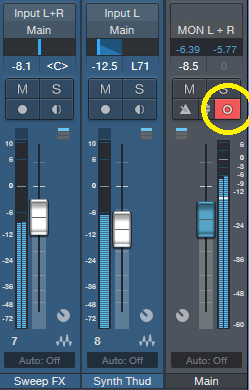
Figure 3: The Channel Mode button (circled in yellow) can switch the output between mono and stereo.
Hopefully, everything will sound correct—just collapsed to mono. But if not, start soloing channels and comparing what they sound like with the Channel Mode button in stereo and mono, until you chase down the culprit. Make the appropriate tweaks (which may be as simple as tweaking the delay time in one channel of a stereo delay processor), make sure the mix still sounds good in stereo, and you’re done.
Friday Tip – Create “Virtual Mics” with EQ
I sometimes record acoustic rhythm guitars with one mic for two main reasons: no issues with phase cancellations among multiple mics, and faster setup time. Besides, rhythm guitar parts often sit in the background, so some ambiance with electronic delay and reverb can give a somewhat bigger sound. However, on an album project with the late classical guitarist Linda Cohen, the solo guitar needed to be upfront, and the lack of a stereo image due to using a single mic was problematic.
Rather than experiment with multiple mics and deal with phase issues, I decided to go for the most accurate sound possible from one high-quality, condenser mic. This was successful, in the sense that moving from the control room to the studio sounded virtually identical; but the sound lacked realism. Thinking about what you hear when sitting close to a classical guitar provided clues on how to obtain the desired sound.
If you’re facing a guitarist, your right ear picks up on some of the finger squeaks and string noise from the guitarist’s fretting hand. Meanwhile, your left ear picks up some of the body’s “bass boom.” Although not as directional as the high-frequency finger noise, it still shifts the lower part of the frequency spectrum somewhat to the left. Meanwhile, the main guitar sound fills the room, providing the acoustic equivalent of a center channel.
Sending the guitar track into two additional buses solved the imaging problem by giving one bus a drastic treble cut and panning it somewhat left. The other bus had a drastic bass cut and was panned toward the right (Fig. 1).
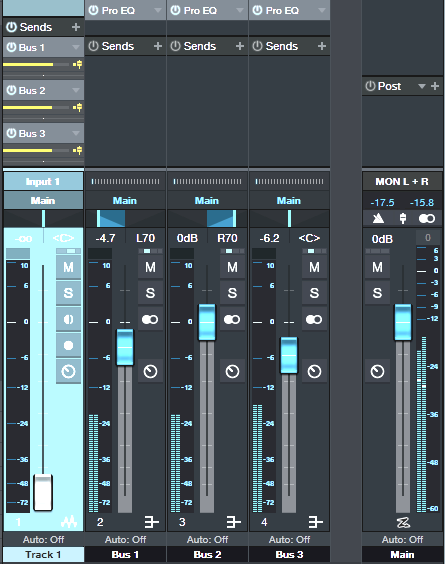
Figure 1: The main track (toward the left) splits into three pre-fader buses, each with its own EQ.
One send goes to bus 1. The EQ is set to around 400 Hz (but also try lower frequencies), with a 24 dB/octave slope to focus on the guitar body’s “boom.” Another send goes to bus 2, which emphasizes finger noises and high frequencies. Its EQ has a highpass filter response with a 24dB/octave slope and frequency around 1 kHz. Pan bus 1 toward the left and bus 2 toward the right, because if you’re facing a guitarist the body boom will be toward the listener’s left, and the finger and neck noises will be toward the listener’s right.
The send to bus 3 goes to the main guitar sound bus. Offset its highpass and lowpass filters a little more than an octave from the other two buses, e.g., 160 Hz for the highpass and 2.4 kHz for the lowpass (Fig. 2). This isn’t “technically correct,” but I felt it gave the best sound.
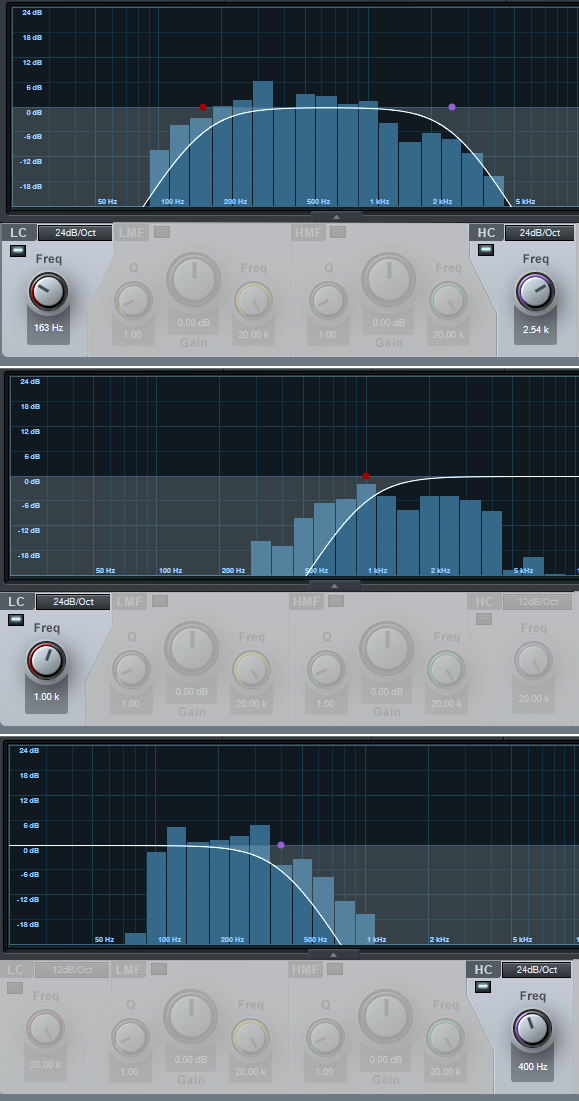
Figure 2: The top curve trims the response of the main guitar sound, the middle curve isolates the high frequencies, and the lower curve isolates the low frequencies. EQ controls that aren’t relevant are grayed out.
Monitor the first two buses, and set a good balance of the low and high frequencies. Then bring up the third send’s level, with its pan centered. The result should be a big guitar sound with a stereo image, but we’re not done quite yet.
The balance of the three tracks is crucial to obtaining the most realistic sound, as are the EQ frequencies. Experiment with the EQ settings, and consider reducing the frequency range of the bus with the main guitar sound. If the image is too wide, pan the low and high-frequency buses more to center. It helps to monitor the output in mono as well as stereo for a reality check.
Once you nail the right settings, you may be taken aback to hear the sound of a stereo acoustic guitar with no phase issues. The sound is stronger, more consistent, and the stereo image is rock-solid.
End Boring MIDI Drum Parts!
I like anything that kickstarts creativity and gets you out of a rut—which is what this tip is all about. And, there’s even a bonus tip about how to create a Macro to make this process as simple as invoking a key command.
Here’s the premise. You have a MIDI drum part. It’s fine, but you want to add interest with a fill in various measures. So you move hits around to create a fill, but then you realize you want fills in quite a few places…and maybe you tend to fall into doing the same kind of fills, so you want some fresh ideas.
Here’s the solution: Studio One 4.5’s new Randomize menu, which can introduce random variations in velocity, note length, and other parameters. But what’s of interest for this application is the way Shuffle can move notes around on the timeline, while retaining the same pitch. This is great for drum parts.
The following drum part has a really simple pattern in measure 4—let’s spice it up. The notes follow an 8th note rhythm; applying shuffle will retain the 8th note rhythm, but let’s suppose you want to shuffle the fills into 16th-note rhythms.
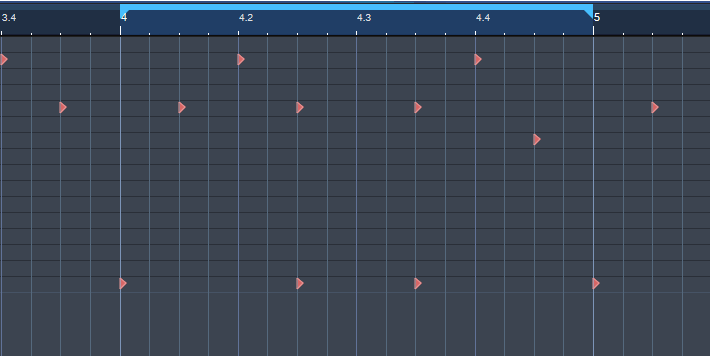
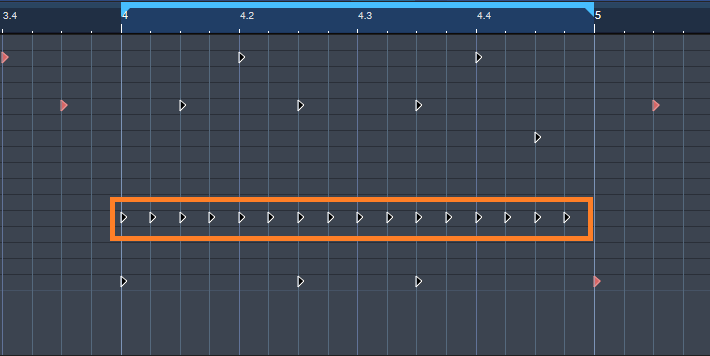
Here’s a cool trick for altering the rhythm. If you’re using Impact, mute a drum you’re not using, and enter a string of 16th notes for that drum (outlined in orange in the following image). Then select all the notes you want to shuffle.
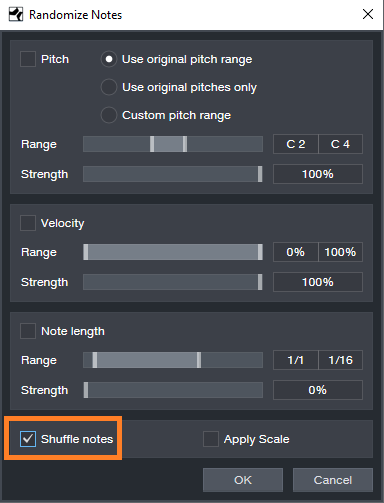
Go to the Action menu, and under Process, choose Randomize Notes. Next, click the box for Shuffle notes (outlined in orange).
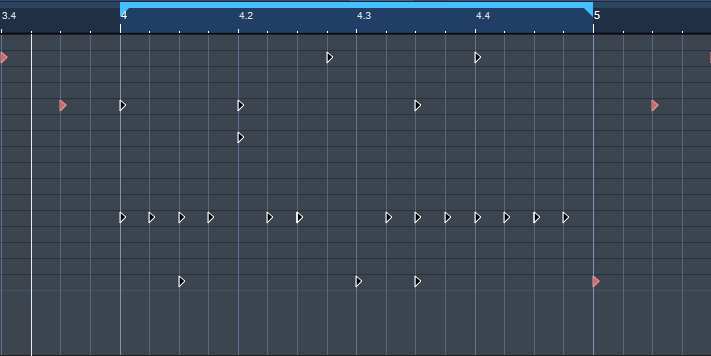
Click on OK, and the notes will be shuffled to create a new pattern. You won’t hear the “ghost” 16th notes triggering the silent drum, but they’ll affect the shuffle. Here’s the pattern after shuffling.
If you like what you hear from the randomization, great. But if not, adding a couple more hits manually might do what you need. However, you can also make the randomizing process really efficient by creating a Macro to Undo/Shuffle/hit Enter.
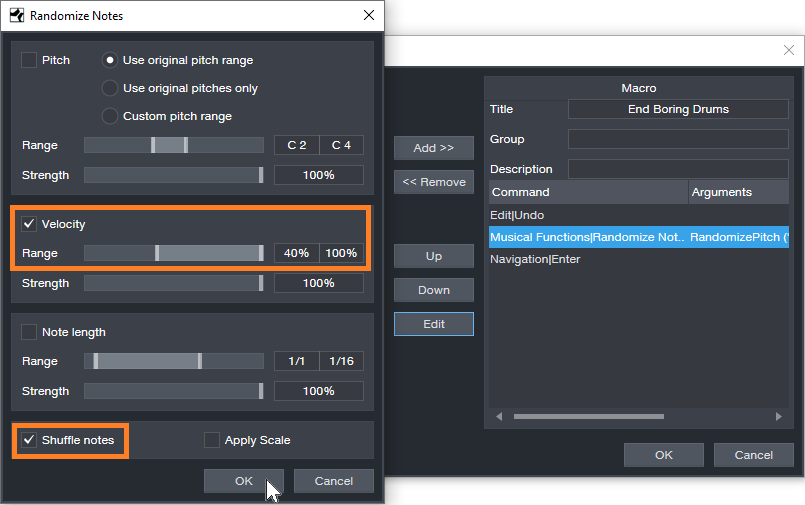
Create the Macro by clicking on Edit|Undo in the left column, and then choose Add. Next, add Musical Functions|Randomize. For the Argument, check Shuffle notes; I also like to randomize Velocity between 40% and 100%. The last step in the Macro is Navigation|Enter. Finally, assign the Macro to a keyboard shortcut. I assigned it to Ctrl+Alt+E (as in, End Boring Drum Parts).
With the Macro, if you don’t like the results of the shuffle, then just hit the keyboard shortcut to initiate another shuffle…listen, decide, repeat as needed. (Note that you need to do the first in a series of shuffles manually because the Macro starts with an Undo command.) It usually doesn’t take too many tries to come up with something cool, or that with minimum modifications will do what you want. Once you have a fill you like, you can erase the ghost notes.
If the fill isn’t “dense” enough, no problem. Just add some extra kick, snare, etc. hits, do the first Randomize process, and then keep hitting the Macro keyboard shortcut until you hear a fill you like. Sometimes, drum hits will end up on the same note—this can actually be useful, by adding unanticipated dynamics.
Perhaps this sounds too good to be true, but try it. It’s never been easier to generate a bunch of fills—and then keep the ones you like best.
Friday Tips: Crazee Snare Enhancements!
You never know where you’ll find inspiration. As I was trying not to listen to the background music in my local supermarket, “She Drives Me Crazy” by Fine Young Cannibals—a song from over 30 years ago!—earwormed its way into my brain. Check it out at https://youtu.be/UtvmTu4zAMg.
My first thought was “they sure don’t make snare drum sounds like those any more.” But hey, we have Studio One! Surely there’s a way to do that—and there is. The basic idea is to extract a trigger from a snare, use it to drive the Mai Tai synth, then layer it to enhance the snare.
Skeptical? Check out the audio example.
ISOLATING THE SNARE
If you’re dealing with a drum loop or submix, you first need to extract the snare sound.
- Create an FX Channel, and insert a Pro EQ followed by a Gate.
- Add a pre-fader send from your mixed drums to the FX Channel. Aside from providing a more consistent level for triggering, a pre-fader send lets you turn down the main drum track. This way you hear only the FX Channel, which makes it easier to tweak the EQ and isolate the snare.
- With the Gate bypassed, tune the Pro EQ to the snare frequency. Use the LC and HC with a 48 dB/octave slope to provide the preliminary isolation, then use a super-sharp bandpass setting to zero in on the snare frequency (Figure 1). The EQ’s background spectrum analyzer can help by making sure the bar in the range you’re boosting goes as high as possible. In stubborn cases, you may need to double up the bandpass filter with a second sharp bandpass filter.
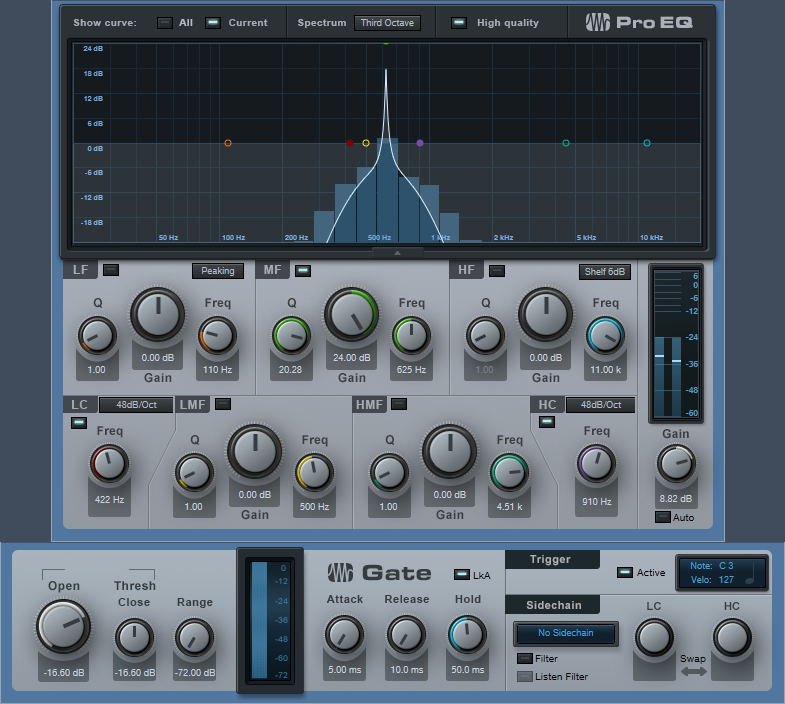
Figure 1: Use the Pro EQ and Gate to extract a snare drum trigger.
- Enable the gate, and click on Active to enable the trigger output. Set the Note and Velocity as desired (however when using noise with Mai Tai, the specific Note isn’t that critical). Adjust the Gate’s settings so that it triggers on the snare hits. Like the Pro EQ, the controls here are critical as well.
- A short attack is usually best.
- Keep release relatively short (e.g., 10 ms), unless you want to mix in some of the peaked/gated sound from this channel along with the Mai Tai and drums.
- Hold times around 50 ms can help prevent false triggering. But you can also get creative with this control. If you don’t want to trigger on hits that are close together (e.g., fills), a long Hold time will trigger on the first snare of the series, but ignore subsequent ones that fall within the hold time.
- Insert the Mai Tai. Set its input to Gate, and enable the mixer’s Monitor button. Figure 2 shows the finished track layout.

Figure 2: Track layout for snare drum extraction.
TWEAKING THE MAI TAI
Now the fun begins! Figure 3 shows a typical starting point for a snare-enhancing sound.
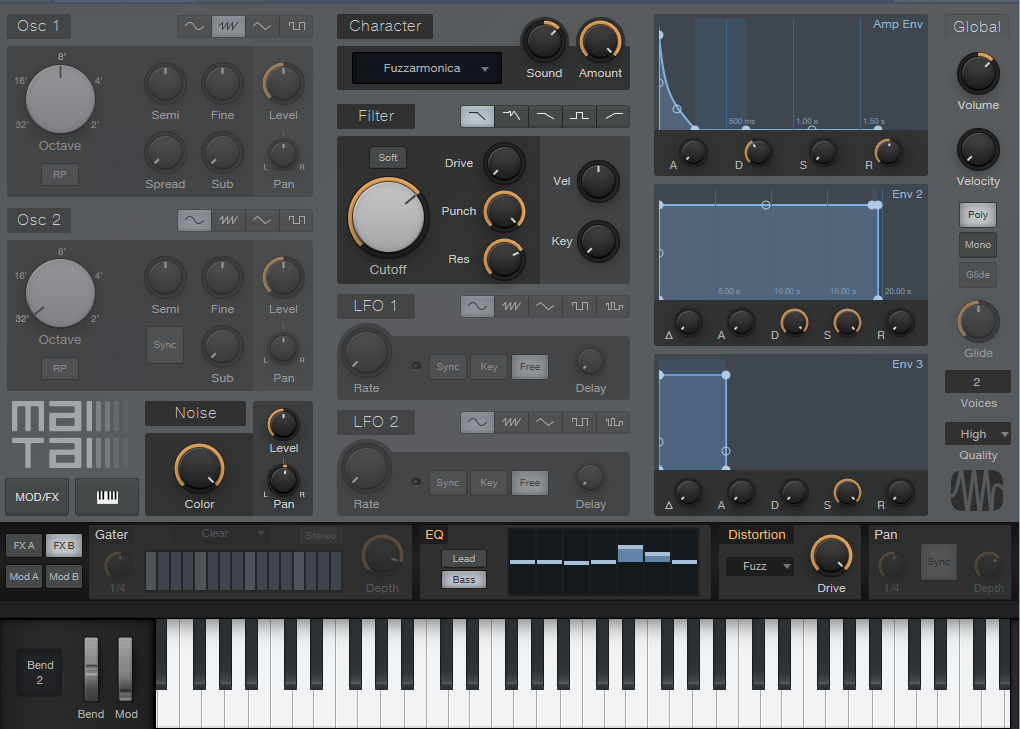
Figure 3: Starting point for a cool snare drum sound with Mai Tai.
The reason for choosing Mai Tai as the sound source is because of its “Character” options that, along with the filter controls, noise Color control, and FX (particularly Reverb, EQ, and Distortion), produce a huge variety of electronic snare sounds. The Character module’s Sound and Amount controls are particularly helpful. The more you play with the controls, the more you’ll start to understand just how many sounds are possible.
BUT WAIT…THERE’S MORE!
If the snare is on a separate track, then you don’t need the Pro EQ or FX Channel. Just insert a Gate in the snare track, enable the Gate’s trigger output, and adjust the Gate Threshold controls to trigger on each snare drum hit. The comments above regarding the Attack, Release, and Hold controls apply here as well.
Nor are you limited to snare. You can isolate the kick drum, and trigger a massive, low-frequency sine wave from the Mai Tai to give those car door-vibrating kick drums. Toms can sometimes be easy to isolate, depending on how they’re tuned. And don’t be afraid to venture outside of the “drum enhancement” comfort zone—sometimes the wrong Gate threshold settings, driving the wrong sound, can produce an effect that’s deliciously “right.”
Friday Tips: Frequency-Selective Guitar Compression
Some instruments, when compressed, lack “sparkle” if the stronger, lower frequencies compress high frequencies as well as lower ones. This is a common problem with guitar, but there’s a solution: the Compressor’s internal sidechain can apply compression to only the guitar’s lower frequencies, while leaving the higher frequencies uncompressed so they “ring out” above the compressed sound. (Multiband compression works for this too, but sidechaining can be a faster and easier way to accomplish the same results.) Frequency-selective compression can also be effective with drums, dance mixes, and other applications—like the “pumping drums” effect covered in the Friday Tip for October 5, 2018. Here’s how to do frequency-selective compression with guitar.

- Insert the Compressor in the guitar track.
- Enable the internal sidechain’s Filter button. Do not enable the Sidechain button in the effect’s header.
- Enable the Listen Filter button.
- Turn Lowcut fully counterclockwise (minimum), and set the Highcut control to around 250 – 300 Hz. You want to hear only the guitar’s low frequencies.
- You can’t hear the effects of adjusting the main compression controls (like Ratio and Threshold) while the Listen Filter is enabled, so disable Listen Filter, and start adjusting the controls for the desired amount of low-frequency compression.
- For a reality check, use the Mix control to compare the compressed and uncompressed sounds. The high frequencies should be equally prominent regardless of the Mix control setting (unless you’re hitting the high strings really hard), while the lower strings should sound compressed.
The compression controls are fairly critical in this application, so you’ll probably need to tweak them a bit to obtain the desired results.
If you need more flexibility than the internal filter can provide, there’s a simple workaround.
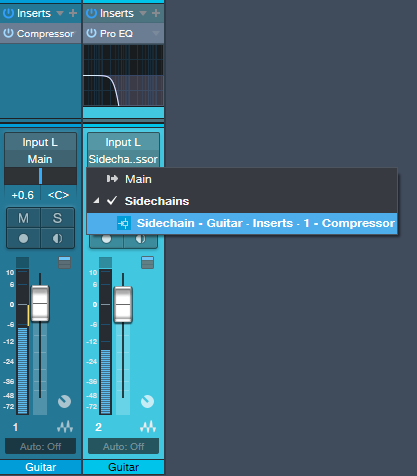
Copy the guitar track. You won’t be listening to this track, but using it solely as a control track to drive the Compressor sidechain. Insert a Pro EQ in the copied track, adjust the EQ’s range to cover the frequencies you want to compress, and assign the copied track’s output to the Compressor sidechain. Because we’re not using the internal sidechain, click the Sidechain button in the Compressor’s header to enable the external sidechain.
The bottom line is that “compressed” and “lively-sounding” don’t have to be mutually exclusive—try frequency-selective compression, and find out for yourself.
Friday Tip: MIDI Guitar Setup with Studio One
I was never a big fan of MIDI guitar, but that changed when I discovered two guitar-like controllers—the YRG1000 You Rock Guitar and Zivix Jamstik. Admittedly, the YRG1000 looks like it escaped from Guitar Hero to seek a better life, but even my guitar-playing “tubes and Telecasters forever!” compatriots are shocked by how well it works. And Jamstik, although it started as a learn-to-play guitar product for the Mac, can also serve as a MIDI guitar controller. Either one has more consistent tracking than MIDI guitar retrofits, and no detectable latency.
The tradeoff is that they’re not actual guitars, which is why they track well. So, think of them as alternate controllers that take advantage of your guitar-playing muscle memory. If you want a true guitar feel, with attributes like actual string-bending, there are MIDI retrofits like Fishman’s clever TriplePlay, and Roland’s GR-55 guitar synthesizer.
In any case, you’ll want to set up your MIDI guitar for best results in Studio One—here’s how.
Poly vs. Mono Mode
MIDI guitars usually offer Poly or Mono mode operation. With Poly mode, all data played on all strings appears over one MIDI channel. With Mono mode, each string generates data over its own channel—typically channel 1 for the high E, channel 2 for B, channel 3 for G, and so on. Mono mode’s main advantage is you can bend notes on individual strings and not bend other strings. The main advantage of Poly mode is you need only one sound generator instead of a multi-timbral instrument, or a stack of six synths.
In terms of playing, Poly mode works fine for pads and rhythm guitar, while Mono mode is best for solos, or when you want different strings to trigger different sounds (e.g., the bottom two strings trigger bass synths, and the upper four a synth pad). Here’s how to set up for both options in Studio One.
- To add your MIDI guitar controller, choose Studio One > Options > External Devices tab, and then click Add…

Figure 1: Check “Split Channels” if you plan to use a MIDI guitar in mono mode.
- To use your guitar in Mono mode, check Split Channels and make sure All MIDI channels are selected (Fig. 1). This lets you choose individual MIDI channels as Instrument track inputs.
- For Poly mode, you can follow the same procedure as Mono mode but then you may need to select the desired MIDI channel for an Instrument track (although usually the default works anyway). If you’re sure you’re going to be using only Poly mode, don’t check Split Channels, and choose the MIDI channel over which the instrument transmits.
Note that you can change these settings any time in the Options > External Devices dialog box by selecting your controller and choosing Edit.
Choose Your Channels
For Poly mode, you probably won’t have to do anything—just start playing. With Mono mode, you’ll need to use a multitimbral synth like SampleTank or Kontakt, or six individual synths. For example, suppose you want to use Mai Tai. Create a Mai Tai Instrument track, choose your MIDI controller, and then choose one of the six MIDI channels (Fig. 2). If Split Channels wasn’t selected, you won’t see an option to choose the MIDI channel.
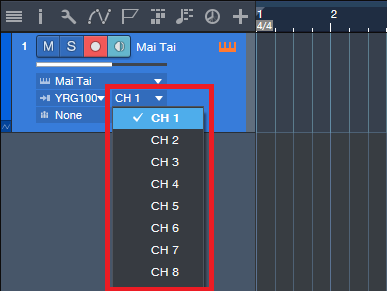
Figure 2: If you chose Split Channels when you added your controller, you’ll be able to assign your instrument’s MIDI input to a particular MIDI channel.
Next, after choosing the desired Mai Tai sound, duplicate the Instrument track five more times, and choose the correct MIDI channel for each string. I like to Group the tracks because this simplifies removing layers, turning off record enable, and quantizing. Now record-enable all tracks, and start recording. Fig. 3 shows a recorded Mono guitar part—note how each string’s notes are in their own channel.
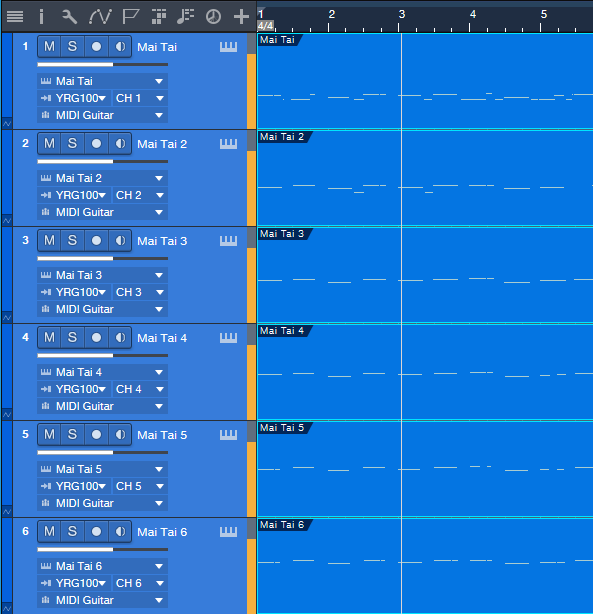
Figure 3: A MIDI guitar part that was recorded in Mono mode is playing back each string’s notes through its own Mai Tai synthesizer.
To close out, here are three more MIDI guitar tips.
- In Mono mode with Mai Tai (or whatever synth you use), set the number of Voices to 1 for two reasons. First, this is how a real guitar works—you can play only one note at a time on a string. Second, this will often improve tracking in MIDI guitars that are picky about your picking.
- Use a synth’s Legato mode, if available. This will prevent re-triggering on each note when sliding up and down the neck, or doing hammer-ons.
- The Edit view is wonderful for Mono mode because you can see what all six strings are playing, while editing only one.
MIDI guitar got a bad rap when it first came out, and not without reason. But the technology continues to improve, dedicated controllers overcome some of the limitations of retrofitting a standard guitar, and if you set up Studio One properly, MIDI guitar can open up voicings that are difficult to obtain with keyboards.
In Mono mode with Mai Tai (or whatever synth you use), set the number of Voices to 1 for two reasons. First, this is how a real guitar works—you can play only one note at a time on a string. Second, this will often improve tracking in MIDI guitars that are picky about your picking.
Friday Tip: Colorization: It’s Not Just About Eye Candy
Some people think colorization is frivolous—but I don’t. I started using colorization when writing articles, because it was easy to identify elements in the illustrations (e.g., “the white audio is the unprocessed sound, the blue audio is compressed”). But the more I used colorization, the more I realized how useful it could be.
Customizing the “Dark” and “Light” Looks
Although a program’s look is usually personal preference, sometimes it’s utilitarian. When working in a video suite, the ambient lighting is often low, so that the eye’s persistence of vision doesn’t influence how you perceive the video. For this situation, a dark view is preferable. Conversely, those with weak or failing vision need a bright look. If you’re new to Studio One, you might want the labels to really “pop” but later on, as you become more familiar with the program, darken them somewhat. You may want a brighter look when working during daytime, and a more muted look at night. Fortunately, you can save presets for various looks, and call up the right look for the right conditions (although note that there are no keyboard shortcuts for choosing color presets).
Figure 1: From left to right: dark, moderate, and bright luminance settings.
You’ll find these edits under Options > General > Appearance. For a dark look, move the Background Luminance slider to the left and for a light look, to the right (Fig. 1). I like -50% for dark, and +1 for light. For the dark look, setting the Background Contrast at -100% means that the lettering won’t jump out at you. For the brightest possible look, bump the Background Contrast to 100% so that the lettering is clearly visible against the other light colors, and set Saturation to 100% to brighten the colors. Conversely, to tone down the light look, set Background Contrast and Saturation to 0%.
Hue Shift customizes the background of menu bars, empty fields that are normally gray, and the like. The higher the Saturation slider, the more pronounced the colorization.
The Arrangement sliders control the Arrangement and Edit view backgrounds (i.e., what’s behind the Events). I like to see the vertical lines in the Arrangement view, but also keep the background dark. So Arrangement Contrast is at 100%, and Luminance is the darkest possible value (around 10%) that still makes it easy to see horizontal lines in the Edit view (Fig. 2).

Figure 2: The view on the left uses 13% luminance and 100% contrast to make the horizontal background lines more pronounced.
Streamlining Workflow with Color
With a song containing dozens of tracks, it can be difficult to identify which Console channel strip controls which instrument, particularly with the Narrow console view. The text at the bottom of each channel strip helps, but you often need to rename tracks to fit in the allotted space. Even then, the way the brain works, it’s easier to identify based on color (as deciphered by your right brain) than text (as deciphered by your left brain). Without getting too much into how the brain’s hemispheres work, the right brain is associated more with creative tasks like making music, so you want to stay in that mode as much as possible; switching between the two hemispheres can interrupt the creative flow.
I’ve developed standard color schemes for various types of projects. Of course, choose whatever colors work for you; for example, if you’re doing orchestral work, you’d have a different roster of instruments and colors. With my scheme for rock/pop, lead instruments use a brighter version of a color (e.g., lead guitar bright blue, rhythm guitar dark blue).
- Main drums – red
- Percussion – yellow
- Bass – brown
- Guitar – blue
- Voice – green
- Keyboards and orchestral – purple
- FX – lime green
Furthermore, similar instruments are grouped together in the mixer. So for vocals, you’ll see a block of green strips, for guitar a block of blue strips, etc. (Fig. 3)
Figure 3: A colorized console, with a bright look. The colorization makes it easy to see which faders control which instruments.
To colorize channel strips, choose Options > Advanced tab > Console tab (or click the Console’s wrench icon) and check “Colorize Channel Strips.” This colorizes the entire strip. However, if you find colorized strips too distracting, the name labels at the bottom (and the waveforms in the arrange view) are always colored according to your choices. Still, when the Console faders are extended to a higher-than-usual height, I find it easier to grab the correct fader with colored console strips.
In the Arrange view, you can colorize the track controls as well—click on the wrench icon, and click on “Colorize Track Controls.” Although sometimes this feels like too much color, nonetheless, it makes identifying tracks easier (especially with the track height set to a narrow height, like Overview).
Color isn’t really a trivial subject, once you get into it. It has helped my workflow, so I hope these tips serve you as well.
Extra TIP: Buy Craig Anderton’s Studio One eBook here for only $10 USD!
Friday Tips: Studio One’s Hybrid Reverb
The previous tip on creating a dual-band reverb generated a fair amount of interest, so let’s do one more reverb-oriented tip before moving on to another topic.
Studio One has three different reverbs—Mixverb, Room Reverb, and OpenAIR—all of which have different attributes and personalities. I particularly like the Room Reverb for its sophisticated early reflections engine, and the OpenAIR’s wide selection of decay impulses (as well as the ability to load custom impulses I’ve made).
Until now, it never occurred to me how easy it is to create a “hybrid” reverb with the best of both worlds: using the Room Reverb solely as an early reflections engine, and the OpenAIR solely for the reverb decay. To review, reverb is a continuum—it starts with silence during the pre-delay phase when the sound first travels to hit a room’s surfaces, then morphs into early reflections as these sounds bounce around and create echoes, and finally, transforms into the reverb decay—the most complex component. Each one of these components affects the sound differently. In Studio One, these components don’t all have to be from the same reverb.
THE EARLY REFLECTIONS ENGINE
Start by inserting the Room Reverb into an FX Channel, and calling up the Default preset. Then set the Reverb Mix to 0.00 and the Dry/Wet Mix to 100%. The early reflections appear as discrete vertical lines. They’re outlined in red in the screen shot below.
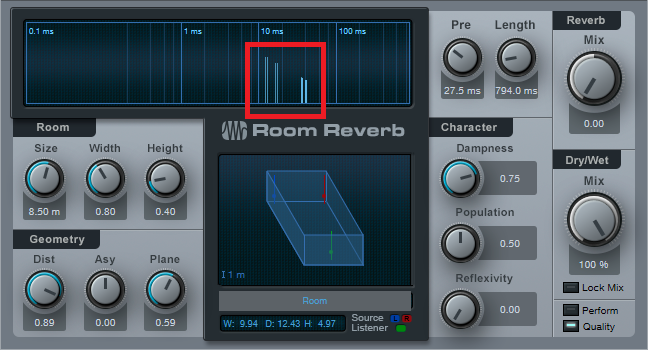
If you haven’t experimented with using the Room Reverb as a reflections engine, before proceeding now would be a good time to use the following evaluation procedure and familiarize yourself with its talents.
- From the Browser, load the loop Crowish Acoustic Chorus 1.wav (Loops > Rock > Drums > Acoustic) into a stereo track. This loop is excellent for showcasing the effects of early reflections.
- Create a pre-fader send from this track to the FX Channel with the Room Reverb, and bring the drum channel fader all the way down for now so you hear only the effects of the Room Reverb.
- Let’s look at the Room parameters. Vary the Size parameter. The bigger the room, the further away the reflections, and the quieter they are.
- Set the Size to around 3.00. Vary Height. Note how at maximum height, the sound is more open; at minimum height, the sound is more constricted. Leave Height around 1.00.
- Now vary Width. With narrower widths, you can really hear that the early reflections are discrete echoes. As you increase width, the reflections blend together more. Leave Width around 2.00.
- The Geometry controls might as well be called the “stand here” controls. Turning up Distance moves you further away from the sound source. Asy varies your position in the left-right direction within the room.
- Plane is a fairly subtle effect. To hear what it does, repeat steps 3 and 4, and then set Size to around 3.00, Dist to 0.10, and Asy to 1.00. Plane spreads the sounds a bit more apart at the maximum setting.
Now that you know how to set up different early reflections sounds, let’s create the other half of our hybrid reverb.
THE REVERB DECAY
To provide the reverb decay, insert the OpenAIR reverb after the Room Reverb. Whenever you call up a new OpenAIR preset, do the following.
- Set ER/LR to 1.00.
- Set Predelay to minimum (-150.00 ms).
- Initially set Envelope Fade-in and Envelope ER/LR-Xover to 0.00 ms.
There are two ways to make a space for the early reflections so that they occur before the reverb tail: set an Envelope Fade-in time, an Envelope ER/LR-Xover time, or both. Because the ER/LR control is set to 1.00 there are no early reflections in the Open AIR preset, so if you set the ER/LR-Xover time to (for example) 25 ms, that basically acts like a 25 ms pre-delay for the reverb decay. This opens up a space for you to hear the early reflections before the reverb decay kicks in. If you prefer a smoother transition into the decay, increase the Envelope Fade-in time, or combine it with some ER/LR-Xover time to create a pre-delay along with a fade-in.
The OpenAIR Mix control sets the balance of the early reflections contributed by the Room Reverb and the longer decay tail contributed by the OpenAIR reverb. Choose 0% for reflections only, 100% for decay only.
…AND BEYOND
There are other advantages of the hybrid reverb approach. In the OpenAIR, you can include its early reflections to supplement the ones contributed by the Room Reverb. When you call up a new preset, instead of setting the ER/LR, Predelay, Envelope Fade-In, and Envelope ER/LR-Xover to the defaults mentioned above, bypass the Room Reverb and set the Open AIR’s early reflections as desired. Then, enable the Room Reverb to add its early reflections, and tweak as necessary.
It does take a little effort to edit your sound to perfection, so save it as an FX Chain and you’ll have it any time you want it.
Friday Tips: Keyswitching Made Easy
As the quest for expressive electronic instruments continues, many virtual instruments incorporate keyswitching to provide different articulations. A keyswitch doesn’t play an actual note, but alters what you’re playing in some manner—for example, Presence’s Viola preset dedicates the lowest five white keys (Fig. 1) to articulations like pizzicato, tremolo, and martelé.
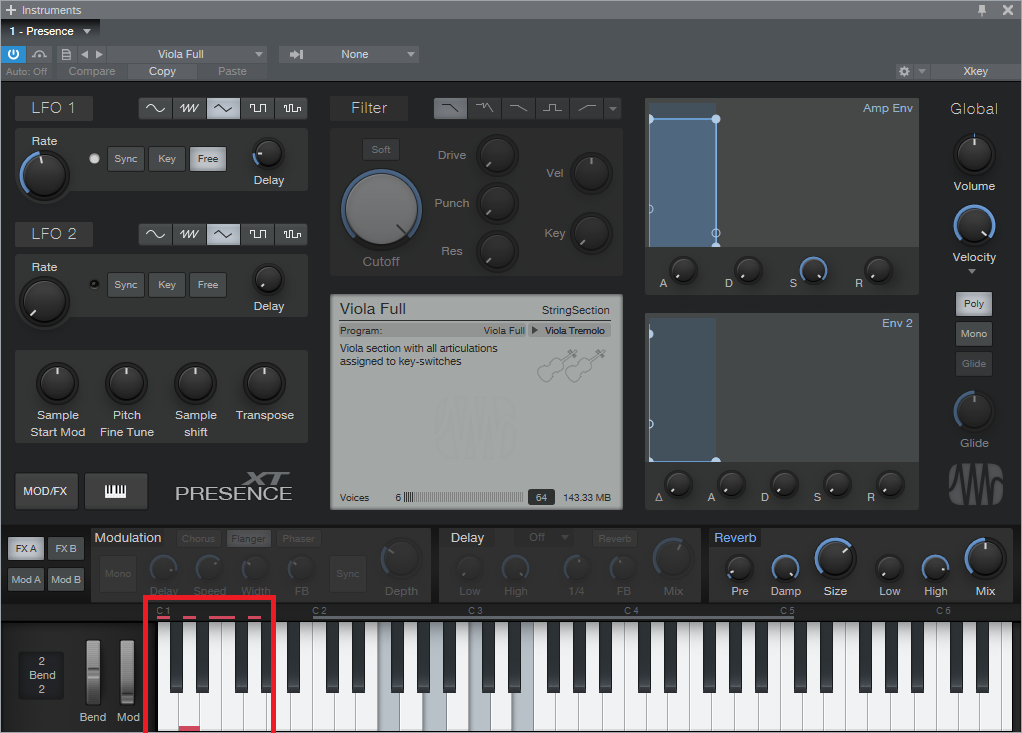
Fig. 1: The five lowest white keys, outlined in red, are keyswitches that provide articulation options. A small red bar along the bottom of the key indicates which keyswitch is active.
This is very helpful—as long as you have a keyboard with enough keys. Articulations typically are on the lowest keys, so if you have a 49-key keyboard (or even a 61-note keyboard) and want to play over its full range (or use something like a two-octave keyboard for mobile applications), the only way to add articulations are as overdubs. Since the point of articulations is to allow for spontaneous expressiveness, this isn’t the best solution. An 88-note keyboard is ideal, but it may not fit in your budget, and it also might not fit physically in your studio.
Fortunately, there’s a convenient alternative: a mini-keyboard like the Korg nanoKEY2 or Akai LPK25. These typically have a street price around $60-$70, so they won’t make too big a dent in your wallet. You really don’t care about the feel or action, because all you want is switches.
Regarding setup, just make sure that both your main keyboard and the mini-keyboard are set up under External Devices—this “just works” because the instrument will listen to whatever controllers are sending in data via USB (note that keyboards with 5-pin DIN MIDI connectors require a way to merge the two outputs into a single data stream, or merging capabilities within the MIDI interface you’re using). You’ll need to drop the mini-keyboard down a few octaves to reach the keyswitch range, but aside from that, you’re covered.
To dedicate a separate track to keyswitching, call up the Add Track menu, specify the desired input, and give it a suitable name (Fig. 2). I find it more convenient not to mix articulation notes in with the musical notes because if I cut, copy, or move a passage of notes, I may accidentally edit an articulation that wasn’t supposed to be edited.
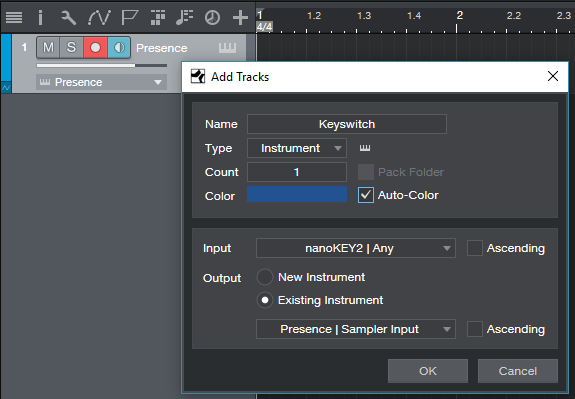
Fig. 2: Use the Add Track menu to create a track that’s dedicated to articulations.
So until you have that 88-note, semi-weighted, hammer-action keyboard you’ve always dreamed about, now you have an easy way take full advantage of Presence’s built-in expressiveness—as well as any other instrument with keyswitching.
Andrea Bocelli and Studio One at the Top of the Billboard Charts!


“In 2017, I was invited by Pierpaolo Guerrini of PPG Studios to be a part of the preproduction of Sí alongside guitarist Daniele Bonaviri,” he continues. “The album production was given to the great producer Bob Ezrin who’s worked with Pink Floyd, KISS and Peter Gabriel.”

“We met several times in my studio—JGRStudio in Rome—and Pierpaolo’s Studio PPGStudio in Tuscany for the sound design process with Studio One and Pro Tools. During these sessions, I recorded all the acoustic guitars and sound design for the pre-production process of several tracks on the record. I also used Studio One for drum editing for some yet-unreleased acoustic versions… and we were quite impressed by how fast and accurate drum editing with Studio One is.”
“So now, Studio One is officially our DAW of choice and the most active in PPGStudio—Andrea’s main recording studio. It’s been an honor to work with Bob Ezrin, and I’m so proud to work with Andrea Bocelli, the most famous singer ever.”
Follow Jurij on Facebook here!
Join the Studio One Family here!
