Tag Archives: Native Instruments
Komplete Kontrol Integration in Studio One, Part 2/3: General-Purpose MIDI Control
In Part 1 (“A New Hope”) of the NI Kontroller trilogy, we covered how to integrate the DAW functions from Native Instruments’ Komplete Kontrol keyboards with Studio One. Let’s take this another step further.
In theory, Komplete Kontrol’s MIDI control surface application is only for stand-alone use, and requires using both an external power supply and the keyboard’s 5-pin DIN MIDI connectors for I/O. With a live rig, this makes sense; for use with a DAW, you have the NKS spec communicating over USB. But wouldn’t it be great to be able to use the Komplete keyboard’s control surface with non-NKS instruments, and even effects, in Studio One over USB? Well, you can.
GETTING STARTED
For Windows, install MIDI-OX. This utility is key to letting us re-direct the MIDI messages at the Komplete keyboard’s external output to Studio One.
For Macs running Catalina, I currently don’t know of any way to use the MIDI Patchbay utility. This is similar to MIDI-OX, but hasn’t been updated since 2008, and system requirements stop at Mac OS X 10.14. You can try using it with pre-Catalina systems; if Apple’s Gatekeeper blocks the installation, you’ll need to allow it under Security & Privacy. Once you get it installed, it should work similarly to MIDI-OX if you choose Komplete Kontrol S-Series Port 1 for the MIDI input option (and consider that equivalent to Komplete Kontrol -1 in the following description), and choose Komplete Kontrol S-Series Port 2 for the MIDI output option (it should work similarly to Komplete Kontrol EXT-1, below). Mac users, please feel free to comment below about what does and does not work with the Mac.
Back to Windows…
- Turn on the Komplete keyboard.
- After the keyboard boots, open MIDI-OX. Under MIDI-OX’s Options > MIDI Devices, choose Komplete Kontrol – 1 for MIDI Input and Komplete Kontrol EXT-1 for MIDI output (Fig. 1). Click OK to close the MIDI Devices screen.
- Open Studio One, but leave MIDI-OX open while Studio One is open.
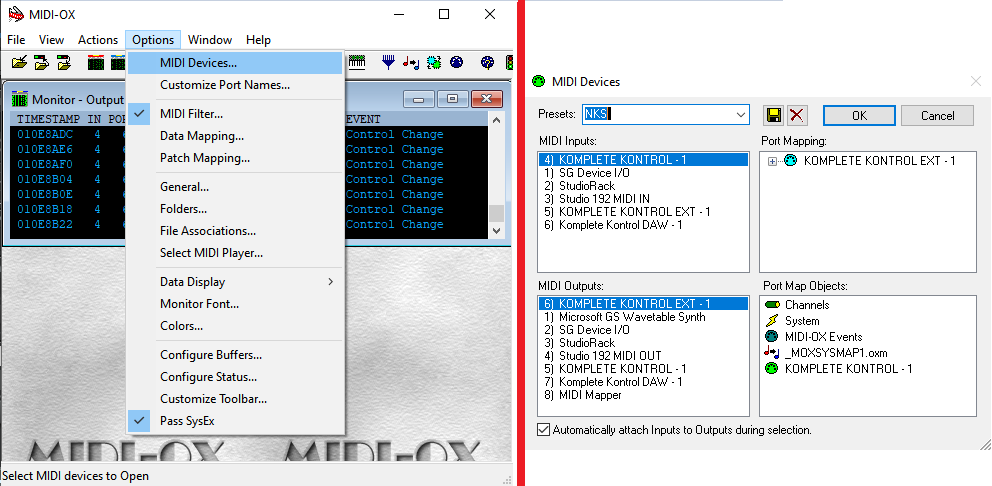
Figure 1: How to set up the MIDI-OX utility so that NI keyboards can control non-NKS instruments over USB.
- Now we need to tell Studio One that MIDI-OX is a new keyboard, even though it isn’t really. Choose Studio One > Options > External Devices, click Add, and choose New Keyboard (Fig. 2).

Figure 2: How to add MIDI-OX as a pseudo-keyboard.
- For Receive From, choose Komplete Kontrol – 1. Studio One will warn you not to do this, but just ignore the warning. For Send To, choose Komplete Kontrol Ext – 1. You’ll have another warning to ignore—but I promise you, no harm will come to Studio One.
- Click OK, then click OK again to get out of the options screen. We’ll cover when/how to use MIDI-OX later.
A WORD OF CAUTION
At the moment, the Komplete Kontrol application’s template management is somewhat primitive. Any changes you make are saved when you close the MIDI controller application; there’s no “Save” or “Save as” command, nor can you manage individual templates—they’re all saved in a single .dat file.
However, if saving-by-closing doesn’t work for you, and you can’t seem to save new templates, there may be an esoteric Windows problem. This is particularly likely for those who upgraded to Windows 10 from an earlier version, because the folder holding the templates may be write-protected due to inheriting permissions. Here’s the fix.
- Open the C: ProgramData folder. (This is a hidden folder, so if you don’t see it, type Windows key+R, and then type Control Panel in the Open box. In the Control Panel, click on Appearance and Personalization, then choose File Explorer Options. Click on View, and then select Show Hidden Files, Folders, and Drives.)
- In ProgramData, locate the Native Instruments folder, and right-click on it.
- Click on the Security tab, then click Edit.
- Choose Users, check all the Allow boxes, and click Apply. Also, do this for any other Group or User names that let you click the Allow boxes (Creator Owner may not…no worries). After applying everything, click OK.
Okay, now that’s out of the way. Hey!! Don’t blame me! It’s a Windows thing.
CREATING A STUDIO ONE-FRIENDLY TEMPLATE
You access the MIDI control surface when you push the Komplete keyboard’s MIDI button, which also defaults to opening if the Komplete keyboard doesn’t see an NKS instrument. The following procedure describes how to create the kind of template we want for Studio One’s plug-ins.
- Open the Komplete Kontrol application (Komplete Kontrol.exe) in stand-alone mode, not as a plug-in. This is the only mode that lets you do MIDI assignments. Then, click on the MIDI 5-pin DIN symbol in the upper right (Fig. 3).
- Create a new template by clicking on the + button under templates. Right-click on it to rename it.
- The template will default to two pages of controls (16 knobs total), but of course, we want more! Click on the + sign to the right of a page, and you can add up to two more pages.

Figure 3: The important items needed to create and customize a template are circled in white. From right to left: MIDI button that opens the MIDI assignment editor, + sign for adding more pages, and + sign for adding more templates (in this case, it’s adding one for the Fat Channel).
- Now comes the tedious part. Each knob and button needs to have a unique MIDI continuous controller (CC) number, so that each one can control a unique parameter. Page 1 defaults to CC14-CC21, and page 2 covers CC22-CC29. However, pages 3 and 4 just duplicate the assignments for page 1, and all the buttons default to CC112-CC119. So it’s time to program some additional controls.
- Click on one of the virtual knobs, and you’ll see its number assignment in the MIDI field toward the lower middle. Change this number to the desired controller number. The label will still reflect the old number, but that’s okay—we’ll be re-naming the labels anyway for specific synth and effects parameters. Here’s how I assigned the controllers.
Knobs
- Page 1: 14-21 (the default)
- Page 2: 22-29 (the default)
- Page 3: 30-37
- Page 4: 38-45
Switches
- Page 1: 88-95
- Page 2: 96-103
- Page 3: 104-111
- Page 4: 112-119 (the default)
Note that you can choose whether the knobs cover an absolute range, as specified by the Range From and To controls, a Relative Range, or a Relative Offset. Since I don’t like my head to explode any more than necessary, I left this option on Absolute to start, knowing that I could change it later. You can also program keyboard parameters, pedals, the touchstrip, and the keyboard key colors—16 color choices in all. So, different templates can color the keys differently for visual confirmation that you’ve chosen the desired template (of course, I chose the color “mint” for the Mojito template).
So to recap, we’ve set up a general-purpose template, with a separate controller for each knob and switch, that we can use to create a custom control surface for non-NKS instruments and effects… as we’ll find out in part 3 of the NKS trilogy, Rise of the Controller.
Komplete Kontrol Integration in Studio One, Part 1/3
Studio One 4.53 introduced integration with Native Instruments’ Komplete series of keyboards, which is a big deal. Although these keyboards are theoretically dedicated to NKS-compatible plug-ins and mixer/transport hands-on control, with Windows systems (Mac fans, there’s more on this later) you can use the keyboard as a general-purpose, hands-on MIDI controller for non-NKS plug-ins, including all bundled PreSonus effects and instruments (as well as plug-ins from other manufacturers). Also, unlike standard NKS, you’ll be able to control effects, regardless of whether or not they’re inserted in an instrument track.
There’s a lot to cover, and since this is more like a tutorial than a tip, it’s split into three parts: DAW control with Studio One, creating custom templates for plug-ins, and how to apply the templates in your workflow.
INTEGRATING THE KEYBOARD
Choose Studio One > Options > External Devices, and click Add. Scroll to the entry for Native Instruments, unfold it, and select either your A/M or S series keyboard for Receive From and Send To. I’m using an S49 (Fig. 1).
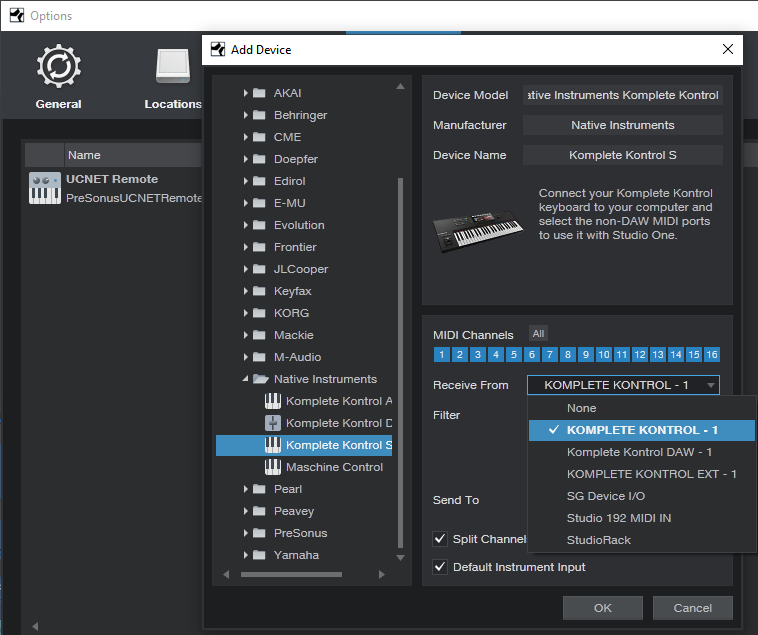
Figure 1: Komplete is selected as the keyboard, with Split Channel selected for more convenient use with multitimbral instruments, like IK Multimedia’s Syntronik.
INTEGRATING THE CONTROL SURFACE
Now let’s set up the Komplete keyboard as a new control surface. Again, choose Studio One > Options > External Devices, click Add, and scroll down to the entry for Native Instruments. Unfold it, and select Komplete Kontrol DAW – 1 for both Receive From and Send To (Fig. 2).
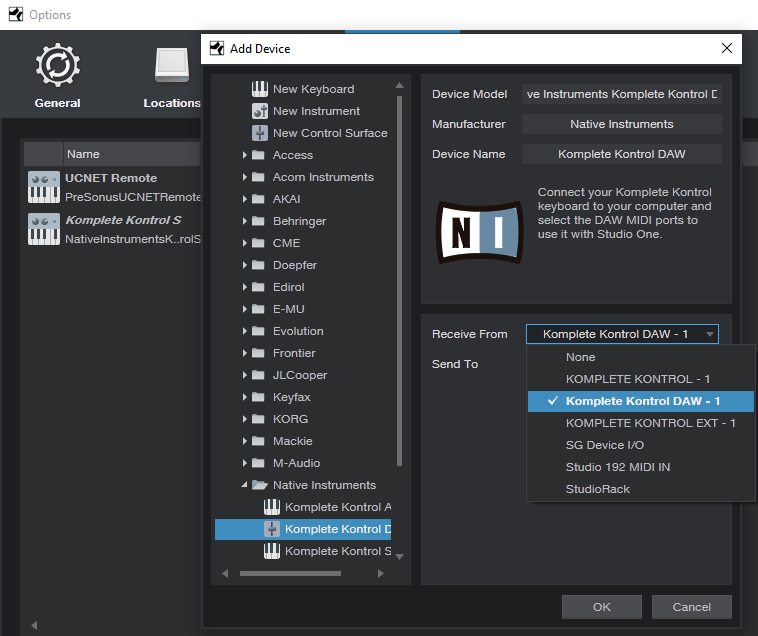
Figure 2: How to add the Komplete keyboard as a control surface for DAW integration.
CHOOSING THE MODE OF OPERATION
To edit NKS plug-ins, press the PLUG-IN mode button in the keyboard’s cluster of six buttons, toward the upper right. Controls that don’t relate to a synth or effect, such as the Transport, Metronome, Tape Tempo, and the like remain active. When it’s time to mix and you want full integration with Studio One’s mixer, press the MIXER button.
The following describes how the control surface for the current S-series Mk2 keyboards integrates currently with Studio One; click here for information from PreSonus on suitability with other NI keyboards, and updates.
Transport. The Play, Rec, and Stop buttons do what you’d expect, but there’s more to the story than that—there are several nuanced options. The following assumes you’re starting from a stopped transport.
- Press Play to begin from the Play Start marker. If there’s no Play Start marker, playback starts from the cursor’s current position. If you stop and re-initiate playback, playback re-starts from the cursor’s original position.
- Return to zero: When the transport is stopped, press Stop again to return to zero.
- Pushing on the big navigation knob toward the right initiates playback from the Play Start marker. (Note that this involves pushing downward into the knob, not left/right or up/down.) If there’s no Play Start marker, playback begins from the Loop Start, whether the loop is active or not.
- Push downward on the navigation knob during playback to jump to the Loop Start, which resumes playback automatically from there.
- Pressing Shift+Play operates the same way as using the navigation knob for playback control.
- With any scenarios involving the Play Start marker, it doesn’t matter if it’s before or after the Loop Start, or within the loop itself.
- Press Rec to initiate or punch-in recording. Press again to end or punch out recording. If you don’t record audio or MIDI while recording is active, there’s no blank event—it’s like nothing ever happened.
- Shift+Rec toggles the count-in between on and off. When you press Shift and count-in is enabled, the Rec button letters light bright red. Otherwise, the rec button letters are dimmed.
- Loop toggles the loop between on and off. To move the loop (whether enabled or not), hold the Loop button down, and rotate the navigation knob. For example, if the loop extends for four measures, moving the knob 1 click clockwise moves the loop forward to the next four measures. Moving the knob 1 click counter-clockwise moves the loop backward to the previous four measures.
- Metronome toggles between on and off.
Mixer
- The display for each visible channel shows the channel’s name, fader level, pan, metering (but not overloads), and status of a channel’s Record, Solo, and Mute buttons.
- Track select buttons. The eight buttons above the display select a track, however, moving the navigation dial left or right moves from one track to the adjacent track (left or right respectively).
- Hold Mute, and then select a channel with its track select button, to mute/unmute. The keyboard’s corresponding select button glows yellow.
- Hold Solo, and then select a channel with its track select button, to solo/unsolo. The keyboard’s corresponding select button glows blue.
- Shift+navigation knob move down (not push inward) selects level for the selected track. This mode remains selected until changed. Both the associated track knob, and the navigation knob, alter the selected track’s level. Holding Shift while moving either knob provides finer resolution. The individual track knobs provide the finest resolution.
- Shift+navigation knob move up (not push inward) selects pan for the selected track. This mode remains selected until changed. Similarly to level selection, both the track knob and navigation knob alter the selected track’s pan, and holding Shift while moving either knob provides finer resolution. The individual track knobs provide the finest resolution. Note: The Pan control for the Main channel is always shown panned full left. You can ignore this, because the Main channel doesn’t have a pan control anyway. The pan is centered properly.
- Auto toggles between Read and Touch (write) automation for the selected track. Be aware that you can’t choose automation off with Auto.
- Left/right arrow buttons select channels in groups of 8. However, if the last bank of eight has fewer than eight channels, the display will fill with the last eight channels. For example, if you expect the last bank to be channels 17-24 but only 22 channels are in use, the keyboard will display channels 15-22. This is by design, because it makes sure there aren’t any blank channels—you can always see eight channels at a time. If you hit the left arrow button, it won’t go back to channel 9, but be offset by the same amount as the previous bank. To “reset” the banks, hit the left arrow button until you’re back at the beginning.
Miscellaneous Functions
- Undo and Redo. For Redo, hold Shift and press Undo.
- Quantize. This quantizes whatever is selected, at the current quantize value.
- Tap this, even if not lit, for tap tempo. I love this feature when starting a song.
This takes care of the mixer and transport functions. Next week, we’ll cover how to create custom MIDI control setups using the Komplete Kontrol application, and that will prepare us for Part 3, which describes how to create “faux NKS” control surface capabilities for PreSonus instruments and effects. Yes, it really is possible…
Using Native Instruments’ THE MOUTH in Studio One 2
Native Instruments can seemingly do no wrong when it comes to compelling and original VSTs. One of their more recent endeavors is THE MOUTH, and enterprising YouTube accountholder void101a has posted a video detailing how to get THE MOUTH to talk the talk in Studio One 2.
Well, I say “detailing,” but at two minutes there’s technically not a lot of time detail… which is good. When it comes to workflow, we try to keep it simple. This isn’t the case so much with our attitude toward convolution reverbs, but I digress.
Here’s how to use your mouth.