Tag Archives: Learn Studio One
Friday Tips: The Center Stage Reverb
If you’ve ever played a large venue like a sports arena, you know that reverb is a completely different animal than what the audience hears. You hear your instrument primarily, and in the spaces between your playing, you hear the reverb coming back at you from the reflections. It might seem that reverb pre-delay would produce the same kind of effect, but it doesn’t “bloom” the way reverb does when you’re center stage in a big acoustical space.
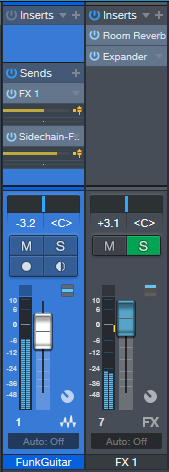
This week’s tip is inspired by the center stage sound, but taken further. The heart of the effect is the Expander, but unlike last week’s Expander-based Dynamic Brightener tip, the Expander is in Duck mode, and fed by a sidechain. Here’s the Console setup.
In the audio example, the source is a funk guitar loop from the PreSonus loop collection; but any audio with spaces in between the notes or chords works well, especially drums (if the cymbals aren’t happening a lot), vocals that aren’t overly sustained, percussion, and the like. I deliberately exaggerated the effect to get the point across, so you might want to be a little more tasteful when you apply this to your own music. Or maybe not…
The guitar’s channel has two sends. One goes to the FX Channel, which has a Room Reverb followed by an Expander. The second send goes to the Expander’s sidechain input. Both are set pre-fader so that you can turn down the main guitar sound by bringing down its fader, and that way, you can hear only the processed sound. This makes it easier to edit the following Room Reverb and Expander settings, which are a suggested point of departure. Remember to enable the Expander’s Sidechain button in the header, and click the Duck button.
The reverb time is long—almost six seconds. This is because we want it going constantly in the background, so that after the Expander finishes ducking the reverb sound, there’s plenty of reverb available to fill in the spaces.
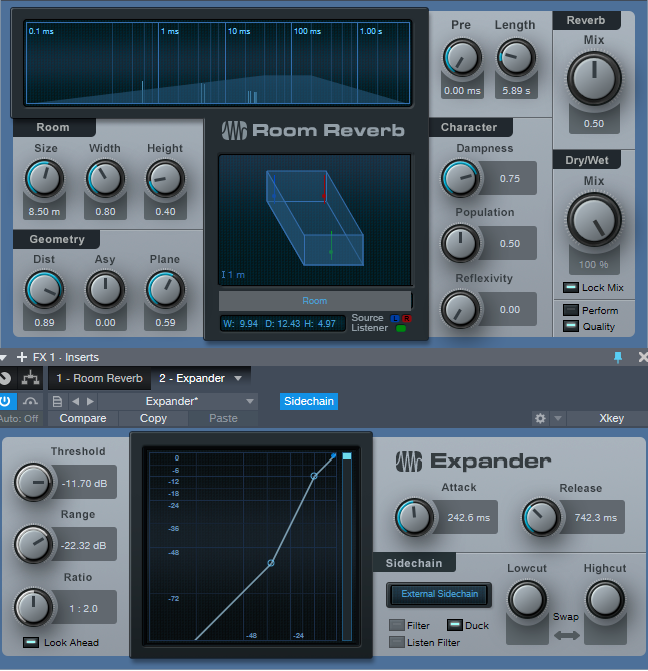
To tweak the settings, turn down the main guitar channel so you can monitor only the processed sound. The Expander’s Threshold knob determines how much you want the reverb to go away when the instrument audio is happening. But really, there are no “wrong” settings—start with the parameters above, play around, and listen to what happens.
This is a pretty fertile field for experimentation…as the following audio example illustrates. The first part is the guitar and the reverb effect; the reverb tail shows just how long the reverb time setting is. The second part is the reverb effect in isolation, processed sound only, and without the reverb tail.
This is a whole different type of reverb effect—have fun discovering what it can do for you!
Friday Tips: The Dynamic Brightener for Guitar
When you play an acoustic guitar harder, it not only gets louder, but brighter. Dry, electric guitar doesn’t have that quality…by comparison, the electrified sound by itself is somewhat lifeless. But I’m not here to be negative! Let’s look at a solution that can give your dry electric guitar some more acoustic-like qualities.
How It Works
Create an FX Channel, and add a pre-fader Send to it from your electric guitar track. The FX Channel has an Expander followed by the Pro EQ. The process works by editing the Expander settings so that it passes only the peaks of your playing. Those peaks then pass through a Pro EQ, set for a bass rolloff and a high frequency boost. Therefore, only the peaks become brighter. Here’s the Console setup.
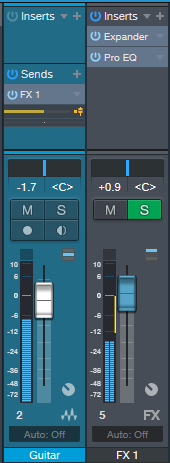
The reason for creating a pre-fader send from the guitar track is so that you can bring the guitar fader down, and monitor only the FX Channel as you adjust the settings for the Expander and Pro EQ. The Expander parameter values are rather critical, because you want to grab only the peaks, and expand the rest of the guitar signal downward. The following settings are a good point of departure, assuming the guitar track’s peaks hit close to 0.
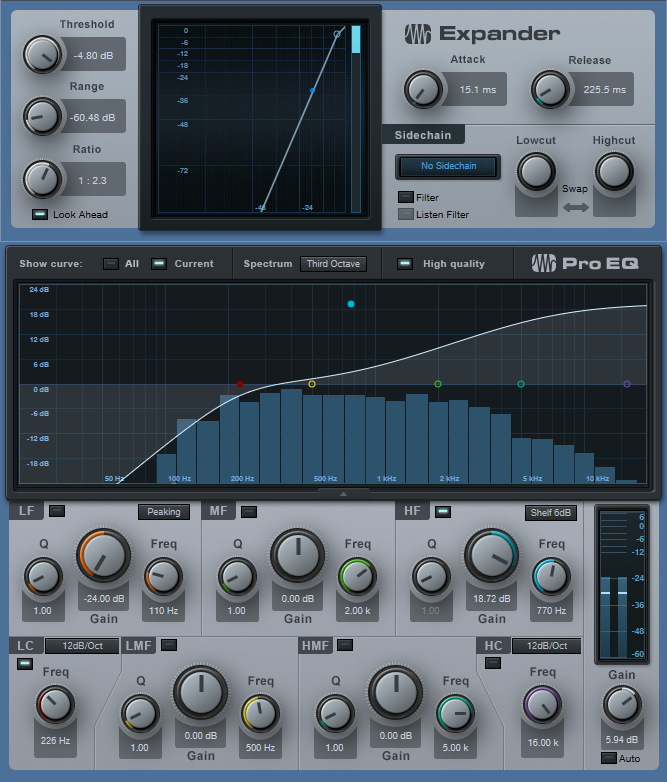
The most important edit you’ll need to make is to the Expander’s Threshold. After it grabs only the peaks, then experiment with the Range and Ratio controls to obtain the sound you want. Finally, choose a balance of the guitar track and the brightener effect from the FX Channel.
The audio example gets the point across. It consists of guitar and drums, because having the drums in the mix underscores how the dynamically brightened guitar can “speak” better in a track. The first five measures are the guitar with the brightener, the next five measures are the guitar without the brightener, and the final five measures are the brightener channel sound only. You may be surprised at how little of the brightener is needed to make a big difference to the overall guitar sound.
Also, try this on acoustic guitar when you want the guitar to really shine through a mix. Hey, there’s nothing wrong with shedding a little brightness on the situation!
Friday Tips: Crazee Snare Enhancements!
You never know where you’ll find inspiration. As I was trying not to listen to the background music in my local supermarket, “She Drives Me Crazy” by Fine Young Cannibals—a song from over 30 years ago!—earwormed its way into my brain. Check it out at https://youtu.be/UtvmTu4zAMg.
My first thought was “they sure don’t make snare drum sounds like those any more.” But hey, we have Studio One! Surely there’s a way to do that—and there is. The basic idea is to extract a trigger from a snare, use it to drive the Mai Tai synth, then layer it to enhance the snare.
Skeptical? Check out the audio example.
ISOLATING THE SNARE
If you’re dealing with a drum loop or submix, you first need to extract the snare sound.
- Create an FX Channel, and insert a Pro EQ followed by a Gate.
- Add a pre-fader send from your mixed drums to the FX Channel. Aside from providing a more consistent level for triggering, a pre-fader send lets you turn down the main drum track. This way you hear only the FX Channel, which makes it easier to tweak the EQ and isolate the snare.
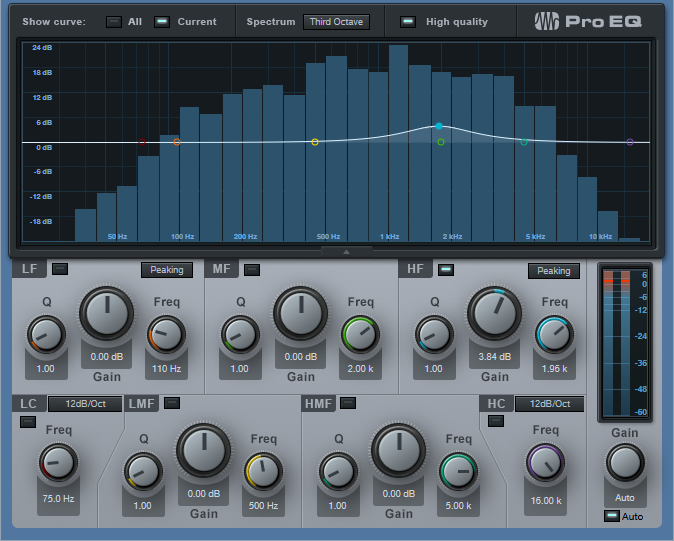
- With the Gate bypassed, tune the Pro EQ to the snare frequency. Use the LC and HC with a 48 dB/octave slope to provide the preliminary isolation, then use a super-sharp bandpass setting to zero in on the snare frequency (Figure 1). The EQ’s background spectrum analyzer can help by making sure the bar in the range you’re boosting goes as high as possible. In stubborn cases, you may need to double up the bandpass filter with a second sharp bandpass filter.
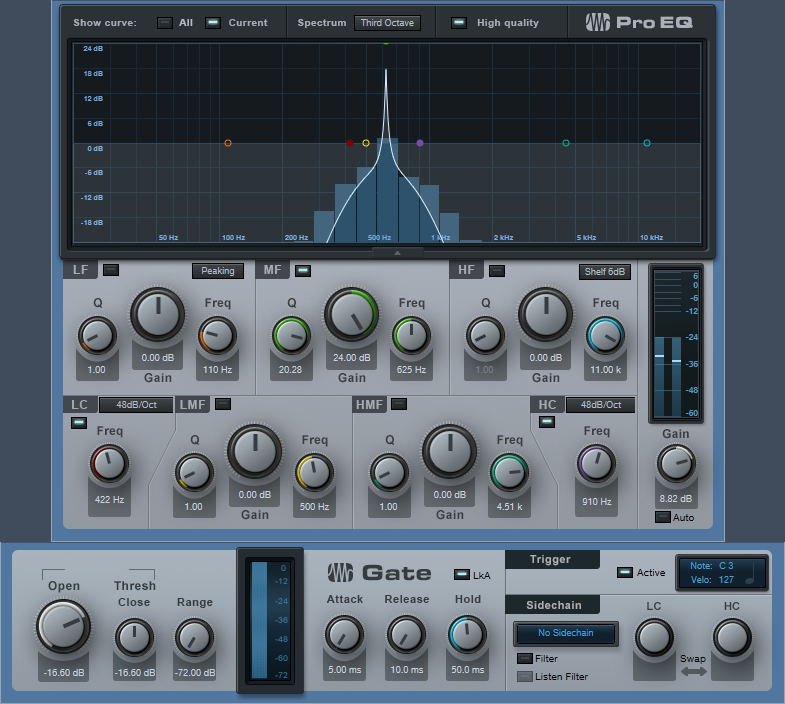
Figure 1: Use the Pro EQ and Gate to extract a snare drum trigger.
- Enable the gate, and click on Active to enable the trigger output. Set the Note and Velocity as desired (however when using noise with Mai Tai, the specific Note isn’t that critical). Adjust the Gate’s settings so that it triggers on the snare hits. Like the Pro EQ, the controls here are critical as well.
- A short attack is usually best.
- Keep release relatively short (e.g., 10 ms), unless you want to mix in some of the peaked/gated sound from this channel along with the Mai Tai and drums.
- Hold times around 50 ms can help prevent false triggering. But you can also get creative with this control. If you don’t want to trigger on hits that are close together (e.g., fills), a long Hold time will trigger on the first snare of the series, but ignore subsequent ones that fall within the hold time.
- Insert the Mai Tai. Set its input to Gate, and enable the mixer’s Monitor button. Figure 2 shows the finished track layout.

Figure 2: Track layout for snare drum extraction.
TWEAKING THE MAI TAI
Now the fun begins! Figure 3 shows a typical starting point for a snare-enhancing sound.
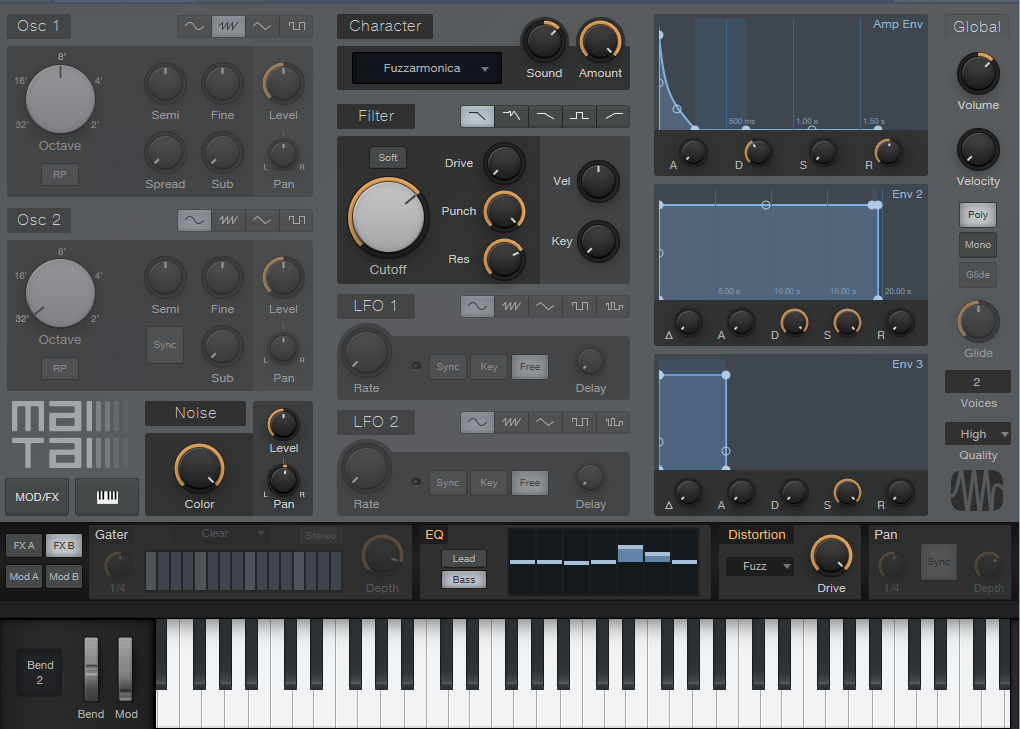
Figure 3: Starting point for a cool snare drum sound with Mai Tai.
The reason for choosing Mai Tai as the sound source is because of its “Character” options that, along with the filter controls, noise Color control, and FX (particularly Reverb, EQ, and Distortion), produce a huge variety of electronic snare sounds. The Character module’s Sound and Amount controls are particularly helpful. The more you play with the controls, the more you’ll start to understand just how many sounds are possible.
BUT WAIT…THERE’S MORE!
If the snare is on a separate track, then you don’t need the Pro EQ or FX Channel. Just insert a Gate in the snare track, enable the Gate’s trigger output, and adjust the Gate Threshold controls to trigger on each snare drum hit. The comments above regarding the Attack, Release, and Hold controls apply here as well.
Nor are you limited to snare. You can isolate the kick drum, and trigger a massive, low-frequency sine wave from the Mai Tai to give those car door-vibrating kick drums. Toms can sometimes be easy to isolate, depending on how they’re tuned. And don’t be afraid to venture outside of the “drum enhancement” comfort zone—sometimes the wrong Gate threshold settings, driving the wrong sound, can produce an effect that’s deliciously “right.”
Friday Tips: Frequency-Selective Guitar Compression
Some instruments, when compressed, lack “sparkle” if the stronger, lower frequencies compress high frequencies as well as lower ones. This is a common problem with guitar, but there’s a solution: the Compressor’s internal sidechain can apply compression to only the guitar’s lower frequencies, while leaving the higher frequencies uncompressed so they “ring out” above the compressed sound. (Multiband compression works for this too, but sidechaining can be a faster and easier way to accomplish the same results.) Frequency-selective compression can also be effective with drums, dance mixes, and other applications—like the “pumping drums” effect covered in the Friday Tip for October 5, 2018. Here’s how to do frequency-selective compression with guitar.

- Insert the Compressor in the guitar track.
- Enable the internal sidechain’s Filter button. Do not enable the Sidechain button in the effect’s header.
- Enable the Listen Filter button.
- Turn Lowcut fully counterclockwise (minimum), and set the Highcut control to around 250 – 300 Hz. You want to hear only the guitar’s low frequencies.
- You can’t hear the effects of adjusting the main compression controls (like Ratio and Threshold) while the Listen Filter is enabled, so disable Listen Filter, and start adjusting the controls for the desired amount of low-frequency compression.
- For a reality check, use the Mix control to compare the compressed and uncompressed sounds. The high frequencies should be equally prominent regardless of the Mix control setting (unless you’re hitting the high strings really hard), while the lower strings should sound compressed.
The compression controls are fairly critical in this application, so you’ll probably need to tweak them a bit to obtain the desired results.
If you need more flexibility than the internal filter can provide, there’s a simple workaround.
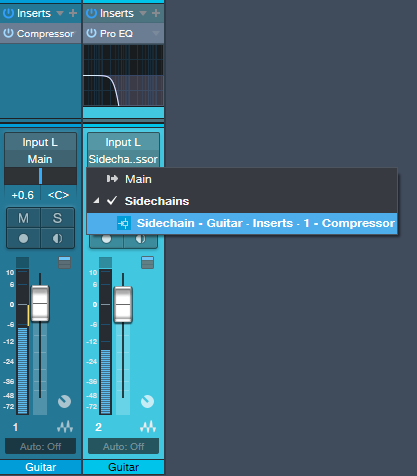
Copy the guitar track. You won’t be listening to this track, but using it solely as a control track to drive the Compressor sidechain. Insert a Pro EQ in the copied track, adjust the EQ’s range to cover the frequencies you want to compress, and assign the copied track’s output to the Compressor sidechain. Because we’re not using the internal sidechain, click the Sidechain button in the Compressor’s header to enable the external sidechain.
The bottom line is that “compressed” and “lively-sounding” don’t have to be mutually exclusive—try frequency-selective compression, and find out for yourself.
Friday Tips: The Sidechained Spectrum
You’re probably aware that several Studio One audio processors offer sidechaining—Compressor, Autofilter, Gate, Expander, and Channel Strip. However, both the Spectrum Meter and the Pro EQ spectrum meter also have sidechain inputs, which can be very handy. Let’s look at Pro EQ sidechaining first.
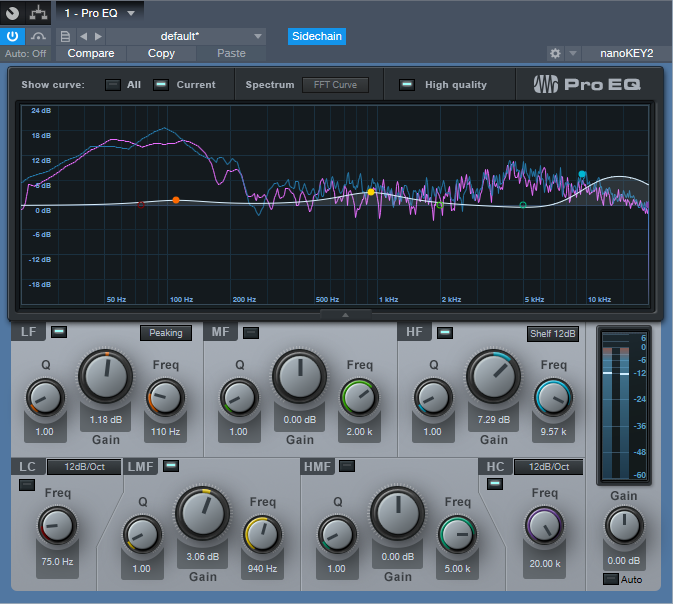
When you enable sidechaining, you can feed another track’s output into the Pro EQ’s spectrum analyzer, while still allowing the Pro EQ to modify the track into which it’s inserted. When sidechained, the Spectrum mode switches to FFT curve (the Third Octave and Waterfall options aren’t available). The blue line indicates the level of the signal going through the Pro EQ, while the violet line represents the sidechain signal.
As a practical example of why this is useful, the screen shot shows two drum loops from different drum loop libraries that are used in the same song. The loop feeding the sidechain loop has the desired tonal qualities, so the loop going through the EQ is being matched as closely as possible to the sidechained loop (as shown by a curve that applies more high end, and a slight midrange bump).
Another example would be when overdubbing a vocal at a later session than the original vocal. The vocalist might be off-axis or further away from the mic, which would cause a slight frequency response change. Again, the Pro EQ’s spectrum meter can help point out any differences by comparing the frequency response of the original vocal to the overdub’s response.
The Spectrum Meter
Sidechaining with the Spectrum Meter provides somewhat different capabilities compared to the Pro EQ’s spectrum analyzer.
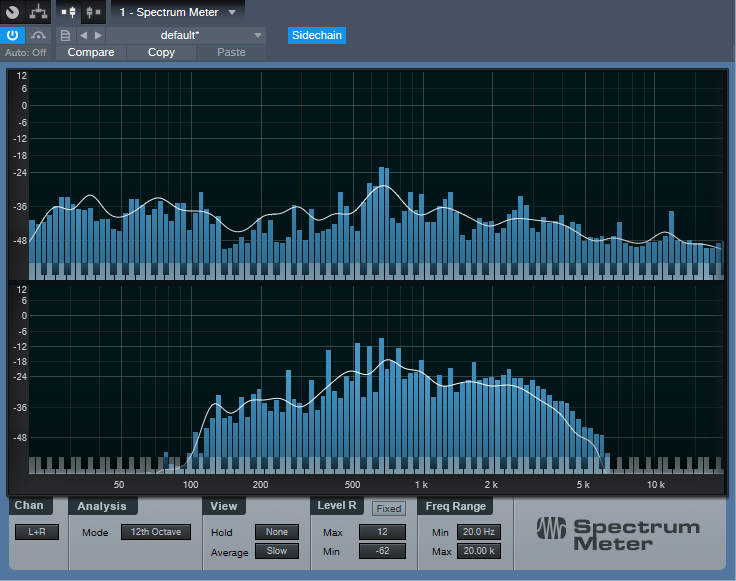
With sidechain enabled, the top view shows the spectrum of the track into which you’ve inserted the Spectrum Meter. The lower view shows the spectrum of the track feeding the sidechain. When sidechained, all the Spectrum Meter analysis modes are available except for Waterfall and Sonogram.
While useful for comparing individual tracks (as with the Pro EQ spectrum meter), another application is to help identify frequency ranges in a mix that sound overly prominent. Insert the Spectrum Meter in the master bus, and you’ll be able to see if a specific frequency range that sounds more prominent actually is more prominent (in the screen shot, the upper spectrum shows a bump around 600 Hz in the master bus). Now you can send individual tracks that may be causing an anomaly into the Spectrum Metre’s sidechain input to determine which one(s) are contributing the most energy in this region. In the lower part of the screen shot, the culprit turned out to be a guitar part with a wah that emphasized a particular frequency. Cutting the guitar EQ just a little bit around 600 Hz helped even out the mix’s overall sound.
Of course, the primary way to do EQ matching is by ear. However, taking advantage of Studio One’s analysis tools can help speed up the process by identifying specific areas that may need work, after which you can then do any needed tweaking based on what you hear. Although “mixing with your eyes” isn’t the best way to mix, supplementing what you hear with what you see can expedite the mixing process, and help you learn to correlate specific frequencies with what you hear—and there’s nothing wrong with that.
Friday Tips: Studio One’s Amazing Robot Bassist
When Harmonic Editing was announced, I was interested. When I used it for the first time, I was intrigued. When I discovered what it could do for songwriting…I became addicted.
Everyone creates songs differently, but for me, speed is the priority—I record scratch tracks as fast as possible to capture a song’s essence while it’s hot. But if the tracks aren’t any good, they don’t inspire the songwriting process. Sure, they’ll get replaced with final versions later, but you don’t want boring tracks while writing.
For scratch drums on rock projects, I have a good collection of loops. Guitar is my primary instrument, so the rhythm and lead parts will be at least okay. I also drag the rhythm guitar part up to the Chord Track to create the song’s “chord chart.”
Then things slow down…or at least they did before Harmonic Editing came along. Although I double on keyboards, I’m not as proficient as on guitar but also, prefer keyboard bass over electric bass—because I’ve sampled a ton of basses, I can find the sound I want instantly. And that’s where Harmonic Editing comes in.
The following is going to sound ridiculously easy…because it is. Here’s how to put Studio One’s Robot Bassist to work. This assumes you’ve set the key (use the Key button in the transport, or select an Instrument part and choose Event > Detect Key Signature), and have a Chord Track that defines the song’s chord progression.
- Play the bass part by playing the note on a MIDI keyboard that corresponds to the song’s key. Yes, the note—not notes. For example, if the song is in the key of A, hit an A wherever you want a bass note.
- Quantize what you played. It’s important to quantize because presumably, the chord changes are quantized, and the note attack needs to fall squarely at the beginning of, or within, the chord change. You can always humanize later.
- Open the Inspector, unfold the Follow Chords options, and then choose Bass (Fig. 1).

Figure 1: Choose the Bass option to create a bass part when following chords.
- Now you have a bass part! If the bass part works, choose the Edit tab, select all the notes, and choose Action > Freeze Pitch. This is important, because the underlying endless-string-of-notes remains the actual MIDI data. So if you copy the Event and paste it, unless you then ask the pasted clip to follow chords, you have the original boring part instead of the robotized one.
- After freezing, turn off Follow Chords, because you’ve already followed the chords. Now is the time to make any edits. (Asking the followed chords to follow chords can confuse matters, and may modify your edits.)
The bottom line: with one take, a few clicks, and (maybe) a couple quick edits—instant bass part (Fig. 2).
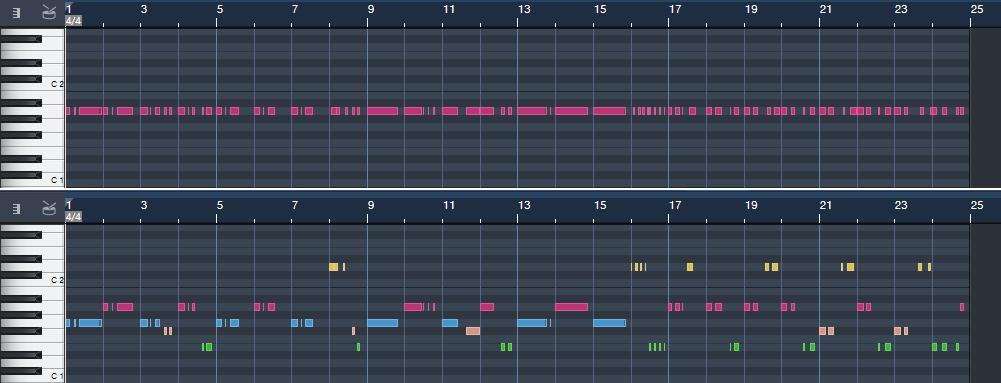
Figure 2: The top image is the original part, and yes, it sounds as bad as it looks. The lower image is what happened after it got robotized via Harmonic Editing, and amazingly, it sounds pretty good.
Don’t believe me? Well, listen to the following.
You’ll hear the bass part shown in Fig. 2, which was generated in the early stages of writing my latest music video (I mixed the bass up a little on the demo so you can hear it easily). Note how the part works equally well for the sustained notes toward the beginning, and well as the staccato parts at the end. To hear the final bass part, click the link for Puzzle of Love [https://youtu.be/HgMF-HBMrks]. You’ll hear I didn’t need to do much to tweak what Harmonic Editing did.
But Wait! There’s More!
Not only that, but most of the backing keyboard parts for Puzzle of Love (yes, including the piano intro) were generated in essentially the same way. That requires a somewhat different skill set than robotizing the bass, and a bit more editing. If you want to know more (use the Comments section), we’ll cover Studio One’s Robot Keyboardist in a future Friday Tip.
Friday Tips—Blues Harmonica FX Chain
If you’ve heard blues harmonica greats like Junior Wells, James Cotton, Jimmy Reed, and Paul Butterfield, you know there’s nothing quite like that big, brash sound. They all manage to transform the harmonica’s reedy timbre into something that seems more like a member of the horn family.
To find out more about the techniques of blues harmonica, check out the article Rediscovering Blues Harmonica. It covers why you don’t play blues harp in its default key (e.g., you typically use a harmonica in the key of A for songs in E), how to mic a harmonica, and more. However, the secret to that big sound is playing through the distortion provided by an amp, or in our software-based world, an amp sim. I don’t really find the Ampire amps suitable for this application, but we can put together an FX Chain that does the job.
Check out the demo to hear the desired goal. The first 12 bars are unprocessed harmonica (other than limiting). The second 12 bars use the FX Chain described in this week’s tip, and which you can download for your own use.
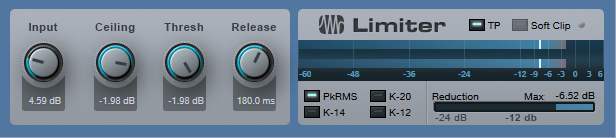
The chain starts with a Limiter to provide a more sustained, consistent sound.
Next up: A Pro EQ to take out all the lows and highs, which tightens up the sound and reduces intermodulation distortion. (When using an amp sim, blues harmonica is also a good candidate for multiband processing, as described in the February 1 Friday Tip.)

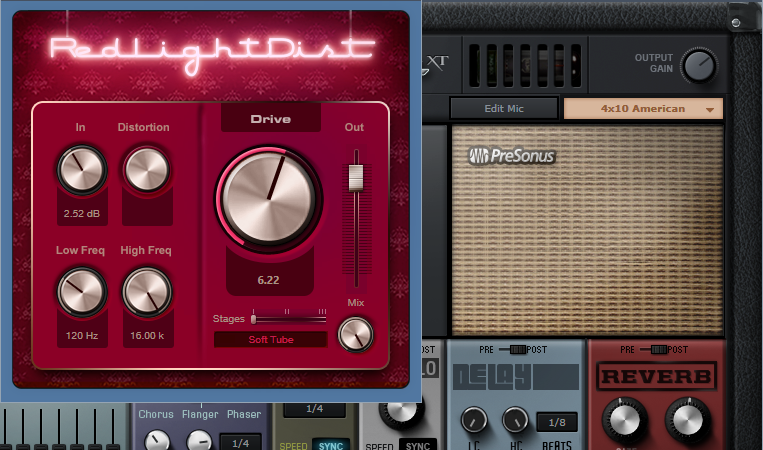
Now it’s time for the Redlight Dist to provide the distortion. For the cabinet, this FX Chain uses the Ampire solely for its 4 x 10 American cabinet—no amp or stomps.
After the distortion/cabinet combo, a little midrange “honk” makes the harmonica stand out more in the mix.
For a final touch, blues harp often plays through an amp with reverb—so a good spring reverb effect adds a vintage vibe.
You can download the Blues Harp.multipreset and use it as it, but I encourage playing around with it—try different types of distortion and amps, mess with the EQ a bit, and so on. For an example of a finished song with amp sim blues harmonica in context, check out I’ll Take You Higher on YouTube.
Click here to download the multipreset!
Friday Tips: Studio One’s Transient Shaper for Kick and Snare
As with so many aspects of audio, the subject of compression presets polarizes people. The purists say there’s no point in having presets, because every signal is different, and the same compressor settings will sound very different on different sources. On the other hand, software comes with presets, and there are plenty of recording blogs on the web that dispense advice about typical preset settings. So who’s right?
And as with so many aspects of audio, they all are. If a preset works “out of the box,” that’s just plain luck. However, there are certain ranges of settings that work well in many cases for particular types of signals. In any case, the effects of compression are totally dependent on the input signal level anyway—if the threshold is set to -10, then signals that peak at 0 will sound very different compared to signals that peak at -10.
The most effective way to approach compression is to decide what effect you want the compression to accomplish, then adjust the compression settings accordingly. It’s also important to remember that compression isn’t just some monolithic effect that “squashes things.” For example, with kick and snare, compression can act just like a transient/decay shaper due to a drum’s rapid decay.
The usual goal for compressing kick is an even sound, yet one that doesn’t reduce punch. However, you have a great deal of latitude in deciding how to implement that goal.
Figure 1: A starting point for kick (and snare) compression.
The preset in Fig. 1 uses a fairly high ratio, and hard knee, to even out the highest levels. You want the compression to take hold relatively rapidly, but not take away from the punch. The best option is to start with the attack time at 0, and increase it until you hear the initial hit clearly (but don’t go past that point). Because a kick decays fast, release can be fast as well.
For transient shaping, slowing the attack time softens the attack. Raising the ratio increases the sustain somewhat, while making space for the attack (assuming an appropriate attack time). Between the attack and ratio controls, you can pretty much tailor the kick drum’s attack and sustain characteristics, as well as even out the overall sound. A higher threshold is another way to emphasize the attack, by letting the decay occur naturally. Lowering the threshold reduces the level difference between the attack and decay.
Snare responds similarly to kick, however with an acoustic drum kit, the kick is more isolated physically than the snare. As a result, compressing the snare has the potential to emphasize leakage. Fortunately, the snare is often the focus of a drum part. As a result, you can simply compress the snare, and accept that leakage is part of the deal. With individual, multitracked drums (including electronic drums) where leakage is not a problem, it’s still usually the snare and kick that get compression.
With snare, you may want to use a lower ratio (2:1 – 3:1) for a fuller snare sound. Or, increase the ratio to emphasize the attack more. Again, use the attack time to dial in the desired attack characteristics.
With both kick and snare, you’ll usually want a hard knee. However, the knee control is a fantastic way to fine-tune the attack—and once you have that dialed in, you’ll be good to go.
Recording in Studio One Made Easy with David Vignola!
 Learn Studio One from David Vignola!
This series is intended for first-time owners of the AudioBox and Studio One Artist and covers everything you will need to know to record your first song. Hit the ground running!
And when you’re ready for the Advanced course, hit up David at his website and get a discount with promo code: PRESONUS25
Watch the whole video series here:
Learn more about the AudioBox here!
Not sure which interface works for you? Well help you find one here!