Tag Archives: Friday Tip
Mid-Side Meets Reverb
The post on using mid-side processing with the CTC-1 garnered a good response, so let’s follow up with one of my favorite mid-side techniques: M-S reverb.
To recap, mid-side processing separates sounds in the center of a stereo file from sounds panned to the sides, processes them individually, then puts them back together again into stereo. It isn’t a perfect separation, because the mid is the sum of the left and right channels. Although this boosts the center somewhat, the mid still includes the sides. However, the side channel is quite precise, because it’s derived from putting the right and left channels out of phase—so the center cancels.
Applying Mid-Side Reverb
Before getting into how to make M-S reverb, here’s why it’s useful. Some productions have an overall reverb to provide ambiance, and a second reverb (often plate) dedicated to the vocal. The vocal is usually mixed to center, so it’s competing for space with the bass, snare, and kick. If they’re contributing to the overall reverb, and the vocal is creating its own reverb, that’s a lot of reverb in the center.
One popular fix is adding a highpass filter prior to the overall reverb, set to around 300 Hz. This keeps the bass and kick from muddying the reverb. However, it doesn’t take care of midrange or high-frequency sounds that are panned to center, like snare. These can compete even more with the vocal if they’re in the same frequency range.
While some reverbs let you tailor high- and low-frequency reverb times with a crossover, this doesn’t cover all the processing you might want to do, nor does Studio One’s Room Reverb include these parameters. Mid-side reverb, with different reverbs on the mid and sides, is a more flexible solution for customizing an overall reverb ambiance.
Assembling the Mid-Side Reverb
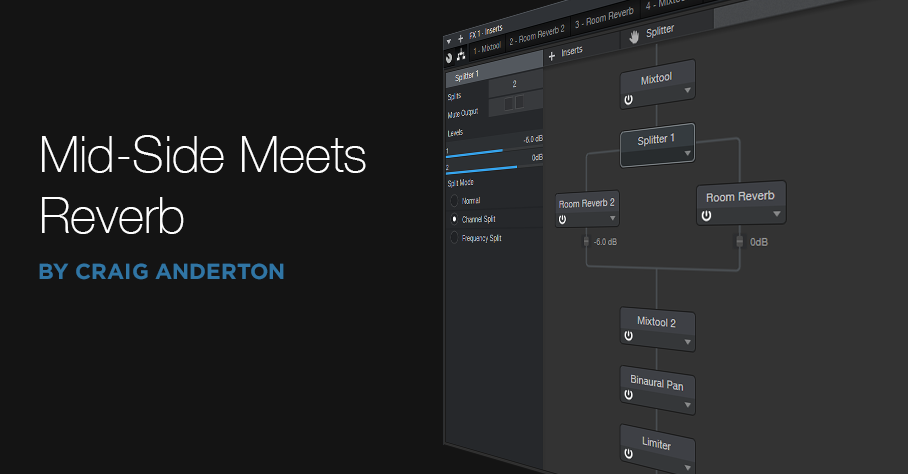
Download the FX Chain, or if you want to roll your own, start by dragging the MS-Transform FX Chain into a bus (of course, this also works for individual channels). Then drag a Room Reverb into each split (Fig. 1). The default reverb preset is a good place to start, but if the FX Chain is in a bus, remember to set the Mix controls for 100% wet sound. I also like to insert a Binaural Pan after the second MixTool to widen the overall stereo image.

Figure 1: Mid-Side Reverb FX Chain, which adds two Room Reverbs and a Binaural Pan to the MS-Transform FX Chain.
The reverb on the left handles the center, while the reverb on the right processes the sides. Lower the fader after the left reverb; Fig. 1 shows -6 dB, but adjust to taste. This alone will open up some space in the center for your vocal and its reverb. However, where this effect really comes into its own is when you tweak the reverb parameters for each reverb. For example…
- If you still want reverb on the kick and low end, vary the mid reverb’s Length parameter. Shorter lengths tighten the kick more, while longer lengths give that Kick of Doom reverb sound.
- Increase Length on the sides for a more atmospheric reverb sound.
- Increase pre-delay on the sides, to make space for attacks on the vocal track. Consonants benefit from the extra clarity.
- For this application, Eco mode sounds fine but try HQ as well.
- Turn up the Binaural Pan after the second Mixtool. I often turn it up all the way, because it sounds great in stereo, and there aren’t any phasey issues of the output collapses to mono.
By adjusting the two reverbs, you can sculpt them to give the desired overall reverb sound. If you then place a vocal in the center with a sweet plate, I think you’ll find that the vocal and overall reverb create a smooth, differentiated, and conflict-free reverb effect.
Quad Image Enhancer
Studio One’s Binaural Pan processor can widen, or narrow, an instrument’s stereo image. Aside from making “bigger” sounds that fill out the stereo spread, it also has practical applications. For example, you can spread out a thick stereo synth pad, or a guitar feeding two cabs in stereo, by turning the width control clockwise from the center position. This opens up more room for vocals, kick, snare, bass, and other centered elements. Binaural Pan can also do the reverse—like narrowing a wide, stereo synth bass part to focus it more—by turning the Width control counter-clockwise from the center position.
For mastering, Binaural Pan can make mixes seem larger than life. However, it’s not necessarily a “one-size-fits-all-frequencies” solution, because you might want to spread the highs as far as possible, but narrow the bass, and add only a little bit of spreading to the upper mids—so let’s make ourselves a multiband image enhancer.
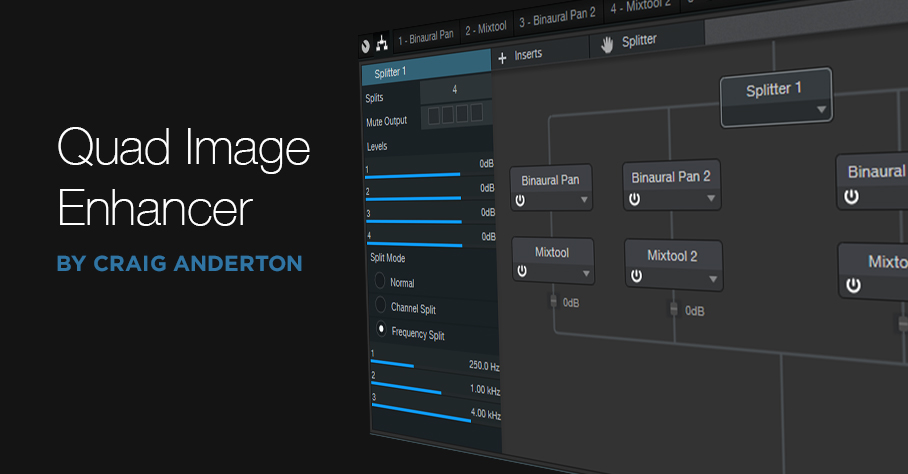
This Quad Image Enhancer FX Chain is ideal for mastering, as well as for working with individual instruments. Fig. 1 shows the modules. The Splitter splits the audio into four bands: Low (below 250 Hz), Low Mid (250 Hz – 1 kHz), Hi Mid (1 kHz – 4 kHz), and High (above 4 kHz). Each of these goes to a Binaural Pan to control the image, and a Mixtool to trim the level (-6 dB to +6 dB).
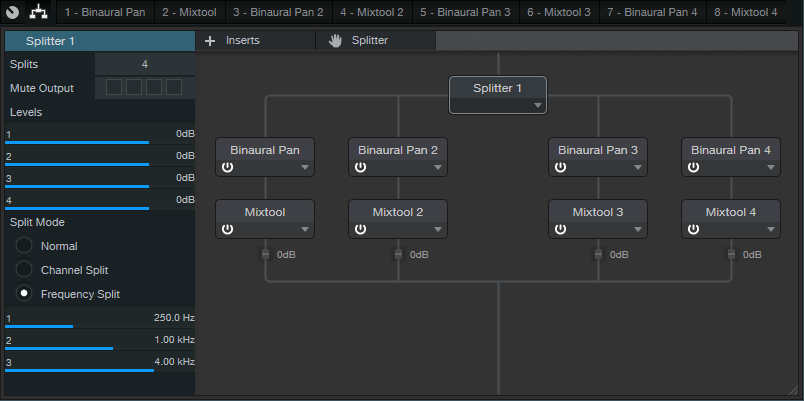
Figure 1: Modules used in the Quad Image Enhancer multipreset.
The split frequencies are arbitrary. You might want to move them around, although the ones in the default multipreset work well with a variety of music.
The Control Panel (Fig. 2) accesses all the needed parameters. Enabling the Mono button is like turning Width fully counter-clockwise, but being able to switch this provides a convenient diagnostic tool for quickly comparing a band’s sound in stereo or mono. Similarly, enabling Bypass makes it easy to hear the effect that widening (or narrowing) has on a particular band. If you need to mute individual bands so you focus completely on one or two bands while editing them, open up the FX Chain, select the Splitter, and mute the desired output(s) in the edit window’s upper-left corner.
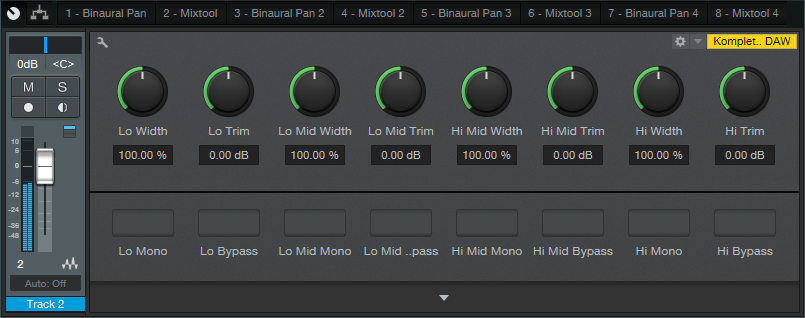
Figure 2: Quad Image Enhancer control panel.
How to Use It
When the Width controls are centered, they don’t affect the sound. You can crank up the widths for a wider sound, but you can also be a little more strategic. The following audio example plays an excerpt of mixed but unmastered audio, followed by the same excerpt going through the Quad Image Enhancer. For this application, the Lo band is narrowed, Lo Mid unchanged, Hi Mid widened slightly, and Hi widened all the way.
Note that unlike some delay-based widening solutions, this FX Chain doesn’t cause any comb filtering-induced “phaseyness” if collapsed to mono.
To widen a sound even further, turn up the Trim control for the Hi Mid or Hi bands by 1-2 dB. Because high frequencies are more directional than low frequencies, emphasizing the high frequencies increases the illusion of width.
Although there are some excellent third-party multiband imaging plug-ins available, you don’t need to go outside the Studio One ecosystem—just download the multipreset, and you’ll be ready to widen, or narrow, your stereo image.
DOWNLOAD THE QUAD IMAGE ENHANCER PRESET HERE
Friday Tip: Rotating Speaker Emulator FX Chain
A rotating speaker is an extremely complex signal processor (as most mechanical signal processors are—like plate reverbs). It combines phase shifts, Doppler shifts, positional changes, timbral variations, and more. And of course, Studio One includes the Rotor processor, which does a fine job of capturing the classic rotating speaker sound.
However, I’ve always felt that rotating speakers have a lot more potential as an effect than just emulating physical versions—hence this FX chain. By “deconstructing” the elements that make up the rotating speaker sound, you can customize it not only to tweak the rotating speaker effect to your liking, but to create useful variations that don’t necessarily relate to “the real thing.” What if you want a speed that’s between slow and fast? Or a subtler effect that works well with guitar? Or simulate the way that the horn spins faster when changing speeds because it has less inertia than the woofer? This FX chain provides a useful, more subtle variation on Rotor’s rotating speaker sound—check out the audio example—but the best way to take advantage of this week’s tip is to download the multipreset, roll up your sleeves, and start playing around.
Rotating speaker basics. There are two rotating speakers—one high-frequency driver, and one low-frequency drum. A crossover splits the signal to these two paths, so we’ll start the emulation by setting the Splitter to Frequency Split mode around 800 Hz. Here’s the routing.
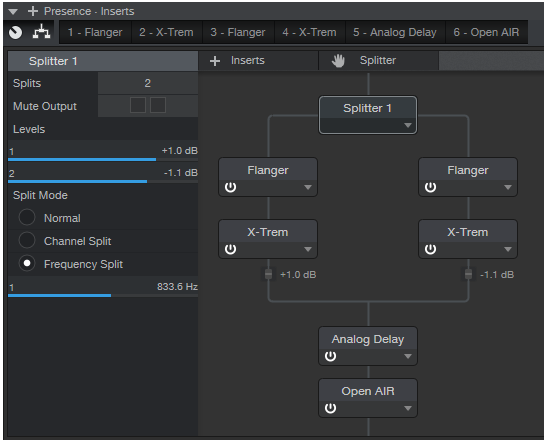
The high-frequency and low-frequency paths each go into a Flanger to provide Doppler and phase shifts, and an X-Trem for subtle panning to provide the positional cues. Let’s look at the individual module settings.
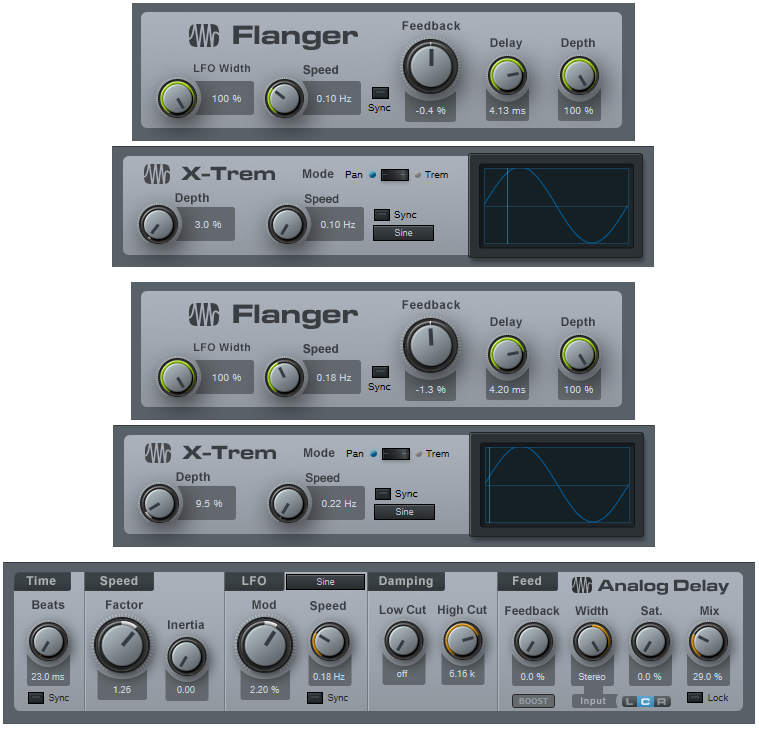
The Analog Delay adds a 23 ms reflection for a bit of a room sound vibe, with some modulation to add a Doppler shift accent. Finally, an Open Air reverb (using the 480 Hall from Medium Halls) creates a space for the rotating speaker.
Knob Control. This was the hardest part of the emulation, because changing speed has to alter (of course) Flanger speed, but also the Flanger’s LFO Width because you want less width at faster LFO speeds. The X-Trem speed and Analog Delay LFO speed also need to follow the range from slow to fast.
However, the curves for the control changes are quite challenging because the controls don’t all cover the same range. Fortunately you can “bend” curves in FX Chains, but you can’t have more than one node. As a result, I optimized the knob settings for the lowest and highest speeds—besides, a real rotating speaker switches to either speed, and “glides” between the two settings as it changes from one to the other. An additional subtlety is that the high-frequency “speaker” needs to rotate just a little faster than the low-frequency one. Also, they shouldn’t track each other exactly when going from the slowest to the fastest speed because with a physical rotating speaker, the low-frequency drum has more inertia.
All these curves do complicate editing any automation, because you need to write-enable each parameter when you turn the knob. So if you need to change some automation moves you made, I recommend not trying to edit each curve—just try another performance with the knob.
Oh, and don’t forget to try this on instruments other than organ!
CLICK HERE TO DOWNLOAD!
Listen here:
Friday Tip: The Secret of Virtual Octave-Divider Bass
Seems simple enough, right? Copy the bass track, edit with Melodyne, and drop all those adorable little orange blobs down an octave. So you do that and… well, it just doesn’t sound all that impressive.
The secret to a great octave-divider bass sound is EQ. Insert a Pro EQ in the track you octave-divided with Melodyne, and edit the settings as shown in the screen shot. The goal is to remove most of the high frequencies that have pick and finger noises—we already have enough in the primary bass track, so adding more artifacts just clutters the sound.
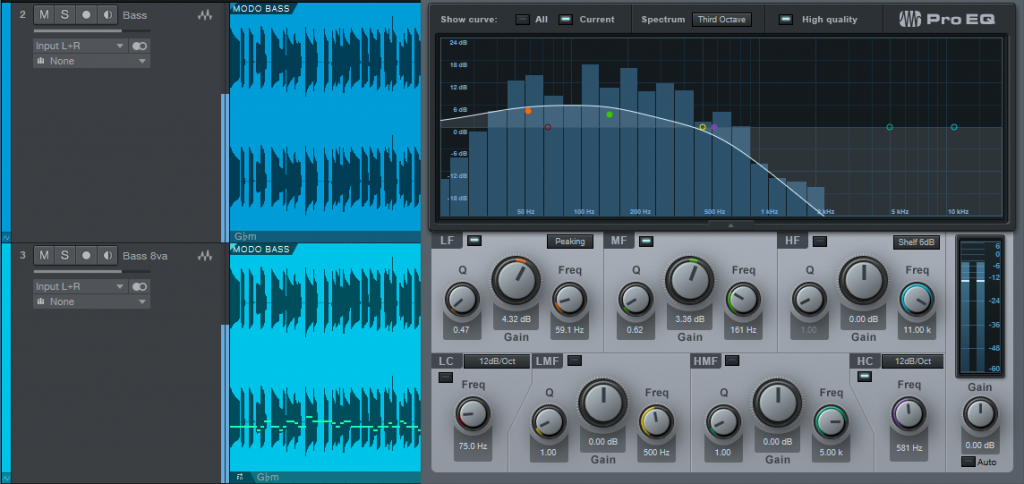
The screen shot shows a High Cut setting of about 600 Hz; you can take it down further, but when the frequency reaches about 200 Hz or so it sounds more like a synth sub-bass (not necessarily a bad thing, especially if you add a little limiting).
And that’s really all there is to it. When you bypass the EQ as a reality test, you’ll hear for yourself why EQ is indeed the secret of virtual octave-divider bass.
Friday Tip: Stereo to Virtual Mono
There are several ways to convert stereo into two mono tracks with Studio One (e.g., for processing the two channels separately, reversing one channel but not the other, etc.), but those ways can be somewhat convoluted. One simple way to convert a stereo track into mono involves going into the Browser, right-clicking on the track’s filename, and selecting Split to Mono Files. But if a track consists of multiple clips from multiple files, then you first need to bounce them to create a track—yet you might not want to bounce them until later. And you’re also creating additional files.
The approach in this tip doesn’t create true mono tracks, but it treats a stereo track as two different tracks that behave exactly like mono tracks—which is probably the desired goal anyway. This method also doesn’t create any additional files, and is non-destructive.
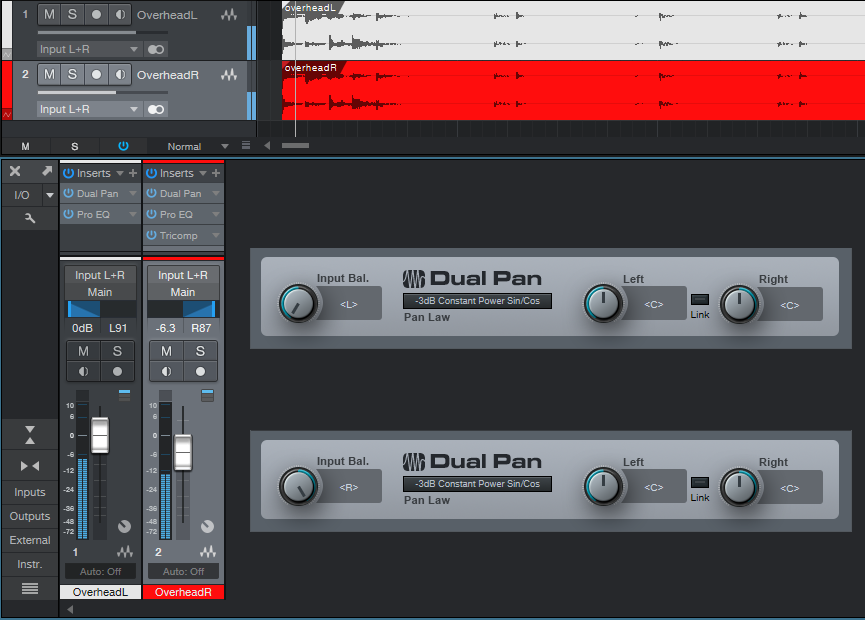
- Insert a Dual Pan into your stereo track. Set Input Balance to Left (fully counter-clockwise), and the Left and Right controls to Center.
- Select the track and choose Duplicate Track (Complete).
- In the duplicated track, set the Dual Pan Input Balance to Right (fully clockwise).
The original track becomes the left channel and the duplicated track, the right channel. Now you can process and pan each channel individually. To avoid confusion, rename one track so it includes the letter L, and the other so it includes the letter R. In the screen shot, the right track is red and the left track is white to follow the color scheme of RCA phono jack stereo connections in consumer electronics devices. Hey, why not?
Friday Tip: Pedal Power
Here’s a follow-up to last Friday’s tip on creating an authentic sounding wah with the Pro EQ. That’s fine, but what if you want to control it with a footpedal instead of a mouse? Keep reading.
First, you need a pedal that generates MIDI data. There are several options. Most keyboard controllers have an expression pedal input. Plug an expression pedal into this, and the controller will likely output controller 11 over MIDI. You may be able to assign this to a different controller number (see your hardware’s documentation); however, this probably won’t be necessary.
If you don’t have a keyboard (or floor multi-effects with a pedal that produces MIDI out), then check out the Pedal Controller, a small box from MIDI Solutions. This accepts an expression pedal input and outputs your choice of MIDI controllers. (For do-it-yourselfers, the circuit board is small enough you can probably mount it in a pedal if you want a stand-alone MIDI pedal.)
Assuming you’re using a keyboard with an expression pedal input, you now need to add the control surface to Studio One if you haven’t already. Call up the Options menu, and add the keyboard. Here, I’ve added The Laboratory controller from Arturia.
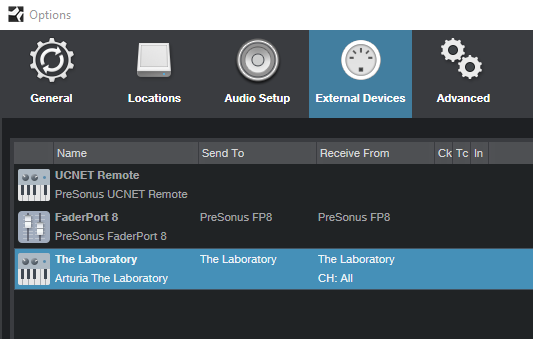
Next, you need to map the pedal. Go to the right-hand side of the Control Link menu and select the device to open the Device Control map. Note that The Laboratory is selected as the device.

If you can’t see the right section of the Control Link menu, then your monitor resolution is probably 1600 pixels wide or less. Another way to open the Device Control map is to open the Mix view [F3], and then click on External in the Console navigation column (to the far left of the Console). This opens the External panel; double-click on the desired device in the External panel.
Now click on the Device Control’s MIDI Learn button, and then move the footpedal. As if by magic, Control 1 appears, with its controller number assignment.
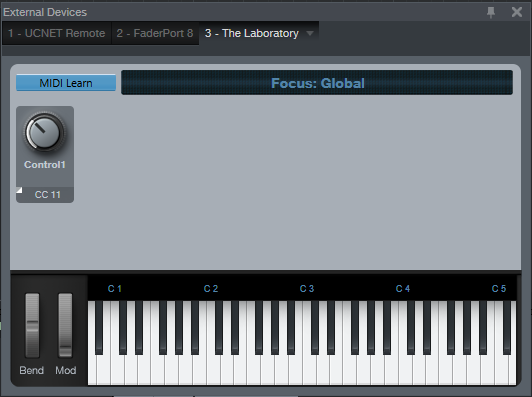
Now whenever you want something in Studio One to react to the footpedal, you just select Control 1. You can also rename this—perhaps not surprisingly, I changed Control 1 to Footpedal.
Now let’s suppose you want to control the Pro EQ Mid Frequency (Freq) control, which we used last week to vary the wah frequency. It’s simple:
- Vary the Freq control.
- Move the pedal.
- Right-click on the Freq knob.
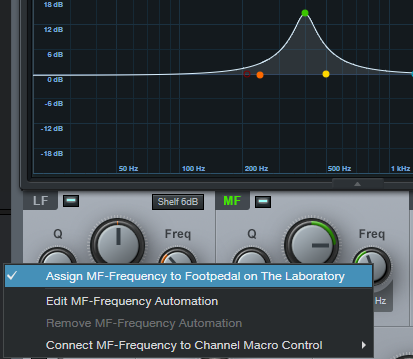
Now choose the desired assignment—in my case, “Assign MF-Frequency to Footpedal on the Laboratory.” Move the pedal, and it will change the frequency.
However, you probably don’t want the pedal to cover the full frequency range, but just a typical wah’s range so you have more precise control. We have a solution for that, too. Instead of right-clicking on the knob and assigning it to the footpedal, assign it to a Channel Macro Control, like Knob 1. Open up the Channel Editor, right-click on Knob 1, move the knob, next move the pedal, and then choose “Assign MF-Frequency to Footpedal on the Laboratory.” (By the way, you can assign pretty much everything in Studio One to a controller using the right-click + move controller + choose assignment protocol.)
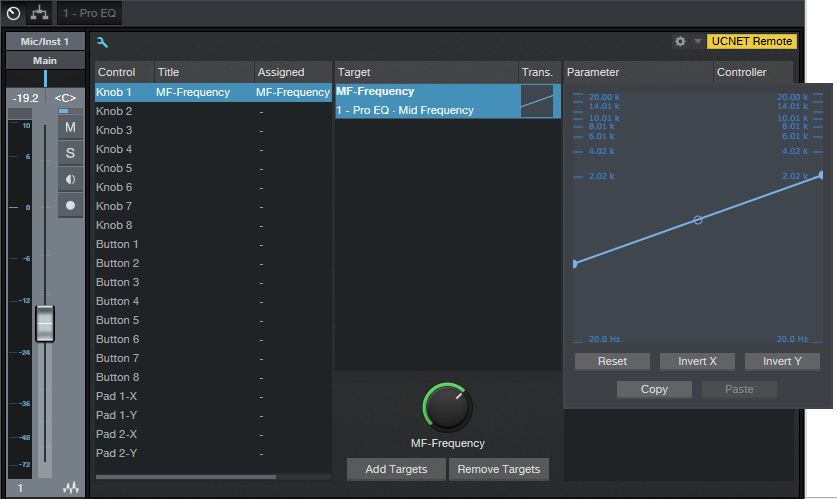
Now you can use the Transition settings graph to limit the pedal’s range. Alter the curve shape to a response you like—it doesn’t have to be linear—or even change the “sense” of the pedal travel so that pulling back on the pedal raises the wah frequency.
Once you’ve done this kind of assignment a few times, it will become second nature and you’ll be able to take advantage of pedal power for increased expressiveness. So put your foot down, get on the good foot, or put your best foot forward—the choice of clichés is yours!
Friday Tip—Vibrato in Studio One!
Vibrato is kind of the forgotten effect. It appeared briefly in Magnatone guitar amps many (many) decades ago, and some effects add it in a way that seems like an afterthought (“Hey, if we include a switch to turn off the dry signal in this flanger, then we’ll get vibrato!”). In fact it’s such a forgotten effect that when I use it on sustained sources like pads and power chords, people often want to know what “that cool new effect” is.
If a program doesn’t have a vibrato plug-in, the usual option is to trick a flanger or chorus into thinking it’s one. However, Studio One’s Flanger and Chorus are designed to give the lush sounds we associate with those effects, so it’s not possible to obtain true vibrato. However, there is a way to do vibrato with the Analog Delay.
The patch is quite simple. Here are the parameter settings.

Time (Beats section): Turn off sync, and enter 1.5 ms. This will delay the audio by 1.5 ms, but that’s only as much as moving your head 18 inches away from a speaker…I can cope.
Set Factor = 1.00, and Inertia = 0.00. Turn Low Cut and High Cut off. Set Feedback and Saturation to 0, and Mix to 100%.
Mod controls the vibrato depth. A maximum of about 37% works for me. If the depth isn’t enough, then enter 2 or 3 ms for the Time parameter. You’ll want the Sine waveform, but the LFO Beats control setting requires some explanation.
With Sync disabled, you can’t increase the LFO rate beyond 5 Hz. Although this will work as vibrato in some cases, generally, you’ll want to be able to go faster. No problem: Turn on Sync, and then you can obtain faster speeds by choosing faster sync values, like 1/8T or 1/16 at 120 BPM.
And that’s all there is to obtaining real vibrato effects with Studio One.