Tag Archives: Friday Tip of the Week
Friday Tip of the Week: Patterns: Not Just for EDM
Some people see “Pattern” and think “step sequencing—not useful for anything other than EDM.” This tip shows how to use Patterns in a rock drum context to add humanized percussion easily and effectively.
First, let’s subject ourselves to a 16th-note pattern of shaker hits, which is the kind of sound that shows why people don’t like step sequencers. Someone who would use this in a musical context is either not a nice person, or perhaps a pharmaceutical company executive who wants to increase sales of headache remedies.
Let’s start improving matters by copying the shaker to two more pads, and creating some sonic variations.
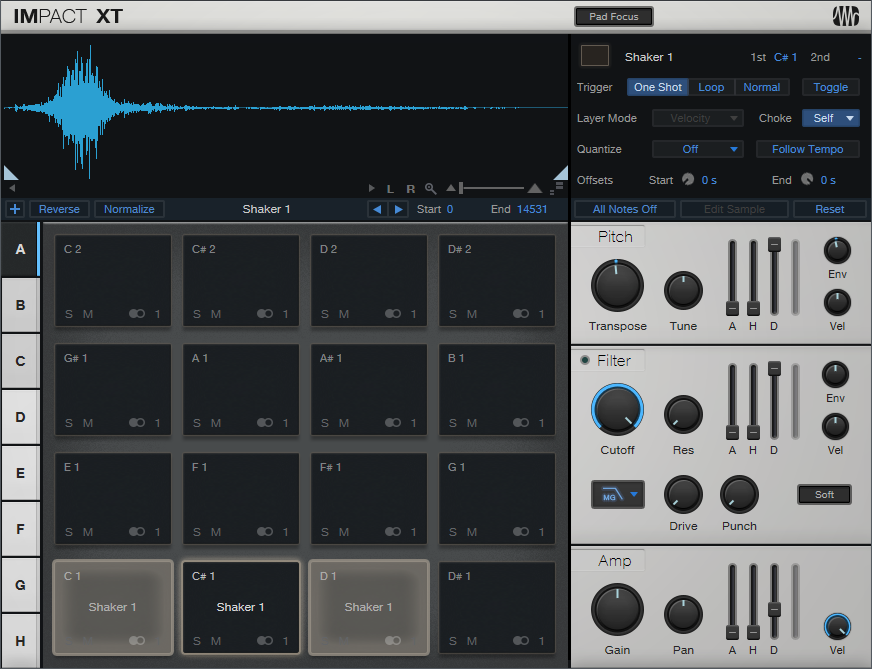
One copy is transposed down two semitones, and has a shorter decay. The other is transposed down three semitones. All three have slightly different filter settings. By alternating the different sounds, we have something that’s better. Well, at least slightly better.
Let’s make it a lot better. We’ll make sure the original shaker sound hits at maximum velocity on every beat to establish a rhythm.
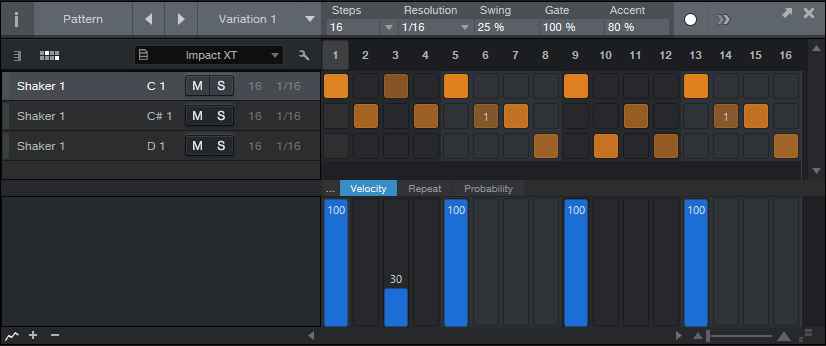
The second row uses a different shaker sound. Because this is a busier part, we’ll create some velocity variations.

Let’s also introduce some repeats so that two of the hits “stutter” a little bit.

However having repeats happen the same way every time doesn’t sound very realistic, and this is where the Pattern’s coolest feature (well, at least in my opinion) comes into play—Probability. The notes with repeats have a fairly low probability, so they’ll show up from time to time but not overstay their welcome. A few of the other notes have lower probability as well. Also, there’s some added swing—not only are Patterns not just for EDM, swing isn’t only for hip-hop.

Now we have a much more interesting shaker part.
If this is too inconsistent for you, it’s easy to make the velocity more similar, increase probabilities…whatever. And of course, we can create variations on these Patterns, make a few changes here and there, and have them sound similar yet different throughout the song.
Thankfully, Patterns don’t have to sound repetitive and boring…unless of course you want them to sound repetitive or boring. But that’s a whole other topic.
Friday Tip: The Customizable Phaser
Studio One’s Phaser is quite sophisticated, especially because you can set the number of stages from 2 to 20. This can emulate many classic phasers, as well as go beyond what was done with typical analog phase shifters. So why do we need yet another phase shifter?
As explained last week, a phaser’s response is like an EQ with multiple notches, because a pair of phase shift stages produces one notch. So for example, if you set Studio One’s Phaser to 8 stages, it produces four notches. The Customizable Phaser differs from standard phasers because every filter stage can be either a notch or peak, to any degree you want. Mixing resonant peaks in with notches produces a sound that recalls a phase shifter, but has a uniquely resonant quality.
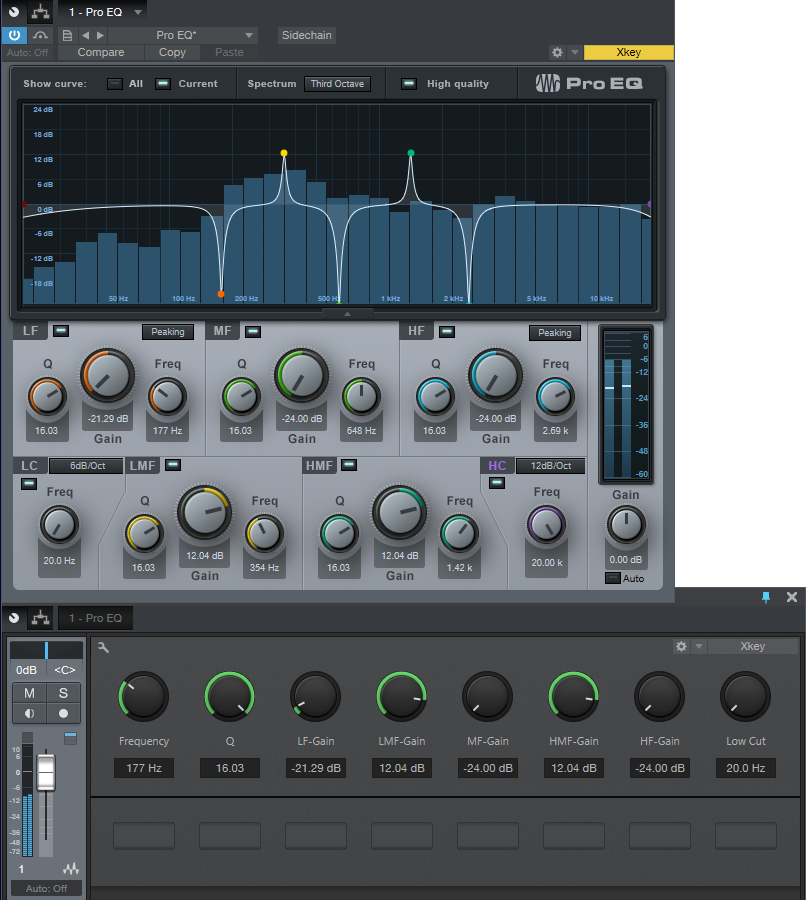
Again like last week, the Pro EQ is the star of the show. The five parametric stages are spaced an octave apart and cover a four-octave range. The trick is having a single Frequency control alter all five stages simultaneously… here’s how.
Creating the FX Chain
Although there’s a downloadable preset, delving into how this effect works is instructive. Mapping a control panel knob to a stage’s gain control is easy; open up the control panel to access the Macro Controls Mapping, and for the five Gain knobs, chose the respective Gain parameter as a target. I limited the knob’s range to -24 dB and +18 dB, because a +24 dB peak can be too much gain. After adjusting one knob as desired, copy the graph and paste it into the graph for the other knobs. Map Q similarly; a range of 4 to 16 works well.
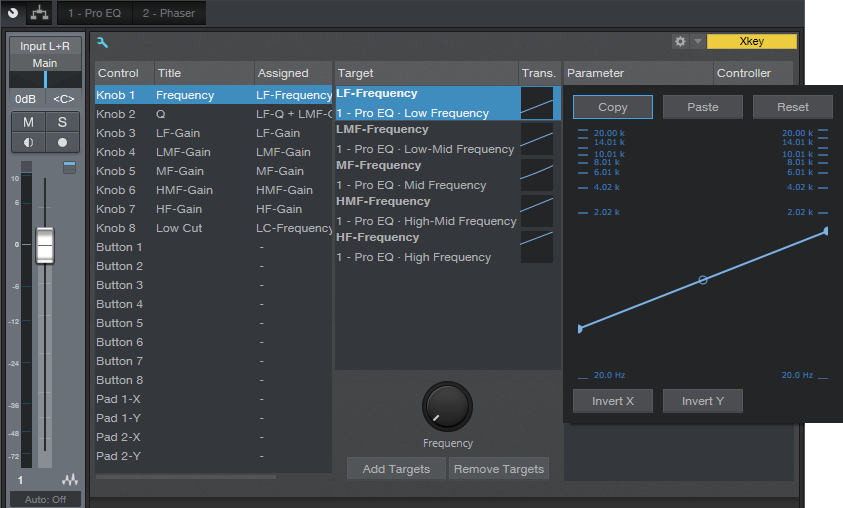
Mapping and offsetting multiple parameters from a single knob is a little more difficult. Start by pinning both the Pro EQ and the Macro Controls Mapping windows. I chose the initial frequencies for the five stages as 75, 150, 300, 600, and 1200 Hz. For the Knob 1 macro, add each stage’s Frequency control as a target.
Suppose you want to map the LF-Frequency target. Set the Frequency knob full counter-clockwise, click on the target’s graph, and while looking at the LF Freq knob on the Pro EQ, adjust the graph’s low node so that the LF Freq knob is at 75 Hz (or thereabouts). Now turn the Freq control fully clockwise, and set the graph’s high node four octaves higher (1.2 kHz) according to the LF Freq knob.
Proceed to the next filter Freq knob and use the same general procedure. For example for the LMF stage, the initial frequency would be 150 Hz, and the highest frequency would be 2.4 kHz. Continue mapping the remaining stages until all the filters cover the desired range when you move the Frequency control.
You’ll also note the Low Cut control is mapped to a knob that covers the range of 20 Hz to 1 kHz. Use this if the signal becomes too “boomy” with the frequency control set to a lower range.
In use
With all the Gain controls set to minimum and a fairly sharp Q, you have the equivalent of a 10-stage phaser. Now try increasing the LMF and HMF gains to around 8 or 9 dB—you’ll hear an immediate difference in the sound. Vary the Q for even more variations. You’ll find that between the Q and Gain controls, it’s possible to obtain phase-shifter sounds, but more importantly, you’ll be able to dial in combinations of resonant peaks and notches that aren’t quite like anything you’ve heard before. Ready for a new phase in phaser sounds? Check out this FX Chain.
Friday Tip of the Week: The Sparkler!
Sometimes it seems that certain recorded sounds, like acoustic guitar attacks and percussion, just don’t have the “sparkle” you hear when they’re playing live. The Sparkler is a sophisticated brightening FX Chain that adds definition—without treble equalization.
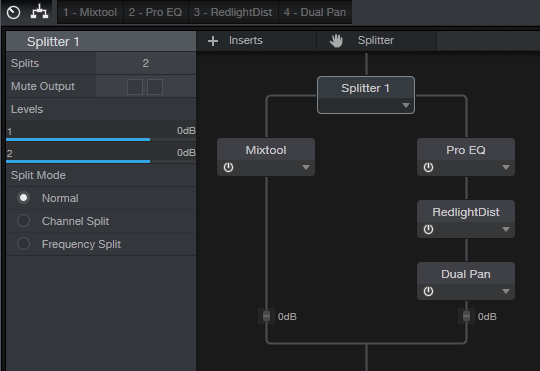
The Sparkler is a parallel effect. Referring to the FX Chain structure, a Splitter in normal mode creates a dry path through the Mixtool. This increases the level by 6 dB to compensate for the volume drop that occurs when bypassing an FX Chain where one of the splits contributes no significant level. The other split goes to the Sparkler effect, which consists of the Pro EQ, Redlight Dist, and Dual Pan.

How it works. First, the signal goes through the Pro EQ, set for a steep (48 dB/octave) high-pass filter that leaves only the very highest frequencies intact. The Low Cutoff control varies the cutoff from 7.6 kHz to 12.5 kHz. The Redlight Dist synthesizes harmonics from those high frequencies. (Even though it has a High Freq control, that’s not drastic enough a cutoff—hence the Pro EQ.) The Soft/Hard control chooses between 1 or 2 distortion stages; stage 1 is my preference because it sounds more natural, but people with anger management issues might prefer 2 stages, which gives a nastier, more aggressive sound.
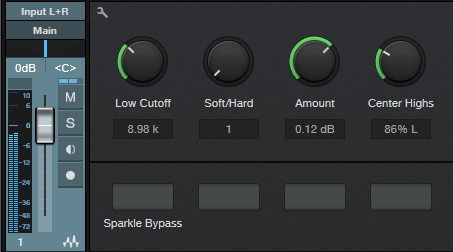
The Amount control sets the Redlight Dist output, which determines how much Sparkle gets added in parallel with the main signal. Use the Sparkle Bypass button to compare the sound with and without the Sparkle effect.
The reason for the Dual Pan module requires some explanation. The Sparkle FX Chain is intended for individual tracks, buses, and even master mixes when used subtly. Highs are very directional, so if with a bus or master there’s a trebly instrument mixed off to one side, like tambourine, the Sparkle effect can “tilt” the image toward the channel with more highs. The Center Highs control, when turned clockwise, brings the Left and Right “sparkle” channels more to center until when fully clockwise, the highs for both channels are centered.
Applying the Sparkle. To learn that the Sparkle effect does, it’s best to listen to the effect by itself and manipulate the controls to hear the results. Unfortunately you can’t assign FX Chain controls to Splitter parameters, so if you want to hear the Sparkle sound in isolation, go into the FX Chain and bring down the post-Mixtool level control all the way. As you tweak the Sparkle sound in isolation, grab only the highest audible frequencies, and avoid harsh distortion—you want just a hint of breakup, and only at the highest frequencies.
When using the Sparkle effect in context with a track of bus, start with the Amount control at minimum, and bring it up slowly. Use the Bypass button for a reality check—you want just a subtle brightening, not highs that hit you over the head and make dogs run away in panic. It takes a little effort to master what this effect can do, and it’s not something you want to use all the time. But when used properly, it can really add—well, sparkle—to tracks that need it.