Tag Archives: Craig Anderton
Craig Anderton’s Big Book Round-Up
If you’ve spent a couple of spare evenings at home poking around the web for tips on music and audio production, it’s really very likely that you’ve run into some posts, articles, or comments from Craig Anderton. In fact, you may have had to update your search criteria to sort by “most recent,” because it’s fairly common for Google to show you some Craig Anderton posts from the dawn of the internet age, which—while cool—may not be particularly full of insight on Studio One version 4.
Fact is Craig is our industry’s most acclaimed writers, and he’s spoken about Studio One in-person at more events than I can count, and is of course responsible for the Friday Tips section of this very blog. In short, Craig’s contributions to the success and proliferation of Studio One can’t really be counted.
But his Studio One books? Those can be counted. There are five.
We wanted to take a minute to thank Craig for all of his hard work, broadly-reaching creative output, and continued support of PreSonus and Studio One. Let’s take a closer look at what he’s got over at shop.presonus.com. Chances are one or more of these will prove valuable to you and your process. Note that these are eBooks, not hardcover books, and will be downloaded as PDFs.
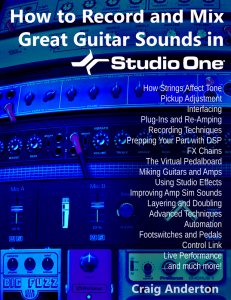
How to Record and Mix Great Guitar Sounds in Studio One
Essential reading for anyone who records guitars in Studio One, this definitive book covers invaluable production and engineering techniques.
- 274-page, beautifully-illustrated eBook is the fifth book in this acclaimed series of how to get the absolute most out of Studio One
- Covers all aspects of recording and mixing guitar, from how to choose the right strings for a particular tone, to advanced techniques that bring out the best in amp modeling plug-ins
- Applicable to all genres, from acoustic folk to heavy metal
- Links from contents page to topics—find specific subjects quickly
- Find out how to use DSP, effects, real-time control, and much more
 The Big Book of Studio One Tips and Tricks
Consolidates, updates, expands on, and categorizes 130 tips from Craig’s popular “Friday Tip of the Week” blog posts that you probably have been checking out right here. Essential reading. This massive book includes tips on how solve problems, enhance sound quality, improve workflow, achieve greater expressiveness, create signature sounds, and much more.
- 289 pages with 278 four-color illustrations to help streamline the learning process
- Includes 39 free presets (28 Multipresets, 10 Mai Tai presets, 1 Presence XT preset) that support the tips
 How to Create Compelling Mixes in Studio One
A comprehensive, practical, and above all inspiring guide on how to use Studio One’s sophisticated toolset to craft the perfect mix.
- 258-page eBook with over 180 four-color illustrations
- Downloadable PDF format, with links from the contents to book topics
- “Key Takeaways” section for each chapter summarizes chapter highlights
- “Tech Talk” sidebars do deep dives into selected topics
- Covers all aspects of mixing with Studio One
 More than Compressors: The Complete Guide to Dynamics in Studio One
The ultimate guide to becoming an expert on Studio One’s dynamics processors and dynamics-oriented features.
- 258-page eBook with over 180 four-color illustrations
- Downloadable PDF format, with links from the contents to book topics
- “Key Takeaways” section for each chapter summarizes chapter highlights
- “Tech Talk” sidebars do deep dives into selected topics
- Covers all aspects of mixing with Studio One
 How to Record and Mix Great Vocals in Studio One
The ultimate guide to capturing, producing, and mixing superb vocal performances in Studio One.
- Profusely illustrated, 121-page eBook
- Covers everything from microphones to the final mix
- Tips on creating compelling vocal performances
- Links from contents page to topics
- Filled with practical, real-world examples
SuperKick—Tune and Enhance Your Kick Drum
If you do hip-hop or EDM, you’re in the right place.
This tip turns wimpy kicks into superkicks, using a different technique compared to drum replacement (see the Friday Tip for February 9, 2018). Listen to the audio example, and you’ll hear why this is cool.
Audio Example: The second four measures add the SuperKick effect to the loop in the first four measures. The added kick is 40 Hz…so don’t expect to hear anything on laptop speakers!
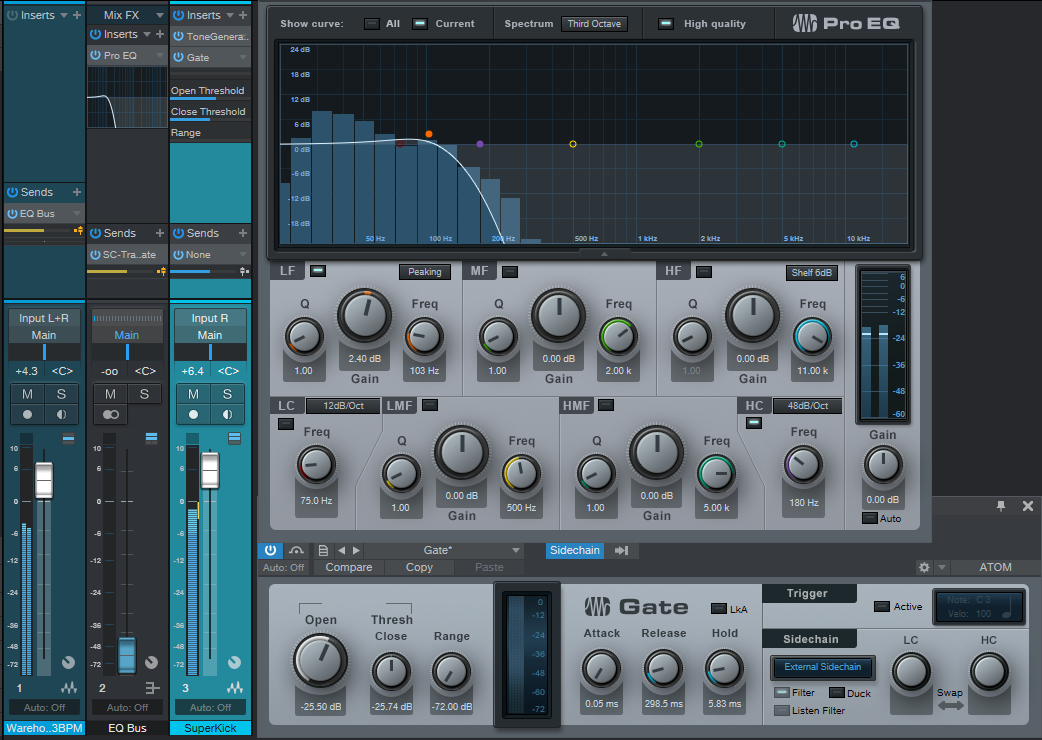
The basic concept is to add another track with a low-frequency sine wave, tuned to your pitch of choice. This can be a WAV file, but this example uses the highly-underrated, and extremely useful, Tone Generator plug-in set to a floor-shaking 40 Hz sine wave. A Bus “listens” to the loop, and uses EQ to filter out everything except the kick; you don’t hear this audio, but it gates the Tone Generator’s sine wave so that it tracks the kick. Fig. 1 shows the setup.
Figure 1: Setup to tune and enhance the kick in an existing loop.
- Track 1 is your drum loop; the audio example uses the Warehouse Tech Musicloop included in Studio One. Insert a pre-fader Send that goes to a Bus (named “EQ Bus” in this example). The reason for a pre-fader send is you’ll want to turn the Track fader down when tweaking the EQ and Gate responses covered later.
- Insert the Pro EQ into the EQ Bus. Tweak the response to filter out everything but the kick. The High Cut’s 48 dB/octave slope will probably do the job, although if there’s a lot of other bass action (like floor toms or bass) you may need to add an additional Peaking stage. Zero in on the kick’s lowest audible frequency, and apply a narrow boost.
- Add a Track, and insert the Tone Generator. Turn it on, then set it to produce a constant, low-frequency sine wave. Follow the tone Generator with a Gate.
- Add a pre-fader send from the EQ Bus to the Gate’s sidechain.
- To produce the most reliable triggering, the Gate settings and the Send level going to the Gate’s sidechain are crucial. Set the Threshold Close just slightly lower than the Open setting. Release determines how long the kick will last; 5 to 10 ms of hold minimizes “chattering.” Start by setting the Open and Threshold controls as shown, and adjust the Send to the sidechain for the most reliable triggering. If the kick tone doesn’t trigger, even with the Send to the sidechain turned up, lower the Open and Threshold close controls. If the kick tone stays on all the time, lower the Send level.
With the loop fader down so you’re not distracted, play with the Tone Generator frequency, EQ frequency to isolate the kick sound, and Gate settings until there’s reliable kick triggering. How you set the gate provides various options: extend the Release for a “hum drum” effect, or for more expressiveness, automate the release time. Increasing the Hold time alters the character as well.=
And after everything is set up…stand back while the floors shake!
The De-Stresser FX Chain
Feeling a little bit stressed?
I’m not surprised. Or do you ever have one of those days? Of course you do! Wouldn’t it be great to go down to the beach, listen to the waves for a while, and chill to those soothing sounds? The only problem for me is that going to the beach would involve a 7-hour drive.
Hence the De-Stresser FX Chain, which doesn’t sound exactly like the ocean—but emulates its desirable sonic effects. If you’re already stressed out, then you probably don’t want to take the time to assemble this chain, so feel free to go to the download link. Load the FX Chain into a channel, but note that you must enable input monitoring, because the sound source is the plug-in Tone Generator’s white noise option.
About the FX Chain
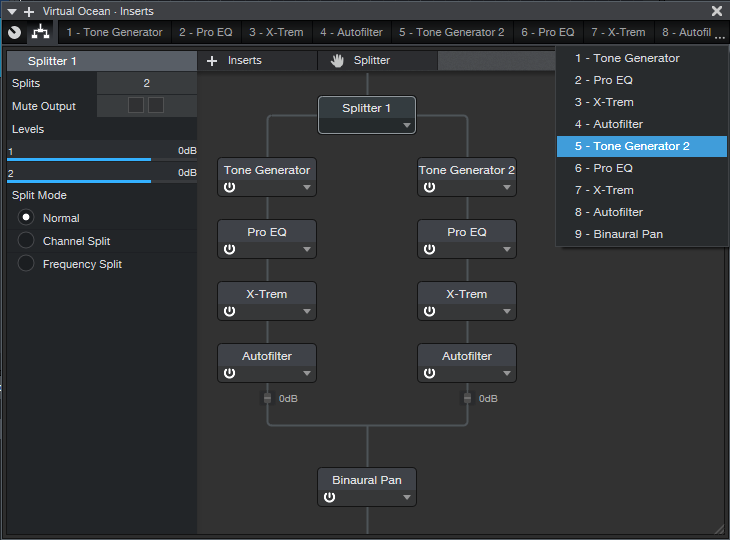
Figure 1: Effects used to create the De-Stresser’s virtual ocean.
Fig. 1 shows the FX Chain’s “block diagram.” The Splitter adds variety to the overall sound by feeding dual asynchronous “waves,” as generated by the X-Trems (set for tremolo mode). The X-Trem LFO’s lowest rate is 0.10 Hz; this should be slow enough, but for even slower waves, you can sync to tempo with a long note value, and set a really slow tempo.
Waves also have a little filtering as they break on the beach, which the Autofilters provide. The Pro EQs tailor the low- and high-frequency content to alter the waves’ apparent size and distance.
And of course, there’s the ever-popular Binaural Pan at the end. This helps create a more realistic stereo image when listening on headphones.
Macro Controls
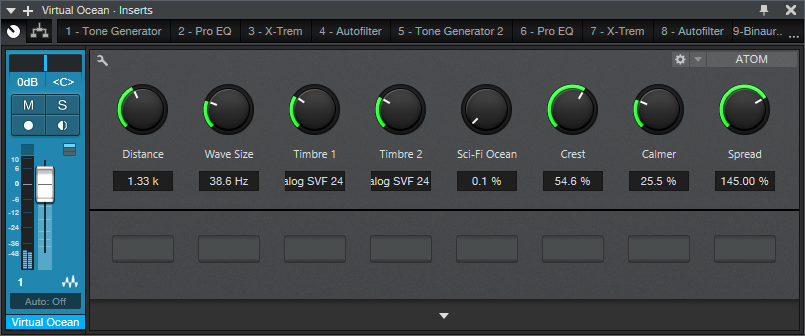
Figure 2: The Macro Controls panel.
Regarding the Macro Controls panel (Fig. 2), the two Timbre controls alter the filter type for the two Autofilters. This provides additional variety, so choose whichever filter type combination you prefer. Crest alters the X-Trem depth, so higher values increase the difference between the waves’ peaks and troughs.
The Sci-Fi Ocean control adds resonance to the filtering. This isn’t designed to enhance the realism, but it’s kinda fun. Another subtle sci-fi sound involves setting the two Timbre controls to the Comb response.
As you move further away from real waves, the sound has fewer high frequencies. So, Distance controls the Pro EQ HC (High Cut) filters. Similarly, Wave Size controls the LC filter, because bigger waves have more of a low-frequency component. The Calmer control varies the Autofilter mix; turning it up gives smaller, shallower waves.
When you want to relax, this makes a soothing background. Put on good headphones, and you can lose yourself in the sound. It also makes a relaxing environmental sound when played over speakers at a low level. If your computer has Bluetooth, and you have Bluetooth speakers, try playing this in the background at the end of a long day.
Son of the Beach
This is just one example of the kind of environmental sounds and effects you can make with Studio One, so let me know if this type of tip interests you. I’ve also done rain, rocket engines, howling gales, the engine room of an interstellar cargo ship, cosmic thuds, various soundscapes, and even backgrounds designed to encourage theta and delta brain waves. I made the last one originally for a friend of mine whose children had a hard time going to sleep, and burned it to CD. When I asked what he thought, he said “no one has ever heard how it ends.” So I guess it worked! Chalk up another unusual Studio One application.
Download the De-Stresser FX Chain here!
Into the Archives, Part 2
After last week’s thrilling cliff-hanger about how to preserve your WAV files for future generations, let’s look at how to export all your stereo audio tracks and have them incorporate effects processing, automation, level, and panning. There are several ways to do this; although you can drag files into a Browser folder, and choose Wave File with rendered Insert FX, Studio One’s feature to save stems is much easier and also includes any effects added by effects in Bus and FX Channels. (We’ll also look at how to archive Instrument tracks.)
Saving as stems, where you choose individual Tracks or Channels, makes archiving processed files a breeze. For archiving, I choose Tracks because they’re what I’ll want to bring in for a remix. For example, if you’re using an instrument where multiple outputs feed into a stereo mix, Channels will save the mix, but Tracks will render the individual Instrument sounds into their own tracks.
When you export everything as stems, and bring them back into an empty Song, playback will sound exactly like the Song whose stems you exported. However, note that saving as stems does not necessarily preserve the Song’s organization; for example, tracks inside a folder track are rendered as individual tracks, not as part of a folder. I find this preferable anyway. Also, if you just drag the tracks back into an empty song, they’ll be alphabetized by track name. If this is an issue, number each track in the desired order before exporting.
SAVING STEMS
Select Song > Export Stems. Choose whether you want to export what’s represented by Tracks in the Arrange view, or by Channels in the Console. Again, for archiving, I recommend Tracks (Fig. 1).
Figure 1: The Song > Export Stems option is your friend.
If there’s anything you don’t want to save, uncheck the box next to the track name. Muted tracks are unchecked by default, but if you check them, the tracks are exported properly, and open unmuted.
Note that if an audio track is being sent to effects in a Bus or FX Channel, the exported track will include any added effects. Basically, you’ll save whatever you would hear with Solo enabled. In the Arrange view, each track is soloed as it’s rendered, so you can monitor the archiving progress as it occurs.
In Part 1 on saving raw WAV files, we noted that different approaches required different amounts of storage space. Saving stems requires the most amount of storage space because it saves all tracks from start to end (or whatever area in the timeline you select), even if a track-only has a few seconds of audio in it. However, this also means that the tracks are suitable for importing into programs that don’t recognize Broadcast WAV Files. Start all tracks from the beginning of a song, or at least from the same start point, and they’ll all sync up properly.
WHAT ABOUT THE MAIN FADER SETTINGS?
Note that the tracks will be affected by your Main fader inserts and processing, including any volume automation that creates a fadeout. I don’t use processors in the Main channel inserts, because I reserve any stereo 2-track processing for the Project page (hey, it’s Studio One—we have the technology!). I’d recommend bypassing any Main channel effects, because if you’re going to use archived files for a remix, you probably don’t want to be locked in to any processing applied to the stereo mix. I also prefer to disable automation Read for volume levels, because the fade may need to last longer with a remix. Keep your options open.
However, the Main fader is useful if you try to save the stems and get an indication that clipping has occurred. Reduce the Main fader by slightly more than the amount of clipping (e.g., if the warning says a file was 1 dB over, lower the Main channel fader by -1.1 dB). Another option would be to isolate the track(s) causing the clipping and reduce their levels; but reducing the Main channel fader maintains the proportional level of the mixed tracks.
SAVING INSTRUMENT AUDIO
Saving an Instrument track as a stem automatically renders it into audio. While that’s very convenient, you have other options.
When you drag an Instrument track’s Event to the Browser, you can save it as a Standard MIDI File (.mid) or as a Musicloop feature (press Shift to select between the two). Think of a Musicloop, a unique Studio One feature, as an Instrument track “channel strip”—when you bring it back into a project, it creates a Channel in the mixer, includes any Insert effects, zeroes the Channel fader, and incorporates the soft synth so you can edit it. Of course, if you’re collaborating with someone who doesn’t have the same soft synth or insert effects, they won’t be available (that’s another reason to stay in the Studio One ecosystem when collaborating if at all possible). But, you’ll still have the note events in a track.
There are three cautions when exporting Instrument track Parts as Musicloops or MIDI files.
- The Instrument track Parts are exported as MIDI files, which aren’t (yet) time-stamped similarly to Broadcast WAV Files. Therefore, the first event starts at the song’s beginning, regardless of where it occurs in the Song.
- Mutes aren’t recognized, so the file you bring back will include any muted notes.
- If there are multiple Instrument Parts in a track, you can drag them into the Browser and save them as a Musicloop. However, this will save a Musicloop for each Part. You can bring them all into the same track, one a time, but then you have to place them properly. If you bring them all in at once, they’ll create as many Channels/Tracks as there are Instrument Parts, and all Parts will start at the Song’s beginning…not very friendly.
The bottom line: Before exporting an Instrument track as a Musicloop or MIDI file, I recommend deleting any muted Parts, selecting all Instrument Parts by typing G to create a single Part, then extending the Part’s start to the Song’s beginning (Fig. 2).
Figure 2: The bottom track has prepped the top track to make it stem-export-friendly.
You can make sure that Instrument tracks import into the Song in the desired placement, by using Transform to Audio Track. As mentioned above, it’s best to delete unmuted sections, and type G to make multiple Parts into a single Part. However, you don’t need to extend the track’s beginning.
- Right-click in the track’s header, and select Transform to Audio Track.
- Drag the resulting audio file into the Browser. Now, the file is a standard Broadcast WAV Format file.
- When you drag the file into a Song, select it and choose Edit > Move to Origin to place it properly on the timeline.
However, unlike a Musicloop, this is only an audio file. When you bring it into a song, the resulting Channel does not include the soft synth, insert effects, etc.
Finally…it’s a good idea to save any presets used in your various virtual instruments into the same folder as your archived tracks. You never know…right?
And now you know how to archive your Songs. Next week, we’ll get back to Fun Stuff.
Safety First: Into the Archives, Part 1
I admit it. This is a truly boring topic.
You’re forgiven if you scoot down to something more interesting in this blog, but here’s the deal. I always archive finished projects, because remixing older projects can sometimes give them a second life—for example, I’ve stripped vocals from some songs, and remixed the instrument tracks for video backgrounds. Some have been remixed for other purposes. Some really ancient songs have been remixed because I know more than I did when I mixed them originally.
You can archive to hard drives, SSDs, the cloud…your choice. I prefer Blu-Ray optical media, because it’s more robust than conventional DVDs, has a rated minimum shelf life that will outlive me (at which point my kid can use the discs as coasters), and can be stored in a bank’s safe deposit box.
Superficially, archiving may seem to be the same process as collaboration, because you’re exporting tracks. However, collaboration often occurs during the recording process, and may involve exporting stems—a single track that contains a submix of drums, background vocals, or whatever. Archiving occurs after a song is complete, finished, and mixed. This matters for dealing with details like Event FX and instruments with multiple outputs. By the time I’m doing a final mix, Event FX (and Melodyne pitch correction, which is treated like an Event FX) have been rendered into a file, because I want those edits to be permanent. When collaborating, you might want to not render these edits, in case your collaborator has different ideas of how a track should sound.
With multiple-output instruments, while recording I’m fine with having all the outputs appear over a single channel—but for the final mix, I want each output to be on its own channel for individual processing. Similarly, I want tracks in a Folder track to be exposed and archived individually, not submixed.
So, it’s important to consider why you want to archive, and what you will need in the future. My biggest problem when trying to open really old songs is that some plug-ins may no longer be functional, due to OS incompatibilities, not being installed, being replaced with an update that doesn’t load automatically in place of an older version, different preset formats, etc. Another problem may be some glitch or issue in the audio itself, at which point I need a raw, unprocessed file for fixing the issue before re-applying the processing.
Because I can’t predict exactly what I’ll need years into the future, I have three different archives.
- Save the Studio One Song using Save To a New Folder. This saves only what’s actually used in the Song, not the extraneous files accumulated during the recording process, which will likely trim quite a bit of storage space compared to the original recording. This will be all that many people need, and hopefully, when you open the Song in the future everything will load and sound exactly as it did when it was finished. That means you won’t need to delve into the next two archive options.
- Save each track as a rendered audio WAV file with all the processing added by Studio One (effects, levels, and automation). I put these into a folder called Processed Tracks. Bringing them back into a Song sounds just like the original. They’re useful if in the future, the Song used third-party plug-ins that are no longer compatible or installed—you’ll still have the original track’s sound available.
- Save each track as a raw WAV file. These go into a folder named Raw Tracks. When remixing, you need raw tracks if different processing, fixes, or automation is required. You can also mix and match these with the rendered files—for example, maybe all the rendered virtual instruments are great, but you want different vocal processing.
Exporting Raw Wave Files
In this week’s tip, we’ll look at exporting raw WAV files. We’ll cover exporting files with processing (effects and automation), and exporting virtual instruments as audio, in next week’s tip.
Studio One’s audio files use the Broadcast Wave Format. This format time-stamps a file with its location on the timeline. When using any of the options we’ll describe, raw (unprocessed) audio files are saved with the following characteristics:
- No fader position or panning (files are pre-fader)
- No processing or automation
- Raw files incorporate Event envelopes (i.e., Event gain and fades) as well as any unrendered Event FX, including Melodyne
- Muted Events are saved as silence
Important: When you drag Broadcast WAV Files back into an empty Song, they won’t be aligned to their time stamp. You need to select them all, and choose Edit > Move to Origin.
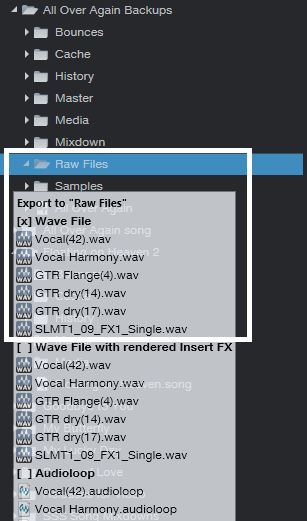
The easiest way to save files is by dragging them into a Browser folder. When the files hover over the Browser folder (Fig. 1), select one of three options—Wave File, Wave File with rendered Insert FX, or Audioloop—by cycling through the three options with the QWERTY keyboard’s Shift key. We’ll be archiving raw WAV files, so choose Wave File for the options we’re covering.
Figure 1: The three file options available when dragging to a folder in the Browser are Wave File, Wave File with rendered Insert FX, or Audioloop.
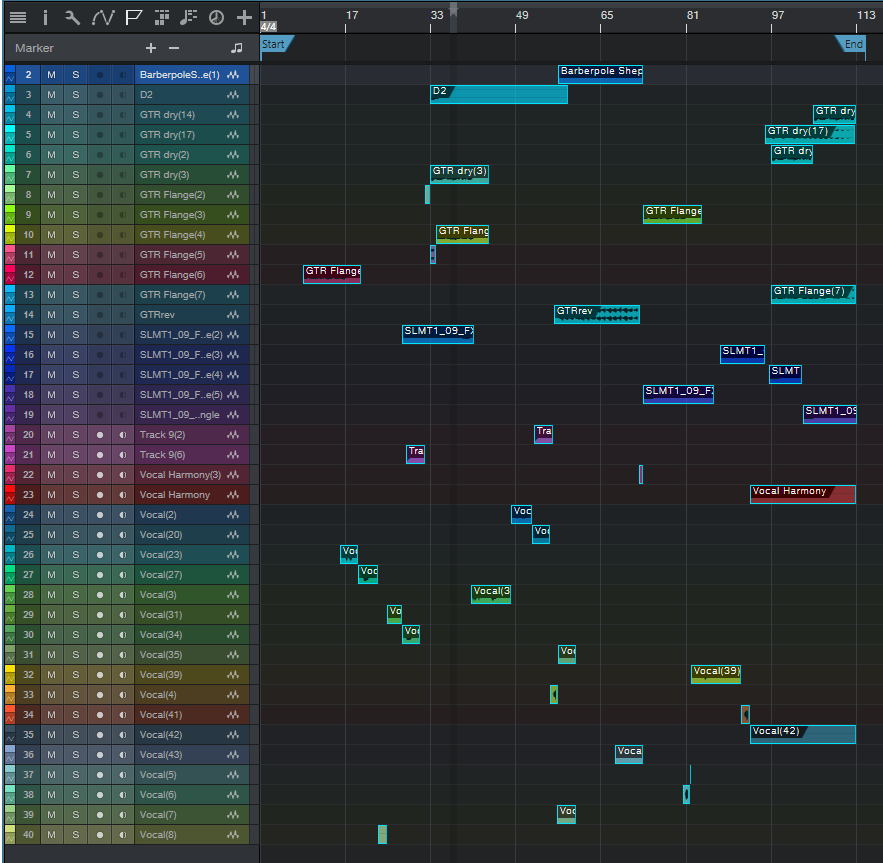
As an example, Fig. 2 shows the basic Song we’ll be archiving. Note that there are multiple Events, and they’re non-contiguous—they’ve been split, muted, etc.
Figure 2: This shows the Events in the Song being archived, for comparison with how they look when saving, or reloading into an empty Song.
Option 1: Fast to prepare, takes up the least storage space, but is a hassle to re-load into an empty Song.
Select all the audio Events in your Song, and then drag them into the Browser’s Raw Tracks folder you created (or whatever you named it). The files take up minimal storage space, because nothing is saved that isn’t data in a Song. However, I don’t recommend this option, because when you drag the stored Events back into a Song, each Event ends up on its own track (Fig. 3). So if a Song has 60 different Events, you’ll have 60 tracks. It takes time to consolidate all the original track Events into their original tracks, and then delete the empty tracks that result from moving so many Events into individual tracks.
Figure 3: These files have all been moved to their origin, so they line up properly on the timeline. However, exporting all audio Events as WAV files makes it time-consuming to reconstruct a Song, especially if the tracks were named ambiguously.
Option 2: Takes more time to prepare, takes up more storage space, but is much easier to load into an empty Song.
- Select the Events in one audio track, and type Ctrl+B to join them together into a single Event in the track. If this causes clipping, you’ll need to reduce the Event gain by the amount that the level is over 0. Repeat this for the other audio tracks.
- Joining each track creates Events that start at the first Event’s start, and end at the last Event’s end. This uses more memory than Option 1 because if two Events are separated by an empty space of several measures, converting them into a single Event now includes the formerly empty space as track data (Fig. 4).
Figure 4: Before archiving, the Events in individual tracks have now been joined into a single track Event by selecting the track’s Events, and typing Ctrl+B.
- Select all the files, and drag them to your “Raw Tracks” folder with the Wave File option selected.
After dragging the files back into an empty Song, select all the files, and then after choosing Edit > Move to Origin, all the files will line up according to their time stamps, and look like they did in Fig. 4. Compare this to Fig. 3, where the individual, non-bounced Events were exported.
Option 3: Universal, fast to prepare, but takes up the most storage space.
When collaborating with someone whose program can’t read Broadcast WAV Files, all imported audio files need to start at the beginning of the Song so that after importing, they’re synched on the timeline. For collaborations it’s more likely you’ll export Stems, as we’ll cover in Part 2, but sometimes the following file type is handy to have around.
- Make sure that at least one audio Event starts at the beginning of the song. If there isn’t one, use the Pencil tool to draw in a blank Event (of any length) that starts at the beginning of any track.
Figure 5: All tracks now consist of a single Event, which starts at the Song’s beginning.
- Select all the Events in all audio tracks, and type Ctrl+B. This bounces all the Events within a track into a single track, extends each track’s beginning to the beginning of the first audio Event, and extends each track’s end to the end of the longest track (Fig. 5). Because the first Event is at the Song’s beginning, all tracks start at the Song’s beginning.
- Select all the Events, and drag them into the Browser’s Raw Tracks folder (again, using the Wave File option).
When you bring them back into an empty Song, they look like Fig. 5. Extending all audio tracks to the beginning and end is why they take up more memory than the previous options. Note that you will probably need to include the tempo when exchanging files with someone using a different program.
To give a rough idea of the memory differences among the three options, here are the results based on a typical song.
Option 1: 302 MB
Option 2: 407 MB
Option 3: 656 MB
You’re not asleep yet? Cool!! In Part 2, we’ll take this further, and conclude the archiving process.
Add Studio One to your workflow today and save 30%!
How to Obtain the Perfect Fadeout
For most song fadeouts, I prefer an S-shaped fade.
It’s also great with audio-for-video productions because I usually use an S-fade for the video, so matching that with an equivalent audio fade works well. Although the Project Page allows only logarithmic or exponential fades for the clips that represent mixed songs, there’s nonetheless an easy way to add S-shaped fades to the Project Page’s songs.
This technique involves adding an S-fade during the final stages of mixing in the Song Page, and then updating the mastering file so that the Project Page version incorporates the fade.
- Add an Automation track.
- Assign it to the Main Volume (Fig. 1). If there’s already automation for the Main volume, no problem; you can still add the S-fade, as described next.
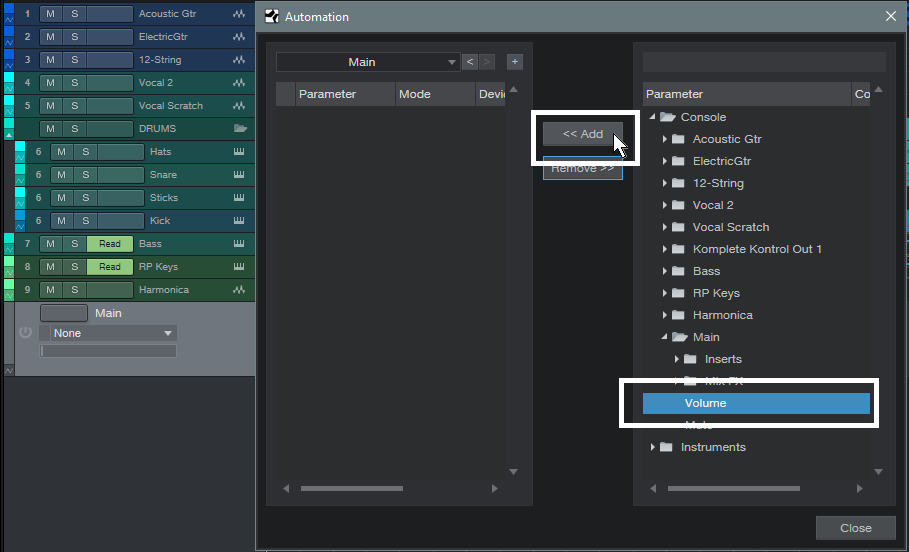
Figure 1: Create an automation track, and assign it to the Console’s Main Volume parameter.
- Add nodes on the automation envelope where you want the fade to start and where you want it to end, as well as a node exactly in the middle of those two nodes (Fig. 2).
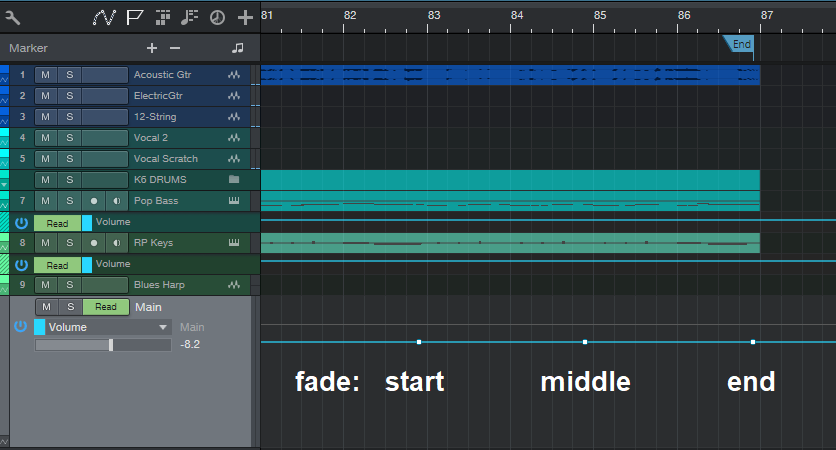
Figure 2: Adds nodes at the fade’s intended start, middle, and end.
- Drag the end node all the way to the minimum level, which is the end of the fadeout.
- Drag the middle node to halfway between the start and end node levels.
- Drag the line between the start and middle nodes upward, to create a logarithmic fade.
- Drag the line between the middle and end nodes downward, to create an exponential fade down to the fadeout’s minimum level (Fig. 3).

Figure 3: How to drag the nodes, and adjust their curves, for an S-shape fade.
And there you have it—an S-shaped fadeout. What’s more, unlike programs with a fixed S-shape fade, you can alter the shape for the first and second curves. For example, maybe you want a fairly quick fade out at first but then extend the final fade.
After creating the fade, now all you need to do is update your mastering file, and the song in the Project Page will incorporate your perfect, S-shaped fade.
Before signing off this week, I wanted to mention there’s a new Studio One eBook out—How to Record and Mix Great Guitar Sounds in Studio One. It’s 274 pages and covers everything from how strings and pickups affect tone to getting the most out of the latest Ampire version (and a whole lot more). You can preview the table of contents here.
Tremolo: Why Be Normal?
Tremolo (not to be confused with vibrato, which is what Fender amps call tremolo), was big in the 50s and 60s, especially in surf music—so it has a pretty stereotyped sound. But why be normal? Studio One’s X-Trem goes beyond what antique tremolos did, so this week’s Friday Tip delves into the cool rhythmic effects that X-Trem can create.
TREMOLOS IN SERIES
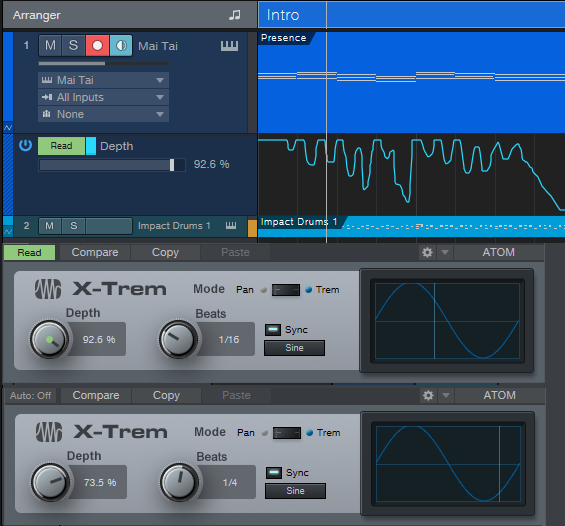
The biggest improvement in today’s tremolos is the sync-to-tempo function. One of my favorite techniques for EDM-type music is to insert two tremolos in series (Fig. 1).
Figure 1: These effects provide the sound in Audio Example 1. Note the automation track, which is varying the first X-Trem’s Depth parameter.
The first X-Trem runs at a fast rate, like 1/16th notes. Square wave modulation works well for this if you want a “chopped” sound, but I usually prefer sine waves, because they give a smoother, more pulsing effect. The second X-Trem runs at a slower rate. For example, if it syncs to half-notes, X-Trem lets through a string of pulses for a half-note, then attenuates the pulses for the next half-note. Using a sine wave for the second tremolo gives a rhythmic, pulsing sound that’s effective on big synth chords—check out the audio example.
BUILD YOUR OWN WAVEFORM
X-Trem’s waveforms are the usual suspects: Triangle, Sine, Upward Sawtooth, and Square. But what if you want a downward sawtooth, a more exponential wave (Fig. 2), or an entirely off-the-wall waveform?
Figure 2: Let’s have a big cheer for X-Trem’s 16 Steps option.
This is where the 16 Steps option becomes the star (Fig. 2) because you can draw pretty much any waveform you want. It’s a particularly effective technique with longer notes because you can hear the changes distinctly.
But for me, the coolest part is X-Trem’s “Etch-a-Sketch” mode, because you can automate each step individually, choose X-Trem’s Automation Write, and go crazy. Just unfold X-Trem’s automation options, choose all the steps, add them to the track’s automation, and draw away (Fig. 3).
Figure 3: Drawing automated step changes in real-time takes X-Trem beyond “why be normal” into something that may be illegal in some states.
Of course, if you just draw kind of randomly, then really, all you’re doing is level automation. Where this option really comes into its own is when you have a basic waveform for one section, change a few steps in a different section and let that repeat, draw a different waveform for another section and let that repeat, and so on. Another application is trying out different waveforms as a song plays, and capturing the results as automation. If you particularly like a pattern, cut and paste the automation to use it repetitively.
And just think, we haven’t even gotten into X-Trem’s panning mode—similarly to its overachieving tremolo functions, the panning can do a lot more than just audio ping-pong effects. Hmmm…seems like another Friday Tip might be in order.
The “Double-Decker” Pre-Main Bus
This Friday tip has multiple applications—consider the following scenarios.
You like to mix with mastering processors in the Main bus to approximate the eventual mastered sound, but ultimately, you want to add (or update) an unprocessed file for serious mastering in the Project page. However, reality checks are tough. When you disable the master bus processors so you can hear the unprocessed sound you’ll be exporting, the level will usually change. So then you have to re-balance the levels, but you might not get them quite to where they were. And unfortunately, one of the biggest enemies of consistent mixing and mastering is varying monitoring levels. (Shameless plug alert: my book How to Create Compelling Mixes in Studio One, which is also available in Spanish, tells how to obtain consistent levels when mixing.)
Or, suppose you want to use the Tricomp or a similar “maximizing” program in the master bus. Although these can make a mix “pop,” there may be an unfair advantage if they make the music louder—after all, our brains tend to think that “louder is better.” The only way to get a realistic idea of how much difference the processor really makes is if you balance the processed and unprocessed levels so they’re the same.
Or, maybe you use the cool Sonarworks program to flatten your headphone or speaker’s response, so you can do more translatable mixes. But Sonarworks should be enabled only when monitoring; you don’t want to export a file with a correction curve applied. Bypassing the Sonarworks plug-in when updating the Project page, or exporting a master file, is essential. But in the heat of the creative moment, you might forget to do that, and then need to re-export.
THE “DOUBLE-DECKER,” PRE-MAIN BUS SOLUTION
The Pre-Main bus essentially doubles up the Main bus, to create an alternate destination for all your channels. The Pre-Main bus, whose output feeds the Main bus, serves as a “sandbox” for the Main bus. You can insert whatever processors you want into the Pre-Main bus for monitoring, without affecting what’s ultimately exported from the Main bus.
Here’s how it works.
- Create a bus, and call it the Pre-Main bus.
- In the Pre-Main bus’s output field just above the pan slider, assign the bus output to the Main bus. If you don’t see the output field, raise the channel’s height until the output field appears.
- Insert the Level Meter plug-in in the Main bus. We’ll use this for LUFS level comparisons (check out the blog post Easy Level Matching, or the section on LUFS in my mixing book, as to why this matters).
Figure 1: The Pre-Main bus, outlined in white, has the Tricomp and Sonarworks plug-ins inserted. Note that all the channels have their outputs assigned to the Pre-Main bus.
- Insert the mastering processors in the Pre-Main bus that you want to use while monitoring. Fig. 1 shows the Pre-Main bus with the Tricomp and Sonarworks plug-ins inserted.
- Select all your channels. An easy way to do this is to click on the first channel in the Channel List, then shift+click on the last channel in the list. Or, click on the channel to the immediate left of the Main channel, and then shift+click on the first mixer channel.
With all channels selected, changing the output field for one channel changes the output field for all channels. Assign the outputs to the Main bus, play some music, and look at the Level Meter to check the LUFS reading.
Now assign the channel outputs to the Pre-Main bus. Again, observe the Level Meter in the Master bus. Adjust the Pre-Main bus’s level for the best level match when switching the output fields between the Main and Pre-Main bus. By matching the levels, you can be sure you’re listening to a fair comparison of the processed audio (the Pre-Main bus) and the unprocessed audio that will be exported from the Main bus.
The only caution is that when all your channels are selected, if you change a channel’s fader, the faders for all the channels will change. Sometimes, this is a good thing—if you experience “fader level creep” while mixing, instead of lowering the master fader, you can lower the channel levels. But you also need to be careful not to reflexively adjust a channel’s level, and end up adjusting all of them by mistake. Remember to click on the channel whose fader you want to adjust, before doing any editing.
Doubling up the Main bus can be really convenient when mixing—check it out when you want to audition processors in the master bus, but also, be able to do a quick reality check with the unprocessed sound to find out the difference any processors really make to the overall output.
Acknowledgement: Thanks to Steve Cook, who devised a similar technique to accommodate using Sonarworks in Cakewalk, for providing the inspiration for this post.
Melodic Percussion
This week’s tip shows how to augment percussion parts by making them melodic—courtesy of Harmonic Editing.
The basic idea is that setting a white or pink noise track to follow the chord track gives the noise a sense of pitch. Although having a long track of noise isn’t very interesting, if we gate it with a percussion part, then now we’ve layered the percussion part’s rhythm with the tonality of the noise. Add a little dotted 8th note echo, and it can sound pretty cool.
Step 1: Bring on the Noise
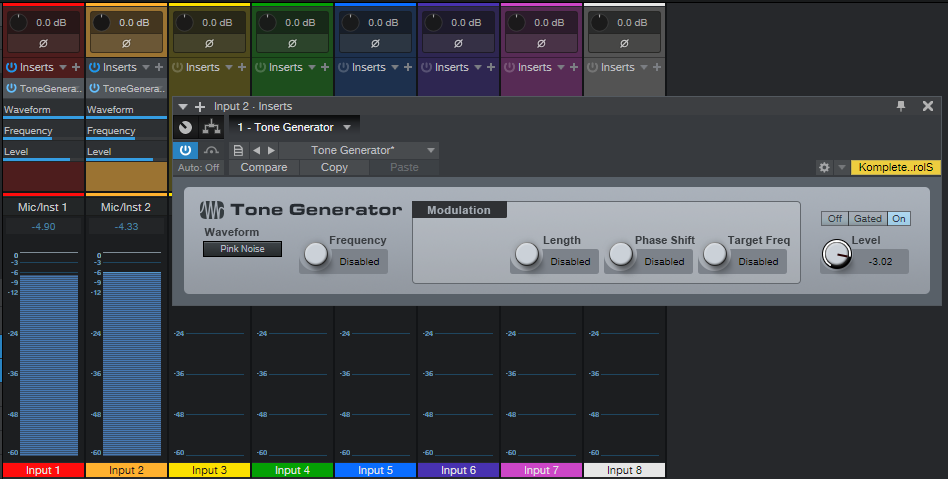
Noise needs to be recorded in a track to be affected by harmonic editing, so open up the mixer’s Input section, and insert a Tone Generator effect in tracks 1 and 2. Set the Tone Generator to Pink Noise, and trim the level so it’s not slamming up against 0 (Fig. 1).
Figure 1: We need noise in each channel to implement this technique.
Record-enable both tracks (set them to Mono channel mode), enable Input Monitor, and start recording noise into the tracks. The reason for recording into two tracks is we want to end up with stereo noise, so the tracks can’t be identical.
Step 2: Make the Noise Stereo
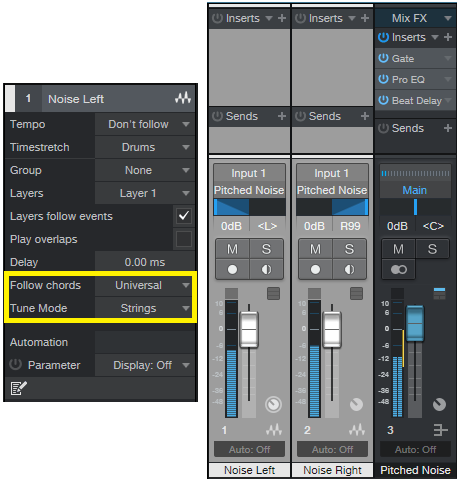
Now that the noise is recorded, you can remove the Tone Generator effects from the track inputs. At the mixer, pan one channel of noise left, and one right. In each track’s Inspector, choose Universal Mode for Follow Chords, and Strings for Tune mode (Fig. 2).
Figure 2: How to set up the tracks for stereo noise. The crucial Inspector settings are outlined in yellow.
Set each track’s output to a Bus, and now we have stereo noise at the Bus output. Insert a Gate in the Bus, and any other effects you want to use (I insert a Pro EQ to trim the highs and lows somewhat, and a Beat Delay for a more EDM-like vibe—but use your imagination).
Step 3: Control the Gate’s Sidechain
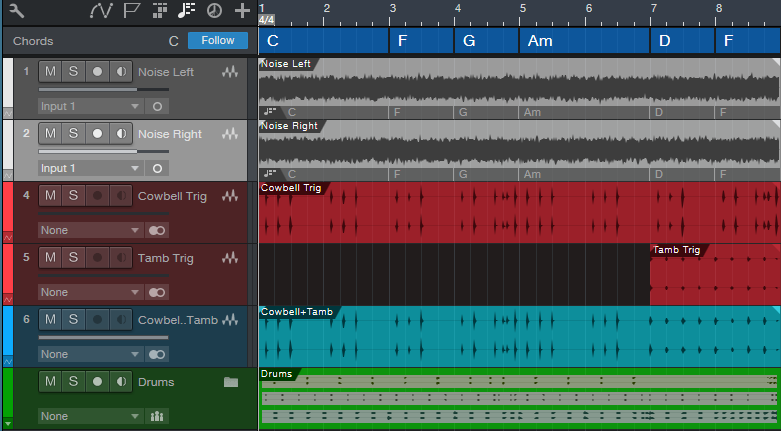
Choose the percussion sound with which you want to control the Gate sidechain, insert a pre-fader send in the percussion track, assign the send to the Gate, and then adjust the Gate parameters so that the percussion track modulates the noise percussively. Fig. 3 shows the track setup.
Figure 3: Track layout used in the audio example.
Tracks 1 and 2 are the mono noise tracks that follow the Chord Track, and feed the Bus. Tracks 4 and 5 both have pre-fader sends to control the Gate, so that for the first 7 measures only the cowbell controls the gate, but at measure 8, a tambourine part also modulates the Gate.
Track 6 has the cowbell and tambourine audio, which is mixed in with the pitched noise, while the folder track has the kick, snare, and hi-hat loops. (The reason for not using post-fader sends on the percussion tracks is so that the tracks controlling the Gate are independent of the audio, which you might want to process differently.)
But Wait…There’s More!
With a longer gate, the sound is almost like the rave organ sound that was so big at the turn of the century. And there are options other than gating, like using X-Trem…or following the Gate with X-Trem. Or draw a periodic automation level waveform for the bus, and use the Transform function to make everything even weirder. In any case, now you have a new, and unusual tool, for percussive accents.
Keyboard Meets Power Chords
Hey keyboard players!
Do you feel kind of left out because of the cool guitar amps that Studio One added in version 4.6? Well, this week’s tip is all about having fun, and bringing power chord mentality to keyboard, courtesy of those State Space amps. Listen to the audio example, and you’ll hear what I’m talking about.
And so you can get started having fun, you don’t even have to learn what’s going on to get that sound you just heard. Download Power Chordz.instrument, drag it into the track column, feed it from your favorite MIDI keyboard, and start playing.
Now, I know some of you prefer just to download a preset and get on with your life, and that’s fine—but for those who want some reverse engineering, here’s what’s under the hood.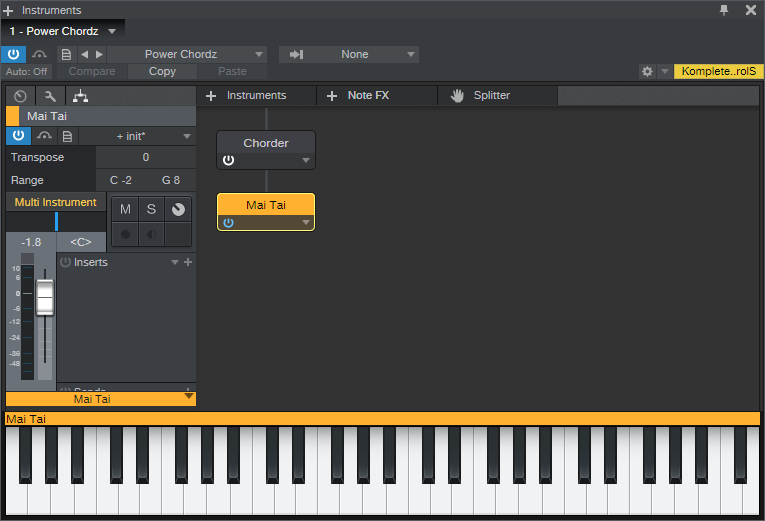
Figure 1: The Multi-Instrument is pretty basic—it just bundles a Chorder Note FX and Mai Tai together.
The preset starts with a Multi-Instrument (Fig. 1) that consists of the Chorder Note FX, and Mai Tai synthesizer. The Chorder plays tonic, fifth above, an octave above, octave+fifth above, and two octaves above when you hit a keyboard key—your basic “it’s not major, and it’s not minor” type of power chord.
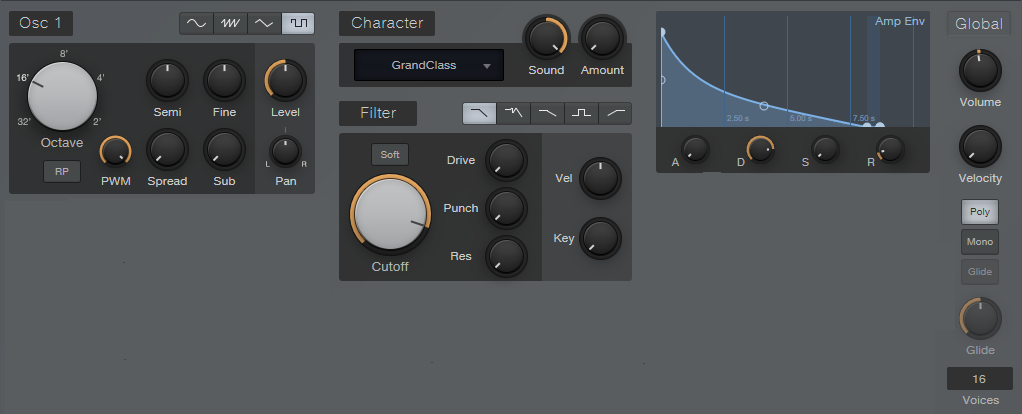
The Mai Tai uses a super-simple variation on the Init preset. In Fig. 2, anything that’s not relevant is grayed out. Turn off Osc 2, Noise, LFO 1, and LFO 2. There’s no modulation other than pitch bend, and no FX. Envelope 2 and Envelope 3 aren’t used. I set Pitch Bend to 7 semitones to do whammy bar effects, but adjust to taste. Also, you might want to play around with the Quality parameter. I’m allergic to anything called “normal,” so if you are as well, try the 80s, High, and Supreme settings to see if you like one of those better.
Figure 2: The Mai Tai preset uses simple waveforms, which is what you want when feeding amp sims and other distortion-oriented plug-ins.
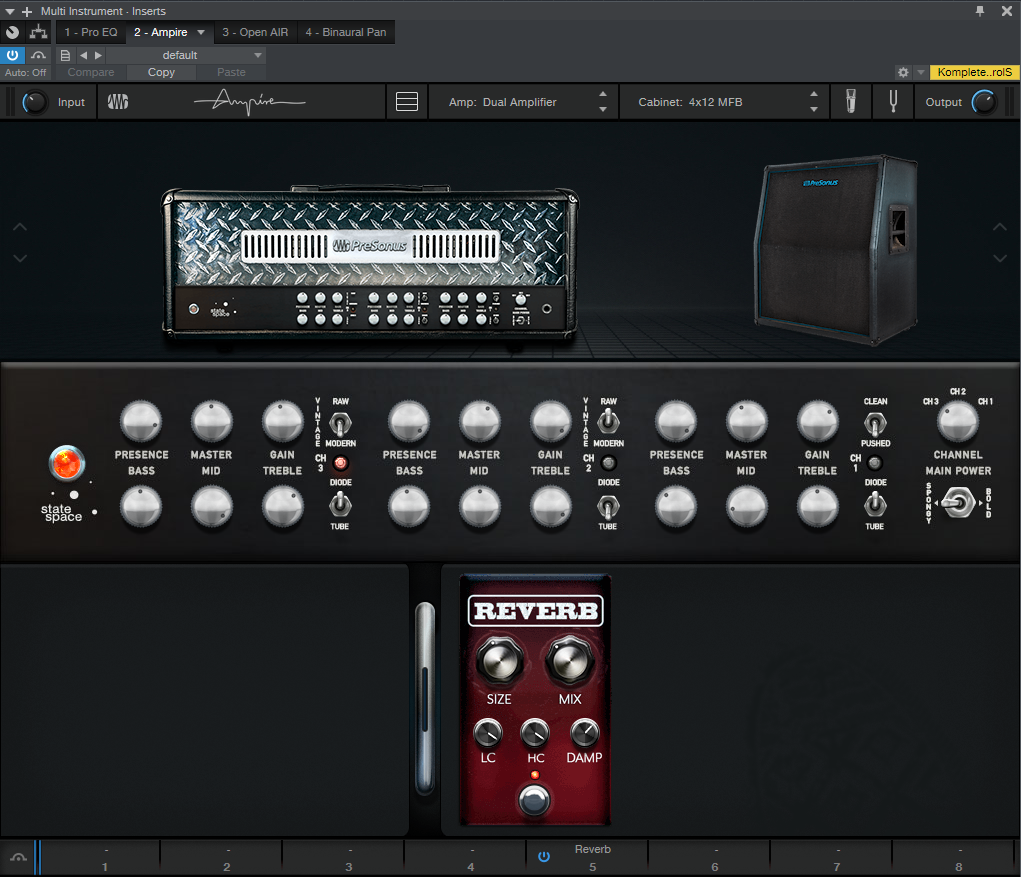
Look in the instrument’s mixer channel, and you’ll see four Insert effects: Pro EQ, Ampire, Open Air, and Binaural Pan. You can check out their settings by opening them up, but the Ampire settings (Fig. 3) deserve a bit of explanation.
Figure 3: Ampire is using the Dual Amplifier and 4×12 MFB speaker cabinet, but just about any amp and cab has their merits.
The reason for choosing the Dual Amplifier is because it’s really three amps in one, as selected by the Channel knob on the right—I figured you’d appreciate having three separate sounds without having to do anything other than adjust one knob. Try different cabs and amps, but be forewarned—you can really go down an Endless Rabbit Hole of Tone, because there are a lot of great amp and cab sounds in there. I’ll admit that I ended up playing with various permutations and combinations of amps, effects, and cabs for hours.
You can also get creative with the Mai Tai, specifically, the Character controls. I didn’t assign any controls to a Control Panel, or set up modulation because having a pseudo-”whammy” bar pitch wheel was enough to keep me occupied. But, please feel free to come up with your own variations. And of course…post your best stuff on the PreSonus Exchange!
