FIVE Things to do While You’re in Isolation… Booth.
See what we did there?
So you’re stuck at home social distancing yourself, you’ve watched everything on TV, nothing new is streaming, you probably should shower—but here you are reading another blog post. Welcome to the club. We thought it would be helpful to suggest some things you can do during this time of isolation.
-
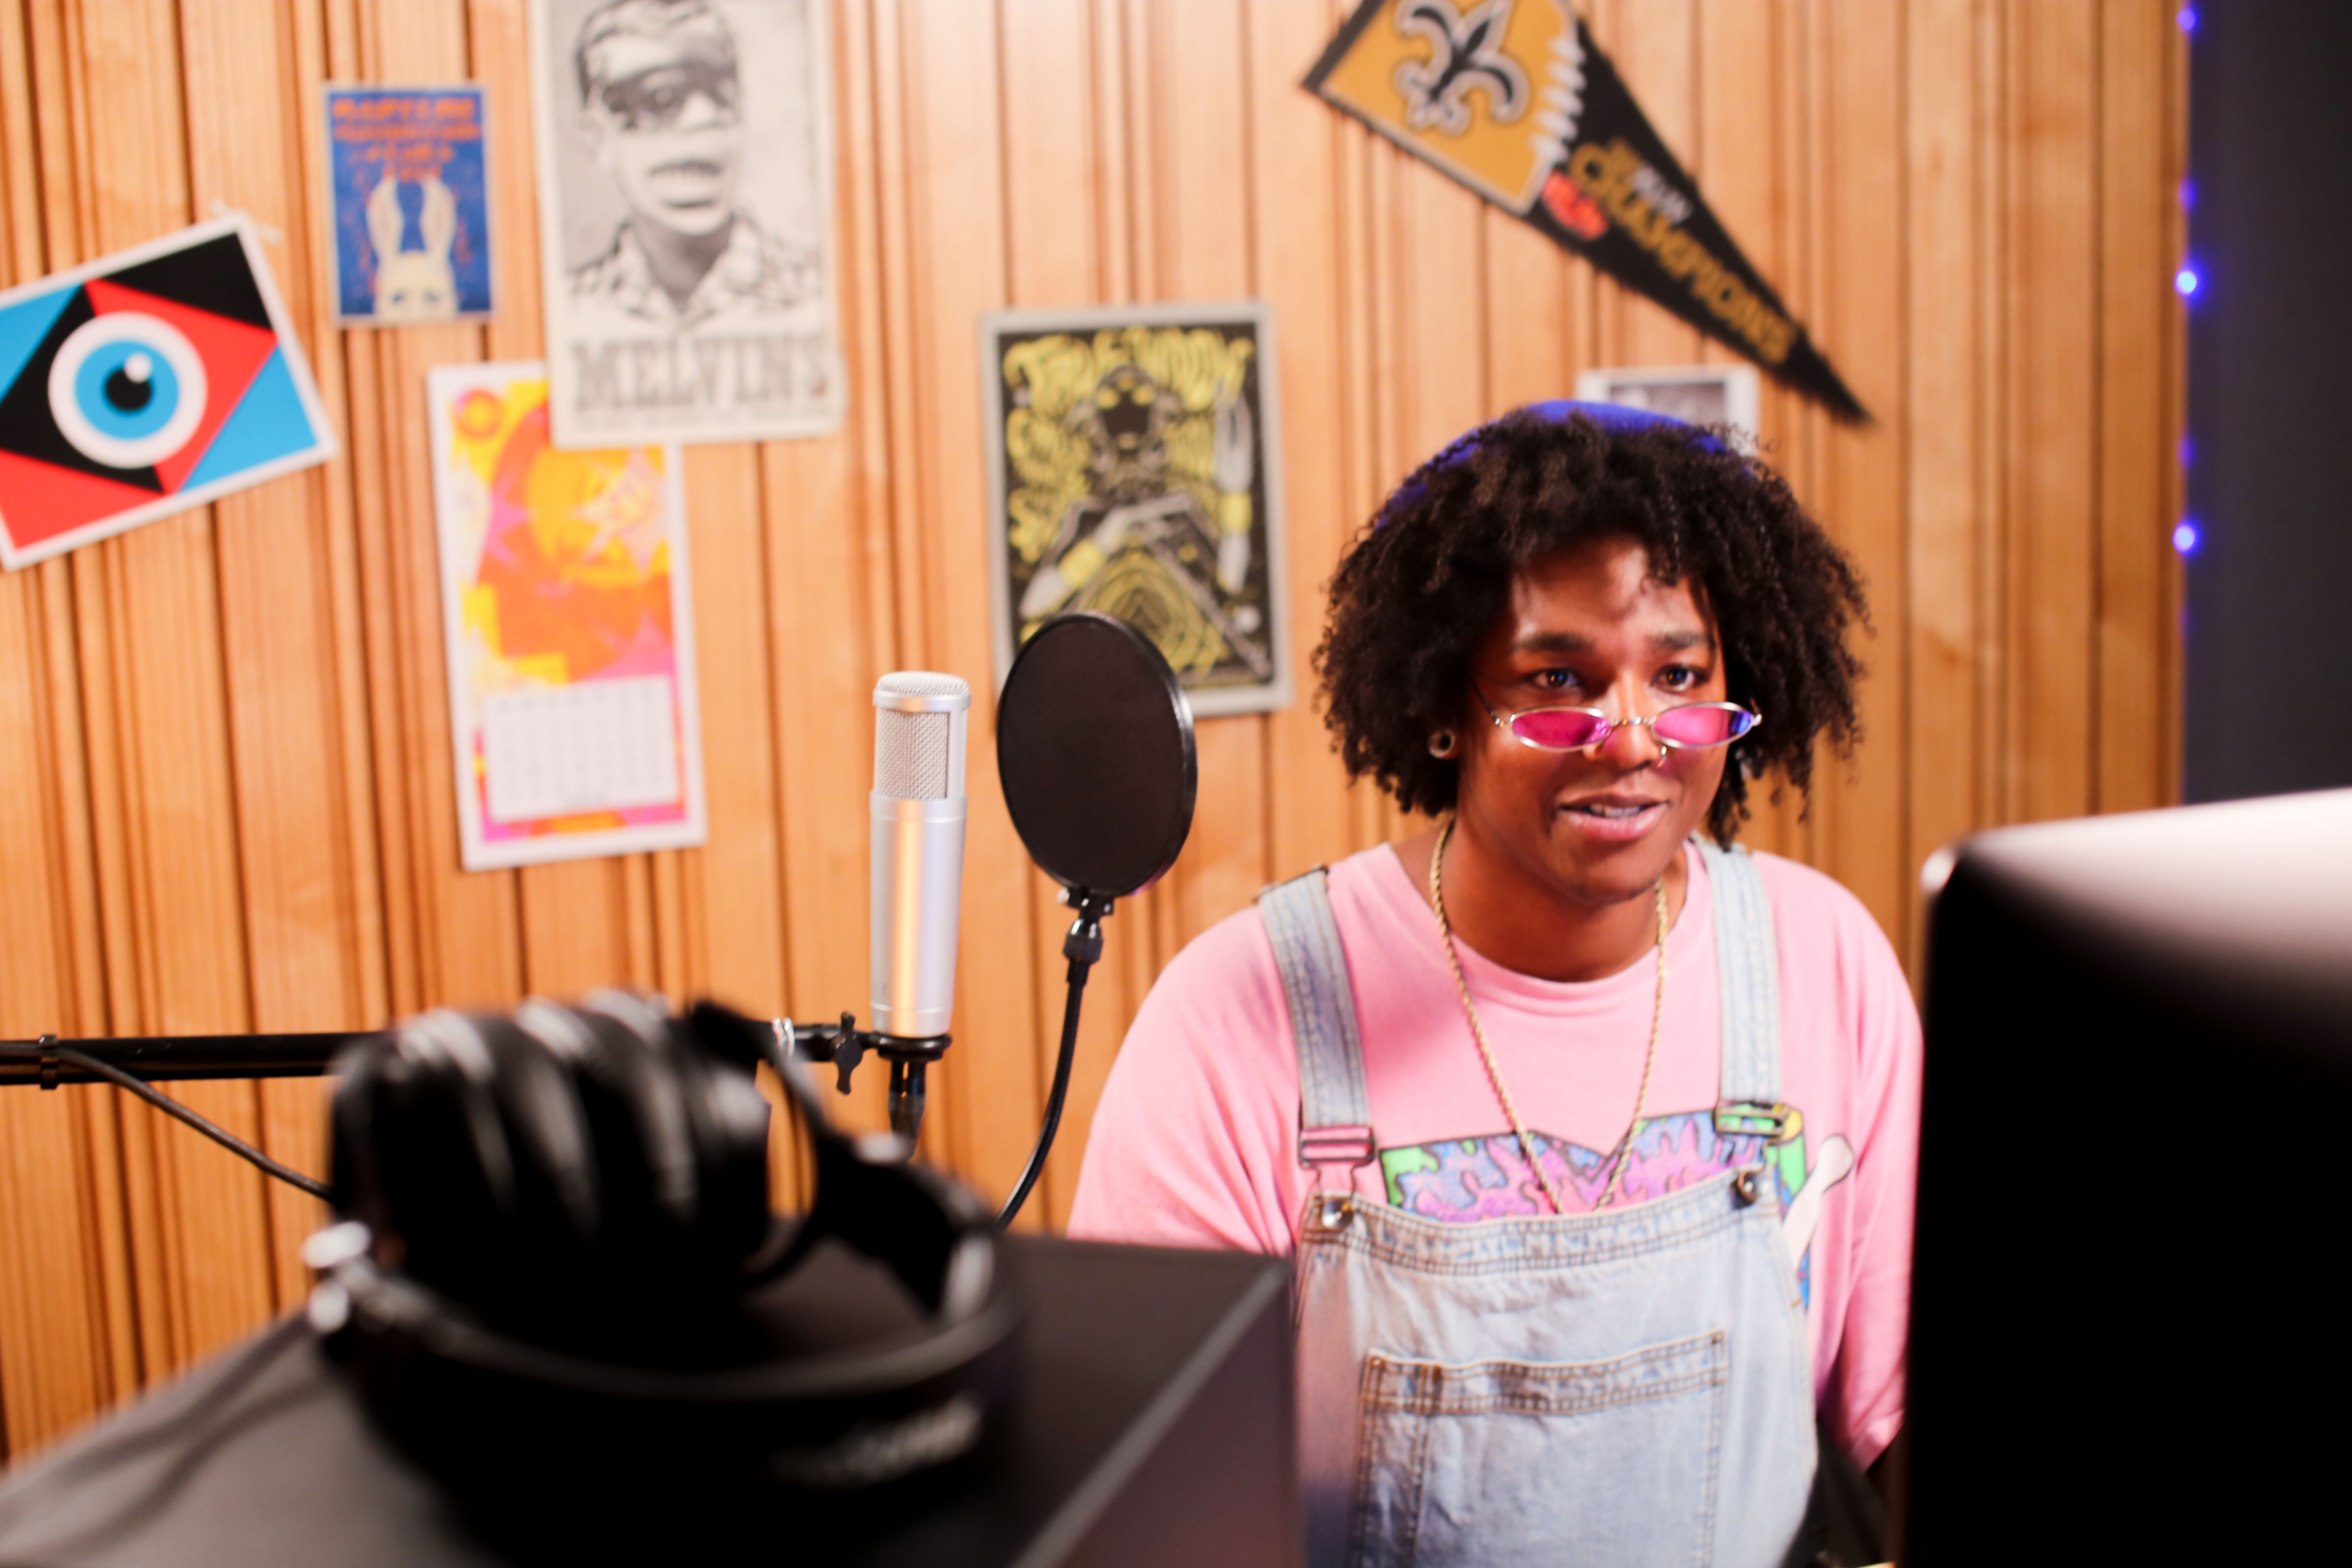
- Check out PreSonus’ latest YouTube series, the River City Sessions. This monthly, genre-agnostic online series features hand-picked up-and-coming artists from Louisiana and beyond, offering them a chance to record a few songs and a video in exceptional fidelity—for free. Each episode is intended to capture the live, performative spirit of the artists, with minimal attention to overdubs, layering, etc. We just published a new performance today by Palomino Darling! Watch the whole playlist here:
- Add a bunch of stuff to your Amazon Wishlist
- From the bedroom producer to the professional home studio, there is a ton of gear out there. You don’t need the most expensive gear, you need the RIGHT gear. Check out this article on curating the ultimate home recording equipment.
- Keep the creative juices flowing!

- Let’s be honest, life is boring without music. We need to help each other stay in a creative space and keep making music. Go back to your first ever mix or recording, listen again with a fresh pair of ears and consider what you would change. What did you like then that you don’t now? How has technology changed since then? Open a book, go through old photos, cook a meal, check out #PreSonus on Instagram and see what other musicians are working on all over the world.
- Brush up on those audio terms that everyone seems to know so well.
- Here’s a list of them… Hypercardioid Microphone Pattern is a thing. ?
- Calibrate your Studio Monitors… FINALLY!
- Proper studio monitor placement and calibration is critical to get the best experience in your listening environment. Taking the extra time to set up your studio monitors will make mixing easier and ensure that your mixes translate well from speaker to speaker. You’re not going anywhere, so just do it. Read more on how-to here.
I know it seems like the end of the world as we know it… but it’s not. We’ll look back and remember the time Covid-19 tried to ruin 2020… and we might even write some songs about it to share as well.
The show must go on. How to live stream your gigs in the time of COVID-19.

With concerns about COVID-19 canceling gatherings of all sizes, from SXSW to the Pearl Jam tour, musicians might be finding their own gigs also canceled or suddenly playing to an empty house. In this new and temporary era of social distance, live streaming your band’s performances might be the solution.
Live streaming is a great way to gain new fans, continue to entertain your loyal fanbase, and sell more content when you can’t play at the local summer festival or proceed with your tour as planned—but getting started can be a little daunting. Whether you’re an established band with a devoted following or an emerging artist looking to building your fanbase; live streaming is perhaps the best way to share your talent and music with a limitless audience.
PreSonus has put together this guide to help provide some tips and tricks to get started live streaming and keep the music going.
Start Small

If you’re like most musicians, the quality of your performance improves when you’re in front of an audience that is participating in your performance, applauding and cheering you on. This is perhaps the biggest challenge when beginning live streaming: you must find a way to bring that same energy to a camera in an otherwise empty room.
One way to get started is to create brief excerpts of a rehearsal to use as a story in your band’s Facebook or Instagram feed. This takes off some of the pressure because the video can’t be very long. Another method is to bring the audience to you. If you’re self-isolating with your family or roommates, put them to use and use them as your audience. This lets you merge your physical and virtual audiences, giving you some comfort with the medium before the camera becomes the only member of the crowd.
Choosing a Streaming Medium
 When you’re first beginning to create live streams for your band, controlling the cost to your band’s budget is critical. And while there are paid services that will allow you to create a private live stream that is ad-free and customizable, until you have an established audience, the cost for these services may not be justifiable. Services like YouTube Live, Facebook Live, and You Now will let you broadcast your performances for free and are designed to help you create a relatively stress-free live stream. Some free services will even let you preview your live stream before it goes live so you can make sure the quality is exactly what you want to broadcast. The trade-off is that these free services will interrupt your broadcast with ads, but this is a relatively small price to pay. Additionally, these free services already have millions of users who may stumble on your live stream, providing greater access for more impressions.
Choosing your Camera and Connection
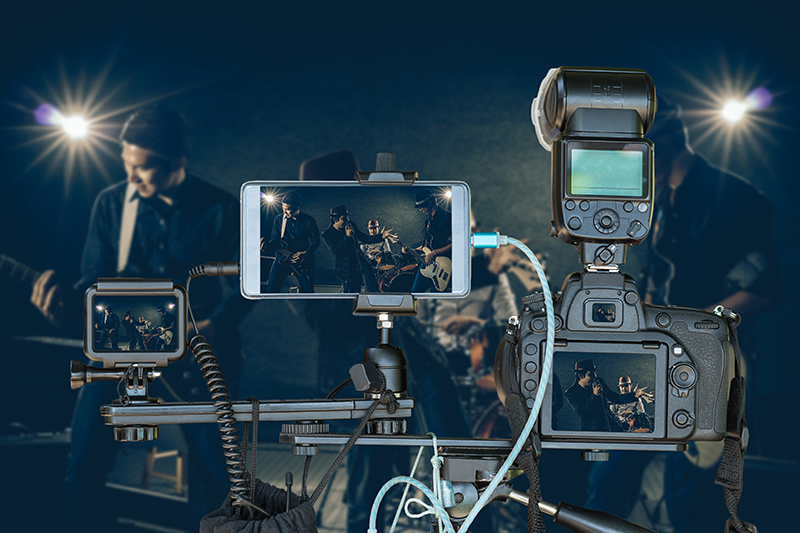
Making your live stream look and sound as professional as possible is the best way to attract attention. After all, nobody likes to watch a video that looks bad and sounds worse. To live stream your band’s performances, you’ll need some basic video production equipment to represent yourself well. There are several options based on your budget, but here are the essentials:
- Camera. Webcams are often the first thought when considering live streaming, but inexpensive doesn’t usually mean quality. We recommend using an HD camcorder, DSLR, or Mirrorless Camera with excellent video quality. 1080p is the current standard in resolution, however many 4K cameras are becoming more affordable. (It’s important to note that consider some streaming platforms will not output in 4K.) Be sure to investigate how a camera performs in low light; some cameras, like those designed for action, may not perform in low light situations that are more suitable for creating the right vibe for a live performance. And remember, just like an audio interface or a mixer, a good camera can be an investment into photography or video recording other than your live stream, so buy something that will fit all your needs. The good news is than an excellent camera that will suit all your needs can be purchased for less than $500.
- Lens. Camcorders can have great quality and you don’t need to purchase any lenses. That being said, they aren’t as versatile and won’t have the same video quality of a DSLR or Mirrorless camera. Many cameras will come with a kit lens that has a variable focal length and a low F-Stop that will most likely work for you.
- Light. Don’t forget about lighting before you record your live stream. Even if you just use a well lit room or have a large window, it can make a huge difference. There are many options for lighting such as LED, fluorescent, and tungsten. It is important to match the white balance of your camera to your lights as well as diffuse the light so it isn’t just bright, but also soft and photogenic.
- Tripod or Mount. You are going to need something to setup, frame, and stabilize yours shots. Every tripod has a suggested weight limit, so get one based on your needs.
- Power. When you’re live streaming your band’s performance, you don’t want to run anything on batteries. Make sure every piece of equipment has a power system to ensure your camera doesn’t die out during a long broadcast.
- Video encoder. A video encoder is a piece of hardware or software that takes your video content and converts it to a digital format so that you can stream it on the Internet. There are many different types of encoders on the market and with just a little research, you can find one to suit your needs and your budget.
- Video Switcher (optional). A single camera shot will work well for many live streams, but if you want to take yours to the next level, a multi-camera shot will add another dimension to the final product. Investing in a video switcher will allow you to switch between multiple cameras or video sources and will cost around $1000. Be sure to look for a device with XLR audio inputs to bring in your audio.
- Internet Connection. A strong internet connection is required if you want to live stream. HD streaming requires 3 to 5Mbps, and 4K will require 25Mbps.
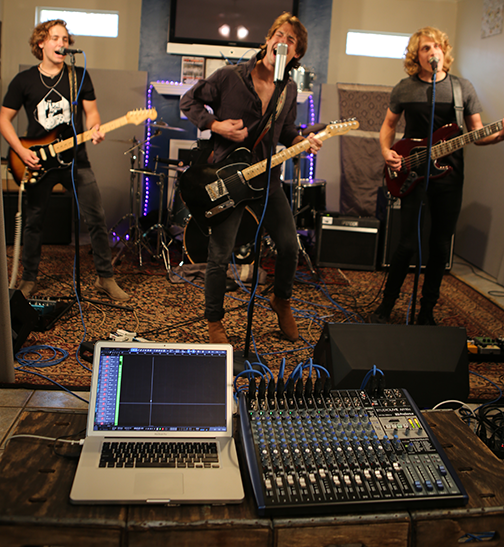
Choosing your Audio Interface
The way you record the audio for your live stream is the difference between standing out and turning off your audience. If the sound quality on your live stream is professional, your band will be presented at its best. After all, your music is what will attract your audience!
The easiest way to record your band for a live stream is to use a mixer with stereo recording capability. This will allow you to create a live mix (much in the same way you create a mix for a live performance). If your band is already gigging and rehearsing, chances are you’re already looking for a good mixer. The great news is that many modern mixers offer some level of audio recording ability. Whether analog or digital, a mixer with onboard recording can provide a cost-effective solution to create an amazing live stream sound. Let’s take a look at both approaches:
Analog Mixers
 At their core, most analog mixers share many of the same features and functions. The biggest advantage of analog mixers is that they’re generally less complicated and less expensive than digital mixers of the same frame size. The disadvantage is that analog mixers usually have fewer onboard features than digital mixers, and their sound quality depends entirely on the quality of the analog circuitry.
Some analog mixers, use great-sounding analog circuitry, provide EQ on every channel, offer monitor mixing options, and include an onboard effects processor for reverb and delay effects with an integrated audio interface. Depending on the mixer model, this audio interface might be a simple stereo output so you can record the main mix or provide you with a full 24-bit, 96 kHz multitrack recording interface that lets you capture every input channel, plus the main mix. These hybrid analog mixer/audio interfaces are give you all the tools you need to create your live streams and high-quality studio tracks.
Digital Mixers
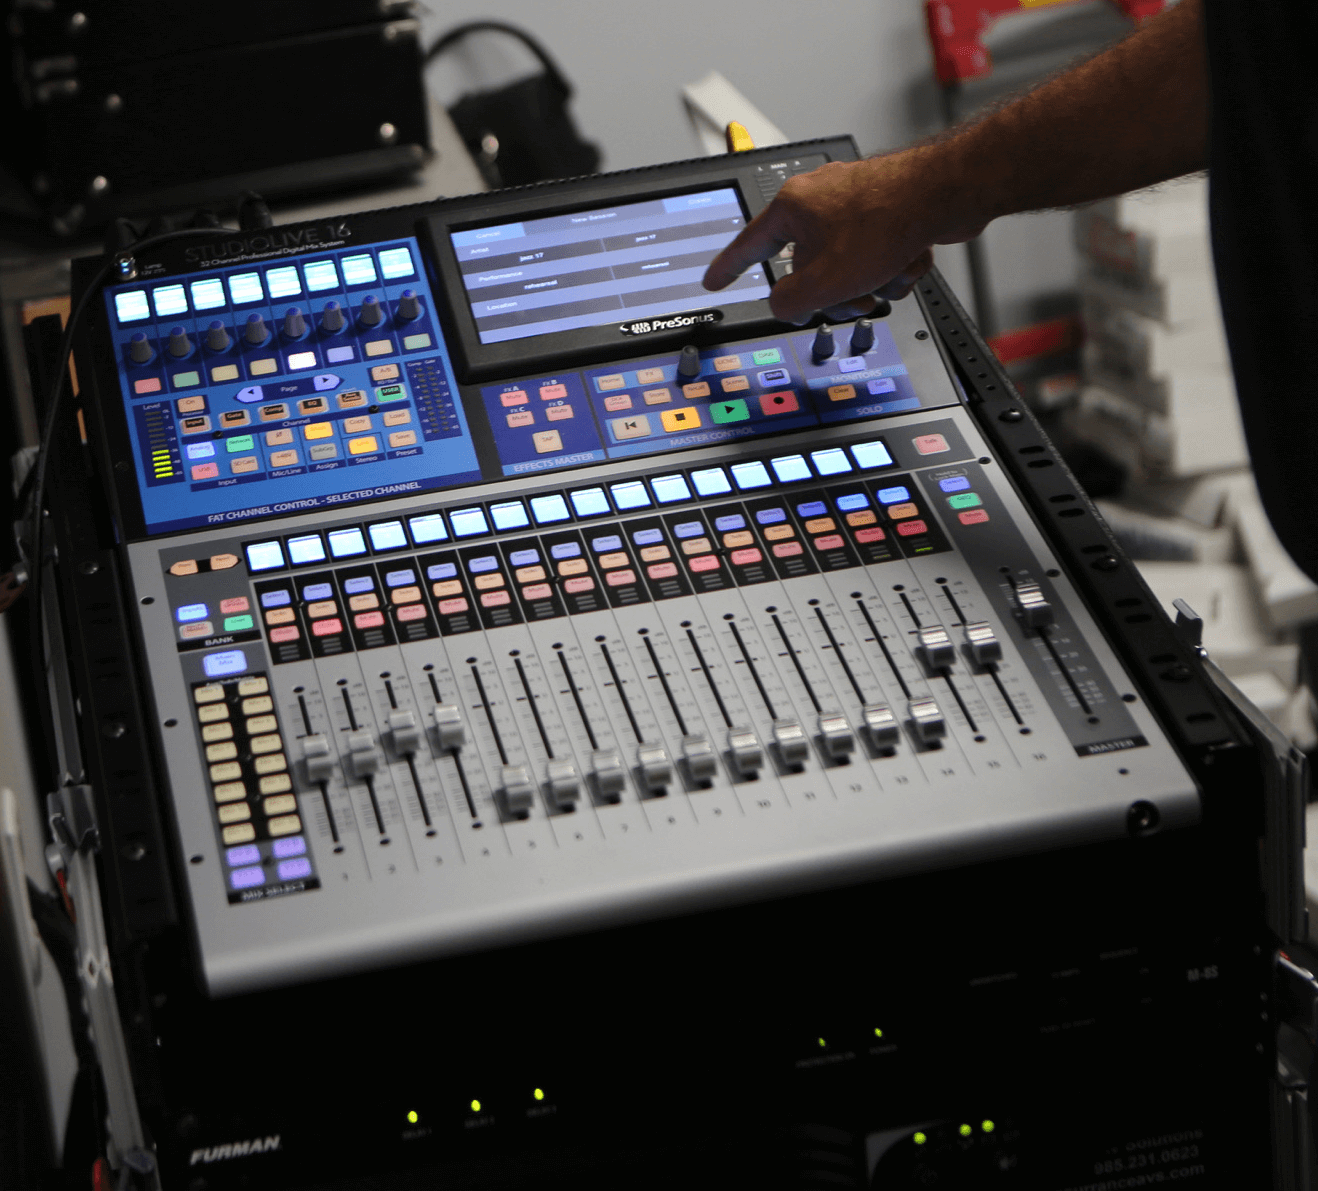 Digital mixers include the basic functions provided by their analog cousins and add many tools that save you money by eliminating the need for expensive outboard equalizers, compressors, noise gates, multi-effects processors, and the like. While you don’t need these processors just to mix audio, they are essential for producing better-sounding, more polished mixes. All these tools are done courtesy of an onboard digital signal processor (DSP). This processor is responsible for routing, level control, and so on. Full-featured digital mixers provide plenty of graphic and parametric EQ, dynamics processing, and more.
Some digital mixers combine the simplicity of an analog mixer with the processing power of a digital mixer and include an onboard audio interface. Because the parametric EQ, compression, noise gate, and limiter are available on every input and output, you save the cost of outboard gear and mountains of cables, as well as the hassle of connecting it all so your live stream will sound great.
Digital mixers also provide simple ways to manage a large mix, making it even easier to manage high channel count mixes in a live recording situation by providing DCA groups. Each group is given a master level control so you can control the overall level of the group while maintaining each channel’s relative balance in the mix. In this way, for example, you can create a single fader to control every mic on the drum kit, making it easier to control the overall level in the main mix.
Many digital mixers also provide an onboard audio interface, so all you need to do is connect your gear and your computer and you’re ready to record.
Audio Interfaces
 If you have a studio production background and are comfortable mixing in a DAW, a traditional audio interface may be an excellent solution for you. When using an audio interface, you must route the main output from your DAW to a set of inputs on your audio interface. These inputs will be the stereo audio source for your live stream.
At this point, you will need to create a loopback for your live stream. An easy way to do this is to use the S/PDIF input and output that many interfaces. S/PDIF is a stereo digital audio standard that is ideally suited for this workaround; this is what we will be using for the loopback in this example:
- In your DAW, patch the main output to the S/PDIF out on your audio interface.
- Patch the S/PDIF output to the S/PDIF input on your audio interface using a S/PDIF cable.
- In your live stream software, select the S/PDIF input as the audio source. Make sure that the S/PDIF input is not enabled for recording in your DAW.
When using an audio interface for live streaming, you will want to select one that also allows you to monitor your performance. Some audio interfaces offer an onboard DSP that provides low-latency monitor mixes. Other audio interfaces provide a fast enough transport speed that you can monitor your performance through the plugins and mix engine in your DAW.
Choosing a Computer
Audio and video production require a powerful CPU to ensure the best performance. The computer you use can be a Mac® or Windows® PC, so you can continue to use whichever operating system with which you’re most comfortable. The first thing you’ll need to check is the system requirements for the streaming application you’d like to use. Keep in mind that the “minimum system requirements” published by any accessory hardware or software manufacturer are just that: The bare minimum computer specs that you need to get the bare minimum level of performance.
The better your computer specs are, the more smoothly your live streaming will go.
Lights, Camera, Action

After some practice runs and careful preparation, it’s time to launch your live stream. Unlike a live performance at a local venue, the audience will be as close to you as your camera. When filming the band together, being camera-conscious means that band members should select coordinating outfits that will not distract or detract from your musical performance. It’s always a good idea to simply film a few performances and critique your camera presence before launching your live stream. Great visuals to go with your polished music production will go a long way to attract new followers and grow your audience.
But I’m Not an Audio Engineer
One of the biggest challenges when creating your live stream might be the fear that your audio will not sound its best. Now is a great time to team up with a local live sound engineer in your area. With so many gigs being canceled, many audio engineers have lost their steady source of income. So, why not reach out and hire an audio engineer to run your live stream show for you? Even better, get a few mixing lessons so you can continue to live stream when life returns to normal. And it will go back to normal.
From your friends at PreSonus—be safe, be inspired, and keep creating.
Fun and Games with Alternate Mixes
There are many uses for alternate mixes, and Studio One makes it not only easy to create alternate mixes, but also to store them as part of a song. We’ll cover traditional uses for alternate mixes, and then get into some more unusual applications.
How to Create and Store Alternate Mixes
When sending a file off for mastering, sometimes the engineer will want two additional versions, one with the vocal up 1 dB and another with it down 1 dB. This is because during the course of mastering, the relationship of the vocal to the track might change. A more prosaic example is creating a mix without vocals for karaoke, and of course, remixes are common in EDM. You might also do an “unplugged” version with only the acoustic tracks.
After creating the alternate mix:
- Choose Song > Export Mixdown (Fig. 1).

Figure 1: The Export Mixdown dialog box. Note that Import to track (outlined in white) is checked to bring the exported file into the song.
- Choose a location for the mix, the export range, file resolution, and make sure you check Import to track. (If while exporting a warning says there was clipping, reduce the master fader to compensate—for example if the export was 1 dB over 0, reduce the master fader level by at least 1 dB.)
- The file will now appear as a track within your song. When you save the song, you’ll save the alternate mix.
If your mix changes are relatively extensive, save it as a Version so you can recall it later. Choose File > Save New Version, and name it (Fig. 2). Use a name that corresponds to the name of the alternate mix file, and then you can choose File > Restore Version to recall the version corresponding to that particular mix.

Figure 2: It’s easy to save a version of a song that corresponds to a particular alternate mix.
Processing Song Sections with Alternate Mixes
Suppose you want to add flanging to only a solo section of a song. You can insert a flanger in the main bus, and then adjust automation to enable it and set the parameters as desired. However, another option is to create a mix, and bring it into your song as a track. Then, create an alternate mix you bring into the song. Now you can experiment on the alternate mix with the effect(s) you want to use, and when you have the sound you want, render it. Cut the solo section you want to flange from the main mix, and insert the rendered solo section from the alternate mix.
Better Virtual Instrument and Amp Sim Feel
Last week’s tip covered how to save CPU power with amp sims by bouncing and/or transforming the track with the sim. One user commented “I can see how doing [this] reduces CPU load, but only after I’ve finished choosing and using an amp sim patch. My frustration is the latency or CPU hit when actually playing my guitar through an amp sim, deciding on what I’m going to play, rehearsing it, auditioning amp sim patches and so on.” Alternate mixes to the rescue: make a premix of all tracks except the one with the amp sim, and then disable the tracks themselves. With the tracks now placing no load on the CPU because you’re listening only to the premix, you can throttle the latency way down when playing around with your sim and adding a new part. After recording the part, you can use the tips presented last week to reduce the CPU drawn by the amp sim.
Auditioning Different Mixes for Albums
The renewed interest in vinyl has had a corollary effect: an interest in albums and collections of songs, not just singles. As a result, Studio One’s synergy between the Song and Project page—where you can edit songs after hearing them in context with the master file, and update the master file with that song’s changes—is brilliant. But even if you don’t produce albums, Studio One’s mastering options make it easy to obtain consistency among songs. That way, if someone switches from one song of yours to another on YouTube or Spotify, there won’t be a jarring difference.
But you might do various mixes of songs, so you can choose the best one when assembling an album. If you update the version in the mastering file after changing a mix, to compare it to a previous mix you need to open the file with the other mix (which may take a fair amount of time if you have lots of effects and virtual instruments), update the mastering version, and repeat with any other mixes.
A simpler option is to create alternate mixes in your song as described above (remember to save each alternate mix as a separate version), and mute all tracks in the song except for the track with the mix you want to audition. Update the mastering file with that track. To audition a different mix, mute all tracks except for the different mix, update the mastering file, and hear that mix in context. Once you decide which mix you like best, open the Version containing that mix, and then you can make further tweaks to it.
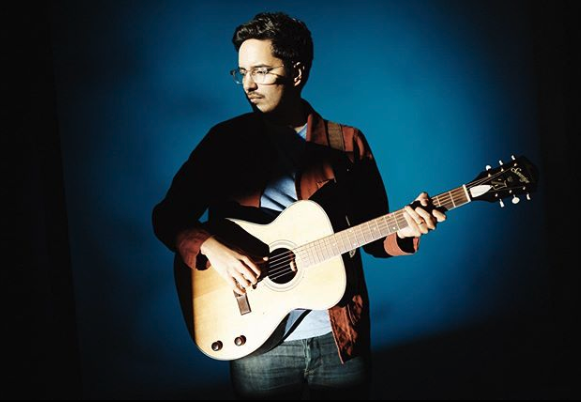
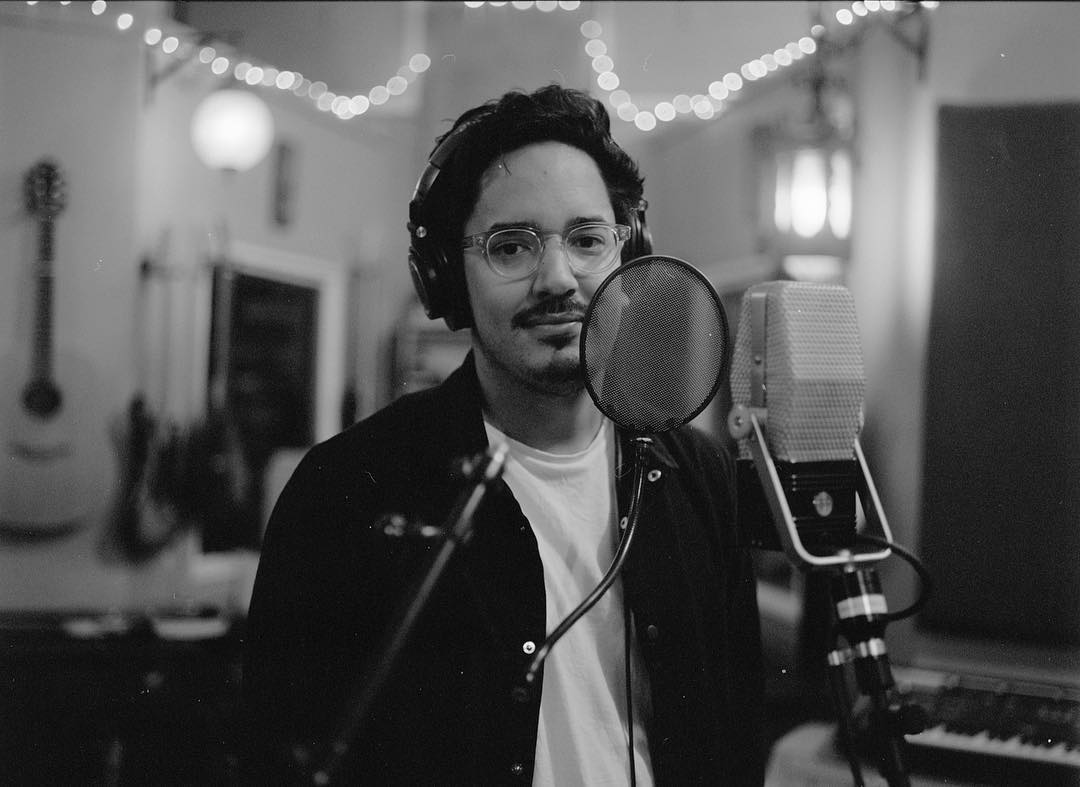
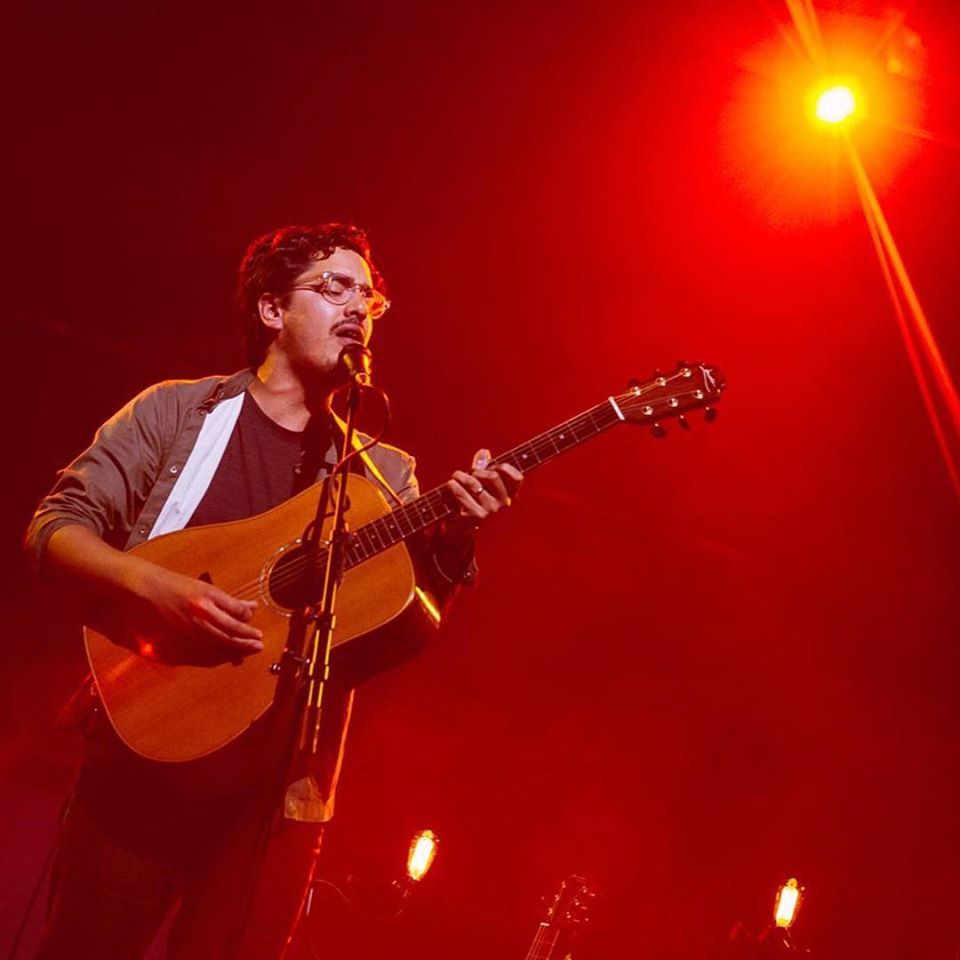
LA Based Singer-Songwriter Talks Studio One: Luke Sital-Singh
Luke Sital-Singh is a British singer-songwriter based in Los Angeles. He sings and writes songs of love, loss, longing, grieving, hope, and basically the whole gamut of the human experience. His voice is haunting and personal… and his lyrics? Profound. With three studio albums, one live album, seven EPs, a ton of singles and a TED Talk in 2018, Luke’s gift is exceptional and rare, and we’re glad he’s sharing it with us.
We connected with Luke on Instagram and immediately became huge fans. What’s made this friendship better is that he’s new to the Studio One family. We took some time to get to know him better and hear how his experience with Studio One has been so far.
Give us some background on yourself. How long have you been making music?
I’m an artist and songwriter from the UK currently based in LA. I released my first EP in 2012 and have been making and releasing music ever since. My latest album came out in 2019, and right now I’m currently working on writing my fourth album whilst trying my hand as a songwriter working with other artists and writers on their projects.
How has the music industry changed since your early days?
In so many ways but I think the most obvious to me day-to-day at the moment is the impact of social media and keeping your online persona updated every second of the day. It’s a horror show and if I were starting out again today it would be enough to send me running for the hills.

Watch Luke’s TED Talk
Describe the first time you wrote a song? Produced it?
Hmm, I don’t remember details but I can imagine it was an easy, pure, uncomplicated. I most probably thought nothing of it. It was almost definitely a rip off of the Goo Goo Dolls (who were my favs at the time). I never had a lightbulb moment in where I knew I was gonna write songs. It was such a gradual process. I just wanted to give it a try, and I kept trying and trying… and I’m still trying today.
Who has been a musical influence in your life?
I would say my eldest brother Matt was the first major musical influence in my life. He introduced me to some cool music when he was a teenager and it was his guitar I stole when I started learning. He was also a bit of a computer geek so he helped me record some early demos and covers in his bedroom. I still have some of those recordings. Truly awful songs! But it got the ball rolling.
Have you ever wanted to give up on music? What keeps you going?
Yes, many times. It’s often overwhelming and ever-changing. So you once you feel like you get a handle on a way forward, the industry changes and you’re left scrambling around again. Also the pressures of always being on. I always feel guilty when I’m not writing or gigging or posting on social media. It’s hard to find downtime without feeling like you’re losing time and opportunities. Unfortunately and fortunately it still pays all my bills and I’ve got no other life skills to fall back on. Also when it’s good. It’s really good.
 So you’re new to Studio One. When did you first hear about Studio One?
I was looking for a change from the DAW I was using. And I started to see a lot more people talking about Studio One online. I found myself watching loads of YouTube videos about the features and reasons why it’s better than the other DAWs. It piqued my interest enough to try a demo and see what I thought of it myself.
What features are you most impressed with?
As a jobbing artist, the price was pretty compelling, for one thing. Perhaps that sounds a little unexciting, but it matters for people like me. I don’t have tons of cash to drop on all this software whenever I want.
I’m still learning Studio One, but I’m finding it a lot faster than what I’ve used before. The drag and drop functionality is so great. In general, and incoming from another DAW, I’m just finding it more intuitive. Studio One is faster and compliments the workflow habits I’ve developed using other software. As I use it more I’m excited to see how my workflow develops around Studio One’s unique functionally. As of now, I’ve only produced a handful of tracks using it and I’m loving it and I’m excited to keep learning.
I also find the chord track functionality brilliant for songwriting and trying out ideas I would never think of on the guitar.
 How easy/difficult was Studio One to learn?
Very easy. I especially found that the ability to map the keyboard shortcuts to match other DAWs made it so much faster to get up and running. Now I’m slowly transitioning to the Studio One keyboard shortcuts.
Where do you go for support?
I haven’t had to yet! Knocks on wood…
Any other thoughts on Studio One or PreSonus gear?
I just think PreSonus is great! For whatever reason, it’s not the sexiest name in music gear but it should be. I feel like I wish I’d tried Studio One years ago. I find I go into sessions with other people these days and tell them I use Studio One and they turn their nose up. When I tell them the kind of functionality it offers, everyone is impressed and surprised. It’s one of those unfortunate things about the music recording culture and I suppose just general culture when it comes to brands etc. People like the cool stuff even if it’s actually no better or perhaps it’s worse than lesser-known brands. I hope more people start to see how great Studio One is and PreSonus in general!
Recent projects? What’s next for you?
I’ve got a new EP dropping in April, a few tracks are available online. Also, I’m going on tour in Europe and the UK in April/May and I’m hoping to play some more shows around the US later this year. Other than that I’m busy writing my next record and working with other artists as a songwriting collaborator.
Check out Luke’s Tour Dates
Follow Luke on Instagram here
Subscribe to Luke’s YouTube here
Stream Luke’s Music
Watch Luke’s TED Talk!
Join the Studio One family today!
Six Reasons EDM Producers Should Add Studio One with Ken Bauer!
Swedish DJ and Producer Ken Bauer has several successful releases under his belt over the span of his career and has recently been making the transition into the Future House scene with each single. His latest collaboration with J-Rob MD with “Feels Just Right” has certainly cemented his place as one to watch in 2020! With all his success, he has become an expert in the EDM music scene alongside Studio One. Here he shares in his own words, six reasons everyone should consider adding Studio One to their workflow.
Follow Ken on Instagram
I was asked by the esteemed online music school nextlevelsound.com if I could write a blog post giving 5 reasons why any EDM producer should consider Studio One. When starting to think about it I realized it was impossible to only mention 5 reasons so I asked if I could write a series of blogposts instead. But the theme will always be 5 reasons or features why you should consider Studio One.
This time I will be looking at 5 features that make it easy to start a new track idea with Studio One. One small disclaimer though, some of the features I will mention requires the Pro version of Studio One.
1. Arranger track
When I start a new track it can sometimes feel overwhelming. We all know how easy it is to come up with an 8 bar killer idea and then after hearing the same loop for 4 hours you don’t like the idea anymore and you try to come up with a new 8 bar idea and the process repeats itself. What I do is that I always start by drawing the blocks for the arrangement. I study the latest trends for the genre I produce in and then I draw down the arrangement blocks in the Arranger track in Studio One. If it is a club-oriented EDM track I would probably come up with something like:

The cool thing is that you can move and copy these arranger blocks with drag and drop. This will actually move and copy everything, such as events, parts and automation. This means that you can save a lot of time by working on the first drop and then just copy that block to the second drop and then just tweak the second drop to your liking.
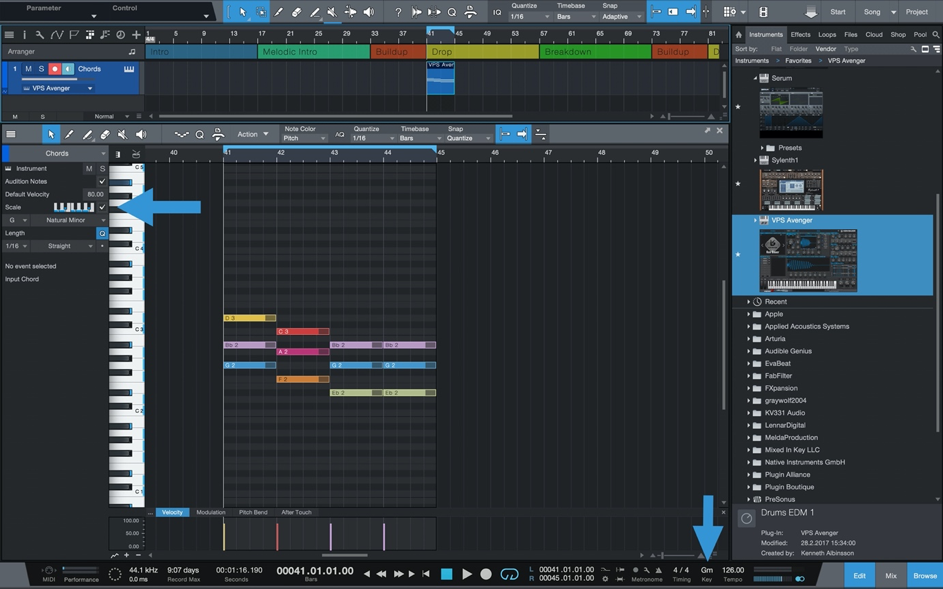
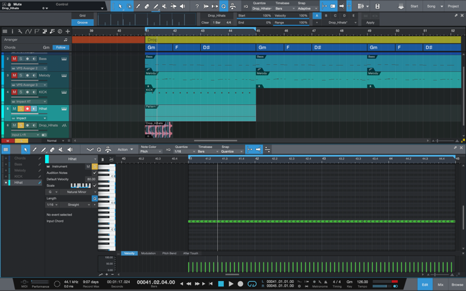
2. Midi Scale Lock
To be honest, I haven’t studied music theory as much as I should even though I know the basics. For me, any help I can get with musical composition is highly appreciated. This is where the Midi Scale Lock comes in. First, we have to decide on a key for the track. You can easily do this when creating the song but you can change it in the bottom of the arrangement view as well. In this example, I have chosen G minor. When you double click on a midi event or just creating a new one by clicking on an empty area you will see the musical event inspector on the left. Click on the checkbox next to the small keyboard where it says scale. Now Studio One only allows you to enter notes in the key of G minor. However, you can override this by moving the existing notes with your arrow keys or just disable the checkbox again. This makes it super easy to input 3 musically correct chords in the key of G minor. In this example, I have added G minor, F major and D# major
3. Chord track
OK, now we have a great starting point. A chord progression. Let’s see how we can use this to continue on our idea. Studio One has a chord track that you can enable. After enabling the chord track we can right-click on our midi event with the chord progression we just did and find something called “Extract to Chord Track”. Studio One will now analyze the midi event and extract the chords to the chord track as you can see in the picture below.

Now let’s go ahead and add another VST instrument with a bass sound. Then I will just add a bass rhythm playing the same note, in this example, just the note G.

Now I will open the track inspector for the Bass track by clicking on the “i” button on the top left. There I will find something called “Follow Chords” which is Off by default. Now go ahead and choose “Bass”. Now, this Bass track will follow the bass of the chords. See below how the bass pattern changed to follow the chords:

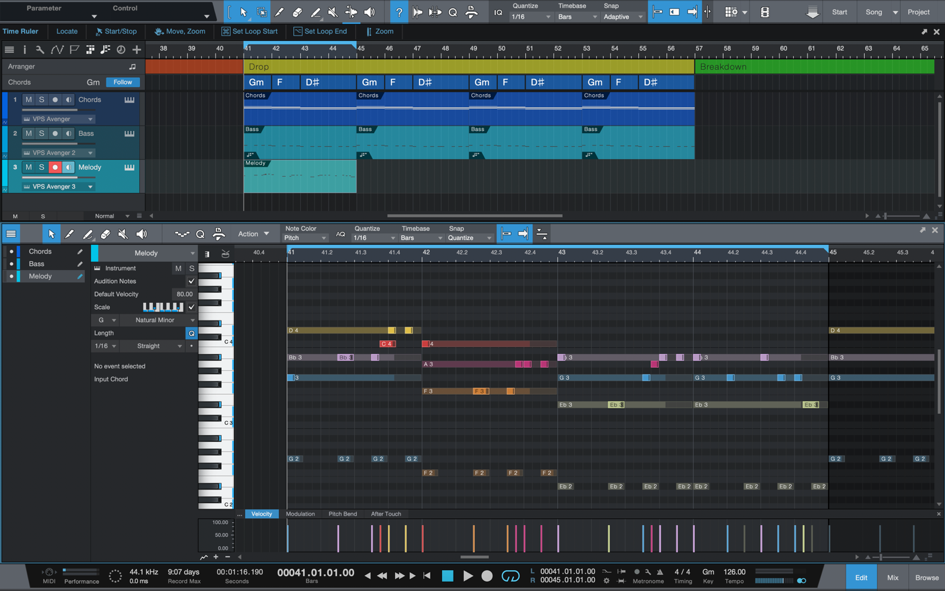
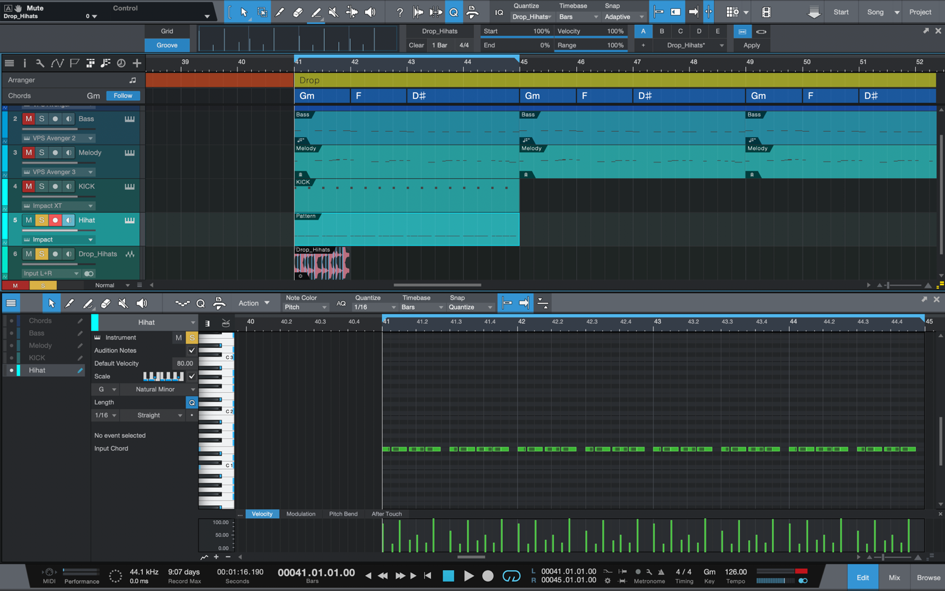
4. Multi-Lane Midi Editor (Ghost Notes)
Now we have to come up with a melody and to make sure we use only the right notes I will be using two great features in the Midi editor. The first one is coloring all the notes by Pitch. This means I can easily see that the bottom bass note in the example has the same note as the bottom G-note in the chord above. The second awesome feature is the “multi-lane” button in the middle left (blue box with 4 white lines). This lets you choose any track from your list of Instrument tracks to have it being displayed while editing the midi of another track. In the example below I am displaying both the chord track and bass track together with my new melody track. However, the only track that I will edit is the track having a “blue pencil” which in this case is the Melody track. Now I can easily find notes belonging to the chords as well as making sure they time well with the bass rhythm.

In this example, I have added a melody.
5. Groove Assistant
After adding a 4X4 KICK and a straight hi-hat pattern I realize that the hi-hat pattern needs a better groove. I go to Splice and download a cool hi-hat loop. However, I don’t want to use the loop, I just want to use the groove from the loop. In the pictures below you can see my original hi-hat pattern and the loop I downloaded from Splice.
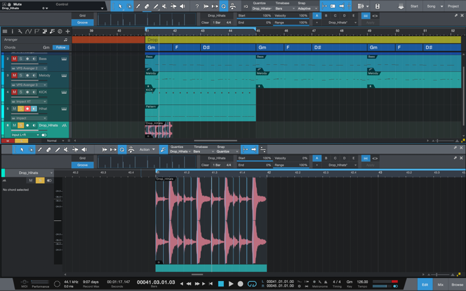
Then I will enable the Groove Assistant by clicking on the “Q” icon on the toolbar and select Groove. Now all I have to do is drag the audio loop event at the bottom to the Groove area as you can see below.
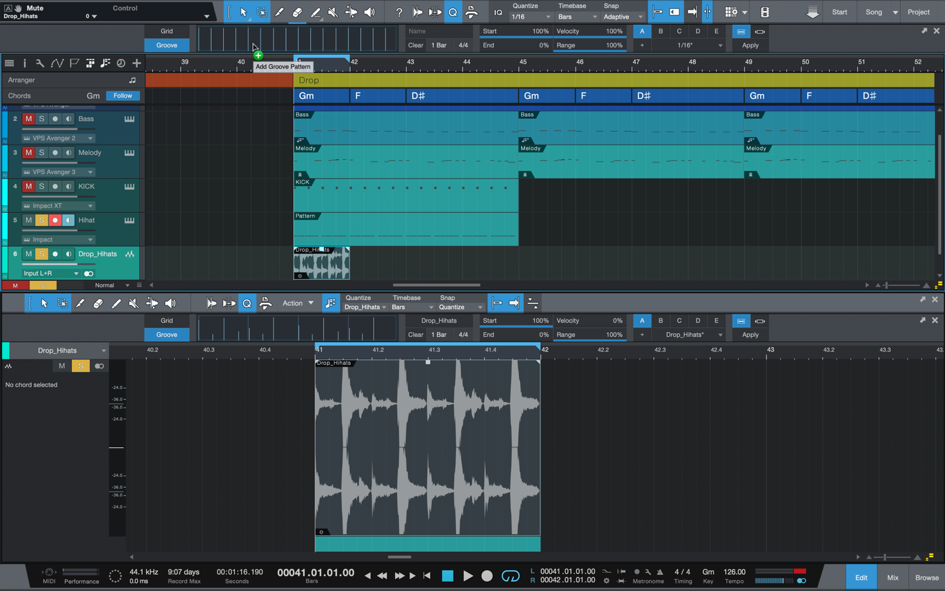
The groove is now extracted, and you can now use it as a Quantize template and/or save it for later use. Now I click on my hi-hat event and press “Q” for quantize. Voila, the straight 1/16 hi-hat pattern have now inherited the groove from the audio loop. Now if I would like to, I could use this groove pattern for all my basslines and melodies to keep everything in the same groove.
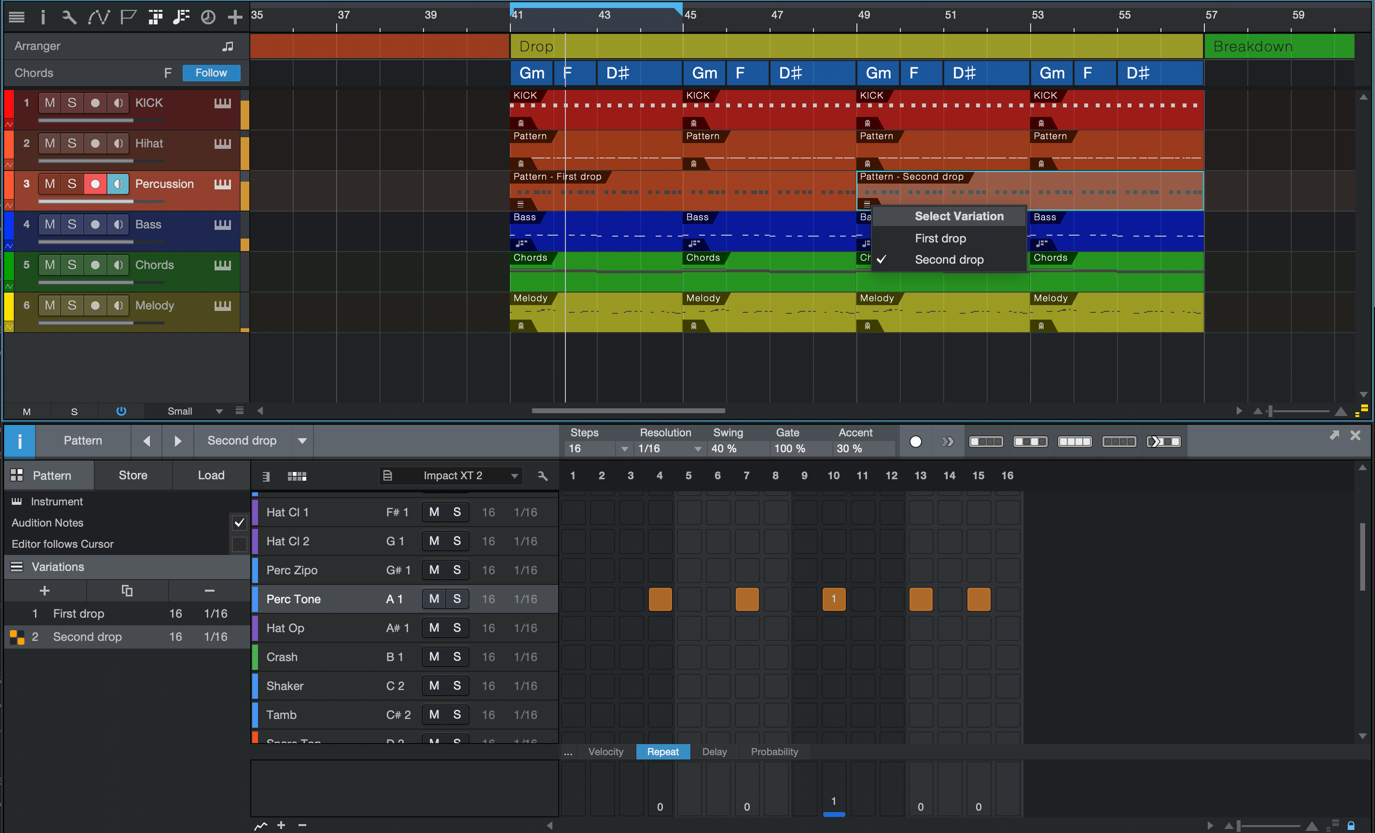
6. Pattern editor
Wait. Didn’t we say 5 features? In my opinion, it would be impossible to have a Studio One EDM tutorial without mentioning the excellent pattern editor. I will now add an Impact instrument with a percussion. To create a pattern, I just have to double click an empty area together with my option key. Now a drum machine kind of sequencer appears and I can easily draw in my pattern as I would in any drum machine editor. This is virtually like having a built-in drum sequencer in the arrangement. With patterns, you can simply drag the right edge of the part to extend/loop it. My preferred way of arranging with patterns is to loop the part to the full length of the song, then cut the long part in places you want to hear a different variation. Then use the local pull-down menu on the part itself to select the variation. It’s really that simple.
Summary
All in all, these six features help me start a new track quickly, the arranger tracks give me a great overview and sort of a to-do list. The Midi Scale makes sure that I create my chords in a key. The Chord track is great for having all my other tracks, such as the bassline, following the same chord progression. The multi midi editor (Ghost Notes) makes it is easy to draw in a melody that is in key and sounds good together with my chords and bassline. The groove editor is great for “borrowing” grooves from both audio and midi files. Finally, the pattern editor makes it super easy to create drum beats and bass patterns.
Follow Ken on Instagram here: https://www.instagram.com/kenbauersweden/
Listen to Ken Bauer on Spotify here:
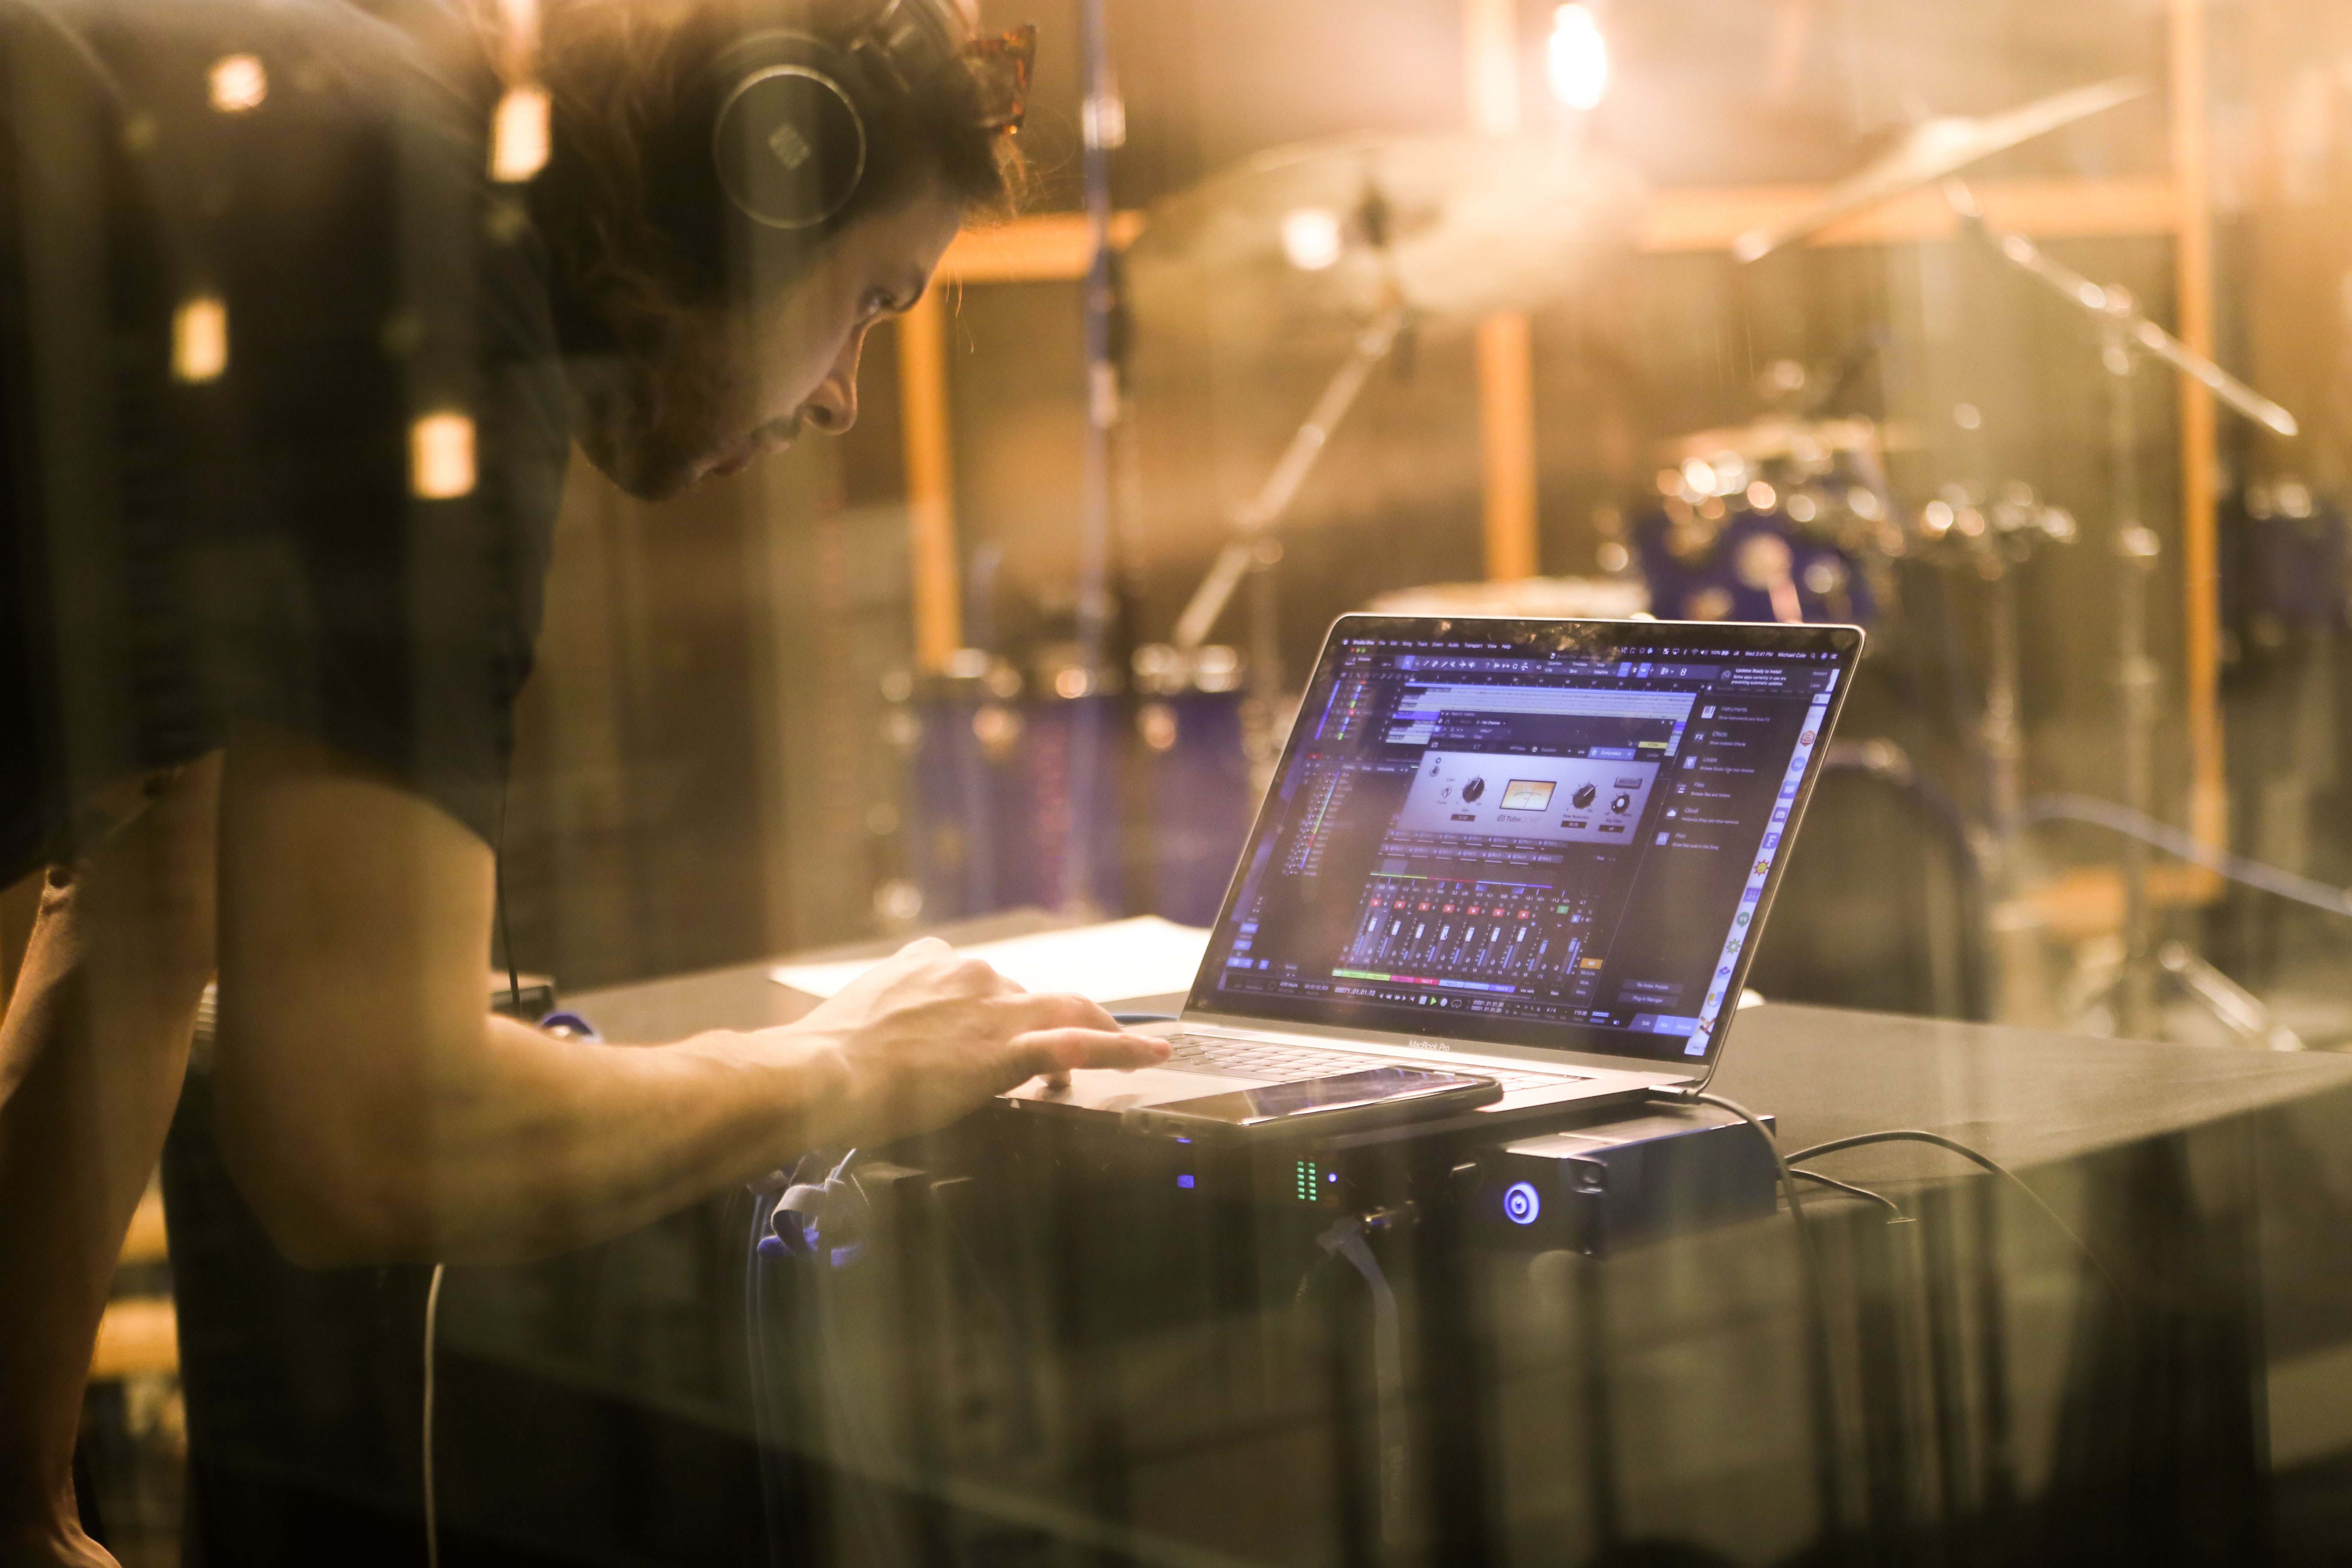
Lij Shaw: Recording Studio Rockstars
Nashville-based Lij Shaw sure stays busy year-round as an audio engineer and podcast producer!
Recording Studio Rockstars is a #1 iTunes podcast that invites you into the studio to learn from recording professionals so that you can make your best record ever and be a “Rockstar” of the studio yourself. Lij started the podcast because he had loved the excitement of being an intern in the control room during a real session with professional recording engineers and producers. He remembered listening in on the amazing stories they would tell, and realized that he had a chance to help people everywhere have that same experience through podcasting.
Podcasting now allows him to help people all over the world by doing the very thing that he and other producers and engineers love to do anyway, which is talk about making great records in the studio.
During the first part of his career, Lij focused on the idea that a record that he helped to create could impact thousands of listeners. But now podcasting gives the platform to help more people—who love recording—impact many thousands more through their music that he’s been helping them create.
What is mind-blowing is that Lij’s musical and creative impact has grown exponentially through podcasting! We sat down with Lij and asked him a few questions about it all.
Q: How long have you been in the audio industry?
A: I started recording music in my teens with a four-track cassette tape machine, eventually went to MTSU for their college recording program, and have now been recording professionally for 30 years.
Q: How has the audio industry changed since your early days?
A: Recording studios used to be huge industrial spaces that required massive budgets to create and operate with 2” tape machines and wide mixing consoles. Today the recording studio has evolved and shrunk down to the size of a portable smartphone. With a simple laptop, interface, and software you can have a complete professional recording studio for a tiny fraction of what it used to cost. This year five of the top Grammy awards were swept up by Billie Eilish and her brother Finneas O’Connell for producing a record in their bedroom recording studio. Times have definitely changed!
Q: Where did the idea for your podcast come from?
A: I had been a podcast fan for a couple of years listening to business-focused podcasts like Pat Flynn, and John Lee Dumas. In fact, I started listening because I wanted to learn more about running the business side of my recording studio. Pretty soon I thought, “why not start a podcast of my own to talk about making records? It’s what we all do anyway!”I saw a wide-open opportunity through podcasting to bring my expertise and network of music professionals together to create something that I had already devoted my life to: the recording studio. I also realized that many of us making records shared the same feeling of being somewhat in the shadows of the bands and artists we recorded every day. We want to say, “Hey we are Rockstars too!”
So the title, Recording Studio Rockstars, is a nod to the listeners who are “The Rockstars” or would like to be one day, and it is also a compliment to the guests that I invite onto the show who are already there.
Q: How does your first podcast compare to your most recent?
A: My first podcast was terrible! I spent all day trying out different positions on my microphone just to see what my voice sounded like. I recorded my intro ideas over and over again and spent hours mixing one minute of voice and music. I’m sure it sounded like a mess! Then one a long drive I listened to them repeatedly and began to get excited about the possibility that this might actually work.
It took me a few years to finally launch Recording Studio Rockstars. In fact, this is my fourth podcast! My first show was called “Bitcoins and Gravy,” and was all about cryptocurrencies. I created that show with a co-host and we did quite well, getting plenty of press and were quickly added to a growing network of podcasts. But after 8 months of hard work with 30 episodes and 60 interviews conducted the partnership blew up. I had started my podcast with the wrong partner. So I had to start all over again. Plus I realized that I was being pulled in a direction that while fascinating wasn’t really where my heart was in making music.
My next podcast started with a group of four co-hosts and again fell apart after eight months of hard work. This time it just fizzled out because the four parents didn’t have the same vision for the podcast. Partnerships are tough.
Then I started my music podcast called The Toy Box Studio Show and began interviewing producers and musicians but soon realized that the show title and focus didn’t really help anyone understand why they should listen.  The title made it sound like the show was all about me rather than all about the listener and helping them in some way. So eventually I got the message and launched Recording Studio Rockstars which has now grown to over a million downloads and over 250 interviews with weekly fans that love the show.
Q: There are so many podcasts these days. How do you stand out?
A: Having an easy to understand title is a great start. Recording Studio Rockstars has two keywords in it that a listener is likely to search for “recording studio.” The interview-style podcast also gains some traction by tapping into the existing networks of many of its guests. And the most important thing of all is the simple act of being unshakably consistent. By publishing on the same day every week and being consistent in the content and message, it allows the audience to know what to expect and feel like its worthwhile to give their time to listen to your show. Treat your audience with great respect and they will likely treat you with great respect, too—by listening to your show.
Q: Do you ever take your podcast on the road?
A: At first I offered to bring my laptop studio over to my guests’ studios to conduct the interviews but quickly discovered that I could be much more efficient if I had the guest come over to my studio. It took me too long to set everything up remotely. But now that the technology for recording a mobile podcast has improved so much I am looking at using new portable options like the ones offered by PreSonus.
They’re now making the AR8c portable USB interface/mixer that would easily allow you to have a professional podcasting studio in any location. 
Using their high-quality, built-in Class A XMAX mic preamps, you can connect it you a laptop to record multiple mic inputs for group podcasts, and add bumper music in real time for fast-paced podcast production… OR simply record in stereo directly to an onboard SD card for convenience that doesn’t even require a laptop!
![]() The ioStation 24c gives you a simple interface that would allow you to plug in your mic, and one for your guest to record to Studio One on your laptop. It also doubles as a powerful single-fader control surface. Plus you can record in high-quality resolution: 24-bit/192kHz.
The ioStation 24c gives you a simple interface that would allow you to plug in your mic, and one for your guest to record to Studio One on your laptop. It also doubles as a powerful single-fader control surface. Plus you can record in high-quality resolution: 24-bit/192kHz.
Q: What’s your favorite podcast right now?
A: I certainly have some podcasts about music and recording that I enjoy like Working Class Audio, Six Figure Home Studio, The Mastering Show, Roadie Free Radio, Produce Like A Pro, Bobby Owsinski’s Inner Circle, and Song Exploder. Some of my favorite business-related shows are Smart Passive Income, Entrepreneur On Fire, and the Graham Cochrane Show. And there are many other great marketing podcasts like The Art Of Paid Traffic, and Perpetual Traffic. But I also love listening to podcasts that have nothing to do with my usual work topics, like The Singularity, FM podcast, or Data Dash and Crypto Zombie.
Q: What advice do you have for someone who wants to start a podcast? 
A: Get very clear on who you would like to help with your podcast and why they would want to dedicate many hours of their life to listening to you. I have fans that regularly will tell me they have listened to nearly every episode of my show. That means they have literally spent hundreds of hours listening to me interview my guests. Wow!
So, why do they do this? Because it helps them name better records. Why will your fans want to give you that much of their time? Also, why do you want to do the podcast in the first place?
It takes a huge amount of effort and time and you will definitely get to the point where you are completely sick of creating your own podcast and wish you could just take a break. But you don’t want to take a break if you are trying to be consistent. So you want to pick a topic that you absolutely love that will carry you through those very difficult moments.
Lastly… be very clear with yourself whether you want this to become a business and learn how to outline the path from a fan listening to your show all the way to you offering them the massive value that you could make the foundation of your business. What is your mission statement in one or two sentences? Get clear and then get even clearer. And then take your topic and narrow it down further. Then take that focus and narrow it even further until you have something very specific for your audience.
Recording Studio Rockstars | The Toy Box Studio | Save Home Studios
Using 3rd-Party Cabs with Ampire XT
There’s an old joke about guitarists:
“How many guitars does a guitar player need?”
“Just one more!”
…and sometimes I feel the same way about amp sims, because all of them are different. Ampire XT benefits from PreSonus’s “State Space” technology, and if you have no other amp sims, its collection of amps has pretty much all the essentials.
What’s more, you can load thrid-party cabinet impulse responses (IRs) that re-create the sound of various cabinets, mics, and mic positions. These go into the User Cabinet, whose unique feature compared to typical IR loaders is being able to load individual IRs for the three mics.
But you can take impulses even further by turning off an amp’s cabinet altogether, and following Ampire XT with the Open Air convolution processor. Although most people probably think of Open Air as a way to create a variety of reverb and other space-based effects, it’s also a flexible impulse response loader that plays nice with cabinet impulses.
There are many free cabinet impulses on the web to get you started. Admittedly, the sound quality varies—some are fine, some aren’t, but there’s also a middle ground where tweaking the Open Air controls can give the sound you want. http://cabs.kalthallen.de is a popular source for free impulses (click on the Free tab), but there are many other companies that offer free samples, or sell impulses commercially.
The Setup
Create an FX Chain with Ampire XT followed by Open Air. The Impulse Responses are only for cabinets, so set up Ampire XT’s amp and effects however you want, but turn off the cabinet section (Fig. 1).

Figure 1: Click the cabinet bypass button (middle left, outlined in white) and the cabinet field will show None (upper right, outlined in white).
Follow Ampire XT with the Open Air, and start with its Default preset. Drag an impulse into the Open Air waveform display window (or click on the impulse name field to open the file selector, and then navigate to the impulse you want). Turn Mix to 100% so that you hear only the cabinet output, and none of the pre-cabinet amp sound (Fig. 2).
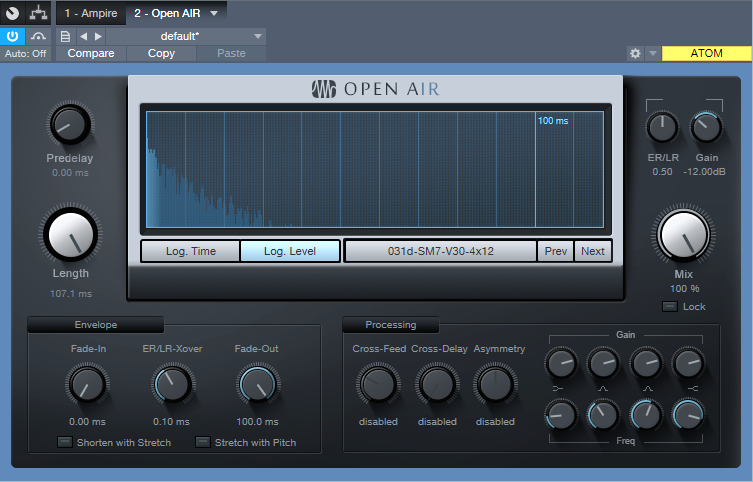
Figure 2: Make sure you set the Open Air Mix control to 100%, so that you don’t hear the pre-cabinet amp sound.
Tweaking the Tone
The Kalthallen impulse shown in the screenshot above didn’t need tweaking to sound good, but you’ll find that with a lot of the free impulse responses, you’ll need to tweak the Gain and Frequency controls. Often the main problem is a “thin” sound and Fig. 3 shows some tweaks that help remedy this issue—pull back on the highs, and boost the low end for a bigger, beefier tone.
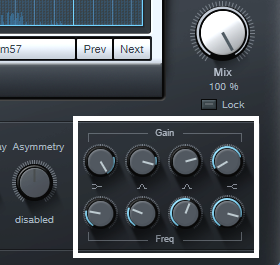
Figure 3: These EQ settings can help tame free impulse responses that sound too thin.
But the most dramatic tweaks come by enabling Shorten with Stretch and Stretch with Pitch, then varying the Length control. This can produce sounds that are similar to different mikings, or even cab sounds you’ve never heard before. The Predelay, ER/LR-Xover, and ER/LR controls can also affect the sound, although the differences aren’t as dramatic as stretching with the Length control.
Finally, although it’s great to have options, you don’t want to suffer from option overload (“maybe trying just one more impulse will give the sound I want…”). If you download a bunch of impulses, create a folder of favorites in a place where it’s easy to open it up, and drag-and-drop impulses into Open Air. If you find one you really like, save it as an Open Air preset for future use.
Open Air: Much More Than Just Reverb
After doing some fairly “normal” tips for the last few Fridays, let’s go a little crazy—and explore some interesting sound design and rhythmic possibilities.
Open Air is a wonderful convolution processor, but it’s helpful to remember it can load any audio file, not just room and reverb impulses. I’ve said many times it’s more fun to ask “what if?” than “how do I?”, because “what if” is all about experimentation. So I asked “What if I’m using a drum loop, and also load that same loop into Open Air as an impulse?” You might not use the resulting sound all the time, but give this technique a try—you’ll hear an entirely new type of percussive effect.
- Make sure the loop itself matches the song’s tempo, and it isn’t just stretched to fit. If it was stretched to fit, select the loop and type Ctrl+B to make the length change permanent.
- Copy the loop (e.g., to an empty track). Open Air doesn’t seem to like high-level drum loop impulses, so drag down the top envelope handle to reduce the level by at least -6 dB. Again, select the loop and type Ctrl+B to make this change permanent.
- Drag the copied loop into the Open Air waveform window, and now you have a cool drum impulse.
- The odds are it will sound pretty dreadful; if needed, start by reducing the Open Air Gain control to prevent distortion.
- The EQ settings are really important (Fig. 1). I’ve had the best results by cutting back on the low frequency shelf, and boosting the high frequency one. To adjust EQ, temporarily set the Mix to 100% so you can hear the results of any changes easily; after the EQ is tweaked, adjust the Mix amount to taste.
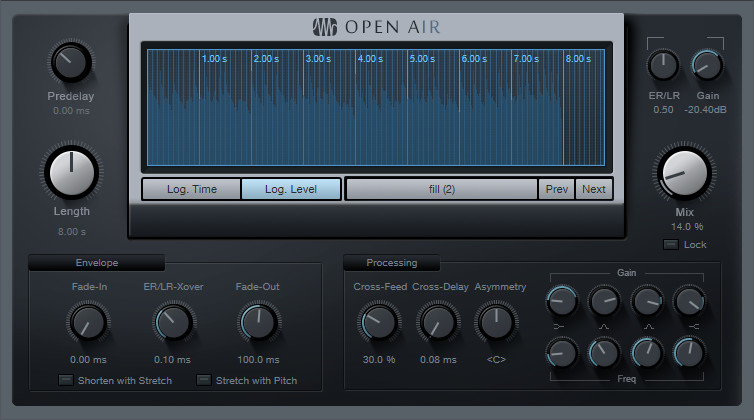
Figure 1: Typical Open Air settings when modulating a drum loop by itself.
Remember that the drum loop is still acting like a reverb, so it will build up a bit over time until the level stabilizes, and the processed sound will have a tail as long as the loop.
Next, there are several ways to add variations. First, you don’t have to convolve a loop with itself—check out the audio example.
The first four measures are a drum loop convolved with itself. The second four measures convolve the original drum loop with a tom loop, while the final four measures convolve the original drum loop with a percussion loop.
Altering the Open Air Length can create interesting effects, especially when using a rhythmically related length—like half or 1/3 the length. With sparse loops, longer lengths can work too, like 1.33, 1.5, or 1.66 the length (get out your calculator, and work with the number that’s shown under the Length control). Additional EQ and processing can add even more interest.
And remember to experiment with other types of impulse as well—pads, voices, guitar chords, whatever! You never know what you’ll discover.
River City Session Episode 2 featuring The Big Burly Man!
In celebration of our 25th anniversary, last month we announced our new YouTube series the River City Sessions. The River City Sessions give us a chance to support the kind of musicians that help build our company and share their work with a global audience. This month features Donald Gelpi aka. The Big Burly Man, performing his song “Holy Ghost.”
You may be curious about where the name “The Big Burly Man” came from (so were we) so we took some time to get to know the man behind the beard and more about his songwriting and this haunting song.
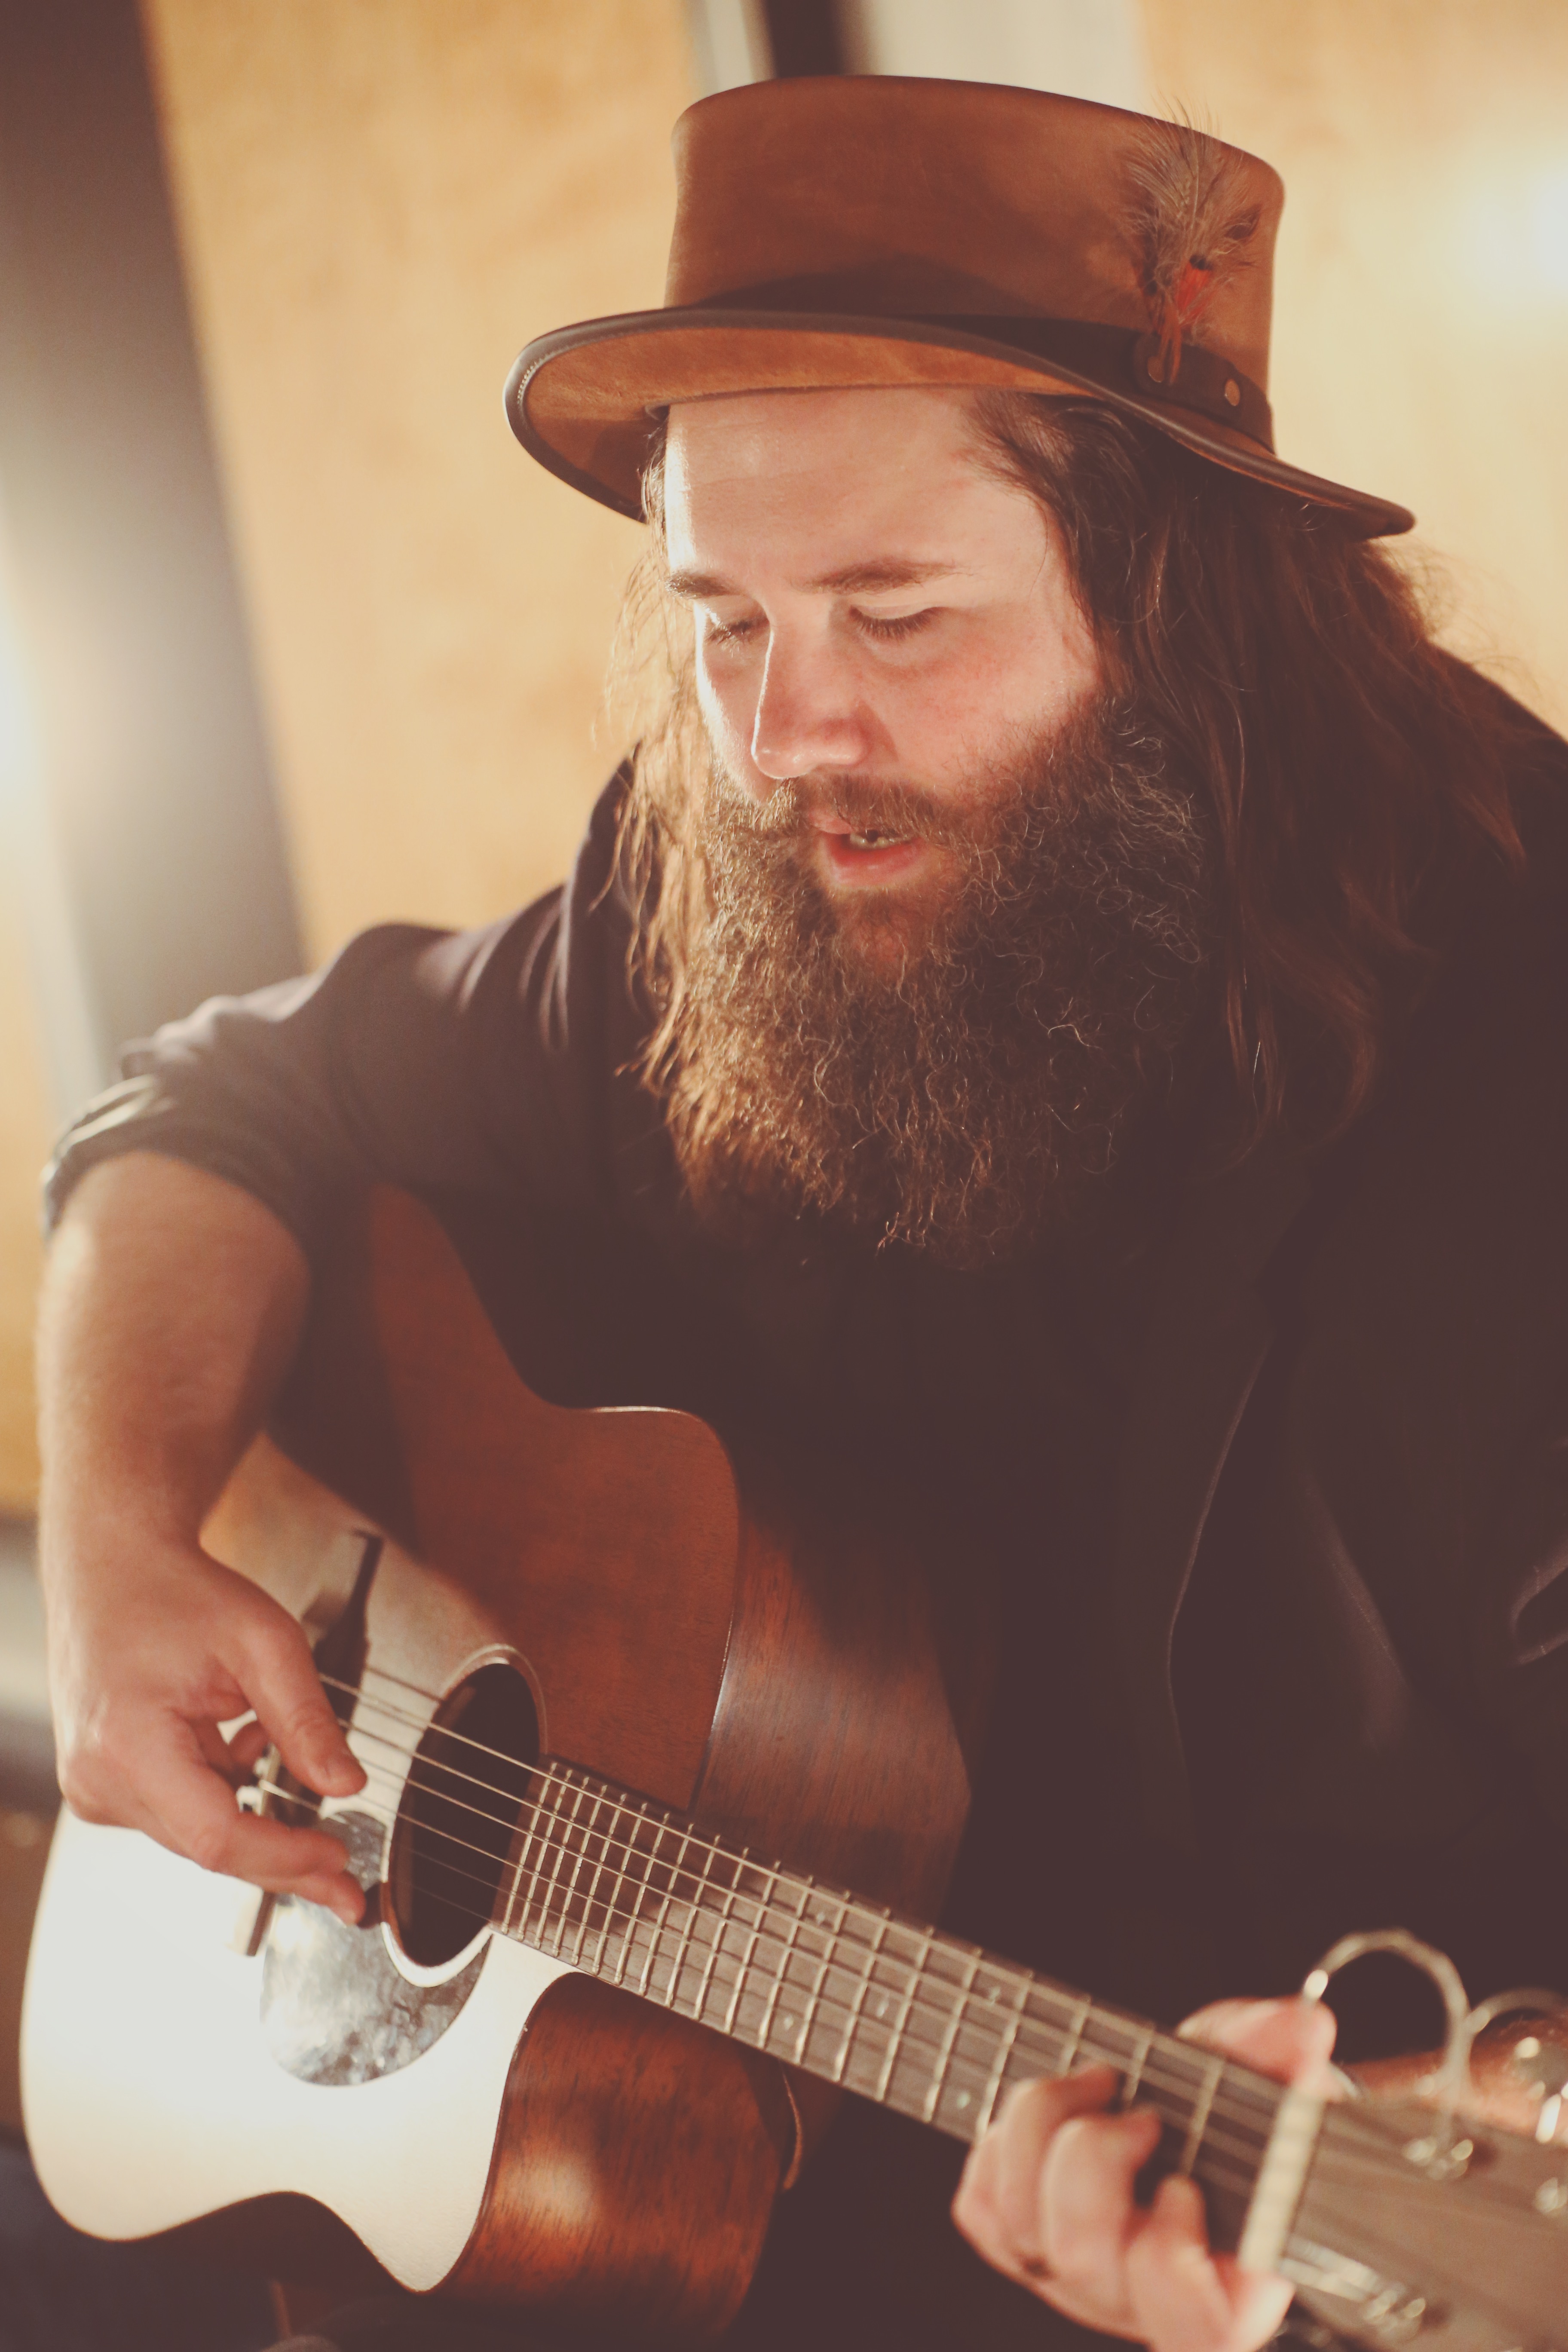
Big Burly Man performs original song “Holy Ghost”
Tell us about yourself. How long have you been making music? Who are some of your inspirations? Who did you grow up listening to?
About 18 years now. My inspirations span all over the place. From Fats Domino, Nick Drake, Van Morrison, Louis Armstrong, Elvis, Bob Dylan, Roy Orbison, The Beatles, Bob Marley, and Led Zeppelin to newer artists like Damien Rice, Gregory Alan Isakov, Ray LaMontagne, Iron and Wine, The Tallest Man On Earth, The Lumineers, Jose Gonzalez, Ben Howard, and many, many more.
Besides my rap and alternative rock stage, I really had my first musical shock listening to Led Zeppelin around 16. I was really into them, and still, love them today. I had also gotten into other classic greats like Jimi Hendrix, which got me into, Bob Dylan from loving “All Along the Watchtower.” That kind of started the whole folk-singer songwriter thing for me.
Where did The Big Burly Man come from? It’s a great name!
Thank you! Some years back I had written a song called “The Big Burly Man.” It was about me, and at the time it was kind of a hidden moniker. It had been on my mind to possibly start performing under it for a couple years. Some of my favorite artists go under stage monikers, and it was a lot more common for artists to do it back in the day. A lot of those old blues players did it too. It’s almost like being a character, as a part of this whole creative idea. I don’t know, it just seemed fun and cool.
Tell us about the song you performed for the River City Session. When did you write it? What’s the inspiration?
I wrote it towards the end of October of 2019. It’s got this haunting sound to it, and it was around Halloween, so naturally, I was thinking about ghosts and things like that. I’ve gotten a lot closer to God over this past year, and I thought how great would it be to have this haunting sounding song referring to the most epic ghost or spirit of all. Holy Ghost, I thought. I love it.
What’s the best song you’ve ever written? Why is it the best?
It’s difficult to say. “Holy Ghost” is up there. Another song that I would naturally think of first is “C’est La Vie.” It’s a very upbeat and catchy song soaked in heartfelt lyrics and truth. It’s a local fan favorite too.
Tell us about a successful show or event you were a part of.
It wasn’t without mishaps, but this past October. I had the honor of putting together my very own music festival. It was called “Baton Magique.” It was an Indie Folk Festival at Tin Roof Brewery. It was a lot of work, but we had a pretty great turnout for its first time around, and I received a lot of fantastic feedback from folks which made it all worth it for me. I was also very fortunate to have a few local musicians who were involved pitch their ideas and help with the process. It’s a beautiful thing.
Who is your dream collaboration?
Just one? Ha! It would have to be Bob Dylan, Van Morrison, Damien Rice, or Gregory Alan Isakov. There are many others, but you don’t have all day.
What do you enjoy most about making music? What do you hate most?
The magic of it all! It truly seems that way. When I write a new song, it’s like getting a new toy or something. I just can’t put it down. It feels like Christmas morning. It’s an absolutely thrilling experience! God is the creator. He loves to create. It’s not too far fetched to imagine why we love to create different things too. Mine just so happens to be simple folk songs.
I wouldn’t say I hate it, but the only part that feels like work is promoting my music, and trying to get folks to come out to a show. There’s also always a lot of “it’s who you know gets the good show” going on behind the scenes. I know that happens everywhere though, but it’s tough sometimes. That’s why I’m super grateful y’all chose me. Y’all didn’t know me, or owe me any favors. Thank you!
If you could change anything about the music industry, what would that be?
I’m not sure I’d change too much. It is what it is. And the way it is is due to many factors and reasons. I’m thankful just to do my small part as big as I can do it.
What advice do you have to anyone getting into the music scene?
Create the kind of music that inspires you! If you feel that lantern being lit and burning from the inside, you’re doing it right.
Watch his performance here:
Learn more about capturing The Big Burly Man’s intimate sound from the engineer Kyle.
PreSonus COO talks Notion, Career and PreSonus!
Here are three cool things you may not know about PreSonus’ notation software Notion.
- Notion was featured in an Apple commercial and photos featured in Apple Stores… True story. Watch the commercial HERE!
- Notion has won several awards, including a prestigious music industry NAMM TEC Award for Best Smartphone/Tablet App.
- Notion has a 4 out of 5 rating in the Apple App Store.
In 2013, we acquired the assets of Notion Music, adding Notion™ music notation and composition software and their other solutions to our product line-up. This innovative product was the first notation app to run on iOS in addition to Mac and Windows, one of the most downloaded music creation apps. Notion and their team were a natural fit in the PreSonus culture of inventive technology development. When PreSonus acquired Notion Music not only did we score an award-winning software, we also got the one and only Jim Boitnott. All year we’re celebrating 25 years of PreSonus so it’s only fitting to celebrate Notion and hear more from one of the creators and current COO of PreSonus Jim Boitnott!

What were you doing before PreSonus?
I was the CEO of Notion Music.
Was owning a business something you dreamed of doing or just fell into it as the products came along?
I never actually owned Notion Music, it was owned by several people and started by Lori and Jack Jarrett. When I was brought in I was in various management positions, and then became CEO. I never dreamed of being a CEO, I just wanted to make a great product that we were proud of. One day after working very hard for years I found myself sitting in that role. I tried to make the best choices I could for our team and customers.
What’s the process of having a great idea to getting it out the door?
This could be a book… There are so many pieces of this massive puzzle no one ever thinks about! Most importantly, commitment from incredibly talented people is crucial. Hard work, focus, and simply finding a way to make it happen. And that’s just getting it out the door… There are many more obstacles after that to make “it” successful.
What need was the Notion intended to meet?
An easy-to-use notation software product with great playback. We always wanted to lead with the sound results, others always lead with the printed results.
At the time, did you have any data supporting the need for this product?
Kind of, but none that would have made a difference. It was more of a “we want to build this and we are” mentality. However, when we released Notion for iPad we did have more data that helped us realize the opportunity. We knew there was a great opportunity for the iPad version and it did pay off with great results, as well as being featured in an Apple ad campaign… one of our proudest moments.
What was the biggest challenge? Major roadblocks?
I’ll be honest, at different times in our company history, it was different issues, such as; ego’s, red tape, lack of experience, internal politics, indecision, cooperation, budgeting, forecasting, etc. It felt like everything at different times, but when it came to making Notion the product, that sometimes felt like the easiest and clearest part. Once we finally got a team that was focused in one direction we were pretty incredible for such limited resources. Then, our biggest roadblocks became time, resources, really good competitors, and market factors.
At the time of its conception, how did you define success?
I think that was part of the problem early on, I think everyone had a different opinion of what success was. Some would have said revenue, others would say a great product, and some were just worried about other things. However, for the first iPad version of Notion, we had a clear goal “Be the first-ever notation app for iOS and make it as solid as the desktop version that it worked alongside of.”
How did you guys come together to build it?
Notion Music from 2003-2013 had some incredible people involved in it, at different times and in different ways. We had people from all over the world come together in Greensboro, NC and created something special. All played a role in getting us where we are today. I was teaching guitar and film scoring classes at Elon University using competitor notation products and then met a co-founder, we randomly struck up a conversation one day. Once she found out I was very knowledgeable with Finale and Sibelius I found myself working at Notion Music just a few weeks later. However, like many businesses, there are highs and lows, and unfortunately, after Notion v2 we had to make some major changes and lost a great number of our team and redesigned the product. The final team, which basically stayed totally intact for the last 5-6 years and all the way through the PreSonus acquisition, were put together based on their versatility, skills, and work ethic. An amazing team: Ben, Chris, Eric, Kyle, Richard, Brian and Brian, Josh, Patrick, Kris, Allison…we all worked hard and had fun.
How did you feel when it was complete?
Like most software products… Notion is not complete, and will never be complete.
When you think about the last 25 years, how does it make you feel seeing how far PreSonus has come?
Just looking at the last 6+ years I have been here it makes me very proud to see what we all have accomplished. The PreSonus team is remarkable, and the stories I have heard about the previous 20 years can go from one extreme to the other. I’ve given responses to those stories like, “How did you even stay in business?” to, “Amazing, how did you accomplish that?”..and of course “Rick did what!?” But looking at 25 years, I’m proud of PreSonus and the amazing team here, and I’m proud of the Notion team that worked through so much adversity to have an opportunity to even be here.
Interested in Notion? Check it out here.
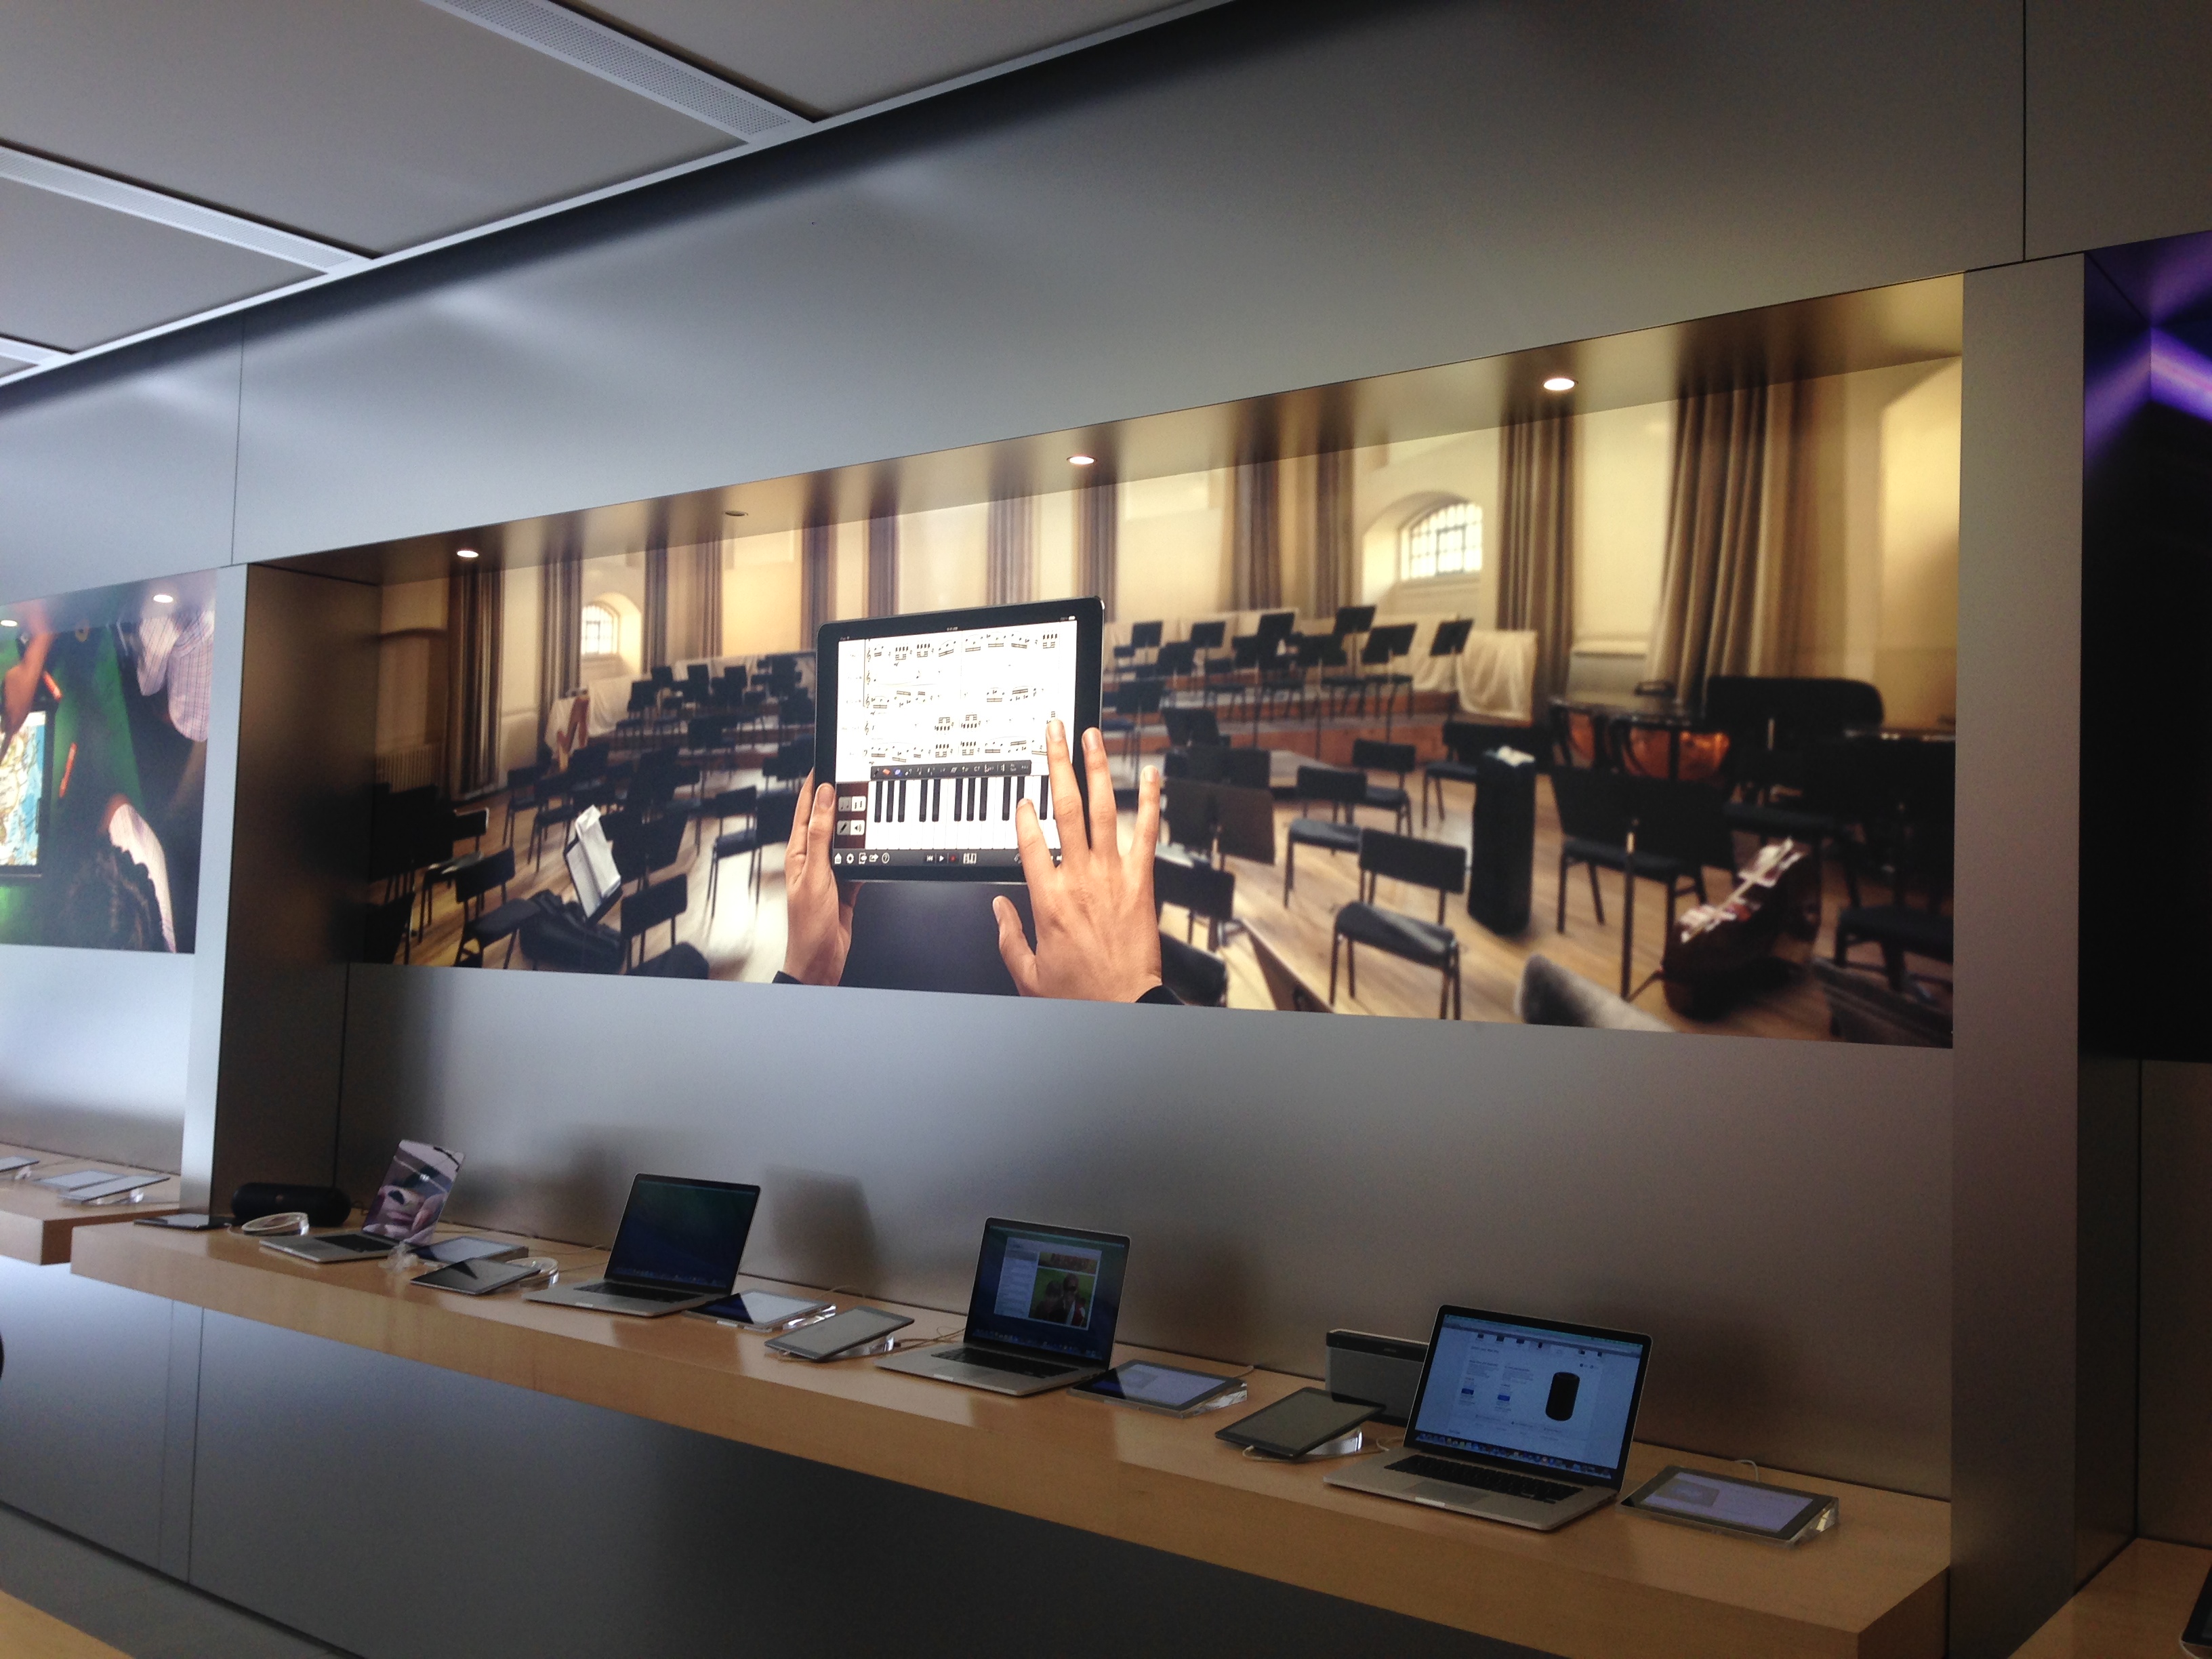
Notion Music featured in Apple Stores across the world!