Bigger, Wider Sounds: Try Stereo Miking
If you haven’t experimented yet with mid-side stereo miking, you’ll be in for a treat when you do. Here’s why:
- Record background singers with gorgeous stereo imaging
- Capture a guitar amp with stereo room sound
- Run synths and drum machines through a PA or amp, and obtain the vibe of recording electronic instruments in an acoustic space
- Capture full stereo with choirs, plays, podcasts, seminars…you name it
Even better, mid-side stereo miking collapses perfectly to mono, and Studio One Professional bends over backward to make the recording process easy.
Wait—Is This Déjà Vu?
The post Mid-Side Processing with Artist covered mid-side processing for Studio One Artist, and Mid-Side Processing Made Easy did the same for Studio One Professional. However, these were only about processing mid and sides audio extracted from an already recorded stereo track.
This post is about recording with mid-side miking, and monitoring the result as it’s being recorded. This lets you achieve optimum mic placement by hearing the results of changes in mic positioning, in real time. You don’t have to record the audio first, and then play it back to see if you got it right. And on playback, there’s no need to extract the mid and sides, because you already recorded them as separate tracks.
Mid-Side Recording? I’m Already Intimidated!
You needn’t be. You might have heard about mid-side recording requiring math, phase changes, encoding, decoding, a degree in physics, etc. Nope! As I said, Studio One Professional makes it easy.
There are many ways to record in stereo. The most common is X/Y miking, where one directional mic points toward the left, and one toward the right. But this technique is not ideal. Directional mics color sound coming in from outside the pickup pattern, and the two signals don’t play nice when collapsed to mono.
Mid-side miking uses a mic with a cardioid pickup pattern to capture the center of a stereo sound, and a mic with a bi-directional (aka figure-8) pickup pattern to capture the left and right sides. Ribbon mics inherently have a figure-8 pickup pattern, but there are also multi-pattern condenser mics that can be switched to a figure-8 pickup pattern. With this pickup pattern, the mic’s front and back pick up sound, while the sides don’t pick up any sound.
Fig. 1 shows how you’d set up the two mics for mid-side stereo recording. Pretend you’re a guitar amp looking at the mics. The top, figure-8 mic is mounted upside down because the diaphragms of the two mics need to be as close together as possible. The figure-8 mic’s side faces you. Its front faces to the left, and its rear faces to the right. Meanwhile, the cardioid mic is pointing at you.
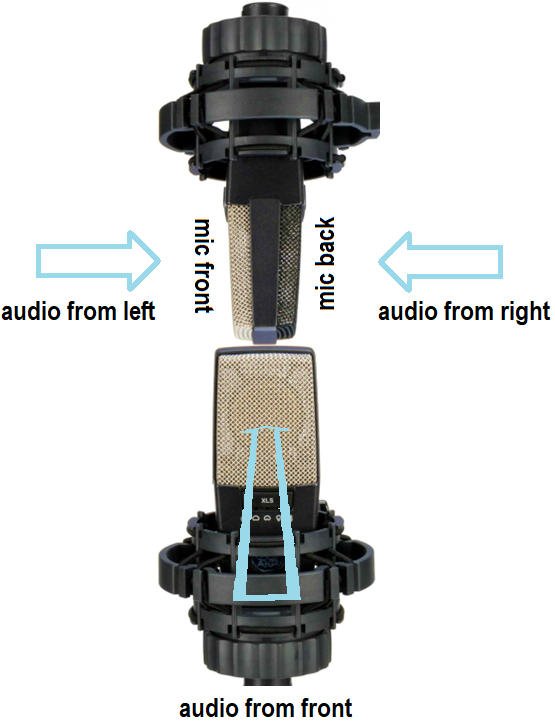
Figure 1: Mid-side miking setup. (Mic images courtesy Sweetwater Publishing)
The Studio One Connection
You need two tracks and mixer channels, one for the cardioid (mid) mic and one for the figure-8 (sides) mic. Record the two mics like you would any other mics. However, this is where many people get lost—it’s counterintuitive that the single mic cable coming from the figure-8 mic can turn into right and left channels in Studio One. Fortunately, Studio One knows how to do this.
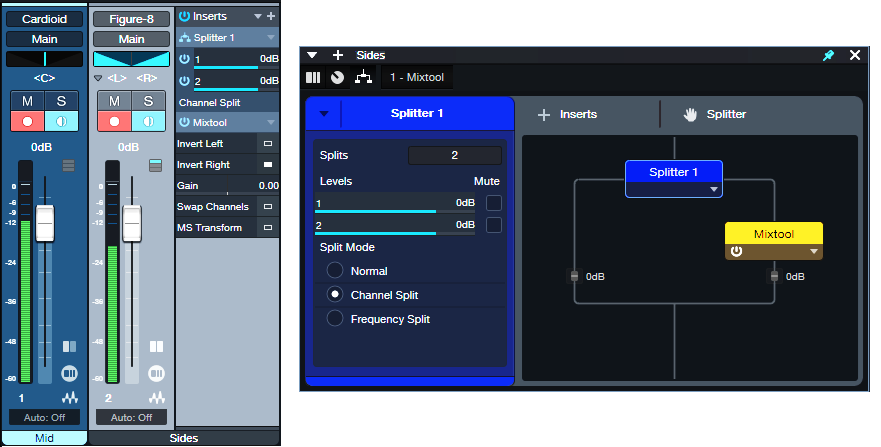
Figure 2: Studio One FX Chain for mid-side recording.
Fig.2 shows audio being recorded. Pan the Cardioid mic to center for your mid (center) audio. For the Sides mic, set the track input to mono, but set the track mode to stereo (important!). This combination allows recording in mono, but playing back in stereo.
A Splitter in Channel Split mode splits the mono audio into two paths. All the Mixtool plugin does is invert the right channel path’s polarity. Now the left and right channels are out-of-phase, so there’s a wide stereo spread. At the mixer, set the Sides channel’s Pan mode to Dual Pan. Pan the controls hard left and right. Now we have the Splitter’s left channel audio panned to the left, and the right channel’s audio panned to the right.
You might think “wait a second…if the left and right channels are out-of-phase, then if they play back in mono, they’ll cancel.” Exactly! And that’s why mid-side miking offers superb mono compatibility. When the sides cancel, you’re left with the mono audio from the cardioid mic, which also picks up sounds that are in front of the mic to the left and right. So, you’re not losing the audio that ends up being stereo—just the stereo imaging. And of course, mono audio has no problem being played back in mono.
Now, Here’s the Really Cool Part
You don’t have to understand how all this works, just create the setup described above. The Sides channel varies the level of the stereo image, and the Mid channel varies the mono center. So, you can make the stereo image wider by raising the level of the Sides channel, and lowering the level of the Mid channel. Or, lower the Sides channel for a narrower image. Or, process the two separately, and gain the advantages of mid-side stereo processing.
Go ahead—bathe your ears with stereo recording instead of mono. As long as you have one mic with a directional pickup pattern, one mic with a figure-8 pickup pattern, and two mic stands, you’re good to go. And there’s a bonus: if you start getting involved with Atmos mixing, having stereo audio gives you more fun options than mono.
How to Prioritize Vocals with Mix Ducking
This complements the tip Better Ducking for Voiceovers and Podcasts and the tip Why I Don’t Use Compression Anymore. It applies the concept of voiceover ducking to your entire mix. Here’s the TL;DR: Insert the Pro EQ3 in a master bus, feed its sidechain from your vocal track, and adjust the Pro EQ3’s dynamic EQ to reduce the vocal frequencies in the stereo mix. When done subtly, it makes the voice stand out more, because the mix behind it stands out less.
Create a Secondary Main Bus
Inserting the Pro EQ3 in the Main bus won’t work, because the vocal goes to the Main bus. So, any dynamic EQ would affect the voice as well as the mix, which we don’t want. The solution is to create a secondary Main bus. We’ll call it the Sub Bus.
1. Select all your tracks in the mix (click on the lowest-numbered track and shift+click on the highest-numbered track).
2. Ctrl/Cmd click on the vocal track to de-select it. The other tracks should still be selected.
3. Right-click on one of the selected tracks and choose “Add Bus for Selected Channels” (fig. 1).
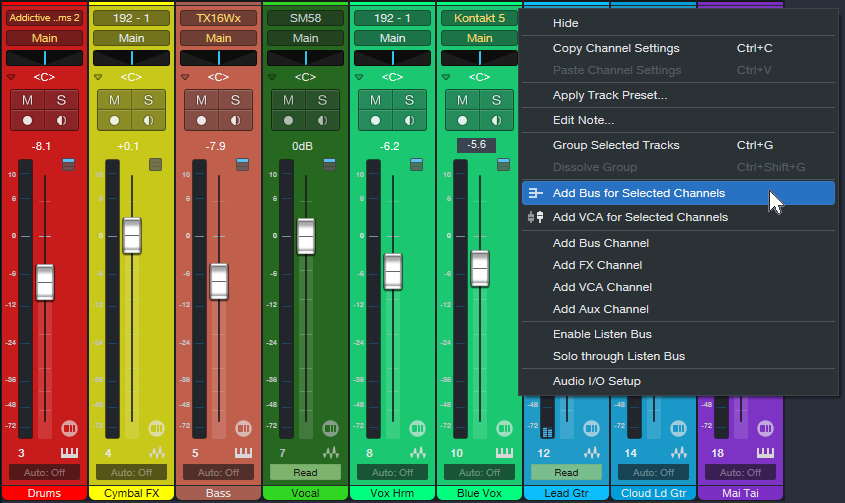
Figure 1: All tracks are selected except for the Vocal track (7). They’re about to be re-assigned from the Main bus to the new Sub Bus.
4. The new Sub Bus feeds the Main bus. Confirm that all track outputs go to the Sub Bus except for the Vocal track, which still goes to the Main bus. Now we can process the Sub Bus independently of the Vocal.
5. Insert a Pro EQ3 into the Sub Bus. Insert a Send from the Vocal track to the Pro EQ3’s sidechain. Fig. 2 is a simplified signal flow diagram.
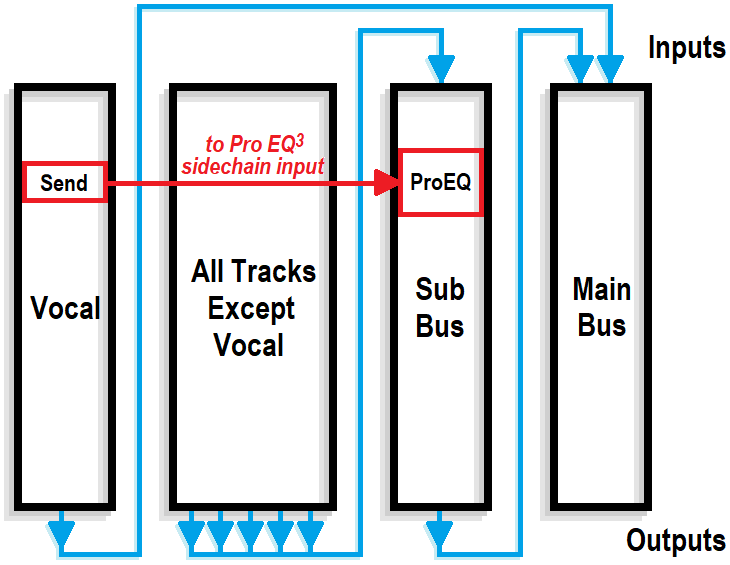
Figure 2: All tracks except the Vocal go to the Sub Bus. The Sub Bus out and Vocal out go to the Main bus. A send from the Vocal track drives the sidechain of a Pro EQ3 inserted in the Sub Bus.
6. Now comes the most important part—choosing the optimum dynamic EQ settings. The goal is to add dynamic cuts at frequency ranges that correspond to the voice. The settings in fig. 3 are a good start for experimenting with this process:
- The Frequencies are set an octave apart
- The Ranges are at their maximum negative values
- The Q settings are 2.0
- The Sidechain is enabled for the signal coming from the vocal
7. Adjust the Threshold for each stage so the vocal peaks trigger a subtle cut. Fig. 3 shows a range of 12 dB, so the cuts shown are around -2 dB to -3 dB. That may not seem like much, but it’s sufficient to open up space for the vocal.
8. Optimize the setting for each Threshold parameter. To compare the processed and unprocessed sound, turn off the Vocal track’s Send. Don’t disable the Sidechain at the Pro EQ3 instead, or the EQ will respond to the mix’s dynamics instead of the vocal’s.
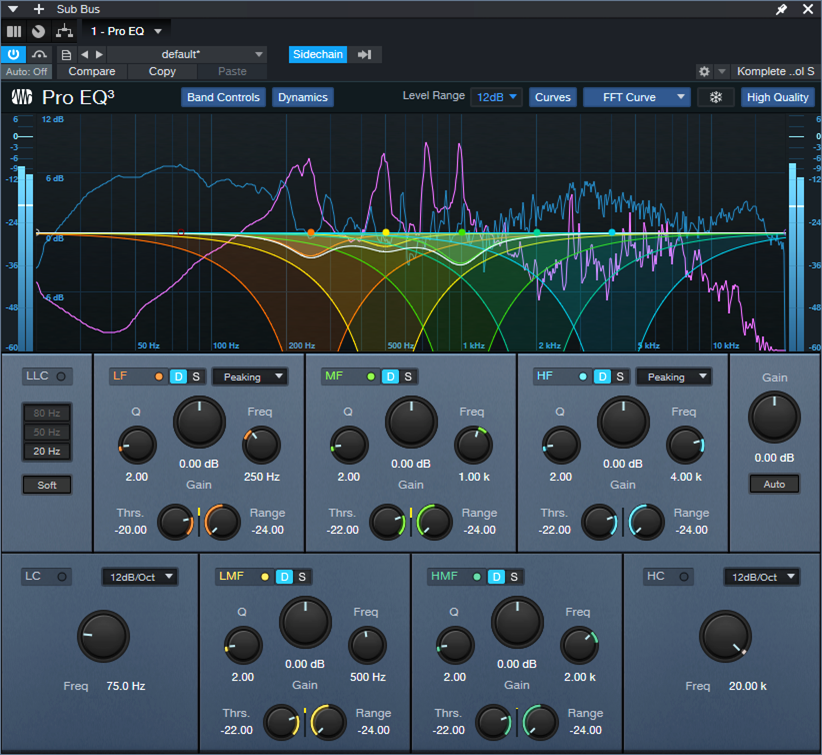
Figure 3: The violet waveform is the Vocal feeding the sidechain. The blue waveform is the stereo mix. The colored curves are the five EQ stages. Set LF and HF to Peaking mode. The wavy white line toward the center shows how much of a cut was occurring when this screen shot was taken.
9. Use the Vocal track’s Send slider to fine-tune the level going to the Pro EQ3’s sidechain.
This technique assumes the vocal has a consistent dynamic range, either from compression or from the techniques in the blog post about why I don’t use compression anymore. Otherwise, loud parts will push the background down further—but a lower level isn’t needed when the vocal is at its loudest. If the vocal’s dynamics are an issue, automate the Vocal track’s Send to reduce the amount of cut for loud vocal sections.
Because there are so many variables, there are many ways to optimize the sound:
- Narrowing the Q may provide much of the benefits of this technique without affecting the submix as much.
- You might not want to set the Range parameter as low as it is in fig. 3, so that there are “guardrails” against the Threshold settings being too low and causing too deep of a cut.
- Broadening the Q makes the effect cover a wider frequency range, so you may not need to cut as much (fig. 4). This is more like the traditional ducking used in voiceovers.

Figure 4: Broader Q settings give less focused cuts.
Remember that this technique’s intention is to add a subtle enhancement—it’s not a cure for a mix, arrangement, or vocal that needs work. However, it can provide that extra little something that makes a vocal stand out a bit more and fit more comfortably into a mix.
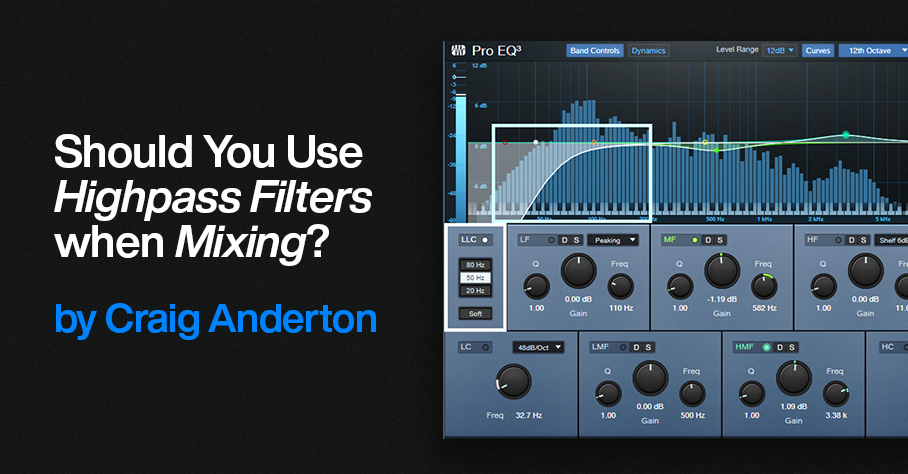
Should You Use Highpass Filters when Mixing?
Engineers sometimes advocate using high-pass filters to “clean up the low end and tighten the sound.” Others believe that because of issues inherent in highpass filters, they should be used sparingly, if at all. So, who’s right? Well, as with many aspects of audio technology, they both are in some ways. Let’s dive deeper, and then explore Studio One’s clever highpass filtering solution.
But before getting into the details, let’s look at the big picture. Joe Gilder did a video called THIS is Eating Up All Your Headroom in Your Productions where he shows how low-end energy can accumulate and reduce headroom with no sonic benefits. This is why engineers often apply a highpass filter to a final mix. So, let’s look at the sources that can lead to this accumulation of low-frequency energy, and the right way to fix them within individual tracks before they start accumulating in your final mix.
The Case for Highpass Filtering
Sometimes, low-frequency artifacts that you don’t want travel along with your audio. One potential issue is a directional microphone’s proximity effect, where getting closer to the mic boosts bass unnaturally. Hitting guitar pickups accidentally can generate low-frequency sounds. Transposing samples down by a couple octaves may put energy in the sub-sonic range and even if you can’t hear sub-sonic audio, it uses up headroom.
Highpass filtering has other applications. Too many instruments overlapping in low-frequency ranges can create a muddy sound. For example, you might want to reduce some of a guitar’s low frequencies to avoid interfering with bass. This is usually what people mean by “tightening up” the sound.
The Case Against Highpass Filtering
Analog filters produce phase shifts, but the phase shifts in highpass filters with steep slopes are particularly drastic around the cutoff frequency. Most digital filters model analog filters, so they also have phase shifts. Fig. 1 shows a typical example of phase shift in a digital highpass filter with a 100 Hz cutoff and a 24 db/octave slope. The bright line is the filter curve, the darker line shows the amount of phase shift.
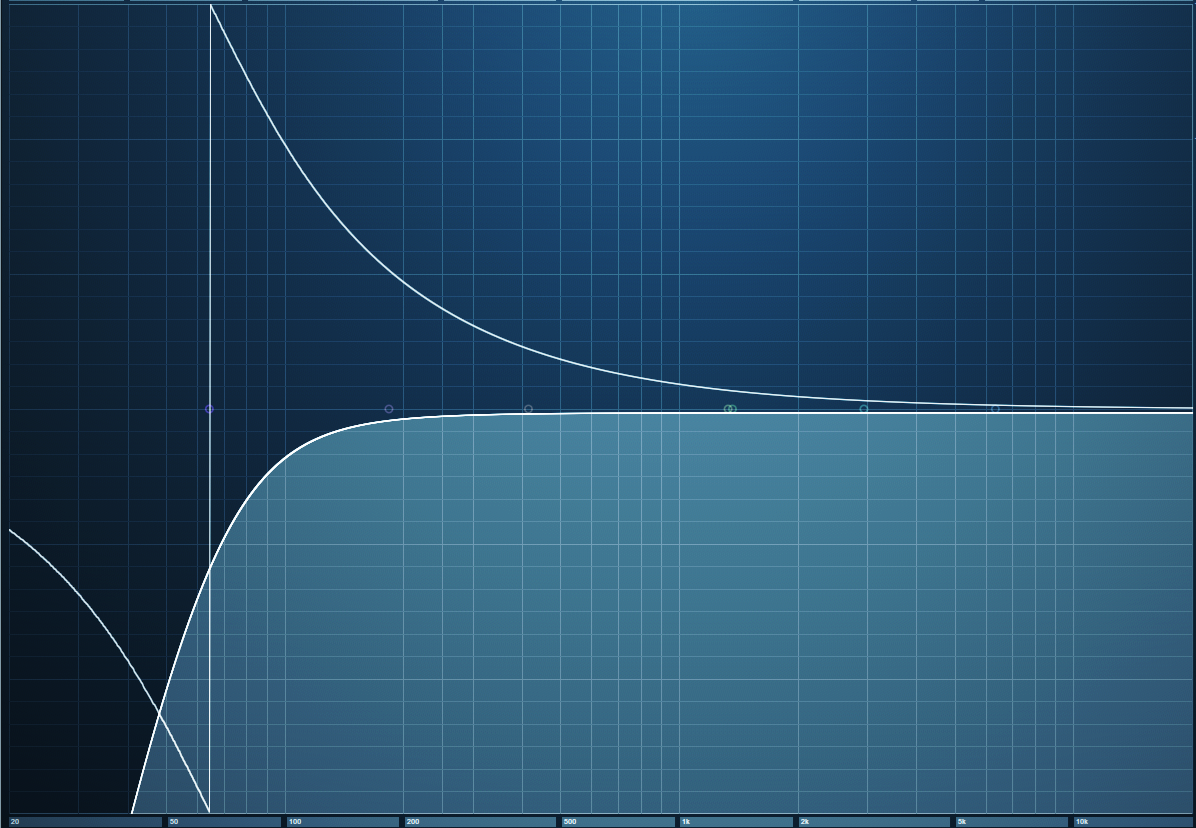
Figure 1: Phase shift around the cutoff frequency of a 24 dB/octave highpass filter. The horizontal axis goes from 20 Hz to 20 kHz, so the phase shift impacts the audio well into the midrange. The vertical axis covers -180 degrees to +180 degrees of phase shift.
Wow! That looks scary, doesn’t it? It would look even scarier if the slope was steeper than 24 dB/octave. Fortunately, our hearing can’t detect phase changes—unless the audio interacts with other audio. This is why if you set a phase shifter effect’s dry/wet control to all wet or all dry with no modulation, the sound is the same. You hear the phase-shifted effect only when there’s a mix of wet and dry sounds.
When mixing, this phase shift can matter if two signals with similar waveforms are in parallel. For example, consider bass through a DI in parallel with bass through an amp, or two mics at different distances from an acoustic guitar or group of backup singers. The worst-case scenario is multiple acoustic instruments being recorded simultaneously in an acoustic space—the inevitable leakage means the various tracks will have quite a bit of audio in common.
Differing mic distances from a source will cause phase shifts anyway, but using a typical highpass filter (e.g., to reduce p-pops with vocals) will accentuate the phase shifts. In either case, if the parallel tracks have enough audio in common, when they’re mixed together phase shifts will alter the sound.
Solution #1: Don’t Worry, Be Happy
In many cases, tracks won’t be in parallel with other tracks that have similar or identical audio, so there won’t be any audible degradation from phase changes caused by a highpass filter. If using a highpass filter does introduce phase problems, cutting with a shelf or peak filter instead can reduce the low frequencies (albeit not in the same way). These filter types produce less drastic phase changes.
Solution #2: The Pro EQ3’s LLC Filter
Highpass filters with steep slopes are popular because of their ability to remove bass artifacts and tighten up the sound. But if you need to tighten up or reduce bass artifacts with multiple tracks, inserting all those highpass filters will contribute significant phase changes. Phase variations in the bass range can be a problem (as anyone who’s tried to mix in a small, untreated room knows), so it’s unfortunate that highpass filters are the best choice for solving these problems.
However, linear-phase highpass filters don’t produce phase shifts—that’s their outstanding characteristic. You can use as many linear-phase highpass filters as you want, and not introduce any phase shifts.
But that has its own complications, because linear-phase filters require a lot of processing power. Using several multi-stage, linear-phase EQs in a project can bring your CPU to its knees pretty quickly, as well as introduce an annoying amount of latency.
This is why Studio One’s solution is particularly elegant. The Pro EQ3 has a single linear-phase highpass filter stage (fig. 2). This covers the most common need for a linear-phase filter in most projects, without the CPU burden of a multi-stage linear-phase EQ where you may not need linear-phase operation for the other stages anyway.
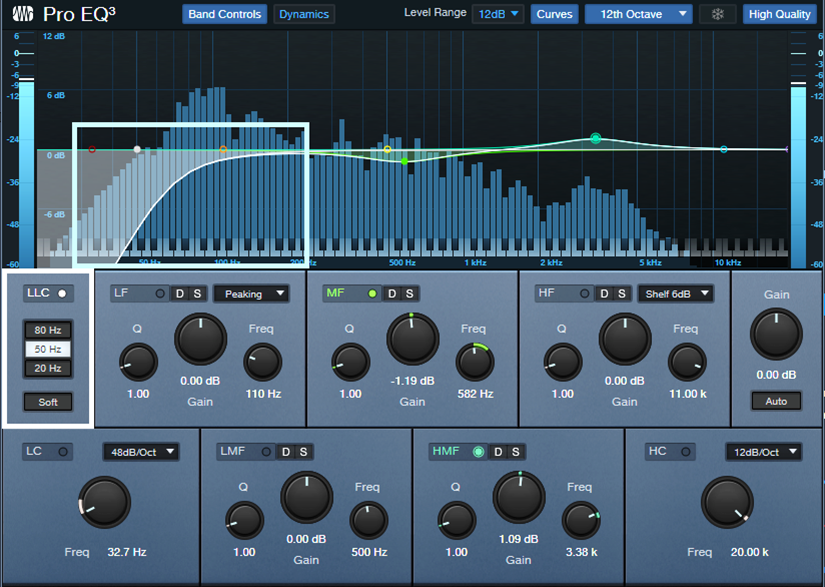
Figure 2: The LLC linear-phase highpass filter (outlined in white) is producing the low-frequency cut outlined in light blue.
Enabling the LLC stage contributes about 31 ms of latency compared to the 50-100 ms from a typical multi-stage linear EQ, and takes care of the frequency range where you’re most likely to need a linear-phase EQ. If adding the LLC filter is still too CPU-intensive for a project, or if the latency is bothersome, you can always invoke the “Transform to Rendered Audio” option. Check “Preserve Real Time State” if you think you may need to edit the tracks effects’ settings in the future. This allows you to return to the unrendered audio, make your edits, and then re-render.
The LLC’s natural slope is 24 dB/octave, which will cover most low-frequency problems that need a solution. For general tightening, you may prefer the 12 dB/octave slope obtained by clicking the “Soft” button.
So—Highpass Filtering, Yes or No?
The answer is…both! If you need to highpass an individual track, go ahead and do it if the results sound better—you won’t need to use a linear-phase filter, so there won’t be CPU issues. But if you need to use highpass filtering with parallel tracks that have audio in common, the LLC stage is a clever solution. Furthermore, if you need a slope that’s steeper than 24 dB/octave, supplement the LLC with a shelf filter set for a mild slope. This cuts the low-frequency audio further, but won’t add as substantial a phase shift as a non-linear-phase highpass filter set to a steeper slope.
Studio One: A Brief Exploration with Josh Cumbee

The GRAMMY-nominated artist, producer, and songwriter shows us how he uses Studio One to cook a musical idea from scratch.
Josh Cumbee is a triple threat: The LA-based artist, producer, and songwriter started releasing his own music while he was enrolled in the music business program at USC, then branched out into television and film composition before landing an engineering gig with super producer and John Legend co-writer, Toby Gad.
In 2015, he was nominated for Album of the Year at the Latin Grammy Awards and has since gone on to work with Olivia Rodrigo, Madonna, Sia, Sean Paul, Janet Jackson, Armin Van Buuren, and more. The secret to his sweeping success? “There’s so much room in the sandbox, and there’s so much flexibility with audio and with all the tools we have. And for me, I feel like I have to capture everything. I have to suck all that oxygen out of the room and put it into the idea.”
Watch this episode to see how Josh weaves lush pads and dynamic vocal stacks into bespoke percussion and found sounds with Studio One.
In this Brief Exploration, Josh Cumbee builds a richly-layered track from scratch using a dynamic range of instruments and effects from Studio One’s complete suite of included plug-ins.
Josh starts with a base layer of haunting synth pads before improvising a short, syncopated guitar riff over the top to generate the initial rhythmic pattern. “I usually just have ‘takes to layers’ on, do a couple passes, and use a little bit of quantization because I don’t want to lose that human feel…I like to get a couple takes, until I feel like I’ve felt it emotionally. Then if there’s any problem spots, I comp through from previous ones.” Then the whole composition gets a healthy dose of Studio One’s Analog Delay to generate ambience and depth.
With the melodic foundation in place, Josh drums out a beat on a tightly mic’d road case and drenches it in “juicy, fat, nasty” Red Light Distortion “to create something as bespoke as possible, and then work the samples around that, rather than having to try and make the samples fit into this world.” Then he improvises lyrics and a vocal melody using a combination of templates and onboard effects: “I’m a total sucker for harmonies, and I find it’s very inspiring – especially once you find a hook line – to play around with that. For me, the way that I’m able to do those quickly is by having a template already set up” and “for background vocals, I can instantly fix it with Melodyne.”
In the home stretch, Josh transitions to the low end with a bone-rattling bassline courtesy of Studio One’s stock monophonic subtractive synth, Mojito, and the Eris Sub 8. Then he creates avant-garde percussion samples from the sounds of clanking camera equipment he captured during setup – “I could dig through a sample bank for a thousand years, and could never find what happened in this room today” – and drenches the entire composition in additional textures and tones for a hauntingly atmospheric finish.
Any final words of wisdom? “Studio One can be intimidating because there are so many options. And when you see somebody using it in an advanced fashion, it gets a little scary; but the truth of the matter is Studio One isn’t the deep end of the pool – it’s more like an ocean. You kind of can walk in from the beach. You bring your key commands from another DAW, you can bring a lot of your workflows. You just find that there’s more depth and flexibility every step of your process that allow you to continue to level up, so you never really plateau.”
PreSonus products used: Studio One, Analog Delay, Red Light Distortion, Melodyne, Eris Sub 8
Try Studio One for free, and check out the rest of our A Brief Exploration series here.
Why I Don’t Use Compressors Anymore
This wasn’t a conscious decision, or something I planned. But when I looked through my last few songs while seeking candidates for a book’s screenshots, I was shocked to realize there were almost no channel inserts with compressors. Curious, I went back even further, and found that I’ve been weaning myself off compressors for the past several years without even knowing it. WTF? What happened?
First of All, It’s 2023
Compressors are at their very best when solving problems that no longer exist. I certainly don’t need to control the levels of the PA installations at the 1936 Berlin Olympics (one of the first compressor applications). In the pre-digital era, compression kept peaks from overloading tape, and lifted the quiet sections above the background hiss and hum. But it’s 2023. Compression isn’t needed to cover up for vinyl or tape’s flaws. Besides, we have 24-bit A/D converters and increasingly quiet gear. Today’s technology can accommodate dynamic range.
Even though compression does bring up average levels for more punch and sometimes more excitement, to my ears (flame suit on) the tradeoff is that compression sounds ugly. It has artifacts, and adds an unnatural coloration. Furthermore, the way it reduces dynamic range takes away an emotional element we may have forgotten existed—because it’s been clouded by compression for decades. So, how can we retain the benefits of compression, yet avoid the ugly aspects?
Replacing Bass Compression
In my studio musician days, compressing bass was a given (not compressing bass may even have been against Local 802’s by-laws, haha). But I prefer light saturation. It clips off the peaks, gives more sustain because the average level can be higher, and doesn’t produce a “pop” on note attacks. (Yes, lookahead helps with compression pops, but then this neuters the attack.)
Saturation not only allows a higher average level, but adds harmonics that help bass stand out in a track. And bass needs all the help it can get, because low frequencies push speakers and playback systems to the limit. It’s amazing how much saturation you can put on bass, yet when part of a mix, the bass sounds completely clean—and you can hear all the notes distinctly.
Fig. 1 shows settings I’ve used in recent projects. RedLightDist sounds wonderful, while Autofilter (used solely for its State Space saturation) has the advantage of including a lowpass filter. So, you can trim the harmonics’ higher frequencies if needed.
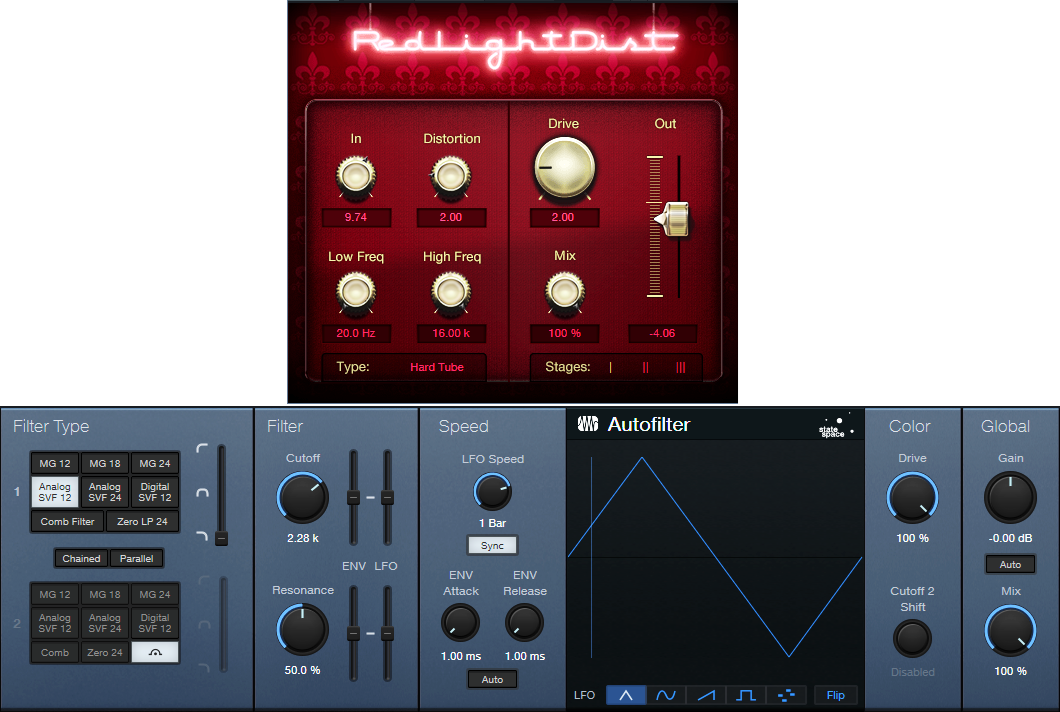
Figure 1: (top) RedLightDist settings for saturation. (bottom) Autofilter taking advantage of State Space distortion.
Replacing Vocal Compression
Compression keeps vocals front and center by restricting dynamics, so the soft parts don’t get lost. But there’s a better option. Gain Envelopes and normalization allow tailoring vocal dynamics any way you want—without attack or release times, pumping, breathing, overshoot, or other artifacts. The sound is just as present and capable of being upfront in a mix as if it’s compressed. However, the vocal retains clarity and a natural vibe, because gain envelopes and normalization have no more effect on the sound than changing a channel fader’s level (fig. 2).
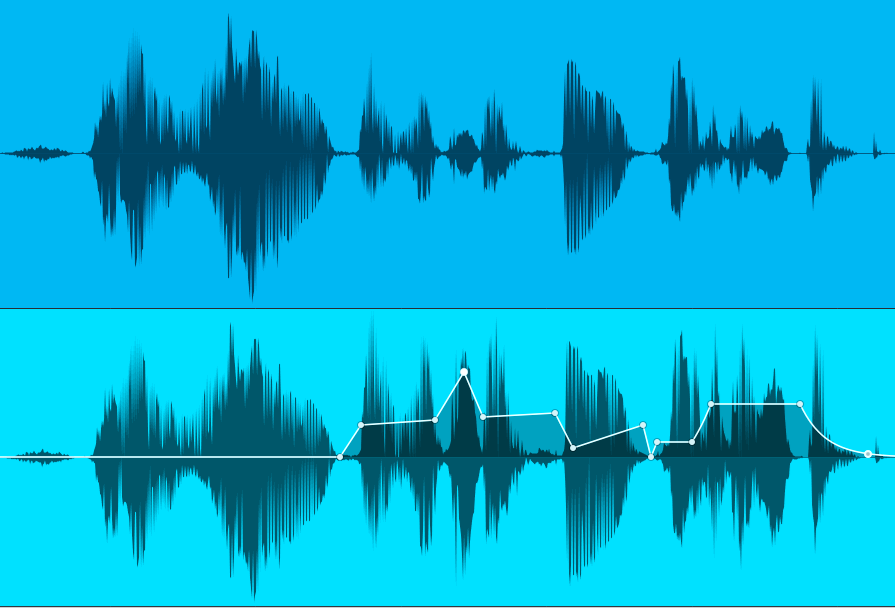
Figure 2: A typical vocal, before and after using a Gain Envelope to edit the level for more consistency.
Even better, while you’re editing you can also tweak mouth clicks, pops, and breaths in a way that compressors cannot. I’ve covered using Gain and Event Envelopes before, so for more info, check out the video Get Better Vocals with Gain Envelopes. Also, see the blog post Better Vocals with Phrase-by-Phrase Normalization.
I’m not the world’s greatest vocalist by any means, yet people invariably comment on how much they like my vocals. Perhaps much of that is due to not using compression, so my voice sounds natural and connects more directly with listeners.
Replacing Drum Compression
Adding compression on drums for more “punch,” as well as to bring up room ambience, is common. However, drums were the first instrument where I ditched compression in favor of limiting. Limiting keeps the peaks under control, but doesn’t change their shape and also allows for a higher average level. This brings up the body and room sound. (Note: Limiter2 is particularly good for this application. You may not have equally good results with other limiters.)
Look at the drum waveforms in fig. 3. Both have been normalized to the same peak levels, but the lower one had 5 dB of limiting. The peaks are still strong, and the average level is higher. Fortunately, this amount of limiting isn’t enough to reduce the drum’s punch. In fact, the punch and power is stronger than what I’ve been able to obtain with compression.
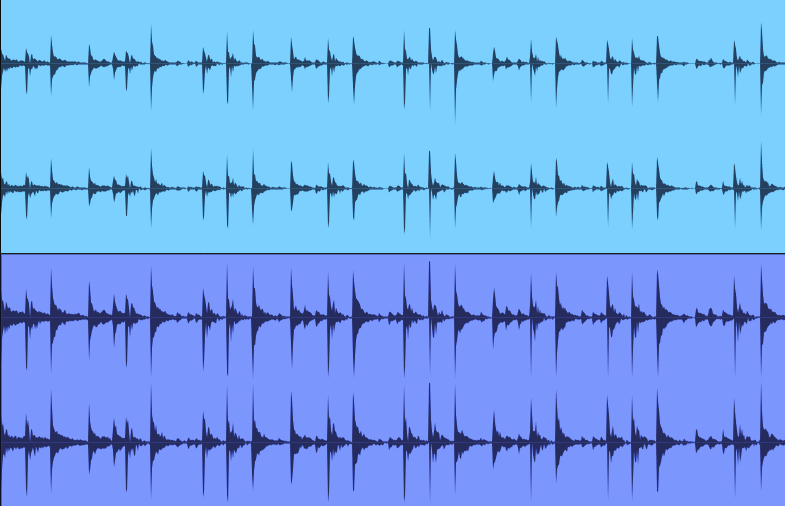
Figure 3: The top drum waveform is prior to limiting. The bottom one has had 5 dB of limiting. Both are normalized to the same peak value.
Final Comments
Although I don’t use compression much anymore for audio, I do use it as a tool. Gobs of compression can increase guitar sustain. Inserting a compressor prior to an envelope filter can restrict the dynamic range for more predictable triggering. Using two compressors in series, set to very low ratios and high thresholds, “glues” tracks and buses together well. Then again, that’s because the effect is so subtle the result doesn’t sound compressed.
But let’s get one thing straight: I certainly don’t mean this as a diss to those who like the sound of compression. It has its own sound, and it’s become a fixture in pop and rock music for a reason. Top engineers who line their walls with gold records have gotten a lot of mileage out of compression. I would never recommend that people not use compression. What I do recommend is trying other options. To hear what these techniques sound like, check out any recent music on my YouTube channel.
I’m sure my avoidance of compression is a personal bias. I’ve worked on many classical music sessions, and my gold standard for sound is live acoustic music. Neither one has anything to do with compression. So, it’s probably not surprising that even in rock and EDM productions, I strive for clarity and a natural, lifelike sound. Compression just doesn’t do that for me. But hey, it’s 2023! Now we have tools that can give us the goodness of compression, without the drawbacks.
Phrasing—The Final Correction Frontier
First, a follow-up: In the October 13 tip about creating Track Presets for parallel processing, I mentioned that Track Presets can’t include buses, which is wrong. Sorry! However, the premise behind the tip is still valid. For example, by using tracks (which can record) instead of buses (which can’t), you can create Track Presets for recording tracks with effects that produce random changes in real time. Or, create Track Presets optimized to record hands-on effects control while recording the results. Another part of the tip about creating a dummy bus so that a channel fader can provide a master “send” to tracks, without sending audio to the main bus, can also be useful. Now, on to this week’s tip.
We have tools to correct pitch, and tools to correct timing. But one of the most important aspects of expressive music is phrasing, especially with vocals. Pushing a vocal slightly ahead of the beat, or lingering on a phrase a bit longer, can enhance the vocal performance.
Fortunately, the Bend Tool can alter phrasing. Of course, vocals don’t have the fast, strong transients to which bend markers usually lock. But we can place bend markers where we want them, and ignore the rhythmic grid. Think of bend markers not only as tools to correct timing, but as tools to add expressiveness to vocals by altering their phrasing.
Getting Started
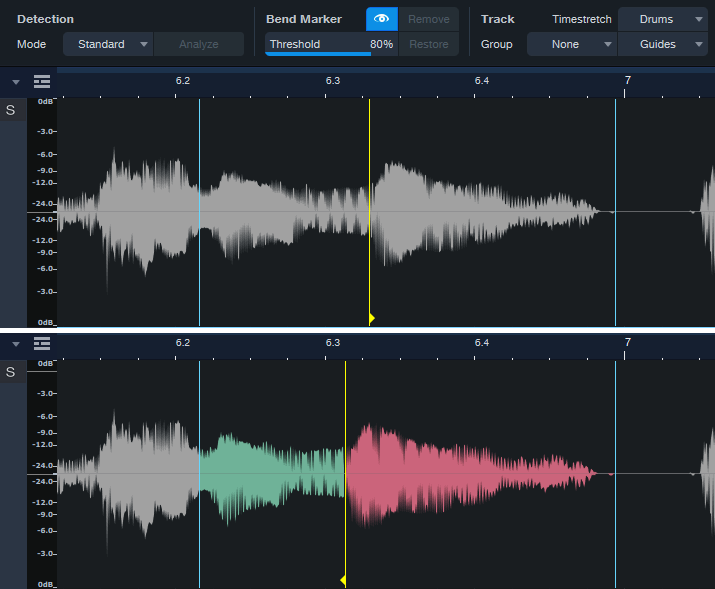
Figure 1: Note the show/hide “eye” button toward the top. Moving a bend marker affects the audio between it and both the previous and next bend markers.
- Turn on Show Bend Markers (the eye button in fig. 1).
- Turn off snap. Phrasing rarely benefits from the grid.
- Remember that stretching involves the interaction of three bend markers. The top part of fig. 1 shows a phrase before moving the yellow bend marker. The lower part shows what happens after moving the bend marker forward in time. Audio between the bend marker and the previous bend marker becomes time-compressed (green coloration). Audio between the bend marker and the next bend marker becomes time-expanded (red coloration).
- You’ll often need to place bend markers manually, in the spaces between words or phrases.
Remove Unneeded Transients, then Edit the Phrasing
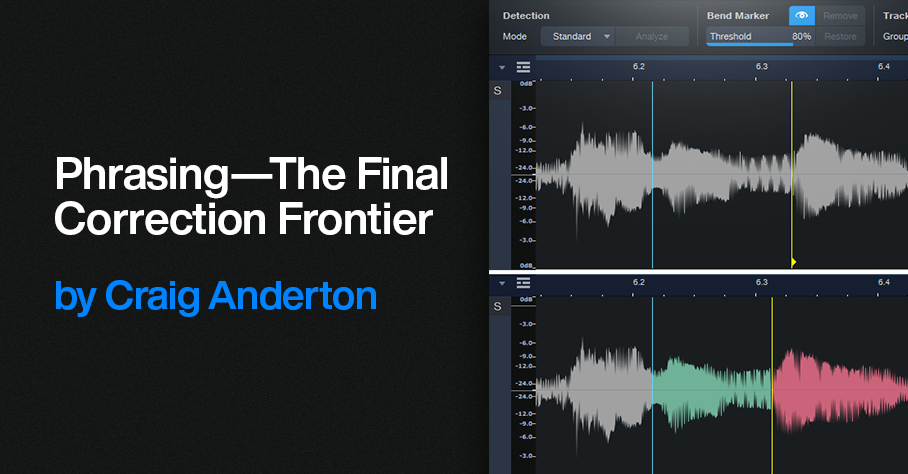
Because vocal phrases don’t have defined transients, asking Studio One to detect transients won’t give the same results as percussive instruments. Often, transient pairs will be close together. You want only one of these (usually the one closest to the note beginning). Hover over the unneeded bend markers with the Bend Tool, and double-click to delete them (fig. 2).
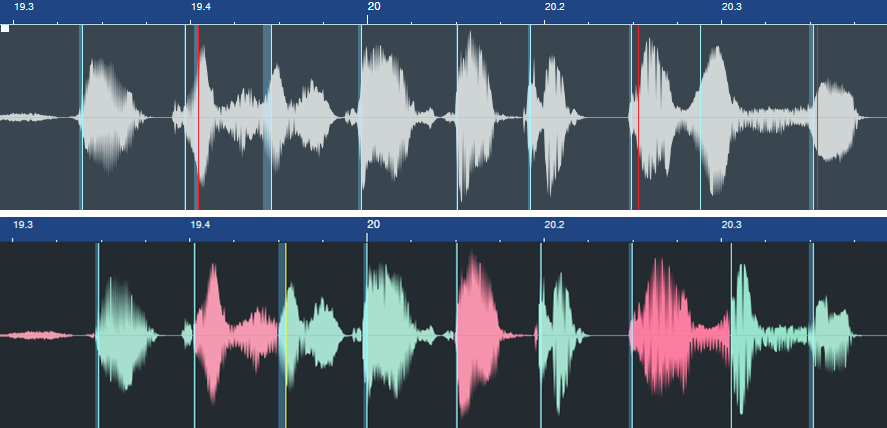
Figure 2: In the top image, the bend markers to be eliminated are colored red. The lower image shows the result of altering the phrasing.
In this case, I wanted to tighten the timing and move some notes closer to the beat. But also look at the second bend marker from the right in fig. 2. This had nothing to do with timing, but altered a word’s phrasing to slow down the audio leading up to it, and speed up the audio after it. This led the note more dramatically into the final note.
Here’s another before and after example. The words toward the end have had their phrasings adjusted considerably.

Figure 3: The phrasing slows down toward the end to give the lyrics more emphasis. The bend marker at the far right was added to keep the final word’s length closer to its original length.
Remember that moving a bend marker affects audio before and after the marker. In the bottom of fig. 3, the added bend marker at the end of the last word prevented the audio from being too compressed. Otherwise, the word would have been shortened. In cases where you need to move an entire word earlier or later on the timeline, sometimes it’s easier to split at the beginning and end of the word, and move the Event itself rather than use bend markers.
Custom Markers
If the transient detection isn’t useful with vocal phrasing, you’re better off placing bend markers manually. The Bend Tool options are:
- Click to create a bend marker.
- To alter the phrasing, hover on a bend marker. Then, click and drag to move the bend marker earlier or later on the timeline.
- To move a bend marker without affecting the audio, hold the Alt/Opt key, hover over the marker until left- and right-facing arrows appear, then click and drag.
- Double-click on a bend marker to delete it.
Vocoder Tweaks and Tricks
Vocoder’s aren’t “normal” effects. For example, Arturia’s Vocoder V is an effect/instrument hybrid, because it’s an audio effect that includes a synthesizer driven by a MIDI input. Prior to Studio One version 6, which added instrument sidechaining, Vocoder V didn’t work in Studio One. However, as mentioned in the Studio One forum by users Feugeu1 and Tremo, Blue Cat Audio’s PatchWork could provide a workaround.
With version 6, the workaround was no longer necessary, with one exception we’ll get to shortly (which also applies to the PreSonus Vocoder). Referring to fig. 1, here’s how to use Vocoder V with Studio One:
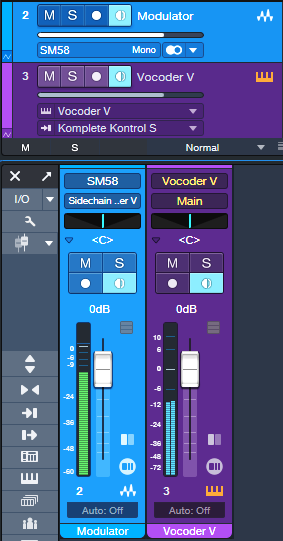
Figure 1: Track setup for using Arturia’s Vocoder V in Studio One.
1. Create an audio track for the Modulator audio (e.g., a microphone). Input Monitor must be on for real-time mic use, but not if you’re playing back audio.
2. Drag the Vocoder V into Studio One’ Arrange View to create an instrument track.
3. Instead of assigning the modulator’s track Output to the Main bus, assign the track Output to the Vocoder V’s sidechain.
4. In the Vocoder V’s Advanced settings section, choose Voice Input and a suitable preset (e.g., Vocoder). Close the Advanced settings section.
5. Verify that the Vocoder V instrument track’s input is assigned to your MIDI keyboard, its output goes to Vocoder V, and the instrument track’s Input Monitor is enabled.
Talk into the mic or play back audio from the track, and play your keyboard to trigger the Vocoder V. You can record the Modulator audio and the MIDI data feeding the Vocoder V at the same time.
Finally, under the “it’s always something” category, sometimes calling up the Vocoder V editor from PatchWork doesn’t work. Simply copy the Vocoder instance in PatchWork, cut it, and then paste it back into where you cut it.
About Low-Latency Monitoring and Vocoders
However, there’s a potential complication. PreSonus forum user Bailatosco found that when enabling low-latency monitoring for instruments, Vocoder V can’t accept audio input with Studio One. This is also true if you want to use a virtual instrument’s audio output as a carrier signal for Studio One’s Vocoder.
If you don’t use low-latency monitoring for your instruments, you can ignore the rest of this tip. But if low-latency monitoring is essential to what you do, the workaround used prior to v6.0 with Blue Cat Audio’s PatchWork plugin provides a solution. Fig. 2 shows the track setup.
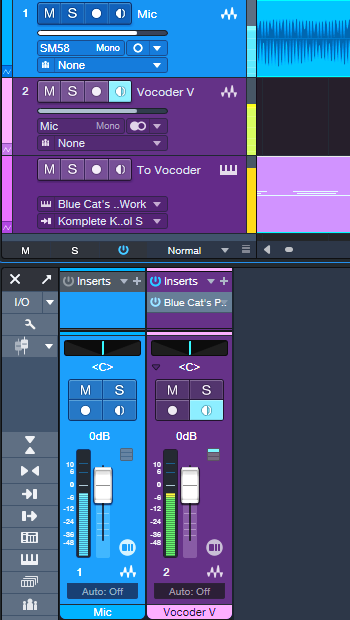
Figure 2: Track setup for using Vocoder V with Low-Latency Monitoring enabled.
1. Create an audio track. Choose your Mic (or other modulator source) as the input, and enable Input Monitor.
2. Insert Blue Cat Audio’s PatchWork in the audio track.
3. Load (not drag and drop) Vocoder V into one of the PatchWork slots.
4. Create an Instrument track. Assign its input to your MIDI keyboard, its output to PatchWork, and enable the Instrument track’s Input Monitor.
As with the previous example of using Vocoder V without low-latency monitoring, you can talk into the mic or play back audio from the track, and play your keyboard to trigger Vocoder V. Recording the Modulator audio and the MIDI data feeding the Vocoder V at the same time is also possible.
We can do a similar trick to feed an instrument carrier input into the PreSonus Vocoder, and be able to use low-latency monitoring. As with Vocoder V, the synth driving the Vocoder won’t benefit from low-latency monitoring, but any other instruments will. Fig. 3 shows the track setup.
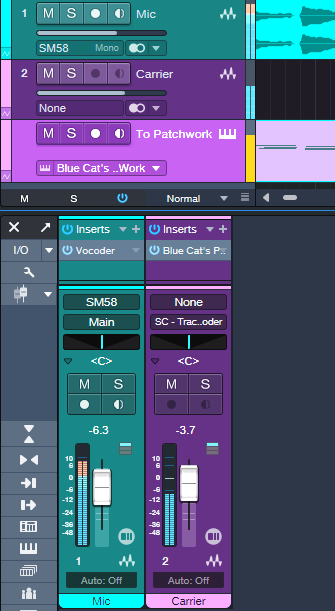
Figure 3: Track setup for using the PreSonus Vocoder with low-latency instrument monitoring.
1. Create an audio track. Choose your Mic (or other modulator source) as the input, and enable Input Monitor. Insert the Vocoder into this track.
2. Create a second audio track, and insert Blue Cat Audio’s PatchWork.
3. Load (not drag and drop) the instrument you want to use as a Carrier into one of the PatchWork slots.
4. Assign the second track’s output to the Vocoder sidechain (as shown in fig. 3), or add a pre-fader Send and assign it to the Vocoder sidechain if you want to be able to mix in the carrier sound with the second track’s channel fader.
5. At the Vocoder, choose the appropriate sidechain input, and choose Side-chain for the Carrier Source.
6. Create an Instrument track. Assign its input to your MIDI keyboard, its output to PatchWork, and enable the Instrument track’s Input Monitor.
Happy vocoding!
Release Your Music in Stereo and Immersive
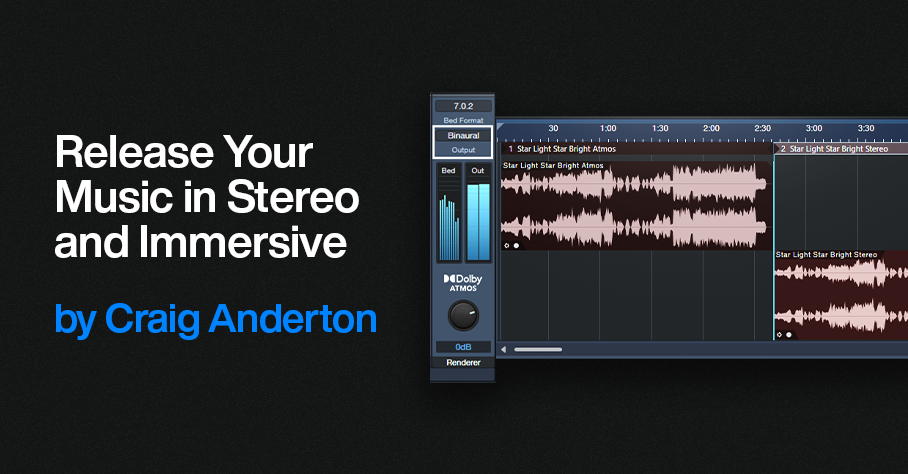
For over a decade, stereo and mono vinyl records co-existed before the transition to stereo was complete. During that time, many records were released in both mono and stereo. We’re in a similar situation now, with stereo still ruling the world but with immersive sound (primarily Dolby Atmos) coming on strong. It makes sense to release music in both formats—and Studio One makes it easy.
I release my music on YouTube, which doesn’t support multichannel Atmos files. But YouTube can play back Atmos files that have been rendered as binaural stereo. As long as people listen on headphones or earbuds, the music will have that full, wide immersive quality. So, I now post a headphones-only Atmos mix, and a conventional headphones/speakers stereo mix. Given how many people listen to music on headphones or earbuds, this isn’t as limiting as it might seem.
So does this work? Following are links to a binaural and stereo mix of the latest song in my YouTube channel. Both are done entirely in Studio One 6.5. Don’t expect instruments whizzing around your head—this isn’t a movie or a game. The more you listen to Atmos Binaural mixes and acclimate to what the process does, the more you hear the full, wide effect compared to stereo.
Atmos Binaural (headphones or earbuds only)
Stereo (speakers or headphones)
Here’s an overview of why Studio One makes this process so easy, especially if you’re used to mixing with headphones. Refine the Atmos mix as much as you can with headphones, because that’s how people are going to listen to it. Then, create a new Project in the Project page.
Set the Dolby Renderer to Binaural, and send the file to the Project page. Return to the Song page, choose Stereo for the Renderer to downmix your Atmos mix to stereo, and then add that file to the Project. Your Project will then have both Atmos Binaural and Stereo files, which you can export for your two mixes.
Note that the stereo downmixing is faithful to the mix. Of course, the stereo file lacks the Atmos fullness, but you don’t lose any of the music. In fact, because the downmixing tries to translate any Atmos nuances to stereo, you may end up with a better stereo mix than if you’d started with a stereo mix.
How to Do It—The Details
Here’s the step-by-step process.
1. Finish your Atmos mix. Make sure it sounds awesome on headphones 😊. The Dolby Atmos Renderer should be set to Binaural (fig. 1).
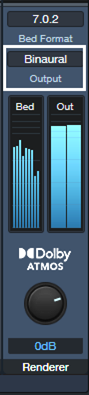
Figure 1: Choose Binaural for the output when rendering to Atmos Binaural.
2. Choose Song > Add to Project > New Project “Song Title.”
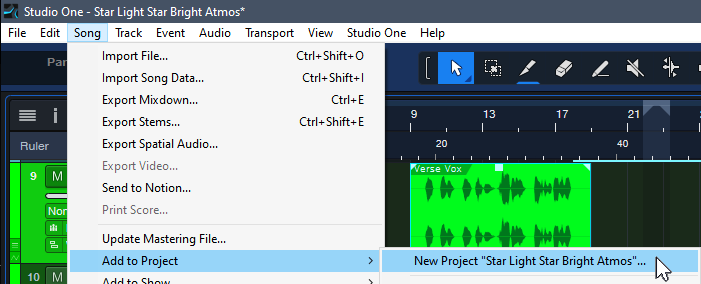
Figure 2: The New Project will eventually contain both the Atmos Binaural and Stereo renders.
3. Set the Sample Rate, and click OK. Click OK again when asked to update the mastering file. Optionally, normalize it after it’s updated.
4. Go back to your Atmos mix. Save As “Song Title” Stereo. (This gives you separate songs for Atmos and stereo, in case you want to make changes later in either one.) In the Atmos renderer, change the Output from Binaural to Stereo.
5. Choose Song > Add to Project > Song Title (the top item in the list, not the “New Project” item that’s the next one down).
6. Click OK when asked to Update Mastering Files.In your Project, the Atmos mix will be followed by a track with the Stereo mix (fig. 3). If you normalized the Atmos mix, normalize the Stereo Mix.
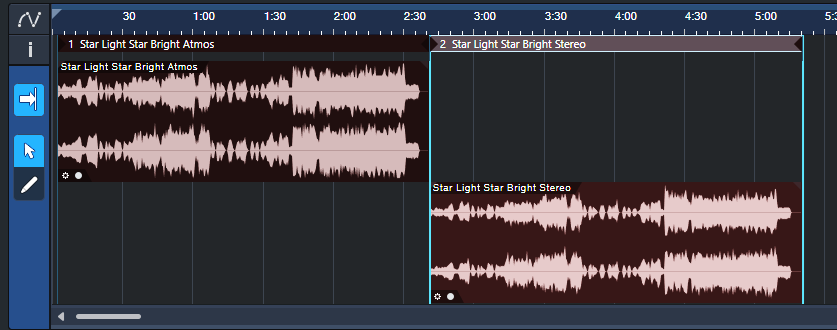
Figure 3: Both the Atmos and Stereo mixers are now in the Project page.
7. Add the insert processor(s) for the Atmos track and edit as desired. I typically use the Waves L3-16 to attain an LUFS reading of -12.5 so that the mix pops a bit more, with a True Peak between ‑1.0 and ‑1.5.
8. Drag the processor from the Atmos track insert to the Stereo track name in the track column. This inserts the processor in the Stereo file’s track.
9. Check the Loudness Information for the Stereo track. It will likely be lower. Edit your insert processors to obtain the same Post FX LUFS level as the Atmos track.
10. Listen to the stereo mix over loudspeakers as a reality check.
11. Click on Digital Release, and choose the formats for the two files.
And now, you’ve given your listeners a choice between an immersive binaural mix, or a conventional stereo one.
Tips
- In step 8, if you use more than one processor on your master file, it’s probably simplest to save the processors as a temporary FX Chain you can import into the other track.
- Because both mixes end up in the Project page, it’s easy to compare the two. The Phase meter will confirm the fuller sound you’re hearing, by displaying a wider, fuller stereo spread.
- You can process the master file in the Post fader insert section of the Main fader. However, I recommend doing it in the Project page, so you can go back and forth between the two files and obtain a consistent level prior to exporting.
- If there are significant differences between the two files (unlikely), you can return to either the original song or the one with Stereo in the title. Make your edits, then re-render.
- Similarly to mixing stereo over different loudspeakers to get a sense of how the mix translates over different systems, it helps to do reality checks on your Atmos Binaural mix with several different headphones.
String Arrangements Made Simple
Strings can enhance almost any genre of music—and with a little more effort, you can do string arrangements that go beyond simply adding a string pad preset. So, let’s look at how to create a convincing string section intro for a song. To hear the example used for this tip, go to the end, and check out the stereo mix. There’s also a headphones-only Atmos mix that’s rendered to binaural.
Choose Your Instruments
You don’t need a high-end sample library to create string arrangements. The sounds included in Presence are excellent—I often prefer them to mainstream string libraries. The following presets from Presence’s Strings folder (fig. 1) sound wonderful for a string section: Violins > Violin Full, Violas > Viola Full, Cellos > Cello Full, and Contrabass > Contrabass Full. In the audio example, all used the Sustain keyswitch C1 (except C0 for the Cellos).
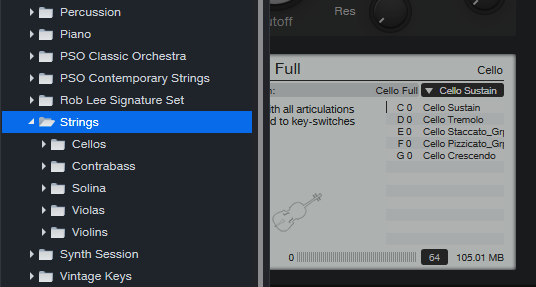
Figure 1: Presence’s Strings folder is your friend for string arrangements.
Group Your Instruments
Place each instrument in its own track, and group them via buses or VCA channels. After setting a balance of the instruments, vary their common bus level to add dynamics while retaining the proper balance. In larger arrangements, you can have individual groups for violins, other strings, brass, percussion, etc. I also use Sends to a common reverb, so that the instruments sound like they’re in the same acoustic space (fig. 2).
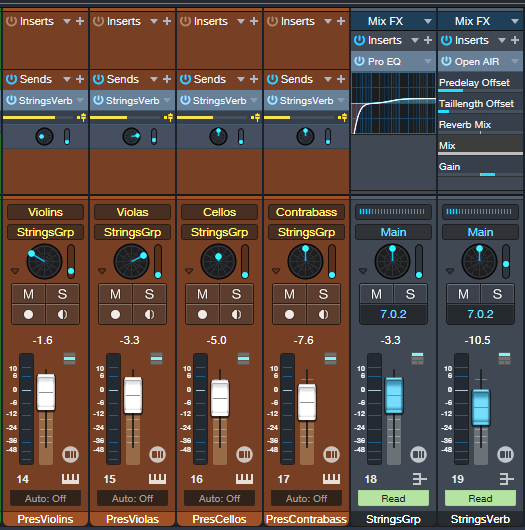
Figure 2: Track layout for the string section, set up for Dolby Atmos. This layout also works with conventional stereo.
Pay Attention to Instrument Note Ranges
The beauty of string arrangements is how the notes from different instruments weave around each other as they create harmonies in the “sweet spots” of their note ranges. (For a crash course in string arrangements, check out Bach’s string quartets.) Players normally don’t play much at the highest and lowest notes of an instrument’s range. Ideally, the notes from different instruments shouldn’t overlap too much. Let each instrument have its own space in the frequency spectrum (fig. 3).
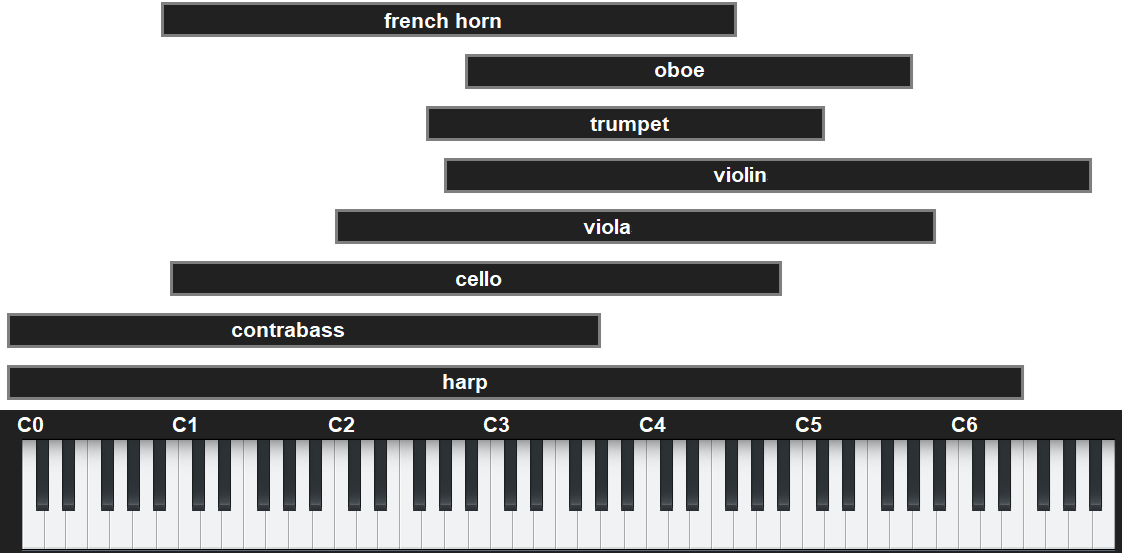
Figure 3: Typical note ranges for various orchestral instruments.
Edit Velocity, Modulation, and Keyswitches
These are all powerful tools for expressiveness. I generally prefer editing velocity rather than level for individual instruments (fig. 4), and edit overall level with the instrument groups.
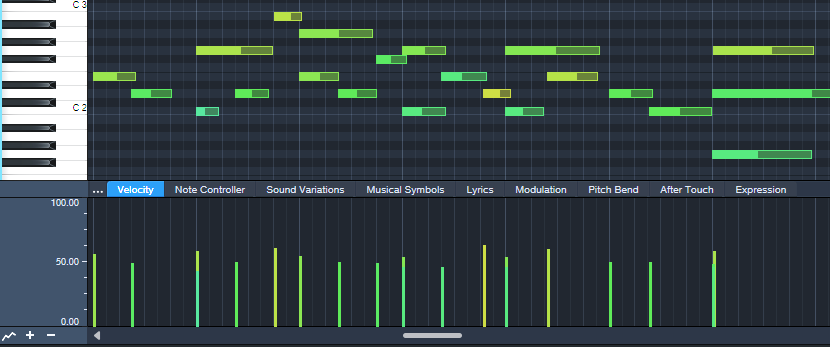
Figure 4: Notes for a violin part, and their velocities.
Modulation and Expression parameters are also essential. Fig. 5 shows vibrato being added to strings. I use the mod wheel for a human touch, but sometimes straighten out modulation changes that “wobble” too much.

Figure 5: Modulation added for violin vibrato.
Keyswitches choose different articulations, which can add variations and expressiveness in longer passages.
Tempo Changes: The Secret Sauce
Ritardandos, accelerandos, and rallentandos are not only important parts of a conductor’s toolbox, they’re the final touch for adding expressiveness in Studio One. Pushing tempo and pulling it back, in conjunction with velocity and modulation changes, gives a sense of realism and sophistication you can’t obtain any other way. Although tempo changes may not be an option if the strings are being added to music cut to a click, in a strings-only section tempo changes are pure gold. Fig. 6 shows the tempo changes used in the audio example.
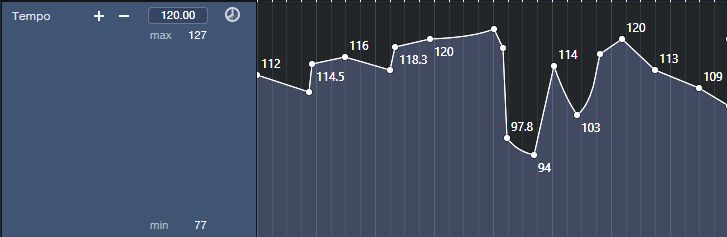
Figure 6: Tempo changes add feel and flow to music.
Let’s listen to all these techniques applied to a string section introduction. Here’s the stereo mix.
And for an extra treat, here’s the Atmos mix, rendered to binaural. You need to listen to it on headphones to preserve the Atmos effect==being rendered to binaural means it won’t sound right over speakers.
The Metal Amp De-Harsher
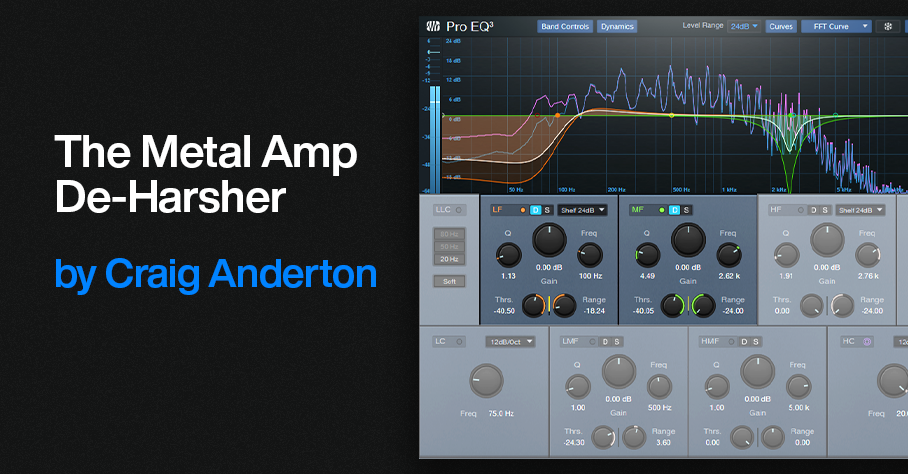
Since Dynamic EQ was introduced in version 5, I’ve used it to replace and improve some techniques I used to do with static EQ. For example, I’m a fan of adding a sharp notch in front of amp sims that feature heavy distortion. This is because notching out certain frequencies can lead to a smoother, less harsh sound. After tuning the notch for the sweetest tone, you make the Q narrow enough to take out only the frequencies that cause the harshness.
However, dynamic EQ can de-harsh amps with more finesse than static EQ. Fig. 1 shows the setup.
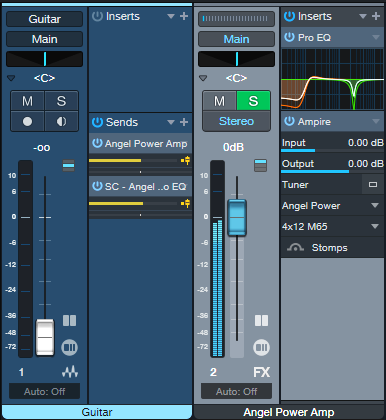
Figure 1: Setup for de-harshing with the Pro EQ3’s dynamic EQ.
The Pro EQ3 inserts before Ampire. I used Ampire’s Angel Power amp for the audio example. You’ll hear the biggest improvements with this technique when using high-gain amps, but it can also be effective with other amp sim designs.
Fig. 2 shows the Pro EQ3 settings. The de-harsher uses only two stages of EQ. The most crucial one is the midrange filter around 2.62 kHz. That’s the frequency I liked best, but be sure to vary the notch and try different frequencies with different amps. The effect is quite dependent on the notch frequency.
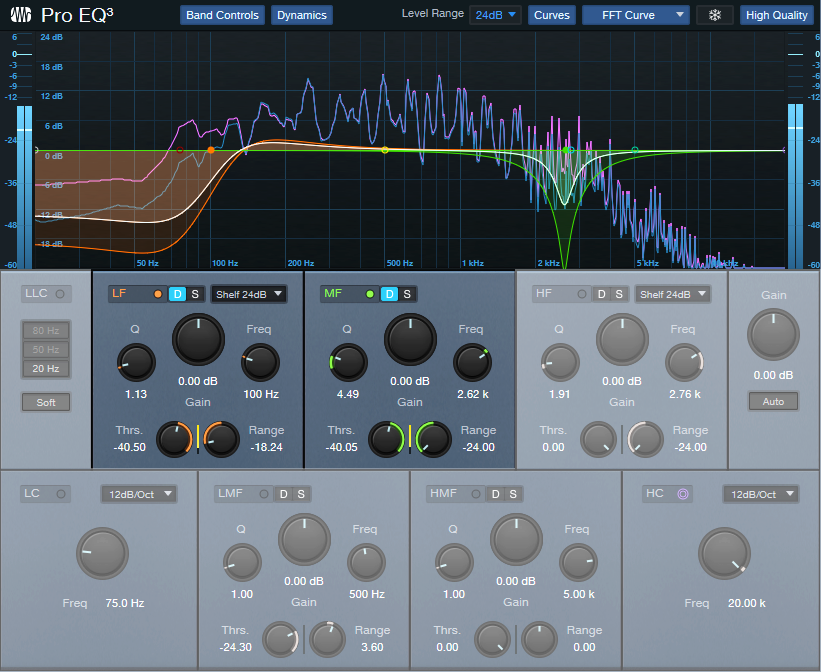
Figure 2: Pro EQ3 settings.
The low-frequency shelf is there because…well, because we can. There’s not a lot of useful energy down that low, so why have it take up bandwidth? Fewer frequencies being distorted means a cleaner sound.
Start with the settings shown. The optimum Threshold and Range parameter values depend on the input signal strength. For the Mid frequency, set the Threshold so that the notch reaches the full -24 dB of attenuation when hitting your strings the hardest. Dial back the Range if you want to re-introduce a little more bite. The low shelf settings aren’t that critical. I set it so that when slamming chords, there’s maximum attenuation.
The audio example plays the straight Angel Power amp, and then the same riff with the same settings but with the de-harsher EQ inserted before the amp. If you play the original version right after the de-harshed version, you may find it easier to notice the “spiky,” harsh artifacts that the de-harsher removes.