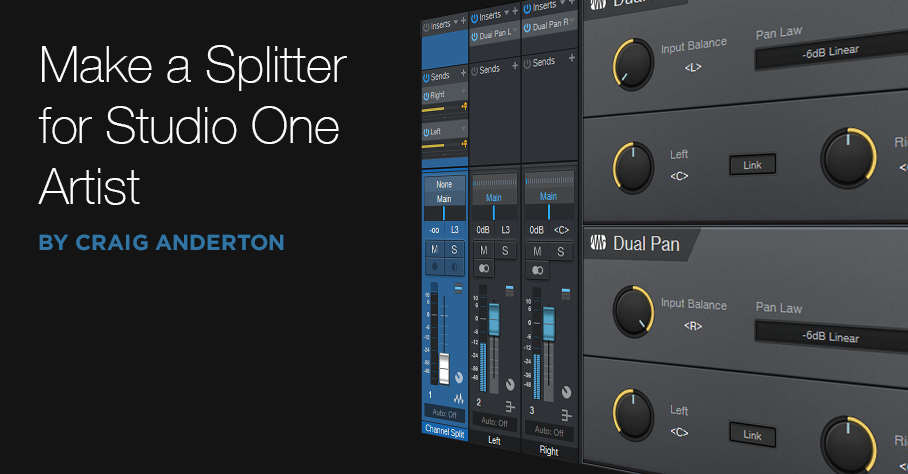
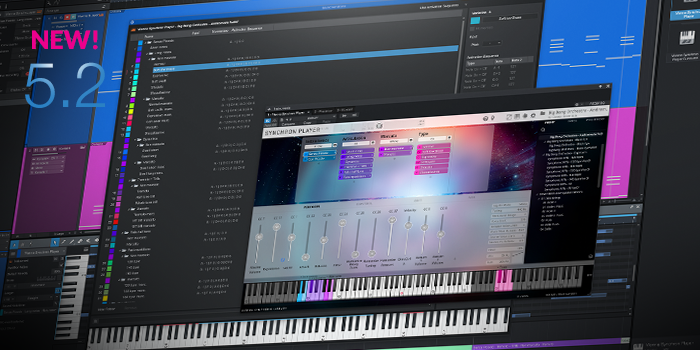
Make a Splitter for Studio One Artist
One of my favorite Studio One Professional features is the Splitter, and quite a few of my FX Chains use it. If you own Studio One Artist, which doesn’t have a Splitter, you may look longingly at these FX Chains and think “If only I could do that…”
Well, you can implement most splitter functions in Studio One Artist, by using buses. All the following split options are based on having a track that provides the audio to be split, along with pre-fader sends to additional buses. Note that the track’s fader should be turned all the way down.
Normal Split
The Splitter’s Normal mode sends the input to two parallel paths, which is ideal for parallel processing. For Artist, we’ll duplicate this mode with two buses, called Split 1 and Split 2 (fig. 1).
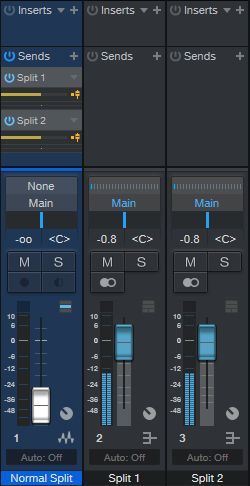
Figure 1: How to create a Normal split in Artist.
The sends to the buses are pre-fader, and panned to center. One send goes to Split 1, and the other to Split 2. Now you can insert different effects in Splits 1 and 2 to do parallel processing.
Channel Split
The Channel Split mode also splits the input into two parallel paths. One path is for the left channel, while the other path is for the right channel.
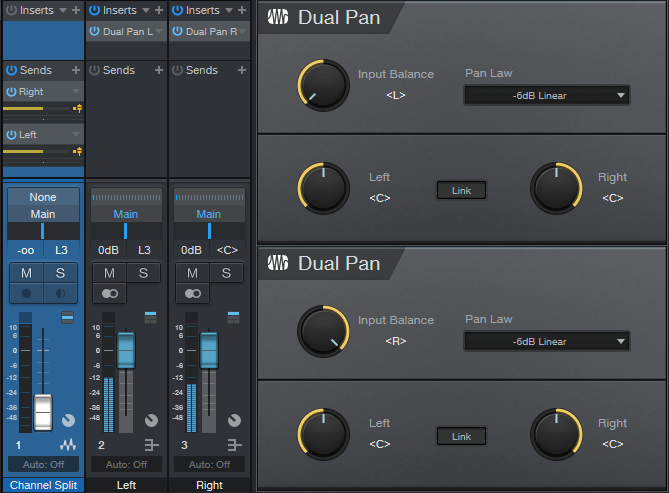
Figure 2: How to create a Channel Split in Artist.
The setup is the same as for the Normal Split (fig. 2), except that each bus has a Dual Pan inserted. The Dual Pan for the left channel has the Input Balance set to <L>, while the Dual Pan for the right channel has the Input Balance set to < R>. I recommend the -6dB Linear Pan law so that if you pan either of the buses, the level remains constant as you pan from left to right.
Frequency Split
This is tough to duplicate, because the Splitter can split incoming audio into five frequency bands. If other DAWs don’t do it, we can’t expect Artist to do it. But, we can do a three-way, tri-amped split into low, mid, and high frequencies (fig. 3).
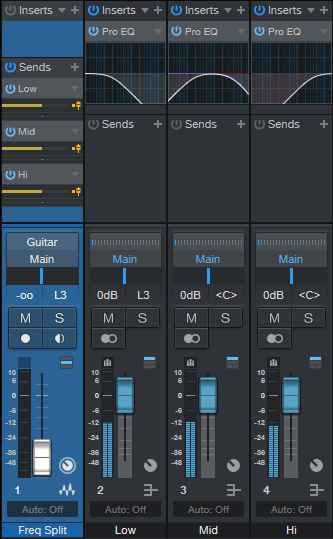
Figure 3: Tri-Amp Frequency Split.
This split is like the Normal Split, except that there are three buses and pre-fader sends instead of two, and each bus has a Pro EQ2 inserted. Each EQ covers its own part of the frequency spectrum—low, mid, and high (fig. 4). Using 6 dB/octave slopes doesn’t provide as much separation between frequency ranges as steeper slopes, but the gentler slopes are necessary to make sure the frequency response is flat when you mix the three channels together.

Figure 4: (Top to bottom) low, mid, and high curves.
The only filter sections we need to use are High Cut and Low Cut—you can ignore everything else. Fig. 5 shows the settings. All bands have 6 dB/octave slopes.
Enable the Low band’s Pro EQ2 HC (High Cut) filter, and choose 200 Hz for frequency. Enable the Mid band’s Pro EQ2 LC (Low Cut) filter, and set it to 200 Hz; also enable the HC filter, and set it to 4.00 kHz. Finally, enable the High band’s Pro EQ2 LC filter, and set it to 4.00 kHz. These frequencies are a good starting point, but you may want to modify the split frequencies for different types of audio sources. Just make sure that the low band HC frequency is the same as the mid band’s LC frequency, and the Mid band’s HC frequency is the same as Hi band’s LC frequency.
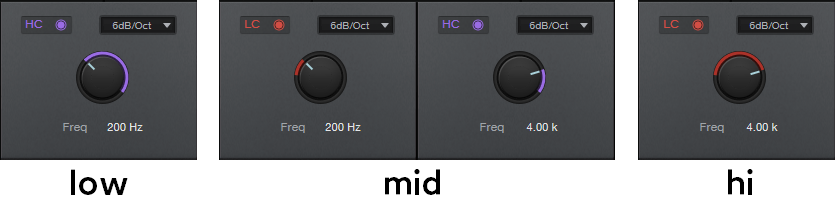
Figure 5: Filter control settings.
Granted, setting up these splits takes more effort than dragging a Splitter plug-in into a channel, but the result is the same: cool parallel processing options.
The Dynamic Brightener—Reloaded
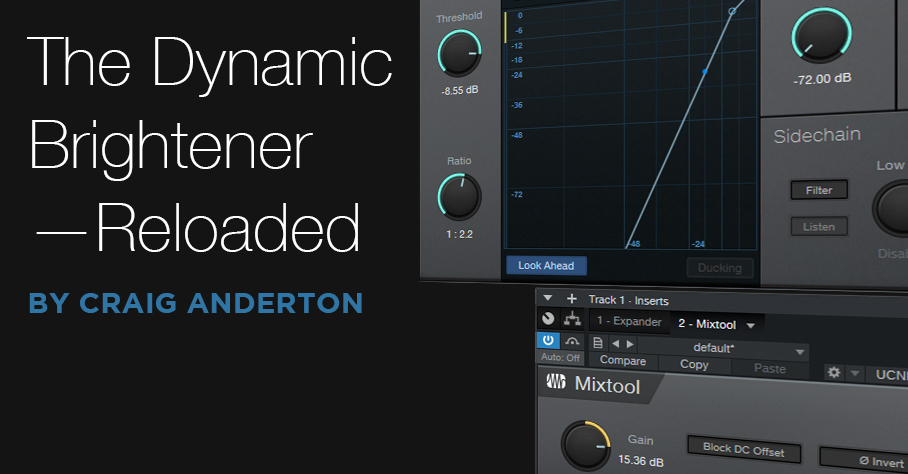
In April 2019, I did a Friday Tip called The Dynamic Brightener for Guitar. It’s kind of a cross between dynamic EQ and a transient shaper, and has been a useful FX Chain for me. In fact, it’s been so useful that I’ve used it a lot—and in the process, wanted to enhance it further. This “reloaded” version makes it suitable for more types of audio sources (try it with drums, bass, ukulele, piano, or anything percussive), as well as less critical to adjust. It also lessens potential high-frequency “smearing” issues—the original version applied large amounts of boost and cut, with a non-linear-phase EQ.
Although the original version could have been built using a Splitter, I did a bus-based implementation so that it would work with Studio One Artist. This new version needs to use the Splitter (sorry, Artist users), but that’s what allows for the improvements.
Another interesting aspect is that by using the effects’ expanded view in the channel inserts, you don’t even need to open the effect or Splitter interfaces, to do all the necessary tweaking. This makes the reloaded version much easier to edit for different types of tracks.
How It Works
Fig. 1 shows the FX Chain’s block diagram.
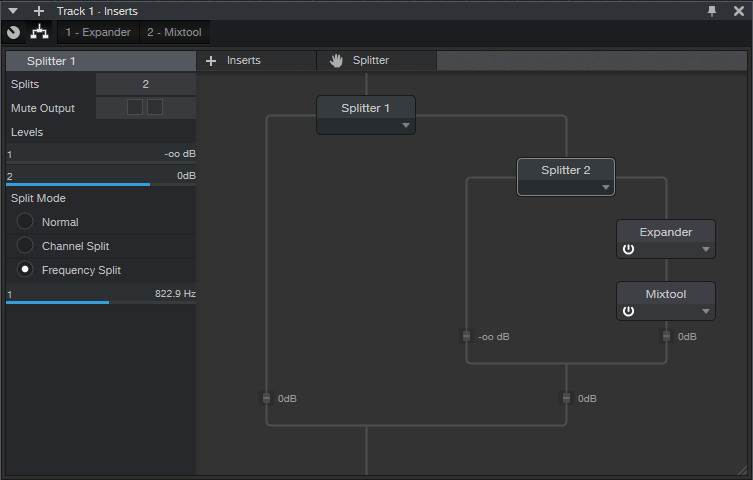
Figure 1: The Reloaded Dynamic Brightener’s block diagram.
Splitter 1 is a normal split. The left split provides the track’s dry sound, while the right split goes to Splitter 2, which is set up as a Frequency Split. The Frequency Split determines the cutoff for the high frequencies going into the right split. Splitter 2’s left split, which contains only the split’s lower frequencies, is attenuated completely. Basically, Splitter 2 exists solely to isolate the audio source’s very highest frequencies.
These high frequencies go to an Expander, which emphasizes the peaks. This is what gives both the transient shaping and dynamic EQ-type effects. Because the high frequencies aren’t very loud, the Mixtool allows boosting them to hit the desired level.
Fig. 2 shows the initial Expander and Mixtool settings. But, you won’t be opening the interfaces very much, if at all…you don’t even need Macro Controls.
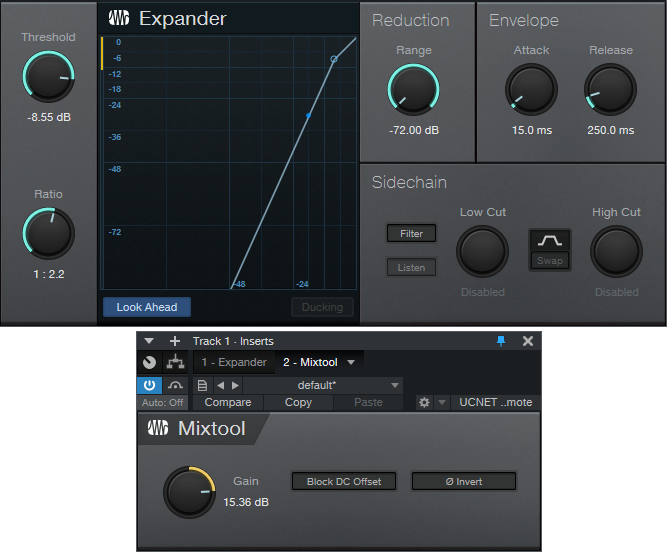
Figure 2: Initial parameter settings for the Expander and Mixtool.
Using the Reloaded Dynamic Brightener
In the short console view, open up the “sidecar” that shows the effects. Expand the effects, and set the mixer channel high enough to see the ones shown in fig. 3.
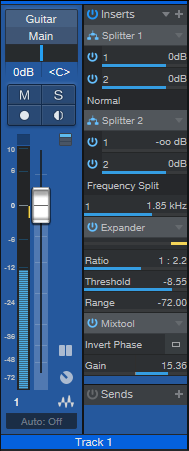
Figure 3: The Reloaded Dynamic Brightener controls.
Here’s how to optimize the settings for your particular application:
- Turn off Splitter 1’s output 1 power button. This mutes the dry signal, so we can concentrate on the brightener’s settings.
- Adjust Splitter 2’s Frequency Split to isolate the optimum high-frequency range for brightening. This can be as low as 1 kHz or less for guitars with humbucker pickups, on up to 6 kHz (or more) to emphasize drum transients.
- Set the Expander’s Ratio and Threshold parameters for the desired amount of brightening and transient shaping. Higher Threshold settings pick off only the top of the boosted high-frequency peaks; the Ratio parameter controls the transient shape. The higher the ratio, the “peakier” the transient.
- After editing the high frequencies, re-enable the dry signal by turning on Splitter 1’s output 1 button.
- Mix in the desired amount of brightening with the Mixtool Gain parameter. In extreme cases you may want to increase the level control at the end of the Splitter 2 branch, or the output level from Splitter 2 output 2, but this will be needed rarely, if at all.
- As a reality check to determine what the brightener contributes to the sound, turn off either Splitter 1 or Splitter 2’s output 2 power button to mute the brightened signal path.
This is a tidier, easier-to-adjust, and better-sounding setup than the original dynamic brightener. Download the FX Chain here—the default settings are for dry guitar, and assume a normalized overall track level. With lower track levels, you’ll need to lower the Expander Threshold, or boost output 2 from Splitter 1. But feel free to tweak away, and make the Reloaded Dynamic Brightener do your bidding, for a wide variety of different audio signals.
The Virtual “Back of the Tape Box.”
In the 20th century, tape reels came in boxes. Engineers wrote information about tracks, running order, timing, credits, and such on the back of the box. And because it was a box, you could fold up some sheets of paper and include lyrics, notes, and other information
These days, when you open a project, it’s just like you left it. But what mics did you use? How was the tone control set on the bass? And you got those loops from…which sample library? If you ever need to re-visit a track, fix a glitch, do an overdub, or weeks pass before you can finish a project, you’ll need to know these details. Let’s talk about taking notes, and while we’re keeping track of things, let’s also create a lyrics track.
Taking Notes
To access Studio One’s virtual “back of the tape box,” choose Song > Song Information.
- The Info tab shows selected meta data, info from the Song Notes tab, and any image you uploaded to Song Setup. The image can show an album cover, but also a miking setup, an analog processor’s control settings, or a cool picture that inspires you.
- For developing song lyrics, I keep the Song Notes tab open, and do my writing/editing there. Saving lyrics with a song is convenient. However, it’s also useful for other notes—session personnel, web site URLs with reference info, and so on.
- Track Notes (fig. 1) is where you can include all track-related information. It’s ideal for info that’s not included in a preset, like the vocal mic of choice, analog processor control settings, and which pickup you used on a guitar.

Figure 1: Track notes are key to documenting a session.
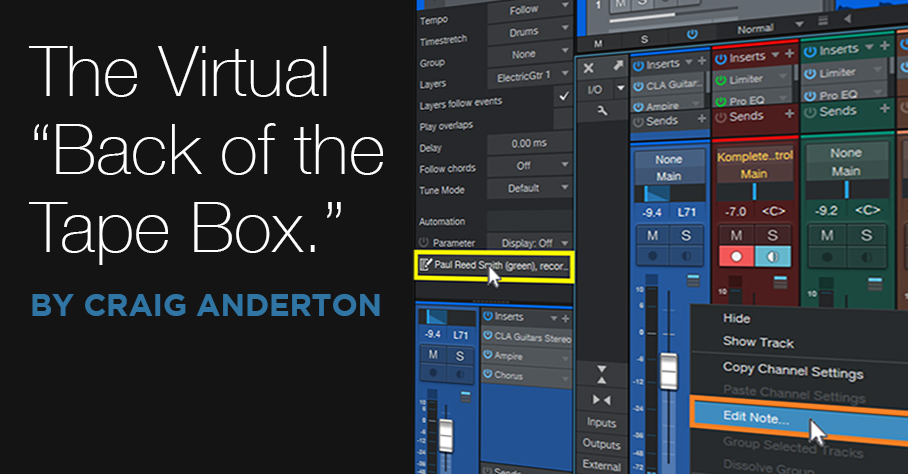
Track Notes Access Shortcuts
In addition to accessing track notes in the Song Information menu, you can scroll down in the Inspector to the field below automation, and click on it to open the corresponding Track Notes (fig. 2). Or, right-click anywhere within a Console channel, and select Edit Note from the context menu. This is the fastest way to view or edit Track Notes, compared to going to Song Information, selecting a tab, and then clicking on the track label.
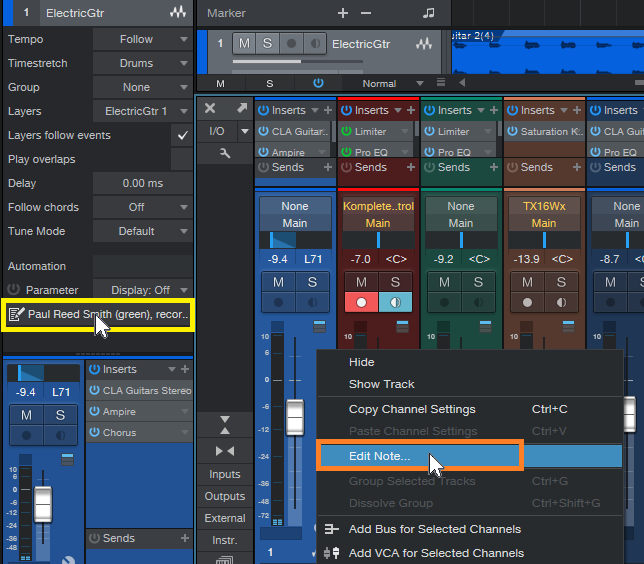
Figure 2: Open track notes from within the Inspector by clicking, or in a mixer Channel by right-clicking.
Furthermore, you can supplement Track Notes by entering information in the track name itself. Hovering over the name in the Arrange window or a mixer Channel (fig. 3) shows whatever you entered, which can be quite long if needed. This is useful for temporary notes, like if you recorded several similar parts, and need to differentiate among them.

Figure 3: You can see long track names by hovering over them.
Pipeline Docs
Analog processors…you love ‘em, right? But when they don’t have presets, and you’re using them with Pipeline, you’ll want to know how the controls were set. Pipeline’s image icon (lower left) allows uploading an image of control settings, while the pencil icon allows adding a note (fig. 4).
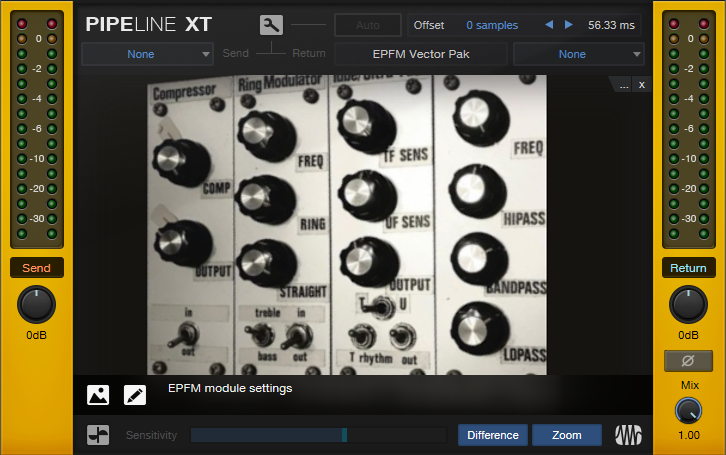
Figure 4: The rack of effects from my book “Electronic Projects for Musicians,” being used with Pipeline.
A photo larger than 1200 x 1200 will be scaled to fit the image space, but click on the image, and it expands to the original size. You may even be able to see all the controls on a rack-mount piece of gear.
If you have an analog synthesizer with so many controls they won’t fit in a picture, no problem. Pipeline doesn’t have to be used for its intended purpose. You can take a picture of the synth’s oscillators, another of the filters, another of the envelopes, Then, stack multiple Pipelines within a track, to be used solely as a picture gallery. However, each instance does add latency—when you don’t need to see the pictures, disable the track, and hide it to reduce clutter.
Of course, you could always put the images in a folder, and include that folder in your song folder. But it’s kinda cool that everything you need to know about a song can be stored within that song.
The Lyrics Track
A lyrics track is helpful, because you always know where you are in the song—not just in the “chorus” or “verse.” It can be located right above a vocal, so it’s easy to find and select a particular part that needs editing, overdubbing, deleting, etc. Although Studio One doesn’t have a lyric track per se, you can put one together in two ways (fig. 5). There are pros and cons to each approach.

Figure 5: Lyric track made with markers (top) and with a dedicated “lyrics track.”
Marker-based lyric track. Lyric markers are quite readable, and have useful songwriting functions:
- Select the Marker track, open the Inspector, and jump to a particular phrase by clicking on it. It’s a quick way to get where you want to go.
- Right-click on any marker, select “Create Arranger Sections from Markers,” and now you have the start of an Arranger Track based on the lyrics.
- Right-click on a marker, and choose “Stop at Marker” to make sure that playback won’t continue past that point.
Event-based lyric track. This might be best if you already have a lot of markers inserted, and don’t want to add more. Create a dummy track, and populate it with events whose lengths correspond to phrases. One advantage is that you can color-code the events to help guide you through a vocal by emphasizing certain phrases. Another advantage is that if you zoom in or out, the Event will continue to span the length of the chosen phrase. A Marker is always anchored to the beginning.
Hassan El Shafei: Journey Into Studio One
Our newest PreSonus Sphere Artist, Hassan El Shafei, is a musician, producer and founder of THE BASEMENT RECORDS in Egypt.

Hassan has produced records for some major artists in the Middle East, and was also one of the judges on the Arab Idol show (the equivalent to American Idol in the Middle East) for four seasons, which aired on MBC. Hassan started releasing his own records featuring other artists in the region, starting with this track, back in the days when he was predominantly still working in Logic and Ableton Live:
Here’s a more in-depth account of his history and evolution with DAWs and how he’s settled upon Studio One and PreSonus Sphere, in his own words:
I started producing a long time ago, using Logic when it was owned by E-magic (the good old days!) I loved Logic, but I felt limited until I got introduced to Ableton Live. I spent a bit of time on my own experimenting with it, but it was too daunting to use for ongoing projects until I took a quick crash course in London on Ableton Live, and then I switched when I felt comfortable using it. I didn’t switch 100 percent, though, because there were many things that were better done in Logic… but Ableton was a game changer, producing music in a completely different mindset… minimalism yet experimental!
The idea of racks, drum kits, and so on was endless, and it felt like a modular system that I could change according to my needs… BUT Ableton was also limiting in many ways: it was very unstable, and lacked many features—as if they were stubborn to actually fix or introduce features. So I started looking somewhere else after years of using Ableton and experimenting with the folks at Bitwig. (I even have a 1.0 badge, I think I had the beta before they released the first version!)
Bitwig were actually adding all the things to Ableton Live that the community wanted but, again they took their own route… which isn’t what I needed until finally I got introduced to Studio One.
I first tried Studio One 3 and was intrigued, but I couldn’t rely on it 100 percent until version 4 was out, which introduced Impact XT and Sample One XT. That changed everything for me, having its ease-of-use in my production environment—yet I also get the all-in-one kind of vibe, which I have never found in any DAW available and trust me… I have looked in every corner!!!
Studio One was the first DAW that lets me produce my whole record from writing ideas to final mixes in one place. That never happened before: it was always either Logic and Pro Tools or Ableton and Logic etc. Now it’s ONLY Studio One, and after all these years that’s really something special to note, in my opinion!
The workflow in Studio One is unbeatable: the Macros are pure magic, the ability to have Key Commands to assign uncommon commands makes Studio One very powerful. Production is a breeze, yet I have all these powerful tools: I can integrate Melodyne and ReVoice Pro via ARA, and I can use Layers while recording and Patterns for beatmaking.
Studio One is the most stable DAW I have ever used, it handles anything I throw at it. I have a big appetite when its comes to production, from producing pop records to scoring music to picture/video… and Studio One 5 is keeping up at my speed! Last but not least, the folks at PreSonus are amazing at consistently striving to achieve the best DAW out there; they are very active online, enthusiastic and most importantly… they listen to the community.
And that to me is priceless.
And one other thing—my newest projects have started to incorporatethe new Show Page in Studio One Version 5 for performing live perfectly in sync with my session tracks! Exciting!
Join PreSonus Sphere today! Only $14.95 per month for Studio One Professional, Notion, and so much more.
Follow Hassan on Instagram
Follow The Basement Records on Instagram
Dive into Ampire and Studio One with Forest Whitehead
Forest Whitehead hails originally from Shreveport, Louisiana, and has been based out of Nashville, TN since the fall of October of 2009.
Starting out as just a guitar player, he quickly began learning production and songwriting which led to signing his first publishing deal in 2011.
Since then, Forest has produced five #1 songs and has written four #1 songs most recognized for country superstar Kelsea Ballerini. He has a 2021 Grammy nomination for his work with Mickey Guyton for a song called “Black Like Me.”

After achieving success with his career in mainstream country radio, Whitehead has started an online presence called Music City Playbook that educates songwriters, artists, and producers on everything from songwriting, production, and publishing deals in the Nashville music industry.
With weekly production tutorials posted on his YouTube Channel, Forest’s goal is to become the go-to place online for quick success for songwriters wanting to produce their own music from home.
Make MIDI Guitar 2 Work with Windows
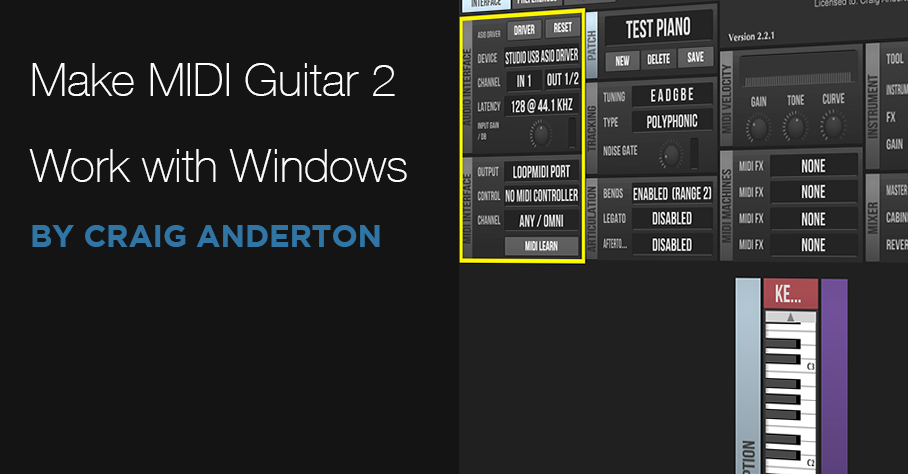
Jam Origin’s MIDI Guitar 2 (MG2) is a software-only, guitar-to-MIDI converter. It doesn’t require any special jacks, pickups, or multipin connectors—just give it your guitar’s audio output. MG2 works stand-alone, but can also insert as a plug-in into your guitar’s audio track, and generate a MIDI output. This shows up as an available MIDI input to an instrument track.
Unfortunately, when used as a plug-in, I encountered numerous issues—primarily degraded pitch bend performance and problems with VST3 instruments (apparently this is a common issue). I just couldn’t get it to work in a satisfying way.
However, there’s a workaround—and it works well. Pitch bends translate more smoothly, and it doesn’t matter whether the virtual instrument you’re driving is VST2 or VST3. Of course, like any MIDI guitar, you’ll need to clean up the data a bit but mostly, this involves just deleting notes shorter than a certain length. Pitch bending often needs editing, but on the other hand, MG2 handles vibrato very well.
The Solution: Virtual MIDI Ports
The solution is not to use MG2 as a plug-in. Instead, run it in stand-alone mode, assign its output to a virtual MIDI port, and set Studio One’s virtual instrument to that same virtual MIDI port. This approach bypasses any potential issues caused by taking MIDI data from an audio plug-in out, passing it through a DAW, and feeding it into an instrument.
Unlike the Mac, Windows doesn’t support virtual MIDI ports natively. However, the loopMIDI accessory program from Tobias Erichsen solves that. Download the program, and install it. The loopMIDI icon shows up in the taskbar. Right-click on it, and choose Configure loopMIDI (also check Autostart loopMIDI while you’re at it). Configuring just means hitting the + sign to create a port (fig. 1).
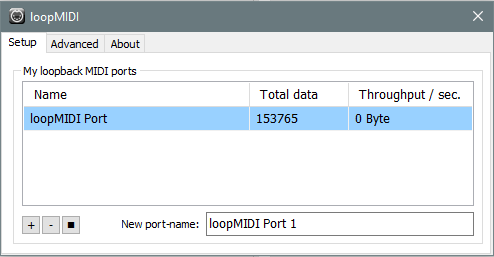
Figure 1: Configuring loopMIDI port.
After installing loopMIDI, we need to tell Studio One there’s a new MIDI control device. Open Studio One (because you checked Autostart, loopMIDI will already be running), and choose Studio One > Options > External Devices. Click the Add button, and set up loopMIDI as a MIDI keyboard (fig. 2).
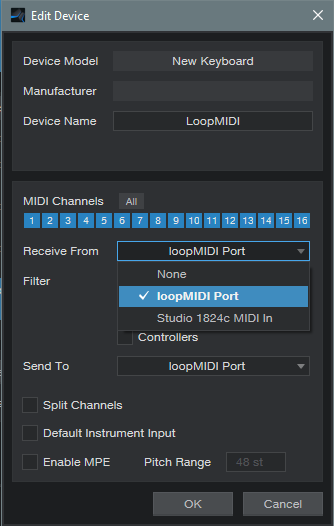
Figure 2: loopMIDI is being set up as a new MIDI controller.
Next, set up MG2 in stand-alone mode (fig. 3). Note that there’s no problem with running MG2 and Studio One at the same time using a PreSonus ASIO interface (probably others as well).
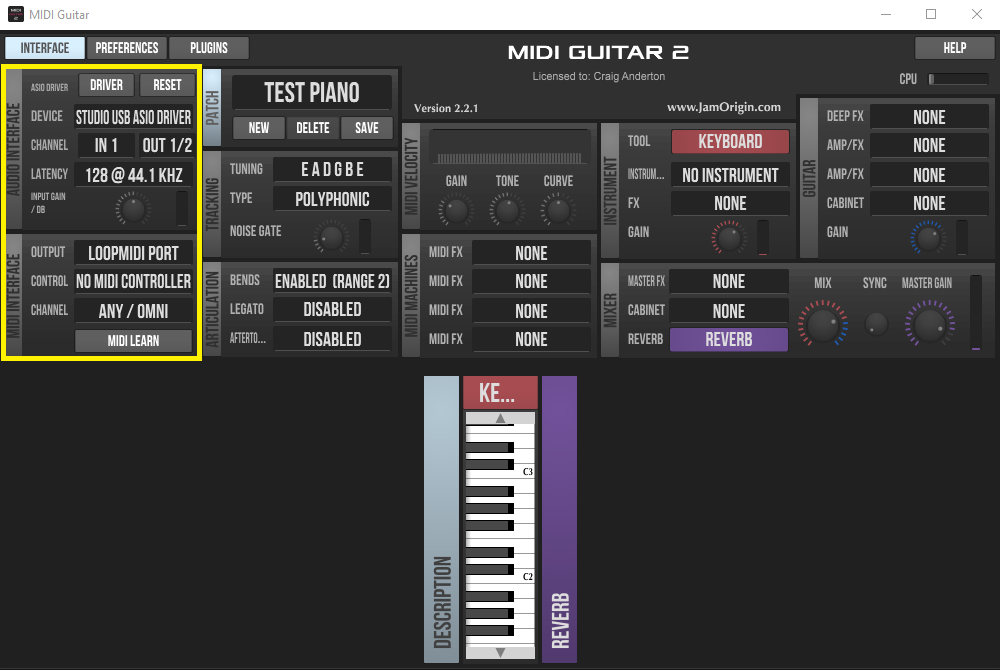
Figure 3: The sections outlined in yellow connect with your audio interface and Studio One.
In the Audio Interface section, specify the interface driver, and the input where MG2 will expect to find your guitar’s audio. Jam Origin recommends using 44.1 kHz with 128 samples of latency, and I didn’t argue. Set MG2’s MIDI Interface output to the loopMIDI port. This is where MG2 will send the MIDI data derived from your guitar.
For the final step, insert your virtual instrument into Studio One, and set its input to loopMIDI (fig. 4). Note that you don’t need to insert a guitar track, unless you want to record your guitar part as well as drive a virtual instrument. I insert a guitar track anyway, if for no other reason than to be able to use Studio One’s tuner—pitch-based guitar-to-MIDI converters seem to like accurate tuning.
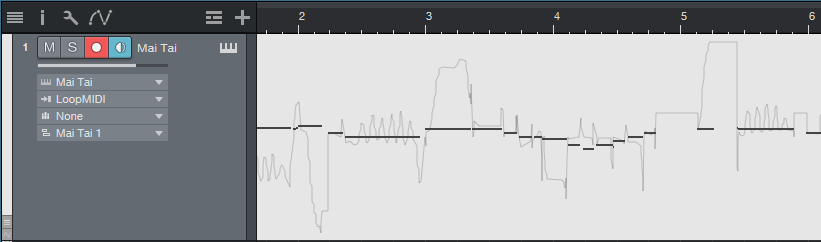
Figure 4: The Mai Tai input is set to loopMIDI. Note data (in monophonic mode), along with pitch bend, has been recorded.
Optimizing MIDI Guitar 2
To recap, your guitar goes into an audio interface input, MG2 in stand-alone mode listens to the audio input and converts it to MIDI, and then the MIDI data goes to your virtual instrument. However, we’re not quite done, because MG2 has various customization options.
The stand-alone version can play instruments, but we don’t need to do that because we’re triggering instruments in Studio One. So for the Instrument, choose No Instrument.
There’s a choice of polyphonic or monophonic tracking, depending on whether you want to play chords or single-note lines, and set bend to the same range in semitones as your instrument.
Experiment with Legato, which can even give infinite sustain. Gain and Curve help tailor your playing for the best triggering. In my experience, MG2 seems happiest when you don’t hit the strings too hard. In any event, those are the basics. Sorting out MG2’s settings in detail isn’t necessary, because you can go to the Jam Origin website and delve into the documentation there.
I must say that when I first tried using Jam Origin, I was frustrated, and felt I had just wasted $99. But after using the standalone/virtual port workaround, now I’m a happy camper. Sure, MIDI guitar isn’t perfect. But MG2 can lay down some tasty MIDI lines, and as to sawtooth-based power chords… well, let’s just say they sure are fun.
The Flanger Lab
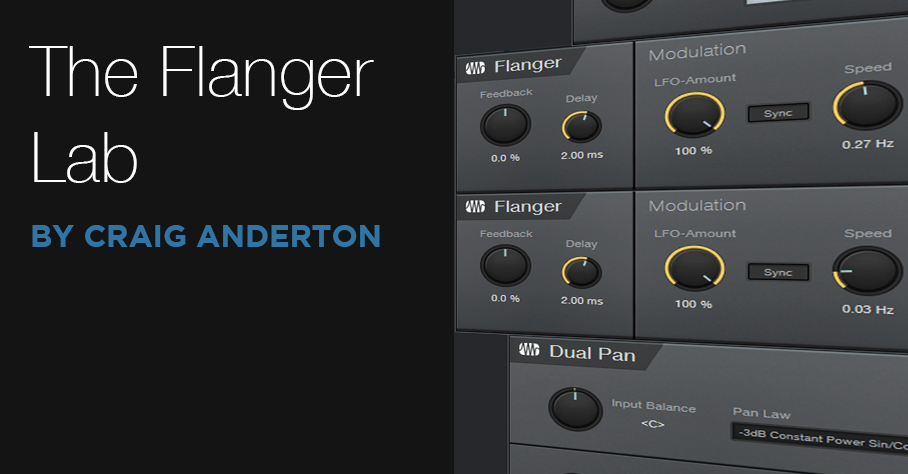
The Flanger Lab FX Chain provides a wide variety of effects, from traditional flanging to psycho-acoustic panning, and can even incorporate some mid-side mojo—it all depends on how you set the controls. Originally, I had planned to include a control panel for Studio One Pro users, but there are simply too many options to fit into eight controls. It’s more fun just to open up all the effects, play with the knobs, and be pleasantly surprised.
The FX Chain itself is fairly straightforward (fig. 1): A split into two Flangers, one preceded by a Mixtool to invert the phase, and a Dual Pan at the end.

Figure 1: Flanger Lab FX Chain block diagram
Now let’s look at the effects (fig. 2).
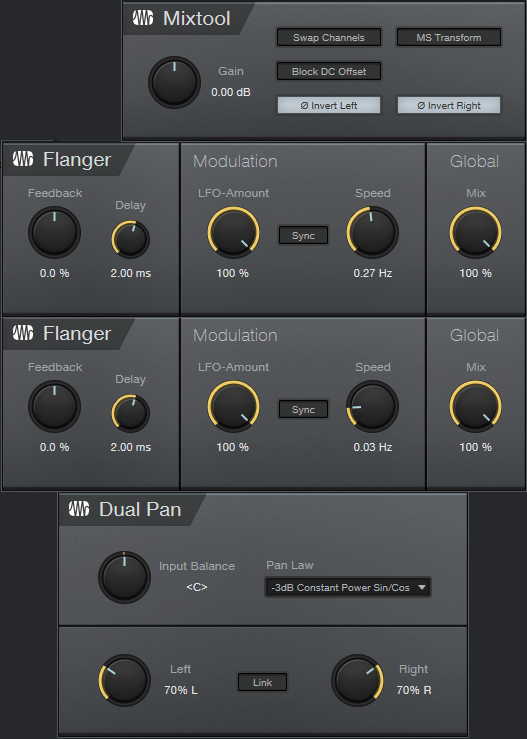
Figure 2: Effects used in the Flanger Lab FX Chain.
The audio example, with stereo program material, uses the settings shown in figures 1 and 2. However, this is just one possible sound. Flanger Lab is equally effective with mono distorted guitar, stereo string pads, and more.
Here are some tips on how different control settings affect the sound.
- Flanger Lab works with mono or stereo audio.
- Because the Mixtool is inverting the phase of one split, as the flangers approach the same audio in both channels, the mid cancels (which gives through-zero flanging), and you’re essentially just hearing the sides.
- Choosing Normal split mode instead of Channel Split accentuates the mid cancellation. This can produce a dreamy, ethereal effect with instruments that you want to have come in and out of the mix in interesting ways.
- Offsetting the Mixtool gain by even just a little bit will reduce the cancellation when the audio coincides.
- Offsetting the Flanger Delay controls changes the sound—for example, there’s quite a difference between having a delay of 1 ms for one Flanger and 5 ms for the other, compared to the default of 2 ms for each one.
- I prefer offsetting the Speed controls so that one is slow, and the other faster. This helps randomize the sweeping effect.
- LFO Amount and Mix do what you’d expect.
- Setting Feedback to the same negative percentage has less intensity than setting them both to the same positive percentage, but try setting one for negative feedback, and the other for positive feedback.
- Altering Input Balance on the Dual Pan, with both Pan controls centered, changes the proportion of the two flangers in the audio output. When set fully to the left or right, the sound is like traditional flanging, based on the flanger settings in the left or right channel respectively.
- Centering both Dual Pan controls gives a traditional, mono flanging sound, with through-zero cancellation. Spreading the controls out further products psycho-acoustic panning effects that will make your head spin on headphones, but translate to speakers as well. Also when spread fully to the left and right, mid cancellation doesn’t happen. With playback over a mono system, the panning goes away, and you just get flanging.
- The controls interact—for example, changing the delay time will change the effect of the panning mentioned in the previous tip.
The bottom line is you can play with the controls for hours. Well, at least I could! If you come up with a cool sound, save it as a custom FX Chain. Given the variables, you might not be able to find that sound again.
Finally, there seems to be persistent confusion about how to handle downloaded FX Chains, like where to store them, and how to put them in custom folders. For answers to these and other questions about FX Chains, please check out the Friday Tip Fun Facts about FX Chains.
Download the Flanger Lab.multipreset FX Chain preset here
Man, Your Mom is more punk than you.

Hometown homemakin’ homewreckers Your Mom formed in 2016 via the local Baton Rouge Adult Music Club. And while they are quite likely to show up with a fistful of guitars and a batch of homemade cookies in return for being booked at your venue, you’d best show some appreciation—because they’re equally as likely to steal your husband if you don’t.
Your Mom performs an arrestingly brash casserole of high-strung punk ‘n’ roll stomp that sits squarely at the intersection of The Kinks, The Sonics, and the scrapbooking aisle of Hobby Lobby. Make no mistake: Your Mom are appreciative, supportive sweethearts to the core—during the day. But when the sun goes down and the stage lights go up, Your Mom are rock’n’roll werewolves in pearl necklaces, howling requiems of tupperware warranties and matriarchal authorities. And you better listen up, buster.
We booked Your Mom to record a River City Session here at PreSonus HQ on a Sunday morning, because it turned out that not one of them had a commitment to show up at a church. They arrived with guitars and donuts, this time—and nailed two songs, live, in four takes. And then they started excitedly talking about margaritas, loaded out, gave us all hugs and thank-you’s, and rode off into the early afternoon—leaving us with only their killer tracks, four signed artist release forms, and tinnitus. Rock delivered, mission accomplished.
Check out their performance of “Dessert” below. And then call your mom.
Your Mom is:
- Dorothy LeBlanc: vocals and bass
- Sandy Brock: vocals and guitar
- Kay Lindsey: lead guitar
- Debbie Roussel: drums and vocals
- Dave Hinson: rock coach
- Your Mom’s on SoundCloud
- Your Mom’s on Facebook
- Your Mom’s also on Instagram
- Baton Rouge Adult Music Club
The Ampire Sweetener

I work a lot with amp sims, and I love ’em. Well, except for one thing: Almost all of the ones that involve distortion exhibit what I call “the annoying frequency.” It’s hard to describe, but when it’s removed, you can definitely tell what’s missing—kind of a whistling sound, but without a sense of pitch. I have no idea why this particular type of artifact happens. It doesn’t go away if I increase the sample rate, choose a different pickup, switch guitars, or change my socks. And it’s worse with some amp sims than others; when reviewing a [particular amp sim by a PreSonus competitor] and I made the product manager aware of the annoying frequency, a subsequent expansion pack included a parametric equalizer so users could notch it out.
Granted, the 3rd gen Ampire is light years ahead of the 1st gen, as well as a lot of other amp sims out there. But we can still make it better, because the goal of the Friday Tip is to make things better, right?!? Besides, I’m an unreasonably picky guitar player.
Adding the EQ
Download the preset Ampire Sweetener.preset , and load it into the Pro EQ2 (Just open the .zip and double click the .preset file to install). It will now have the curve shown in Fig. 1. Insert the Pro EQ2 after your Ampire amp and cab of choice, and the sound will magically lose its artifact.

Figure 1: Insert these notch filters after Ampire and its cab.
You have every right to skeptical—after all, you are reading this on the internet—so let’s listen to an audio example. The first half is with the EQ following the MCM800 amp and 4×12 MFB cab. The second half is with the EQ bypassed, but everything else the same. Both examples in the audio file are normalized to the same level. I’m pretty sure you’ll hear the artifact in the second half. Another way to hear the difference is play some power chords, and bypass the EQ stages to hear what they contribute to the sound.
The EQ’s curve isn’t only about the dual notches. There’s no need for super-high or -low frequencies, so those are reduced as well. Also, because the notches are in the high frequencies, adding a slight treble shelf compensates for the reduced amount of highs.

Figure 2: Reduce the high-shelf level and the two notches to sound more like the original amp sim/cab tone.
Now, this doesn’t mean you’ll like the end result better. You might prefer the sound with the artifact, and that’s fine. However, the artifact persists through the various amps and cabs. Inserting the Ampire Sweetener EQ removes that common element, which emphasizes the unique character, and tonal quality, of the individual amps and cabs. However, you can also “split the difference” by dialing back the parameters outlined in white (Fig. 2).
Finally, if you use other amp sims, many (if not most) will also benefit from one or two steep notches at the output. They probably won’t be the same frequencies, but they’ll likely be pretty close. The bad news is quite a few of them have far more prominent artifacts than Ampire, but the good news is the higher level makes it easier to hear them, so you can dial in their frequencies more quickly to notch them out.
The Top 10 Reasons to Try Studio One
When Studio One was released almost a dozen years ago, it instantly became one of the fastest-growing DAWs around. With each dot release and major update, Studio One has grown into a comprehensive powerhouse, offering features and innovative workflows not available anywhere else. We could make dozens of 10 Ten Lists of our favorite Studio One features, but here are the top 10 reasons we love Studio One today.
10. Multi-instruments.
Studio One lets you build a sound as unique as you by letting you stack multiple instruments on a single Instrument Track. Multi-instruments can be built as layers, key splits, or both, and you can record, edit, and play them like a single Instrument. A fully customizable Macro Panel gives you control over any parameter on any stacked Instrument or over multiple parameters on multiple Instruments at the same time.
Each Multi Instrument has its own Mixer channel, while each individual output of the combined Instruments receive full-featured sub-channels. You can process these outputs with plug-ins and sends, and then save everything into a single Multi Preset. There’s no limit to the creative possibilities for creative production and sound design.
9. Smart Tool.
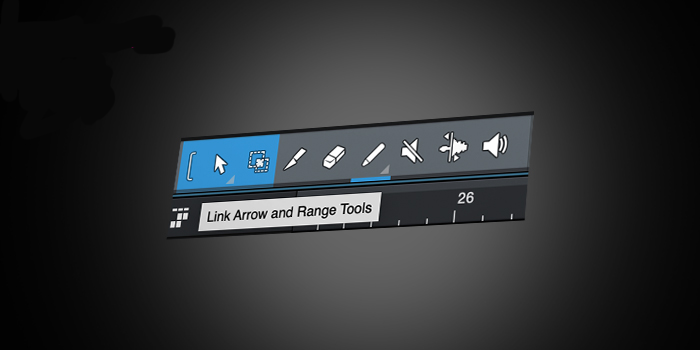
Edit fast with audio and MIDI! We’ve combined the Arrow and Range Tools to boost your audio editing efficiency through the roof. Select, move, split, or duplicate Events; trim start- and end-points of Events; adjust fades; and change the overall Event level in one seamless action—all with the same tool! Simply mouse over the upper or lower half of an Event to edit with the Arrow or Range Tools, respectively. Studio One’s smart tools change dynamically to stay in the moment with you!
MIDI Note events can be selected, moved, and resized. Plus, you can change note velocity, mute or unmute events, split events and parts, even glue adjacent notes—all with the same useful tool.
8. One-click Busses and Groups.
Only Studio One lets you add busses and groups on the fly right from the console. Need to add an FX Bus? Just drag and drop the plug-in you want to load to the send of any channel to instantly create the bus and the return and begin adjusting the send level immediately! Creating a drum bus is as easy as selecting all your drum channels, right-clicking, and selecting “Add Bus Channel.” Channels can be grouped and ungrouped on the fly the same way, simply select, right-click and group. Easy peasy.
7. Drag and Drop… Everything.
Studio One pioneered the drag and drop workflow that quickly made it a fan favorite from version 1.0. More than the ability to drag-and-drop an object to a new location on the timeline, Studio One lets you use drag-and-drop to do just about anything:
- Drag in audio loops from the Browser to automatically create an Audio Track and start using them in your production.
- Add plug-in effects—even specific presets—simply by dragging and dropping them on the desired track or channel.
- Ready to add a virtual instrument? You got it. Just drag it from the Browser to the Arranger Window to create a new Instrument Track and open the plug-in.
- Need to do a quick stem export? Just drag the audio file from your song to any location on your computer…or directly upload to your PreSonus workspaces!
- Copy complete insert FX chains from one Mixer channel to another by drag-and-drop.
- Complete send chain levels and routing can be copied from one channel to another simply with drag and drop.
- Convert audio to MIDI using Melodyne via drag-and-drop.
- Convert an Instrument Part to audio simply by dragging it to an Audio Track.
- Extract chords by dragging any audio or MIDI object directly to the Chord Track.
- Drag Arranger sections to create completely new arrangements on the fly or move them to and from a Scratch Pad to experiment with them before you commit them to your song.
No other DAW lets you work so quickly and efficiently.
6. Comprehensive Plug-in Suite.
Studio One comes loaded with a Native Effects plug-in suite that provides just about any tool you need for mixing, mastering, performing, and producing. These aren’t average stock DAW plug-ins, these plug-ins are so good we sell them separately for use in other DAWs. You get State-Space modeled guitar amps and stompboxes with Ampire and Pedalboard; the complete Analog Effects Collection featuring State-Spaced modeled input stages on select plug-ins; Fat Channel XT with two State-Space modeled Compressor and EQ models; a suite of analysis tools to help you fix your mix; plus inspiring effects like Autofilter, Groove Delay, Room Reverb and more!
But we didn’t stop with channel effects. Studio One Professional features the unique Console Shaper plug-in. Console Shaper uses our proprietary Mix Engine FX processing technology that affects your music across all channels on a bus, rather than just processing the bus output, as with a traditional plug-in. This allows for vintage-inspired artifacts like console crosstalk, surface noise, and drive. Mix Engine FX apply processing at a much deeper level, across any number of channels—and even in between.
5. Robust Composing Tools.
Studio One is a modern composer’s dream come true, and it all starts with Studio One’s Sound Variations—the next level in articulation support—so you get the most out of the complex virtual instruments and orchestral libraries. An extended mapping editor provides tools for managing complex articulation maps, and you can drag and drop Sound Variations into any order, or place them into custom folders for lightning-fast navigation. Sound Variations can be triggered by key switches, hardware controllers, keyboard shortcuts, custom macros, or highly customizable custom layouts for Studio One Remote. It’s never been easier to use orchestral libraries to their fullest potential.
But we didn’t stop there. Modern composers need tools that let them incorporate electronic elements with traditional scoring. The Score View brings the best features of PreSonus’ award-winning notation software, Notion, into Studio One. In addition to traditional notation, you get tablature and drum notation. View multiple staves at once to work on voicing, or view just one track at a time. Scores can be printed directly from Studio One. Staff Presets make it quick and easy to create lead sheets by automatically setting up the track name, cleff, staff type, and appropriate transposition for each instrument. And of course, scores created in Studio One can be sent to Notion and vice versa.
4. Arranger Track and Scratch Pads.
Studio One’s Arranger Track is a simple, intuitive way to reorder, duplicate, and remove Song sections like verses and choruses. Try out different arrangements, swap sections, lengthen or shorten solos, and structure a Song exactly the way you want with a simple drag-and-drop.
Try out new arrangements on the fly using the Arranger Track Inspector. Double-click any Arranger section to jump to it without missing a beat. Drag Arranger Track parts to a Scratch Pad to experiment with new mixes, parts, and more. If you like what you’ve created, you can drag the part back in to replace the old one or put it in a new section of your song.
3. Integrated Mastering and More.

Studio One Professional is the only DAW that links songs and stems with finished, mastered Projects. Transfer mixes or mixed stems to the Project page for mastering—but if you hear anything you need to change, simply jump back into the Song and make your tweaks; the revised version updates with a single click, so you can continue mastering without losing any previous work.
Use Studio One Native Effects and your favorite third-party plug-ins to provide the final EQ, dynamics, and imaging control you need to create a professional sound. You’ll also find analysis tools, like spectrum analysis, M/S-processing, K-System and EBU loudness metering, phase meter, expandable level meter, and oscilloscope to provide visual confirmation to what you hear, as well as help with conformance to existing broadcast and duplication standards.
And when your masterpiece is ready, you’ll find DDP export, CD burning, and direct upload to Soundcloud and PreSonus Sphere options to share your mastered recordings with your clients and collaborators—or release your albums to the world.
2. Integrated Performing.
Studio One 5 takes you from the studio to the stage or stream with the Show Page. Create a Setlist using songs you’re already created in Studio One, incorporating a mix of live instruments, pre-recorded tracks, and virtual instruments. Each song in the Setlist can have its own unique instrumentation, and thanks to Studio One’s incredible amp modeling and virtual synth instruments, you may never need to bring a heavy amp to a show ever again.
Songs in your Setlist can be rearranged on the fly using drag-and-drop. Use the Arranger Track to alter your performance in real-time: loop sections on the fly, jump to a different part, and automatically change patches—all without missing a beat.
When it’s showtime, turn on the clean Performance view with Setlist navigation and use the customizable, real-time controls over the parameters you want to adjust on stage: levels, parameters, patches… even launch and loop entire Song sections. Every performer on stage can use Studio One Remote v1.6 to control their performance from their favorite mobile device. Your studio sound is larger than life—now your stage persona can be, too.
1. All in.
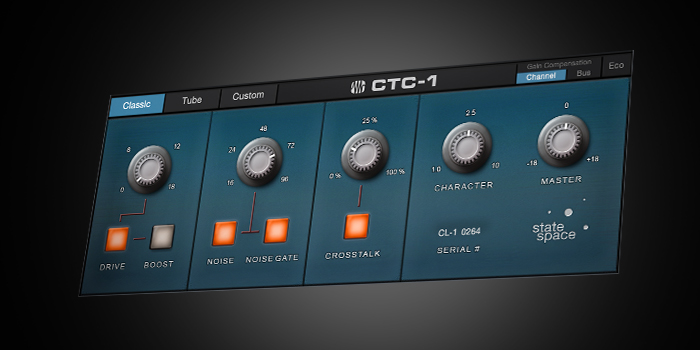
Studio One is designed to grow with you. To that end, PreSonus offers a complete suite of Studio One add-ons that add new features, sounds, and functions when you need them. Add three new State-Space modeled Mix Engine FX consoles with CTC-1 Pro Console Shaper. Expand Fat Channel XT with up to eight vintage compressor models and seven classic EQs. Add otherworldly synths, pads, and more to Presence XT with Deep Flight One. Or create complete orchestrations with PreSonus Symphony Orchestra and PreSonus Studio Grand. Need even more sound control? Unlock the Presence XT’s powerful Edit Page with the Presence XT Editor and turn Presence XT into the perfect host for any custom sampler sound library.
Every Studio One Add-on is available separately, so you can buy what you want when you need it. Or, join PreSonus Sphere and get it all: Studio One Professional, Notion, every PreSonus Add-on for Studio One, exclusive Studio One features, access to curated Studio One presets and effects chains from PreSonus artists; and so much more. All in PreSonus Sphere.