The Sweet Spot with Grammy-Nominated Producer 6ix
Logic’s Grammy-nominated producer breaks down his Sweet Spot.
Before he found success as an avant-garde hip hop producer, 6ix was just 30 units shy of a degree in neurology and physiology at the University of Maryland. But inches from the finish line and with “no plans of doing music career-wise,” 6ix’s life took an unexpected turn when he met Bobby Hall, aka Logic, at a beat battle.
“There would be these beat battles that I would do with my boy, Owen, and we ended up winning them all. I was like, ‘damn, there might be something here,’ and that’s when I met Logic.” From the outset, their creative connection was undeniable: “The first day I met him, he was like ‘you’re gonna be my producer.’ I remember dropping out of school, and then I moved to LA like 3 days later. I just stuck with my gut, and it worked out.”
In the 15 years since, the Grammy-nominated 6ix has gone on to produce 8 full-length records for Logic and has worked with Drake, 21 Savage, Khalid, Dizzy Wright, Sylvan LaCue, and more. “Being an Indian dude in this space, I wanna show people that it’s possible. That you don’t gotta follow the same route every time. Like, you don’t gotta be a doctor or engineer or whatever. It’s possible. Like, if I can do it, anybody can do it, really.”
Watch this episode to hear 6ix’s origin story and see how he uses the Eris Studio 5 Monitors and Sub 8BT Subwoofer to dial in his Sweet Spot.
In this episode of The Sweet Spot, 6ix talks about his origins, creative philosophy, and songwriting process.
“What really got me into music as a kid was probably my dad and my uncle,” he says. “There’s something about tapping into what I loved growing up that kind of relieves all pressure for me and I get back into that mindset of doing it for fun.” And for 6ix, a critical part of that mindset is keeping it simple: “I’m a big proponent for simplicity [because] it really lets the artist shine and lets the fans connect to what they’re really saying…Sometimes all it takes is a kick, snare, hat, a sample chop, or a dope piano or Rhodes part, and a bassline.”
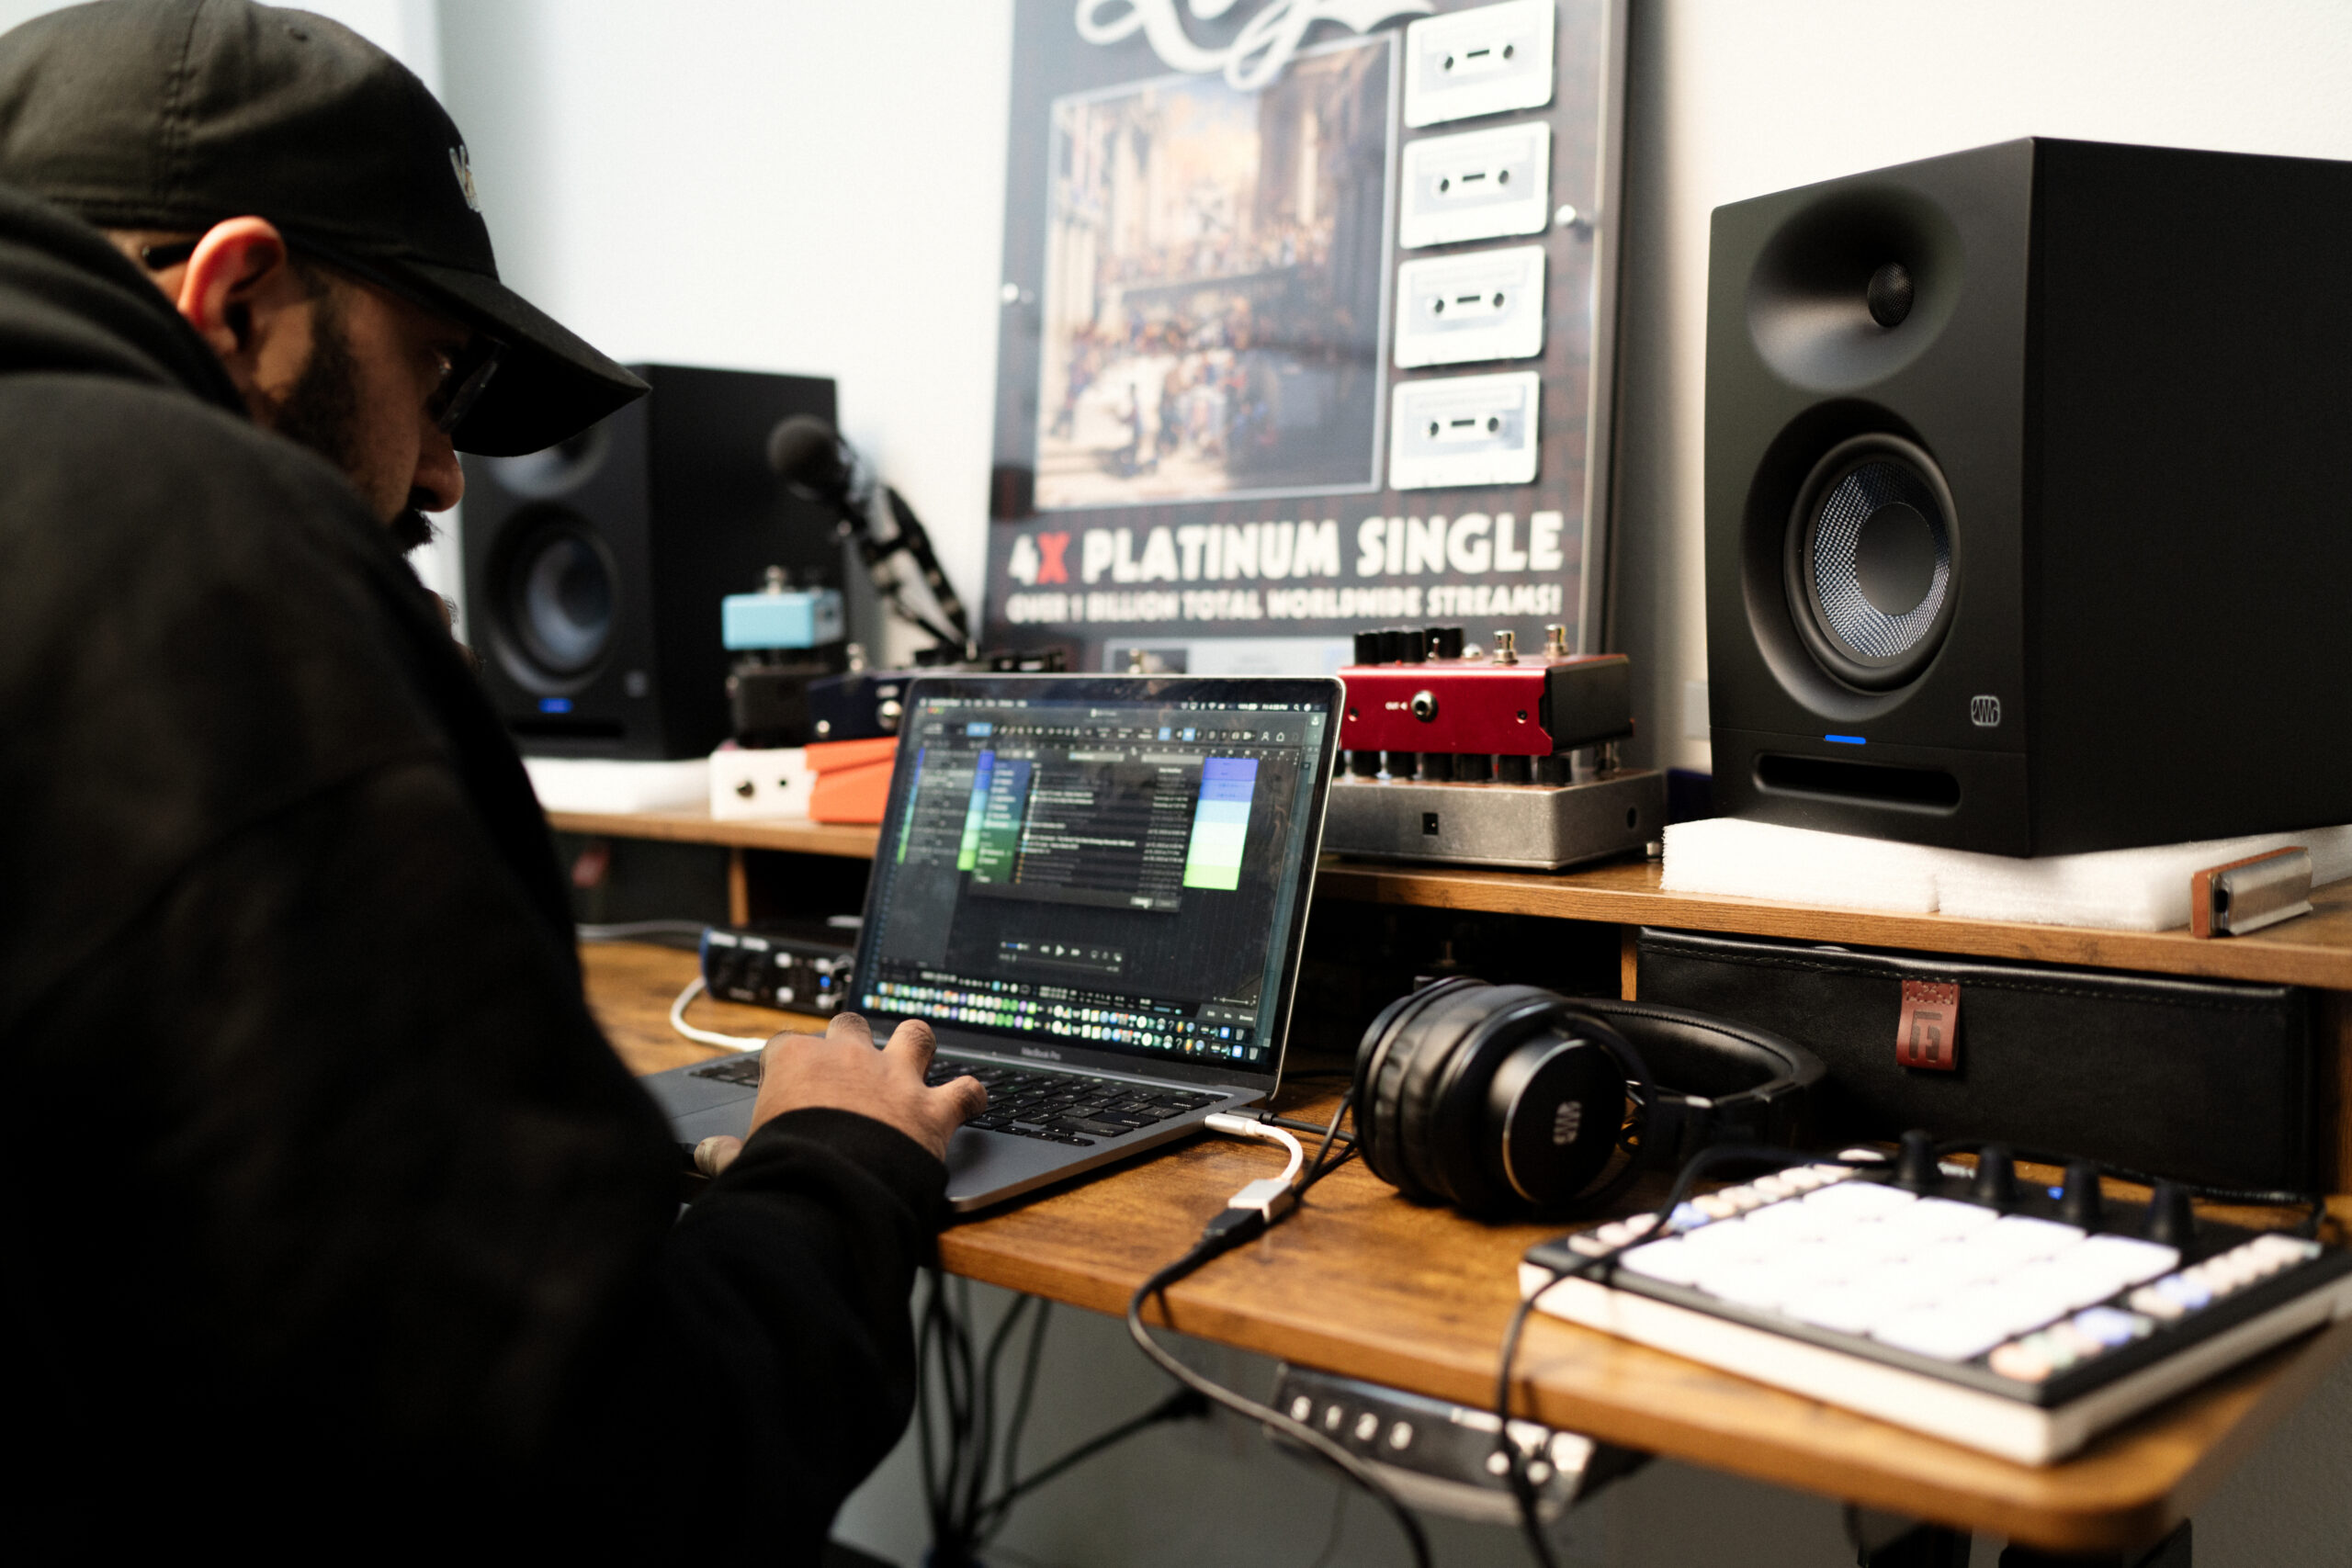
When it comes to gear, the Eris 3.5 studio monitors and Sub 8BT subwoofer give 6ix the low-frequency foundation he needs for his bass-heavy beats: “Having good speakers is very important for me, especially for my low end. That’s why I like these Eris studio monitors so much. I just plugged them in straight up, and the levels were perfect. Everything is super accurate. I can hear the kick and I can hear the bass in two different spaces. I could mix full records on these speakers, just because everything is leveled and in place. I’m really impressed with how these sound.”
Any final words of wisdom? “I like the simple process. I’m at a point in my career where I’m having fun just making music that I wanna make at the crib, at the house. I feel comfortable here and I can just be my total self, and that’s my Sweet Spot.”
PreSonus products used: PreSonus Eris Studio 5 Monitors and Sub 8BT.
Check out the all-new family of Eris Studio Monitors and watch the rest of our Sweet Spot series here.
The Sweet Spot with Multi-Platinum Producer Warren Huart
The Grammy-nominated multi-Platinum producer breaks down his Sweet Spot.
From the studio with chart-topping artists like Aerosmith and The Fray, to empowering 700,000+ subscribers on his world famous YouTube channel, Produce Like A Pro, producer and engineer Warren Huart is a multi-platinum prodigy with a deep passion for audio education and DIY ethics.
Warren’s impressive resume carries some serious weight – but he hasn’t let it cloud the air of what really matters: the music. Check out this episode where he discusses how he’s happiest when working with an artist he can co-write with, produce, play instruments, engineer, and mix, all while being able to achieve great sound from relatively inexpensive gear like the new PreSonus Eris Studio Monitors.
Long before the platinum certifications and star-studded CV’s, Warren got his professional start at just 16 years old when he left home to join a funk band. “I’ve been doing music professionally my whole life, and I learned to record out of necessity. I started on 4 track cassettes, moving into ADATS, and eventually into the earliest DAWs.”
His passion for educating others is a direct result of his own DIY educational path: “I started the YouTube channel purely and simply to connect to people. Between the beginners and the incredibly successful there’s a massive, massive gap there. So I came in to make it all make sense.” And now, the Produce Like A Pro YouTube channel is packed with the kind of educational content he wishes had been available when he was still learning: “I realized I had no advantages when I started. I never went to school for this and that is what most people are facing these days. I wanted to illustrate how you could do it by just working hard at your craft.”
When it comes to mixing, “a good pair of monitors is paramount. For me, I want two things: I want detail in the mid-range so I can get in there and mix everything, but I also want an additional, extended low end that you can now get in smaller speakers.” And the newly-redesigned Eris studio monitors deliver both at a shockingly affordable price point – which is crucial for Warren and his audience.
For Warren, accessibility is everything: “Like PreSonus, I believe very strongly in the democratization of the music industry. It has been one of the most important things for us, because now we’re able to access incredibly inexpensive, great-sounding equipment.” And in spite of having near-limitless access to any audio equipment under the sun, Warren is a huge fan of thoughtfully-priced products that punch well above their weight, like the PreSonus Eris Studio 8 Monitors and Sub 8BT: “Despite the fact I’m sitting in front of some relatively expensive equipment, 90% of my life is spent on speakers that are about $300. Bravo to PreSonus for producing a pair of speakers that’s really gonna kick down some doors.”
Any final words of wisdom? “I’m at my happiest when I’m working with an artist that I can co-write with, produce, play instruments, engineer, mix. For me, that is my Sweet Spot.”
PreSonus products used: PreSonus Eris Studio 8 Monitors and Sub 8BT.
Check out the all-new family of Eris Studio Monitors and watch the rest of our Sweet Spot series here.
Don’t Make This Mixing Mistake!

By Craig Anderton
Do you think of mixes in absolute terms, or relative terms? Knowing the difference, and when to apply which approach, can make a huge difference in how easily mixes come together. This can also affect whether you’re satisfied with your mixes in the future.
Mixing is about achieving the perfect balance of all of a song’s tracks. When you start mixing, or if you mix in parallel with developing a song, your mixing moves are absolute moves because you haven’t set up the relationship among all the tracks yet. For example, the guitar might be soft compared to the drums and bass, so you increase the guitar’s level. At that point, you don’t yet realize that when a piano becomes part of the mix, the guitar will mask it to some degree. So, now you’ll need to readjust the guitar’s level not only with respect to the drums and bass, but also in relation to the piano.
The further your mix develops, the more important the relative balance among all the levels becomes. Remember: Any change to any track has an influence on every other track. I can’t emphasize that enough.
A Different Way to Finish a Mix
At some point, your mix will be “almost there.” That’s when you notice little flaws. The drums are a bit overpowering. The bass needs to come up. The background singers don’t have quite the right balance with the lead vocal. Two keyboard parts are supposed to be the same level, but one is slightly louder.
The absolute approach to addressing those issues would be to make those changes. The kick comes down a bit. The bass comes up. You balance out the background singers and the keyboards. Then you render another mix to see if the problems have been addressed. It’s better, but now the bass is masking the low end of the keyboards. So, you bring up the keyboards a bit, but now they step on the background vocals…
If you’re not concentrating on how the tracks fit together in relative terms, then you’ll constantly be chasing your tail while mixing. You’ll keep making a series of absolute adjustments, and then wonder why relatively speaking, the mix doesn’t gel.
The Relative Approach to Mixing
VCA Channels are the key to relative mix edits, because they can offset tracks easily compared to the rest of the mix. Take the example above of the drums being a bit overpowering, the bass too soft, etc. Rather than try to fix them all at the same time, here’s what I do:
1. Choose the issue that seems most annoying. Let’s suppose it’s the drums being overpowering. I always start with fixing tracks that are too loud instead of too soft, because lowering the level of the loud track will make all the other tracks louder, relatively speaking.
2. Select the drum tracks (or drum bus) and choose “Add VCA for Selected Channels.”
3. Lower the VCA channel for the drums by (typically) -0.5 dB, but no more than -1.0 dB.
4. Not change any other track levels. Now it’s time to render a new version of the mix, and live with it for a day.
Having softer drums will change the relative perspective of the entire mix. Maybe the bass wasn’t that soft after all; maybe it was just masked a bit by the kick. Maybe the rhythm guitar is actually louder than it seemed, because its percussive strums were blending in with the drum hits—but the strums weren’t noticeable until the drums were softer. And so on.
That -0.5 dB of difference will change how you hear the mix. -0.5 dB may not seem like much, but that’s just one perspective. A different perspective is that it’s making every other track +0.5 dB louder than the drums. So, you need to evaluate the mix with fresh ears, because that one change has altered the entire mix.
An advantage of using VCA channels is that when you add the VCA Channel, its initial setting is 0.0. It’s easy to see how much you’ve offset the track level with the VCA, compared to (for example) changing a drum bus fader from -12.6 to -13.1. It’s also easy to get back to where you started in case after listening to the track, you decide other tracks were the problem, and the drums need to return to where they were. Just reset the VCA to 0.0.
Let’s suppose that after listening to the rendered version a few times at different times of the day, it seems like the drums fit in much better with the overall mix. Make the change permanent by de-assigning the tracks to the VCA Channel, and then removing the VCA Channel. (Or, leave it in and hide it if you think you might need more changes in the future.)
Next, let’s suppose the bass still seems a little soft. I’ll repeat the four steps listed above, but this time with the bass track, and raise it by +0.5 dB (fig. 1). Then it’s time to render the track again, and live with it for a day.
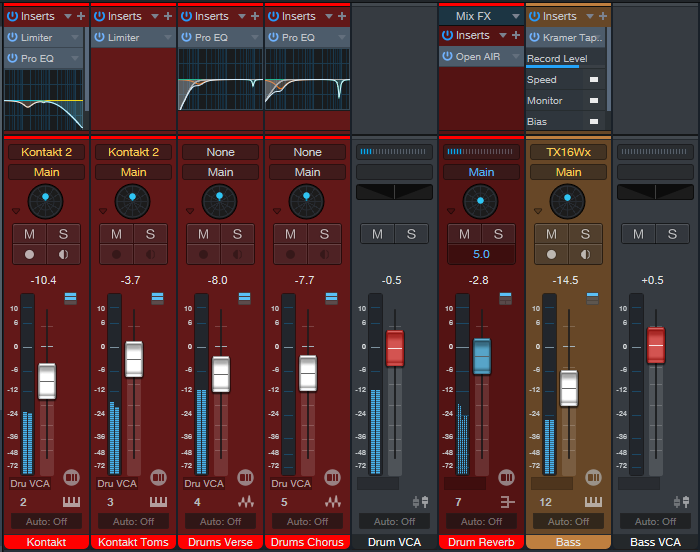
Figure 1: A VCA channel has altered the drum mix by -0.5 dB. That VCA Channel is about to be removed, because -0.5 dB turned out to be the right amount. Meanwhile, a VCA Channel has been added to see if increasing the Bass level by +0.5 dB helps it fit in better with the mix.
It might seem that this one-track-at-a-time approach would take forever, especially because sometimes you may need to revise earlier changes. But it can save time, for two reasons:
- Mixing sessions don’t go on for hours. Because you listened to the rendered mix with fresh ears and know what you need to change, you make the change. After rendering the new mix, you’re done for the day, aside from listening to it several times under various conditions. Your final mixes now become 5 to 10 minutes at a time spread over multiple days. An additional advantage is that you always hear the mix with fresh ears, instead of having listener fatigue set in during a long mixing session.
- Often, after taking care of the most problematic tracks, other issues resolve themselves because they weren’t the problem—their relationship to the problematic tracks was the problem. Fixing those other tracks fixes the relationship.
If after repeated listening over a few days (and being brutally critical!) I don’t hear anything that needs to change, then the song is done.
A Corollary to Relative Mixing
This approach is also one reason why I don’t use dynamics processors in the master bus, except for the occasional preview. All dynamics processors are dependent on input levels. As you change the relationship of the tracks, you’re also changing how a master bus’s dynamics processor influences your mix.
Some people say they need to mix through a dynamics processor, because the mix doesn’t sound right without it. I think that may be due to mixing from an absolute point of view, and the dynamics processor blurs the level differences. I believe that if you achieve the right relative balance without using a master bus dynamics processor, when you do add dynamics processing during the mastering process, the balance will remain virtually identical. Your mix will also gain the maximum benefits from the dynamics processing.
Once you start considering when to employ a relative mixing approach compared to a more absolute approach, I think you’ll find it easier to finish mixes—and you’ll end up with mixes you’re satisfied with years later.
Tuff Beats
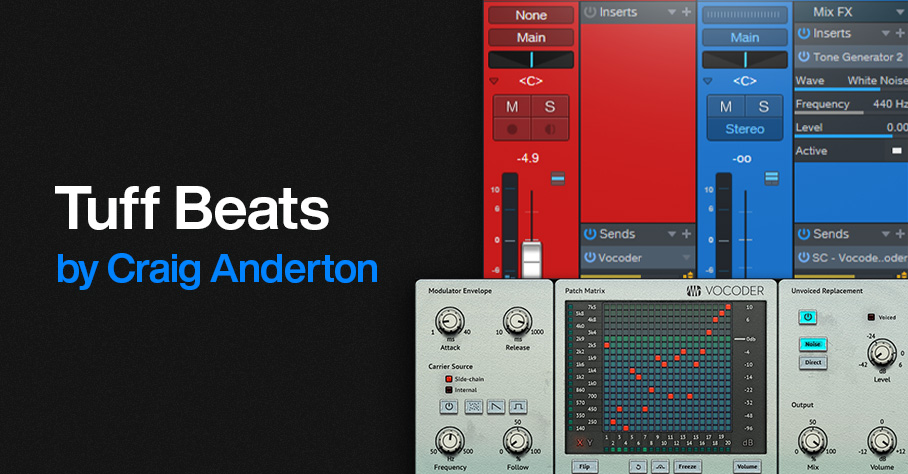
By Craig Anderton
Calling all beats/hip-hop/EDM/hard rock fans: This novel effects starts with drums modulating the Vocoder’s white noise carrier, and takes off from there. The sound can be kind of like a strange, aggressive reverb—or not, because the best part of this tip is the crazy variety of sounds that editing or automating parameters can create.
The following audio example plays just a few of the possibilities. The first two measures are the original loop. Then, several 2-measure examples alter Vocoder parameters.
Track Layout
Fig. 1 shows the track layout:
- The Drums track hosts the waveform that modulates the Vocoder via a pre-fader send to the Vocoder track. How you set the Drums track fader depends on whether or not you want to mix in unprocessed sounds.
- The Carrier track generates white noise as a carrier for the vocoder’s sidechain (fig. 2), as sent through a pre-fader send. You’ll probably want to keep the Carrier track’s fader at minimum.
- The Vocoder track produces the processed output to mix in with the drums.

Figure 1: Track layout for Tuff Beats processing.
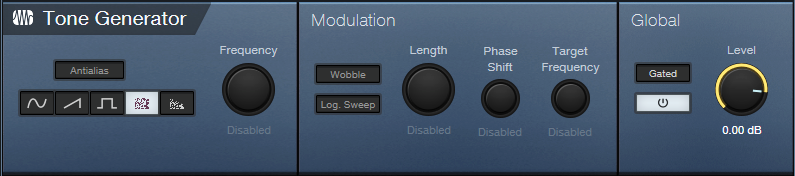
Figure 2: Tone Generator settings.
Editing the Effect
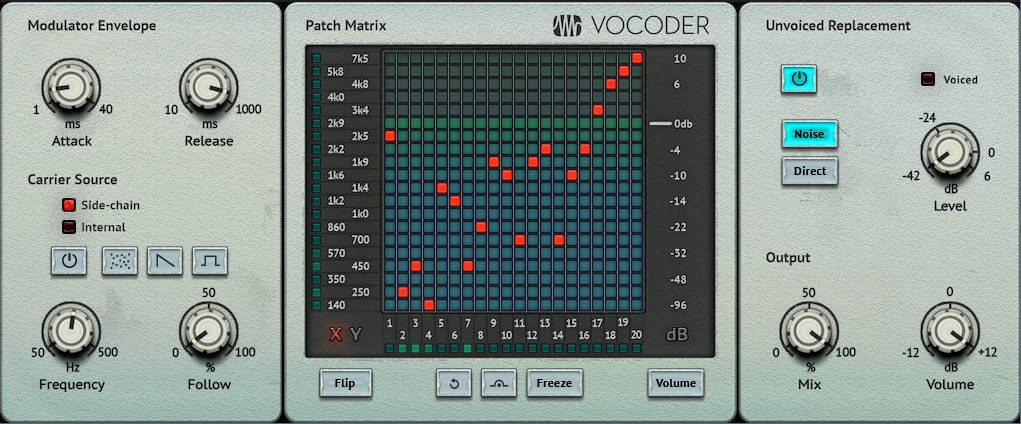
Figure 3: Typical Vocoder settings.
The only crucial setting is that the Carrier Source must be set to Side-Chain (fig. 3). Aside from that, you have plenty of options for subverting the sound:
- Release. At longer release times, the sound is like a strange reverb. Shorter settings are more like doubling.
- Release automation. Try drawing waveform automation with the Paint tool, like negative-going sawtooth waves and triangle waves. Freehand drawing can produce even wilder effects.
- Attack. Turning up Attack reminds me of a transient shaper, because it softens the drum attack.
- Patch Matrix. This alters the “reverb” character. You can get some pretty whacked out filtering effects.
- Matrix automation. Now you can really go insane. Choose Write for the Vocoder’s automation mode, and “draw” on the Patch Matrix as you would an Etch-a-Sketch. This changes the filtering effects, and the automation remembers your moves.
It doesn’t take much effort to come up with some pretty novel sounds, so…have fun!
Reinvent Your Stereo Panning
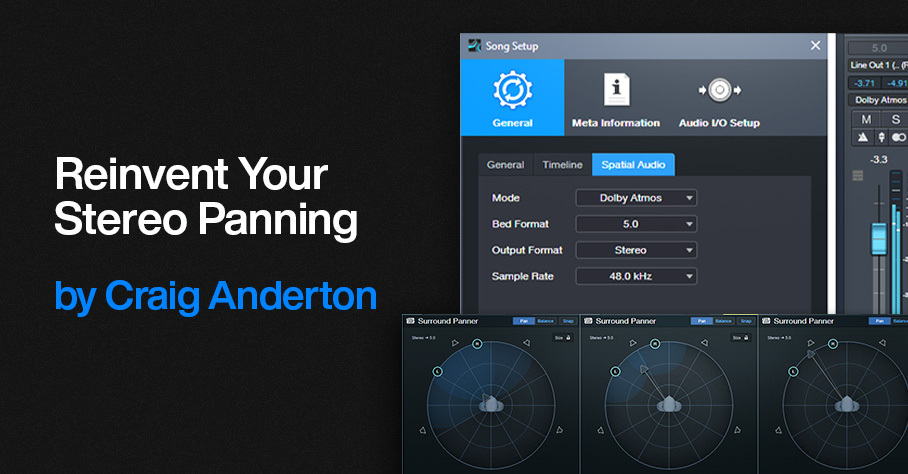
This tip is about working with stereo, NOT about Dolby Atmos® or surround—but we’re going to steal some of what Atmos does to reinvent stereo panning. Studio One’s Surround panners are compatible with stereo projects, offer capabilities that are difficult to implement with standard panpots, and are easy to use. Just follow the setup instructions below, and start experimenting to find out how surround panning affects stereo tracks. (Surround panners work with mono tracks too, although of course the stereo spread parameter described later is irrelevant.)
Setup
When you’re ready to mix, choose Song > Spatial Audio. Select the parameter values to the left in fig. 1. In the output section (fig. 1 right), select 5.0 for the Bed format, and Stereo for both Speakers and Headphones so you can use either option to monitor in stereo.
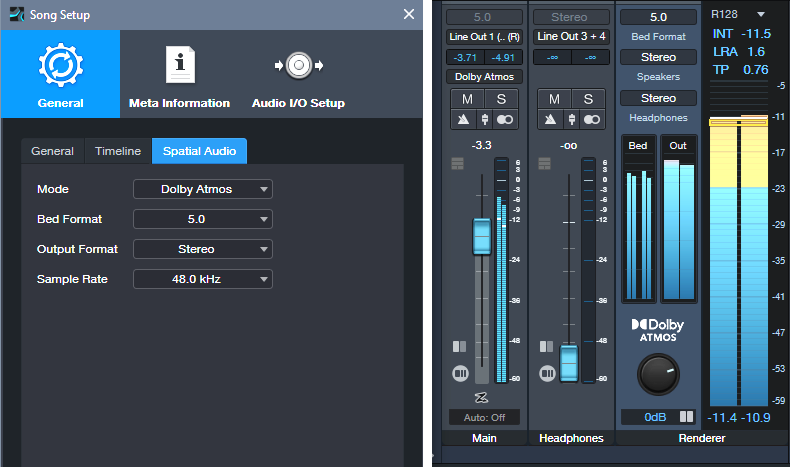
Figure 1: Parameter setup for Surround panning with stereo projects.
After choosing Dolby Atmos for spatial audio, channel panpots turn into surround panpots. Double-click on them to see the “head-in-middle-of-soundfield” image shown below. Choose Disable Center, which isn’t used. LFE Level doesn’t matter, unless you’re using a subwoofer.
Using surround panners for stereo offers several adjustable parameters:
Spread. Move the L and R circles to set the left and right pan position spread, or click and drag in the numeric Spread field. The spread (fig. 2) can go from 0 (mono), to 100% (standard panning), to 200% (extra wide, like binaural panning).
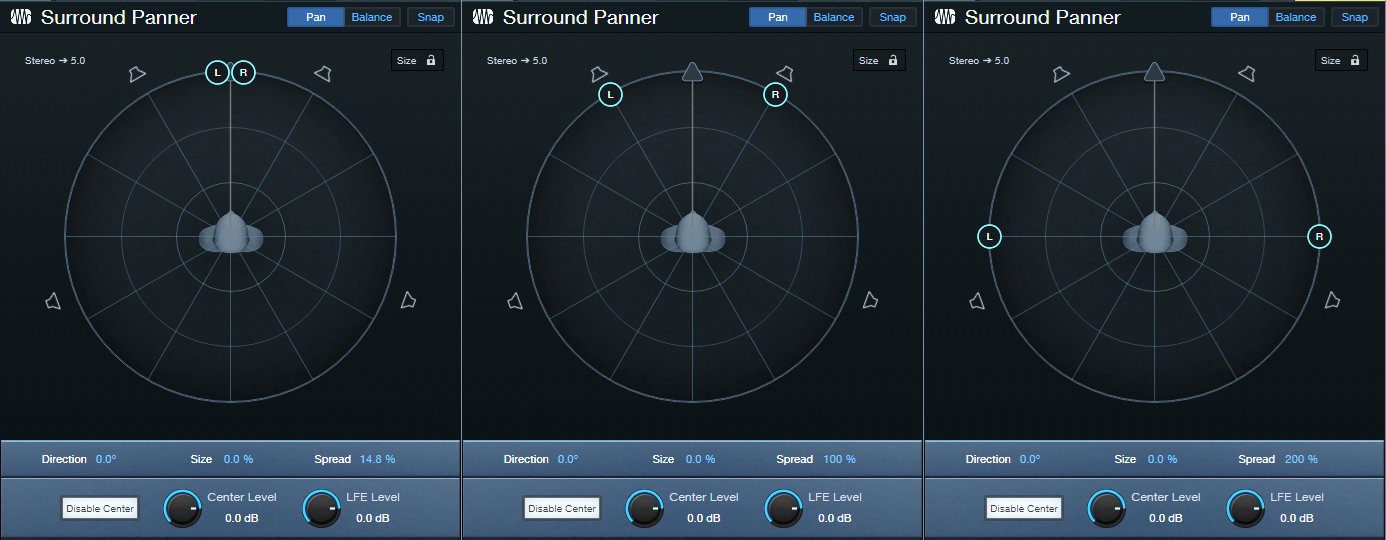
Figure 2: (Left to right) 14.8% spread, 100% spread, 200% spread.
Direction. After establishing the spread, click on the arrow and rotate the spread so it covers the desired part of the stereo field (fig. 3). You can also click and drag on the numeric Direction field. Between spread and direction, you can “weight” the stereo spread so that it covers only a sliver of the stereo field, covers center to right or left, mostly left, mostly right, etc.
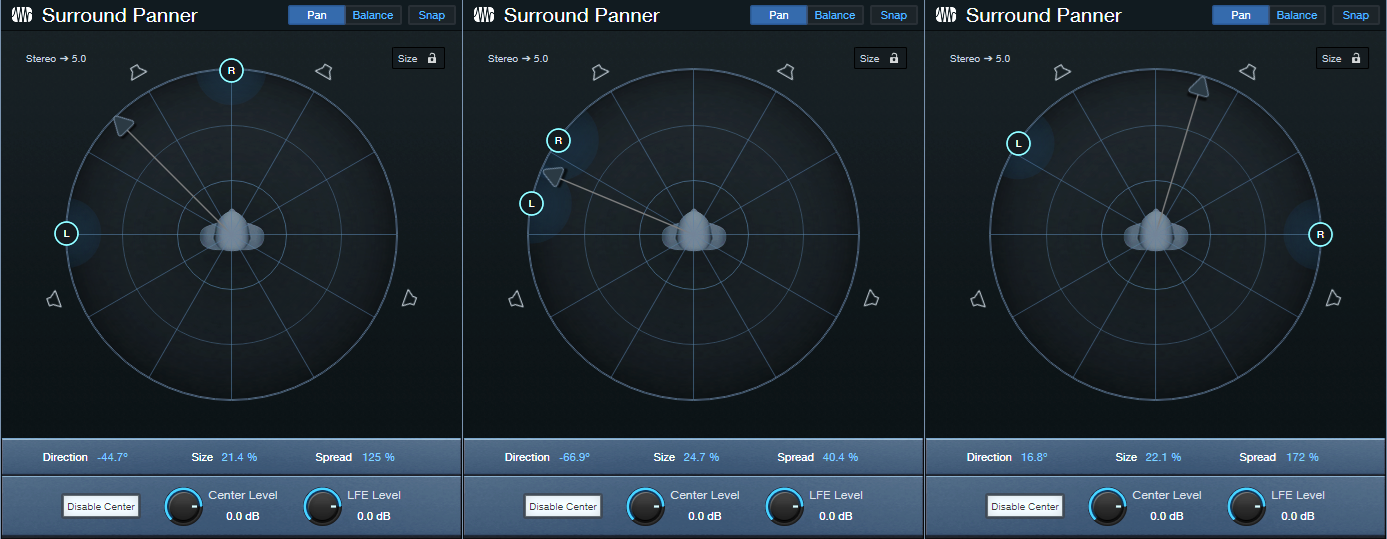
Figure 3: (Left to right) Panned from left to center, panned to a narrow slice of the stereo field, and panned almost full but tilted toward the right.
Size. This has no equivalent with stereo panpots. Click on the arrow, and move it closer to the head for a “bigger” size, or further from the head for a “smaller” size (fig. 4). You can also click and drag on the numeric Size field. The result isn’t as striking as with true surround, but it’s much more dramatic than standard panning. Note the “cloud” that shows how much the sound waves envelope the head. All the previous images showed a small size.
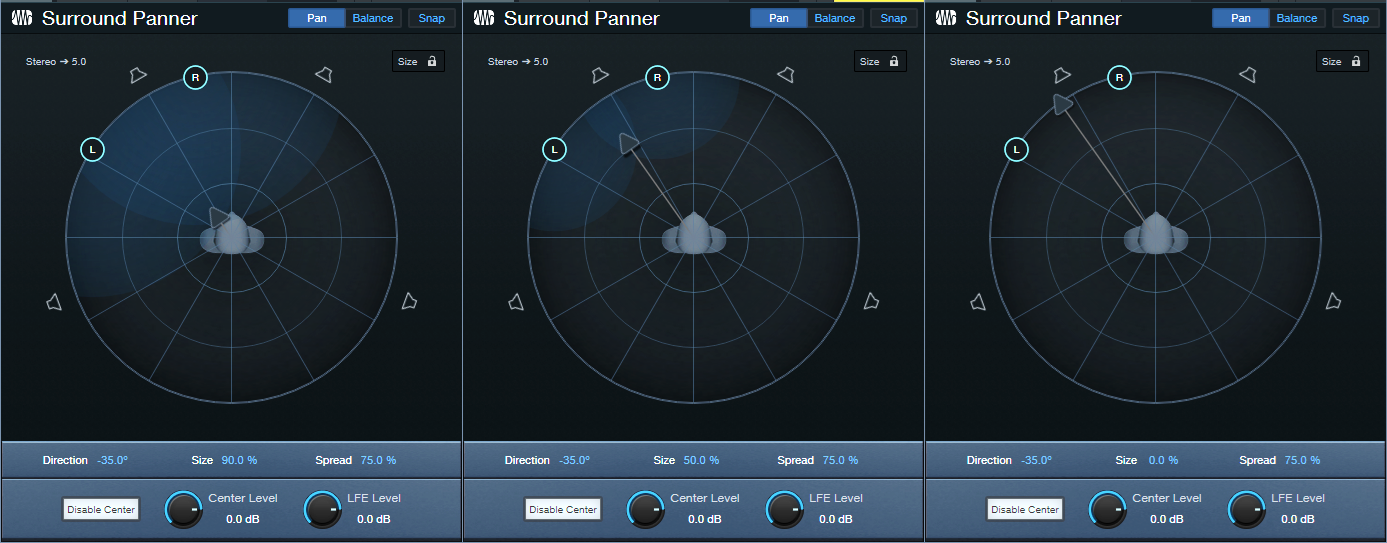
Figure 4: (Left to right) Biggest size/least distance, moderate size/moderate distance, smallest size/furthest distance.
Flexible automation. A joystick or controller pad can automate two of the parameters simultaneously. Or, modulate all three parameters using three controls from a control surface. This is a huge deal compared to standard panning. For example, suppose an instrument is ending a solo, while another solo starts. The one that’s ending can pan to a narrower spread, move off to the side, and become smaller just by moving three controls.
Other Features
- Balance Tab. The surround panners can also serve as conventional balance controls. This setting interacts with the panners. For example, if the L and R buttons are close to each other, there won’t be much balance to adjust. I rarely use the balance option. To make sure that surround panning isn’t altered by a Balance parameter setting, check that the balance “dot” is in the center of the virtual head.
- Size lock. This maintains the same Size setting, regardless of what you do with the Direction and Spread parameters. Hold Shift to bypass Lock temporarily, and fine-tune Size.
- Object Panner. Right-click on the Surround panner, and you can choose an Object Panner instead. This is less relevant with stereo, because front/back and lower/higher directionality doesn’t exist like it does in a true Atmos system. However, the Object Panner does have Size, Spread, and Pan X (left/right) parameters, so feel free to play around with it—you may like the interface better than the surround panner. It’s also possible to do crazy automation moves. In any case, you can’t break anything.
- Other. This is another function you reach via a right-click on the Surround Panner. You’ll see a list of other plugins on your system that may have spatial placement abilities, like Waves’ Nx series of control room emulators, Brauer Motion, Ozone Imager, Ambisonics plugins, and the like. If you insert one of these, you can revert to the stock Studio One panners or choose other options by clicking on the downward arrow just under the “other” plugins name.
It may sound crazy to use Surround panners in stereo projects—but try it. You can truly do stereo panning like never before.
Studio One: Mix in a New Dimension with Jeff Ellis
The GRAMMY-winning recording and mix engineer shows us how he uses Studio One to create an artful immersive mix.
Jeff Ellis is a force to be reckoned with. The LA-based recording and mix engineer started his career as an intern at the legendary EastWest Studios, where he was selected to engineer Frank Ocean’s debut album – the dynamic and lushly layered Channel Orange.
Just one year later, Ellis’ work was nominated for both Record of the Year and Album of the Year at the GRAMMY Awards, where he won Best Urban Contemporary Album – a success that led to engineering Ocean’s critically-acclaimed sophomore album, Blonde and building a star-studded CV of artists like Doja Cat, Odd Future, The Neighbourhood, Akon, Skylar Grey, Nick Jonas, and more.
Watch this episode to see how Ellis uses Studio One to create an immersive mix in his Atmos room at EastWest Studios.
In this episode of Mix In A New Dimension, Jeff Ellis uses Studio One’s spatial audio to create an immersive mix of Mayer Hawthorne’s horn-heavy love ballad, “For All Time.”
Having mixed the record in stereo, Ellis was already deeply familiar with the track and felt it was ideally suited to a spatial mix. “That particular album is so high-fi, and there’s so much depth to it. It’s so well arranged, and it’s just like a classic album.”

For Ellis, the single greatest piece of guidance when mixing in Atmos is making sure that the Atmos version is not a different piece of art: “I don’t want you to get a different emotional response from the song depending on if you listened to it on stereo or spatial audio. If I’m able to get the song to be more immersive and have a little bit more depth without any of the artistry of it changing, that’s gonna be my ultimate goal.”
“In this particular song, the drums are right in the center. I took the overhead cymbal sounds and widened those out a bit. And then for all the percussion elements, I put the overheads up and widened it out. The kick and snare are pretty much right up the center, or close to it. And I’m just massaging the sounds out into this big, Atmos field. And as I’m doing it, I’m going back and forth between the Atmos mix and the stereo mix to make sure none of the intrinsic level relationships between the parts of the song are changing as I’m panning these things out.”

Any final words of wisdom? “Make sure that the balance between the elements in the song and the aesthetic don’t change between stereo and Atmos – it’s just getting more immersive. Be sensible, be artful, don’t be a technician, and have fun with it.”
PreSonus products used: Studio One
Try Studio One+ and check out the rest of our Mix In A New Dimension series here.
Presence Electric 12-String (the Artist Version Remix)
Presence’s sound library includes a fine acoustic 12-string guitar, but not an electric one. So, perhaps it’s not surprising that one of the more popular blog posts in this series was about how to create a realistic electric 12-string preset with Presence.
Unfortunately, that was before Studio One introduced Track Presets. The preset relied on a Multi Instrument, so it worked only with Studio One Professional. However, thanks to Track Presets, we can revisit our electric 12-string, and make a plug ’n’ play version that works for Studio One Artist as well as Professional (download link at the end).
Overcoming the Sampling Problem with 12 String Guitars
Sampling a 12-string is difficult. The sound is constantly changing due to the shimmering effect from slightly detuned strings. Furthermore, some notes are doubled with octave-higher notes, while other notes are doubled with unison notes. My solution is not to try and sample a 12-string guitar, but to construct one from three sets of 6-string guitar samples.
Each of the three Presence instances (fig. 1) loads the preset Guitar > Telecaster > Telecaster Open from the stock Presence library:
- One instance provides the main guitar sound.
- Transposing another instance up 12 semitones provides the octave-above notes.
- A physical 12-string guitar doesn’t have octaves on the 1st and 2nd strings, so the third Presence instance provides a unison sound for the higher strings.
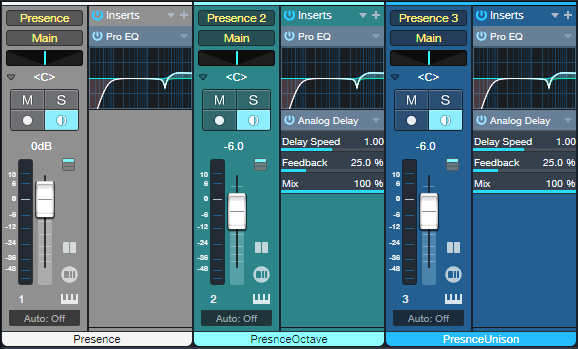
Figure 1: With three instances needed to create a single instrument, note that all three Monitor buttons must be enabled to play the instrument from your keyboard or MIDI guitar controller.
Limiting Note Ranges
In the original preset, Multi Instrument Range edits prevented the unison sounds from overlapping with the octave-above sounds. In the Artist preset, two Input Filter Note FX restrict the ranges (fig. 2).

Figure 2: The upper Note FX Input Filter restricts the range of the octave-above notes to A#2 and below. The lower Note FX Input Filter restricts the range of the unison strings to B2 and above.
Emulating the 12-String “Shimmer”
A 12-string is never perfectly in tune, which gives a shimmering effect. The octave instance is transposed up +12 semitones, but the Pitch Fine Tune setting is +5 cents. The unison instance Pitch Fine Tune is -2 cents. This gives the chorus-like that’s inherent in 12-string guitars. Detuning the virtual strings provides a more realistic sound than trying to “fake it” with a time-based modulation effect.
About the Analog Delays
The higher string in a pair of strings plays just a little bit late, because your pick hits the main string before the octave or unison string. To emulate this effect, the Analog Delay (fig. 3) provides a 20 ms delay for the octave and unison instances. (We can’t use Presence’s Delay, because the mix needs to be 100% delay—no dry sound.)
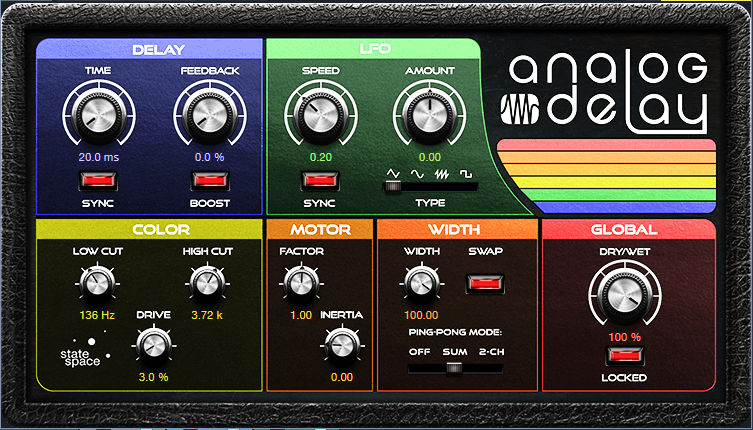
Figure 3: Analog Delay settings used to emulate string pluck delay.
Without this delay, the emulated 12-string lacks realism. The Analog Delay also adds some High Cut to reduce some of the brightness caused by transposing the octave strings. The Width settings provide a big stereo image, but for a more “normal” sound, turn ping-pong mode to Off.
The octave and unison instance levels are -6 dB below the main guitar sound. With physical 12-string guitars, the octave strings are thinner than the strings that generate the standard pitch. So, they generate less output. Lowering the level of the octave strings gives a better overall balance. Technically, the unison strings could be at the same level, but their levels are also a little lower to avoid an unbalanced sound compared to the octave strings.
EQ Settings
The Octave and Unison string instances use Presence’s internal EQ to attenuate the highest and lowest frequency bands. The main instance attenuates the low band, but peaks +3 dB at 3 kHz. Regarding the Pro EQ3 settings, open up the preset if you want to deconstruct the programming. The main aspects are a bass cut to give a more trebly, “Ricky”-like 12-string sound, a high-shelf boost for a little extra brightness, and a narrow notch around 3.2 kHz to reduce some “string ping” inherent in the original samples. As always, though, adjust for your tastes in guitar tone.
So, Studio One Artist aficionados, what are you waiting for? Download the preset, and get ready to make some cool electric 12-string sounds.
Download CA 12-String Electric Artist.trackpreset here!
Faster, Simpler, and Better Comping
At first, this might not seem too exciting. But follow the directions below, and try comping using this method—I don’t think you’ll be disappointed. This tip shows how to:
- Audition, select sections of, and promote Takes while listening to the rest of the mix, at any level you want.
- Listen to the edited Parent track made up of the Takes you’ve promoted, at any time during the comping process. Again, this is in context with the mix.
- Do all of the above while looping, so there’s never a break in the editing process.
- Do comping with only the Arrow tool—you don’t need the Listen tool.
Preparation: Set Up Dim Solo
First, implement the Dim Solo function described in the blog post Super-Simple Dim Solo Functionality. Dim Solo allows soloing a track or tracks, while all the other tracks are at an adjustable lower level. The process works by assigning all tracks except for the one you want to solo (e.g., a vocal track with its Take layers) to a VCA channel. You can then “dim” all the non-soloed tracks with the VCA level fader to whatever level you want while you comp, and hear the Takes in context with the song. After auditioning and selecting the desired sections of your Takes, set the VCA fader back to 0.0 to return to the original mix levels. The minute or two it takes to set up Dim Solo is more than offset by the benefits it offers to comping. For more details, refer to this blog post for how to create the Dim Solo function.
Faster Take Auditioning, Selecting, and Promoting
After setting up Dim Solo and using the VCA Channel fader to adjust the level of the mix (which excludes the track being comped, because it isn’t part of the VCA group), here’s how to audition and select Takes:
1. Safe Solo (Shift+Click) the parent track with the Takes. This is important! It allows soloing the Parent track without muting the tracks that are playing back at the dimmed level.
2. Loop the section with the Takes you want to audition.
3. Click a Take’s Solo button to audition it while the song loops (fig. 1).
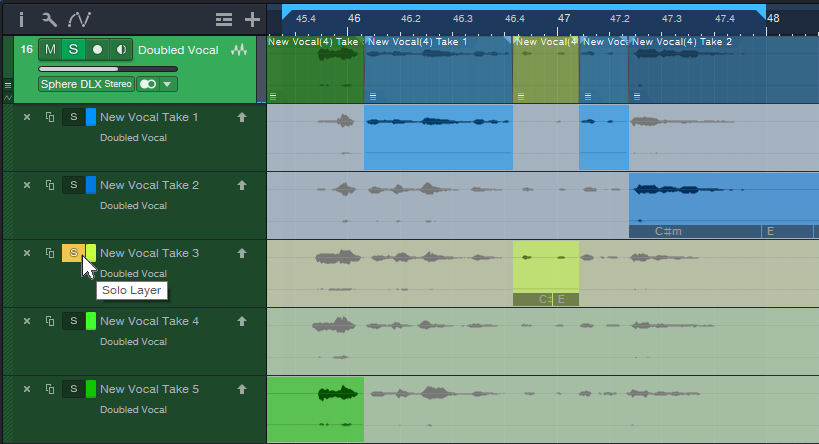
Figure 1: Take 3 is being soloed for auditioning, and for selecting sections to be promoted to the Parent track. Turning off the Take’s Solo would solo the Parent track, so you could audition the edited parent track and hear any Take sections that had been promoted.
4. If you hear a section in a Take you want to promote to the Parent track, use the Arrow tool (which turns into an I-beam cursor when hovering over a selected Take) to click+drag over the section.
5. Continue soloing Takes while the music loops, and select the sections you want to promote to the Parent track. If needed, alter the loop start and end points.
6. If at any time you want to hear the edited Parent Track with the Takes you’ve promoted up to that point, make sure no Take layers are in solo mode.
Better Music Through Better Comping
One reason I wrote up this tip is because of an interesting side effect. The Takes I selected as “best” when auditioned in the usual way were often not the same Takes chosen as “best” when listening to them in context with the music. A technically perfect Take is not necessarily the same thing as a Take with the best feel. Listening to, selecting, and promoting the Takes in context with the mix makes a big difference in helping to select Takes that fit the music like a glove.
How to Quickly Slash Your Latency
You know the feeling: You’re tracking or doing an overdub with a virtual instrument or amp sim, but you’re frustrated by the excessive latency inherent in complex projects with lots of plugins. And with older computers, latency may be an annoying fact of life.
Of course, Studio One has clever low-latency native monitoring. However, there are some limitations: plugins can’t introduce more than 3 ms of latency, FX Chains can’t use Splitter devices, and external effects using the Pipeline plugin are a non-starter.
This tip’s universal technique has only one significant limitation: it’s oriented exclusively toward having the lowest latency when tracking or doing overdubs. Fortunately, most of the time that’s when low latency is most important. Latency doesn’t matter that much when mixing down.
Here’s the process:
1. Make a premix of all tracks except the one with the virtual instrument or amp sim you want to track with or overdub. Do this by exporting the mix (Song > Export Mixdown) and checking Import to Track (fig. 1). The imported track becomes a premix of your tracks. Note that if any of the tracks use Pipeline, the premix must be done in real time.
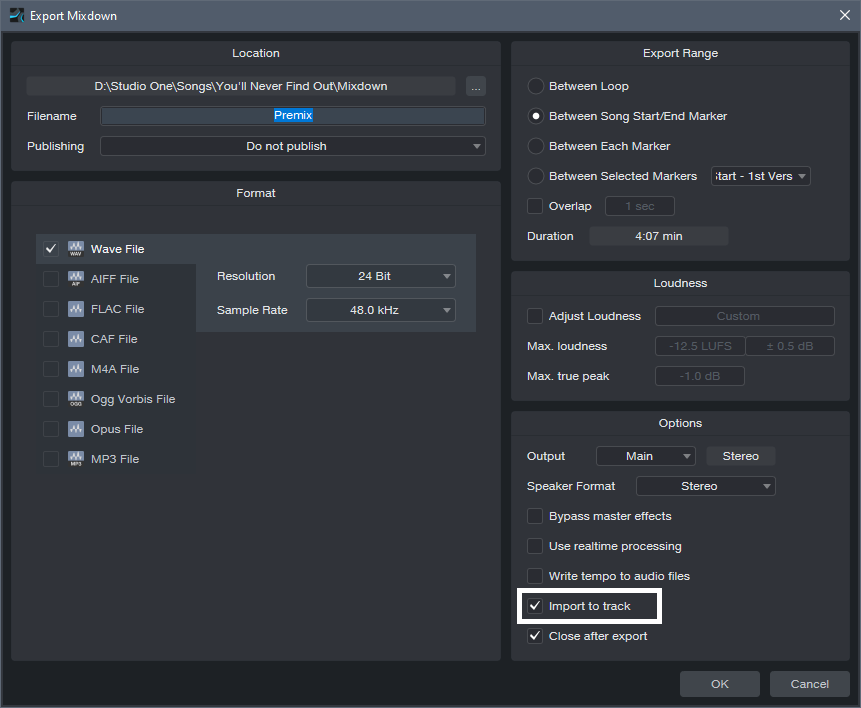
Figure 1: The first step is to create a Premix of all your tracks. Make sure you select Import to Track (outlined in white).
2. Select all tracks except for the Premix and the one with the virtual instrument or amp sim you want to use for your overdub.
3. In the Arrange view, right-click on the selected tracks. Choose Disable Selected Tracks (fig. 2).
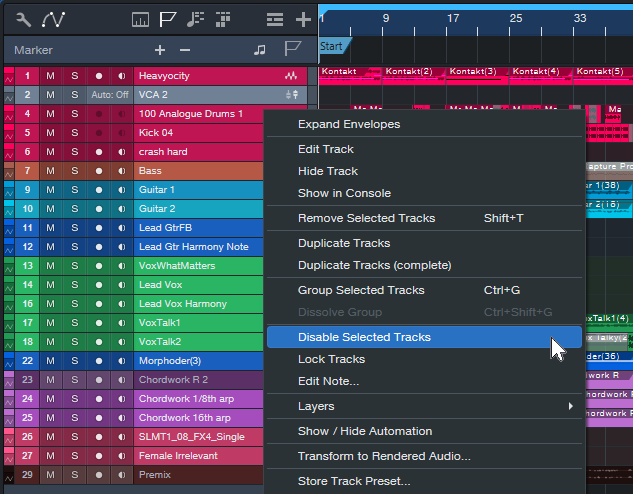
Figure 2: In this example, all the tracks are selected for disabling, except for the Mai Tai instance in Track 23 and the Premix.
4. Now you can overdub or track while listening to the premix. Because there’s now so little load on the CPU (fig. 3), you can reduce the Device Block Size and Dropout Protection (under Studio One > Options > Audio Setup) to lower the latency.
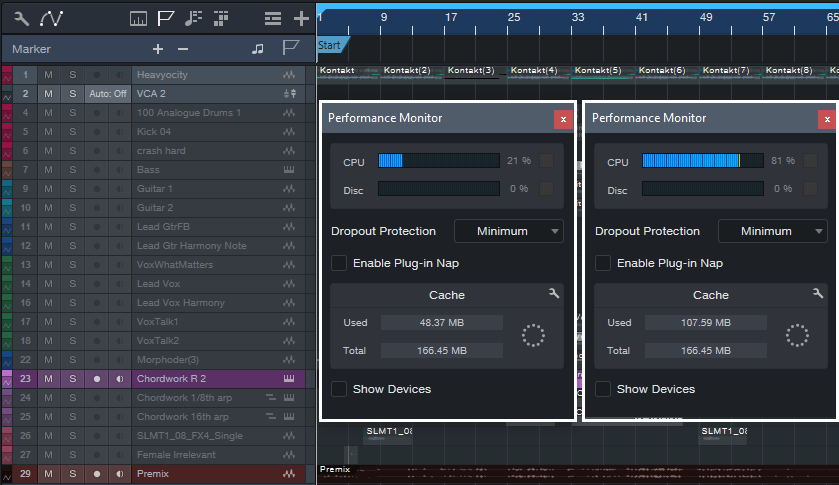
Figure 3: The Performance Meter on the left shows CPU consumption with all tracks except the Mai Tai and Premix disabled. The Performance Meter on the right shows CPU consumption with all the tracks enabled.
5. While listening to the premix as your reference track, you’ll be able to play your virtual instrument or through your amp sim with much lower latency.
6. When you’re done with your overdub or tracking, you can delete or mute the Premix, and return the latency to a higher setting that allows for mixing without dropouts or other problems.
How to Fix Phase Issues
Recording audio using more than one feed from the same source may create phase issues. For example, when miking a bass amp and taking a DI (dry) input, the DI’s audio arrives at your interface instantly. But because sound travels 12″ (30 cm) in 1 millisecond, the mic’s audio will arrive later due to the distance between the mic and speaker. This means it won’t be time-aligned with the direct sound, so there will be a phase difference.
Miking an acoustic guitar with two mics, or drum overheads that are a distance from the drum kit, may also lead to potential phase problems. Even partial phase cancellations can thin or weaken the sound.
It’s best to check for phase issues and fix them prior to mixing. One way to resolve phase issues is to look at the two waveforms on the timeline, and line them up visually. However, the waveforms may not look that similar (fig. 1), especially when comparing audio like a room mic with a close-miked sound.
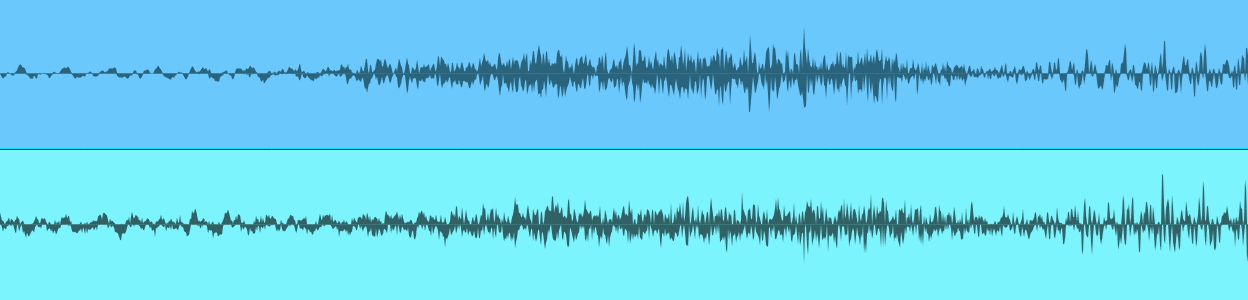
Figure 1: Despite being zoomed in, you wouldn’t necessarily know from the waveforms that they are at their point of maximum cancellation.
Another option is to sum the sources in mono, delay or advance one relative to the other, and listen for what sounds the strongest. That can work, but it’s not always easy to hear exactly when the waveforms are in phase. Let’s make the process more foolproof.
The Phase Correction Process
The goal is to find the alignment of the two waveforms where the audio sounds the strongest. However, it’s easier to hear phase cancellation than addition. So, by inverting the phase of one channel, we can align the tracks for maximum cancellation. Returning the phase to normal then gives the strongest sound. Here’s the process:
1. Solo the channels that may have a potential phase issue. Determine whether they do by listening for a thinner sound when they’re summed to mono, or both panned to center.
2. Match the channel levels as closely as possible.
3. Pan the two channels hard left and hard right.
4. Insert the Phase Meter plugin in the master bus.
5. Insert a Mixtool in one of the instrument channels. Invert the Mixtool’s phase. If a track uses stereo audio, invert the left and right channels.
6. Turn off Snap. This allows nudging an Event in 1 millisecond increments. Select the Event and type Alt+Right Arrow to move the track earlier by 1 ms, or Alt+Left Arrow to move the track later by 1 ms.
7. Nudge one of the tracks with respect to the other track until the Phase Meter shows the most negative correlation (i.e., the lower bar graph swings to the left as much as possible, as in fig. 2). This indicates maximum cancellation. Note: The time range for maximum cancellation is extremely narrow. One millisecond can make the difference between substantial cancellation and no cancellation. Be patient. Adjust 1 ms at a time.
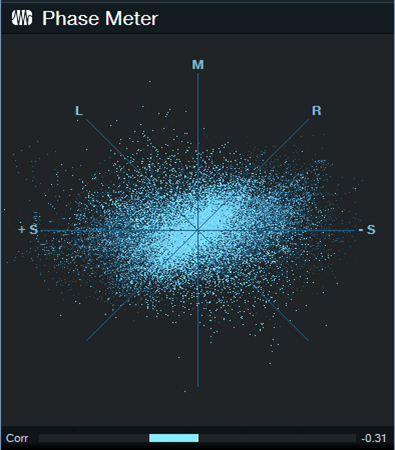
Figure 2: A negative correlation reading indicates that the two sources have phase differences.
8. You’ve now aligned the two tracks. Remove the Mixtool plugin so that the two signals are in phase.
Tip: For audible confirmation, in Step 7 listen as you make these tiny changes. If you enable the Mono button in the Main bus, aim for the thinnest possible sound. If you monitor in stereo, listen for the narrowest stereo image.
Super-Fine Tuning
1 ms is a significant time shift when trying to match two signals’ phase. Step 7 will isolate a 1 ms window where the two tracks are in phase (or at least close to it), but you may be able to do better.
Select Samples for the Timebase and turn off Snap. Zoom in far enough, and you’ll be able to click on the Event and drag it earlier or later in 1 sample increments (fig. 3). That can tighten the phase further, if needed.
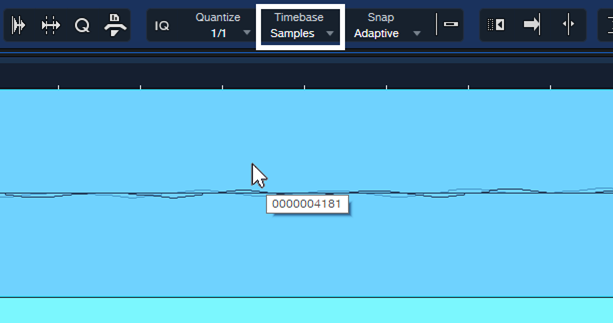
Figure 3: With Timebase set to Samples and Snap turned off, the resolution for moving an Event is 1 sample.
This may be overkill, but I know some of you are perfectionists 😊. Happy phase phixing!