Category Archives: Uncategorized
Create Ampire Cabs with Pro EQ2
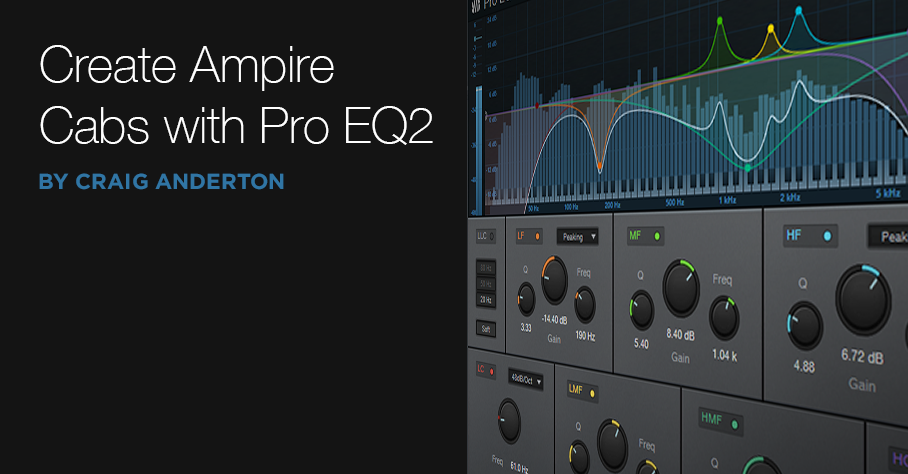
IR-driven cabs are often the weak link with amp sims Fortunately, cab emulations have improved dramatically over the years. Yet like samples, they remain “frozen” to a particular cab—they have their sound, and that’s it.
Although some guitar players think that a cab is a magical device, it’s really just a filter. To be sure, it can be a magical filter…but it’s still a filter. So, we can use filters to create our own cabs. They won’t be able to replicate a specific cabinet down to the smallest detail, but that’s not the point. Using the Pro EQ2 filter to create your own cabinet can give responses that IRs can’t give, with a different sound that can be satisfyingly smooth, and…well, “analog.”
I analyzed the frequency response of several cabs, using the Tone Generator’s pink noise along with the Spectrum Analyzer plug-in, then tried to replicate the response as closely as possible with the Pro EQ2. Although sometimes I was shocked at how close this could come to the cab, more often than not I couldn’t help but make some tweaks—it’s almost like I had taken that cab, brought it into a woodworking shop, and made specific changes for my needs.
If you want to experiment…be my guest! Insert Ampire, choose your amp (I particularly like the following curves with the VC30), select no cab in Ampire (important!), insert the ProEQ2 afterward, and rock out. Here are some ideas to get you started. Note that the white curve is the sum of all the other curves, so that’s the curve you actually hear.
This curve is based on a 1 x12 cabinet that’s designed for leads, but works with rhythm parts as well (Fig. 1).
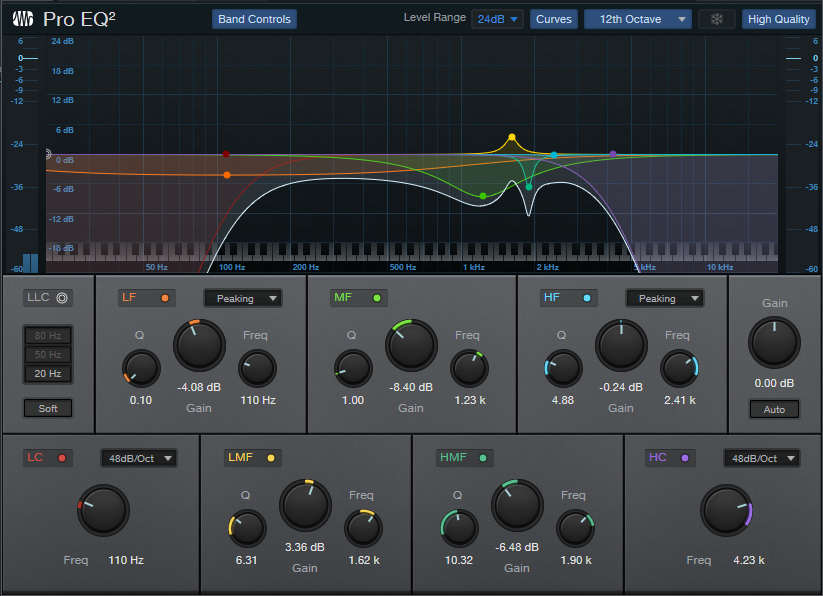
Figure 1
Here’s a curve that’s more “Tweedish” (Fig. 2)
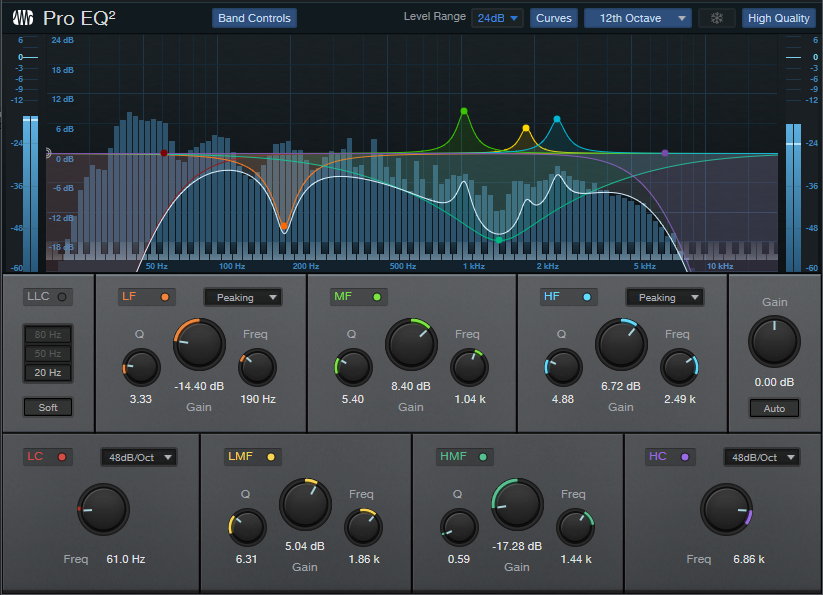
Figure 2
This curve (Fig. 3) is based on an amp by a company that no longer makes amps, but whose name I better not mention so that I don’t have to deal with lawyers. Suffice it to say they’re known mostly for making guitars that are popular with rock guitarists.

Figure 3
And here’s one more…just because we can (Fig. 4)! It’s based on a 2 x 12 cab.
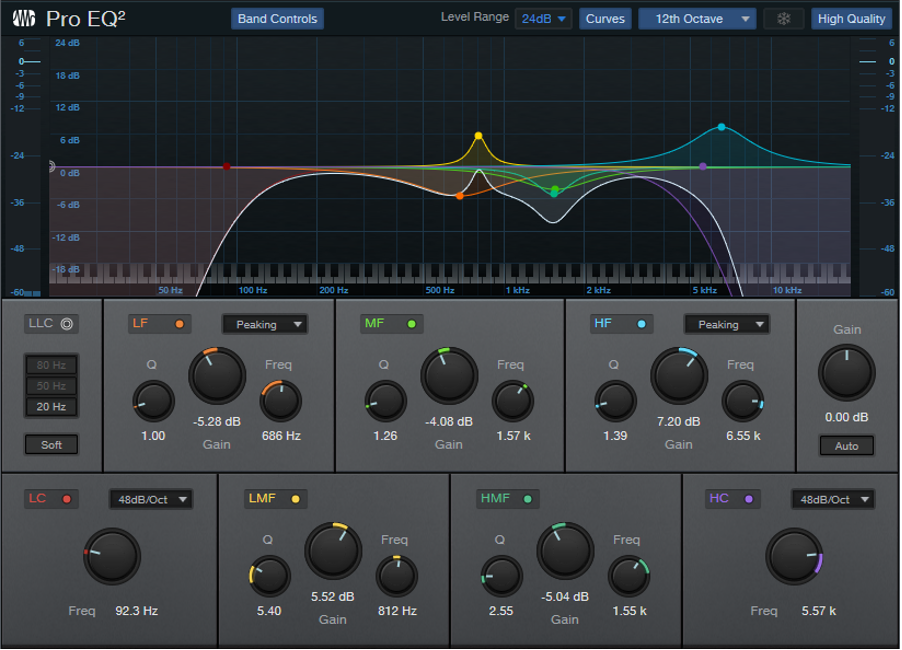
Figure 4
These all have two elements in common: high-frequency rolloffs, and interesting resonances. Although “EQ cabs” may not replace IRs, they’re not supposed to—this is about augmenting your options. Nonetheless, in many of my current productions, I prefer using the Pro EQ2-based cabs because it’s easier to tailor them to fit in with a specific mix.
For this week’s tip, I’m not providing presets because this isn’t about presets—it’s about editing an “analog” cab to give the sounds you need for your productions. So, the “best” curve will depend on what works best with your guitar, playing style, and production goals. In any event, I think you’ll find that constructing your own cabinet can provide a musically useful, and novel, way to expand on what IR-based cabinets can do.
The Ultimate TremPan
I never lost faith in the potential of tremolo, even after those opto-based amplitude processors in guitar amps had become quaint. X-Trem rewarded my faith—and it’s about time tremolo joined the 21st century, given that we’re a fifth of the way through it already.
This FX Chain does dual-band standard tremolo, harmonic tremolo, and panning—and because it’s dual-band, the high and low frequencies are processed independently. You can download the Ultimate TremPan FX Chain if you can’t wait, but because of the flexibility, let’s go through the control panel before covering how it works.
Download the Ultimate TremPan FX Chain!
The control panel (Fig. 1) gives multiple ways to configure the effect. The low- and high-frequency bands have identical switches.
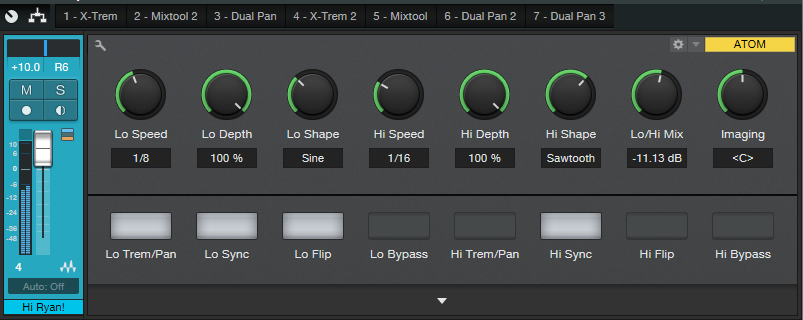
Figure 1: The TremPan control panel.
- Trem/Pan – chooses tremolo or panning mode
- Sync – Syncs to tempo
- Flip – Reverses the LFO phase, e.g., from positive-going to negative-going sawtooth
- Bypass – Bypasses a band, so you hear the effect on only the non-bypassed band
Let’s look at the controls. The low- and high-frequency bands have three controls in common.
- Speed – The sync switch determines whether the LFO speed syncs to tempo or runs free. When running free, the Speed control calibration still shows rhythmic values, but it’s actually continuously variable.
- Depth – Controls how much the tremolo or panning affects the signal.
- Shape – Available LFO waveforms are Triangle, Sine, Sawtooth, or Square.
The Hi/Lo Mix control determines the balance of the low- and high-frequency bands. Imaging spreads the low and high bands; when centered, the low and high bands are centered too, and if a band is in panning mode, it pans the full stereo field. Turning this control counter-clockwise moves the low band toward the left and the high band toward the right, while de-emphasizing panning so that when fully counter-clockwise, both bands are acting as tremolos in their respective channels. Turning this control clockwise reverse the action, i.e., when fully clockwise, the high band sounds like a tremolo in the left channel, while the low band sounds like a tremolo in the right channel.
How It Works
Figure 2 shows the block diagram.
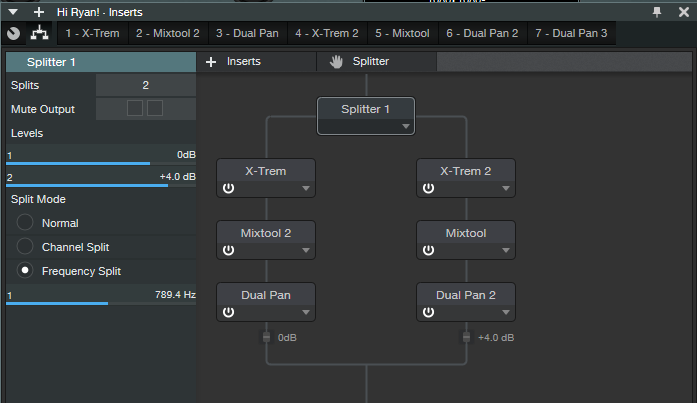
Figure 2: The processors inside the Ultimate TremPan FX Chain.
The Splitter does two splits based on frequency, with a split around 800 Hz. This seems to work well for guitar, but feel free to play around with it (I hope that in some future update, Splitter parameters will be assignable to control panel Macro knobs).
The Mixtools have their gains varied oppositely by the Lo/Hi Mix control to set the proportions of the high and low bands. The Dual pans in the Splits have their Input Balance controlled oppositely by the Imaging knob.
Applications
You have a lot of options, but here are some of my favorites.
- Different tremolo speeds and waveforms avoid the stereotyped tremolo sound.
- For EDM tremolo, try two negative-going sawtooths (i.e., don’t enable Flip) with the low band set to 1/8th notes and the high band set to 16th This gives a cool percussive effect.
- You can do the “harmonic tremolo” effect, as found in some old Fender amps, by setting both modes to tremolo and the same speed, but choosing Flip for one of the bands.
- Panning the low band back and forth slowly while setting a fairly fast tremolo for the high band gives a wide, interesting imaging effect.
The rhythmically synched effects can make one instrument almost sound like two instruments, working together as a team. This FX Chain can also animate hand percussion tracks by varying where the percussion happens in the stereo field. Have fun with this sucker—it’s time to re-discover amplitude modulation.
Control Ableton as a ReWire Client with ATOM SQ

It’s not surprising a lot of Studio One users also have Ableton Live, because they’re quite different. I’ve always felt Studio One is a pro recording studio (with a helluva backline) disguised as software, while Ableton is a live performance instrument disguised as software.
Fortunately, if you like working simultaneously with Live’s loops and scenes and Studio One’s rich feature set, Studio One can host Live as a ReWire client. Even better, ATOM SQ can provide full native integration with Ableton Live when it’s ReWired as a client—once you know how to set up the MIDI ins and outs for both programs.
Studio One Setup
- Under Options > Advanced > Services, make sure ReWire Support is enabled.
- Insert Ableton Live (from Instruments > ReWire). Click “Open Application” in the dialog box, but if Live won’t open (it doesn’t for me), open Live manually. Note that Live must be version 10.1.15 or higher.
- In Studio One, go Options > External Devices. Click on ATOM SQ, and then click on Edit.
- Select None for both Receive From and Send To. Click OK, then click OK again to leave the Options menu.
- In the ReWire track, set the MIDI input to ATOM SQ so that ATOM SQ’s knobs can control Ableton Live.

Ableton Live Setup
- Choose Options > Preferences > Link MIDI tab.
- Set the MIDI and Ports connections as shown.
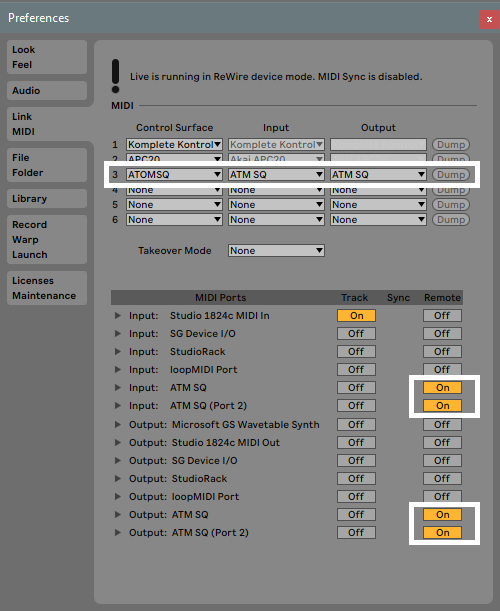
Now ATOM SQ will act as an integrated controller with Ableton Live while it’s ReWired into Studio One. Cool, eh?
Returning to Studio One
To return control to Studio One, reverse the process—in Live, set Control Surface to None, and toggle the MIDI Ports that relate to ATOM SQ from On to Off. In Studio One’s Options > External Devices, For ATOM SQ, reconnect ATOM SQ to Receive From and Send To.
Note that with ATOM SQ controlling Studio One, the Transport function still controls both Live and Studio One. Also, if Live has the focus, any QWERTY keyboard assignments for triggering Clips and Scenes remain valid. So even while using ATOM SQ in the native mode for Studio One, you can still trigger different Clip and Scenes in Live. If you switch the focus back to Studio One, then any QWERTY keyboard shortcuts will trigger their assigned Studio One shortcuts.
Note: When switching back and forth between Live and Studio One, and enabling/disabling Studio One and Ableton Live modes for ATOM SQ, to return to Live you may need to “refresh” Live’s Preferences settings. Choose None for the Control Surface and then re-select ATOM SQ. Next, turn the various MIDI Port options off and on again.

Learn more about the ATOM SQ here!
The Vocal QuickStrip
This tip is excerpted from the updated/revised 2nd Edition of How to Record and Mix Great Vocals in Studio One. The new edition includes the latest Studio One 5 features, as well as some free files and Open Air impulses, but also has 35% more content than the first edition—it’s grown from 121 to 194 pages. And as a “thank you” to those who bought the original version, you’re eligible for a 50% discount on the 2nd edition. There’s also a bundle with the book and my complete set of 128 custom impulses for Open Air…but so much for how I spent my summer vacation, LOL. Let’s get to the tip.
Suppose you’ve laid down your raw vocal—great! Now it’s time to overdub some instrumental parts and background vocals. Unfortunately, though, that raw vocal is kind of…uninspiring. So you start browsing effects, tweaking them, trying different settings—and before you know it, you’re going down a processing rabbit hole in the middle of your session.
Next time, open up the Vocal QuickStrip. Insert this vocal processing’s “greatest hits” FX Chain in your vocal track, tweak a few settings, admire how wonderful the vocal sounds, and then carry on with your project.
There’s a download link for the Vocal QuickStrip.multipreset file, so you don’t need to assemble the chain yourself. It works with Studio One 4 as well as 5 (note that the Widen button for the Doubler is functional only in Studio One 5).
The Effects
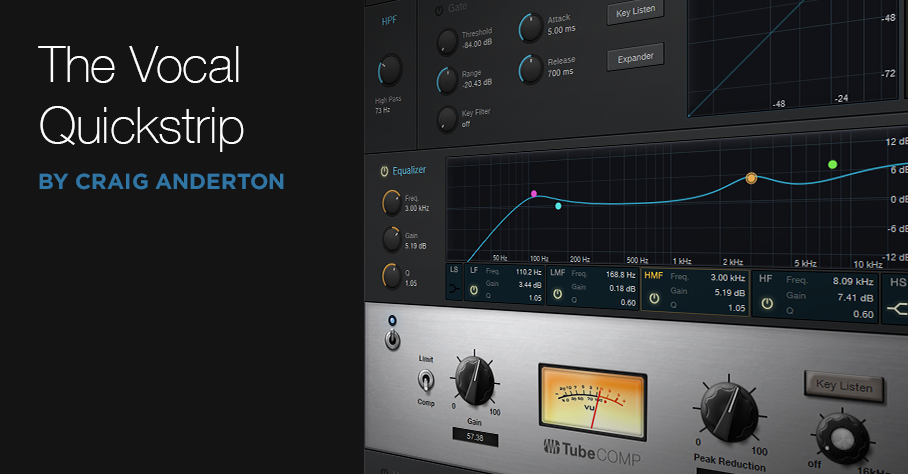
The Fat Channel (Fig. 1) is the heart of the chain. Of its three available compressors, the Tube Comp model emulates the iconic LA-2A compressor—the go-to vocal compressor for many engineers.
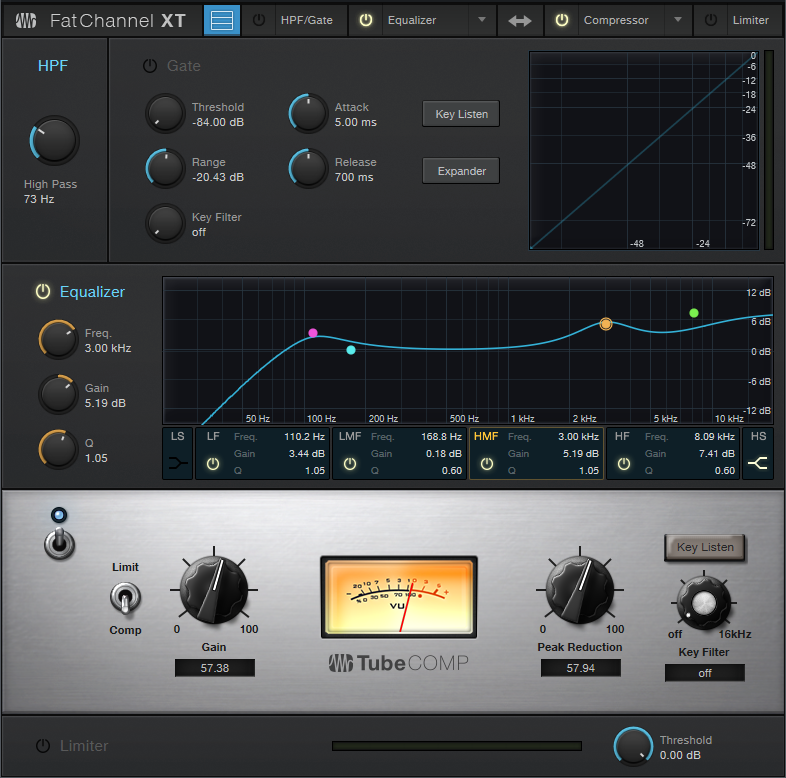
Figure 1: Fat Channel settings for the Vocal QuickStrip FX Chain.
The Fat Channel also includes a built-in high-pass filter. You can place the EQ either before or after the compressor; here, the EQ is before the compressor because boosting certain frequencies “pushes” the compressor harder. This contributes to the Vocal QuickStrip’s character.
The EQ uses all four stages. The most interesting aspect is how the Low Frequency and Low-Mid Frequency stages interact subtly when you edit the Bottom control. The Low-Frequency stage is fixed at 110 Hz with 1 dB of gain, but its Q tracks the Low-Mid Frequency stage’s Gain control. So, when you pull the LMF Gain down, the LF stage’s Q gets broader; increase Gain, and the Q goes up somewhat.
The High-Mid Frequency stage sits at 3 kHz, because boosting in this frequency range can improve intelligibility. The High-Frequency section adds “air” around 10 kHz. However, as you increase the Top control, the frequency goes just a bit lower so that the boost covers a wider section of the high-frequency range. This makes the effect more pronounced.
The Chorus is the next processor in the chain, but it’s used for doubling, not chorusing (Fig. 2).

Figure 2: The Chorus provides a voice-doubling ADT effect.
The parameters are preset to a useful doubling effect, and there are only two control switches—one to enable/bypass the effect, the other to increase the stereo spread.
For echo/delay effects, the Analog Delay comes next (Fig. 3). Although many of the parameters are well-suited to being macro controls, there had to be a few tradeoffs to leave enough space for the crucial controls from other effects.
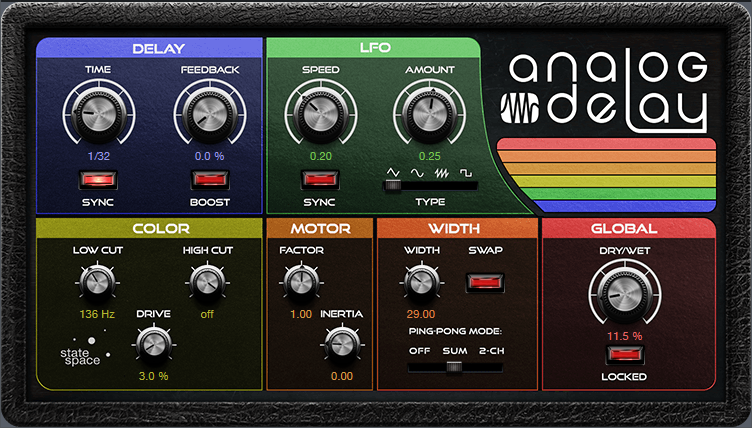
Figure 3: The Analog Delay is set up for basic echo functionality.
For example, the Delay Time controls beats rather than being able to choose between beats and sweeping through a continuous range. Feel free to change the Macro control assignment. Also, the LFO isn’t used, so if you want to modify the ping-pong effects, you’ll need to open the interface and do so manually. In any event, the Delay Beats, Feedback, and Mix parameters cover what you need for most vocal echo effects.
The final link in the chain is the Open AIR reverb (Fig. 4). Normally I use my own impulse responses (see the Friday Tip Synthesize Open AIR Reverb Impulses in Studio One for info on how to create your own impulse responses), but of the factory impulses, for vocals I’m a big fan of the Gold Plate impulse. (If you have my Surreal Reverb Impulse Responses pack that’s available from the PreSonus shop, I’d recommend using the 1.2 Fast Damped, 1.5 Fast Damped, or 2.25 Fast Damped vocal reverbs. However, note that these three files are also included for free with the second edition of the Vocals book)
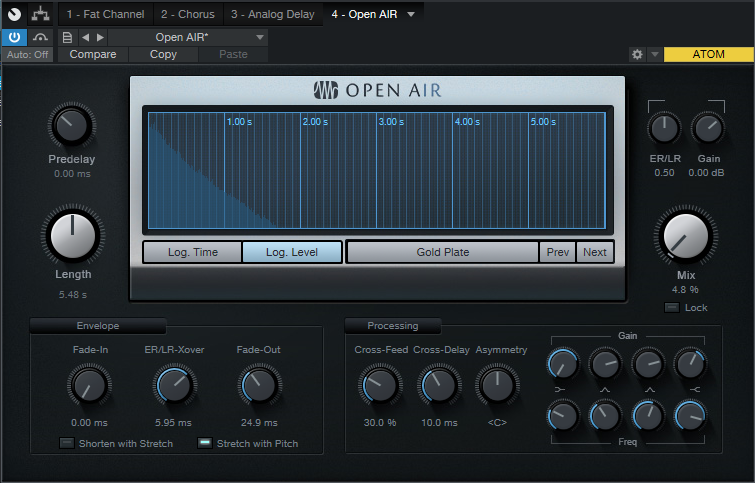
Figure 4: The Open AIR reverb plug-in’s Gold Plate impulse response is one of my favorite factory impulses for vocals.
The Macro Controls
When designing an FX Chain with so many available parameters, you need to choose which parameters (or combinations of parameters) are most important for Macro controls (Fig. 5).
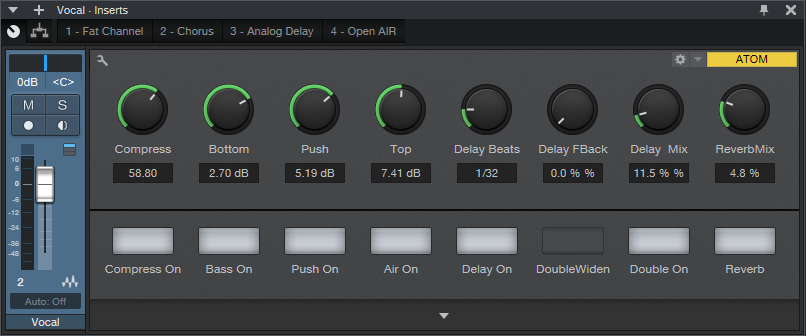
Figure 5: The Vocal QuickStrip Macro controls.
Compress varies both the Peak Reduction and Gain to maintain a fairly constant output—an old trick (see the EZ Squeez One-Knob Compressor tip), but a useful one. Bottom, Push, and Top control three EQ stages. All of these, and the Compressor, have bypass switches so it’s easy to compare the dry and processed settings.
Delay also has a bypass switch, as well as controls for delay time in beats, delay feedback, and dry/wet delay mix. The only switches for the chorus-based doubling function are bypass and narrower/wider. Reverb includes a bypass button and dry/mix control, because that’s really all you need when you have a gorgeous convolution reverb in the chain.
So go ahead and download the Vocal QuickStrip, use it, and have fun. But remember that an FX Chain like this lends itself to modifications—for example, insert a Binaural Pan after the Open AIR reverb, or optimize some EQ frequencies to work better with your mic or voice. Try the other two compressors in the Fat Channel (or if you’re a PreSonus Sphere member, then try the other eight compressors—they all have different characters). With a little experimentation, you can transform an FX Chain that works for me (and will hopefully work well for you) to an FX Chain that’s perfect for you. Go for it!
Download the Vocal QuickStrip FX Chain here
Purchase How to Record and Mix Great Vocals in Studio One here
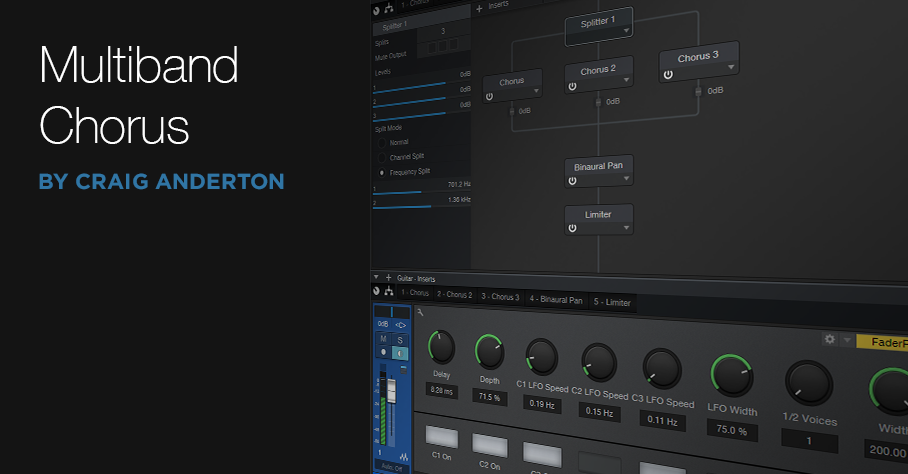
Sweet Multiband Chorus
 Full disclosure: I’m not a big fan of chorusing. In general, I think it’s best relegated to wherever snares with gated reverbs, orchestral hits, DX7 bass presets, Fairlight pan pipes, and other 80s artifacts go to reminisce about the good old days.
But sometimes it’s great to be wrong, and multiband chorusing has changed my mind. This FX Chain (which works in Studio One Version 4 as well as Version 5) takes advantage of the Splitter, three Chorus plug-ins, Binaural panning, and a bit of limiting to produce a chorus effect that covers the range from subtle and shimmering, to rich and creamy.
There’s a downloadable .multipreset file, so feel free to download it, click on this window’s close button, bring the FX Chain into Studio One, and start playing. (Just remember to set the channel mode for guitar tracks to stereo, even with a mono guitar track.) However, it’s best to read the following on what the controls do, so you can take full advantage of the Multiband Chorus’s talents.
Anatomy of a Multiband Chorus
The Splitter creates three splits based on frequency, which in this case, are optimized for guitar with humbucking pickups. These frequencies work fine with other instruments, but tweak as needed. The first band covers up to 700 Hz, the second from 700 Hz to 1.36 kHz, and the third band, from 1.36 kHz on up (Fig. 1).
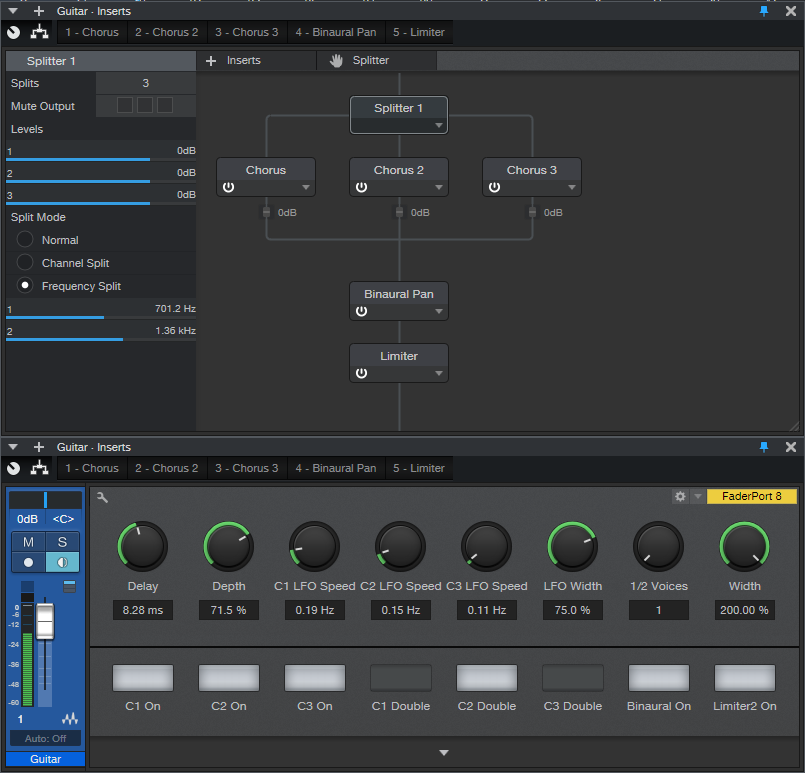
Figure 1. FX Chain block diagram and Macro Controls panel for the Multiband Chorus.
Each split goes to a Chorus. The mixed output from the three splits goes to a Binaural Pan to enhance the stereo imaging, and a Limiter to make the signal “pop” a little more.
Regarding the control panel, the Delay, Depth, LFO Width, and 1/2 Voices controls affect all three Choruses. Each Chorus also has its own on/off switch (C1, C2, and C3), Chorus/Double button (turning on the button enables the Double mode), and LFO Speed control. You’ll also find on/off buttons for the Binaural Pan and Limiter, as well as a Width control for the Binaural Pan. Fig. 2 shows the initial Chorus settings when you call up the FX Chain.
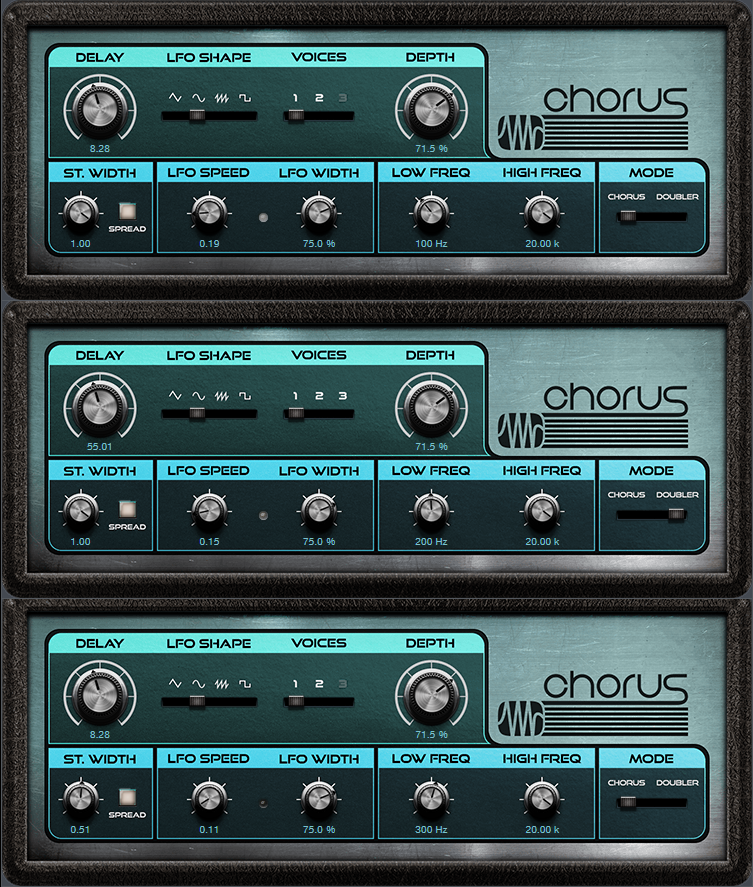
Figure 2. Initial FX Chain Chorus settings.
The Multiband Advantage
Because chorusing occurs in different frequency bands, the sound is more even and has a lusher sound than conventional chorusing. Furthermore, setting asynchronous LFO Speeds for the three bands can give a more randomized effect (at least until there’s an option for smoothed, randomized waveform shapes in Studio One).
A major multiband advantage comes into play when you set one of the bands to Doubler mode instead of Chorus. You may need to readjust the Delay and Width controls, but using Doubler mode in the mid- or high-frequency band, and chorusing for the other bands, gives a unique sound you won’t find anywhere else. Give it a try, and you’ll hear why it’s worth resurrecting the chorus effect—but with a multiband twist.
Download the .multipreset here.
The Limiter2 Deep Dive
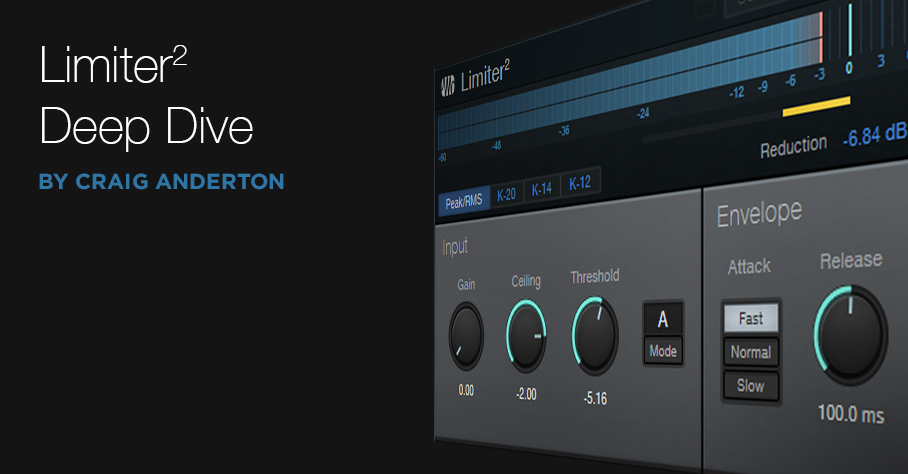
At first, the changes to the effects in Version 5 seem mostly cosmetic. But dig deeper, and you’ll find there’s more to the story—so let’s find out what’s new with Limiter2 (Fig. 1).
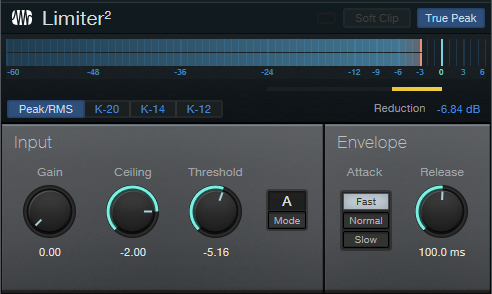
Figure 1: Limiter2 has had several design changes for Version 5.
The control parameters are more logical, and easier to adjust. Prior to V5, there was an unusual, by-design interaction with the Ceiling and Threshold controls; setting Ceiling below Threshold gave the limiter a softer knee. However, the tradeoff was difficulty in obtaining predictable results. Besides, if the soft knee aspect is important to you for dynamics control, just use the Compressor with a really high ratio.
In Limiter2, the Threshold is relative to the Ceiling—the Ceiling sets Limiter2’s absolute maximum level, while Threshold sets where limiting begins below the Ceiling, based on the Threshold parameter value. For example, if Ceiling is 0.00 and Threshold is -6.00, then the limiter’s threshold is ‑6.00 dB. But if the Ceiling is ‑3.00 dB and the Threshold is -6.00, then the limiter’s Threshold is -9.00 dB. Makeup gain occurs automatically so that as you lower the Threshold parameter, the output level increases as needed to meet the Ceiling’s target output level.
Modes and Attacks
There are now two Modes, A and B, and three Attack time settings. The pre-V5 Limiter had less flexible attack options, which mostly impacted how it responded to low-frequency audio; the waveform could have some visible distortion when first clamped, but the distortion would disappear after the attack time completed.
I’ll spare you the hours I spent listening and nerding around with the (highly underrated) Tone Generator and Scope plug-ins to analyze how the new options affect the sound, so here’s the bottom line.
In applications where you want to apply something like 6 dB of peak reduction to make a track or mix “pop,” the Limiter2 performance in Mode A is essentially perfect. Unless you’re into extreme amounts of limiting or material with lots of low frequencies, Mode A should cover what you need 95% of the time (and it also outperforms the pre-V5 limiter).
If you’re using Limiter2 as a brickwall limiter to keep transients from spilling over into subsequent stages, then use Mode A/Fast attack for the highest fidelity and give up a tiny bit of headroom, or Mode B/Fast Attack for absolute clamping.
Fig. 2 shows how the fast and slow times compare. The following were all set for 50 ms release times, 1 kHz sine wave input, and -20 dB Threshold—so Limiter2 was being hit pretty hard.
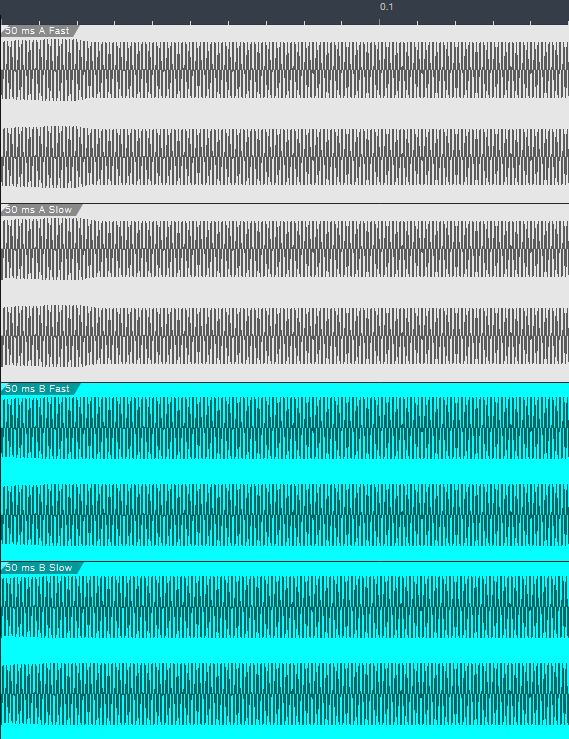
Figure 2: Fast and Slow attacks compared for Modes A and B, cropped to 150 ms duration. Top to bottom: Mode A/Fast, Mode A/Slow, Mode B/Fast, Mode B/Slow.
The visuals are helpful, but on signals with fast transients, you may hear more of a difference with the different attack times than these images might indicate. Nonetheless, it’s clear that Mode B/Fast is super-fast. If you look carefully at Mode A/Slow, you’ll see a very tiny downward blip on the first cycle of the attack (it’s less visible on Mode B/Slow). Mode A takes about 20 ms to settle down to its final level.
Low-Frequency Performance
For more background on the nuts and bolts of how this works, the tradeoff for Mode B’s higher speed mostly involves very low frequencies (under 80 Hz or so, and especially under 50 Hz). With a 50 Hz sawtooth wave, 100 ms Release, and a significant amount of limiting, Mode B/Slow gives some visible overshoot and distortion. Mode B/Fast reduces the overshoot but increases distortion. Mode A does less of both—with Slow, there’s less overshoot, and with Fast, there’s less distortion. Note that any distortion or overshoot occurs only when pushing Limiter2 to extremes: very low-frequency waveforms, with steep rise/fall times, short release times, and lots of limiting. However, this is mostly of academic interest with waveforms that have lots of harmonics, like sawtooth and square. The level of the harmonics is high enough to mask any low-level harmonics generated by distortion.
I also tested with a sine wave, which gives an indication of what to expect with audio like a kick drum (e.g., 40-60 Hz fundamental) or low bass notes. Mode B/Fast has less distortion than Mode B/Slow, while Mode A, fast or slow, flattens peaks almost indiscernibly (Fig. 3).
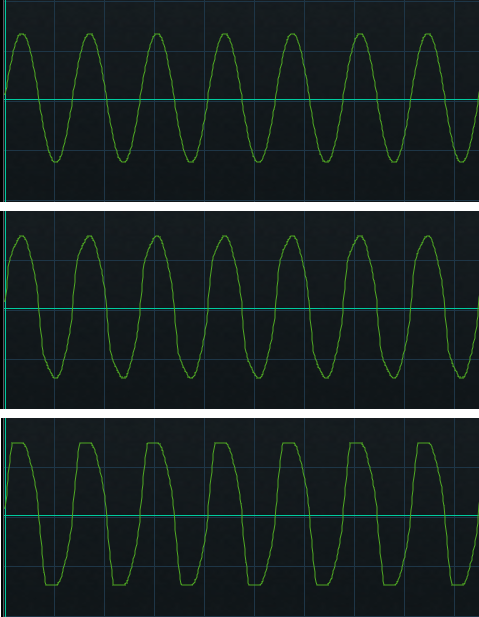
Figure 3: A 30 Hz sine wave with about 15 dB of limiting. Top: A Mode. Middle: B Mode/Fast. Bottom: B Mode/Slow.
In this situation, Mode A would likely be my choice, but as always, use your ears—the light distortion from Mode B can actually enhance kick drum and bass tracks. Also note that which mode to use depends on the release time. For example, with a short (35 ms) release, B/Slow had the most audible distortion, B/Fast was next, and B/Normal had no audible distortion.
While I was in testing mode, I decided to check out some third-party limiters (Fig. 4) with a different program. These are all marketed as “vintage” emulations, and set to the fastest possible attack time.
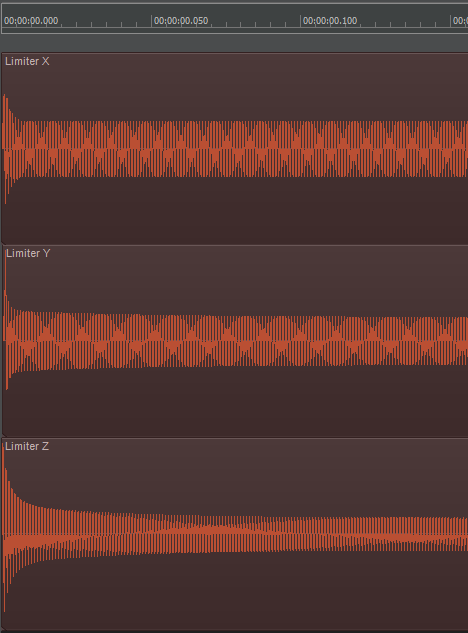
Figure 4: The results of testing some other limiters.
In case you wondered why some people say these vintage limiters have “punch”…now you know why! The time required to settle down to the final level is pretty short (except for the bottom one), but the limiter doesn’t catch the initial peaks. This is why you can insert one of these kinds of limiters, think you’re limiting the signal, but the downstream overload indicators still light on transients. Incidentally, the Fat Channel’s Tube limiter has this kind of “vintage punch” response in the Limit mode, while the Fat Channel’s one-knob, final limiter stage—although basic—is highly effective at trapping transients.
Why Overlap Correction is Totally Cool

Studio One’s Overlap Correction feature for Note data isn’t new, but it can save you hours of boring work. The basic principle is that if Note data overlaps so that the end of one note extends long enough to overlap the beginning of the next note, selecting them both, and then applying overlap correction, moves the overlapping note’s end earlier so that it no longer overlaps with the next note.
My main use is with keyboard bass. Although I play electric bass, I often prefer keyboard bass because of the sonic consistency, and being able to choose from various sampled basses as well as synth bass sounds. However, it’s important to avoid overlapping notes with keyboard bass for two main reasons:
- Two non-consonant bass notes playing at the same time muddies the low end, because the beat frequencies associated with such low frequencies are slow and disruptive.
- The sound is more realistic. Most bass parts are single-note lines, and with electric bass, there’s usually a finite amount of time between notes due to fingering the fret, and then plucking the string.
One option for fixing this is to zoom in on a bass part’s note data, check every note to make sure there aren’t overlaps, and shorten notes as needed. However, Overlap Correction is much easier. Simply:
- Select All Note data in the Edit View.
- Choose Action > Length, and then click the Overlap Correction radio button.
- Set overlap to -00.00.01.
- Click OK.
Normally I’m reluctant to Select All and do an editing function, but any notes that don’t overlap are left alone, and I haven’t yet run into any problems with single-note lines. Fig. 1 shows a before-and-after of the note data.

Figure 1: The notes circled in white have overlaps; the lower copy of the notes fixes the overlaps with the Length menu’s Overlap Correction feature.
Problem solved! The reason for setting overlap to -00.00.01 instead of 00.00.00 is because with older hardware synthesizers or congested data streams, that very slight pause ensures a note-off before the next note-on appears. This prevents the previous note from “hanging” (i.e., never turning off). You can specify a larger number for a longer pause—or live dangerously, and specify no pause by entering 0.
Also, although I referenced using this with keyboard bass, it’s useful for any single-note lines such as brass, woodwind, single-note MIDI guitar solos, etc. It can also help with hardware instruments, including electronic drums, that have a limited number of voices. By removing overlaps, it’s less likely that the instrument will run out polyphony.
There’s some intelligence built into the overlap correction function. If a note extends past another note, there won’t be any correction. It also seems to be able to recognize pedal points (Fig. 2).
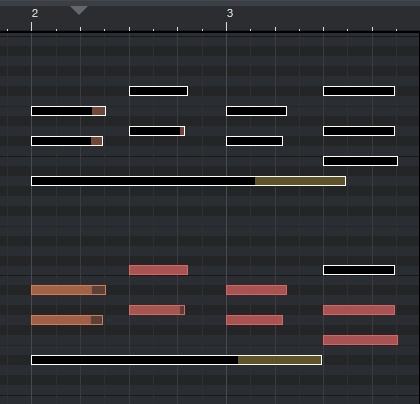
Figure 2: Overlap Correction is careful about applying correction with polyphonic lines.
Selecting all notes in the top group of notes and selecting Overlap Correction didn’t make any changes. As shown in the bottom group of notes, preventing the pedal point from overlapping the final chord requires selecting the pedal point, and any of the notes in the last chord with which the pedal point overlaps.
It’s easy to overlook this gem of a feature, but it can really help with instrumental parts—particularly with keyboard bass and solo brass parts.
90 Day Grace Period Information
The response to Studio One 5 and the launch of PreSonus Sphere has been OVERWHELMING, to say the very least… We are blown away and extremely grateful for our customers’ enthusiasm! We are working non-stop to respond to specific issues any customers may run into. We wanted to take a minute and answer a few questions about the grace period we’re offering to our customers.

Join PreSonus Sphere here.
PreSonus is providing a super-sized 90 day grace period for Studio One version 5. This means if you registered a copy of Studio One 4 on or after April 1, 2020, you are within the grace period. Here are all the specifics:
- If you registered Studio One 4 Professional within the grace period, you will receive either Studio One 5 Professional or enjoy a full year as a member of PreSonus Sphere. Just choose which option you prefer in your MyPreSonus account.
- If you registered Studio One 4 Artist within the grace period, you will have a choice between a complimentary upgrade to Studio One 5 Artist or a 4-month membership in PreSonus Sphere. Just choose which option works best for you.
- If you registered a piece of PreSonus hardware that came with Studio One 4 Artist included within the grace period, you will receive 4 months membership in PreSonus Sphere for free. Studio One 5 Artist is not an option in this scenario, however, your Studio One 4 license is still yours and you can purchase an upgrade if you prefer. Please note: you must be the original owner of the registered PreSonus hardware to qualify.
Note: If you registered a copy of Studio One 4 Artist that was bundled with a third-party product during the grace period, we are sorry but you are not eligible for an upgrade.
During this grace period, if you have multiple copies of Studio One Professional or Studio One Artist in your account, all copies are stamped as upgraded automatically. However, only you only get one copy of Studio One 5 or PreSonus Sphere per account, not per product. This is only a rule for those registrations that occurred during the grace period.
Instructions to Redeem:
- Log in to your MyPreSonus account
- Go to “Products.” This will take you to the Products page.
- Select the qualifying software that you would like to upgrade.
- You should see a green “Redeem” button. Click it to begin the process. If you don’t see the Redeem button, it may be necessary to log out of your my.presonus.com account and log back in to refresh the page.

After clicking the Redeem button above you will see a screen similar to the one pictured below. Depending on how you acquired your product or your product type you may not have both buttons:

Into the Archives, Part 2
After last week’s thrilling cliff-hanger about how to preserve your WAV files for future generations, let’s look at how to export all your stereo audio tracks and have them incorporate effects processing, automation, level, and panning. There are several ways to do this; although you can drag files into a Browser folder, and choose Wave File with rendered Insert FX, Studio One’s feature to save stems is much easier and also includes any effects added by effects in Bus and FX Channels. (We’ll also look at how to archive Instrument tracks.)
Saving as stems, where you choose individual Tracks or Channels, makes archiving processed files a breeze. For archiving, I choose Tracks because they’re what I’ll want to bring in for a remix. For example, if you’re using an instrument where multiple outputs feed into a stereo mix, Channels will save the mix, but Tracks will render the individual Instrument sounds into their own tracks.
When you export everything as stems, and bring them back into an empty Song, playback will sound exactly like the Song whose stems you exported. However, note that saving as stems does not necessarily preserve the Song’s organization; for example, tracks inside a folder track are rendered as individual tracks, not as part of a folder. I find this preferable anyway. Also, if you just drag the tracks back into an empty song, they’ll be alphabetized by track name. If this is an issue, number each track in the desired order before exporting.
SAVING STEMS
Select Song > Export Stems. Choose whether you want to export what’s represented by Tracks in the Arrange view, or by Channels in the Console. Again, for archiving, I recommend Tracks (Fig. 1).

Figure 1: The Song > Export Stems option is your friend.
If there’s anything you don’t want to save, uncheck the box next to the track name. Muted tracks are unchecked by default, but if you check them, the tracks are exported properly, and open unmuted.
Note that if an audio track is being sent to effects in a Bus or FX Channel, the exported track will include any added effects. Basically, you’ll save whatever you would hear with Solo enabled. In the Arrange view, each track is soloed as it’s rendered, so you can monitor the archiving progress as it occurs.
In Part 1 on saving raw WAV files, we noted that different approaches required different amounts of storage space. Saving stems requires the most amount of storage space because it saves all tracks from start to end (or whatever area in the timeline you select), even if a track-only has a few seconds of audio in it. However, this also means that the tracks are suitable for importing into programs that don’t recognize Broadcast WAV Files. Start all tracks from the beginning of a song, or at least from the same start point, and they’ll all sync up properly.
WHAT ABOUT THE MAIN FADER SETTINGS?
Note that the tracks will be affected by your Main fader inserts and processing, including any volume automation that creates a fadeout. I don’t use processors in the Main channel inserts, because I reserve any stereo 2-track processing for the Project page (hey, it’s Studio One—we have the technology!). I’d recommend bypassing any Main channel effects, because if you’re going to use archived files for a remix, you probably don’t want to be locked in to any processing applied to the stereo mix. I also prefer to disable automation Read for volume levels, because the fade may need to last longer with a remix. Keep your options open.
However, the Main fader is useful if you try to save the stems and get an indication that clipping has occurred. Reduce the Main fader by slightly more than the amount of clipping (e.g., if the warning says a file was 1 dB over, lower the Main channel fader by -1.1 dB). Another option would be to isolate the track(s) causing the clipping and reduce their levels; but reducing the Main channel fader maintains the proportional level of the mixed tracks.
SAVING INSTRUMENT AUDIO
Saving an Instrument track as a stem automatically renders it into audio. While that’s very convenient, you have other options.
When you drag an Instrument track’s Event to the Browser, you can save it as a Standard MIDI File (.mid) or as a Musicloop feature (press Shift to select between the two). Think of a Musicloop, a unique Studio One feature, as an Instrument track “channel strip”—when you bring it back into a project, it creates a Channel in the mixer, includes any Insert effects, zeroes the Channel fader, and incorporates the soft synth so you can edit it. Of course, if you’re collaborating with someone who doesn’t have the same soft synth or insert effects, they won’t be available (that’s another reason to stay in the Studio One ecosystem when collaborating if at all possible). But, you’ll still have the note events in a track.
There are three cautions when exporting Instrument track Parts as Musicloops or MIDI files.
- The Instrument track Parts are exported as MIDI files, which aren’t (yet) time-stamped similarly to Broadcast WAV Files. Therefore, the first event starts at the song’s beginning, regardless of where it occurs in the Song.
- Mutes aren’t recognized, so the file you bring back will include any muted notes.
- If there are multiple Instrument Parts in a track, you can drag them into the Browser and save them as a Musicloop. However, this will save a Musicloop for each Part. You can bring them all into the same track, one a time, but then you have to place them properly. If you bring them all in at once, they’ll create as many Channels/Tracks as there are Instrument Parts, and all Parts will start at the Song’s beginning…not very friendly.
The bottom line: Before exporting an Instrument track as a Musicloop or MIDI file, I recommend deleting any muted Parts, selecting all Instrument Parts by typing G to create a single Part, then extending the Part’s start to the Song’s beginning (Fig. 2).

Figure 2: The bottom track has prepped the top track to make it stem-export-friendly.
You can make sure that Instrument tracks import into the Song in the desired placement, by using Transform to Audio Track. As mentioned above, it’s best to delete unmuted sections, and type G to make multiple Parts into a single Part. However, you don’t need to extend the track’s beginning.
- Right-click in the track’s header, and select Transform to Audio Track.
- Drag the resulting audio file into the Browser. Now, the file is a standard Broadcast WAV Format file.
- When you drag the file into a Song, select it and choose Edit > Move to Origin to place it properly on the timeline.
However, unlike a Musicloop, this is only an audio file. When you bring it into a song, the resulting Channel does not include the soft synth, insert effects, etc.
Finally…it’s a good idea to save any presets used in your various virtual instruments into the same folder as your archived tracks. You never know…right?
And now you know how to archive your Songs. Next week, we’ll get back to Fun Stuff.
Add Studio One to your workflow NOW for 30% off!
Safety First: Into the Archives, Part 1
I admit it. This is a truly boring topic.
You’re forgiven if you scoot down to something more interesting in this blog, but here’s the deal. I always archive finished projects, because remixing older projects can sometimes give them a second life—for example, I’ve stripped vocals from some songs, and remixed the instrument tracks for video backgrounds. Some have been remixed for other purposes. Some really ancient songs have been remixed because I know more than I did when I mixed them originally.
You can archive to hard drives, SSDs, the cloud…your choice. I prefer Blu-Ray optical media, because it’s more robust than conventional DVDs, has a rated minimum shelf life that will outlive me (at which point my kid can use the discs as coasters), and can be stored in a bank’s safe deposit box.
Superficially, archiving may seem to be the same process as collaboration, because you’re exporting tracks. However, collaboration often occurs during the recording process, and may involve exporting stems—a single track that contains a submix of drums, background vocals, or whatever. Archiving occurs after a song is complete, finished, and mixed. This matters for dealing with details like Event FX and instruments with multiple outputs. By the time I’m doing a final mix, Event FX (and Melodyne pitch correction, which is treated like an Event FX) have been rendered into a file, because I want those edits to be permanent. When collaborating, you might want to not render these edits, in case your collaborator has different ideas of how a track should sound.
With multiple-output instruments, while recording I’m fine with having all the outputs appear over a single channel—but for the final mix, I want each output to be on its own channel for individual processing. Similarly, I want tracks in a Folder track to be exposed and archived individually, not submixed.
So, it’s important to consider why you want to archive, and what you will need in the future. My biggest problem when trying to open really old songs is that some plug-ins may no longer be functional, due to OS incompatibilities, not being installed, being replaced with an update that doesn’t load automatically in place of an older version, different preset formats, etc. Another problem may be some glitch or issue in the audio itself, at which point I need a raw, unprocessed file for fixing the issue before re-applying the processing.
Because I can’t predict exactly what I’ll need years into the future, I have three different archives.
- Save the Studio One Song using Save To a New Folder. This saves only what’s actually used in the Song, not the extraneous files accumulated during the recording process, which will likely trim quite a bit of storage space compared to the original recording. This will be all that many people need, and hopefully, when you open the Song in the future everything will load and sound exactly as it did when it was finished. That means you won’t need to delve into the next two archive options.
- Save each track as a rendered audio WAV file with all the processing added by Studio One (effects, levels, and automation). I put these into a folder called Processed Tracks. Bringing them back into a Song sounds just like the original. They’re useful if in the future, the Song used third-party plug-ins that are no longer compatible or installed—you’ll still have the original track’s sound available.
- Save each track as a raw WAV file. These go into a folder named Raw Tracks. When remixing, you need raw tracks if different processing, fixes, or automation is required. You can also mix and match these with the rendered files—for example, maybe all the rendered virtual instruments are great, but you want different vocal processing.
Exporting Raw Wave Files
In this week’s tip, we’ll look at exporting raw WAV files. We’ll cover exporting files with processing (effects and automation), and exporting virtual instruments as audio, in next week’s tip.
Studio One’s audio files use the Broadcast Wave Format. This format time-stamps a file with its location on the timeline. When using any of the options we’ll describe, raw (unprocessed) audio files are saved with the following characteristics:
- No fader position or panning (files are pre-fader)
- No processing or automation
- Raw files incorporate Event envelopes (i.e., Event gain and fades) as well as any unrendered Event FX, including Melodyne
- Muted Events are saved as silence
Important: When you drag Broadcast WAV Files back into an empty Song, they won’t be aligned to their time stamp. You need to select them all, and choose Edit > Move to Origin.
The easiest way to save files is by dragging them into a Browser folder. When the files hover over the Browser folder (Fig. 1), select one of three options—Wave File, Wave File with rendered Insert FX, or Audioloop—by cycling through the three options with the QWERTY keyboard’s Shift key. We’ll be archiving raw WAV files, so choose Wave File for the options we’re covering.
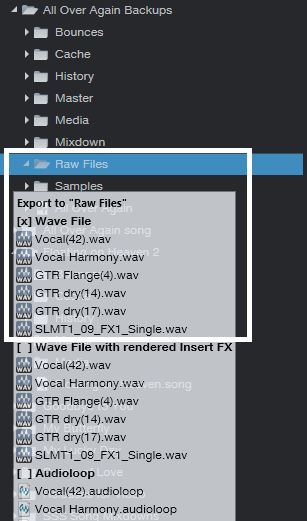
Figure 1: The three file options available when dragging to a folder in the Browser are Wave File, Wave File with rendered Insert FX, or Audioloop.
As an example, Fig. 2 shows the basic Song we’ll be archiving. Note that there are multiple Events, and they’re non-contiguous—they’ve been split, muted, etc.
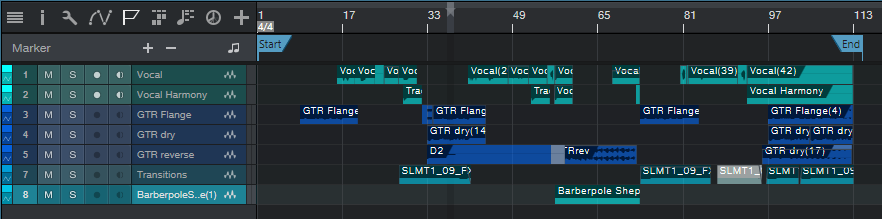
Figure 2: This shows the Events in the Song being archived, for comparison with how they look when saving, or reloading into an empty Song.
Option 1: Fast to prepare, takes up the least storage space, but is a hassle to re-load into an empty Song.
Select all the audio Events in your Song, and then drag them into the Browser’s Raw Tracks folder you created (or whatever you named it). The files take up minimal storage space, because nothing is saved that isn’t data in a Song. However, I don’t recommend this option, because when you drag the stored Events back into a Song, each Event ends up on its own track (Fig. 3). So if a Song has 60 different Events, you’ll have 60 tracks. It takes time to consolidate all the original track Events into their original tracks, and then delete the empty tracks that result from moving so many Events into individual tracks.
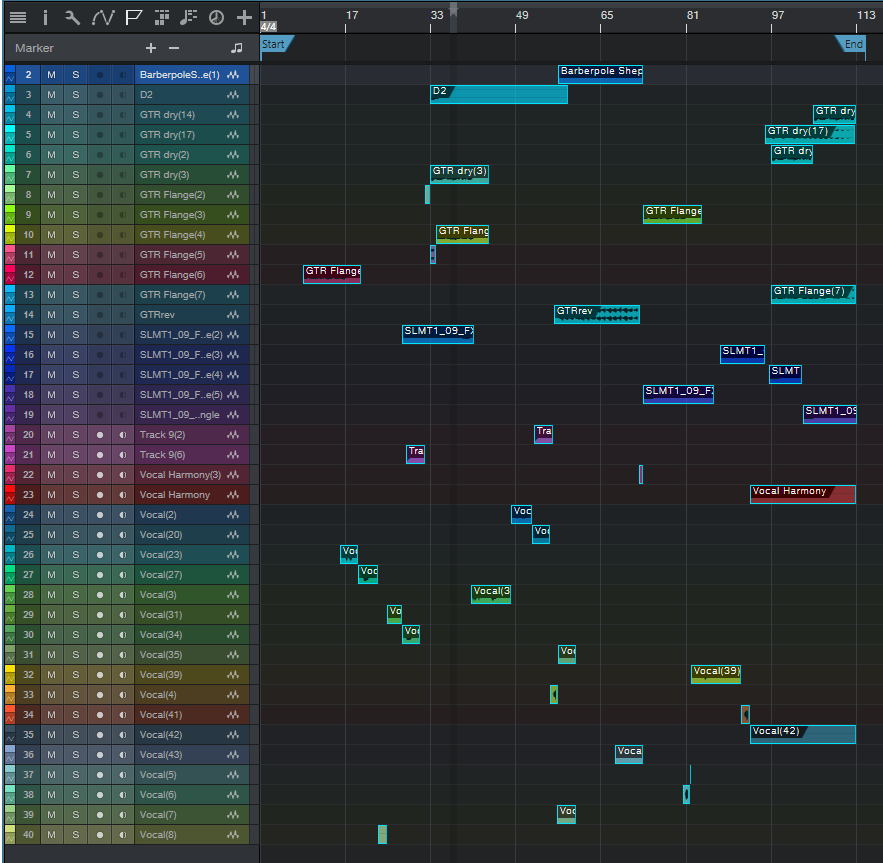
Figure 3: These files have all been moved to their origin, so they line up properly on the timeline. However, exporting all audio Events as WAV files makes it time-consuming to reconstruct a Song, especially if the tracks were named ambiguously.
Option 2: Takes more time to prepare, takes up more storage space, but is much easier to load into an empty Song.
- Select the Events in one audio track, and type Ctrl+B to join them together into a single Event in the track. If this causes clipping, you’ll need to reduce the Event gain by the amount that the level is over 0. Repeat this for the other audio tracks.
- Joining each track creates Events that start at the first Event’s start, and end at the last Event’s end. This uses more memory than Option 1 because if two Events are separated by an empty space of several measures, converting them into a single Event now includes the formerly empty space as track data (Fig. 4).
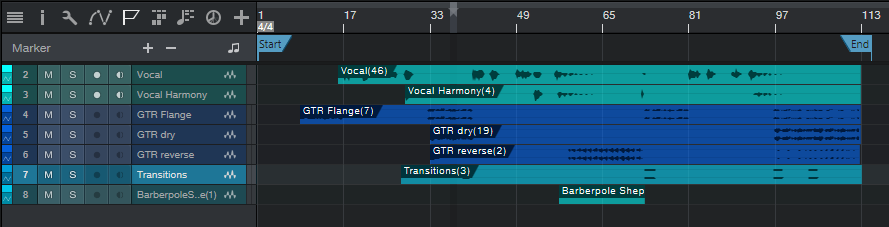
Figure 4: Before archiving, the Events in individual tracks have now been joined into a single track Event by selecting the track’s Events, and typing Ctrl+B.
- Select all the files, and drag them to your “Raw Tracks” folder with the Wave File option selected.
After dragging the files back into an empty Song, select all the files, and then after choosing Edit > Move to Origin, all the files will line up according to their time stamps, and look like they did in Fig. 4. Compare this to Fig. 3, where the individual, non-bounced Events were exported.
Option 3: Universal, fast to prepare, but takes up the most storage space.
When collaborating with someone whose program can’t read Broadcast WAV Files, all imported audio files need to start at the beginning of the Song so that after importing, they’re synched on the timeline. For collaborations it’s more likely you’ll export Stems, as we’ll cover in Part 2, but sometimes the following file type is handy to have around.
- Make sure that at least one audio Event starts at the beginning of the song. If there isn’t one, use the Pencil tool to draw in a blank Event (of any length) that starts at the beginning of any track.
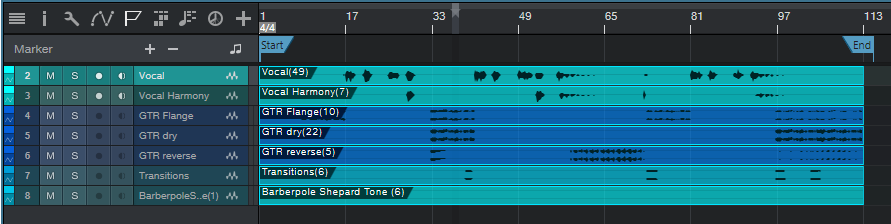
Figure 5: All tracks now consist of a single Event, which starts at the Song’s beginning.
- Select all the Events in all audio tracks, and type Ctrl+B. This bounces all the Events within a track into a single track, extends each track’s beginning to the beginning of the first audio Event, and extends each track’s end to the end of the longest track (Fig. 5). Because the first Event is at the Song’s beginning, all tracks start at the Song’s beginning.
- Select all the Events, and drag them into the Browser’s Raw Tracks folder (again, using the Wave File option).
When you bring them back into an empty Song, they look like Fig. 5. Extending all audio tracks to the beginning and end is why they take up more memory than the previous options. Note that you will probably need to include the tempo when exchanging files with someone using a different program.
To give a rough idea of the memory differences among the three options, here are the results based on a typical song.
Option 1: 302 MB
Option 2: 407 MB
Option 3: 656 MB
You’re not asleep yet? Cool!! In Part 2, we’ll take this further, and conclude the archiving process.
Add Studio One to your workflow today and save 30%!
