Category Archives: Uncategorized
Mid-Side Meets the CTC-1
I’ve often said it’s more fun to ask “what if I…?” than “how do I?” “What-if” is about trying something new, while “how do I” is about re-creating something that already exists. Well, I couldn’t help but wonder “what if” you combined the CTC-1 with mid-side processing, and sprinkled on a little of that CTC-1 magic? Let’s find out. (For more information on mid-side processing, check out my blog post Mid-Side Processing Made Easy. Also, note that only Studio One Professional allows using Mix Engine FX.)
One stumbling block is that the CTC-1 is designed to be inserted in a bus, and the Mid-Side Transform FX chain won’t allow inserting Mix Engine FX. Fortunately, there’s a simple workaround (see Fig. 1).
- Copy the stereo track you want to process, so you have two tracks with the same stereo audio. One will provide the Mid audio, and the other, the Sides audio.
- Insert an MS-Transform FX Chain into each track (you’ll find this FX Chain in the Browser’s Mixing folder, under FX Chains)
- Create a bus for each track.
- Assign each track output to its own bus (not the main out). However, the bus outputs should go to the Main out.
- Add a CTC-1 Mix Engine FX in each bus.
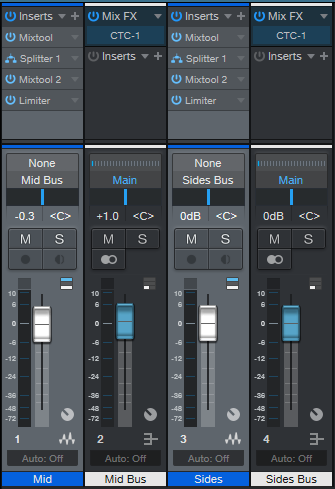
Figure 1: Setup for adding mid-side processing with the CTC-1 to a mixed stereo file.
- To dedicate one bus to the mid audio, and the other to the sides, open up the Splitters in the MS-Transform FX Chains.
- Mute the sides output for the Mid track (top of Fig. 2, outlined in orange). Then, mute the mid output for the Sides track (bottom of Fig. 2, also outlined in orange).

Figure 2: One bus is Mid only, the other is Sides only.
Now you can add the desired amount of CTC-1 goodness to the mids and sides. And of course, you can vary the bus levels to choose the desired proportion of mid and sides audio.
Audition Time!
The following example is an excerpt from the original file, without the CTC-1.
Next up, CTC-1 with the Custom option on the Mid, and the Tube option on the Sides. Fig. 3 shows their settings—a fair amount of Character, and a little bit of Drive.
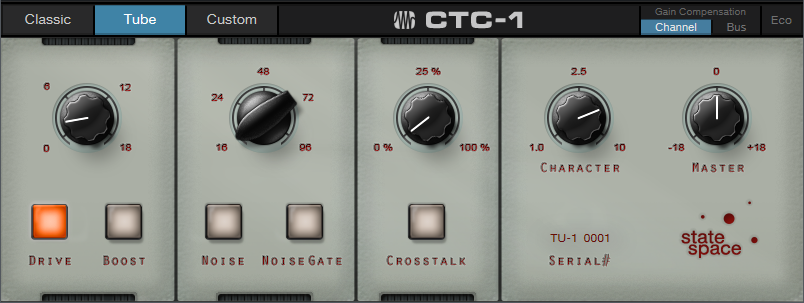
Figure 3: CTC-1 settings for the audio example.
If you didn’t hear much difference, trying playing Audio Example 1 again after playing Audio Example 2. Sometimes it’s easier to tell when something’s missing, compared to when something’s been added.
The more you know about the CTC-1, the more effectively you can use it. The bottom line is I now know the answer to my “what if” question: get some buses into the picture, and the CTC-1 can be hella good for processing mid and sides!
The Multiband X-Trem
Finally! People are becoming aware of the Splitter. Although the Splitter can act like a Y-cord or split based on channel, the coolest Splitter feature for me is being able to split based on frequency. This is what makes creating multiband FX Chains in Studio One sooo easy.
Check out the audio example to hear a taste of what this can do with a pad and drum part. The first four measures are unprocessed, while the second four measures use the same Multiband X-Trem settings on the pad and the drums.
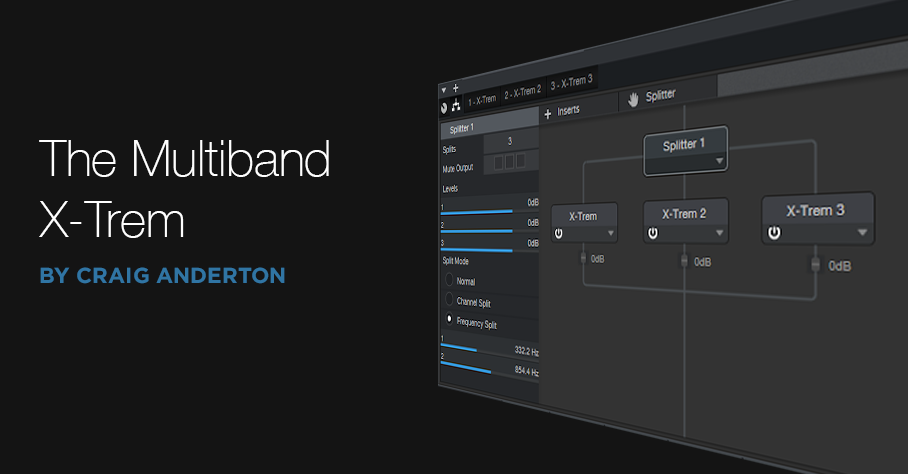
The block diagram (Fig. 1) is pretty simple—the Splitter creates three bands, Lo, Mid, and Hi, with crossovers at 332 and 854 Hz. (There’s nothing magical about those particular frequencies, choose what works best for the audio you’re putting through it.)

Figure 1: Block diagram for the Multiband X-Trem.
The real magic in this FX is the way the crucial parameters are brought out to the control panel that’s available in Studio One Pro (Fig. 2). However, Studio One Artist users can still load the FX Chain, and edit individual parameters. Although it’s more time-consuming, you can end up with the same sonic results.

Figure 2: Multiband X-Trem control panel.
How to Use It
This FX Chain assumes you’re going to sync it to tempo. Each of the three bands has a control to choose the Beat (tremolo rhythm) and Waveform, along with buttons to choose each band’s mode (Pan or Tremolo) and waveform Phase Flip. So far, that’s pretty simple.
The Mix section toward the right, with two knobs and their associated switches, is a little more complex. There aren’t enough control panel knobs to have a Depth control for each band, however in use, I’ve found that I usually adjust the depth for the Mid and Hi bands together, and the Lo band by itself. So, the Lo band has its own Depth control, while the Mid and Hi bands share a Depth control. There are also buttons to bypass the X-Trem for the Mid and/or Hi band. This is almost as good as having individual Depth controls, because you can remove depth for either band as needed.
We’ll close out with some additional tips…
- The sawtooth wave defaults to positive-going (i.e., the level ramps up from nothing to full). Flipping the phase makes a more percussive effect.
- A slow rhythm for the Lo band gives a sort of “rolling” effect. Faster speeds seem to work best for the Mid and Hi bands.
- Feel free to jump in and do tweaks—like change the Gate or Step waveform levels, vary the levels of the bands within the Splitter module, or change the crossover frequencies.
Happy download! Grab the Multiband X-Trem FX Chain preset here.
A Slick Trick for Thick Kicks
Imagine if you had a mold for sound, the same way you can have a mold for Jell-O—and whatever you poured into your “sonic mold” took on those particular characteristics. Well, that’s pretty much what convolution processors do. When they load their “mold,” which is called an impulse response, it shapes whatever sound they’re processing.
Studio One has two convolution processors. Ampire uses one to load speaker cabinet impulse responses. For example, when Ampire wants to sound like it’s going through a 2 x 12 speaker cabinet, it loads a 2 x 12 cabinet impulse response. The other convolution processor, Open Air, is optimized for creating acoustic spaces. So if the impulse is of a concert hall, sound processed through Open Air sounds like it’s in a concert hall. If the impulse is a blues club, the the sound takes on the characteristics of being in a blues club.
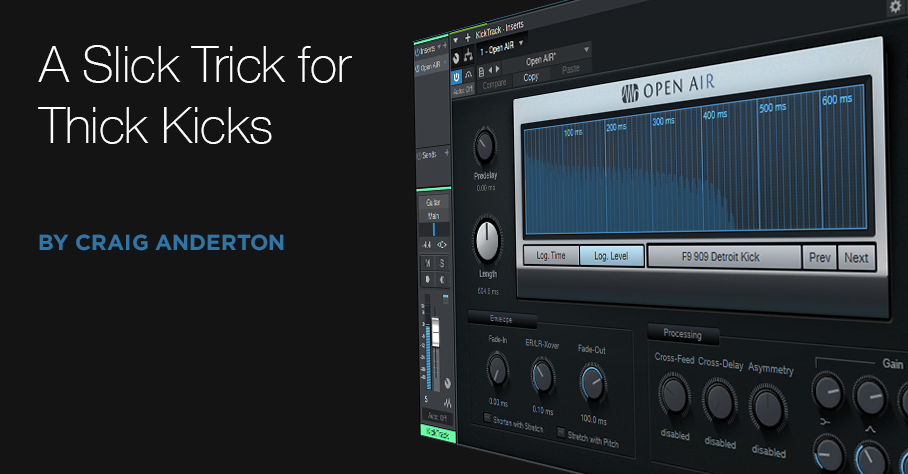
What’s perhaps not as well known is that you can load pretty much any WAV file into Open Air and use that as your sonic mold. So, this month’s tip is for the EDM and hip-hop crowd, because we’re going to load big-sounding kick drums into Open Air. Then, we’ll use them as molds to turn wimpy kicks into giant, thick kicks that smash through a mix, while leaving a trail of sophisticated destruction in their wake. But don’t take my word for it—check out the audio example, which has no EQ or compression.
There are five two-measure examples. The first example is from a kick track. The second, third, and fourth examples process the kick using this technique. The fifth example repeats the first example, as a reminder of how the sound started.
The secret is processing the kick track through the Open Air reverb, using a kick drum sample as the impulse (Fig. 1). Just like how a cabinet impulse response imparts the sound of a cabinet onto a guitar amp, these kick drum impulses shape the kick track to have an entirely different character.

Figure 1: The Open Air reverb has a kick impulse loaded, and imparts that sound to the kick track.
Studio One’s Sound Sets have lots of kick drum samples. Here are the ones I used for the second, third, and fourth two-measure examples. The Open Air Mix control hovered around 30% for these.
Acoustic Drum Kits and Loops > Samples > TM Pop Rock Kit > DW 20.24 Pop Rock Kick > DW 20.24 Pop Rock Kick 1.wav
Acoustic Drum Kits and Loops > Samples > TM Thuddy 70’s Kit > Gretsch 14×22 Vintage Thuddy Kick > Gretsch 14×22 Vintage Thuddy Kick 1.wav
909 Day Studio One Kits > Samples > F9 909 Detroit Kick.wav
So What’s the Catch?
Kick drum impulses can overload the Open Air pretty easily. The first two examples used the softest-velocity kick, but the F9 909 Detroit Kick was way too loud (well, unless you like horrific distortion). Most convolution reverbs are happiest with impulses that peak at around -12 dB.
So, the solution is simple. Drag the kick drum impulse into a Studio One track, use the gain envelope to cut the gain to about -12 dB peak, hit ctrl+B to make the change permanent, and then you can drag this impulse from the Studio One track right into the Open Air reverb.
Of course, you don’t have to limit yourself to kick, but it does seem kicks are where this technique shines the brightest. I also fooled around with using a floor tom as an impulse, and open hi-hat impulses on closed hi-hat tracks. The results aren’t always predictable…but that’s what makes it fun, right?
The Presence 12-String Electric Guitar
It’s difficult to sample a 12-string. The core Presence content includes a 12-string acoustic guitar, but there are no 12-string electrics—so let’s construct one.
One of my favorite guitars ever is the Rickenbacker 360 12-string. Back in my touring days, it travelled tens of thousands of miles with me (Fig. 1).
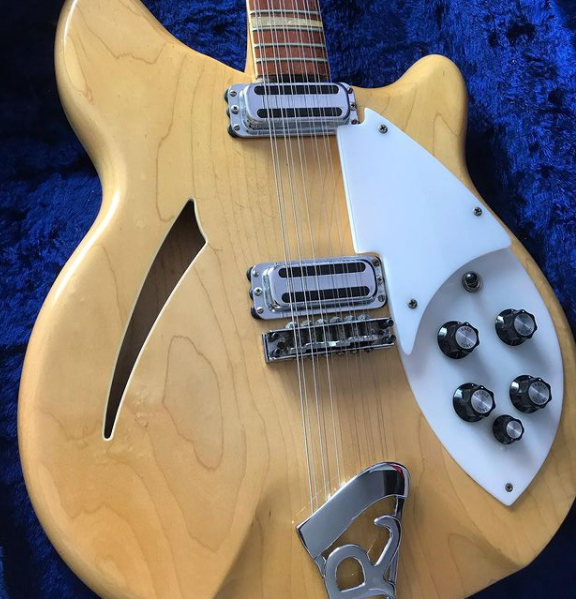
Figure 1: The mighty Rickenbacker 360 12-string guitar. Nothing else sounds like it.
I thought it would be a challenge to try and emulate that iconic sound with Presence. Listen to the audio example, and hear the results.
How It Works
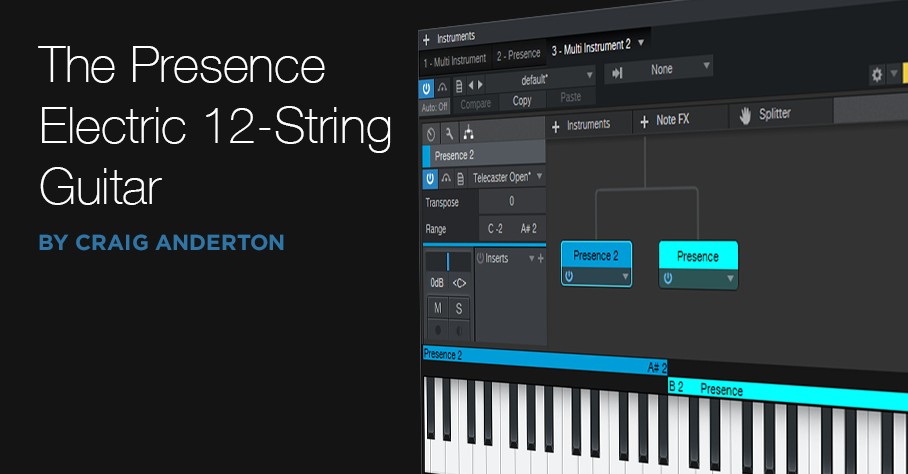
The sound starts with one Presence instance, which uses a 6-string electric guitar preset. Then, we create a second, multi-instrument track with two Presence instances that use the same electric guitar preset. Transposing one of the instances up creates the octave above sound; however, a real 12-string guitar doesn’t have octaves on the 1st and 2nd strings. So, we use the final Presence for a unison sound, and edit the ranges in the multi instrument so they don’t overlap.
Step-by-Step Guitar Construction
- Create an Instrument track with Presence, and load the Guitar > Telecaster > Telecaster Open preset. This guitar sound is closest to a Rickenbacker, but we’ll do some EQ tricks later to get it closer.
- Create a new Instrument track with Presence, and load the same preset. Drag a second instance of Presence into the same track. When asked whether you want to “load the instrument or combine the instrument Presence,” choose Combine. This opens the Multi Instrument window. Load the same preset into the new Presence instance as well.
- In the multi instrument, drag the upper end of one Presence key range down to A#2 (we’ll call this the “Octave Presence”). Drag the lower end of the other Presence key range up to B2 (we’ll call this the “Unison Presence”). Fig. 2 shows the multi instrument window.

Figure 2: The multi instrument window has two instances of Presence—one for the octave above strings, and the other for the unison strings.
- Open the Octave Presence preset. Set Transpose to +12, and Pitch Fine Tune to +5 cents. Then open the Unison Presence preset, and change Pitch Fine Tune to -2 cents.
- Insert an Analog Delay in the multi Instrument channel , with the settings shown in Fig. 3. The reason for the 20 ms delay is because the higher string in a pair of strings gets hit just a little bit late. (We can’t use the Delay in Presence itself, because the mix needs to be 100% delay—no dry sound.) Without this delay, the emulated 12-string doesn’t sound right.
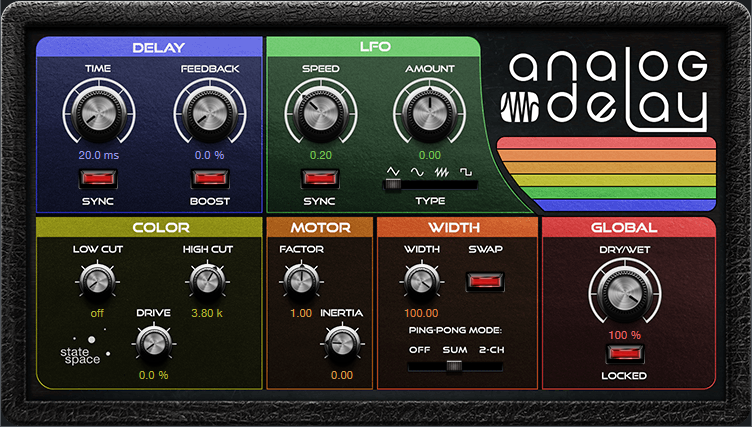
Figure 3: The Analog Delay emulates the delay caused by hitting the octave strings just a little bit later.
Note the High Cut setting—this reduces some of the brightness caused by transposition. The Width settings give a big stereo image, but for a more “normal” sound, turn ping-pong mode to Off.
Your mixer should look like Fig. 4, with two channels (basic guitar, and multi preset).
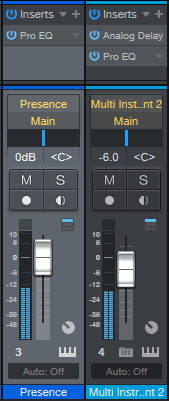
Figure 4: Mixer channels for the 12-string guitar.
Additional Tweaks
The Pitch Fine Tune settings in the multi instrument instances emulate the reality that a 12-string is seemingly never in tune, which accounts for that beautiful shimmering effect. Feel free to adjust your virtual 12-string so that it’s more or less in tune.
Another important tweak is to set the multi instrument channel’s fader about -6 dB below the main guitar sound. The octave strings on a 12-string are thinner than the strings with standard pitch, so they generate less output. This isn’t true of the 1st and 2nd strings, but that’s fine. With the octave strings a little lower, there’s a better balance.
Bring on the EQ
And finally…the coup de grâce to get us closer to the iconic Ric sound. On the main Presence instance, use the EQ in the Bass range. Boost 3 dB 3200 Hz, and pull the lowest slider down all the way. On both multi instrument instances, pull down the highest and lowest sliders (Fig. 4). Then, insert a Pro EQ in each mixer channel.
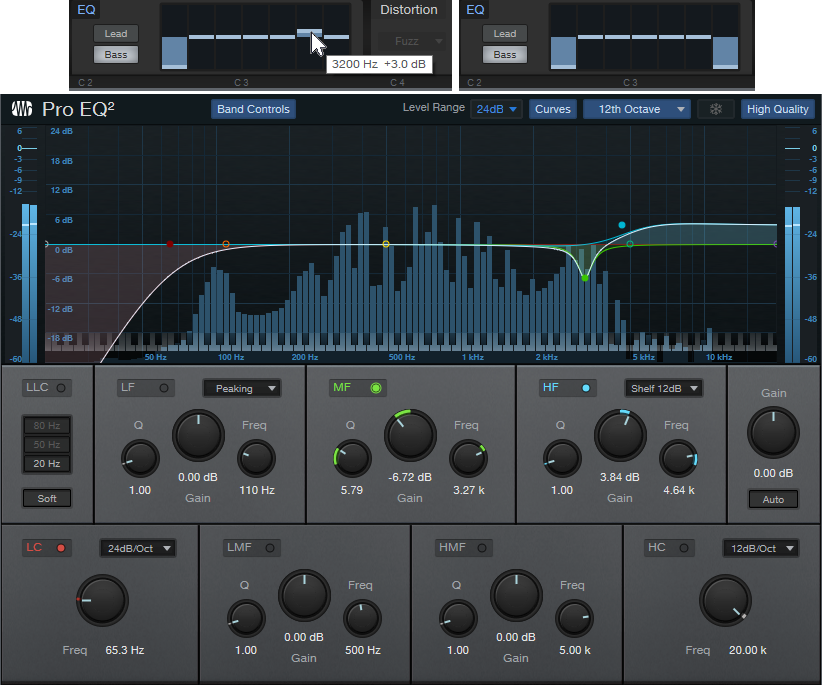
Figure 5: These EQ settings help get “the” sound. Clockwise from top: EQ on main Presence, EQ on the two multi instrument Presence instances, and Pro EQ placed on both mixer channels.
The narrow cut in the Pro EQ at 3.27 kHz helps reduce what sounds like some bridge “ping” in the original Telecaster samples. But all the EQ settings shown are suggestions. Between the broad EQ in Presence and the surgical nature of the Pro EQ, you can shape the sound however you want.
Mastering: What LRA Means to You
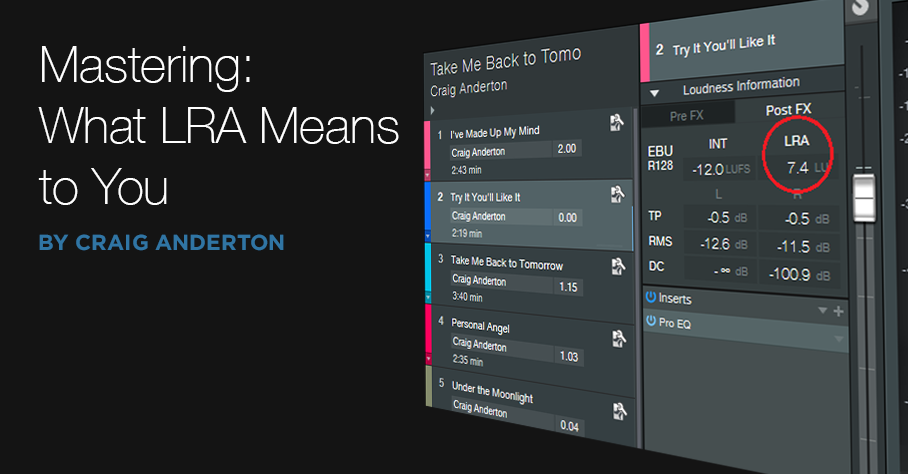 Studio One offers multiple diagnostic tools. We covered the LUFS loudness measurement (based on the R128 loudness standard), in the context of creating consistent levels in a collection of songs. But what about that mysterious LRA reading to its right?
LRA stands for Loudness Range. A complex algorithm measures loudness, analyzes how it’s distributed throughout a song, determines a song’s dynamics properties, and represents that with a number. The lower the number, the less dynamics. (Note that this is not about dynamic range, but rather, musical dynamics.)
Dynamics don’t reflect recording quality. Some songs have lots of dynamics, some don’t. Dynamics may or may not relate to whether the music is compressed or limited—heavily compressed music can still have major loudness differences, whereas music with light compression may not have much dynamics at all.
An Artistic Measurement—Not So Much a Technical One
LRA is more interesting from an artistic standpoint than a technical one. There’s really no “typical” LRA reading for various genres, aside from broad generalities: Classical music is most dynamic, so you can expect LRA readings of 9 or more. Country or jazz will have less dynamics; a reading of 6 to 8 is typical. Rock and EDM often hit around 5 to 6, and hip-hop, 5 or less. But again, LRA readings vary all over the place within any specific genre, as well as within an album. On my most recent album, LRA readings varied from 4 for a slamming, full-tilt track up to 10 for a longer, more nuanced song.
My main use of LRA is checking out soundtracks intended to go behind narration or industrial videos, because excessive dynamics can distract from the messaging. If there’s a high LRA reading, I’ll tweak the level automation as needed to smooth out variations. (Of course, I’d hear any problem variations when assembling the video, but prepping a track beforehand saves time.)
Conversely, if I want some sections in a rock track to really pop in contrast to sections that are more sedate, the LRA reading will confirm whether that goal has been met. If not, I might want to re-consider making the parts that are supposed to be quiet quieter, and then supercharge the dramatic sections. This isn’t only about changing levels. For example, the part that’s supposed to hit harder might benefit from a screaming lead guitar overdub, and more drums.
Do Dynamics Really Matter?
People might assume EDM doesn’t have a lot of dynamics, because they think of four-on-the-floor kick drums. But while researching various pieces of music for this post, I found that my favorite EDM artists tended to make music with more dynamic range—often more than typical rock songs. Coincidence? I’m not sure. But it makes sense that if a DJ wants to take you on a journey over the course of a set, that would involve dynamic variations.
Dynamics are a part of music. If all your songs have LRA readings of 3 or 4, there may not be enough changes in dynamics to keep listeners engaged for more than a few songs…but maybe your intention is to create a hypnotic groove, in which case a low LRA reading could be totally appropriate.
Ultimately, LRA isn’t about rules, but about data. How you use that data is up to you, but I hope you now have a better understanding of what that data means.
#ATOMChallenge
Show us your ATOM or ATOM SQ in action! Tag PreSonus in a video of you performing your sickest beat with the hashtag #ATOMChallenge to be entered to win an ioStation 24c and one free year of album distribution from TuneCore. Contest is held from March 1st – 31st, winner announced April 2nd.
Here’s what you need to do to enter:
- You must tag PreSonus on Instagram, Facebook, Twitter, or TikTok
- Post a video of yourself performing a beat on your ATOM or ATOM SQ
- Post the video to your account and include the hashtag #ATOMChallenge in the caption
START SUBMITTING ENTRIES TODAY!
One winner will be chosen on April 2nd and win an ioStation 24c and one free year of album distribution from TuneCore. Private accounts will not qualify, so set your profiles to public if you want to win! Winners will be contacted directly by PreSonus.
Check out Product Manager, Dom Bazille, accepting the challenge:
Remembering Peter Burrows

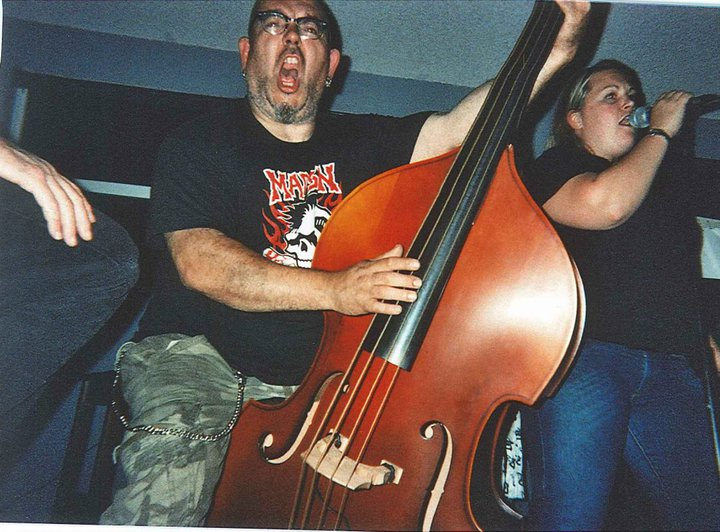
Simultaneously an industry giant and a gentle one, Peter Burrows was 300 pounds of motorcycle-riding, upright bass-slapping, River Thames moxy shoehorned into a tweed vest and a newsie cap. He was an engineering marvel, a devoted family man, a history buff, and a well-traveled audio industry vet; simultaneously an impossibly kind soul who took no crap. Pete, wiser than most of us, seemed to have figured out the secret to an anxiety-free life balanced in confidence, love, intellect, and humor—leaving many of us a little jealous about why we couldn’t figure out how to to do that for ourselves. But, you see, figuring things out was just what Pete did. Pete reverse-engineered living.
He came from London to the states (likely by motorcycle, because he would have figured that out, too) in the mid ‘90s to work at Mackie, and it wasn’t too long before he eventually found his way down to PreSonus about nine years ago. He worked with us for a long time in Engineering Services, where his troubleshooting acumen and larger-than-life personality couldn’t have been a better fit. Pete had a tendency to ride his Harleys and Indians to work in sweltering Louisiana summers—but only on the days when he didn’t show up in a hot rod. (The only thing louder than those engines was his laugh, by the way.)
But when Baton Rouge flooded in 2016, Peter Burrows was the one guy who still found a way to come into work. That’s admirable enough to an employer, of course—but Pete, being Pete, chose to come in by kayak.
Seriously.
And that’s the kind of guy he was. What might be a problem to you or I wasn’t a problem for Peter Freakin’ Burrows. It was, in fact, an opportunity for him to show you he had an idea for a fix, and he was sure it was going to work, so let’s just get it started and—hey look, it worked! Wasn’t so hard after all, mate.
As Pete aged, so did his tastes. He maintained a particular musical passion for primal rockabilly. And while his nonmusical interests were diverse, they also tended to skew vintage. He explored classic motorcycles, old guns, pinball repair, and 1930s fashion to their absolute fullest. Of course, that was all going down when he wasn’t spending boardgame time with his wife and two kids. Pete’s family is suggesting donations to Gentleman’s Ride, with friends in the UK encouraged to reach out to the Canal River Trust.
Take some time today to hug your loved ones and raise a glass to departed friends. It’s what Pete would’ve wanted you to do.
Godspeed, Pete. We’re not sure what you’re riding on your trip to the other side, but we can’t wait to see you again so you can show us how it works.

Using a Touchscreen with Studio One
The first touchscreens could detect a single touch, but modern touchscreens can handle up to ten touch points—which makes sense, because we have ten fingers. Studio One supports ten touch points natively on Windows, and thanks to a built-in TUIO extension, on the Mac as well.
DAW control with touch sounds sexy, but using touch on a large monitor is a different experience compared to using touch on a smartphone or tablet. Furthermore, whether a third-party plug-in supports multiple touchpoints is hit-or-miss. Also consider that a good touch monitor costs around $300—that’s quite a bit more than a standard monitor, so you need to decide how valuable touch would be to you.
Practically speaking, you probably don’t need touch, but it does offer two major advantages when working with Studio One. The main plus for me is being able to use a touchscreen control surface and mouse simultaneously—two-handed operation improves the physical workflow. The other advantage is being able to edit multiple parameters simultaneously with effects and virtual instruments (like adjusting filter cutoff while trimming the filter envelope amplitude, or editing EQ frequency and boost/cut8 simultaneously).
The Ergonomics of Using Touch
To use a touchscreen as a control surface, I lay the monitor down almost flat, at about a 20% angle (Fig. 1). It feels very much like working with a conventional hardware mixer. For this application, it’s vital that the monitor have an adjustable A-frame stand, so that you can adjust it to any angle you want.
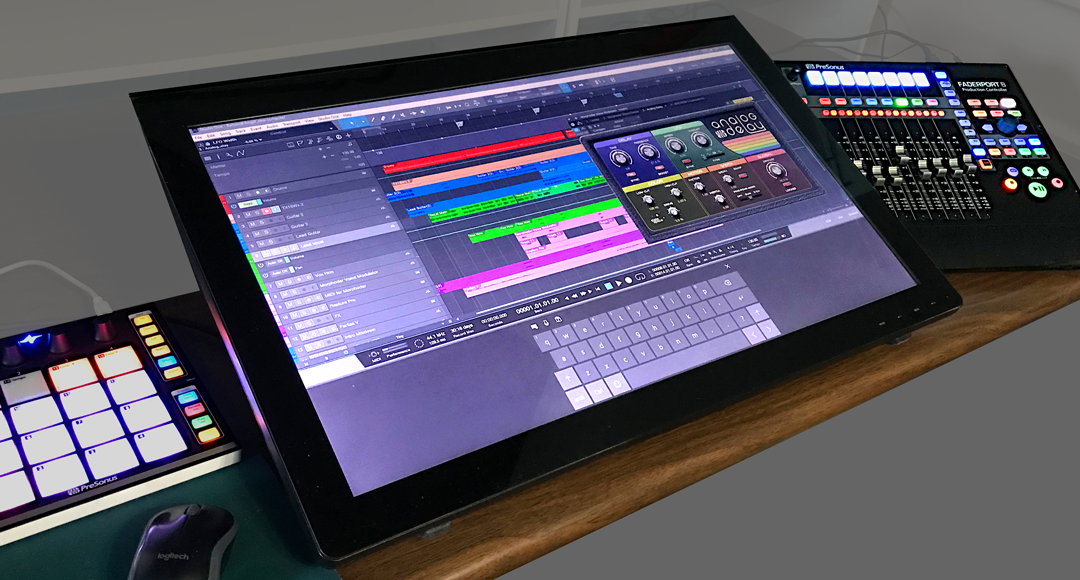
Figure 1: The Planar touchscreen is flanked by PreSonus control surfaces—that’s a lot of hands-on control. It’s at more of an angle than I normally use so that the screen is more visible.
Where touch doesn’t work, at least for me, is trying to use it with a conventional monitor placement (i.e., at a right angle to the desk surface, directly in front of you). Reaching out tires your arms; when I’m using the touch screen as a conventionally placed monitor for a project like writing an article, I rarely use touch. However, it can be helpful to move windows around while the mouse is doing something else, or touching a function after the mouse has made a selection. If you have RSI issues, touch can also provide a break from using a mouse all the time.
Also note that it takes a while to develop “touch technique.” You generally need to use the point of your finger to be sufficiently precise, and with the monitor at a low-lying angle, I usually have to aim a little toward the top of what I’m trying to hit. Also, you need to learn a few new tricks. You “right-click” simply by touching, and then continuing to hold your finger down until the context menu appears. And you can zoom tracks horizontally or vertically with two-finger pinches or stretches, which is pretty cool…as well move a project horizontally along the timeline by just swiping left or right.
Integrating a QWERTY Keyboard
You also need to decide how to integrate a QWERTY keyboard. If it’s in front of the touchscreen, then the touchscreen needs to go further back, which diminishes its ease of use because you have to reach further. One option is placing a keyboard on your lap, or adding an under-table keyboard drawer. Then you can slide the keyboard out when needed, and slide it back in when you want to concentrate on the touchscreen.
Another option is using Windows’ onscreen keyboard. Although primarily intended for tablet mode, right-click on the Taskbar, and choose “Show touch keyboard button.” This button will appear on the taskbar and persist; click on it to show/hide the keyboard. (Also for what it’s worth, you can enable a button for an onscreen touchpad.) Note that you have several keyboard options, from a mini-keyboard to one that includes Alt, Ctrl, Windows, and Function keys (Fig. 2).
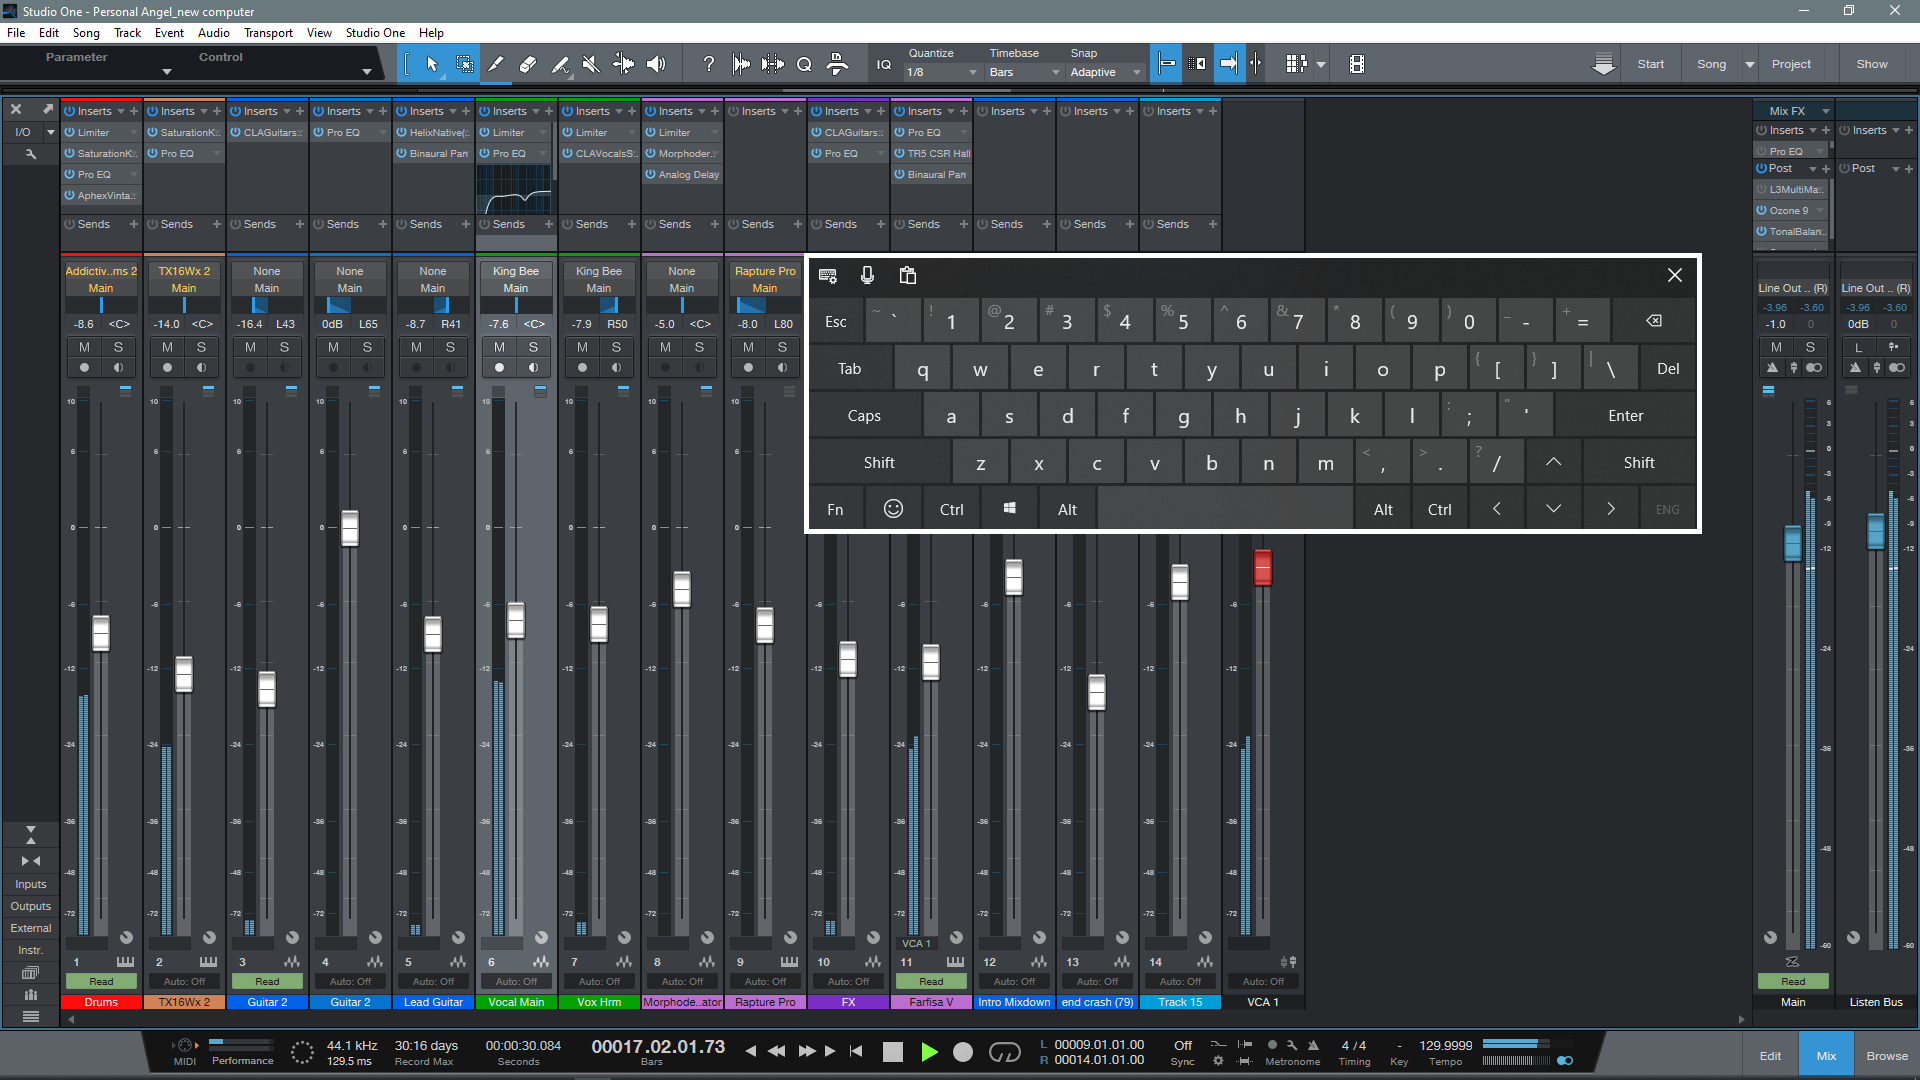
Figure 2: This shows the full keyboard, set for the option to float anywhere over the window. Note how the faders are stretched to give excellent touch resolution.
So Is It Worth It?
If you miss working on a hardware mixer surface, a gently angled, horizontal touch screen is pretty close to that experience. Studio One’s ability to extend the height of faders is also great—when you mostly want to concentrate on fine level adjustments, you can do so with touch. Multitouch on effect and instrument parameter adjustment is also welcome, especially compared to bouncing the mouse back and forth among parameters. Another factor is that unlike an external hardware control surface, you don’t have to “mentally map” the hardware to what you see on the screen—after all, you’re adjusting what’s on the screen.
If you have a choice between spending $300 on upgrading your speakers or buying a reasonably large touchscreen, I’d prioritize upgrading your speakers. But if you’re looking for a new tool that can give you an edge in certain workflows, a touchscreen may be the answer. And even if it isn’t, it can always serve as a conventional monitor, and provide an extra screen. And we can never have enough screens!
Authentic ADT (Automatic Double-Tracking)
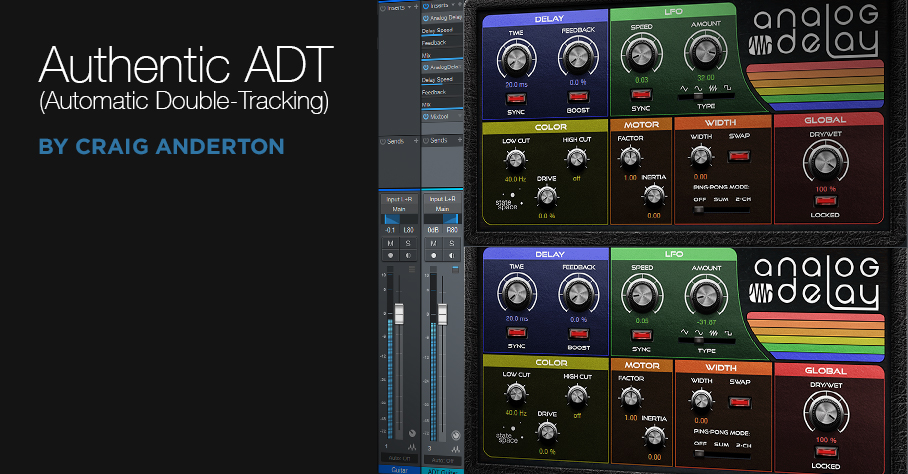
Double-tracking is the process of recording the same part a second time, and trying to duplicate the original part as closely as possible. The goal is to make a part sound bigger, more prominent, or (with mono instruments), create a stereo image from the two tracks.
Spoiler alert: humans aren’t perfect. When playing the second part, there will be slight timing, and perhaps pitch, variations. Within reason, these variations are good, because they keep the part from sounding like the original part was just copied to another track. However, sometimes it’s difficult to play a second part that’s tight enough, especially with something like a complex or fast lead guitar part. The usual solution is to do electronic doubling using an effect, like Studio One’s Chorus/Doubler.
However (at least to my ears), electronic doubling has never sounded quite the same as actually double-tracking a part. So here’s a different approach that I find more satisfying, and closer to “the real thing.” It requires copying the original track, processing it as described in this tip to create the doubled sound, then mixing the processed track with the original track. The audio example plays the original track, then the doubled version using this technique.
I wasn’t planning to do an effects chain, because the Analog Delay settings in Fig. 1 are pretty foolproof. In fact, unless you want to explore the options brought out to the control panel, just insert the FX Chain, and carry on with your mixing or recording.
Figure 1: Analog Delay settings for the Authentic ADT effect.

How It Works
To give a more randomized effect, there are two delays (delayed sound only) in series, set for the same initial delay time, but modulated at different LFO rates. So the longest, and shortest, delays happen only when the maximum deviations of the two LFOs coincide. Otherwise, the delay changes constantly, in a somewhat non-periodic way.
But the “secret sauce” is using this on a track dedicated solely to producing the ADT effect. One of the problems with electronic ADT is that the variations can never be ahead of the original, or at the same time—they can only lag. Real double-tracking doesn’t work that way. Sometimes the player will hit a little ahead, sometimes a little behind, and sometimes right on the beat.
To solve this issue, suppose your initial delay setting 20 ms, as in Fig. 1. Because there are two delays in series, this means the total initial delay setting is 40 ms. Move the copied, doubled track 40 ms ahead (earlier) on the timeline. Now the initial delay isn’t delayed compared to the original track, so as the delay time varies, it can lead or lag the original part. (Moving the doubled track ahead by 20 ms acts more like an electronic doubler, where the doubled part always lags, or plays at the same time as, the original.)
Initial delay time settings of 13 to 25 ms work well. For whatever value you choose, move the original track ahead in time, compared to the original track, by twice the amount of the delay time setting.
The Macro Controls Panel
Fig. 2 shows the Macro controls panel. These parameters have been constrained to what I find to be useful settings.
Figure 2: Control panel for the Authentic ADT FX chain.

The maximum delay is 25 ms because remember, there are two delays in series so this can go as high as 50 ms. If this amount of delay happened all the time it would be perceived more like slapback echo, but happening on occasion adds to the realism.
Depth and Rate are to taste. I generally adjust them to give a minimal flanging effect in case the original and doubled tracks end up being summed to mono at some point. However, that’s a worse-case scenario. This technique is designed for a cool stereo effect, with the original and ADT tracks panned oppositely (not necessarily full left and right, just oppositely).
Mod Shape affects only one of the delays, but is interesting. A sawtooth shape, with the other delay being modulated by a sine wave, may give good results if the audio isn’t too continuous. Square can be useful with very low Width settings, but you’ll probably get more use out of sine or triangle wave modulation.
So go ahead—download the FX Chain! I think you’ll agree it gives a more authentic ADT sound.
DOWNLOAD THE AUTHENTIC ADT FX CHAIN
The Filter Shape Shifter

Ah yes…the good old days. When tape cost a week’s salary, you had to clean your recorder’s tape heads and capstan every day, and worst of all, there was no undo. And I had to make fun effects by laboriously breadboarding parts, soldering, and deciding what tradeoffs to make because an effect with 26 controls and 12 switches wasn’t really viable.
But now we have Studio One so we don’t have to mess with tape, and FX Chains, so we can make our own crazeee multieffects without having to solder anything! Which brings us to this week’s tip.
Back in the 70s, sample-and-hold effects from synthesizers were a big deal. This effect synched to tempo, and stepped through a resonant filter. Its cutoff frequency changed on the beat, and held until the next beat, at which point it changed to a different random cutoff frequency. I always liked that effect with guitar, and thought it would make a good Friday Tip, along with a companion, downloadable FX Chain. But I got carried away…check out the audio example, with guitar, bass, and drums.
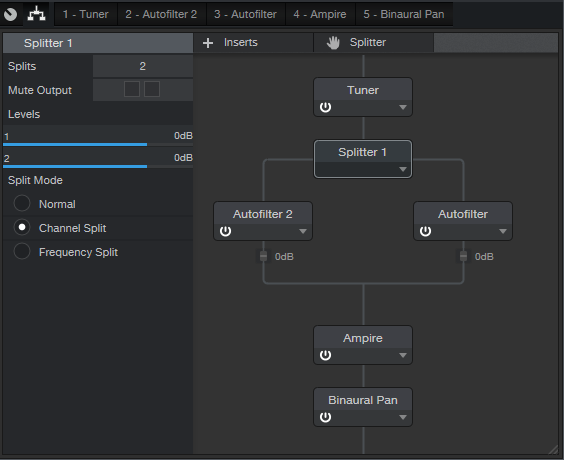
Fig. 1 shows the FX Chain basics. The chain splits the stereo input by channel, into two Autofilters. These are modulated by their LFO step sequencers, which sync to the beat. The filters are before Ampire, so they alter the distortion character in a more subtle way than they would if they followed Ampire.
Figure 1: The Filter Shape Shifter “block diagram.”
Here’s the story on the Macro Controls (Fig. 2).
Figure 2: Macro controls for the Filter Shape Shifter FX Chain.
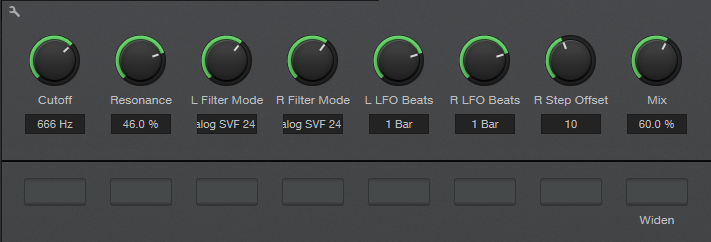
Cutoff and Resonance are “master” controls for both filters. The Filter Modes choose the filter types for the left and right Autofilters, while the two LFO Beats controls choose the rhythmic sync for the left and right LFOs.
R Step Offset is a bit unusual. It changes the values for all of the right LFO’s steps except for 1, 4, 8, and 12. Automating this parameter and varying it can add a considerable amount of variety to the sound, but keeping a constant, relatively high filter frequency on steps 1, 4, 8, and 12 maintains the beat.
Mix changes the wet/dry mix for both filters, and Widen enables a Binaural Pan when you want a wider stereo spread. And you know you want it.
Do check it out, and have fun warping your guitar-meets-Ampire sound!
DOWNLOAD THE FILTER SHAPE SHIFTER FX CHAIN HERE