Category Archives: Uncategorized
“Universal” Gated Reverb
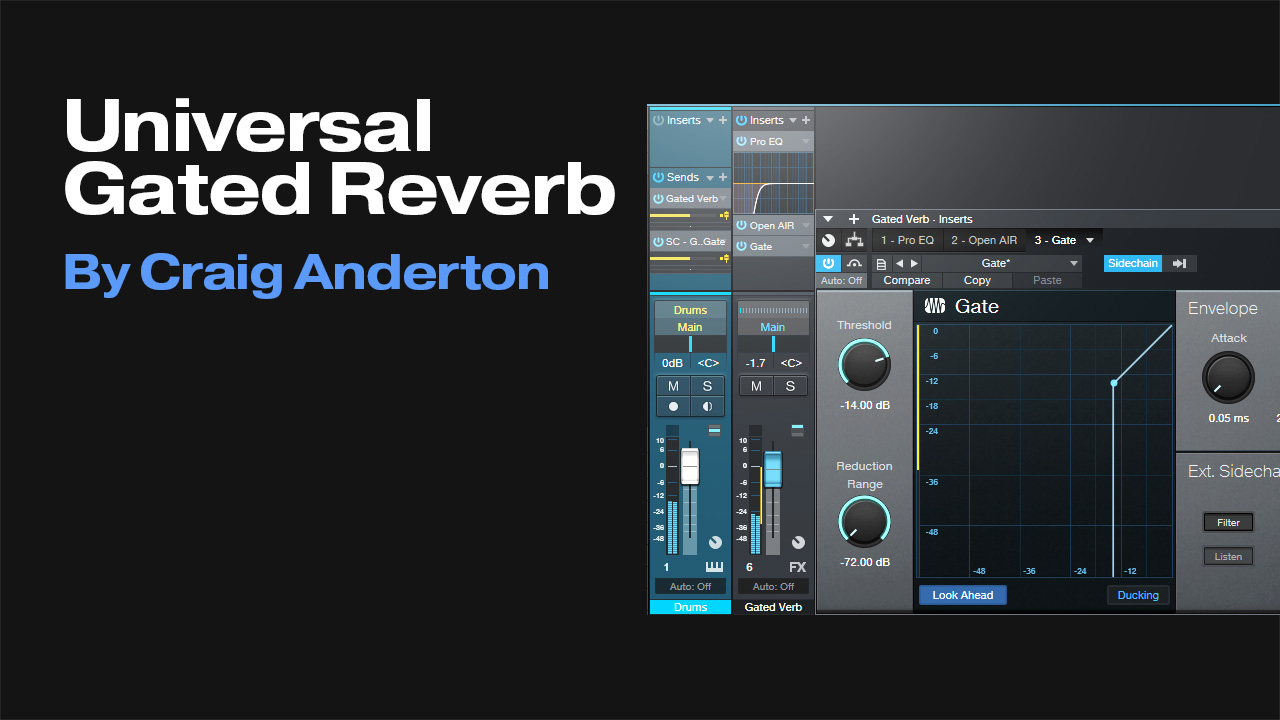
Last week’s tip covered using the Mixverb to create the 80s gated reverb effects with drums. This week, we’ll present a more universal solution. But also, we’ll do some cool tricks with gated delay (there’s nothing like a dotted eighth-note delay, right?).
Compared to last week’s tip, the main difference this week is that it’s not limited to using individual drum sounds (although that remains the most flexible approach). Because the gate following the reverb has a sidechain, it works with drum loops or a mixed drum bus. Fig. 1 shows the mixer setup for a drum loop.
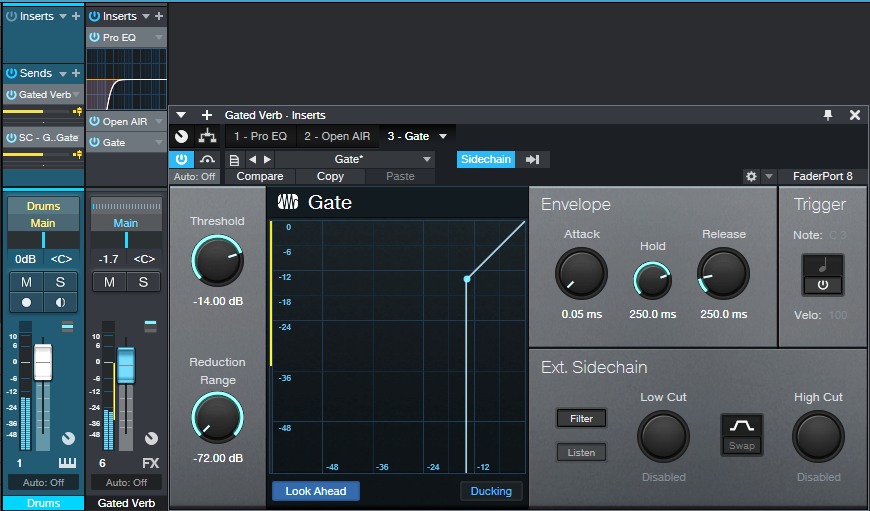
The drum (or loop, or bus) track has two sends. One goes to an FX Channel with Open Air reverb followed by Gate. The Pro EQ2 before the reverb is optional—it’s there to keep low frequencies, where the kick lives, out of the reverb. The other send controls the Gate’s sidechain.
For Open Air, I prefer reverb sounds that don’t have a lot of early reflections, with a long, consistent tail. Try different reverbs, because the results vary greatly depending on the reverb itself. My go-to is using a 4.00 or 8.00 second “Balanced” impulse from my Surreal Reverb Impulse Reponses sample pack, tweaked with the Open Air EQ. In the audio example, using this particular impulse imparts a sort of melodic component as well as space. However, most long, smooth reverbs will work.
Gate Settings
First off, a “gotcha”: When you assign a sidechain to the Gate, it assumes you want Duck mode. You don’t! Make sure you turn off Ducking, or you’ll wonder why the gating doesn’t work as expected.
The Gate’s Hold parameter plays an important role. You can set the Threshold to pick up as much of the drum dynamics as you want, and then use Hold to set a specific amount of time that the Gate is open. Release tailors the sound further by setting the way the Gate cuts off, from no time to a bit of a decay. For example, 250 ms adds a bit more of a reverberant character if you want a less drastic gating effect.
Audio examples? Sure! Let’s start with gated reverb on drums. The first half is dry drums. The second half has gated reverb, and uses the parameters shown in fig. 1.
The final audio example gates a dotted eight-note delay from the Analog Delay. In some ways, I think this is a better application than traditional reverb…but maybe that’s just because I haven’t heard it a zillion times before. This example has only the processed sound, since you already heard the dry sound in the previous audio example.
Instant Rebate! Get the AudioBox 96 Studio Blue Edition for just $149.95 in the U.S. and Canada!

Click here to find a dealer!
Now through the end of December, get an instant rebate on the AudioBox 96 Studio Blue Edition at participating dealers in the USA and Canada!
Start recording today with this complete, all-PreSonus package! Based on the AudioBox USB 96 audio/MIDI interface and award-winning Studio One recording and production software, PreSonus AudioBox 96 Studio is great for creating multitrack recordings, demos, live recordings, podcasts, field recordings for video and sound effects, and much more. Learn more about the AudioBox 96 Studio here.
You get our best-ever selling AudioBox interface, the M7 Condenser microphone, comfy HD7 headphones, Studio One Artist, the Studio Magic Suite (over $1000 worth of software) and all the cables you need to hook it up. It’s everything you need to record and produce in a single purchase—and for a limited time it’s more affordable than ever!
This is an instant rebate, live at the point of purchase. No forms to fill out.
Instant Rebate! Get a PX-1 or a pair of PM-2s for $99.95 in the USA until November 29th 2021!

Click here to find a dealer!
Instant Rebate! Now through the November 29th 2021, get the PX-1 or a pair of PM-2s for $99.95 at participating dealers.
Start recording today with the PX-1 or a pair of PM-2s. The PX-1 large-diaphragm cardioid condenser microphone is an ideal solution for recording vocals, guitar, podcasts, and much more! Learn more about the PX-1 here. The PM-2 stereo mic set provides 2 matched, pro-quality, small-diaphragm condenser mics with XY mounting bar. Ideal for drum overheads, ensembles, etc. Learn more about the PM-2 set here.
This is an instant rebate, live at the point of purchase. No forms to fill out.
Save $30 on AudioBox 96 Studio 25th Anniversary in the USA and Canada in November 2021!

Click here to find a dealer!
Now through the end of November 2021, save $30 on the AudioBox 96 Studio 25th Anniversary Edition at participating dealers in the USA and Canada!
Start recording today with this complete, all-PreSonus package! Based on the AudioBox USB 96 audio/MIDI interface and award-winning Studio One recording and production software, PreSonus AudioBox 96 Studio is great for creating multitrack recordings, demos, live recordings, podcasts, field recordings for video and sound effects, and much more.
You get our best-ever selling AudioBox interface, the M7 Condenser microphone, comfy HD7 headphones, Studio One Artist, the Studio Magic Suite (over $1000 worth of software) and all the cables you need to hook it up. It’s everything you need to record and produce in a single purchase—and for a limited time it’s more affordable than ever!
This is an instant rebate, live at the point of purchase. No forms to fill out.
Make a Splitter for Studio One Artist
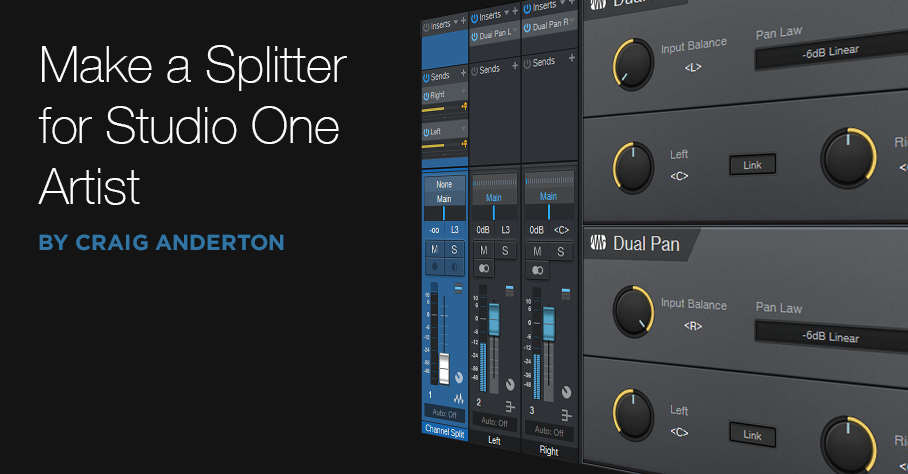
One of my favorite Studio One Professional features is the Splitter, and quite a few of my FX Chains use it. If you own Studio One Artist, which doesn’t have a Splitter, you may look longingly at these FX Chains and think “If only I could do that…”
Well, you can implement most splitter functions in Studio One Artist, by using buses. All the following split options are based on having a track that provides the audio to be split, along with pre-fader sends to additional buses. Note that the track’s fader should be turned all the way down.
Normal Split
The Splitter’s Normal mode sends the input to two parallel paths, which is ideal for parallel processing. For Artist, we’ll duplicate this mode with two buses, called Split 1 and Split 2 (fig. 1).
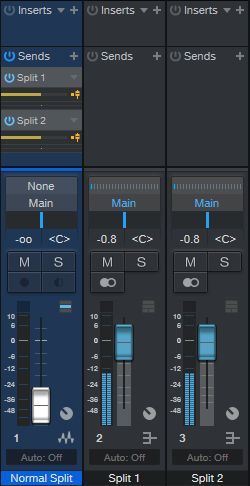
Figure 1: How to create a Normal split in Artist.
The sends to the buses are pre-fader, and panned to center. One send goes to Split 1, and the other to Split 2. Now you can insert different effects in Splits 1 and 2 to do parallel processing.
Channel Split
The Channel Split mode also splits the input into two parallel paths. One path is for the left channel, while the other path is for the right channel.
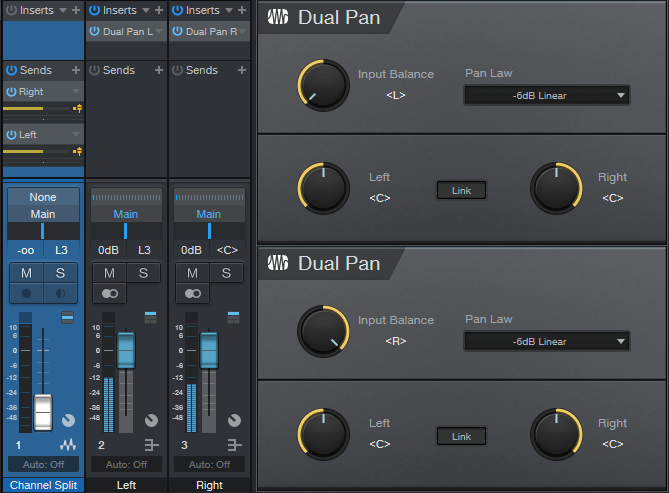
Figure 2: How to create a Channel Split in Artist.
The setup is the same as for the Normal Split (fig. 2), except that each bus has a Dual Pan inserted. The Dual Pan for the left channel has the Input Balance set to <L>, while the Dual Pan for the right channel has the Input Balance set to < R>. I recommend the -6dB Linear Pan law so that if you pan either of the buses, the level remains constant as you pan from left to right.
Frequency Split
This is tough to duplicate, because the Splitter can split incoming audio into five frequency bands. If other DAWs don’t do it, we can’t expect Artist to do it. But, we can do a three-way, tri-amped split into low, mid, and high frequencies (fig. 3).
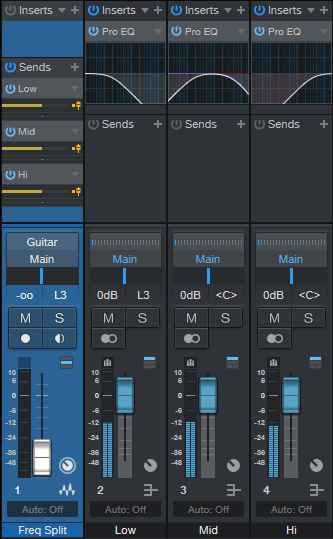
Figure 3: Tri-Amp Frequency Split.
This split is like the Normal Split, except that there are three buses and pre-fader sends instead of two, and each bus has a Pro EQ2 inserted. Each EQ covers its own part of the frequency spectrum—low, mid, and high (fig. 4). Using 6 dB/octave slopes doesn’t provide as much separation between frequency ranges as steeper slopes, but the gentler slopes are necessary to make sure the frequency response is flat when you mix the three channels together.

Figure 4: (Top to bottom) low, mid, and high curves.
The only filter sections we need to use are High Cut and Low Cut—you can ignore everything else. Fig. 5 shows the settings. All bands have 6 dB/octave slopes.
Enable the Low band’s Pro EQ2 HC (High Cut) filter, and choose 200 Hz for frequency. Enable the Mid band’s Pro EQ2 LC (Low Cut) filter, and set it to 200 Hz; also enable the HC filter, and set it to 4.00 kHz. Finally, enable the High band’s Pro EQ2 LC filter, and set it to 4.00 kHz. These frequencies are a good starting point, but you may want to modify the split frequencies for different types of audio sources. Just make sure that the low band HC frequency is the same as the mid band’s LC frequency, and the Mid band’s HC frequency is the same as Hi band’s LC frequency.
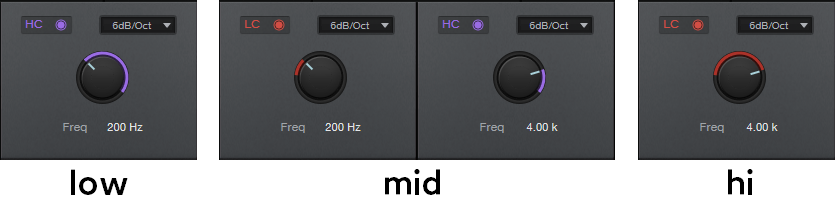
Figure 5: Filter control settings.
Granted, setting up these splits takes more effort than dragging a Splitter plug-in into a channel, but the result is the same: cool parallel processing options.
The Dynamic Brightener—Reloaded
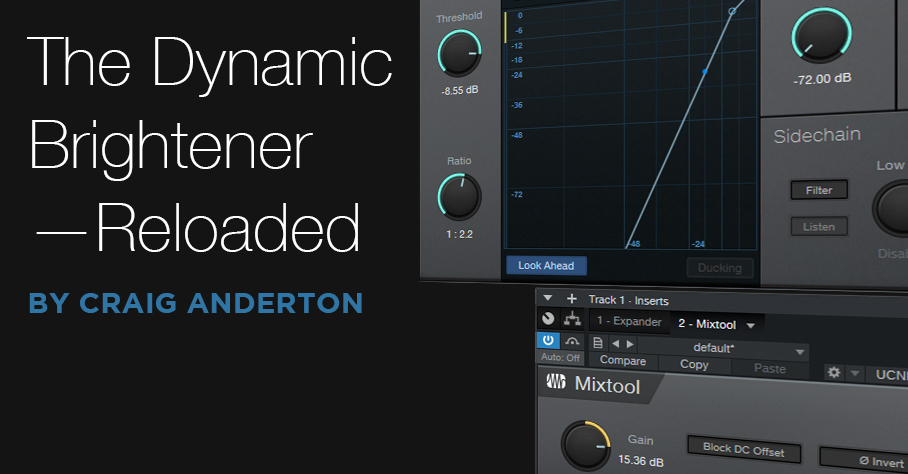
In April 2019, I did a Friday Tip called The Dynamic Brightener for Guitar. It’s kind of a cross between dynamic EQ and a transient shaper, and has been a useful FX Chain for me. In fact, it’s been so useful that I’ve used it a lot—and in the process, wanted to enhance it further. This “reloaded” version makes it suitable for more types of audio sources (try it with drums, bass, ukulele, piano, or anything percussive), as well as less critical to adjust. It also lessens potential high-frequency “smearing” issues—the original version applied large amounts of boost and cut, with a non-linear-phase EQ.
Although the original version could have been built using a Splitter, I did a bus-based implementation so that it would work with Studio One Artist. This new version needs to use the Splitter (sorry, Artist users), but that’s what allows for the improvements.
Another interesting aspect is that by using the effects’ expanded view in the channel inserts, you don’t even need to open the effect or Splitter interfaces, to do all the necessary tweaking. This makes the reloaded version much easier to edit for different types of tracks.
How It Works
Fig. 1 shows the FX Chain’s block diagram.
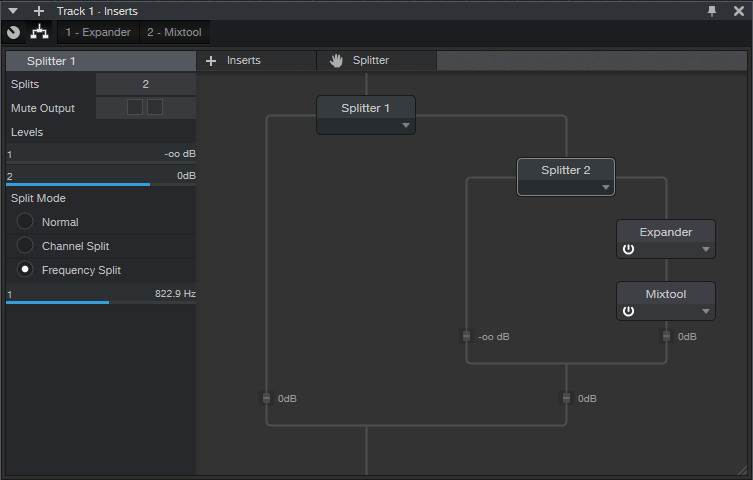
Figure 1: The Reloaded Dynamic Brightener’s block diagram.
Splitter 1 is a normal split. The left split provides the track’s dry sound, while the right split goes to Splitter 2, which is set up as a Frequency Split. The Frequency Split determines the cutoff for the high frequencies going into the right split. Splitter 2’s left split, which contains only the split’s lower frequencies, is attenuated completely. Basically, Splitter 2 exists solely to isolate the audio source’s very highest frequencies.
These high frequencies go to an Expander, which emphasizes the peaks. This is what gives both the transient shaping and dynamic EQ-type effects. Because the high frequencies aren’t very loud, the Mixtool allows boosting them to hit the desired level.
Fig. 2 shows the initial Expander and Mixtool settings. But, you won’t be opening the interfaces very much, if at all…you don’t even need Macro Controls.
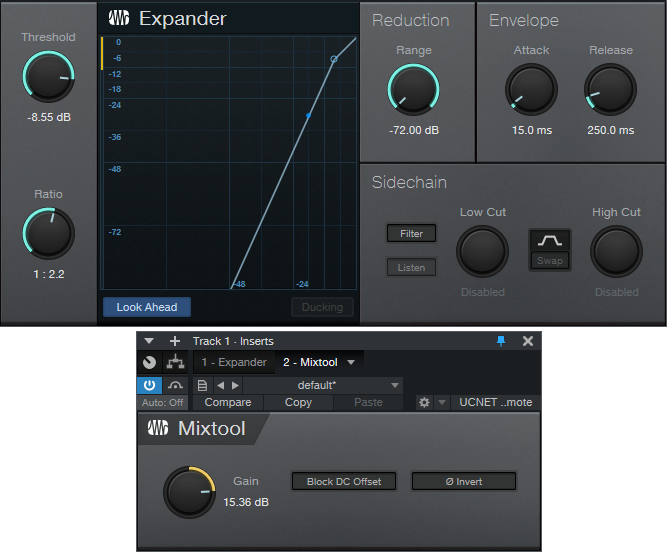
Figure 2: Initial parameter settings for the Expander and Mixtool.
Using the Reloaded Dynamic Brightener
In the short console view, open up the “sidecar” that shows the effects. Expand the effects, and set the mixer channel high enough to see the ones shown in fig. 3.
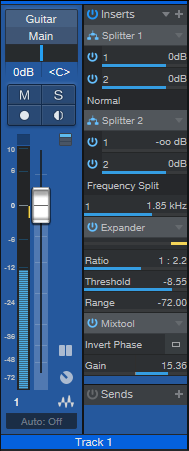
Figure 3: The Reloaded Dynamic Brightener controls.
Here’s how to optimize the settings for your particular application:
- Turn off Splitter 1’s output 1 power button. This mutes the dry signal, so we can concentrate on the brightener’s settings.
- Adjust Splitter 2’s Frequency Split to isolate the optimum high-frequency range for brightening. This can be as low as 1 kHz or less for guitars with humbucker pickups, on up to 6 kHz (or more) to emphasize drum transients.
- Set the Expander’s Ratio and Threshold parameters for the desired amount of brightening and transient shaping. Higher Threshold settings pick off only the top of the boosted high-frequency peaks; the Ratio parameter controls the transient shape. The higher the ratio, the “peakier” the transient.
- After editing the high frequencies, re-enable the dry signal by turning on Splitter 1’s output 1 button.
- Mix in the desired amount of brightening with the Mixtool Gain parameter. In extreme cases you may want to increase the level control at the end of the Splitter 2 branch, or the output level from Splitter 2 output 2, but this will be needed rarely, if at all.
- As a reality check to determine what the brightener contributes to the sound, turn off either Splitter 1 or Splitter 2’s output 2 power button to mute the brightened signal path.
This is a tidier, easier-to-adjust, and better-sounding setup than the original dynamic brightener. Download the FX Chain here—the default settings are for dry guitar, and assume a normalized overall track level. With lower track levels, you’ll need to lower the Expander Threshold, or boost output 2 from Splitter 1. But feel free to tweak away, and make the Reloaded Dynamic Brightener do your bidding, for a wide variety of different audio signals.
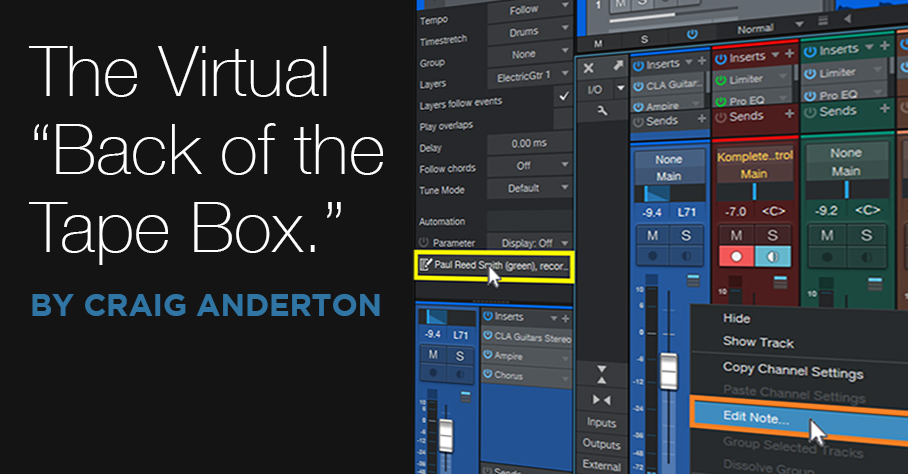
The Virtual “Back of the Tape Box.”
In the 20th century, tape reels came in boxes. Engineers wrote information about tracks, running order, timing, credits, and such on the back of the box. And because it was a box, you could fold up some sheets of paper and include lyrics, notes, and other information
These days, when you open a project, it’s just like you left it. But what mics did you use? How was the tone control set on the bass? And you got those loops from…which sample library? If you ever need to re-visit a track, fix a glitch, do an overdub, or weeks pass before you can finish a project, you’ll need to know these details. Let’s talk about taking notes, and while we’re keeping track of things, let’s also create a lyrics track.
Taking Notes
To access Studio One’s virtual “back of the tape box,” choose Song > Song Information.
- The Info tab shows selected meta data, info from the Song Notes tab, and any image you uploaded to Song Setup. The image can show an album cover, but also a miking setup, an analog processor’s control settings, or a cool picture that inspires you.
- For developing song lyrics, I keep the Song Notes tab open, and do my writing/editing there. Saving lyrics with a song is convenient. However, it’s also useful for other notes—session personnel, web site URLs with reference info, and so on.
- Track Notes (fig. 1) is where you can include all track-related information. It’s ideal for info that’s not included in a preset, like the vocal mic of choice, analog processor control settings, and which pickup you used on a guitar.

Figure 1: Track notes are key to documenting a session.
Track Notes Access Shortcuts
In addition to accessing track notes in the Song Information menu, you can scroll down in the Inspector to the field below automation, and click on it to open the corresponding Track Notes (fig. 2). Or, right-click anywhere within a Console channel, and select Edit Note from the context menu. This is the fastest way to view or edit Track Notes, compared to going to Song Information, selecting a tab, and then clicking on the track label.
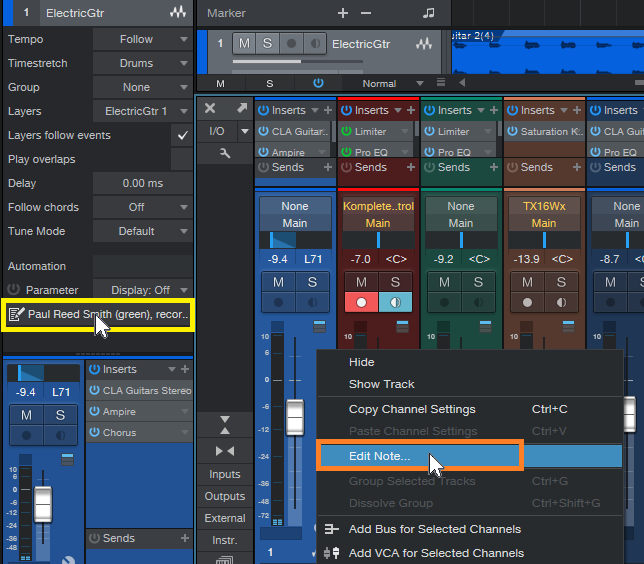
Figure 2: Open track notes from within the Inspector by clicking, or in a mixer Channel by right-clicking.
Furthermore, you can supplement Track Notes by entering information in the track name itself. Hovering over the name in the Arrange window or a mixer Channel (fig. 3) shows whatever you entered, which can be quite long if needed. This is useful for temporary notes, like if you recorded several similar parts, and need to differentiate among them.

Figure 3: You can see long track names by hovering over them.
Pipeline Docs
Analog processors…you love ‘em, right? But when they don’t have presets, and you’re using them with Pipeline, you’ll want to know how the controls were set. Pipeline’s image icon (lower left) allows uploading an image of control settings, while the pencil icon allows adding a note (fig. 4).
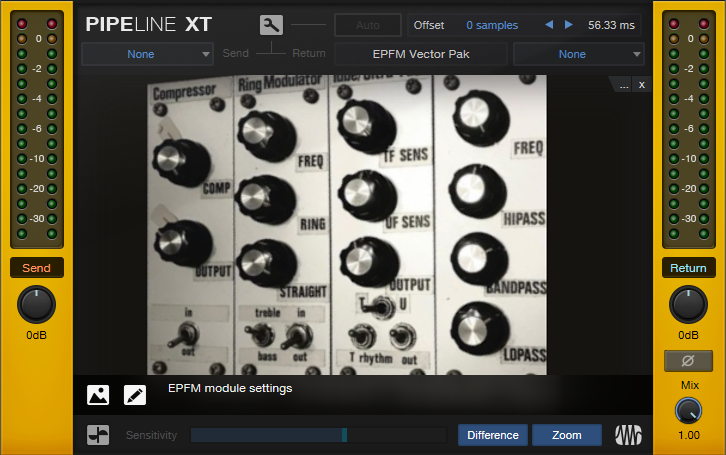
Figure 4: The rack of effects from my book “Electronic Projects for Musicians,” being used with Pipeline.
A photo larger than 1200 x 1200 will be scaled to fit the image space, but click on the image, and it expands to the original size. You may even be able to see all the controls on a rack-mount piece of gear.
If you have an analog synthesizer with so many controls they won’t fit in a picture, no problem. Pipeline doesn’t have to be used for its intended purpose. You can take a picture of the synth’s oscillators, another of the filters, another of the envelopes, Then, stack multiple Pipelines within a track, to be used solely as a picture gallery. However, each instance does add latency—when you don’t need to see the pictures, disable the track, and hide it to reduce clutter.
Of course, you could always put the images in a folder, and include that folder in your song folder. But it’s kinda cool that everything you need to know about a song can be stored within that song.
The Lyrics Track
A lyrics track is helpful, because you always know where you are in the song—not just in the “chorus” or “verse.” It can be located right above a vocal, so it’s easy to find and select a particular part that needs editing, overdubbing, deleting, etc. Although Studio One doesn’t have a lyric track per se, you can put one together in two ways (fig. 5). There are pros and cons to each approach.

Figure 5: Lyric track made with markers (top) and with a dedicated “lyrics track.”
Marker-based lyric track. Lyric markers are quite readable, and have useful songwriting functions:
- Select the Marker track, open the Inspector, and jump to a particular phrase by clicking on it. It’s a quick way to get where you want to go.
- Right-click on any marker, select “Create Arranger Sections from Markers,” and now you have the start of an Arranger Track based on the lyrics.
- Right-click on a marker, and choose “Stop at Marker” to make sure that playback won’t continue past that point.
Event-based lyric track. This might be best if you already have a lot of markers inserted, and don’t want to add more. Create a dummy track, and populate it with events whose lengths correspond to phrases. One advantage is that you can color-code the events to help guide you through a vocal by emphasizing certain phrases. Another advantage is that if you zoom in or out, the Event will continue to span the length of the chosen phrase. A Marker is always anchored to the beginning.
The Ampire Sweetener

I work a lot with amp sims, and I love ’em. Well, except for one thing: Almost all of the ones that involve distortion exhibit what I call “the annoying frequency.” It’s hard to describe, but when it’s removed, you can definitely tell what’s missing—kind of a whistling sound, but without a sense of pitch. I have no idea why this particular type of artifact happens. It doesn’t go away if I increase the sample rate, choose a different pickup, switch guitars, or change my socks. And it’s worse with some amp sims than others; when reviewing a [particular amp sim by a PreSonus competitor] and I made the product manager aware of the annoying frequency, a subsequent expansion pack included a parametric equalizer so users could notch it out.
Granted, the 3rd gen Ampire is light years ahead of the 1st gen, as well as a lot of other amp sims out there. But we can still make it better, because the goal of the Friday Tip is to make things better, right?!? Besides, I’m an unreasonably picky guitar player.
Adding the EQ
Download the preset Ampire Sweetener.preset , and load it into the Pro EQ2 (Just open the .zip and double click the .preset file to install). It will now have the curve shown in Fig. 1. Insert the Pro EQ2 after your Ampire amp and cab of choice, and the sound will magically lose its artifact.

Figure 1: Insert these notch filters after Ampire and its cab.
You have every right to skeptical—after all, you are reading this on the internet—so let’s listen to an audio example. The first half is with the EQ following the MCM800 amp and 4×12 MFB cab. The second half is with the EQ bypassed, but everything else the same. Both examples in the audio file are normalized to the same level. I’m pretty sure you’ll hear the artifact in the second half. Another way to hear the difference is play some power chords, and bypass the EQ stages to hear what they contribute to the sound.
The EQ’s curve isn’t only about the dual notches. There’s no need for super-high or -low frequencies, so those are reduced as well. Also, because the notches are in the high frequencies, adding a slight treble shelf compensates for the reduced amount of highs.

Figure 2: Reduce the high-shelf level and the two notches to sound more like the original amp sim/cab tone.
Now, this doesn’t mean you’ll like the end result better. You might prefer the sound with the artifact, and that’s fine. However, the artifact persists through the various amps and cabs. Inserting the Ampire Sweetener EQ removes that common element, which emphasizes the unique character, and tonal quality, of the individual amps and cabs. However, you can also “split the difference” by dialing back the parameters outlined in white (Fig. 2).
Finally, if you use other amp sims, many (if not most) will also benefit from one or two steep notches at the output. They probably won’t be the same frequencies, but they’ll likely be pretty close. The bad news is quite a few of them have far more prominent artifacts than Ampire, but the good news is the higher level makes it easier to hear them, so you can dial in their frequencies more quickly to notch them out.
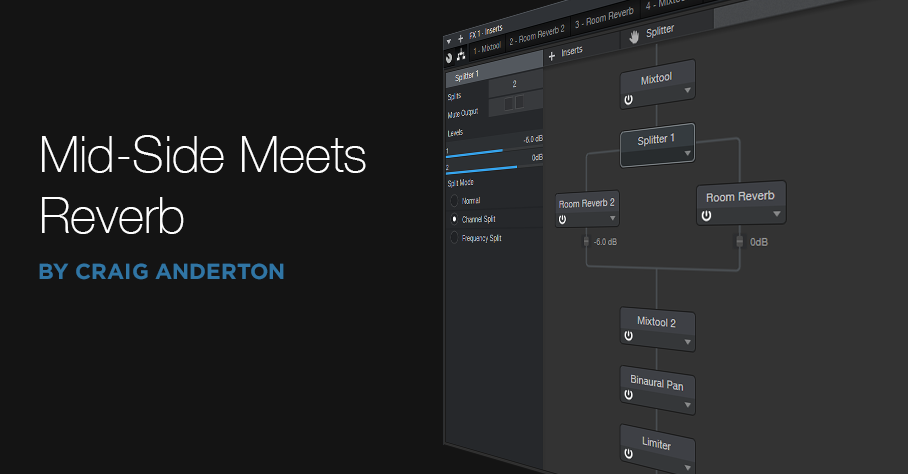
Mid-Side Meets Reverb
The post on using mid-side processing with the CTC-1 garnered a good response, so let’s follow up with one of my favorite mid-side techniques: M-S reverb.
To recap, mid-side processing separates sounds in the center of a stereo file from sounds panned to the sides, processes them individually, then puts them back together again into stereo. It isn’t a perfect separation, because the mid is the sum of the left and right channels. Although this boosts the center somewhat, the mid still includes the sides. However, the side channel is quite precise, because it’s derived from putting the right and left channels out of phase—so the center cancels.
Applying Mid-Side Reverb
Before getting into how to make M-S reverb, here’s why it’s useful. Some productions have an overall reverb to provide ambiance, and a second reverb (often plate) dedicated to the vocal. The vocal is usually mixed to center, so it’s competing for space with the bass, snare, and kick. If they’re contributing to the overall reverb, and the vocal is creating its own reverb, that’s a lot of reverb in the center.
One popular fix is adding a highpass filter prior to the overall reverb, set to around 300 Hz. This keeps the bass and kick from muddying the reverb. However, it doesn’t take care of midrange or high-frequency sounds that are panned to center, like snare. These can compete even more with the vocal if they’re in the same frequency range.
While some reverbs let you tailor high- and low-frequency reverb times with a crossover, this doesn’t cover all the processing you might want to do, nor does Studio One’s Room Reverb include these parameters. Mid-side reverb, with different reverbs on the mid and sides, is a more flexible solution for customizing an overall reverb ambiance.
Assembling the Mid-Side Reverb
Download the FX Chain, or if you want to roll your own, start by dragging the MS-Transform FX Chain into a bus (of course, this also works for individual channels). Then drag a Room Reverb into each split (Fig. 1). The default reverb preset is a good place to start, but if the FX Chain is in a bus, remember to set the Mix controls for 100% wet sound. I also like to insert a Binaural Pan after the second MixTool to widen the overall stereo image.

Figure 1: Mid-Side Reverb FX Chain, which adds two Room Reverbs and a Binaural Pan to the MS-Transform FX Chain.
The reverb on the left handles the center, while the reverb on the right processes the sides. Lower the fader after the left reverb; Fig. 1 shows -6 dB, but adjust to taste. This alone will open up some space in the center for your vocal and its reverb. However, where this effect really comes into its own is when you tweak the reverb parameters for each reverb. For example…
- If you still want reverb on the kick and low end, vary the mid reverb’s Length parameter. Shorter lengths tighten the kick more, while longer lengths give that Kick of Doom reverb sound.
- Increase Length on the sides for a more atmospheric reverb sound.
- Increase pre-delay on the sides, to make space for attacks on the vocal track. Consonants benefit from the extra clarity.
- For this application, Eco mode sounds fine but try HQ as well.
- Turn up the Binaural Pan after the second Mixtool. I often turn it up all the way, because it sounds great in stereo, and there aren’t any phasey issues of the output collapses to mono.
By adjusting the two reverbs, you can sculpt them to give the desired overall reverb sound. If you then place a vocal in the center with a sweet plate, I think you’ll find that the vocal and overall reverb create a smooth, differentiated, and conflict-free reverb effect.
Recording ReWired Programs

I had a bunch of legacy Acid projects from my pre-Studio One days, as well as some Ableton Live projects that were part of my live performances. With live performance a non-starter for the past year, I wanted to turn them into songs, and mix them in Studio One’s environment.
Gregor’s clever video, Ableton Live and Studio One Side-by-Side, shows how to drag-and-drop files between Live and Studio One. But I didn’t want individual files, I needed entire tracks…including ones I could improvise in real time with Live. The obvious answer is ReWire, since both Acid and Live can ReWire into Studio One. However, you can’t record what comes into the Instrument tracks used by ReWire. Nor can you bounce the ReWired audio, because there’s nothing physically in Studio One to bounce.
It turned out the answer is temporarily messy—but totally simple. First, let’s refresh our memory about ReWire.
Setting Up ReWire
Start by telling Studio One to recognize ReWire devices. Under Options > Advanced > Services, make sure ReWire Support is enabled. In Studio One’s browser, under the Instruments tab, open the ReWire folder. Drag in the program you want to ReWire, the same way you’d drag in an instrument. (Incidentally, although you’re limited to dragging in one instance of the same ReWire client, you can ReWire two or more different clients into Studio One. Suitable clients includes Live, Acid Pro, FL Studio, Renoise, Reason before version 11, and others.)
After dragging in Ableton Live, open it. ReWired clients are supposed to open automatically, but that’s not always the case.
Now we need to patch Live and Studio One together. In Ableton Live, for the Audio To fields, choose ReWire Out, and a separate output bus for each track. In my project, there were 9 stereo tracks (Fig. 1).
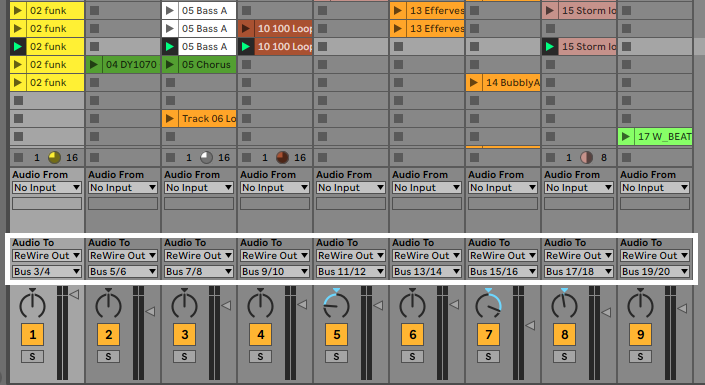
Figure 1: Assign Ableton Live’s ReWire outputs to buses. These connect to Studio One as track inputs.
Then, expand the Instrument panel in Studio One, and check all the buses that were assigned in Ableton Live. This automatically opens up mixer channels to play back the audio (Fig. 2). However, the mixer channels can’t record anything, so we need to go further.
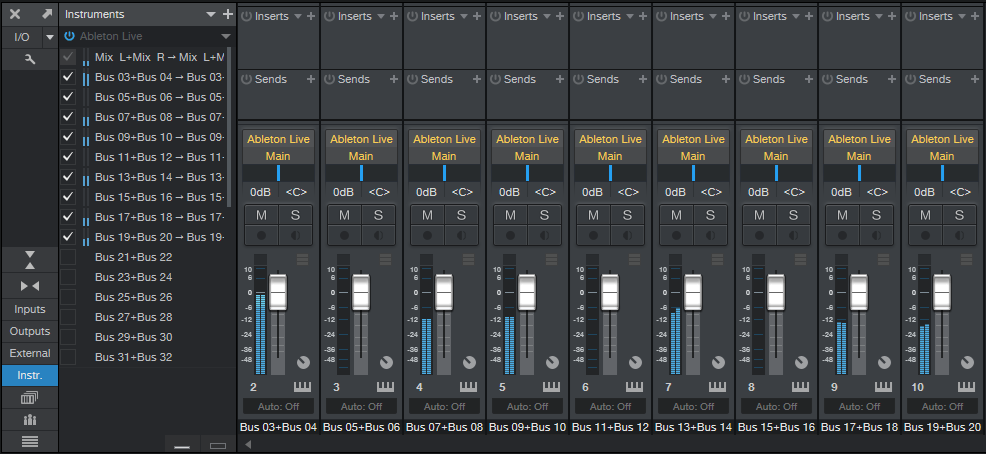
Figure 2: Ableton Live loaded into Studio One, which treats Ableton Live like a virtual instrument with multiple outputs.
Recording the ReWired Program
As mentioned, the following is temporarily messy. But once you’re recorded your tracks, you can tidy everything up, and your Live project will be a Studio One project. (Note that I renamed the tracks in Studio One as 1-9, so I didn’t have to refer to the stereo bus numbers in the following steps.) To do recording:
- In each Studio One track, go to its Send section and choose Add Bus Channel. Now we have Buses 1-9—one for each track.
- Our original instrument tracks have served their purpose, so we can hide them to avoid screen clutter. Now Studio One shows 9 buses (Fig. 3).
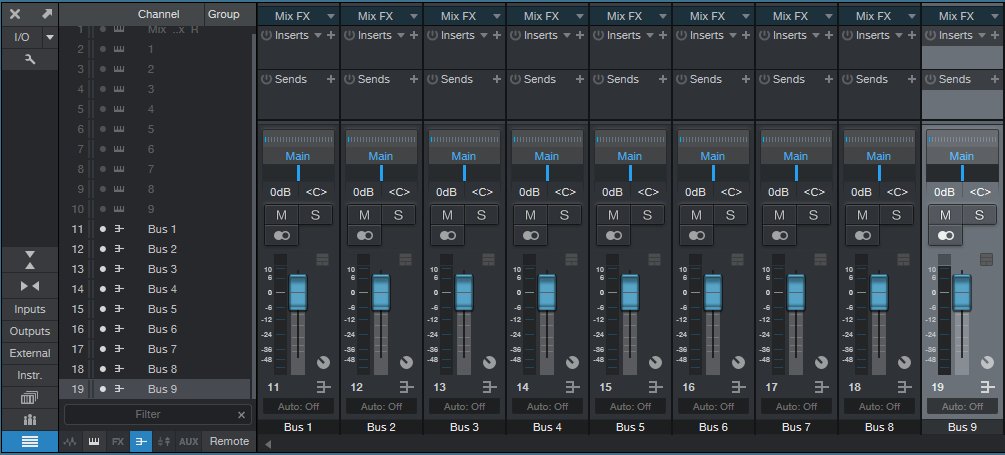
Figure 3: The buses are carrying the audio from Ableton Live’s outputs.
- Create 9 more tracks in Studio One (for my project, these were stereo). Assign each track input to an associated bus, so that each of the 9 buses terminates in a unique track. Now we can hide the bus tracks, and record-enable the new tracks to record the audio (fig. 4).
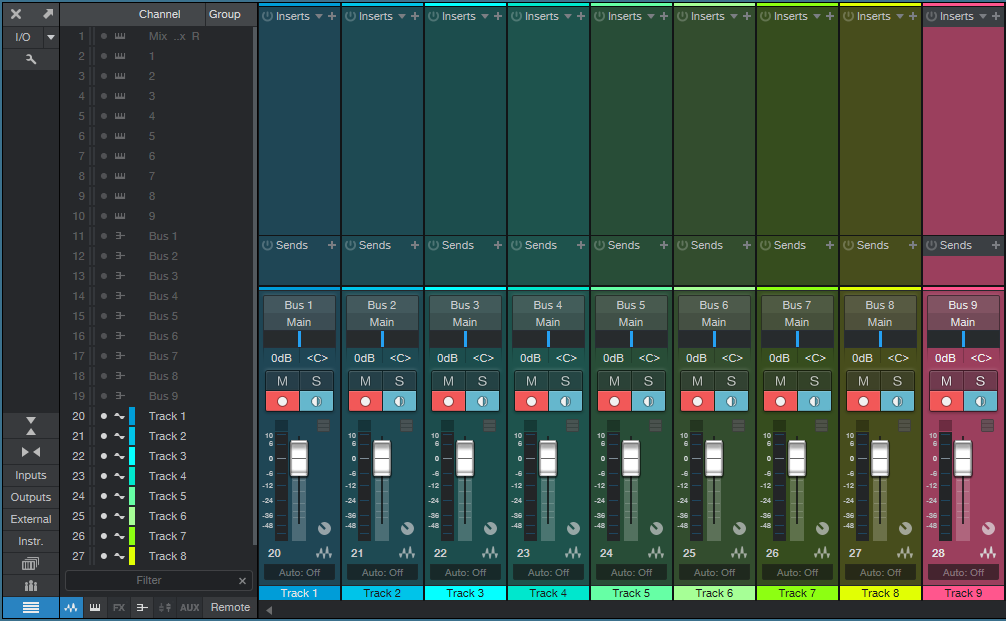
Figure 4: Studio One is set up to record the audio from Ableton Live.
- Now you’re ready to record whatever is in Ableton Live over to Studio One, in real time.
- Fig. 5 shows the results of unhiding everything, narrowing the channels, and hitting play. At this point, if everything transferred over correctly, you can delete the ReWired tracks, remove the buses they fed, close Ableton Live, and you’re left with all the Live audio in Studio One tracks. Mission accomplished!
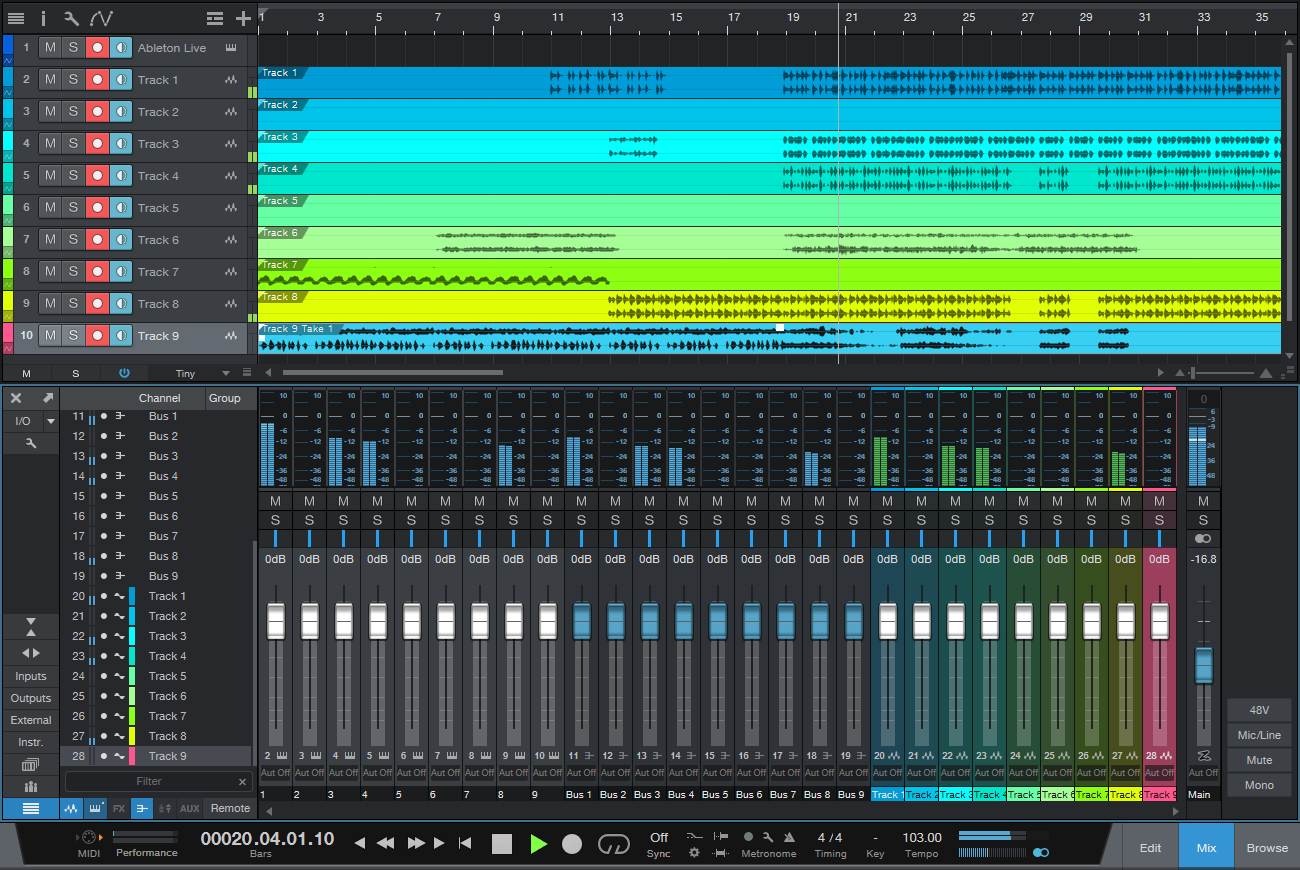
Figure 5: The Ableton Live audio has completed its move into Studio One. Now you can delete the instrument and bus channels you don’t need any more, close Ableton Live, return the U-Haul, and start doing your favorite Studio One stuff to supplement what you did in Live. Harmonic Editing, anyone?
Bonus tip: This is also the way to play Ableton Live instruments in real time, especially through Live’s various tempo-synched effects, while recording them in Studio One. And don’t forget about Gregor’s trick of moving Studio One files over to Live—this opens up using Live’s effects on Studio One tracks, which you can then record back into Studio One, along with other tracks, using the above technique.
Granted, I use Studio One for most of my multitrack projects. But there’s a lot to be gained by becoming fluent in multiple programs.