Category Archives: Studio One
10 Not-Hitting-Drums ATOM Tips
It’s easy to assume ATOM is an MPC-type pad controller, and ignore it if that’s not of interest. But ATOM is tightly integrated with Studio One for navigation, editing, and more, and also works with third-party software—which even applies to third-party software (like virtual instruments) running inside Studio One.
1. The Auxiliary Keyswitch Keyboard
The problem: you have a 4-octave keyboard, but you’re using a program like SampleTank or Kontakt that uses lower-octave keys for keyswitching. The solution: Add ATOM as an auxiliary keyboard for triggering keyswitches (Fig. 1).

Figure 1: IK SampleTank’s lower keys trigger loops (as identified with arrows), while the upper keys play one-shots. You can set up ATOM to play the lower, keyswitched notes, and play the one-shots from your main keyboard.
1. Select the Instrument track and set it to All Inputs, so it receives notes from the main keyboard and from ATOM.
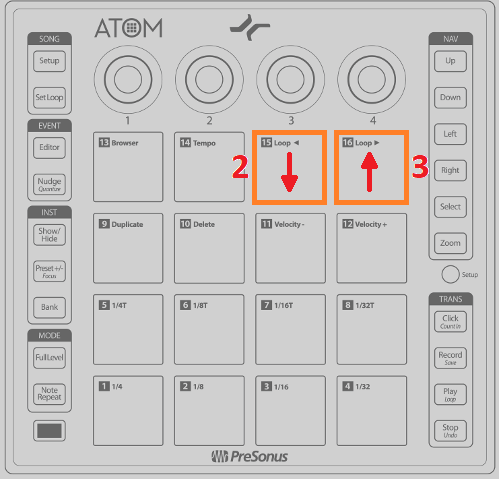
Figure 2: Use Pads 15 and 16 to cover the desired keyboard range for keyswitching.
2. Tap Pad 15 to transpose down an octave (Fig. 2). Each tap transposes down another octave. To keep track of how far down you’ve transposed, Pad 15 is orange at the default octave, tan = -1 octave, purple = -2 octaves, and red = -3 octaves.
3. Tap Pad 16 to transpose up an octave. Each tap transposes up another octave.
Considerate Bonus Feature: ATOM remembers the octave settings for different instrument tracks, even if they’re not instruments bundled with Studio One.
2. “Feel Factor” Changes
Leading or lagging rhythms by only a few milliseconds can make a major difference in the “feel,” the mix, and therefore, the music’s emotional impact (for more about the “feel factor,” please check out this article on my educational site, craiganderton.org). But how can you do that with Studio One, whose highest resolution goes to 64th notes? It’s easy with ATOM—and frankly, this feature alone justifies ATOM to me. The following works with both note and audio data.
1. In Studio One, turn off snap.
2. Select the notes (or audio Events) whose timing you want to shift.

Figure 3: You can lead or lag events in 1 millisecond increments with ATOM.
3. On ATOM, press and hold Nudge (Fig. 3).
4. Tap the Left button to move the selected notes or Events ahead (lead) by 1 ms, and the Right button to move the selected notes late (lag) by 1 ms (Fig. 4).
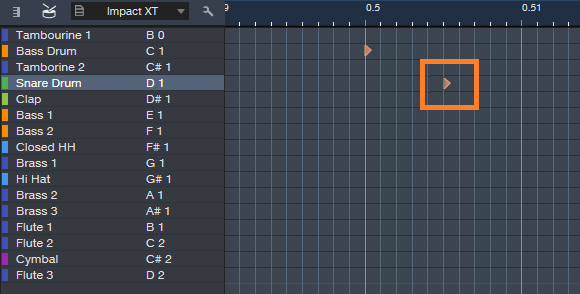
Figure 4: The timeline shows seconds. The note outlined in orange has been nudged 5 ms later.
This is huge. Try moving percussion a few milliseconds ahead of the beat to give a more “urgent” feel, or a snare a few milliseconds after the beat for a “bigger” sound.
3. Don’t Panic!
Stuck notes? No problem—see Fig. 5. (Note: the upper left Setup button needs to be off.)

Figure 5: It’s easy to nuke stuck notes with ATOM.
1. Press and hold the Quick Setup button, and select the track with the stuck notes.
2. Tap Pad 4 to send an All Notes Off command.
4. Tap Your Tempo
This is one of my favorite features for songwriting, because it’s a lot easier to tap a tempo (Fig. 6) than tweak it when you have a song idea.
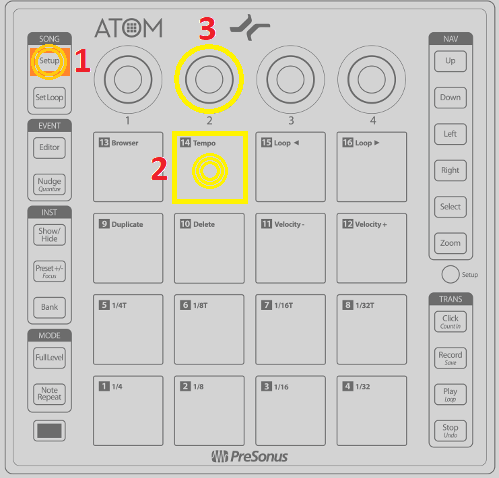
Figure 6: It’s easy to capture a song’s “feel” when songwriting by using tap tempo.
1. Tap the Song Setup button in the upper left.
2. Tap Pad 2 at the desired song tempo; this sets the tempo in the control bar.
3. To fine-tune the tempo, turn Knob 2.
5. The Hands-On Instrument Browser
You can call up instruments and presets quickly with ATOM (Fig. 7).
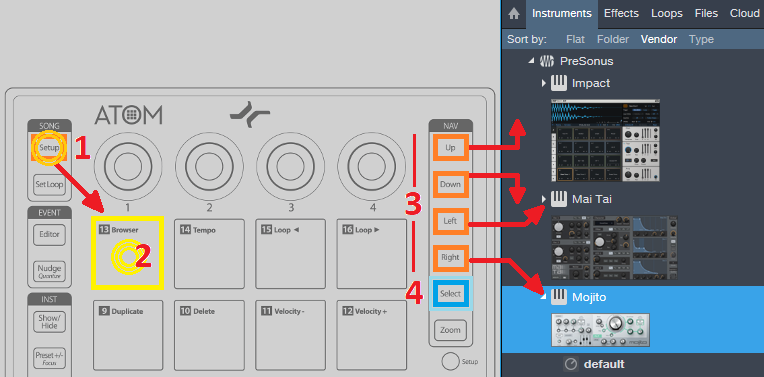
Figure 7: ATOM plays well with the Browser.
1. Press Setup, and it glows orange.
2. Toggle the Browser show/hide by tapping Pad 13 (Browser).
3. When the Browser is open, use the Up and Down buttons to go up and down through the list of instruments and presets. Use the Right button to open a preset list, and the Left button to close the list.
4. When you have the preset or instrument you want, press Select. This creates an Instrument track with the currently selected preset, or the instrument itself if no preset is selected.
6. Wicked Fast Exclusive Solo
There are many times—especially when proofing tracks before mixing–that I want to be able to select tracks quickly, and go into exclusive solo mode (i.e., only that track will be soloed—even other tracks that are soloed will be muted). It’s super fast if the Arrange View or Console has the focus (Fig. 8).
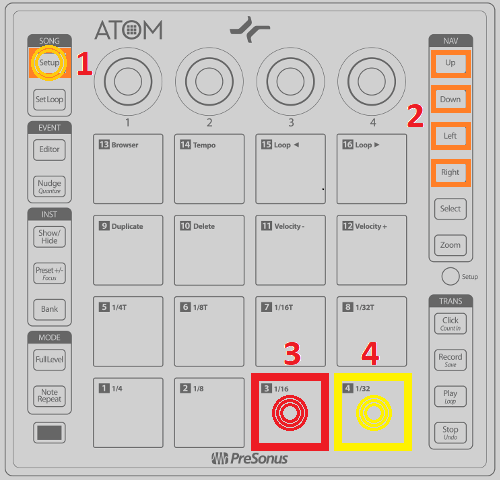
Figure 8: Step through tracks quickly, and “exclusive solo” them, with ATOM.
1. Tap Setup, and it glows orange.
2. Use the Up button or Left button to step up through tracks, and the Down or Right button to step down through tracks. (That’s kinda cool that either one Up/Down or Left/Right works, because it’s natural to use Up/Down in the Arrange view, and Left/Right on the Console).
3. Tap Pad 3 to mute the selected track.
4. Tap Pad 4 to solo the selected track, or Alt+Pad 4 for exclusive solo.
7. Control FX Chain Macro Knobs

Figure 9: Want hands-on control over the various FX Chains I’ve presented in these Friday Tips? ATOM can do it.
This is an easy one. Call up an FX Chain. Move the ATOM knob you want to assign to a Macro control. Right click on the Macro control. Assign it to the ATOM knob (Fig. 9).
8. Faking Studio One as a Third-Party Application
ATOM is happiest when playing with Studio One, because of the tight integration. But I still use Cakewalk’s Rapture Pro in a lot of tracks; I sampled a ton of Gibson basses, and made what I think are some really cool instruments with them. Unfortunately, in theory you can’t use ATOM’s aftertouch or knobs as a generic control surface when running in Studio One…but hey, we laugh at theory around here! You can, by faking Studio One into not recognizing ATOM as ATOM.
1. Go to Studio One > Options > External Devices, and remove ATOM.
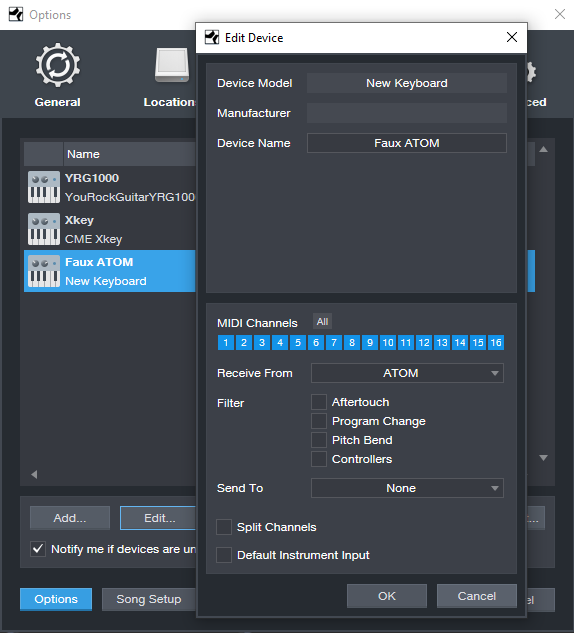
Figure 10: How to fool ATOM into thinking Studio One is a third-party application.
2. Click Add, and choose New Keyboard (I named it Faux ATOM; see Fig. 10). You don’t need to Send To anything. ATOM’s status light at the top will glow green to indicate ATOM isn’t under Studio One’s control.
3. If your instrument has MIDI learn, assign the four controls or aftertouch however you want, and record as you would any automation from a control surface (Fig. 11).
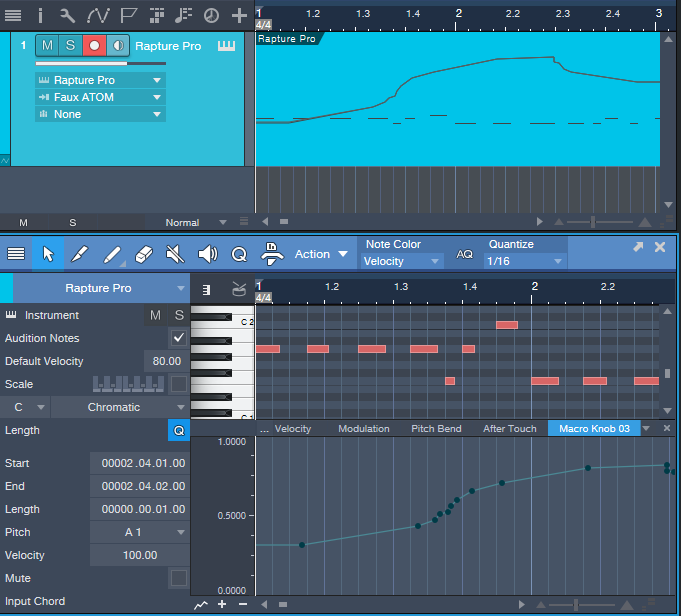
Figure 11: The screen shot shows the results of recording ATOM’s Macro Knob 3 as a control source for a third-party synthesizer.
Don’t worry, you haven’t lost ATOM. Go Studio One > Options > External Devices, and remove Faux ATOM. Click on Reconnect; Studio One finds ATOM, and lists it as an external device. Another option is to close and re-open Studio One (ATOM gets added automatically).
9. Cool Event Editor Stuff
The documentation seems to imply that you can do cool event editor things only with the Instrument track, but that’s not quite true—you can do plenty with audio tracks as well.
1. Press the Editor button (in the left side, under Event). It doesn’t matter if Song Setup is on, because if it is, hitting Editor turns it off. The Edit view appears.
2. To hide the Edit view, hold Shift and tap Editor.
While in the Editor (or with audio tracks, the Arrange view):
10. The More Ways to Undo, the Better
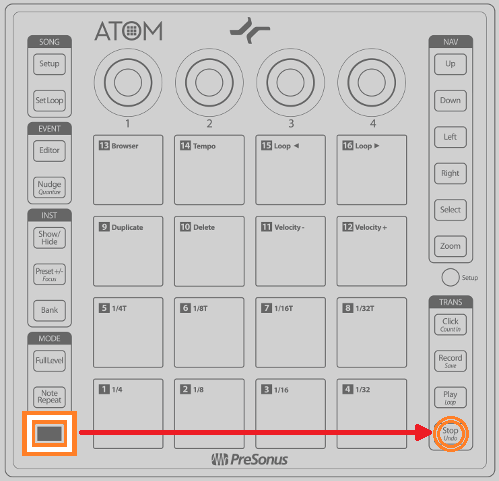
Figure 12: No one will ever know you made that horrible mistake if you undo.
Hold Shift and tap Undo (Fig. 12) to undo your last mistake…because there are never enough ways to undo!
Ten FX Chain Splitter Tips
Hey—September is Studio One’s 10th birthday!! It’s past the “terrible twos,” getting really good grades in school, becoming smarter with each update, and has become highly proficient at riding a bicycle. It’s a good kid.
For those who weren’t aware of its birth a decade ago, half the music industry thought the idea of PreSonus coming out with a baby DAW was ridiculous. The other half felt differently; instead, they simply thought it was stupid. There was plenty of hearty laughter around the NAMM show, as people placed their bets on how many months Studio One would last before it went away. After all, how could an upstart that didn’t even do surround compete with well-established DAWs?
Never mind.
Anyway, here we are ten years later, so I thought—why not make each Friday Tip of the Week for this month ten tips? We’ll start with one of my favorite Studio One features, the Splitter.
- It’s great that you can specify the number of splits. The Channel Split mode makes sense with two splits—one is left, one is right. With 4 splits, the two on the left are the left channel, the two on the right, the right channel. But what about 3 and 5 splits? With 3, the middle is the right channel, and the other two are the left channel. With 5 splits, the left-most, right-most, and center splits are the left channel; the remaining two are the right channel (Fig. 1).

Figure 1: Meatloaf says “two out of three ain’t bad.” Studio One says “two into five can be cool.”
- The Mute Output buttons for each split make it easy to audition individual splits (Fig. 2, outlined in red). If a split is muted, then an almost invisible little switch opens up in the split. I think this switch should be brighter, so thanks to the miracle of public-domain Paint programs, I’ve made it a lighter shade of gray in the screen shot…hopefully the developers over in Hamburg, Germany will see this and think “hey, that’s a great idea!” (or more likely, “das ist eine großartige idee!”).
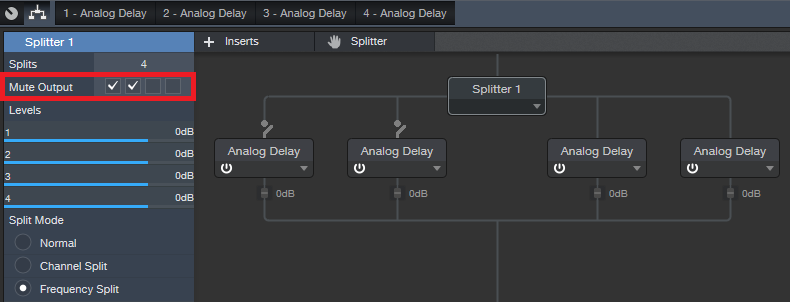
Figure 2: The Mute Output buttons circled in red are a stupendous (and I don’t use that word lightly) feature for when you want to isolate what a particular split is doing to your audio.
3. The bad news: none of the split parameters are automatable. I’ve been told Studio One needs to be old enough to get its driver license before this will be possible.
4. The good news: the effects you bring into the splitter are automatable. So if you want to automate a split’s level, then bring in a Mixtool, and rock out.
5. Because you can rename the effects you bring into an FX Chain, this makes life sooooo much easier when you have a really complex setup involving multiple splits, and need to be able to identify at a glance those effects you want to edit.
6. The level controls in the splits themselves don’t respond to mouse wheel scroll, but the ones in the left panel do – you don’t even have to click on one, just hover over it and scroll your mouse (Fig. 3). This is also true with the frequency sliders in the Frequency Split mode. Bonus tip! Ctrl+click on a slider to return it to 0 dB.
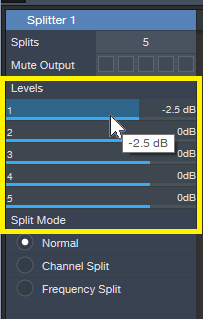
Figure 3: The level controls outlined in yellow respond to the mouse scroll wheel.
7. The Frequency Split mode is ultra-cool, because now you can have up to a five-band crossover. This is the kind of gadget Q would have made for James Bond, if Q had been a Studio One programmer. It makes multiband processing so incredibly easy—those who aren’t taking advantage of this aren’t taking full advantage of Studio One.
8. When used as a Frequency Split crossover, there will always be a minimum of a 100 Hz frequency difference among bands so you can’t do something dumb (like have two frequency band split points be at the same frequency.)
9. The FX Chain window is resizeable—you can extend the right and bottom borders. This is helpful when you’ve gone crazy with a split-based FX Chain (see next).
10. Splitters can go to splitters, which can go to splitters, which can go to splitters, [cut and paste]…so not only can an FX chain have series, parallel, and parallel/series effects, it can have parallel/series+parallel+series/parallel effects. The mind boggles (Fig. 4).
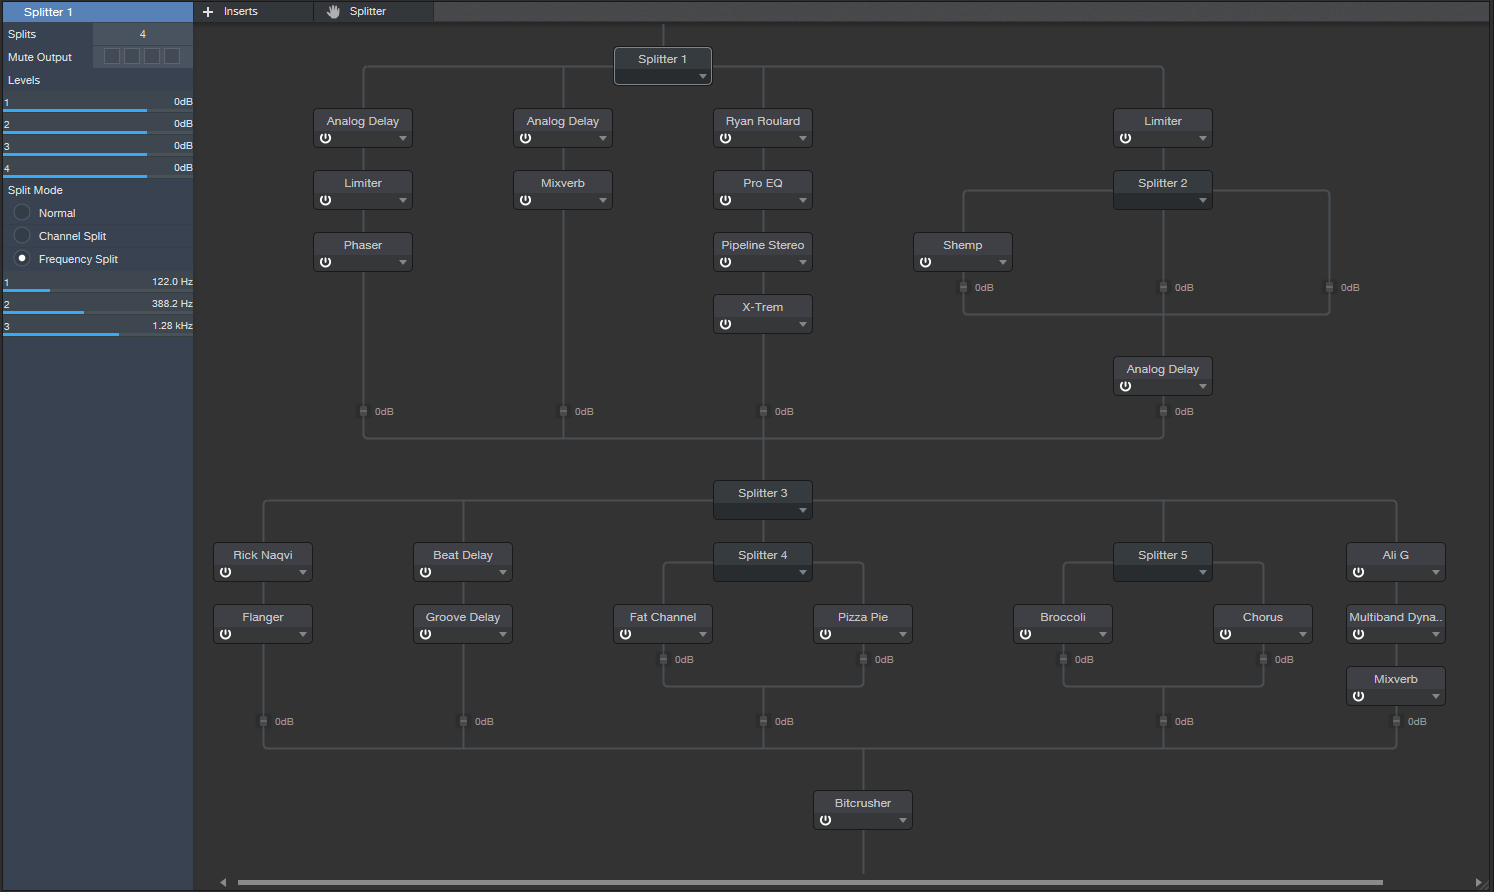
Figure 4: This FX Chain doesn’t actually do anything…or maybe it does…who knows? But it shows how the Splitter can help you can go really nuts with insane combinations of effects, if you’re so inclined.
Craig Anderton Books
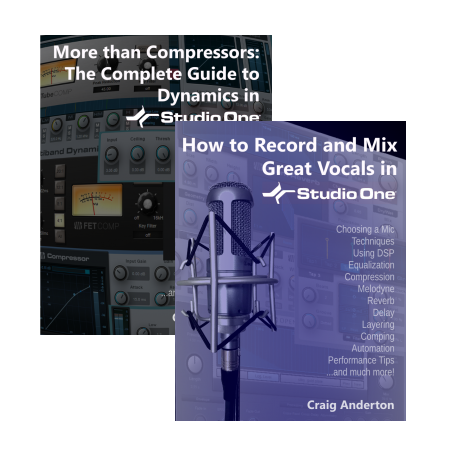 Sometimes a product comes along that’s a certified hit—and Craig Anderton’s downloadable eBooks certainly qualify.
How to Record and Mix Great Vocals, released in January, has helped thousands of Studio One owners record world-class vocals. In June, More than Compressors – the Complete Guide to Dynamics in Studio One appeared, and de-mystified the sometimes complex applications of Studio One’s sophisticated dynamics control processors. The book impressed Studio One developer Arnd Kaiser so much he said “This is could easily become the de-facto reference for Studio One users on all things ‘dynamics.’ Very cool—and highly recommended.” We couldn’t agree more! Both eBooks are currently in the PreSonus shop for the low price of $9.99 each, and will expand your knowledge of Studio One exponentially.
Widen Your Mono Guitar—Sans Problems
Your guitar is most likely mono. But sometimes you want a wide, full, stereo image. I can relate.
One technique is to send the guitar track to an FX channel, insert a delay set for a relatively short delay (like 25 ms), and then pan the original track and FX channel oppositely. But if you sum the signals to mono, then there’s the possibility of cancellation. In fact, I saw a guy in an internet video who said this was a terrible idea, and you should just overdub the part again and pan that oppositely if you want stereo.
Well, overdubbing is an option, assuming you can play tightly enough that the parts don’t sound sloppy. But don’t forget Studio One has that wonderful Channel Mode button on the Main output, so you can test stereo tracks in mono—simply adjust the delay time for minimum cancellation. You won’t be able to avoid cancellation entirely, but tweaking the time may keep it from being objectionable (especially once the delay time gets above 25 ms or so, because that’s more into doubling range). To make any phase issues even less noticeable, lower the delayed sound’s level a little bit to weight the sound more toward the dry guitar.
But I wouldn’t be writing this tip if I didn’t have a better option—so here it is.
- Pan your main guitar track to center.
- Send it to two FX Channels.
- Insert an Analog Delay in each channel, with Mix set for 100% delay, Factor to 1.00, Mod to 0.00, and Width fully counterclockwise. Pan them oppositely. Set the damping as desired. The screenshot shows a good starting point for your settings.

- Set different delay times, preferably somewhat far apart, for the two delays. I prefer prime number delays (3, 5, 7, 11, 13, 17, 19, 23, 29, 31, 37, 41 ms) so the delay timings don’t interfere with each other. For example, set one delay to 11 ms, and the other to 29 ms.
- Bring up the levels of the two delayed channel to create a pleasing stereo spread. It won’t be as dramatic a spread as using one dry and one delayed sound panned oppositely…but frankly, that “super stereo” effect sounds gimmicky compared to a full, robust stereo image. However, if you do want a more dramatic stereo separation, drop the center channel guitar by 6 dB in relation to the FX Channels that are panned right and left—you’ll still get most of the benefits of this approach. (You may need to group all three channels, and raise their levels a bit to compensate for the drop from lowering the center channel level.)
Now, here’s where the magic happens. Set the Main output mode to mono, and you’ll hear virtually no difference between that and the “faux stereo” signal, other than the stereo imaging. The reason why is that now, we have a guitar in the center channel—so choosing mono creates a center channel buildup. This raises the main guitar’s level above the delayed sounds, so there’s virtually no chance of audible cancellation, and it balances the level better between the stereo and mono modes.
Now you have a wide guitar that sounds equally loud, and is phase-issue free, in mono or stereo—happy Friday!
The Bigness of Huge Drum Sound
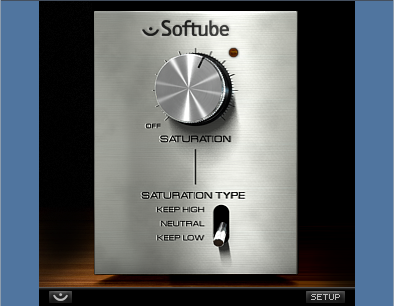
So…you want some huge drum sounds? Here you go. This is super well-suited to hip-hop and EDM, but can also give a monster drum sound for rock. The star of this show is the Softube Saturation Knob and FX Chain Splitter.
Drums lend themselves well to a little crunch, but there are limitations. If you apply a bitcrusher or distortion effect, the sound will become indistinct—which may be what you want, but I prefer a monster low end and a more defined high end. This usually requires a couple tracks with a crossover (or a track/bus combo with filtering), but the Splitter module makes it easy to do this in a single FX Chain.
Here’s the overall view of the FX Chain.

The first effect is a limiter, which is optional—but it can add a nice bit of squashing. The signal then proceeds to a Splitter set for a Frequency Split, with a crossover point around 220 Hz. The low-frequency split (to the left) goes to the Saturation Knob. You have some choices here; the Keep Low setting gives a boomier bass (hip-hop fans take note), while the Neutral and Keep High settings give a tighter sound—good for rock and dance, where you’ll often want the kick to make room for the bass part.
Meanwhile, the high frequencies split off to a Pro EQ and Mixverb. The Pro EQ helps compensate for the low-frequency split’s hugeness by boosting the highs with a broad peak. The Mixverb is a cheap ’n’ cheerful reverb that’s happy to provide a bit of room ambiance.

Finally, the Mixtool at the end provides a Trim control so you can match the enabled level to the bypassed one.
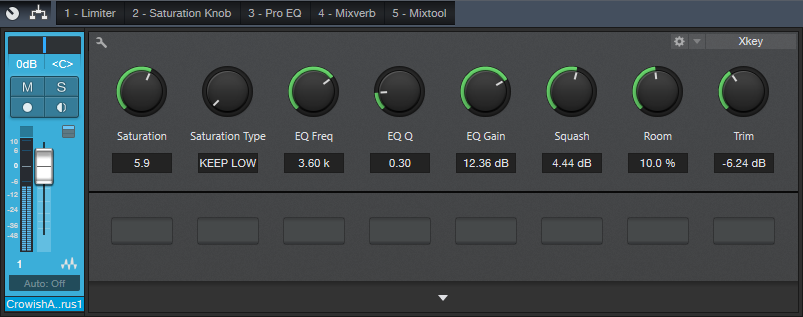
The Channel Editor brings out the crucial controls and is pretty self-explanatory. There are controls for the Saturation Knob’s two parameters, Frequency/Q/Gain controls for the high-frequency EQ stage, a Squash control to push the limiter, Room level, and Trim to adjust the final output.
So is it worth the effort to construct this FX Chain? Yes! But you don’t have to…
And you probably want to hear what it sounds like, so check out the audio example. The first half is a straight acoustic drum loop from Studio One’s library, while the second half has been converted into a Bigness of Huge drum loop. They’ve been normalized to the same peak level for a fair comparison.
Filling the Pipeline
Plug-ins have changed my life, and probably yours. Yet some hardware effects have no software equivalent—like boutique guitar effects, or tube-based equalizers. And there are even unique digital effects, too, like Roger Linn’s AdrenaLinn.
I wanted to use these with Studio One’s Pipeline XT plug-in and the Studio 192 interface, but never got the combo working properly. There were feedback problems, leakage into other channels, and various issues. After hours of trying different mixer settings, and searching the net, I couldn’t find an answer.
Then it dawned on me: PreSonus support! They had the answer, so hopefully this tip will not only inspire people to take a look at Pipeline XT, but help those who haven’t quite figured out how to use it in the PreSonus mixer ecosystem.
PREPPING THE STUDIO 192
Universal Control allows using Studio 192 (with a computer and enough I/O) as a digital mixer, but that’s not necessarily what we want with Studio One. To optimize the Studio 192 for Pipeline XT:
- Open Universal Control, and choose the Scenes screen (Fig. 1)

Figure 1: How to reset Studio 192 to its default settings.
- Click on Studio 192 Default.
- Click on Recall. Now the Studio 192 has its default settings.
- Go to Universal Control’s System window, and choose Mixer Bypass (Fig. 2). Now, all the I/O is under Studio One’s control.
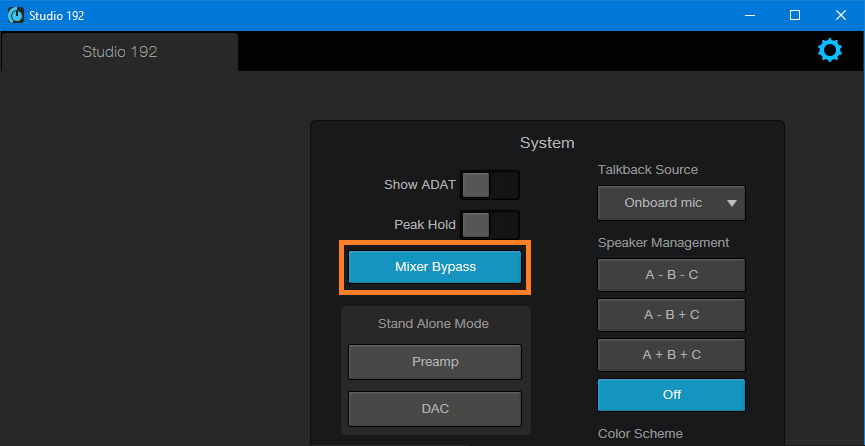
Figure 2: Universal Control’s mixer is now bypassed, so all the I/O is controlled from within Studio One instead of the mixer.
- When you open a project, remember to go into Song Setup and restore anything that’s not the default. For example, if the output usually goes to Headphones 1 for tracking instead of the Main out, make that assignment. Also consider saving this setup as the default.
PREPPING SONG SETUP FOR EXTERNAL HARDWARE
We’ll use the AdrenaLinn as the example. It’s a mono in/stereo out device, but you can choose a mono or stereo output to feed it (I chose stereo because AdrenaLinn isn’t the only hardware device I use with Pipeline XT).
- Assign outputs for the hardware. Go to Song Setup, Audio I/O Setup tab, choose Add Stereo, and then click on the desired outputs in the matrix (Fig. 3). I have patch cords connected semi-permanently to these output jacks so they’re available for any hardware I want to use.
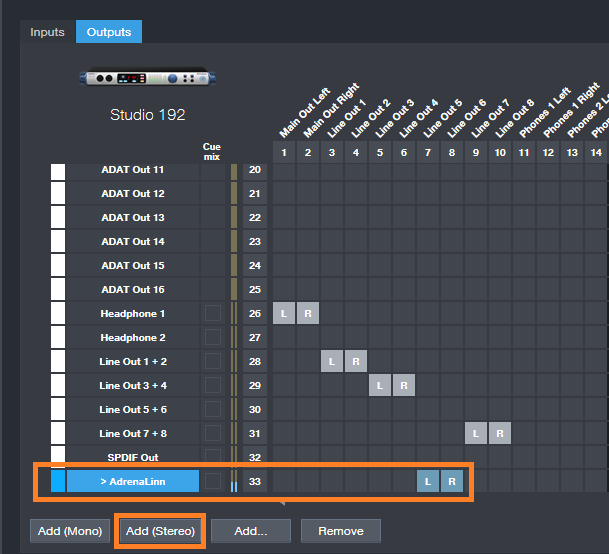
Figure 3: Interface outputs Line Out 5 and Line Out 6 are dedicated to external hardware devices.
- Now assign the inputs that will receive the outputs from the hardware (Fig. 4). I use inputs 1 and 2 because they’re on the front panel, so they’re easy to access—I don’t have to reach behind the rack.
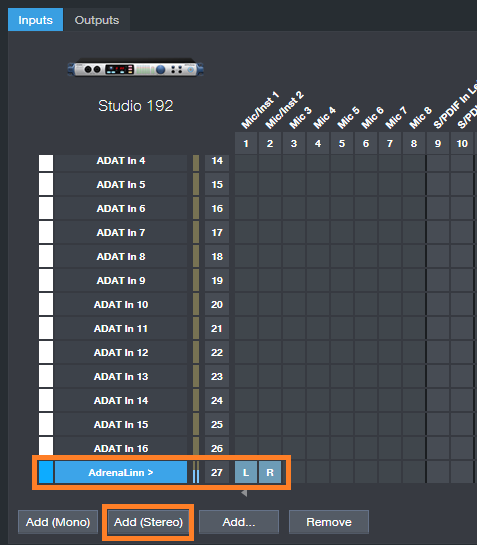
Figure 4: Studio 192 inputs for Mic/Inst 1 and 2 accept the outputs from the external hardware.
Note that you can name these inputs and outputs you just added. Save this Song Setup by clicking on Make Default if you plan to interface Studio One with this same setup hardware in the future. Otherwise, you’ll need to go through the assignment process again. If the setup is saved as a default, when you want to use a hardware effect, Studio One will know where to find it.
TIME FOR PIPELINE XT
This part’s pretty easy. Insert Pipeline Stereo as if it was a regular plug-in. Pipeline XT compensates automatically for the latency that accumulates from sending audio through the outputs, through an effect, then back into Studio One’s interface inputs. What’s more, it’s easy to assign the inputs and outputs in Pipeline XT, because you named them in Song Setup (Fig. 5). Pipeline XT will now divert the channel output to your hardware, and bring the hardware output back again into your channel.
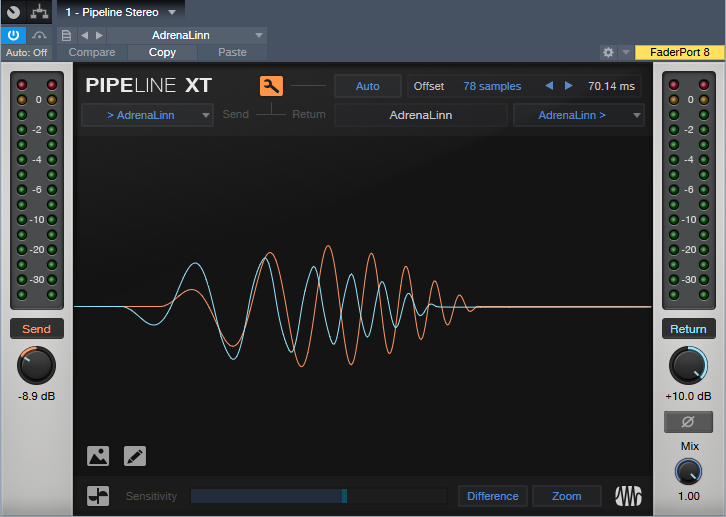
Figure 5: Pipeline XT is ready to go—its in and out have been assigned to the AdrenaLinn I/O, and the signal path has been compensated for latency.
In my experience, Pipeline XT compensates for latency without having to anything further. However, you can click on the wrench and have Pipeline XT compensate automatically, or do so manually. You can also tune out delays by ear. For example, load a drum loop, and copy it to the track with Pipeline XT. Listen to both tracks together, and adjust the Pipeline Offset parameter until the two tracks sound synched. (Note that if you try automatic compensation, it’s best to bypass the effect. With time-based effects, Pipeline XT won’t know which is the “real” signal for which it should compensate.)
Once Pipeline XT has been configured for a particular piece of hardware, you can store the setting as a preset for later recall—just like any effects preset. For me, 90% of the time I’m using external hardware for guitar effects. They operate similarly to AdrenaLinn, so I can just recall that preset.
There are a few other considerations unique to using external hardware.
- Most guitar effects are designed for low input levels. You’ll need to bring Pipeline’s Send control way down to avoid overloading the effect.
- Similarly, you may need to raise the Pipeline’s Return control to bring up the effect’s low-level output.
- You have to use real-time bounces when using external effects, because the audio is being processed in real time through the hardware.
- We’re spoiled by being able to use multiple instances of a single plug-in, but hardware doesn’t work that way—one piece of hardware works with one track. That said, you can insert multiple instances of the same effect in different channels using Pipeline XT, but I don’t recommend it because the channels sum together.
- You can take a picture of the external hardware’s front panel control settings, and include that image in a Pipeline plug-in preset. With AdrenaLinn that feature isn’t really relevant. But for boutique effects with knobs, this is a very useful feature.
Mastering the low end with BASSROOM

Tom Frampton
This blog post will tell you how to get the perfect amount of bass when mastering audio using BASSROOM.
This is where so many potentially awesome tracks fail. Too much bass and your track will sound bloated and lack clarity. Not enough bass and your track will sound weak.
I have a process that helps me set the perfect amount of bass for my clients every time. Since I implemented this technique I can honestly say that my mastering business has dramatically improved (more than doubled!)
I hope that this technique helps you too, whether it’s growing your studio business or simply nailing the master of a track that will further your career as an artist.
Let’s start with why nailing the low-end is so difficult:
- Monitors with great low-end response are super expensive.
- Acoustic treatment is expensive BUT essential for any monitors (expensive or not) to be effective.
- Even when we have great monitors and acoustic treatment how can we be sure of what the perfect low-end level is?
So we’re up against a few hurdles here, but the technique I’ll explain will improve the low- end of your masters, even in the most basic studio set-ups.
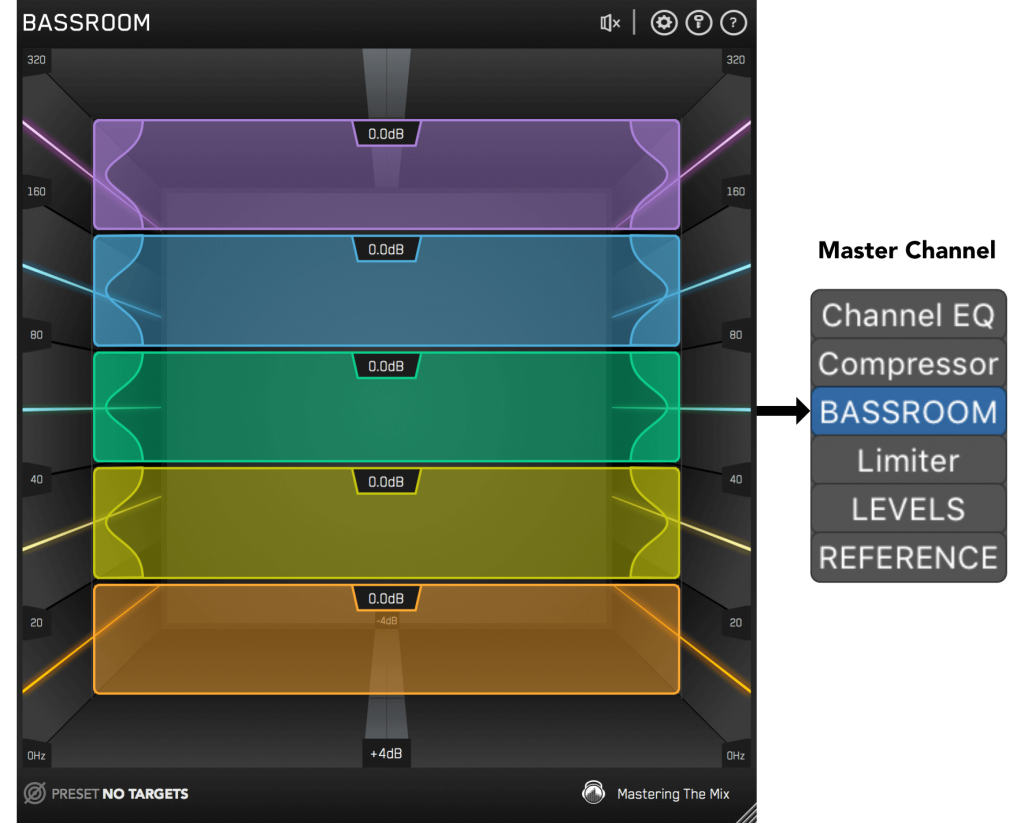
Step 1: Load Up Our Mixing and Mastering EQ BASSROOM on The Master Channel
BASSROOM uses complex algorithms that accurately identifies how the human ear perceives low-frequencies relative to the balance of the whole mix. For that reason it should be loaded on your master channel so it can analyse and be applied to your whole mix.
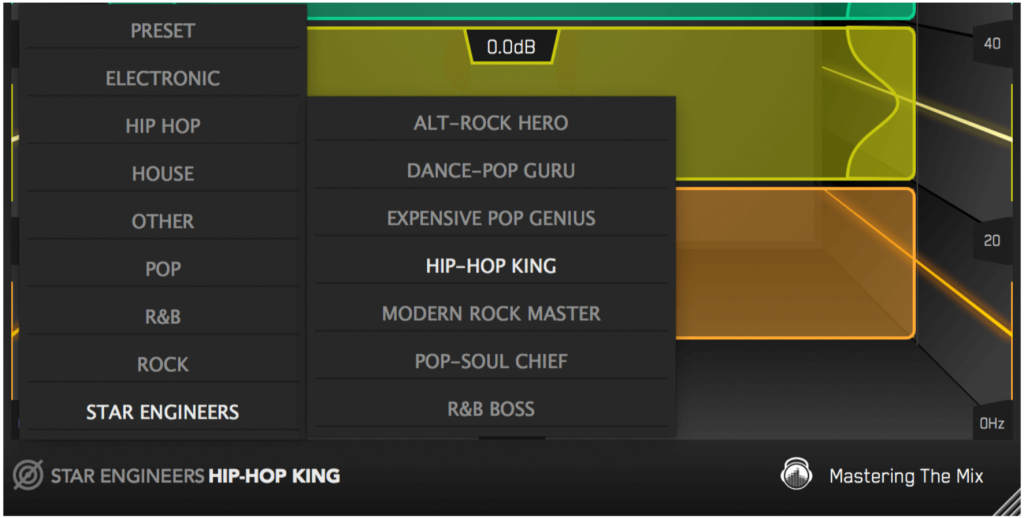
Step 2: Choose A Preset
To get the most value from BASSROOM, start by selecting a preset that best suits the material you’re working on.
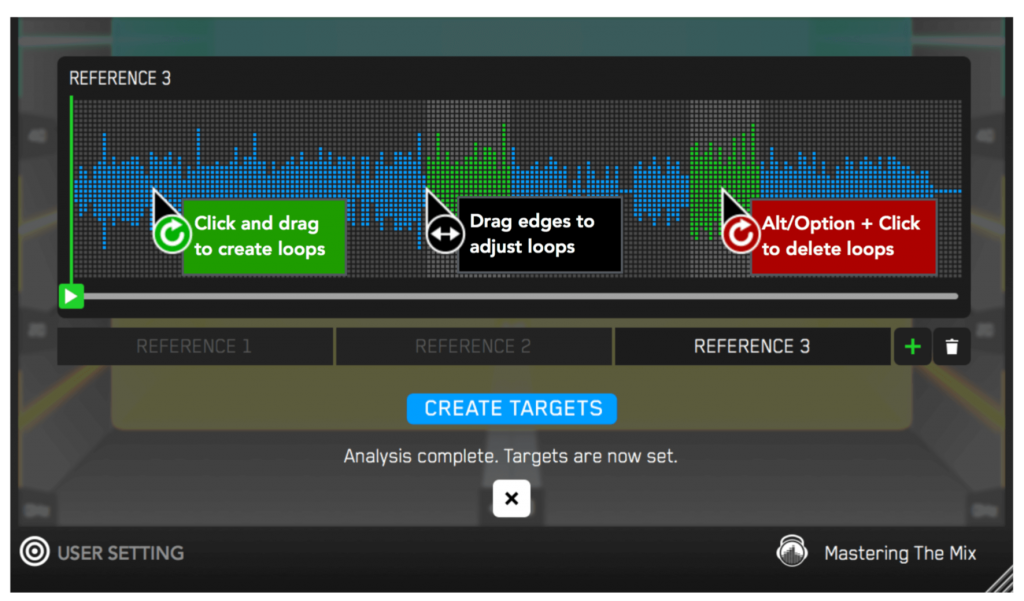
Step 3: Create A Target
Rather than choosing a preset, you can create your own target values by clicking the target icon in the bottom left corner and importing reference tracks. If you’re creating targets, we recommend clicking and dragging on the waveform to select the drop or chorus for the analysis, as this is usually the material with the best representation of the bass in the track. BASSROOM will create targets based on all the tracks loaded into the analysis window.
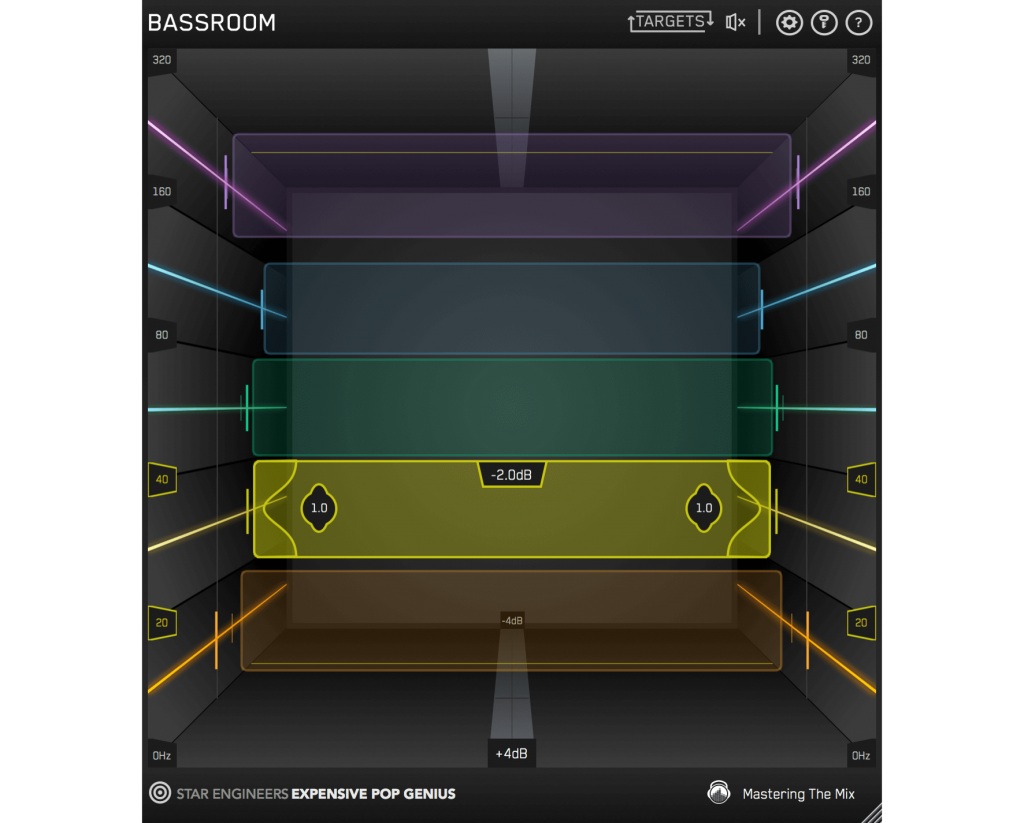
Step 4: Shape Your Low End
Now monitor a bass heavy section of your production (i.e. the drop or chorus), and you’ll see the targets move to the suggested EQ positions based on the tonal balance of your mix compared to the tonal balance of your preset. Use the targets to get a great starting point, then adjust by ear to tweak your low-end to perfection. The algorithm accounts for differences in loudness, so the targets will be accurate and relevant whether you’re mixing or mastering.
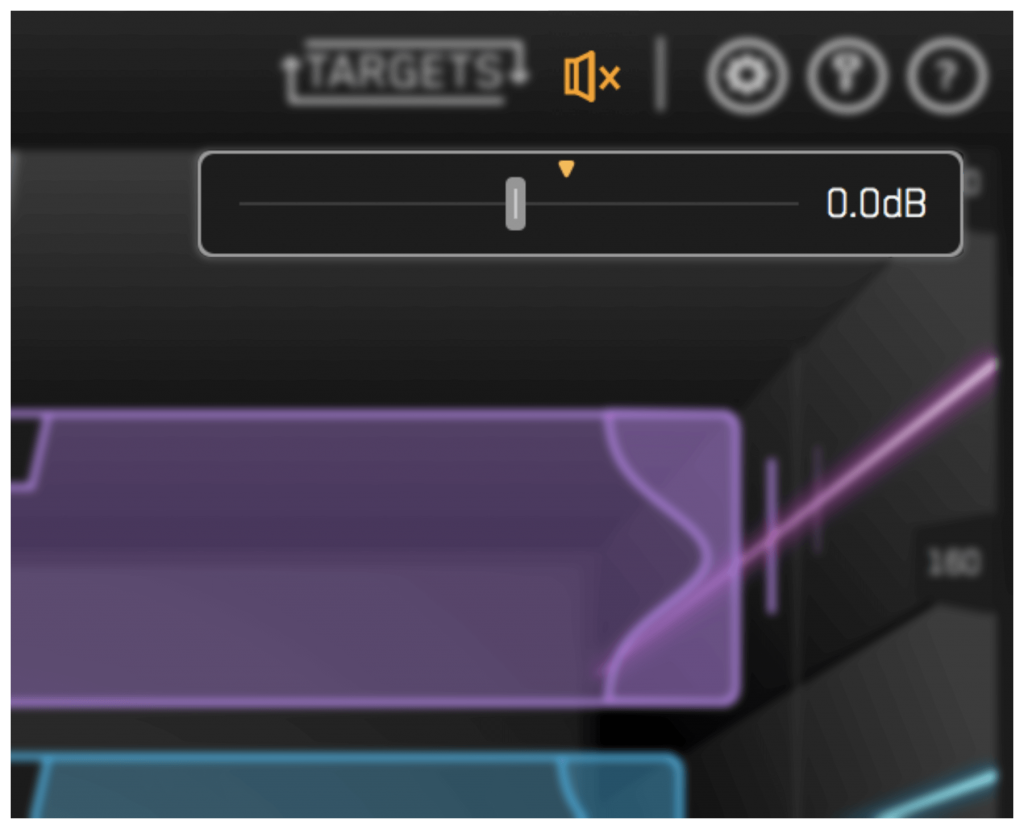
Step 5: The Level Match
The EQ adjustments may have changed the overall gain of your audio. If the gain has changed by more than 2dB the speaker icon will turn orange. Hover your mouse over the bypass icon to open the output gain and level match pointer. Match the gain slider to the level match pointer to match the perceived loudness of your audio before it passed through BASSROOM.
HEAR THE DIFFERENCE!!
Not only will your low-end fall into place, but the level matching will give you a well-balanced sound across the whole frequency spectrum. Toggle bypass on and off to hear the difference.
Click here to get BASSROOM!
Friday Tip: Tempo Changes for Already Mixed Songs – Reloaded
The June 22, 2018 tip covered how to make mastered songs better with tempo changes, but there was some pushback because it wasn’t easy to make these kinds of changes in Studio One. Fortunately, it seems like the developers were listening, because it’s now far easier to change tempo. I’ve been refining various tempo-changing techniques over the past year (and had a chance to gauge reactions to songs using tempo changes compared to those that didn’t), so it seemed like the time is right to re-visit this topic.
WHY TEMPO CHANGES?
In the days before click tracks, music had tempo changes. However, with good musicians, these weren’t random. After analyzing dozens of songs, many (actually, most) of them would speed up slightly during the end of a chorus or verse, or during a solo, and then drop back down again.
For example, many people feel James Brown had one of the tightest rhythm sections ever—which is true, but not because they were a metronome. There were premeditated, conscious tempo changes throughout the song (e.g., speeding up during the run up to the phrase “papa’s got a brand new bag,” in the song of the same name, then dropping back down again—only to speed up to the next climax). Furthermore, the entire song sped up linearly over the course of the song.
Note that you didn’t hear these kinds of changes as something obvious, you felt them. They added to the “tension and release” inherent in any music, which is a key element (along with dynamics) in eliciting an emotional response from listeners.
THE PROBLEM WITH TEMPO CHANGES
It was easy to have natural tempo changes when musicians played together in a room. These days, it’s difficult for solo artists to plan out in advance when changes are going to happen. Also, if you use effects with tempo sync, not all of them follow tempo changes elegantly (and some can’t follow tempo changes at all). Let’s face it—it’s a lot easier to record to a click track, and have a constant tempo. However…
THE STUDIO ONE SOLUTION
Fortunately, Studio One makes it easy to add tempo changes to a finished mix—so you can complete your song, and then add subtle tempo changes where appropriate. This also lets you compare a version without tempo changes, and one with tempo changes. You may not hear a difference, but you’ll feel it.
As mentioned in last year’s tip, for the highest possible fidelity choose Options > Advanced > Audio, and check “Use cache for timestretched audio files.” Next, open a new project, and bring in the mixed file. Important: you need to embed a tempo, otherwise it’s not possible to change the tempo. So, open the Inspector, and enter a tempo under File Tempo. It doesn’t have to match the original song tempo because we’re making relative, not absolute, changes. Also choose Tempo = Timestretch, and Timestretch = Sound – Elastique Pro Formant.
MANIPULATING THE TEMPO TRACK
Working with the tempo track is now as easy as working with automation: click and drag to create ramps, and bend straight lines into curves if desired. You can set high and low tempo limits within the tempo track; the minimum difference between high and low Tempo Track values is 20 BPM, however you can change the tempo track height to increase the resolution. The bottom lines it that it’s possible to create very detailed tempo changes, quickly and easily.
So what does it sound like? Here are two examples. The first is a hard-rock cover version of “Walking on the Moon” (originally recorded by The Police, and written by Sting).
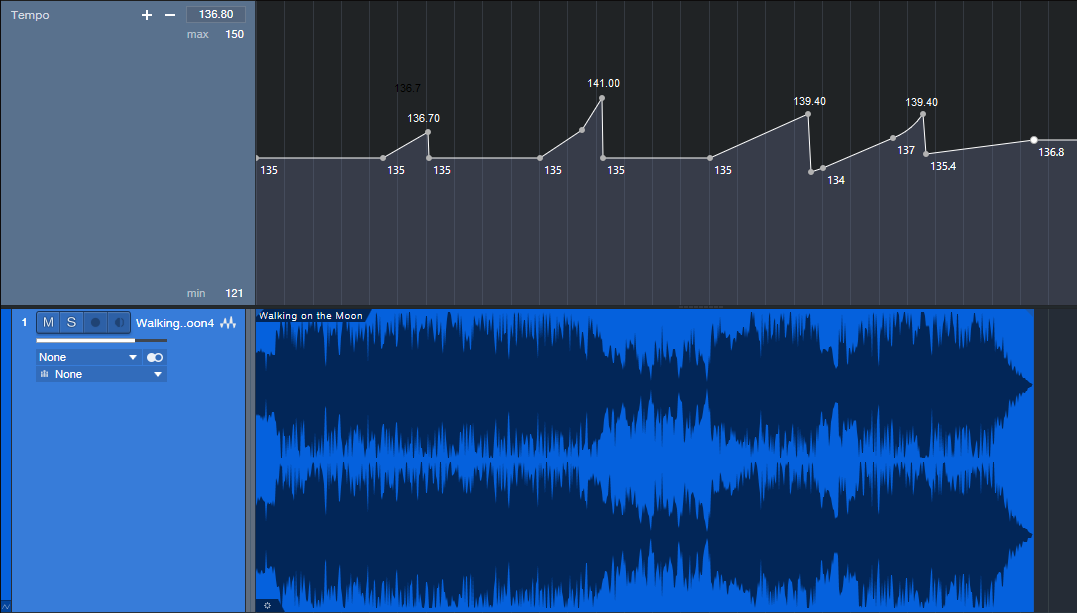
The differences are fairly significant, starting with a low of 135 BPM, going up to 141 BPM, and dropping down as low as 134 BPM.
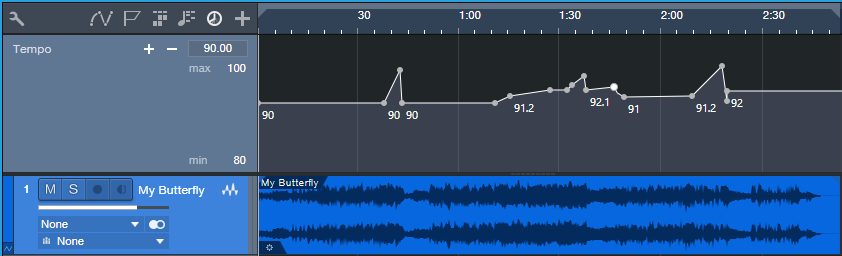
Here’s another example, a slower song called “My Butterfly.” It covers an even greater relative range, because it goes from a low of 90 to a high of 96 BPM. You may be able to hear the speedup in the solo, not just feel it, now that you know it’s there.
Note that when possible, there’s a constant tempo at the beginning and end. It doesn’t matter so much with songs, but with dance mixes, I can add tempo changes in the track as long as there’s a constant tempo on the intro and outro so DJs don’t go crazy when they’re trying to do beat-matching.
So is it worth making these kinds of changes? All I know is that the songs I do with tempo changes get a better response than songs without tempo changes. Maybe it’s coincidence…but I don’t think so.
Friday Tips – Why Mono Matters for Mixing
With the ideal mix, the balance among instruments is perfect, and you can hear every instrument (or instrument section) clearly and distinctly. However, getting there can take a while, with a lot of trial and error. Fortunately, there’s a simple trick you can use when setting up a mix to accelerate the process: Start your mix with all channel pan sliders set to center (Fig. 1).
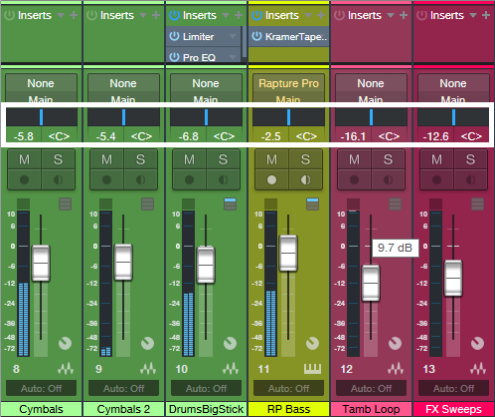
Figure 1: All the pan sliders (outlined in white) are set to center for a reason.
With stereo tracks, changing the track interleave to mono isn’t adequate, because it will throw off the channel’s level in the mix. Instead, temporarily add a Dual Pan set for the -6dB Linear Pan Law, and center both the Left and Right panpots (fig. 2). Now your stereo track will appear in the mix as mono.

Figure 2: Use the Dual Pan, set to the -6dB Linear pan law, to convert stereo channels temporarily to mono when setting up for a mix.
Analysis Time
Now listen carefully to your mix. Are all the instruments distinct? Monitoring in mono will reveal places where one instrument might mask or interfere with another, like kick and bass, or piano and guitar (depending on the note range).
The solution is to use EQ to carve out each instrument’s rightful place in the frequency spectrum. For example, if you want to prioritize the guitar part, you may need to reduce some of the piano’s midrange, and boost the regions above and below the guitar. For the guitar, boost a bit in the region where you cut the piano. With those tweaks in place, you’ll find it easier to differentiate between the two.
For kick/bass issues, the usual solution is to increase treble on one of them—with kick, this brings out the beater sound and with bass, string “zings” and pick noises. Another option is to add saturation to the bass, while leaving the kick drum alone. If the bass is playing relatively high notes, then perhaps a boost to the kick around 50-70 Hz will help separate the two.
Keep carving away, and adjusting the EQ until all the instruments are clear and distinct. Now when you start doing stereo placement, the sound will be open, with a huge soundstage and a level of clarity you might not obtain otherwise—or which might take a lot of tweaking to achieve.
We’re Not Done with Mono Just Yet…
Okay, now you have a great stereo mix. But it’s also important to make sure your mix collapses well to mono, because you have no control over the playback system. It might play from someone’s smartphone, and sounds mostly mono…or play back over speakers that are close to each other, so there’s not real good stereo separation. Radio is another possibility where the stereo might not be wonderful.
Some processors, especially ones that control stereo imaging with mid-side processing, may have phase or other issues when collapsed to mono. Short, stereo delays can also have problems collapsing to mono, and produce comb-filtering-type effects. So, hop on over to the main bus, and click the Channel Mode button to convert the output to mono (Fig. 3).
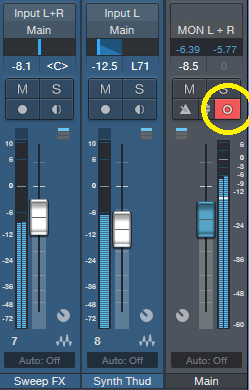
Figure 3: The Channel Mode button (circled in yellow) can switch the output between mono and stereo.
Hopefully, everything will sound correct—just collapsed to mono. But if not, start soloing channels and comparing what they sound like with the Channel Mode button in stereo and mono, until you chase down the culprit. Make the appropriate tweaks (which may be as simple as tweaking the delay time in one channel of a stereo delay processor), make sure the mix still sounds good in stereo, and you’re done.
Friday Tip – Make Impact XT Drums More Expressive
A sampled drum sound can get pretty boring. There’s even a name for triggering the same sound repeatedly—“the machine gun effect.” Sometimes you want this, but often, it’s preferable to have a sound that responds to velocity and is more expressive.
There are two ways to address this with Impact XT, depending on whether you have multiple samples recorded at different intensities (i.e., softer and harder hits), or only one sample, which then means you have to “fake” it sounds like it was recorded with different intensities.
Multiple Drum Samples
This is the most common way to create expressive drum parts. Drum sample libraries often include multiple versions of the same drum sound—like soft, medium, and hard hits. The technique we’ll describe here works for more than three samples, but limiting it to three is helpful for the sake of illustration.
Impact XT makes it super-simple to take advantage of sounds recorded at different intensities because you can load multiple samples on a single pad. However, note that if a pad already contains a sample and you drag a new sample to a pad, it will replace, not supplement, the existing sample. So, you need to use a different approach.
- Drag the first (soft) sample on to an empty pad.
- Click the + sign to the lower left of the pad sample’s waveform display, navigate to the medium sample, and load it (Fig. 1).
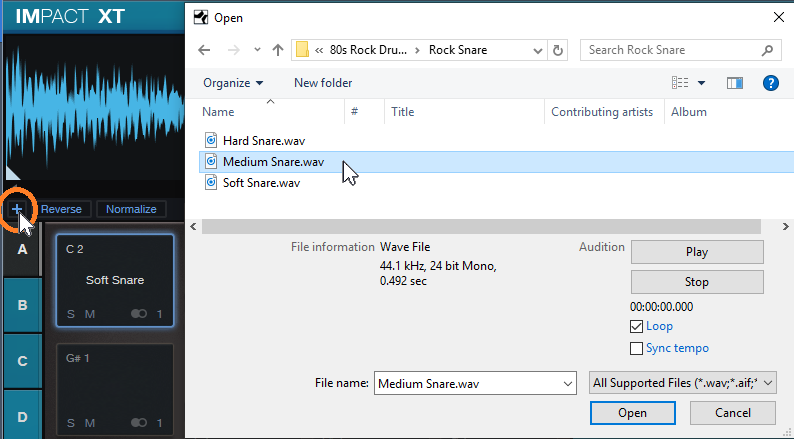
Figure 1: Click on the + sign to load another sample on to a pad.
- Click the + sign again, navigate to the hard sample, and load it.
- Above the pad’s waveform view, you’ll now see three numbers—one for each sample. Impact XT splits the velocity range into an equal number of smaller ranges based on the number of drums you’ve loaded, and automatically assigns the drums to the ranges. 1 is the first sample (soft) you dragged in, 2 is the second (medium) sample, and 3 is the last (hard) sample. Although Impact XT does automatic velocity assignment, you can drag the splitter bar between the numbered sections to vary the velocity ranges (Fig. 2).
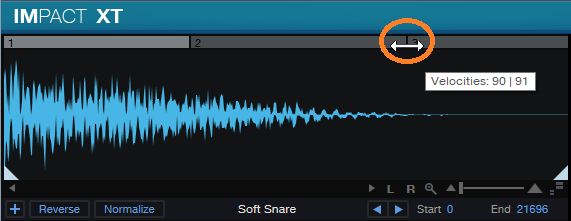
Figure 2: The splitter bar between samples can alter the velocity range to which a sample responds.
Now you’ll trigger different drum samples, depending on the velocity.
How to Fake Multiple Drum Samples
If you have a single drum sample with a hard hit, then you can use Impact XT’s sample start parameter to fake softer hits by changing the sample start time. (Starting sample playback later in the sample cuts off part of the attack, which sounds like a drum that’s hit softer.)
- Do all the steps above, but keep loading the single, hard hit. This loads multiple versions of the same sample on the same pad, split into different velocities.
- Click on the number 1 in the bar above the waveform to select the first sample.
- Drag the sample start time further into the sample to create the softest hit (Fig. 3).
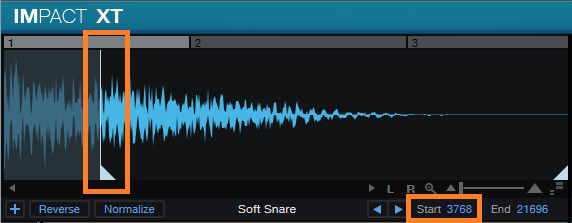
Figure 3: Click on the sample start line, and drag right to start sample playback past the initial attack. The readout toward the lower right shows the amount of offset, in samples.
- Click on the number 2 in the bar above the waveform to select the second sample.
- Move the sample start time halfway between the sample start and the altered sample start time in step 3.
Play the drum at different velocities. Tweak sample start times, and/or velocities, to obtain a smooth change from lower to higher velocities.
But Wait…There’s More!
Let’s add two more elements to emphasize the dynamics. These parameters affect all samples loaded on the pad, and are also effective with pads that have only a single sample.
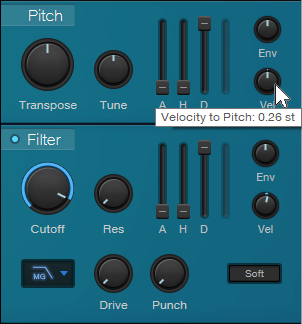
Figure 4: Assigning velocity to Pitch and Filter Cutoff can enhance dynamics even further.
At the Pitch module, turn up the Velocity to Pitch parameter by around 0.26 semitones (Fig. 4). This raises the pitch slightly when you hit the drum harder, which emulates acoustic drums (the initial strike raises the tension on the head, which increases pitch slightly, depending on how hard you hit the drum).
Similarly, back off on the Filter Cutoff slightly, and turn up the Filter’s Vel parameter a little bit (e.g., 10%). This will make the sound brighter with higher velocities.
Done! Now go forth, and give your music more expressive drum sounds.