Category Archives: Studio One
How to Create Compelling Mixes in Studio One—New from Craig Anderton
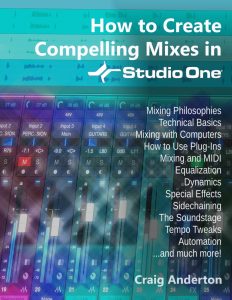
Available NOW at shop.presonus.com from Craig Anderton… How to Create Compelling Mixes in Studio One! This is Craig’s third book on Studio One, and it weighs in at a whopping 258 pages!
Click here to read more and shop!
Mixing is where you create an experience that transports the listener into your musical world. And now, renowned music technology expert Craig Anderton brings his years of production and mixing expertise to an easy-to-understand, comprehensive guide about all aspects of mixing. Chapters include Mixing Philosophies, Technical Basics, Mixing with Computers, How to Use Plug-Ins, Mixing and MIDI, Prepare for the Mix, Adjust Equalization, Dynamics Processing, Sidechaining, Add Other Effects, Create a Soundstage, Mix Automation, Final Timing Tweaks, and Review and Export.
Profusely illustrated, and loaded with constructive, practical, meaningful advice that will improve your mixes dramatically, this 258-page eBook sets the standard for discovering how to make compelling mixes in Studio One.
- 258 pages, 67,500 words, over 180 four-color illustrations
- Downloadable PDF, with links from the contents to book topics
- “Key Takeaways” section for each chapter summarizes chapter highlights
- “Tech Talk” sidebars do deep dives into selected topics
- Covers all aspects of mixing with Studio One
Chapter 1: Mixing Philosophies
Chapter 2: Technical Basics
Chapter 3: Mixing with Computers
Chapter 4: How to Use Plug-Ins
Chapter 5: Mixing and MIDI
Chapter 6: Prepare for the Mix
Chapter 7: Adjust Equalization
Chapter 8: Dynamics Processing
Chapter 9: Sidechaining
Chapter 10: Add Other Effects
Chapter 11: Create a Soundstage
Chapter 12: Mix Automation
Chapter 13: Final Timing Tweaks
Chapter 14: Review and Export
Appendix A: Mixing with Noise
Appendix B: Calibrating Levels
Friday Tip: Percussion Part Generator
Just as we can use plug-ins to process audio, Studio One’s Note FX are plug-ins for MIDI data. They tend to be overshadowed by our shiny audio plug-ins, but have a lot of uses…like generating cool percussion parts.
This may sound like a stretch (“c’mon, can it really generate a musical percussion part?”), but the audio example will convince you. The first four measures are a percussion part created by the Arpeggiator NoteFX, the second four measures combine the percussion part with a house drum loop, and the final four measures are the house drum loop by itself—so you can hear how boring the loop sounds without the added percussion part.
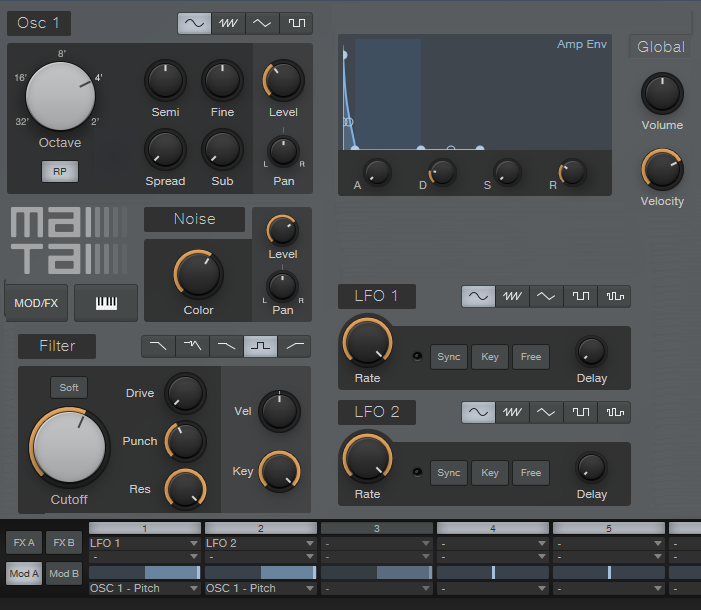
This part was created with three conga and two bongo samples, each assigned to its own MIDI note. The initial “part” was just those five notes, each with a duration of four measures. It doesn’t really matter how long the notes are, you just want them to be continuous for the duration of the drum part. I then added the Note FX Arpeggiator plug-in to arpeggiate the notes (Fig. 1).

Figure 1: The Note FX Arpeggiator, set up to play different drums at different velocities.
By themselves, the standard up/down and down/up patterns tend to sound overly repetitive. The Random option (outlined in red above) helps, but then you have a random percussion part, which doesn’t relate to the music. So let’s introduce the secret sauce: automation (Fig. 2).
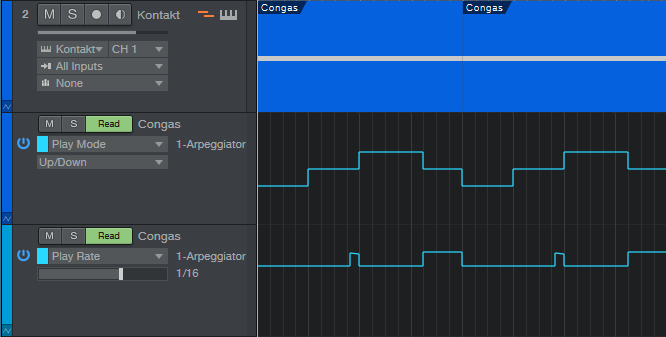
Figure 2: The automation lanes control Note FX parameters.
The key here is automating the Play Mode and Rate. The Play Mode automation starts with up/down for a measure, then down/up, then random for a bit more than a measure, and then down/up again. This adds variety to the part, and when it repeats, the random section creates additional variations so that all the parts don’t sound the same.
But what really adds the human element is varying the Rate. It starts off as 1/16th, but then just before the third measure starts, does one beat that starts with 1/32nd notes and ramps down over the beat to 16th-note triplets. The last three beats of the four measures uses a 32nd-note Rate so that the “robot percussion” adds some tasty, faster fills to lead into the next measure. I used down/up during these faster parts, but random can sound good too.
The final touch is Swing, which is set to around 70% in the audio example. Note how even though the drum loop is metronomically correct, adding swing to the percussion part lets it “dance” on top of the drums.
Now, here’s a very important consideration: You may look at the above and think “this sounds too easy,” or maybe “but what are the exact settings I should use?” The answers are yes, it really is that easy; and the exact settings really don’t matter all that much—feel free to experiment. Studio One’s little robot percussionist is full of surprises, and the way to uncover those is to play around with the settings, and automate them to create variations.
Finally, I’d like to mention that I have a new eBook out! At 258 pages, “How to Create Compelling Mixes in Studio One” is considerably longer than my two previous Studio One books. I’ve been working on it for the past year, and it’s finally available in the eBook section of the PreSonus shop. Check it out—I sincerely hope it helps you make better mixes.
PreSonus FAM Friday with Gregor Beyerle
But who is Gregor? Good question…
How long have you worked for PreSonus?
I have worked for PreSonus since February 2019.
My official title is PreSonus Software Specialist. I produce videos for my series “Studio One with Gregor” on a regular basis. I’m also collecting user feedback for Studio One, and present at our software at workshops and other events.
My favorite thing about working for PreSonus is that I get to work every day on the exact same things I’d spend my free time on, with some of the most incredibly talented people I’ve ever met. It sounds corny, but it’s seriously the best feeling in the world to love what you do!
My first ever cassette was “Sleeping in my Car” from Roxette. That song still rips!
Who’s your go-to band or artist when you can’t decide on something to listen to?
When driving or clubbing, Malaa is always a safe bet. I’m also a massive fan of the German Synthpop band Seabound.
Everyone has a side gig, what’s yours? OR when you’re not at PreSonus, what are you up to?
Besides working for PreSonus, I’m producing, mixing and mastering for several Artists, primarily from the Electro-Industrial / Wave / Gothic scene. Check out Coma Alliance, We Are Temporary or V2A if you want to hear some of my work!
 Got any tips for working with Studio One?
I took my first steps in semi-professional music production with Cubase more than 10 years ago. I knew my way around fairly well, though I always felt that there were just too many steps involved in getting the result that I wanted. When I decided to make producing, mixing, and mastering a full-time career, this annoyance became a serious issue—because I just couldn’t earn a living if each project took so long to finish.
That’s the main reason why I switched over to Studio One. Within just a couple days, I was able to work so much faster than before.
“Studio One with Gregor” will be a regular series, so expect more and more episodes to be released going forward. I’m also working on several other projects that will help people get to know the power of Studio One better, every day. Besides that, I love consolidating user feedback and constantly gather ideas for future Studio One versions. If you have feature requests that you’d like to see implemented in future versions, please keep them coming over at PreSonus Answers.
Follow Gregor on Instagram!
Friday Tip: EZ Multiband Processing
The February 1, 2019 tip covered a multiband processing “development system.” Instead of using the Splitter’s frequency split option, it added sends and buses to make everything accessible in the Mix view. The Multiband Dynamics processor created the bands, which made it easy to add compression or expansion to some of the bands. After creating the desired sound with this development system, I’d port it over to an FX Chain, use the Splitter, and bring out the controls to a macro.
Reader Sagi Sinai came up with a brilliant application for mixing that showed the value of the “development system” approach. But I realized that the Friday Tip has never covered a basic multiband processing application with the Splitter, which can split at up to four different frequencies to create five different bands. So, let’s correct that oversight.
Multiband processing is particularly effective with guitar distortion when you want a more defined, articulated sound, with the potential for a wide stereo image. Of course, that’s not always the desired result—sometimes a spawling, dirty sound is what you want. But a track processed with the multiband distortion can sound more focused, and often, fit better into a mix. The audio example plays through single-band distortion, then through multiband distortion. Both use the same post-distortion effects (Pro EQ, Binaural Pan, Open Air) with the same settings. Note the difference in the stereo imaging and articulation.
Let’s look at the Splitter-based FX Chain setup (Fig. 1).
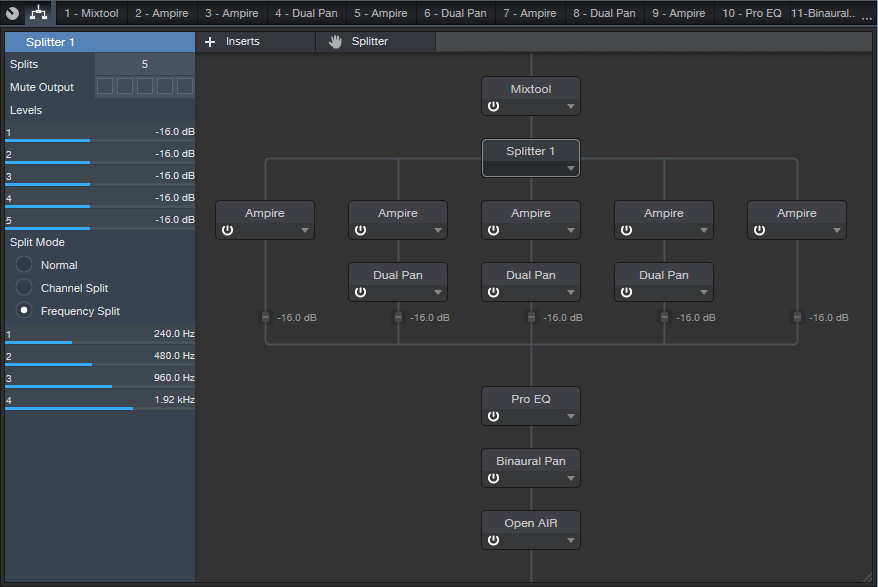
Figure 1 The Splitter is set up to do multiband processing.
The Splitter is using its Frequency Split superpowers to create five bands; each band feeds an Ampire (using the Crunch Boutique amp, no stomps, and the 1 x 12 American cabinet). The Mixtool at the beginning gives about 10 dB of gain—because we’re filtering out so much sound in each band going into each Ampire, the extra gain helps hit the amp a little harder. The Pro EQ at the end (Fig. 2) produces one of my favorite amp sim curves: Rolling off the lows tightens up the sound (like going through an open-back cabinet), while shaving off the extreme highs produces a sweeter sound. The upper midrange lift adds some definition.

Figure 2: Mixtool and Pro EQ settings.
One of the Splitter’s cool features is that you can mute splits. This makes it easy to focus on, and optimize, one split at a time. For the audio example, I used the same Ampire sound for each split so you could hear the “raw” contrast between the single-band and multiband versions. You can always take this further, and optimize each band for its specific frequency range. The Dual Pans on the mids help create the stereo image; the highs and lows are centered to “anchor” the part.
Of course, it’s possible to apply multiband processing to any effect. For example, with delay you might not want to delay all frequencies—delaying low frequencies can add “mud” that doesn’t happen when you delay only the upper mids and treble. Also, long delays on the higher frequency bands and shorter, slapback-type delays on low-frequency bands may create a delay effect that fits better in a track. And splitting an instrument into multiple bands, then chorusing each one separately, can give gorgeous, lush chorusing effects.
So give multiband processing a try—the Splitter makes it easy, and there’s a ton of potential.
Studio One Prime videos
Check it out! Gregor’s got a new series of videos for new users of Studio One Prime. He covers everything from installation and setup to basic beatmaking, and even time-stretching and working with Ableton Live.
More to come from Gregor soon!
Want to make some music? Get started with Studio One Prime here.
Singer, Beat-Maker, Producer EMMAVIE Talks Studio One!
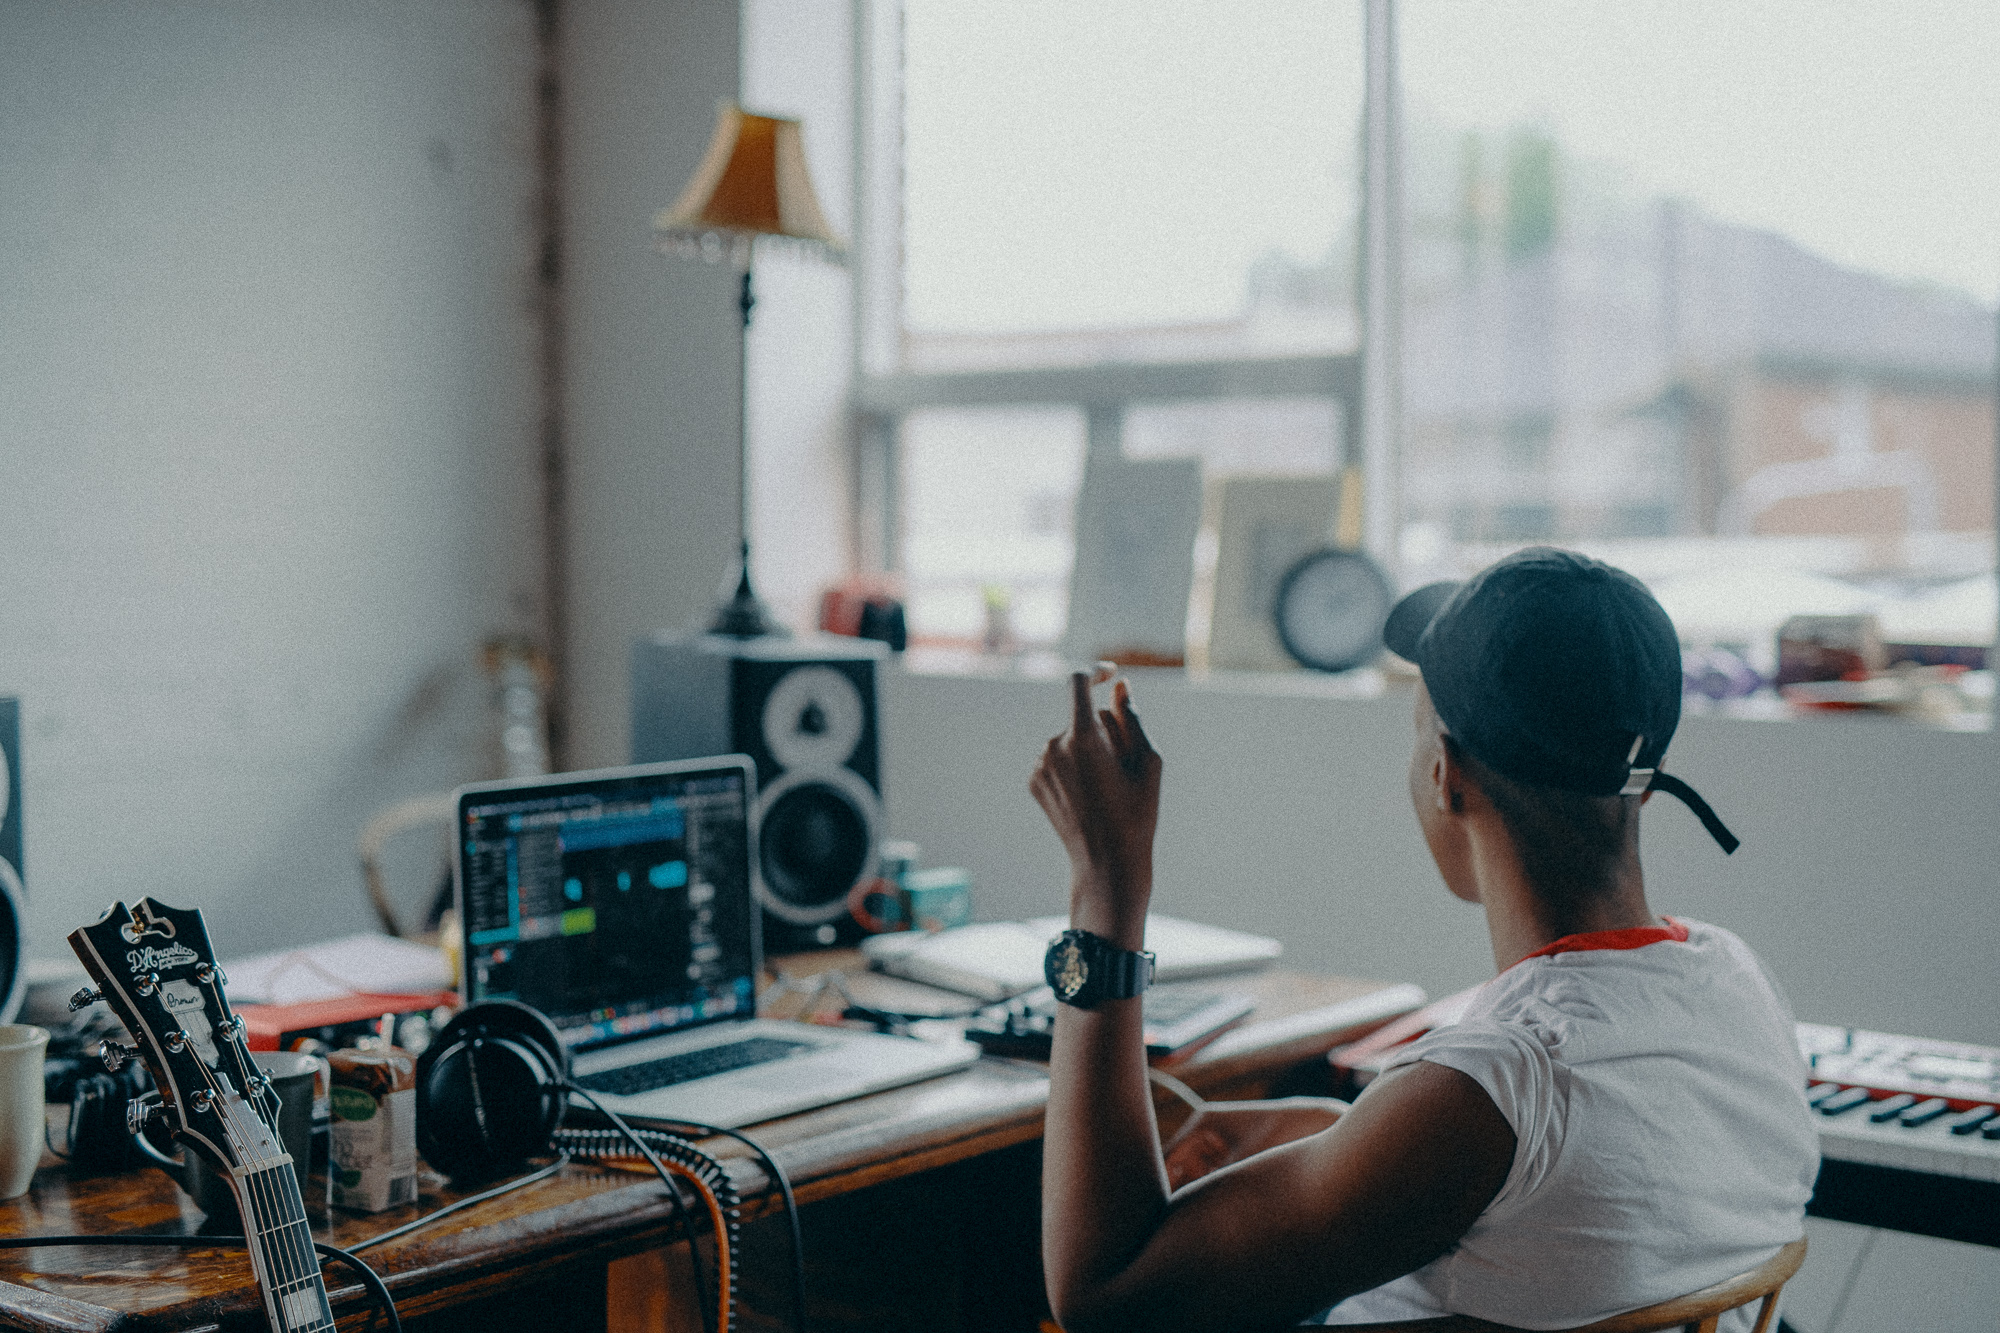
Emmavie can be summed up in one word… COOL!
She’s also talented, brave, stylish, expressive, funny, creative, gifted, innovative, hip, original… OK, we’ll stop now. She’s a singer, songwriter, producer, and DJ from London. Specializing in what she describes as “limitless, soulful, future R&B,” her music is an amalgamation of 90s RnB influences and her love for digital audio experimentation. Emmavie has credits with a number of artists both in the UK and internationally, including collaborations with IAMNOBODI, Budgie, ROMderful, Jarreau Vandal, Dornik, Alfa Mist, Barney Artist and Jay Prince.
We connected with her on Instagram after we noticed her love for Studio One, and she quickly became an office favorite. Read more about Emmavie, her music and career and love for Studio One here.
Give us some background on yourself. How long have you been making music?
I’ve been making beats since I was 11 years old, but I started playing around with sounds a little younger. I remember, I started teaching myself how to play basic melodies and chords on a Casio keyboard my dad bought me from Argos in primary school. I used this to play with the built-in drum sounds too, and when I moved to secondary school, I needed a way of recording this. I started teaching myself how to make beats after school. There were no YouTube tutorials back then, so it was a calamitous process. I think that would explain why my sound is so experimental now.
 How has the music industry changed since your early days?
When I first decided I was confident enough to share my music, MySpace was the number one social media platform for independent artists to be seen… and even then, the only way to professionally release and sell your music was to be distributed through a record label. These days, you can top the charts with a song you’ve made in your bedroom/home studio! The days of needing a label to gain traction are dwindling. In fact, the perception of releasing independently without industry backing but gaining a lot of traction and virality is possibly an even more attractive narrative, nowadays. When I started making music, being signed and moving to a million-dollar studio was at the top of my list of goals. Now, I can make music anywhere. I make beats on the plane and outside in the park. My new focus is the groundwork: studying, practicing, becoming the best at what you do and building your own core following. Without these, a label will rarely sniff in your direction.
Describe the first time you wrote a song? Produced it?
I wrote my first song at eight years old with my younger brother using a karaoke machine. I can’t remember how that went but we used to practice and perform it for our parents, haha! I was a quiet kid, and I discovered writing lyrics was a good guise to get my thoughts out. My dad played so much old-skool R&B and Neo soul where everyone sang about being in love, and I guess a part of me wanted to feel like that too so I started writing about love but at 11, what did I know about it? The earliest song I can remember producing was called “Are you okay?” and it was a song asking my imaginary love interest to tell me what’s up when things aren’t smooth between us. Clearly, I was listening to music beyond my years. It was an intense eight-bar R&B loop with The Neptunes-style drums and ridiculously loud synths. I recorded the vocals on a £10 Logitech microphone from Argos!
Who has been an influence in your life?
The most influence I’ve had in my life has been from my friendships and adverse life experiences. I’ve had the same best friends for 18 years and it shocks me how much we’ve grown with each other. We both spend so much time working out all the issues of the world and working through all of thoughts together, we’re each other’s therapists. After all this intense self-analysis and critical thought, you end up in a place of understanding. And when you know something you can confidently talk, write and convert it into art; and that’s what’s kept me writing hundreds of songs over the years.
Musically, it’s been artists like Missy Elliott, Pharrell, Timbaland, Jon B, and Musiq Soulchild. I became obsessed with electronic music listening to Dorian Concept, Hudson Mohawk and Monte Booker on Soundcloud and because I couldn’t play an instrument, I learned how to manipulate samples like they do in order to get the desired effect.
Have you ever wanted to give up on music? What keeps you going? 
I’ve wanted to give up on music many times! At times, it’s difficult to stay motivated when you’re working away, making and sharing music and your bills are piling up. It’s difficult not to compare yourself to others because you need examples of success in order to set goals for yourself, but the comparison is the thief of joy. In my career, I’ve had a lot of people make me huge promises and then let me down but later on, I learned that the direction and trajectory of my life and career is no one else’s responsibility but mine. Confidence and self-belief is what keeps me going. When you have confidence, it allows you to act and send out messages of intent to others which causes them to believe and invest in you. The confidence comes from practicing and knowing that now I can make a song without difficulty.
What do you like about PreSonus? What caught your eye?
It just works for my brain. I need to be able to work fast when inspiration hits. I have used every DAW, and so many things about the layout of other programs just didn’t lend itself well to my brain. All of the functions are so easily accessible and placed where it just makes sense. It feels like I can do everything I need to ever do by just right clicking.
When did you first hear about Studio One?
Approximately three years ago, I was introduced to Studio one by a studio engineer who was mixing and mastering a single of mine. I watched him using it and he was adamant I should try it and then a few months after that, whilst I was running a music production demonstration, two producers approached me at the end and told me that they thought I would love it. This piqued my interest.
Any tips or tricks or interesting stories based on your experience with Studio One?
One of my tricks is I automate the tempo to do a slight increase or decrease when my beat is about to do a flip. It’s so subtle and might only change by as little as 3bpm but it makes such a difference to the feel. I might make the climb/descent happen in a space of three seconds, so it’s quick… but it’s felt.
An obvious piece of advice but somebody needs to hear this because so many of us experience the devastation of losing all of our music at least once in our careers. DOUBLE BACK UP ALL OF YOUR PROJECT FILES! Make sure not just your .MP3s and .WAVs exist in three places but your entire project file. On your computer, on an external hard drive and online e.g DropBox, Google Drive.
 How easy/difficult was Studio One to learn?
In my experience, Studio One is the easiest DAW to learn. It’s been the easiest to teach on, too.
Where do you go for support?
YouTube tutorials, mostly. And luckily, I have access to producers who’s work I admire that also use Studio One so I go to them for tips.
Where do you go for inspiration?
I go outside. Eventually, the intense pull to create will draw me back inside. I listen to and study old music – Cuban Jazz and 90s R&B are my go-tos right now.
Recent projects? What’s next for you?
I just recently released my debut album, Honeymoon. 13 songs all written, produced and recorded by me in my home studio. It’s had national and international radio play, including being played on the countries top radio station, BBC Radio 1. Next, I will be working with Native Instruments and Nike to present “School of Bop,” a workshop for young artists to learn more about music production and writing and during these demonstrations, I always use Studio One.
FOLLOW, LISTEN!
Join the Studio One family at a very special promo price today!
10 Presence XT Techniques
September is winding down, but we still have one week left to celebrate Studio One’s 10th anniversary—so it’s time for another Friday Tip with 10 Tips! Let’s take a look at some practical, convenient techniques you can do with Presence XT. And yes, there’s a fun downloadable preset at the end.
- “Tighten” and “Loosen” Drum Kits

The Artist Instruments folder has a bunch of drum kits. However, I like to fine-tune drum pitches—higher pitches for a tighter, more beatbox/analog drum sound, or lower for a big rock vibe. Although the Sample Shift control can change pitch, it also changes where the drum appears on the keyboard. For example, if you Sample Shift a snare on the F key by +3, then the drum is lower in pitch, but it now plays back on D instead of F.
There’s a simpler way to tune your drums. Set Env 2 to Full Sustain, and modulate Pitch with it. Turn the modulation amount up to tighten the sound, or down to loosen.
- Control Presence Effects with the Mod Wheel

According to Presence, you can’t control effects parameters with the mod wheel—but there are a lot of useful techniques you can do with a mod wheel, other than control vibrato. Here’s one way to control the effects with your keyboard controller’s mod wheel.
- Choose Studio One > Options, and click on External Devices.
- Click on Add, and choose New Control Surface. Set Receive from your keyboard. You’ll get a scary message warning you “This port is already in use,” but just ignore it and click OK.
- Click OK on the Add Device menu, and now Studio One thinks your keyboard is a control surface.
- In the Mix view, click on the External button toward the left. When the External Devices column appears, double-click on New Control Surface.
- Click on MIDI Learn, and move your mod wheel. Name it to make it feel welcome, and then disable MIDI Learn.
Now you can link anything you want with the mod wheel, including effects. For example…
- Control Distortion Drive with the Mod Wheel
Adding distortion to bass is a beautiful thing, and it’s even more beautiful when you can control the distortion amount with the mod wheel.
- Click on the Edit Mapping button in Presence’s upper right (the somewhat inscrutable gear symbol). Now you can see the control mapping in Presence—which is really important if your monitor isn’t wide enough to show the Edit Mapping option in the toolbar.
- Contrary to the help, which assumes you’re rational and using a separate hardware control surface, move the Mod wheel and it should show up in the right side of the Edit Mapping section.
- Move the Distortion Drive control, which will show up on the left side of the Edit Mapping section.
- Click the “assign” triangle in the middle of the Edit Mapping section, and now the Mod Wheel will control the Drive control. (Another tip: distortion gourmets recommend “Bad Tube” as the best choice for bass distortion.)
- More Expressiveness
The Sample Start Mod control can add major expressiveness because it lets you control the attack’s character via velocity. Here’s how it works: when Sample Start Mod turned counter-clockwise off-center, with low velocities playback starts further into the sample, past the initial attack. But higher velocities trigger the full attack sound. For example, with an instrument like Slap Bass, this technique can emphasize the slap component with high velocities, while lower velocities bypass the slap. However, Sample Start Mod can affect any instrument with a defined attack.
Because a sample may not start at a zero-crossing, you may hear a click with some velocity values. Adding a little bit of Amp Env attack (usually only a millisecond or two) fixes this.
- Change the Female Choir into Monks
Call up the Vox > Choir > Choir Full preset. Set Transpose to -12, and Sample Shift to Semi-Tone: 12. You might also want to slather on some more reverb by turning up the Size and Mix, but regardless, you’re ready for your next moody movie soundtrack, or Gregorian chants dance remix.
- Get Saxy
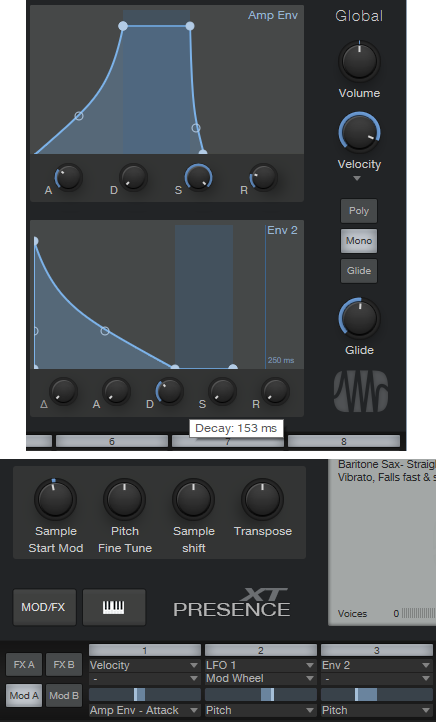
Let’s face it, John Coltrane fans—a sampler will never replace a sax player. However, the Winds > Baritone Sax > Baritone Sax Full preset is pretty good, so it seemed like a useful starting point for something a little more expressive. There are several treaks, but the main action is with the modulation.
- Set Sample Start Mod to -7000. If you play softly, this starts playback further into the sample, so you don’t hear the attack. However, as mentioned previously, modulating sample start can produce clicks because playback may not start on a zero crossing, so…
- Set the Amp Env Attack to 83 ms. This gets rid of any clicks. However, we want a fast attack with high velocities, so…
- In the Mod section, use Velocity to apply negative modulation to the Amp Env attack (you don’t need much) so that hitting the keys harder gives a faster attack.
- We also want to have notes bend up to pitch somewhat, so set the Decay for Env 2 to 153 ms. Again in the Mod section, use it to apply negative modulation to pitch. This causes the pitch to start off somewhat flat, then slide up to the correct pitch.
The penultimate touch is some vibrato by modulating Pitch. I used LFO set to about 4.5 Hz, with 680 ms of Delay time, controlled by the Mod Wheel (although I think Aftertouch is an even better choice, if your controller supports it). And of course, we want some reverb. The existing reverb is okay, but push the Size to 2.45 seconds, and Mix to 45%. Yeah, that’s the ticket! You might also want to choose Mono, unless you know any saxes that play chords. And yes, I’ve provided a downloadable preset for your playing pleasure—scroll down to the end.
- Foolproof Bass Slides

Set the bend to +7 for bend up, and 0 for bend down. Now when you want to slide down to a note, start at the top of the mod wheel, and then bring it down at whatever rate you want. It’s impossible to “overshoot” the target note, even when using the virtual mod wheel on the instrument GUI, with bend down set to 0.
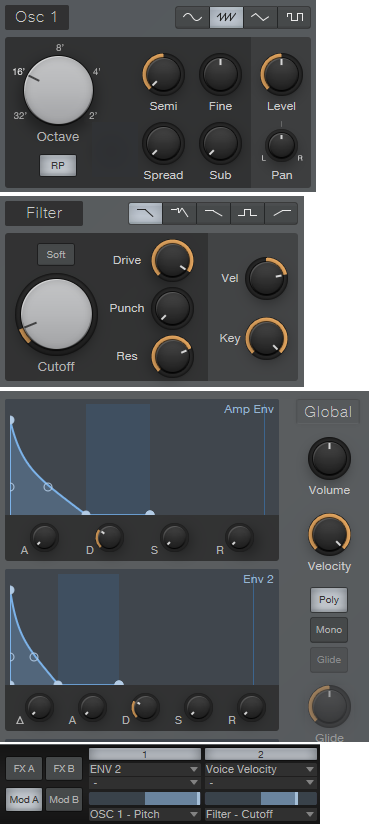
- Add Analog Synth “Drift”
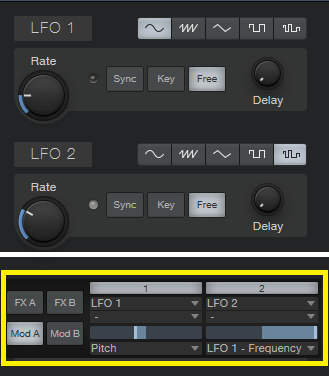
The pitch of analog synths drifts over time. Although Presence XT has a random LFO waveform, it’s stepped, and there’s no way you can “round off” the corners to create smooth variations. But there’s a solution (isn’t there always…). Use the sine waveform for LFO 1 and set it to a low rate, like 0.1 Hz. Select the random waveform for LFO 2, set to a slightly faster rate (like 0.4 Hz), and use it to modulate LFO 1. Meanwhile, use LFO 1 to modulate pitch; you don’t need to use much modulation to obtain a useful effect. Try this with Artist Instruments > Synths > Analog Fifths—you’ll be impressed.
- The Presence XT Editor Is Worth It

There might be a tendency to overlook the editor because Presence XT does enough on its own. And yes, I know the editor is $79.99. But, it’s cheaper than getting another sampler, and the capabilities are impressive. It’s easy to figure out, and it doesn’t take long to add samples—for example, you can specify the root note, high note, and low note by hitting keys. When using per-note samples, you can do fine-tuning, as well as add expressive features like sample start. Presence XT Editor is also a development system, so if you come up with some amazing presets, you can put them into a saleable bundle, and even password-protect it. If you’re into sound design and creating sample-based instruments, I highly recommend unlocking Presence XT’s Editor page.
- But Wait—There’s More!
Presence XT can load sounds from other formats—EXS, Giga, Kontakt version 4 (and below), and Sound Fonts. Finally, check out Tip 1 in the September 13 Friday Tip on using ATOM as an auxiliary keyboard. This makes it easy to access the keyswitching in Presence XT presets that contain this feature, even if you have only a four-octave keyboard.
I hope y’all enjoyed this month’s special editions of the Friday Tip. Happy birthday, Studio One!
Download the saxy sax preset, CA Baritone Sax Full
Coming soon… Mix the Music!
 What’s Mix The Music?
Mix The Music is a new online store specializing in multitrack audio files that allows producers, mix engineers, musicians, and… well, anyone to legally download, listen to, and re-mix songs using the original multitracks as recorded by major artists and film/game composers.
![]()
Who are multitracks for?
You! Music fans, amateur and professional audio engineers, DJs, teachers, and students can all benefit from multitrack audio. Once downloaded, you have independent access to the original individual recorded instrument and vocal tracks like isolated bass, drums, guitar, keys, and more. This lets you:
- Hear how classic recordings were created
- Hear every nuance of your favorite performer’s instrumental techniques
- Play along with legendary artists with exactly the mix that works for you
- Even record your own parts alongside the heaviest hitters in the music world
What styles of music are available?
We’ve got something for everybody—contemporary and classic hits, film scores, video game scores, and more. Even better, our content will continue to rapidly grow with more and more songs from top artists across all genres.
What labels/entities are participating in Mix The Music?
Major label tracks from Universal Music Group, Sony, Paramount, EA, and more are now available in a new .multitrack format containing the original stems. There are many more tracks on the way from dozens of labels and artists, the store is expected to grow rapidly.
How do I open up these multitracks and begin exploring?
Our files use the new .multitrack audio format developed by PreSonus Software Ltd., and as such are available to be opened and processed exclusively in PreSonus Studio One 4—Prime, Artist, and Professional editions. Mix The Music makes it easy and secure to access this never-before-available content—and now any Studio One user can listen to, explore, mix, and remix multitracks from major label artists!
Can I release my own re-mixes of songs from Mix The Music and sell them?
No. The music licenses in question do not allow for this. This is all about your personal learning and enjoyment.
Sounds great! When can I get involved?
Mix The Music will be launching in October, follow the link to learn more: http://www.mixthemusic.com/welcome
PULL N WAY and the 24 hour Studio One Challenge!
Take a second and consider all the things you accomplish in 24 hours…
We’ll wait.
Now. Think about re-writing, producing, mixing, and mastering a song in that amount of time and putting it out for the public. Sound reasonable? Oh, and be sure to book a photographer to shoot the cover art for the single.
Did we just give you an anxiety attack? Sorry.
That’s the exact challenge that was presented to PULL N WAY, a female pop duo from Central Switzerland. Fortunately, Studio One was there to help tackle the assignment.
LATTESSO is a “cold coffee to go” brand in Switzerland. They connected with PULL N WAY for the launch of their latest vegan products. LATTESSO based the 24-hour challenge on the idea to have PULL N WAY re-write one of their existing songs—which would include tracking new vocals and creating new cover art, including photography. Watch the whole challenge here:
We had the opportunity to chat with PULL N WAY and their producer, Andy Prinz about the challenge.
During the challenge, did you want to give up? What kept you going?
Well to be honest, the hours between 3 a.m. and 6 a.m. were the hardest. We just came back to the studio after our photoshoot in Zurich. We almost fell asleep but our passion kept us motivated to continue the challenge! We managed it to finish the song and we sang tons of other songs to stay awake.
 What do you like about PreSonus? What caught your eye?
All the gear is fantastic and affordable. We use Studio One to track all our vocal recordings, edit/comp the vocal tracks, and create basic ideas in pre-production. For monitoring, we have two Sceptre S8s and a Tremblor, and for the recording a Studio 192 USB interface with two priceless headphone outputs and latency-free monitoring. Studio One is a fantastic piece of software, for both composing and producing—and it’s super fast with all the drag & drop functionality. Plus, we love the graphical interface!
When did you first hear about Studio One?
Andy, one of our producers, is a long-time Studio One user… I think from version 1.6 on! So all our first recordings from four years ago had been done in Studio One, and with further PreSonus gear already, so it’s basically the DAW we’re introduced to from the very beginning.
What features are you most impressed with your gear?
The drag & drop functionality, vocal comping, Melodyne & VocALign integration via ARA, new gain functions and the GUI. We totally fell in love with the ATOM controller, which we’re starting to use as a live tool to trigger samples or vocal/drum loops from our existing songs.
How easy/difficult was Studio One to learn during the 24-hour challenge?
It was super easy to record and edit all vocals in this short time, and we made it all on our own. For the final product, we had help from Andy.
Where did you go for support?
We had a basic introduction by our producer, and just learned by doing in Studio One Artist—and we used some YouTube tutorials as well.
Where did you go for inspiration?
We worked with a really cool film crew, they are as old as we are so we had a great time together which made it easy to think about the new lyrics which represent those happy and positive vibes. So we didn‘t really need to go to a certain place to get inspired.
Any other thoughts on Studio One or PreSonus gear?
The gear is affordable and offers a huge variety of functions for semi pro’s and professionals alike! We also like that we don’t have to carry a dongle for Studio One! PreSonus is part of our musical journey for a long time and we’ll continue using it for all current and future recordings. At the moment we’re writing and producing new songs for various collaborations and new Pull N Way songs.. so stay tuned. Equipment: We just found out on Instagram that PreSonus has released some microphones! We’ll definitely try these out!
Recent projects? What’s next for you?
We have released our debut album “Colours” this year but–after several live gigs during Summer–we’ve already started working on new material for our upcoming releases, ranging from Pop to Electronic. We’ll also try to make at least 1-2 cloud trap songs… therefore we’re actually looking for a suitable French rapper. Besides that, we have loads of featuring requests, mainly from the EDM scene/DJs and we’re currently evaluating what’s best for us and what’s the best fit!
Follow PULL N WAY on Instagram here!
10 Mai Tai Percussion Presets
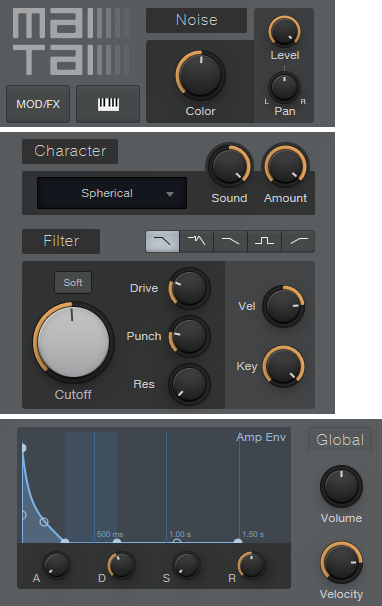
We’re still in September, it’s still Studio One’s 10th anniversary, and so once again the Friday Tip is 10 Tips! This week, the accent is on percussion—which is an essential part of any decent mix. We’re going to get down and dirty in percussion-land, so load the Mai Tai synthesizer, and let’s get started.
If you just can’t stand the suspense, then scroll to the end and download the 10 presets (put them in a Drum folder under Studio One Songs and Projects\Presets\PreSonus\Mai Tai). I still recommend that you look at the text and images, and play around with the sounds—those with an adventuresome spirit will find that there are a lot of variations available in these presets.
Note: To save graphics space and make the concepts clearer, the screenshots include only the relevant modules. We’ll be starting from the Default preset for each tip, however for a clean slate, click on Mod A and de-assign all the mod sources (choose [–] for the source from the pop-up menu, or turn off the numbered modulation strip). Also, note that the default includes Reverb and Delay enabled in FX A—bypass or leave-in, according to taste.
- The Virtual High-Hat
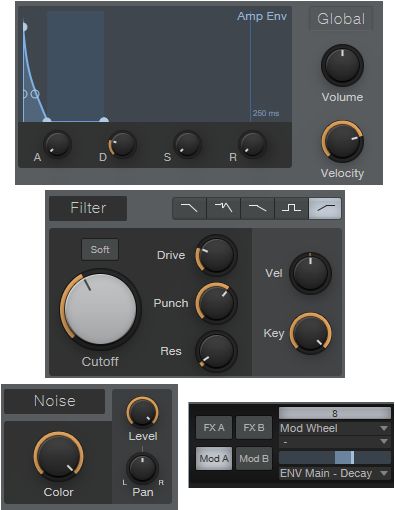
Real drummers work the high-hat from open to closed, and we can do that too.
Adjust the Noise Color control for the desired timbre. Make sure you experiment with the filter; I prefer the HP mode, with some Drive and Punch…but tailor to suit. The only relevant Amp Env control is Decay. Adjust the decay time to give the closed hi-hat sound; turn up Velocity for more dynamics.
The key to getting the most out of this preset is modulation. Click on Mod A, and for modulation source, select Mod Wheel. For the modulation destination, choose the ENV Main – Decay parameter. Turn the Mod Wheel up full, hit some keys, and set the ENV Main – Decay slider in the modulation sectoin for the open hi-hat decay time.
Now you can use the Mod wheel to open and close the high-hat—just remember to “open” the high-hat before you hit the note. Bonus: There’s an additional amount of expressiveness based on how long you hold your finger down on the key.
- Disco Drums

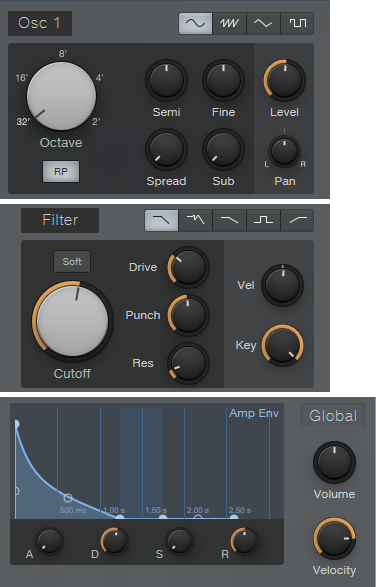
Doooo-doooo-dooo! I probably can’t use the drum company’s name without getting lawyers on my case, but if you like persimmons, you’ll know the drums I’m talking about. For this tip, we only need one oscillator. Set the Amp Env and Env 3 parameters to no Attack, Sustain, or Release and no Delay for Env 3. The Decay controls are all that matter, and they should be identical.
For the modulation, Env 3 controls OSC 1 – Pitch. Set the modulation slider for the desired frequency range covered by the dooo-dooo-dooo.
- Shaker

This is something you’ll probably want to use with 1/8 note-based rhythmic patterns.
Load the default, then turn off both oscillators, Filter, and Character…all we want is Noise. For the Amp Env, set an Attack time around 40 to 100 ms, and the Decay around 125 ms, but adjust to taste.
- Talking Drums

After loading the default preset and resetting the modulators, nuke every module except Osc 1. For this effect, although velocity is tied to pitch to make life easier, you’ll need some manual dexterity: the only way to emulate the true talking drum effect is by working the pitch bend wheel after you hit the drum.
- Ode to Kraftwerk
Let’s face it, Kraftwerk is one of the most influential bands ever. They jettisoned guitars and drums in favor of drum machines and synths long before it was fashionable. Bowie, Depeche Mode, and Aphex Twin were influenced by them. Electro and several variants of club music wouldn’t even exist without them. U2 recorded a version of “Neon Lights” and so did Simple Minds. They’ve been sampled by R.E.M., Coldplay, and Jay-Z. The sound they created is the sound of pop 30 years ago…and today.
Okay, enough about the awesomely amazing and innovative Kraftwerk. They made a lot of their own instruments, and had some cool percussive sounds. This is a tribute to one of those sounds, and it’s also a little more complex than the previous ones.
Load the default preset, and after de-assigning the modulation sources, turn off everything except Osc 1 and Filter. Env 2 influences the Osc 1 pitch, while Velocity controls Filter Cutoff.
- Electronic Snare
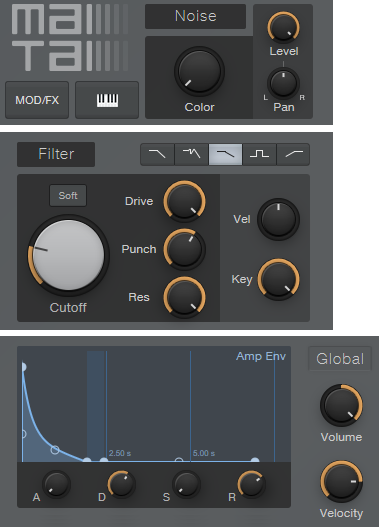
Mai Tai’s Character option is a gold mine for electronic snares, from the 80s and beyond. Pump some noise into the filter with its controls as shown, give the Amp Env a short decay, turn up the Character section’s Sound and Amount controls all the way, and then try out the different characters from the Character drop-down menu. Expect to be surprised—and also experiment with turning up Punch.
- Hum Drum Kick
And here’s the sound that makes sure you don’t fall asleep when you’re stopped at an intersection: the infamous hum drum kick, as immortalized in hip-hop and dance music.
It’s very simple: a low-frequency sine wave oscillator with a Filter and Amp Env. The Filter settings are the crucial ones here, because they determine the attack’s aggressiveness. Experiment with the Drive and Punch control for the best results…a little distortion probably won’t hurt, either.
- Clave
It’s ironic that the simplest sound gets the most complicated preset, but life is full of twists and turns, isn’t it? Also, this one wants a fairly specific pitch: hit C4 for the most clave-like sound using the downloaded preset. However, once you get a feel for this preset, there’s much room for experimentation. Perhaps surprisingly, altering the LFO control parameters, or enabling/disabling them, has a major effect on the sound.
- Giant Thud Explosion
This gives the sound of distant cannon fire, an explosion, impressionistic thunder, or other low, large sounds. It’s based on using white noise with the filter pulled way back, and there are two articulations: hold a key down to have the sound run through the more percussive decay envelope, or tap a key to trigger the longer release time. Use this as a cinematic-type effect sound when transitioning from one song section to another—and you want to start the next section off with a bang. Or a thud.
- Ethic Percussion

This is kind of a tuned, log, bongo kind of thing. Both oscillators and noise are in play, and the filter settings are somewhat crucial because they depend on Drive, Punch, and Res for their sound. Only the Amp Env is needed, and there are no modulation sources—velocity for the filter does all the needed modulation.
Download the 10 presets here!