Category Archives: Studio One
How to Use FX Chain Transition Curves
FX Chains are a powerful Studio One feature, yet I can’t help but notice that when I write tips about FX Chains, some people are lost without a download…so I get the impression people might think that making FX chains is difficult. But it isn’t really, and your reward for creating one is a multi-effects processor that you can call up whenever you want, as well as assign controls that allow tweaking parameters without having to open up the effect GUIs themselves.
One of the most important aspects of mapping parameters to knobs is choosing the right Transition settings, so let’s delve deeper into how to make them do your bidding.
Transition Settings Explained
A great aspect of FX Chains is being able to map Macro knobs to multiple parameters and control them all simultaneously. For example, in the EZ Squeez tip for a one-knob compressor, a single Macro knob varied the Compressor Ratio, Release, Threshold, Knee, Attack, and Gain controls simultaneously. Because of this, when changes in the Ratio or Threshold parameter reduced the output, the Gain control could increase automatically to compensate.
When you map a parameter to a Macro knob, the default is for the knob to alter the parameter over its full range. But, you often don’t want to vary the parameter over its full range. For example, if you were creating a wah pedal effect with the Pro EQ, you wouldn’t want the filter to go from 20 Hz to 20 kHz. A more realistic range would be around 300 Hz to 2 kHz.
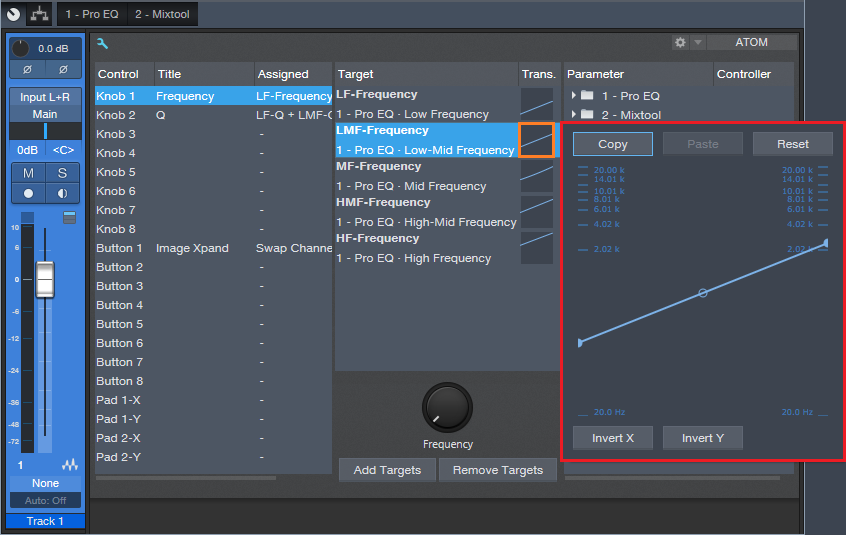
The Transition setting allows restricting the parameter range covered by a control. When you click on the small Transition graphic, a bigger view opens up where you can set the parameter’s upper and lower limits (Fig. 1).
Figure 1: Click on the small graphic window (outlined in orange) to open up a bigger view (outlined in red).
However, the calibrations are sometimes difficult to read, so it can be challenging to create a precise change. Fortunately, there’s an easy solution.
Suppose you want to change the Pro EQ LMF frequency from exactly 150 Hz to 2.4 kHz (five octave range) by turning one of the Macro knobs. To do this:
- Open the Pro EQ GUI so you can see the LMF Freq knob, and “pin” the Pro EQ so that it remains visible.
- Click on the Knob icon in the Pro EQ’s upper left. The Macro Controls panel will appear (or the Macro Control Mappings window if it was opened up last). Since we want to use the Macro Control Mappings window, if the Macro Controls panel appears, click on its little wrench icon toward the upper left.
- Turn the knob at the bottom of the Macro Controls Mapping window fully counter-clockwise.
- Open the larger transition window for the LMF – Frequency parameter.
- Click on the transition line’s left node, and drag it while observing the LMF Freq knob in the Pro EQ. Stop dragging when it hits 150 Hz; you’ve now adjusted the knob’s lower limit. Note that it’s sometimes difficult to obtain a precise setting; you can’t, for example, type in direct value. You may want to temporarily slow down your mouse pointer speed (in the mouse section of your system properties) to make this easier.
- Now we need to set the upper-frequency limit. Turn the knob at the bottom of the Macro Controls Mapping window fully clockwise.
- Re-open the larger transition window for the LMF – Frequency parameter.
- Click on the transition line’s right node, and drag it while observing the LMF Freq knob in the Pro EQ. This time, stop dragging when the knob’s frequency readout shows 2.4 kHz. Note that you won’t be able to reach exactly 2.4 kHz; the closest I could come was 2.38 kHz…close enough. It’s not always possible to hit a value exactly, but most of the time, this doesn’t matter.
This kind of precision came in handy when creating the Imaging Phaser, where I wanted each frequency band in the Pro EQ to cover five octaves, and the bands had to be offset an octave from each other.
Bend Me, Shape Me
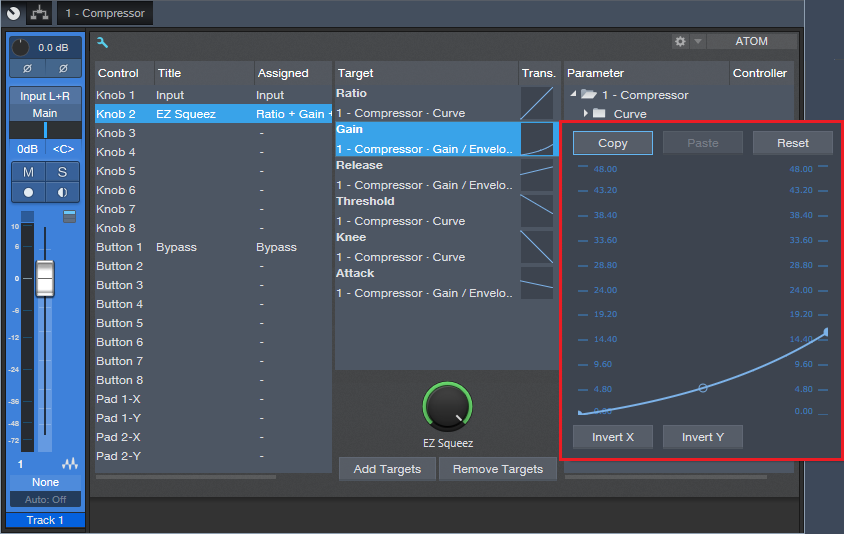
The Transition setting has another very useful feature—you can click the node in the middle to bend the curve into different shapes. For example, the Gain parameter in the EZ Squeez compressor needed to increase in level as the settings became more extreme, which squashed the signal more and brought down the level. Dragging the midpoint down a bit accelerated the amount of Gain as the single knob was turned higher (Fig. 2).
Figure 2: Bending the Transition line alters the “feel” of controls.
Where the Heck Are FX Chains Stored, Anyway?
Whenever a FX Chain tip provides a download link, there’s an inevitable comment in the Comments section along the lines of “Where do I store this after I download it”? The easiest way to find out is to go to the Browser, expand the FX Chains folder, expand a sub-folder if necessary, right-click on an FX Chain, and choose Show in Explorer (Windows) or Show in Finder (Mac). Now you’ll know where your FX Chains live. Note that you can also specify the location for your presets in Studio One > Options > Locations > User Data.
How to get multiple outputs from Kontakt in PreSonus Studio One
In this video, Gregor shows you how to set up multiple outputs in a single Native Instruments Kontakt instance. Fortunately, this is extremely easy to do in Studio One.
Football, Podcasts and Studio One
Over here stateside, ‘Tis the season for family, over-eating, traveling, watching football, and more eating. You may not be a huge fan of the holidays, but I love them! The holidays have something for everyone, much like a recent podcast I came across on Twitter called The F.A.N. Show.
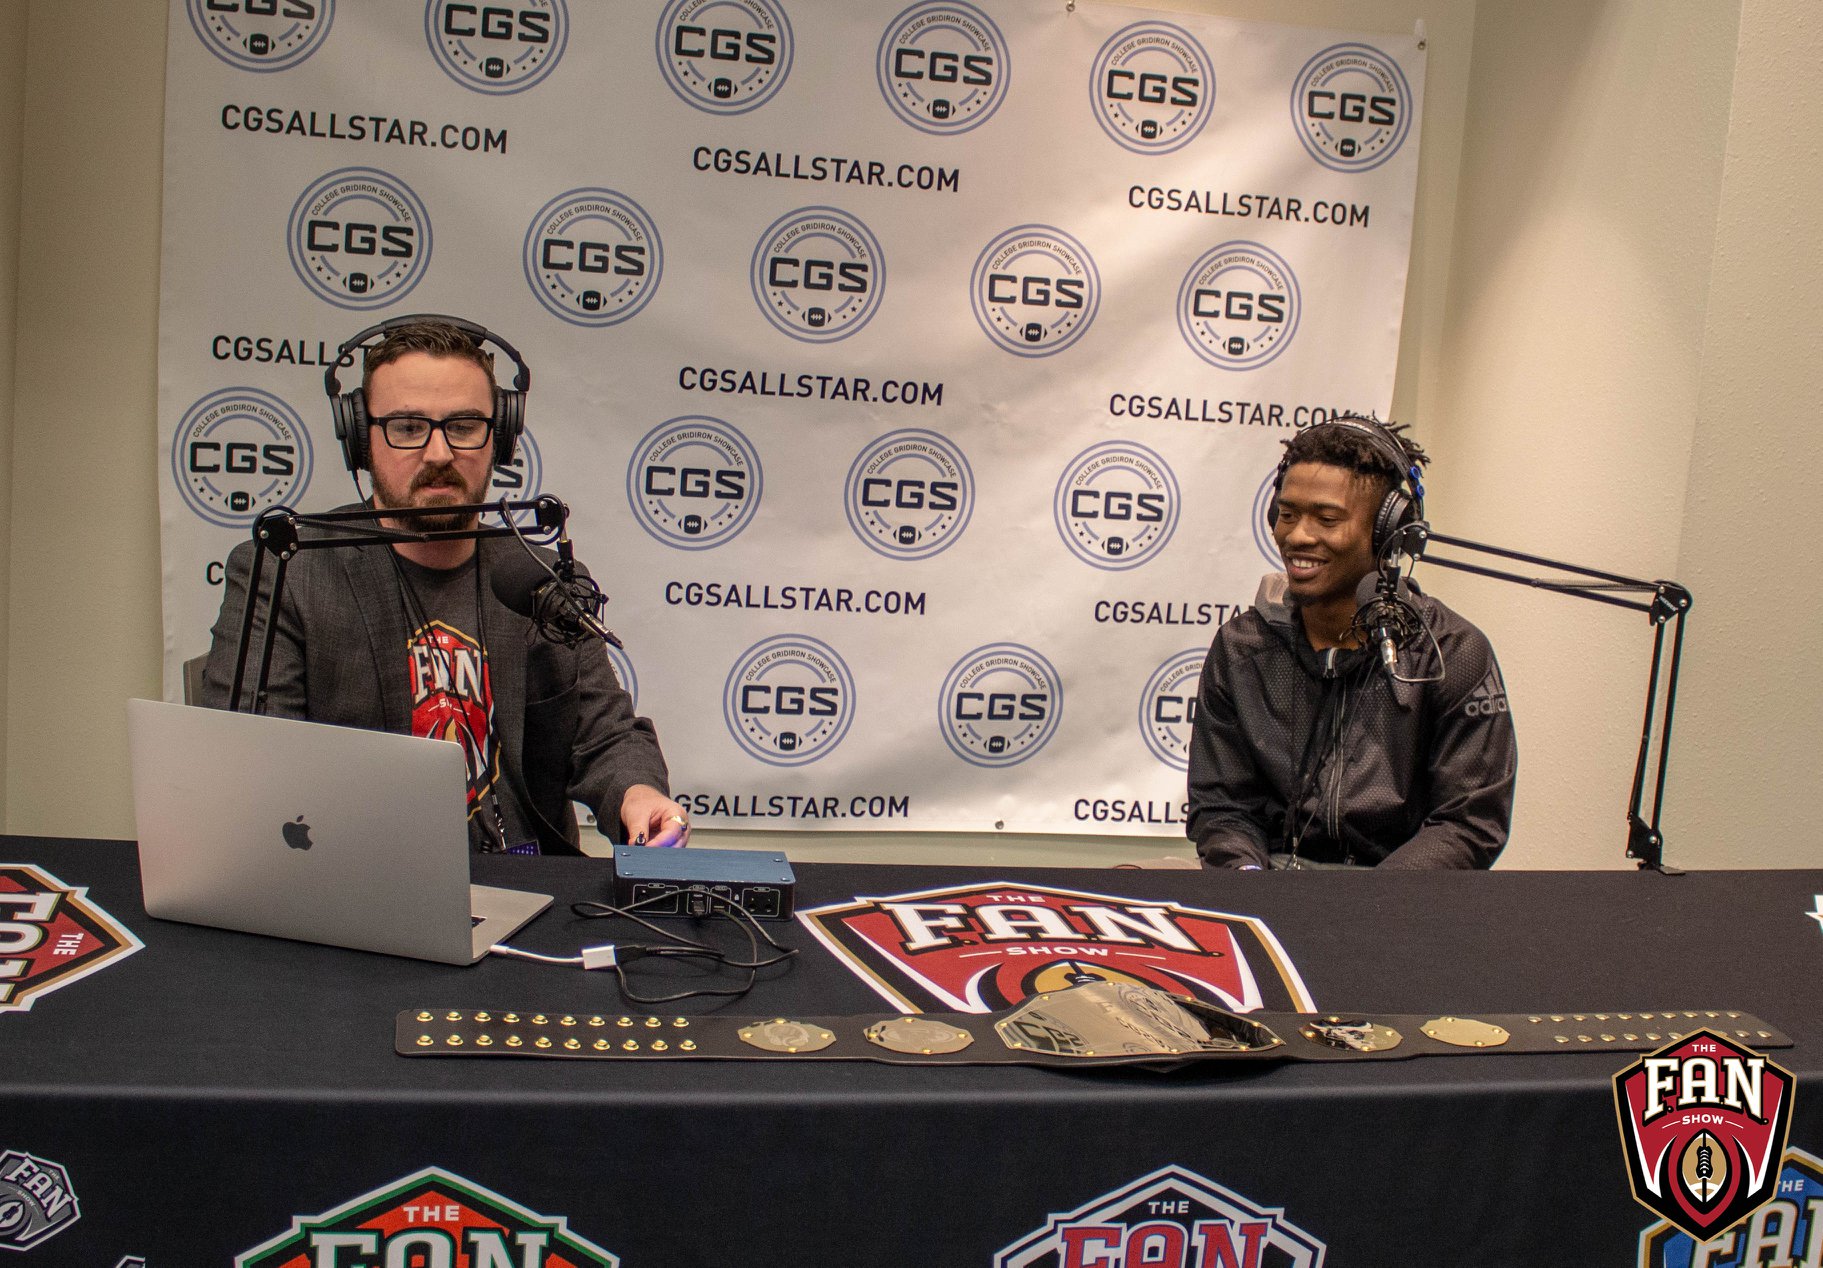
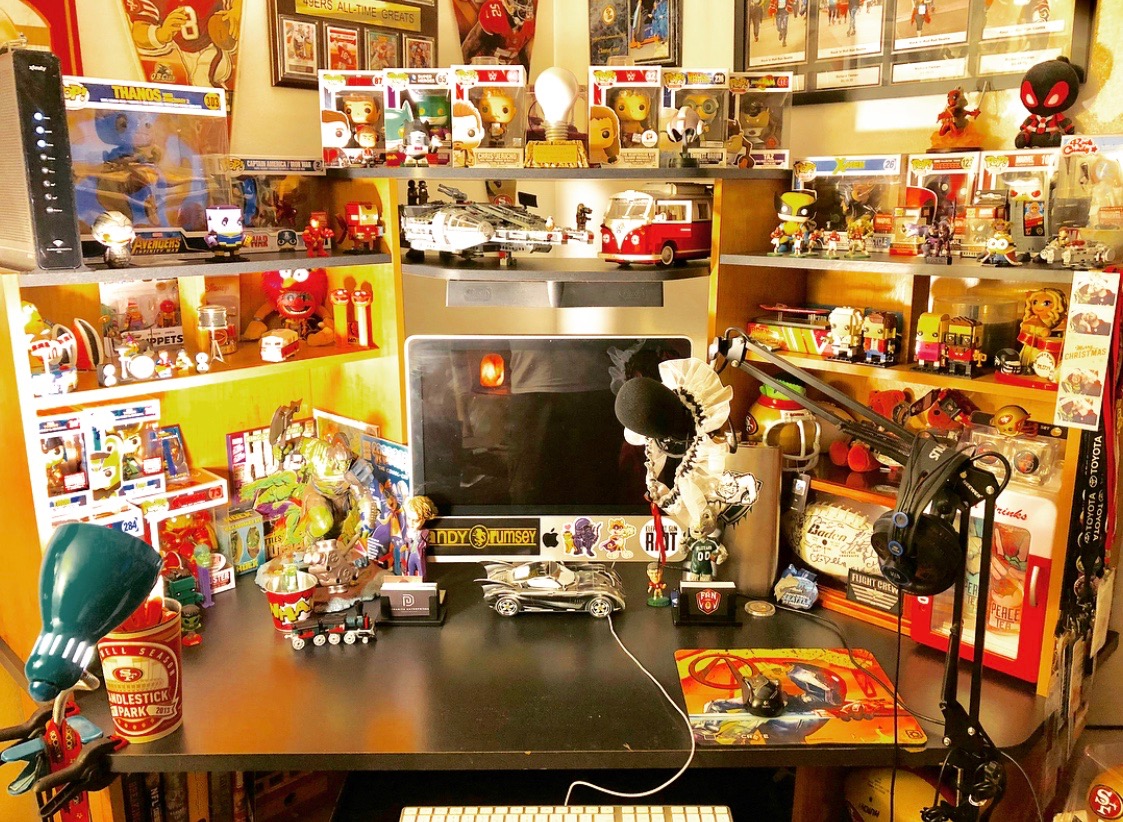
The F.A.N. Show is a one-man, award-winning sports variety show based in Spokane, WA—and it’s in a league of its own. There’s something for every fan. The show is hosted by Richard Tieman, who is a musician, producer, sports fanatic, and Studio One user. After five years of recording 440 podcast episodes on the same AudioBox iTwo he purchased in 2015, Richard shows no signs of slowing down. We wanted to know more about how his podcast came to be so successful.
Tell us about your background. How long have you been in the audio industry?
I was a drummer for a punk rock band since I was 17, and loved music, performing live, and traveling to different cities. I also love a variety of things like football, the outdoors, pop culture, and even pro wrestling. I had a knack for entertaining people, and I’ve always been comfortable on a microphone. I met my wife seven years ago and we’ve been married for five, and she is my single greatest supporter and biggest fan. I’ve been in audio for about 15 years. 10 years ago I got really passionate about it when I started hosting karaoke at a local bar while I was still touring with my band. Then when we broke up five years later, a friend suggested that I should start my own podcast, so I figured… why not?
How has the audio industry changed since your early days? 
It’s changed quite a bit. When I was in the band, podcasts weren’t very popular yet. Not many people even knew what they were. Recording and editing equipment and software were super expensive, so you had to really have a passion for audio/video in order to justify going all-in on the idea. I remember making a business proposal for starting my own karaoke and entertainment company in 2015, and the money I needed for karaoke equipment and songs, just to get started, was about $3,000. Now, everyone and their mom has a podcast or YouTube channel and the cost to buy a “starter kit” for those is around $300. Quite the difference.
What’s your favorite podcast right now?
As a wrestling fan, he’s one of my favorites. He’s also the frontman for the band Fozzy, and he doesn’t just interview wrestlers. He has a wide variety of different guests and that’s what I love about his show. The mix. I guess his podcast is what inspired me to branch out to talk about more than just football. Yes, I love football, but I love other things as well. Music, comics, the outdoors. Why limit myself?
Tell us about your podcast.
At first, it was just me and my thoughts about football and my 49ers. It’s the sport I know well, and the one I felt the most comfortable talking about. I also hated all the irrelevant news you started to see and hear on mainstream sports media. It was less about stats and highlights and more rumors and gossip. I wouldn’t say I started my podcast out of spite, but the idea of being different was certainly appealing. What was a weekly podcast called The ButtFumble Show is now a live-streamed variety show that airs three times a week and covers a little bit of everything: The F.A.N. Show. “Everyone’s a FAN of something, and we have something for every fan.”
Where did the idea for your podcast come from?
The rooftop of a bar in downtown Spokane where my 10-year high school reunion was happening. My buddy Cameron and I were talking about his Seahawks and my 49ers. and going back and forth about their last season and stuff that needed to happen in the offseason. He was really impressed with not only my knowledge of my team and the league, but that I could carry a conversation and could back up my opinions with facts. So he asked if I had ever thought of becoming a sports analyst, and I laughed and said, no thanks. That’s when he suggested starting my own podcast.
How does your first podcast compare to your most recent?
Oh boy. My first episode was terrible. 20 minutes of me sitting in a chair in the spare room of our house, just rambling on about the upcoming season and what to watch for. I’d never used any PreSonus equipment before, or any podcasting equipment for that matter, so my mic was turned down really low and I didn’t know how to edit the recording. Like I said, terrible. Now, almost 440 episodes later, I have my own intro theme, I have segments, sound effects, I know how to edit and get the best sound quality I want. My best episode is always my next episode.
There are so many podcasts these days. How do you stand out?
In all honesty, I can’t say that I do “stand out.” I know that I’ve learned a lot in five years of doing my podcast, and even though all the changes and trying new things, I’ve always stuck to what I believe and not trying to conform to certain styles just to get clicks or downloads. My fans are my fans, and as long as they tune in and listen, I’ll keep doing it. But I do know what makes my show “different,” is that even after five years, I’m still doing it. Not everyone who has thought “Hey, I can do that,” has actually done it for very long. Some guys I know that started podcasts never made it past 10 episodes. I’m about to do my 440th. I pride myself on constantly wanting to learn and get better. Try new things. And I’m persistent.
 What advice do you have for someone who wants to start a podcast?
Be ready for criticism and be open to feedback. Feedback is one of the hardest things because it’s not all good feedback, but you need people supporting you that will be honest with you and tell you what they liked and more importantly, what they didn’t like. That, and to be consistently persistent. Like I said, I know people that never made it more than 10 episodes. There will be a lot of excuses you can make for yourself, but if it’s really something you’re passionate about, you’ll make it a priority. I’ll tell anyone and everyone what programs or equipment I use, and people think I’m crazy for giving away my “secrets to success.” That’s not the secret. I don’t even have a secret. I just made my show a priority and have built a brand as a result.
How did you first hear of PreSonus?
Google. Haha. I talked with my wife about the podcast idea and since the band had broken up and I was going back to school for my AA degree in Business Management, she said I needed a hobby and thought the podcast would be good for me. So we searched “Podcasting kits” and the 2nd or 3rd result was the “PreSonus AudioBox iTwo.” About $220, it came with the AudioBox, mic, mic cord, headphones, and Studio One for editing. Connect it to the USB port on your computer and you’re ready to roll. I loved how simple the set up was, and that it didn’t take up a lot of space. It travels easily too, so it’s easy to take with me when I do podcasts on location.
What PreSonus products do you use?
I still use that same AudioBox iTwo (five years later) and I absolutely love it. I actually want to get another one so I can have one for my studio and one specifically for traveling. Or have one as a backup at the very least. You can never be too prepared when it comes to technology. I’ve since upgraded my mics, but still use Studio One and that same box for my show.
Why was PreSonus a good option for you? Was it easy to learn?
It was convenient, easy to use, and not a lot of extras. The less you have to worry about when it comes to recording, editing, and producing, the better. Not everyone has a producer or even an assistant, so if you’re a “one-man show” like I am, PreSonus is amazing. There was definitely a learning curve. A lot of it was self-explanatory, but I have a lot of audio friends that were happy to help me. YouTube is also an amazing learning tool, haha.
Do you ever take your podcast on the road? 
All the time. I’ll take it to local events like Comic-Con and interview special guests and cosplayers, or I’ll go to the comedy club and interview the comedians in the green room before their show. I’ve even interviewed bands at our local concert house before their shows. But my favorite time of the year is my annual tour. I take the AudioBox and my set up and go to different events across the country like BattleBots, or arena football games and I’ll host tailgate parties and use it for a live stream, or I’ll interview players and coaches after the game. I’ve gotten pretty good at setting up in hotel rooms and at arenas.
Recent projects? What’s next for you?
I just finished my third tour, which was awesome, and I was also hired to do media for different events where I would go and interview players, coaches, staff, cast and crew and publish them as podcasts to help promote the events. The show has a great following and I’ve gotten more and more opportunities like these as a result. I recently accepted the position of Director of Communications for the Sioux Falls Storm. An indoor football team that had heard of me and my podcast and wanted me to be apart of their winning team for 2020. I will be doing that as well as continuing what I do with my podcast. I’m hoping 2020 is my biggest year yet and that moving to a new city will hopefully create new opportunities. The new owners of the Storm were very adamant about me continuing to do my podcast and continuing to grow my brand, so that is what I will look to do next year!
Where can we listen to your podcast?
The F.A.N. Show is available on most major podcasting platforms including:
- iTunes: https://podcasts.apple.com/us/podcast/the-f-a-n-show/id1086005267
- Spotify: https://open.spotify.com/show/5uapKFdFfmrrUIzC8UaFTa
- SoundCloud: https://soundcloud.com/thefanshow
- iHeartRadio: https://www.iheart.com/podcast/53-the-fan-shows-track-28512625/
- Spreaker: https://www.spreaker.com/user/thefanshow
Follow The FAN Show on Instagram!
Follow the FAN Show on Facebook!
Interested in joining the Studio One Family? Click here for the best price all year!
Sound Design? “Commitment” Recording? Say What?
Maybe it’s not a well-known feature, but Studio One allows inserting effects or FX Chains before a track, not just in a track. Open up the Input section, and you’ll see a place to insert effects. The only significant limitation compared to inserting an effect in a track is that Input section effects can’t expose their sidechain inputs.
This feature has multiple uses, but first, let’s touch on how it allows for “commitment” recording. Consider recording electric guitar. In the days before tape recorders had enough tracks to do re-amping, you had to commit to recording the final sound on a track. If you decided you should have used a different amp, you had to re-record the part because the track already had that amp sound, and it was unchangeable.
Amp sims (and re-amping) changed all that. You could record a dry guitar track and change the sound at any time, even up to the final mix. While that certainly offers possibilities, it can also cause “analysis paralysis” because some folks can’t just leave a track alone—so they tweak constantly in the hopes of finding something “better.” I’ve spoken with quite a few musicians who are nostalgic for the days when you had to commit to a part because not being tempted by endless tweaking accelerated the songwriting or recording process. Ultimately, some of them felt that the benefits of spontaneity outweighed the benefits of flexibility.
It’s easy to do commitment recording with your amp sim: put the amp sim in Studio One’s input section, not the track. You can also use the Input section’s Input Controls to adjust the gain and phase going in. Record-enable the track, and you’ll record the processed guitar sound into the track (Fig. 1).
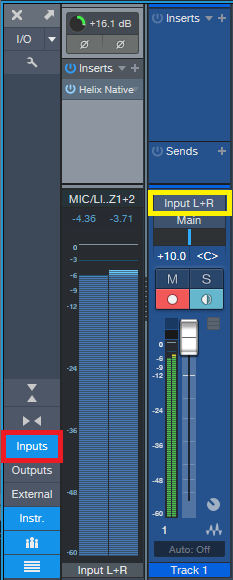
Figure 1: Click on Inputs (outlined in red) to see the input sections prior to the tracks. In this example, a Helix Native amp sim has been inserted into the L+R input. Track 1 is set to record from Input L+R (outlined in yellow), so it will record the processed sound.
This has other uses, like inserting the Virtual Pop Filter into the input section when recording vocal tracks. Of course, you can always insert the virtual pop filter in the track itself after recording, and render the changes. But it can save time and effort to nuke those stoopid pops before they’re recorded.
RE-AMPING MEETS TRACK-TO-TRACK RECORDING
Some amp sims use a lot of CPU, which can be problematic with projects that include tons of tracks. Of course, with Studio One you can always bounce or transform a track, which saves CPU—and you even have the option to revert and re-edit. However, an alternative technique, track-to-track (TTT) recording, allows one track to record the output of another track. For example, in Fig. 2 the guitar is going through AMR/Peavey’s ReValver amp sim in track 1, while track 2 is recording the processed output from track 1.
So, after doing your recording, track 2 will have recorded the sound of the guitar going through ReValver, not the dry sound. Meanwhile, track 1 will have recorded the dry sound. You can simply bypass the amp sim in track 1 to save CPU (instead of bouncing or transforming), and listen to the amp sim sound from track 2 instead of the dry sound from track 1.
If you want to experiment with different amp sounds in track 1, you know that you always have the recorded sound in track 2 as a fallback. Or, try a different amp sim, pan tracks 1 and 2 somewhat off-center with respect to each other, and now you’ll have a “stack” with a bigger stereo image.
INSTRUMENT TRACKS WITH TTT RECORDING
Here’s perhaps an even more important application for the TTT approach. Some synths have randomizing functions; you can also wire up a modular synth-like Voltage to do all kinds of randomized and sequenced effects. And of course, it’s possible to apply randomized modulation effects to almost any synth. By recording the instrument track’s output, you can capture the randomization of that moment in a track. If you don’t like the randomized effects, then just try again by re-recording the track.
SOUND DESIGN WITH TTT RECORDING
Sound design is all about creating novel, unusual sounds, and you often want real-time control over these sounds while you create them, especially if you’re using external hardware. This is another use for TTT recording. For example, I create a lot of FX sounds and sweeps for transitions and emphasis. Many of them involve the Tone Generator effect generating white or pink noise, followed by plug-in processing, and sometimes hardware effects inserted via Pipeline.
The workflow is simple: insert the white noise generator and plug-ins in the input section, as described above for commitment recording, and record the results in a track. Or, insert the white noise in a track, and use the TTT recording technique—the results are the same, except that TTT creates two tracks instead of one.
But wait—there’s more! The Tone Generator isn’t the only effect capable of making sounds you can record into a track. Several effects, when properly abused, can generate sounds. The internal noise and artifacts generated by these effects are often very low-level, but you can always add a maxed-out Compressor and a few Mixtools after the effect to boost their outputs. And of course, once you’ve recorded the effect on a track, you can normalize it to bring up the level.
- Flanger. Turn up the resonance, and boost the output level, for a variety of cool sci-fi effects.
- Rotor. Turn all the controls to maximum, and turn the power on and off for strange psycho-acoustic panning FX.
- Redlight Dist. This is the most versatile noise generator in Studio One. Oceans, rain, torrential storms…you got it.
- Tone Generator. We mentioned using this for noise, but super-low and super-high frequencies can have merit for sound design, especially when followed by other effects. I’ve gotten some great engine sounds with this and X-Trem.
- Bitcrusher. Think of this as a white noise generator currently serving multiple life sentences. It’s even nastier if you max out a couple Mixtools afterwards, and overdrive them.
The VoxTool FX Chain
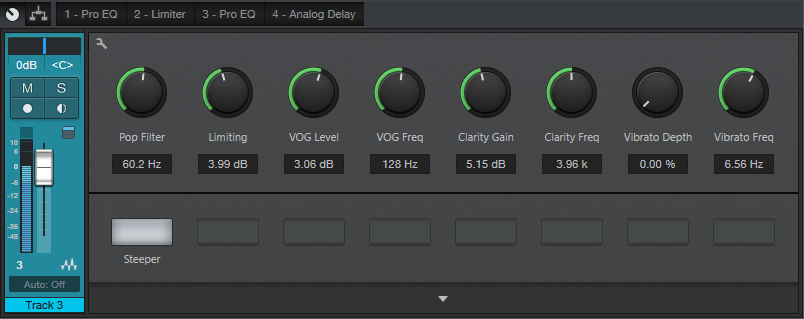
Y’all seem to like FX Chains, so here’s one of my favorites—the VoxTool, a toolchest for bringing out the best in vocals and narration as quickly as possible. You’ll still need to add any desired time-based effects (doublers, reverbs, or whatever), or perhaps some compression, but this will help take care of pops, EQ, peaks/transients, and vibrato during the songwriting process. In fact, this FX Chain may even do the job all the way to the final mix.
You can download the FX Chain from the link at the end of this tip; but let’s cover how the various modules affect the sound, so that (if needed) you can tweak this FX Chain for your particular voice.
1. PRO EQ
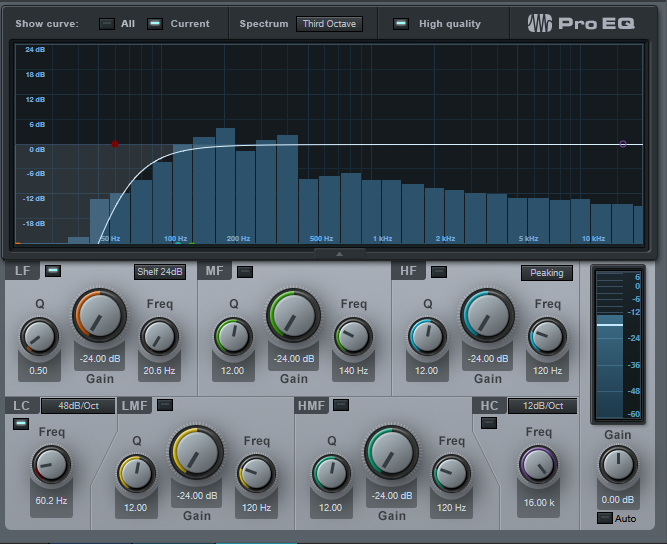
This stage uses the Low Cut Filter, set to 48 dB/octave, with the cutoff frequency controlled by the Pop Filter control. Turning up this control attenuates the low frequencies where pops occur. The Steeper button adds a bit more low-frequency attenuation, aimed specifically at subsonics, by enabling the LF stage.
2. LIMITER

Now that the p-pops are reduced, we can add some limiting to tame any vocal peaks or transients. The Limiting control in the Macro Controls panel turns up the Limiter’s input control to increase the amount of gain reduction.
3. PRO EQ
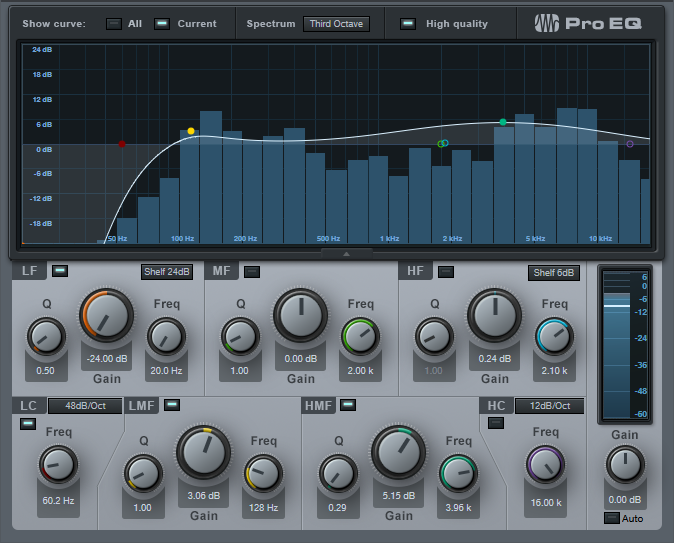
This link in the FX Chain uses four filter stages. Like the first Pro EQ, the Low Cut stage ties to the Pop Filter control for further attenuation of sub-vocal low frequencies, while the Steeper switch enables the LF stage for additional pop filtering. The LMF section provides the VOG effect (what narrators call “Voice of God”). This adds fullness to the bass, like an FM late-night DJ, which can also help restore some low-end depth in the vocal range if removing pops extends a bit into the vocal range. The HMF stage is the engine for the Clarity Gain and Clarity Frequency controls. Increasing Clarity Gain adds intelligibility and articulation to the vocals; vary the Clarity Frequency control to find what works best with your voice.
4. ANALOG DELAY

This provides a vibrato effect, with Vibrato Depth and Vibrato Frequency controls applied to the Analog Delay module. You likely won’t want to leave Vibrato Depth up, but instead, control it with automation, a footpedal, mod wheel, or whatever to add vibrato when needed.
That’s all there is to it! So download the VoxTool FX Chain, and bring your vocals up to speed—fast.
Studio One Tutorials!
These PreSonus Studio One Tutorials starring Gregor Beyerle will help you learn how to make beats on Studio One – and more! You’ll find everything you need to know to get started producing in Studio One in this breakthrough series—from set-up and Studio One basics to more advanced topics like the Project page.
Enjoy!
Click here to view the full playlist on YouTube.
Tighten Mixes with the “Tightener” FX Chain
Sometimes when you’re mixing, sounds conflict because they have too much energy in the same part of the spectrum. The usual solutions are to lower the level of the sound deemed less important, or use EQ to try to ensure that each sound carves out its own part of the spectrum. This week’s tip presents an entirely different solution. It’s the kind of tip where people will likely go “yeah, whatever…” until they run into this problem, try the tip, and find that amazingly enough, it works.
But we’ll also take advantage of this tip to describe how to make a simple FX Chain. FX Chains are an extremely powerful Studio One feature, so if you haven’t gotten into creating your own yet, this is a good project for getting started.
HOW IT WORKS
The Tightener creates four sharp, narrow notches in a Pro EQ, at frequencies related to the musical key. For example in the key of A, the notches are at 110 Hz, 220 Hz, 440 Hz, and 880 Hz. If you have, for example, a song in the key of A where the guitar conflicts with the piano, to have less piano and more guitar, insert the Tightener FX Chain for the key of A into the piano track, and increase the depth of the notches. Here’s how to create a Tightener FX Chain.
- Insert a Pro EQ into a track, and open its interface.
- We’ll be using the LF, LMF, MF, and HMF stages. Set the Q for each stage to 24.00.
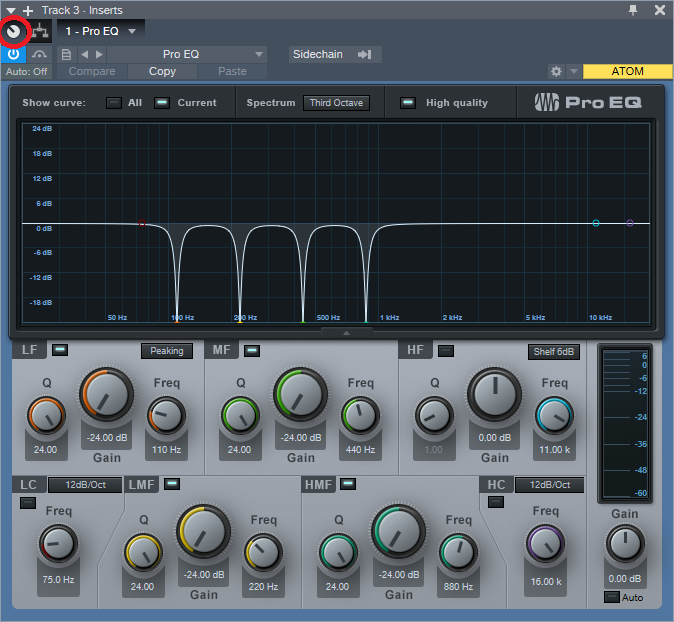
- Referring to the chart at the end, type a filter frequency into each filter stage. For example, with the key of A, choose 110 Hz for the LF stage, 220 Hz for the LMF stage, 440 Hz for the MF stage, and 880 Hz for the HMF stage (Fig. 1).
Figure 1: The filter settings for the key of A Tightener, with the notches set to maximum depth.
- Click on the knob icon in the effect’s upper left corner (just above the enable/bypass “power” button; it’s circled in red in Fig. 1). This opens the FX Chain Macro Controls interface. Then, click on the interface’s Wrench icon to open the Macro Controls editor.
- In the right-hand pane, unfold the Pro EQ folder, then unfold the Low Frequency, Low-Mid Frequency, Mid Frequency, and High-Mid Frequency folders.
6. Ctrl+click on LF-Gain, LMF-Gain, MF-Gain, and HMF-Gain to select all four parameters. The FX Chain Editor should now look like Fig.
Figure 2: The FX Chain Editor shows the Pro EQ parameters used for the tightener.
- Now click on Add Targets. The Gain control parameters will appear in the middle pane. They’ll all be controlled by the one knob at the bottom.
- I wanted the knobs to work so that when the control is full up, there’s no notch and the EQ works normally. Then to reduce the energy at a particular key, turning down the control increases the notch depth, producing more of a cut. However, if you turn the Macro control at the bottom of the window and watch the filter response, you’ll see it goes from full notch at minimum, to full boost when turned up. We don’t want the boost.
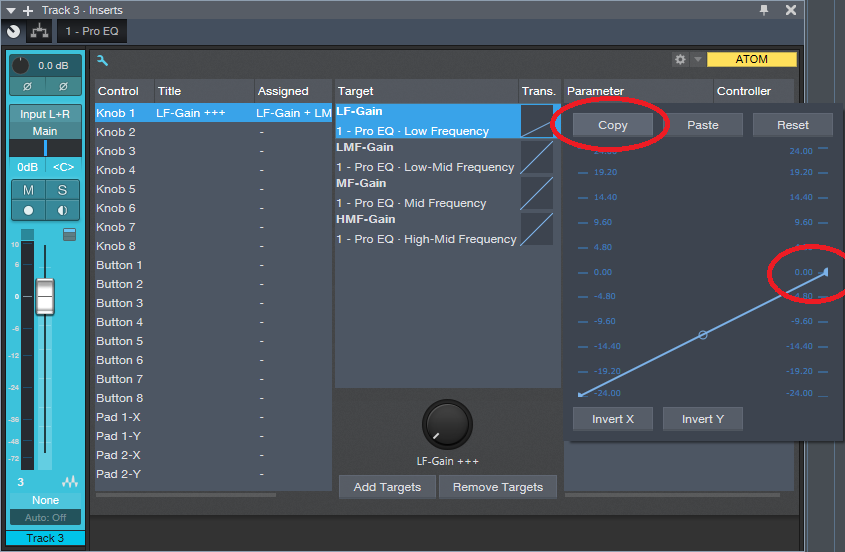
- Click on one of the Trans graphs, and drag the node in the upper-right-hand corner down to 0. This ensures that when the knob is up all the way, its filter gain is zero. Then, click on Copy (Fig. 3).
Figure 3: Adjust one of the graphs so that the maximum value is 0, then copy and paste to the other graphs.
- Click on the other three graphs, and choose Paste. Now all the Gain controls will track each other.
- Look at the filter, and vary the knob at the bottom of the FX Chain Editor. All the notches will go from maximum notch with the control fully counter-clockwise, to minimum notch with the control clockwise.
- Now double-click on the knob label, and type a name like “Tightener A” or “Tightener C#” or whatever, depending on the filter frequencies.
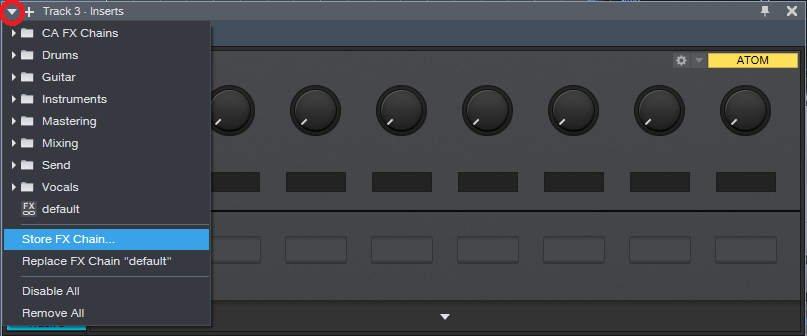
- Click on the wrench to close the Editor. To save the FX Chain, click the downward arrow in the Macro Control panel’s upper left, and choose where to store your preset (Fig. 4).
Figure 4: Don’t forget to store your FX Chains, so you can use them again.
And now you have a Tightener FX Chain! But you’ll want one for each key. It’s easy enough to do—type new frequencies into the four EQ bands, rename the control for the appropriate key, and then save the FX Chain under the name of the new key. For example, if you change the frequencies to 147 Hz, 294 Hz, 587 Hz, and 1175 Hz, you now have a key of D tightener. Here are the frequencies for all the keys (Fig. 5).
Figure 5: Frequencies for an octave’s worth of tighteners.
You need to be a little strategic about applying this FX Chain; it’s needed only when you want to help keep instruments from stepping on each other.
So that you can get started experimenting with this as easily as possible, all the Tightener FX Chains are available for download. After downloading, place them in the folder Studio One Songs and Projects\Presets\PreSonus\FX Chains\Tighteners, or wherever you specified the location for presets in Studio One > Options > Locations > User Data.
But even if you download them, try your hand at creating an FX Chain if you haven’t done so already. They’re really handy.
Download ALL 12 Tighteners Here!
New Arcades and Studio One!
Instagram isn’t just for cute, filtered images of yourself and your dog or gear! It’s a great community uniting musicians and artists brave enough to put their best work out there. One of those Instagram accounts is run by our friend and Studio One user, Adam Sullivan—one of the front men for New Arcades, a UK duo inspired by nostalgic memories of 80s cinema and vintage synth sounds. Think of blue skies, urban nightlife, and hazy sunrises and you have the New Arcades!
Studio One is Adam’s go-to DAW since 2.0! He also has a FaderPort and StudioLive 24R.
Give us some background on yourself. How long have you been making music?
I’ve been a musician from a very young age, nowadays I’m a jack of all trades, master of none. I obtained a degree in music technology and sound engineering/composition at Lancaster University (UK). We started creating music and mixing tracks in 2008 and haven’t quit. It has become more and more serious in the last few years. This all in conjunction with being one of the main FOH Engineers at my church in London, Holy Trinity Brompton. Now I mix various artists’ tracks and create my own music for New Arcades. Additionally, my side project is known as “Shred Ministries” which has developed quite a decent following from the church/Christian scene as a comical reproduction of modern worship. Check it out on YouTube for a laugh.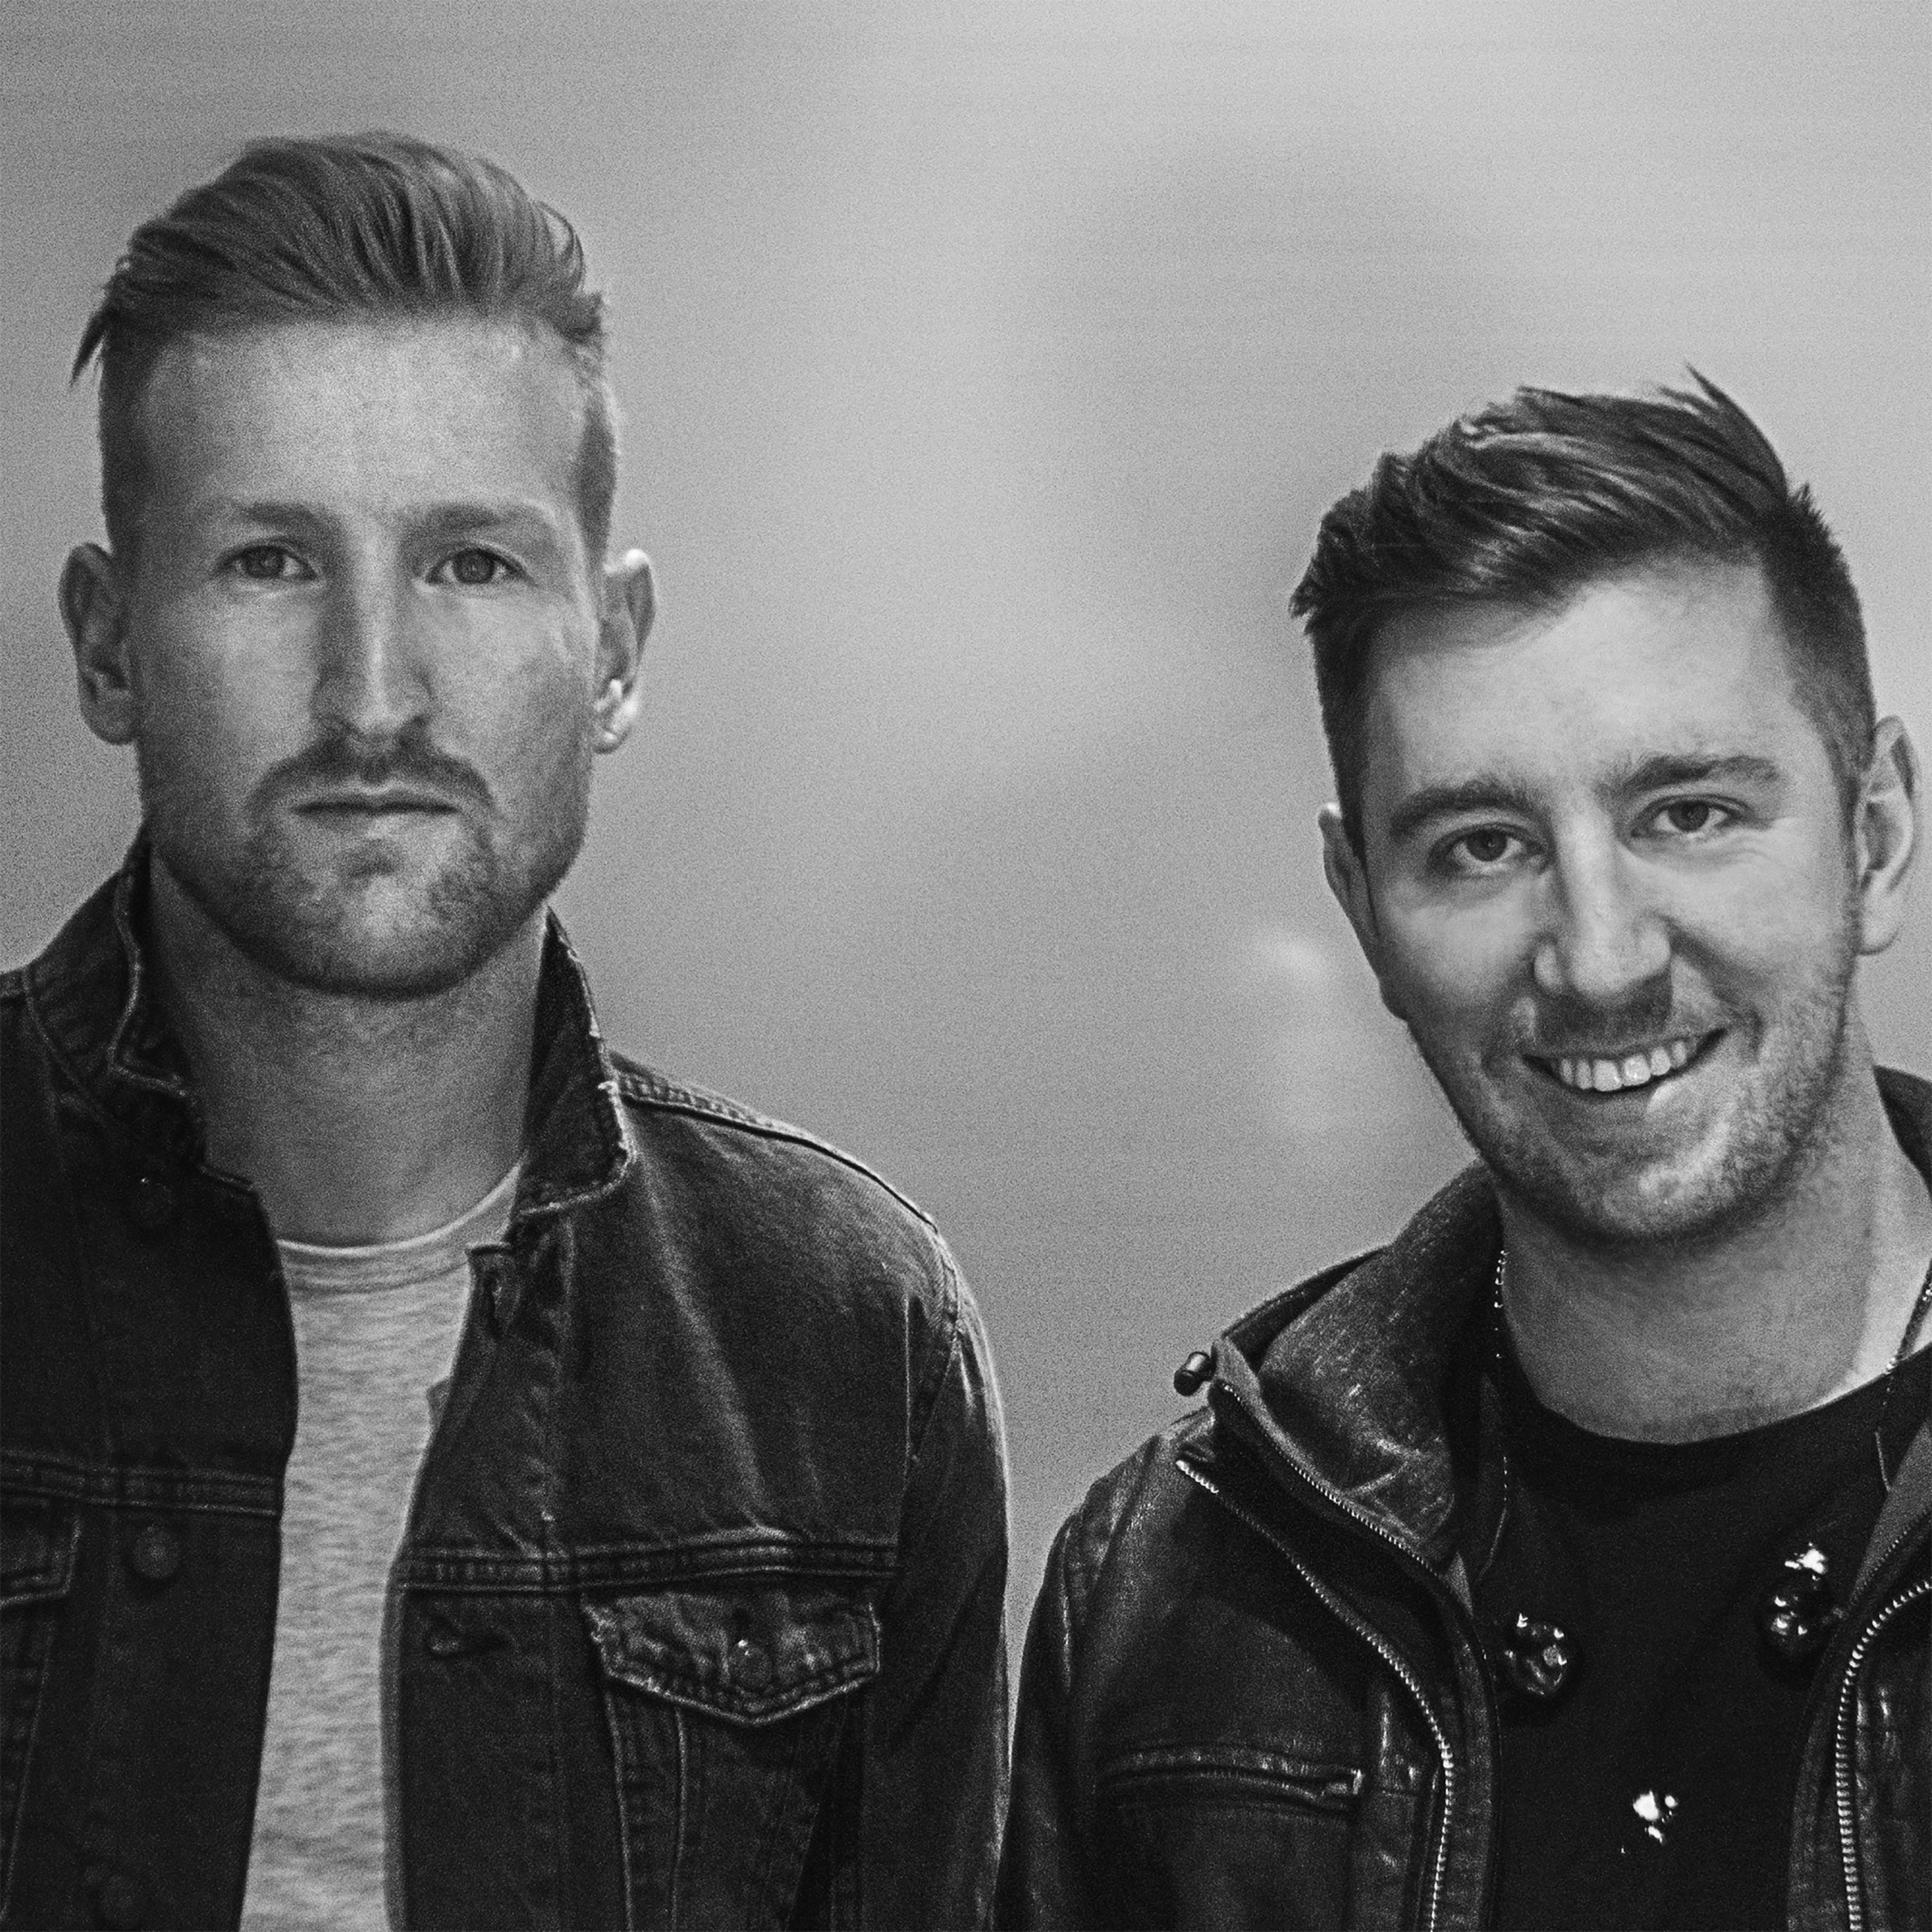
How has the music industry changed since your early days?
Less and less are the labels willing to part with cash in order to promote, the risk is far greater for the artist it seems unless you are manufactured by the giant label themselves. Back in early days with medium independents, there might be a decent(ish) advance in exchange for the master copyright recordings. But it’s tragically at the point now, where for a promise of exposure, and (hopefully) enough money made is usually in exchange for the masters… I think now you have to do so much work, have many friends help push and support you and really drive home the music you create and believe in passionately. I stand by never giving up my masters indefinitely, and I would encourage all artists to be the same even if the promise of a bright future is tempting. Another area: digital music plugins have just stepped up… I now use a kemper when I play live, it’s just fantastic! It sounds incredible and it now would be for me favored over a guitar amp in a room! which I feel is insane! Nothing better than authentically playing the instrument though–somehow that’s always been the same.
Describe the first time you wrote a song? Produced it?
It was a co-write with my fellow band members. I’ve always produced and mixed the tracks but my first one was a pop/Indie/Rock track. I was dead proud! I look back on it now though, it was the early days, I’ve progressed, as has the DAW and the plugins! 😉
Who has been an influence in your life?
Chris and Tom Alge. Absolutely phenomenal mix engineers. Clarity and Punch. Love them.
Have you ever wanted to give up on music? What keeps you going?
A few times I have thought about stopping but I absolutely cannot help my need to create and ultimately, I persevere. I think also having a writing partner and bandmate always helps! Especially when you are both in tune, have similar styles and principles in your songwriting.
What do you like about PreSonus? What caught your eye?
The first thing that caught my eye was back in 2011: Studio One 2.0. It had this simple “Drag and drop” feature. I just loved how easy it was to slap something on the channel… The layout of the mix window and the integration of Melodyne. That, along with the power and depth of the EQ, Room Reverb, and Compressor that came with the package as standard had me hooked!
What PreSonus products do you use?
Studio One 4.5, FaderPort, various bundled software. StudioLive 24R rack mixer. I also use it in conjunction with the StudioLive 24 mix desk that I TOTALLY love!) It works great for all my function work, and is such a flexible setup.
When did you first hear about Studio One?
I was actually referred to it by a friend. They said they’d seen a review in Sound on Sound, which is very well respected. I went home, downloaded the free trial and haven’t looked back!
What features are you most impressed with your gear?
The interface of the Q-Mix and UC Surface app is great. The sound of the preamps in the Series III equipment. Capture 3.0 is fantastic also. Onboard SD card stem recording on the desk itself. I’ve yet to put the StudioLive 24 in with my DAW, but I’ve seen it can be a great surface, along with the remote control iPad app for vocal booth recording.
 Any user tips or tricks or interesting stories based on your experience with Studio One?
Super easy actually! I had a decent understanding of several other DAWs. But Studio One was quite intuitive. I watched a few tutorials and just trial and error massively reap benefits. Studio One 4 is so powerful and versatile. Go exploring!
Where do you go for support?
YouTube, forums, etc. I have friends who are also well-established producers/mix engineers who I can pick the brains of on the regs. But I’m quite independent and I hate being defeated by things—so I usually resolve things myself!
Where do you go for inspiration?
I listen to other artists in the scene or genre I’m in, I watch movies that inspire creativity and put you in a hungry mindset… A bit like watching the movie “Creed” would make you want to train your socks off and chin someone in the ring. 😉 I do similar for my music. There are so many inspiring artists and creators out there, listening to fantastic scores and tracks just make me want to compete to be the best and make something as exciting and epic.
Recent projects? What’s next for you?
I just finished my album for my band New Arcades. I’ve been working on it since 2012! It’s being mastered as we speak, so hopefully won’t be long before it drops. Recently also did a track for well know acoustic/folk artist Roo Panes. He is a fantastic performer and the song we worked on together was called “Thinking Of Japan.” Everything has been recorded and mixed on Studio One. Next, will continue to do loads of live events and functions using all the gear, hopefully, make my own second album and work with more and more artists.
Follow them on Instagram!
Join the Studio One family at the best price all year—NOW!
OS X 10.15 Catalina Updates

Version Information:
- Universal Control (Mac/PC) – v3.1.1.54569
- UC Surface (iOS/Android) – v3.1.0.53214
- Capture (Mac/PC) – v3.0.2.54569
- Worx Control (Mac/PC) – v1.4.0.54335
- QMix-UC (iOS/Android) – v3.0.0.5152
- StudioLive 1602 USB – XMOS v0.05
OS X 10.11.6 (El Capitan) or later
Windows 7 (x64) Service Pack 1 + Platform Update, Windows 8.1 (x64), Windows 10 (x64)
- Izotope Neutron Elements and Klanghelm SDRR2Tube will not install under 10.15.
- Arturia Analog Lite and StudioLinked Trophies will at first not install—you must CTRL+Click (or right click) and select “Open” to install them.
- Check your third-party plug-in developers’ websites for updates, as many of them may not install or run correctly under 10.15, and will need updates themselves to work correctly.
- Some of the Studio Magic Plug-ins will not run under 10.15.
Double Guitar with “Faux Bass”
This technique dates back to when I was doing live gigs with Brian Hardgroove from Public Enemy—me on guitar, him on drums. Since there was no bass player, we needed a way to fill out the bottom end. I’ve come up with a bunch of ways to do that over the years, but the technique presented here is the easiest one yet to implement. We’ll extract a bass line from an existing guitar track, without using MIDI or virtual instruments—here’s how.
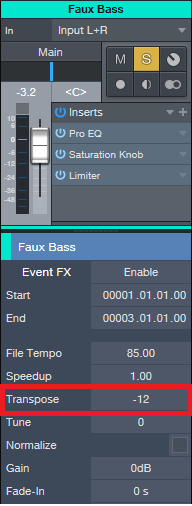
Start by copying the guitar’s audio to a new track, which will become our faux bass track. Call up the Inspector, and transpose the faux bass track down by -12 semitones (Fig. 1). This technique works best with relatively articulated guitar notes, not rhythm guitar chords.
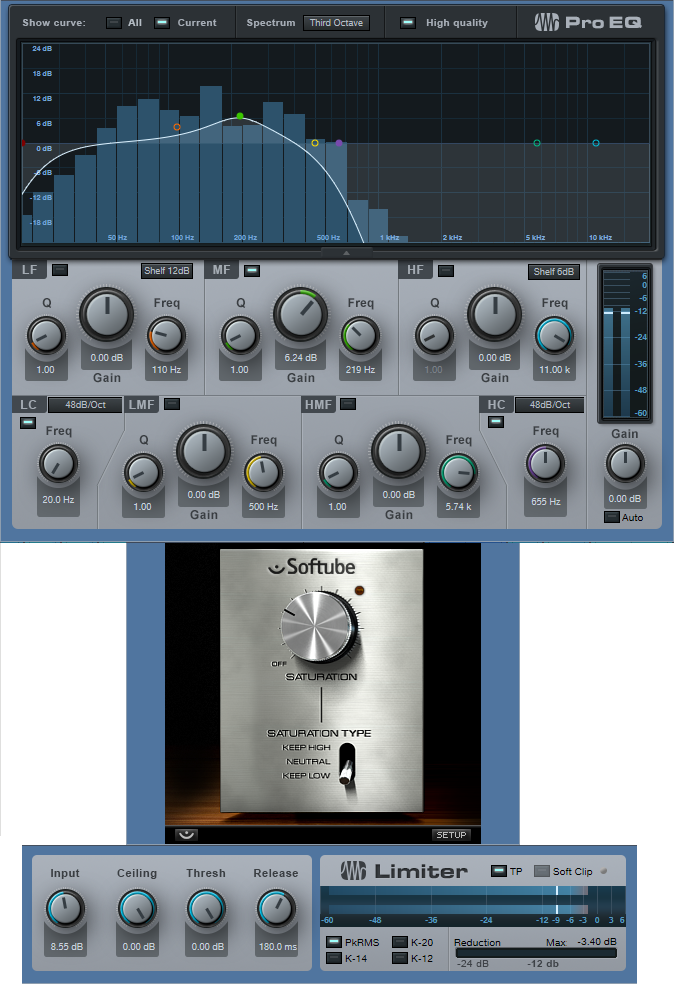
Now, it may seem like transposing down an octave is enough, and we can all go home now. No! The faux bass track needs three processors to sound right (Fig. 2).
- Pro EQ. This takes off the high end. If you transpose the high frequencies down by ‑12 semitones, you end up with midrange frequencies, and that’s not what we want. We want to transpose the low frequencies, to make them lower.
- Saturation Knob. If you’ve ever played bass, and pushed the sound through a vintage 1964 Ampeg B-15 bass amp, then you know why we need a bit of saturation. The object is to give the bass some “growl,” not only so it stands out a bit compared to the guitar, but also so it has a somewhat aggressive edge.
- People tend to limit or compress bass…who am I to argue? Again, this helps differentiate the faux bass track from the guitar and provides a more solid low end.
But as they always say, the proof is in the pudding. However, since we’re not providing a recipe about how to make pudding, check out the audio example instead.
The first two measures are the guitar by itself, while the second two measures have the faux bass playing along. Pretty cool, eh? Oh…and if you’re in a Cream tribute band, this will definitely come in handy for “Sunshine of Your Love.” Have a great weekend!
