Category Archives: Studio One
The Vinyliser FX Chain
Nostalgic for vinyl? Miss the glorious sound of dragging a rock through yards of plastic, the wild frequency response gyrations of analog RIAA curve filters, the surface noise from recycled vinyl, scratches and pops from dust particles, inner groove distortion, sound quality deterioration over time, and warpage from records not being stored properly?
Well, I don’t miss it at all. But, recently I needed to sample a loop from a song that had been recorded with (of course) pristine quality in Studio One, and apply a trashification process to make it sound like the loop was taken from an old, abused, and never cleaned vinyl record. The object was not to come up with an FX Chain like the existing plug-ins that aim to emulate vinyl’s better qualities, but instead, something that could emulate some of vinyl’s worst qualities.
Now, you might think it would be easy-peasy to take something good and make it sound bad, but it’s not—because vinyl is/was a very specialized form of bad, and reproducing that inside of Studio One is a challenge. But we tackle the tough gigs here in the Friday Tip! Here’s what I learned.
Hissy that Fits

Figure 1: The Tone Generator’s white noise output is pretty much all we need for hiss, whether tape hiss or preamp hiss.
The really old vinyl stuff was pre-noise reduction, so we need some hiss. That’s easy: use Studio One’s Tone Generator (Fig. 1), set it for white noise, and keep the level down in the final routing.
Distortion
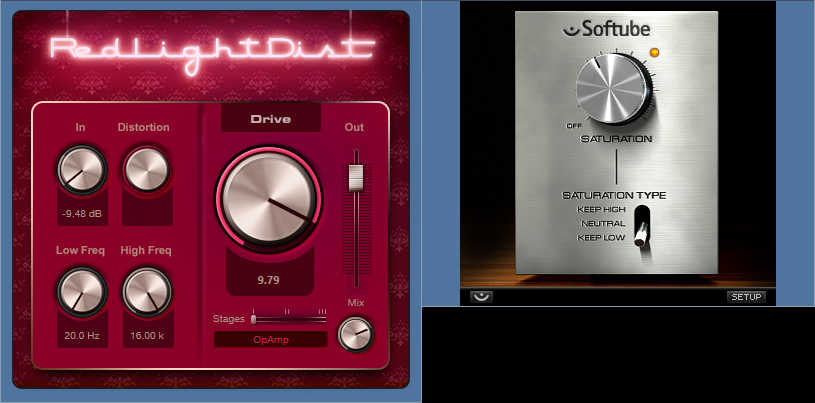
Figure 2: Each of these distortion processors gives a different kind of dirt flavor…try them both.
Simulating inner groove distortion isn’t necessarily easy, but we have a couple options (Fig. 2). The Softube Saturation Knob, set for Keep Low and a fair amount of distortion, will do the job when you’re in a hurry. If you have time to tweak, RedlightDist has much to offer. I like one stage of OpAmp distortion as shown, but you can also increase the distortion, or try different flavors. Some timbres even come close to tape-based distortion.
Warp that Record!

Figure 3: Setting the Analog Delay for vibrato, with no dry signal, emulates the pitch variations caused by a warped record.
The Analog Delay (Fig. 3) is ideal for warpage, because of its ability to do a slow vibrato. Choose a Sine wave speed of 1.33 Hz for a 33-1/3 LP, or 1.80 Hz for a 45 RPM single. Set Feedback to 0.0%, Width to Mono, and 100% for the Mix.
With 1.75 ms of initial delay (a/k/a Time), pushing the Mod amount up to 50% seems like enough warpage for most rational people. However, if you left your record out in the sun, in a car, with the windows closed, while you were at the beach, you can warp the virtual vinyl even further by increasing the initial delay time.
The Analog Delay has a couple of extras that help our cause. Turning up Low Cut and turning down High Cut can give a more lo-fi effect, like the sound is playing back from a portable record player or the like. Turn up saturation as well, because for nasty vinyl sounds, you can never have enough distortion.
Vinyl Surface Noise
I tried, I really did, to do this exclusively within Studio One. The closest I came was following white noise from the Tone Generator with the Gate, setting its Attack/Release/Hold controls to minimum, and editing the Threshold to let through only the very highest, occasional noise peaks. Adding a little high-end shelving EQ helped, as did using X-Trem in pan mode to move the clicks and pops across the stereo field, but ultimately it sounded more like cooking mini digital popcorn than funky scratches.
Admitting defeat, I went to 99Sounds.org (a fine source for unusual, 100% royalty-free samples), and found a section with vinyl noise SFX recorded by Chia. There are 37 samples, a few of which are over-the-top scratchy, but samples #12 and #29 were good for what I needed.
Routing
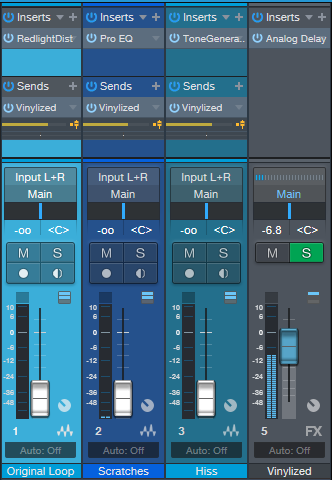
Figure 4: Routing for the Vinyliser effect.
For setup, the three different elements feed into a single FX Channel (Fig. 4), all through pre-fader sends. The original loop has the RedlightDist inserted to create the distortion; the vinyl surface noise samples have their own track (with a Pro EQ to boost the highs a bit); and the hiss has its own track as well. The Analog Delay in the FX Channel warps everything.
So does it sound any good? Of course not! But that’s the whole point…check out the audio examples, with before-and-after for a drum loop, and another for program material (with a more drastic effect than the drums).
Häzel Talks Studio One

Häzel is a Grammy-nominated producer, sound designer and mixer based in Melbourne, Australia who has been in the music industry for about 15 years and have worked with people such as Gallant, Drake, The Beatchild, Mad Clown, Joanna Borromeo, TFOX and was part of a duo called Zebrahim with my friend Ebrahim (eebsofresh). He has also composed music for commercials and worked on sound designing for filmmaker Mikael Colombu for a little, along with producing content for The Weeknd and Cee-lo Green among others.
Currently armed with Studio One Professional Version 4 in tandem with a Studio 192 interface, a pair of Eris 8 monitors and an ATOM controller, this is the setup Hazel uses on a daily basis for anything that has to do with music and sound.
Words from the man himself:
“I compose, record and arrange with it, I mix with it and use it for sound designing. I have it on my laptop as well as my workstation in my home studio and I take it with me when working in bigger studios… I actually find that it is becoming more and more common to find it in well-established studios. Cant’ wait until it becomes the industry standard!
Some of my fellow musician friends recommended it to me a while ago and like everyone else at first I was a little skeptical in making the change until the day I felt limited by the functionalities of some other DAW’s, in terms of the cluttered workflow they bring and just how power-hungry most of them are.
At some points as my ideas were getting more complex, I was forced to use multiple software applications for the different things I was trying to achieve. I needed something new and decided to try Studio One Pro Version 3. I’ve always trusted PreSonus as a brand because I already had a Firebox which served me well for many years. It took me literally one day to make the decision to do the switch. Studio One had everything I needed in one place, it sounded great (if not better) and was very stable ( which I wasn’t used to!), capable of running on anything I could get my hands on and without the need of a dongle. I remember having to bounce or “freeze” tracks before to save CPU, i can’t think of one time I had to do that ever since, even on my bootcamp 12″ MacBook Air.
With every update I get inspired by some new function I didn’t think I needed and then it finds its way into my workflow. You can basically create something or make anything sound good just with the built-in Add-On’s straight out of the box. I love the sound of the Console Shaper, the genius and simple way to sidechain on the latest update, the waveform slip editing and one of the functions I use the most is the event stretching by holding the ALT modifier key.
Fast editing is really key. For me it really just comes to creativity always, I like to test things, sounds, FX, anything really. I like to keep moving and Studio One allows me to do just that. I don’t feel limited or obstructed by the software I’m using. It just feels natural to me.
Anyone who has ever worked in this industry or has ever used a DAW at some point will find it familiar to start with. And when you have an idea of how a function should work, well there’s a big chance that that’s exactly how it works on Studio One, always the most logical and intuitive way in my opinion. Dragging and dropping anything, anywhere or converting file formats with two clicks. I found myself to be a lot more creative with this workflow, I can continuously be doing things, adding/removing sounds and rarely even pause or stop whatever I’m working on. I haven’t found myself missing a function from what I was using before apart from scrubbing which I only used when working to a video, but I can’t think of anything else really.
The only function I can think of that I wish it had so I didn’t have to use anything else would be a manual sample slicing option directly from the Sample One XT virtual instrument (wink, wink!) But there has been so much improvement compared to when I first started within Version 3 so hopefully, that will be coming at some point.
ONE THING: there is a function that I haven’t heard many people talk about which is the waveform slip editing I mentioned previously. When editing an event if you hold ALT and CTRL keys you can slide the waveform left and right. It is an AMAZING tool to make corrections on the fly or simply just to create swing on your drum tracks on. I use all the time and others probably would too, once they discover this feature!

PreSonus has really been setting a new standard with their Studio One DAW and it surpasses everything else with every update. I think that what people like me appreciate the most as a user, is to feel like the company you’re investing yourself on is listening to your opinion and is always working towards improving its products based on your feedback and experience, and it shows.
Every update in the last year only has fulfilled almost every request I can think of and they did it for free. That’s just exemplary to me. And I know that there’s more good stuff coming. Long live PreSonus and Studio One.”
Instagram : @hazeldizzy
Soundcloud: hazeldizzy
Twitter: @hazeldizzy
Gallant – Miyazaki (Prod.Häzel )

Thank you, Häzel… we wish you continued success in all of your creative audio endeavors, bro.
Studio One 4.6—what’s new
Studio One 4.6 is here! To get it, launch Studio One and click “check for updates” from the “help” drop-down menu.
What’s new in 4.6
We’ve responded to the typical Studio One user requests in typical PreSonus fashion: by giving you what you’re hungry for with a side dish of stuff you didn’t even know you wanted. The new and dramatically improved Ampire leads the 4.6 charge, followed by substantial updates to Studio One’s Browser and major improvements to the Pattern Editor. We’ve also completely re-invented Exchange! (Remember Exchange? If you don’t, we aren’t mad.) And of course, there’s a smattering of uncategorizable improvements that we think you’ll like.
Oh, and if you’ve got Studio One 4, this stuff is all free. Read on.
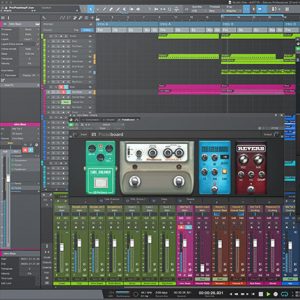
The Ampire Strikes Back
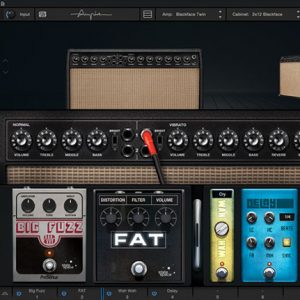
Studio One’s guitar amp simulator, Ampire, has undergone more than a re-design—it’s been thoroughly re-engineered. We scoured auction sites and shadowy pawnshops to collect five of the most sought-after amps—responsible for a million hit songs—and the boys in Hamburg employed our State Space Modeling technology to emulate their circuit behavior down to the last freakin’ capacitor. That’s the same tech that led to the creation of our incredibly true-to-analog Fat Channel plug-ins, BTW. Oh, and we also modeled five additional classic stompboxes, and created five new cabinet impulse responses for a total of sixteen classic cabinets.
Furthermore, Ampire’s Pedalboard can be run as a standalone effect plug-in for folks who don’t need amp and cabinet simulation. Synth users should find experimenting with Pedalboard to be quite rewarding.
Studio One has always rocked… but it’s never quite rocked this hard.
Window shopping

Studio One’s Browser has received a major facelift. Most significantly, shop.presonus.com now has its own tab within the browser, so you don’t even need to leave Studio One to get new sounds and plug-ins when inspiration strikes. Navigating the Browser is also now significantly faster thanks to the new navigation bar below the tabs area. You also get a beautiful new Gallery view for exploring content in a more visible way—which works for the shop, your Instruments and Effects, SoundCloud, and Exchange.
Yeah, Exchange. Remember Exchange? Good, because here comes…
Exchange 2.0!
The new Exchange is where Studio One users can browse, download, review, and preview shared Studio One content from our unparalleled user community. In addition, you’ll be able to upload and rate content from other users. Furthermore, you get a public landing page where your content contributions are posted for all to see. Join the community and share liberally—everybody wins.
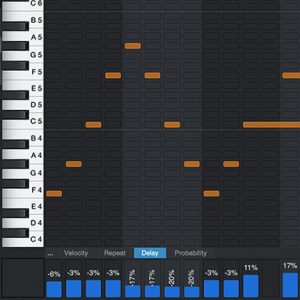
Pattern and Arranger updates
We introduced the Pattern Editor in Studio One 4, and we’ve already received a lot of feedback on how to make them better. You can now convert Instrument Parts to Patterns; both Melodic and Drum Patterns now allow for varied individual note lengths of more than one step. Great for basslines. Furthermore, each step in a Pattern can now have an individual delay value, which may be applied to all steps of an instrument at the same time.
Patterns now have their own Preset format, which includes Variations, which can be loaded and saved independently of the current instrument. And we’ve improved real-time recording to Patterns. (Try it, ATOM users. Seriously.)
Arranger tracks have received improved support for enclosed tempo and time signature changes, even when using the clipboard.
The kitchen sink
Podcasters and voice-over producers will appreciate the new Podcast Production template we’ve added to Studio One—but we didn’t stop there. We also added a new Macro Toolbar page featuring Macros and commands tailored to the specific needs of Podcasters and audiobook producers.
We also added some convenient new keyboard shortcuts, updated the Japanese, German, Spanish, and French manuals, and improved tempo-matching for loops, new gallery views for browsing Fat Channel EQs and compressors, realtime time-stretching support for Presence XT Editor… Click here for the release notes.
Track Matching with the Project Page
Okay, this is an unusual one. Please fasten your seat belts, and set your tray tables to the upright and locked positions.
Personal bias alert: With pop and rock music, for me it’s all about vocals, drums, and bass. Vocals tell the story, drums handle the rhythm, and bass holds down the low end. For a given collection of songs (formerly known as an “album”), I want all three elements to be relatively consistent from one song to the next—and that’s what this week’s tip is all about. Then the other instruments can weave in and out within the mix.
It’s fantastic that you can flip back and forth between the Project page and a Song that’s been added to the Project page, make tweaks to the Song, then migrate the updated Song back to the Project page. But it’s even better when you can make the most important changes earlier in the process, before you start down the final road of mastering.
Here’s a way to match bass and vocal levels in a collection of songs. This takes advantage of the Project page, but isn’t part of the mastering process itself. Instead, you’ll deploy this technique when the mix is in good shape—it has all the needed processing, automation, etc.—but you want a reality check before you begin mastering.
We’ll cover how to match vocal levels for the songs; bass works similarly, and in some ways, more effectively. Don’t worry, I’m not advocating robo-mixing. A mathematically correct level is not the same thing as an artistically correct level. So, you may still need to change levels later in the process—but this technique lets the voice and bass start from a “level” playing field. If you then need to go back and tweak a mix, you can keep the voice and bass where they are, and work the mix around them.
(Note that it’s important to know what the LUFS and LRA metering in the Project page represent. Rather than make this tip longer, for a complete explanation of LUFS and LRA, please check out this article I wrote for inSync magazine.)
- Create a test folder, and copy all your album’s Songs into it. Because this tip is about a diagnostic technique, you don’t want to overwrite your work-in-progress songs.
- Create a new test Project.
- Open a copied Song, remove any master bus processing, and Choose Add to Project for the test project. Add all the other songs on the album to the test project. Do not normalize the songs within the test project.
- Open the Loudness Information section for each song, and select the Post FX tab. Adjust each song’s individual level fader (not the master fader) so all songs have the same LUFS reading, then save the Project. The absolute LUFS value doesn’t matter; choose a target, like -20 LUFS. (When adjusting levels, 1 dB of level change alters the LUFS reading by 1. For example, if a song registers at -18.4 dB, decrease the level by 1.6 dB to reach -20 LUFS. Check and re-check by clicking on Update Loudness as needed until the LUFS readings are the same.)
- Choose a Song to edit (click on the wrench next to the song title). When the Song opens, solo only the vocal track. Then choose Song > Update Mastering File. Note: If a dialog box says the mastering file is already up to date, just change a fader on one of the non-soloed tracks, and try again. After updating, choose View > Projects to return to the test project.
- Repeat step 5 for each of the remaining Songs.
- Select all the tracks in the Project page, then click on Update Loudness.
- Check the Loudness Information for each song, which now consists of only the vocal (Fig. 1). For example, suppose the readings for six songs are (1) -24.7, (2) -23.8, (3) -24.5, (4) -22.7, (5) -23.1, and (6) -24.3. Those are all pretty close; we’ll consider -24.5 an average reading. The vocals on songs (1), (3), and (6) have consistent levels. (2) and (5) are a tad high, but song (4) is quite a bit higher. This doesn’t mean there’s a problem, but when you go back to using the original (not the copied) Songs and Project, try lowering the vocal on that song by 1 or 2 dB, and decide whether it fits in better with the other songs.
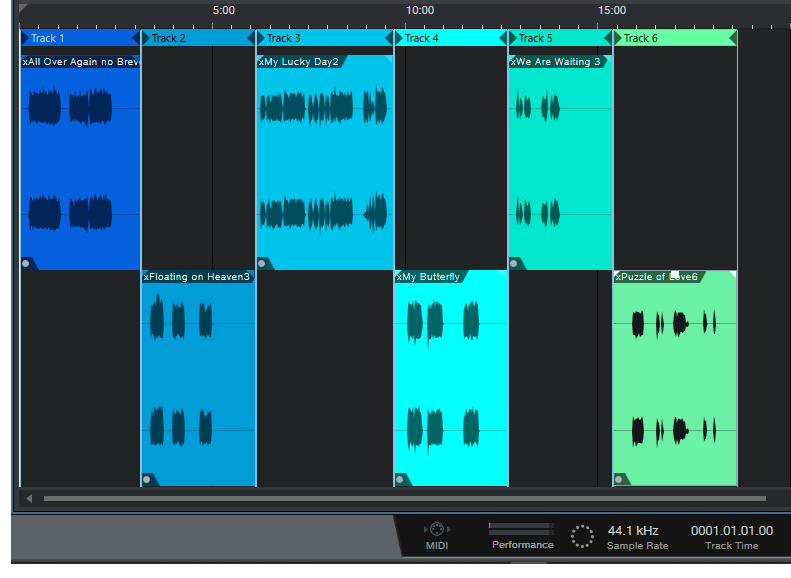
Figure 1: The songs in an album have had only their vocal tracks bounced over to the Project page, so they can be analyzed by the Project page’s analytics.
The waveforms won’t provide any kind of visual confirmation, because you adjusted the levels to make sure the songs themselves had a consistent LUFS reading. For example, if you had to attenuate one of the songs by quite a bit, visually the vocal might seem louder but remember, it’s being attenuated because it was part of a song that was louder.
Also try this technique with bass. Bass will naturally vary from song to song, but again, you may see a lager-than-expected difference, and it may be worth finding out why. In my most recent album, all the bass parts were played with keyboard bass and generated pretty much the same level, so it was easy to use this technique to match the bass levels in all the songs. Drums are a little dicier because they vary more anyway, but if the drum parts are generally similar from song to song, give it a try.
…But There’s More to the Story than LUFS
LRA is another important reading, because it indicates dynamic range—and this is where it gets really educational. After analyzing vocals on an album, I noticed that some of them had a wider dynamic range than others, which influences how loudness is perceived. So, you need to take both LUFS and LRA readings into account when looking for consistency.
For my projects, I collect all the songs I’ve worked on during a year, and release the completed project toward the end of the year. So it’s not too surprising that something mixed in February is going to sound different compared to something mixed in November, and doing something as simple as going back to song and taking a little compression off a vocal (or adding some in) is sometimes all that’s needed for a more consistent sound.
But let me emphasize this isn’t about looking for rules, but looking for clues. Your ears will be the final arbiter, because the context for a part within a song matters. If a level sounds right, it is right. It doesn’t matter what numbers say, because numbers can’t make subjective judgments.
However, don’t minimize the value of this technique, either. The reason I stumbled on it was because one particular song in my next album never seemed quite “right,” and I couldn’t figure out why. After checking it with this technique, the vocal was low compared to the other songs, so the overall mix was lower as well. Even though I could use dynamics processing to make the song reach the same LUFS reading as the other songs, this affected the dynamics within the song itself. After going back into the song, raising the vocal level, and re-focusing the mix around it, everything fell into place.
Tommy Finke Talks Theater, EDM and Studio One!
Tommy Finke, also known as T.D. Finck von Finckenstein, is a singer-songwriter as well as a composer of electronic computer music, theatre music, and modern dance based in Bochum, Germany. He accomplishes all this alongside a Faderport 8, a Studio 1810 and, of course, Studio One 4.5! Take a few minutes and read all about his career and workflow and what his Studio One favorites are.
Please give us some basic background info on your career and current projects.
I am what you might call a jack of all trades. When I started making music I was writing songs for myself and for different punk-music bands I was a member of at that time – those were the typical middle-class-kids-pretending-to-be-punks punk bands, but we were honest and had a lot of fun.
My love for pseudonyms originates from that punk-milieu: I am known as Tommy Finke, T.D. Finck von Finckenstein, sometimes just Finck von Finckenstein, but Thomas David Finke is my given name.
Since someone also had to record and mix the trashy demos, I got into recording and serious music-making during that process. Later I studied Electronic Composition / Modern Music at Folkwang University of Arts in Essen, Germany to improve my skills as a composer, since I thought there should be more than INTRO/VERSE/REFRAIN in my musical repertoire and I really liked the work of Karlheinz Stockhausen or John Cage, to name a few.
I collaborated with German artists on their video installations and composed music for contemporary dance as well as film music and was touring as a singer/songwriter with my own songs, which I still do.
In 2013, I got a call from Theatre Dortmund and they asked me if I wanted to be part of a theatre project with live-sampling and looping on stage. Of course, I wanted it! I programmed a system in Max/MSP for the performance and was live on stage. This lead to more theatre projects and in 2015, I became musical director of Schauspiel Dortmund, the acting department of Theatre Dortmund. In this position, I use all my skills from composing for a piece, recording the music, songwriting, rehearsing with the actors, mastering for the theatre sound system. Every theatre piece has to have a special and unique approach and this keeps my brain and ears busy. I like that a lot.
And as if that was not enough, I founded the record label Retter des Rock Records in 2008 to release my first singer/songwriter album but soon released other people’s music as well.
And this year I established Finck von Finckenstein Music and Sound Art Publishing in cooperation with Schacht Musikverlage in Hamburg, Germany because I wanted to keep all royalties of my work in good hands: mine.
Stream Finke’s music on Spotify here:
What PreSonus products have you used and which do you currently use?
I remember having used a PreSonus Firepod in 2009 alongside my MOTU 828 MkII at that time but I really don’t know where I have left it. It‘s just gone and I am sad about that. Right now I am using a Faderport 8, a Studio 1810 and, of course, Studio One 4, the software that made me a complete PreSonus fanboy. Furthermore, I am looking forward to buying either a StudioLive console or one of the rack mixers. And if I hadn’t bought a UAD Apollo 8 just before you released the Quantum 4848 I’d also be a proud owner of that great interface.

For what applications are you using Studio One Professional?
Studio One is my main DAW. I use it for composing, songwriting, mixing, recording, sound design, mastering, basically everything except for live performances. Might do that, too in the future…
What Studio One feature has proven particularly useful and why?
Pipeline is my favorite feature in Studio One right now! I have always been trapped between the two worlds of analog accidents and the ability to recall a project 100% and work later from the same point where I left it. Pipeline helps you with that. Let me tell you what I recently managed to do with Pipeline XT: I built myself a Neve rack mixer out of a Neve 8816 summing mixer and a 8804 fader expansion. Of course, I was able to send every output to the mixer and record the sum into Studio One. But what I really wanted was a way to get the analog and digital world play nicely together, because sometimes you don’t want your kick drum or another signal with a huge impact to mess up your sum compressor or whatever you apply. So I thought to myself “Since Pipeline XT should be able to calculate all the latency I’d get, I should be able to route just SOME of my tracks into the 8816 and feed the sum back into another instance of Pipeline XT…“ And guess what? It works. I can have a beat in my DAW while I send the guitars and synths out into the analog domain and both are combined in perfect sync in the main bus of Studio One.
Naturally, I had to tweak some stuff here and there until it really worked. For example, the sum-return could not be a bus track in StudioOne but a normal track (because busses work differently with latency and the return-bus had no reference for calculating the input latency when just fed with an input via Pipeline XT…) while the sends had to be bus tracks for routing reasons. But that was just some trial and error work until I felt like I finally got the one thing I was searching for for years now. It took me 2 days but I am sure with Pro Tools it would have taken weeks and a lot of hair loss or even erectile dysfunction.
How does Studio One compare to other DAW’s you have used? What’s better, what’s not as good, what does it give you that other DAW’s don’t?
When I started recording and writing music at the age of 16, I had a Yamaha MD-8 minidisc recorder which was paired with a Steinberg Midi Sequencer on an Atari ST computer. Then I had Steinberg Cubase on my PC when I was 20. With 25, I bought a Mac and was introduced to Logic which was like a different world to me. I kept using Logic until 2015. I had to switch to Pro Tools due to production in a studio that needed projects being delivered as Pro Tools projects. At the theatre, I was always using Ableton Live due to its qualities in scene-based and looped music. I even used Bitwig and Digital Performer. So you could say I know every major DAW. When my Faderport 8 came with Studio One and I opened the DAW for the first time my impression was “Wow, this looks and feels like someone took Cubase, Logic, Pro Tools and took the best of each of them.“ Few weeks of running Pro Tools alongside, then abandoning Pro Tools. I would say Studio One is the fastest way for me to get my ideas out of my head and into the world.
Which Studio One feature or concept doesn’t get enough spotlight (or isn’t talked about enough) in your opinion?
I am a big fan of the tempo track. I like it when musical tempos, even EDM, changes over time. (Please, DJs and DJanes, don’t kill me…) So when I am ready with a basic arrangement of my track I tweak the tempo track until it sounds more natural. Sometimes I go the extra mile and take an old track that had no click at all by Led Zeppelin, The Who or Bob Dylan, feed it into Melodyne, have a tempo analysis and – thanks to ARA – import the tempo into my arrangement to get a certain feeling. It works like a charm. Though I must say I like the tempo recognition of Cubase better than Melodyne’s, so sometimes I search for my Cubase Dongle and start it up just to create a tempo map and head back to StudioOne. Maybe StudioOne needs a tempo recognition outside of Melodyne… anyway, tempo track is a great feature, just like macros and the arranger track, btw.
Any features on your wish list for us to add in future updates?
5.1 or even 7.1 mixing would be great for mixing film tracks. Also, it would be great to have a dedicated track for your movie where you could even cut the film a little.
But what I‘d really like is a live-looping option. Not like in Ableton Live, something more like a live-looper. I‘ve recently bought a software called ALK2 by a Berlin-based software company. They have developed something I have never seen before: an arrangement looper. I say: check it out and buy that company‘s idea and integrate it into Studio One. If live-looping was part of Studio One, I‘d use it for live gigs as well.

Any useful tips/tricks or interesting stories based on your experience with Studio One that would be of interest to our user base?
Since I already told you about my experience with Pipeline XT there’s not much more to say from my side. But I would strongly recommend the great Studio One User Forums at PreSonus’ website and on Facebook. A lot of helpful people with many magic tricks up their sleeves!
Any final comments about PreSonus and Studio One?
Yes: thank you for “Mix the Music“!
Check him out on Facebook!
Join the Studio One family today!
Friday Studio One Tip: Virtual “Nashville Tuning”
Nashville tuning is a popular sound for rhythm guitar parts, and not just in country music: a few hit songs with Nashville tuning include Wild Horses (Rolling Stones), Dust in the Wind (Kansas), Gimme Danger (Iggy Pop), Phase Dance (Pat Metheny), Hey You (Pink Floyd), Wicked Game (Chris Isaak), and many others. It’s not an alternate tuning in the standard sense, because the strings are still tuned (low to high) E A D G B E. Instead, it adapts a 12-string set of strings, or string sets dedicated to Nashville tuning, to a conventional six-string guitar. The first and second strings are the usual E and B respectively, but the lower four strings are tuned an octave higher than standard tuning.
So what does this have to do with Studio One? Well, the downside to Nashville tuning is that you really need to dedicate a guitar to it; you’ll have to adjust the intonation (maybe the truss rod too), and besides, you don’t want to have to change strings all the time. Granted, after playing with Nashville tuning, you might want to dedicate a guitar to it—but in the meantime, we can create a similar effect with Studio One. Although the sound isn’t technically the same, it produces much of the same result: a bright, present rhythm sound (somewhat like a 12-string, but less dense), that’s mostly layered with a companion guitar part. Here’s how to do it.
- Copy your rhythm guitar track, and select it.
- Type F4 to bring up the Inspector.
- Set Transpose to 12 (Fig. 1).

Figure 1: Tune your copied guitar part up an octave.
That’s pretty much all you need to do, but here are some notes on how to apply Nashville tuning.
- Studio One produces amazingly good octave-above sound quality, but it’s not perfect. Another issue is that with physical Nashville tuning, the 1st and 2nd strings aren’t transposed up an octave. This shouldn’t really matter much, because if you can hear the Nashville-tuned guitar prominently, you’re missing the point—it’s to add texture. However, you might want to roll off the highs somewhat, and give a little upper midrange boost, so the sound sits a bit better in a mix (Fig. 2).
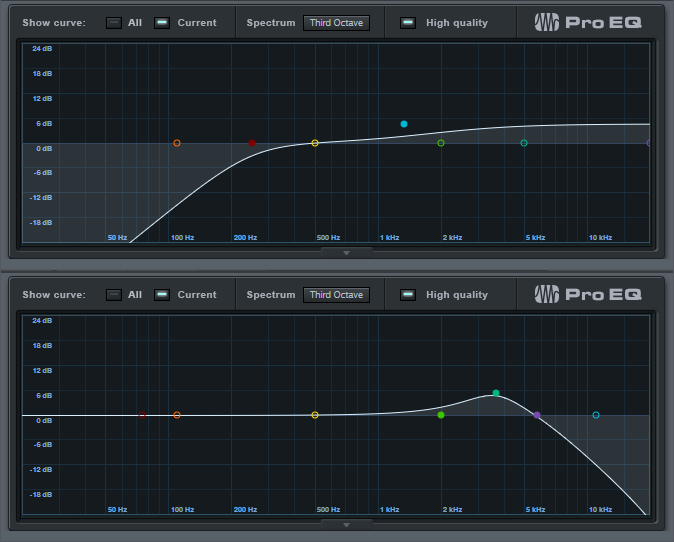
Figure 2: Optional EQ settings for the Nashville-tuned track.
- Often, Nashville tuning is layered with a standard guitar part. Due to slight detunings between two different guitars, you’ll sometimes hear some “shimmer,” like with a 12-string guitar or by adding a chorus unit. However, because the Nashville-tuned track in Studio One is a copy of the original guitar track, the layering is perfect. If you don’t want perfect layering, raise the Inspector’s Tune control by around 10 or 15 cents to add some detuning. (For some reason, I find tuning slightly sharp sounds better than tuning slightly flat).
It’s really that simple, and the bright sound can add a lot to a mix—listen to the audio example, which plays a rhythm guitar part, and then layers the virtual Nashville-tuned guitar part. The copied part is mixed a little than usual to get the point across, but even so, it still sounds pretty cool:
Introducing Ari Ahrendt’s Pure Synthetic Drums
Photo: Matthias Baumgartner
Hi,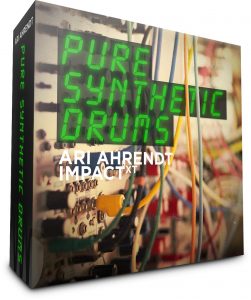
My name is Ari and I’m the creator of Pure Synthetic Drums. In my day job, I’m a Quality Assurance Specialist at PreSonus Software in Hamburg/Germany. My job is to ensure the quality and stability of our software products. In my free time – and when I’m not hiking in the woods, cooking over an open fire or swing my sword – I immerse myself in audio technology, music production, and synthesis. This all adds up wonderfully.
As a percussion oriented Sound Set for Impact XT, Pure Synthetic Drums perfectly augments the already existing products “Analog Model Machine” and “EDM Synth Classics” for our Mai Tai synth. For many years, I’ve been interested in sound design and sonic exploration in order to better understand their structure and quality. Splitting up a sound into its components, then reconstruct it is absolutely fascinating! This was one of the core concepts of Pure Synthetic Drums (PSD).
With this Sound Set, musicians and sound designers are able to create all-new sounds from combining individual components. The underlying model is always the same: all sounds have their roots in synthetic waveforms. That’s the “Pure” part of the name. The idea came up when creating sounds on the Eurorack modular. For example, to create a type of 808 kick, you need a snappy envelope and a self-oscillating filter. Once you created such sound, it remains intact for as long as you don’t tweak any knobs, so you have to destroy one sound in order to create another. Which led to the idea of sampling these sounds in Studio One and make them available as part of the library.
Photo: Matthias Baumgartner
Here I went one step further: instead of just sampling complete sounds, I also included their individual components in the library. This way you could combine the “click” portion of one kick drum with the “boom” portion of another. Or you could enhance the attack sound of a snare with filtered noise from an analog synthesizer – then extend the sound with an epic long release, more than any analog drum machine could ever deliver. The possible combinations are endless. As a user, you’re able to work with drum sounds and their raw components as if you had all of these analog synths and modular systems in your studio. Every single recorded sound is a direct output of a synthesizer—raw and unprocessed. No EQ, no compression—just “Pure.”
Over the course of two and a half years of conception, development and sound design, I’ve constantly drawn inspiration from drum machines, my own synthesizers, and even domestic and natural sounds. You wouldn’t believe how close the crackle of a campfire sounds compared to the filtered attack of an 808 kick. It’s all about finding the right filter parameter settings. So I went back and forth between the campfire and my modular synth lair—don’t worry, the fire was never unattended. Fireman Sam had an eye on it at all times… 😉
The result is a fully-modular product, made from modular synthetic components for creative use by musicians and sound designers. However, if you’re not into tweaking knobs, there are a total of 30 complete, ready to use Impact XT kits to play with, covering the full spectrum of available sounds. I’m an electronic drummer myself, so I made sure to follow the GM-standard key mapping. I’m able to play every kit from my e-drum kit instantly. My neighbors weren’t always pleased… If you’re tired of drumming, you can choose from a variety of included Musicloops representing each of the available drum kits. These include further freestyle grooves and pattern ideas.
Photo: Matthias Baumgartner
Stylistically, the library is covering a variety of musical styles: electro house, minimal, hip-hop, R&B, trap, EDM, psy trance, synth pop, chillout, electronica. For the first time, the integrated step sequencer of Studio One is used here. That’s a lot of source material to choose from to build your own analog drum part.
Combine it with an ATOM and your next track is born.
Pure Synthetic Drums is available now from shop.presonus.com.
Ari Ahrendt’s Pure Synthetic Drums
Photo: Matthias Baumgartner
Hi,
mein Name ist Ari Ahrendt und ich bin der Macher der Pure Synthetic Drums. Bei PreSonus tagsüber als Quality Specialist, kümmere ich mich um die Qualität der Softwareprodukte. Und wenn ich in meiner Freizeit nicht im Wald und in der Natur unterwegs bin, draußen über Feuer koche oder ein Anderthalbhänder schwinge, beschäftige ich mich sehr viel und intensiv mit Tontechnik allgemein, Musikproduktion und synthetischer Klangerzeugung. Alles ergänzt sich wunderbar und hält die Balance.
Als percussion-orientiertes Soundset unterstützt und erweitert die PSD-Collection für Impact XT perfekt die beiden vorherigen Instrumenten-Soundsets “Analog Model Machine” und “EDM Synth Classics” für den Mai Tai Synthesizer. Mich interessiert schon viele Jahre Sounddesign und die Erforschung von Klängen, um ihre Struktur und Beschaffenheit zu ergründen. Es ist faszinierend, einen Klang in seine Bestandteile zu zerlegen, um ihn dann wieder neu zusammensetzen zu können. Das war auch einer der Grundideen der PSD-Collection.
Mit diesem Soundset gebe ich den Musikern und Sounddesignern die Möglichkeit, aus Einzelkomponenten Drumsounds völlig neu zu kreieren und zu kombinieren. Die Grundphilosophie bleibt dabei immer die Gleiche: Alle Sounds haben ihren klanglichen Ursprung in reinen Synthesizerwellenformen. Daher das “Pure” im Produktnamen. Die Idee entstand bei eigenem Sounddesign am Modularsystem. Um zb. eine artverwandte Kick der legendären 808-Bassdrum zu erschaffen, benötigt man knackige Hüllkurven und hauptsächlich ein Filter mit hoher Eigenresonanz. Ist dieser Klang erst einmal gepatched und alle Knöpfe eingestellt, ist der Sound komplett und bleibt auch solange bestehen, bis man die Knöpfe wieder verstellt. Um jedoch einen neuen Klang zu erstellen, muss man zwangsläufig den bestehenden Sound wieder zerstören. Also war die grundlegende Idee, diese fertigen Sounds in Studio One aufzunehmen und eine eigene Library anzufertigen, um die Klänge immer wieder sofort abrufbar zu haben.
Photo: Matthias Baumgartner
Ich bin dabei aber noch einen Schritt weiter gegangen und habe nicht nur komplett fertige Sounds aufgenommen, sondern deren einzelne Bestandteile separat in die Library zusätzlich mit aufgenommen. So kann man beispielsweise eine Attackphase “Click” von einem Bassdrumsound mit einem Ausklang “Boom” einer anderen kombinieren. Ebenso kann man das Anschlaggeräusch einer Snare mit einem gefilterten Rauschen eines anderen Analogsynthesizers versehen. Und das mit einem viel längeren und epischen Ausklang, als es normalerweise analoge Drummachines hergeben. Die Kombinationsmöglichkeiten sind gigantisch. Der User wird damit in die Lage versetzt, Drumsounds oder deren Einzelkomponenten so zu benutzen, als würde er all die Synthesizer und Modularsysteme selbst besitzen. Alle aufgenommen Klänge des Soundsets sind reine Synthesizeroutputs ohne weitere klangliche Nachbearbeitung außerhalb der Synthesizer. Ohne EQing, ohne Kompression… eben “pure”.
In zweieinhalben Jahren Entwicklungszeit, Konzeptausarbeitung und reinem Sounddesign, habe ich mich immer wieder von Drummachines, meinen Synthesizern und sogar Geräuschen aus der Natur inspirieren lassen. Man glaubt gar nicht, wie ähnlich das Holzknacken eines Lagerfeuers an die gefilterte Attackphase einer 808 Bassdrum erinnert. Essenziell dabei ist die richtige Parameterstellung der Filter. Also bin ich immer schnell zwischen Feuerplatz und Modularkeller gewechselt und habe die feinen klanglichen Nuancen umgesetzt. Aber keine Angst, das Feuer war nie unbeaufsichtigt! Feuerwehrman Sam hatte stehts ein wachsames Auge darauf. 😉
Herausgekommen ist ein modulares Produkt, hergestellt aus modularen Synthesizerkomponenten zur kreativen Benutzung für Musiker und Sounddesigner. Und wer gar nicht viel selbst schrauben möchte, bekommt über 30 vollständig fertig zusammengestellte Impact-Drumkits zum sofortigen Einsatz, welche die klangliche Vielfalt der Soundlibrary wiederspiegeln. Als E-Drummer habe ich darauf geachtet, dem GM-Drum-Standard zu folgen. Somit kann ich jedes Set sofort mit meinen E-Drums spielen. Die Nachbarn wollten sich bestimmt schon einige Male beschweren. Aber aufgrund der massiven Analog-Kicks im Soundset, habe ich sie einfach nicht klingeln hören. Wenn einem abends dann die Arme lahm werden vom trommeln, kann man auch gut auf die mitgelieferte Musicloop-Library zurückgreifen. Dort habe ich jedes Drumkit-Kit einzeln präsentiert und darüber hinaus noch freestyle etliche Groove-Ideen festgehalten.
Photo: Matthias Baumgartner
Die musikalische Abdeckung des Soundsets ist vielfältig und deckt etliche Styles ab, wie: Electro House, Minimal, Hiphop, R&B, Trap, EDM, PsyTrance, Synth Pop, Chillout, Electronica. Dabei wird auch erstmalig in einem Soundset der Studio One eigene Stepsequencer benutzt. Alles in Allem kann man sich so ganz entspannt einen Analog-Drum-Track zusammenklicken, ein Pad-Sound darunter legen, und die Basis für den nächsten Track ist damit schon geschaffen.
Pure Synthetic Drums is available now from shop.presonus.com.
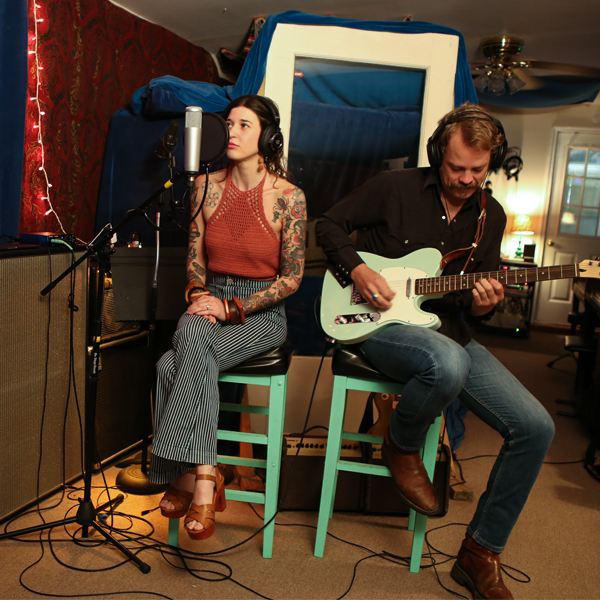
Molly and Denton Making Jams in the Red Stick!
Follow Denton on Instagram!
Have you ever wanted to give up on music? What keeps you going?
At one point in my journey, I told myself, “if I don’t make it in the music business by 27, then I should stop.” But that was a ridiculous thought. Music is more than “making it” whatever that means. I couldn’t stop now, it would kill me.
Join the Studio One family today!
How to Use FX Chain Transition Curves
FX Chains are a powerful Studio One feature, yet I can’t help but notice that when I write tips about FX Chains, some people are lost without a download…so I get the impression people might think that making FX chains is difficult. But it isn’t really, and your reward for creating one is a multi-effects processor that you can call up whenever you want, as well as assign controls that allow tweaking parameters without having to open up the effect GUIs themselves.
One of the most important aspects of mapping parameters to knobs is choosing the right Transition settings, so let’s delve deeper into how to make them do your bidding.
Transition Settings Explained
A great aspect of FX Chains is being able to map Macro knobs to multiple parameters and control them all simultaneously. For example, in the EZ Squeez tip for a one-knob compressor, a single Macro knob varied the Compressor Ratio, Release, Threshold, Knee, Attack, and Gain controls simultaneously. Because of this, when changes in the Ratio or Threshold parameter reduced the output, the Gain control could increase automatically to compensate.
When you map a parameter to a Macro knob, the default is for the knob to alter the parameter over its full range. But, you often don’t want to vary the parameter over its full range. For example, if you were creating a wah pedal effect with the Pro EQ, you wouldn’t want the filter to go from 20 Hz to 20 kHz. A more realistic range would be around 300 Hz to 2 kHz.
The Transition setting allows restricting the parameter range covered by a control. When you click on the small Transition graphic, a bigger view opens up where you can set the parameter’s upper and lower limits (Fig. 1).
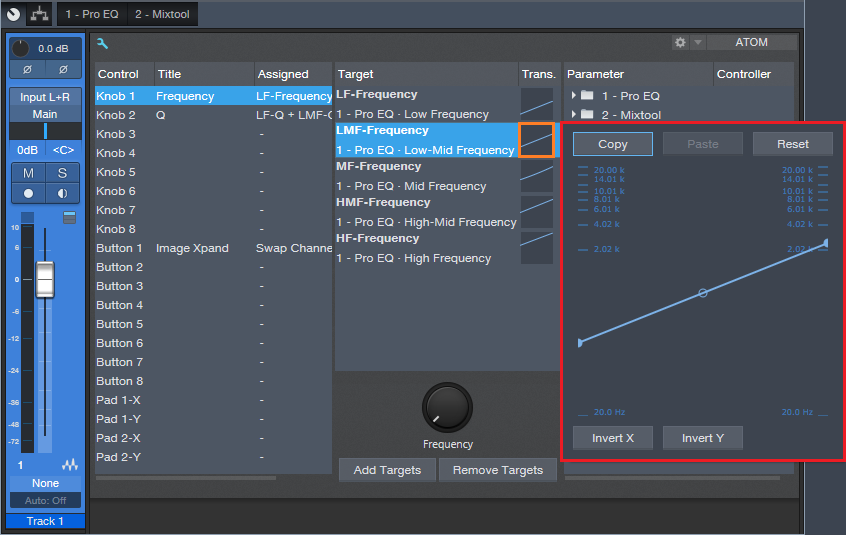
Figure 1: Click on the small graphic window (outlined in orange) to open up a bigger view (outlined in red).
However, the calibrations are sometimes difficult to read, so it can be challenging to create a precise change. Fortunately, there’s an easy solution.
Suppose you want to change the Pro EQ LMF frequency from exactly 150 Hz to 2.4 kHz (five octave range) by turning one of the Macro knobs. To do this:
- Open the Pro EQ GUI so you can see the LMF Freq knob, and “pin” the Pro EQ so that it remains visible.
- Click on the Knob icon in the Pro EQ’s upper left. The Macro Controls panel will appear (or the Macro Control Mappings window if it was opened up last). Since we want to use the Macro Control Mappings window, if the Macro Controls panel appears, click on its little wrench icon toward the upper left.
- Turn the knob at the bottom of the Macro Controls Mapping window fully counter-clockwise.
- Open the larger transition window for the LMF – Frequency parameter.
- Click on the transition line’s left node, and drag it while observing the LMF Freq knob in the Pro EQ. Stop dragging when it hits 150 Hz; you’ve now adjusted the knob’s lower limit. Note that it’s sometimes difficult to obtain a precise setting; you can’t, for example, type in direct value. You may want to temporarily slow down your mouse pointer speed (in the mouse section of your system properties) to make this easier.
- Now we need to set the upper-frequency limit. Turn the knob at the bottom of the Macro Controls Mapping window fully clockwise.
- Re-open the larger transition window for the LMF – Frequency parameter.
- Click on the transition line’s right node, and drag it while observing the LMF Freq knob in the Pro EQ. This time, stop dragging when the knob’s frequency readout shows 2.4 kHz. Note that you won’t be able to reach exactly 2.4 kHz; the closest I could come was 2.38 kHz…close enough. It’s not always possible to hit a value exactly, but most of the time, this doesn’t matter.
This kind of precision came in handy when creating the Imaging Phaser, where I wanted each frequency band in the Pro EQ to cover five octaves, and the bands had to be offset an octave from each other.
Bend Me, Shape Me
The Transition setting has another very useful feature—you can click the node in the middle to bend the curve into different shapes. For example, the Gain parameter in the EZ Squeez compressor needed to increase in level as the settings became more extreme, which squashed the signal more and brought down the level. Dragging the midpoint down a bit accelerated the amount of Gain as the single knob was turned higher (Fig. 2).
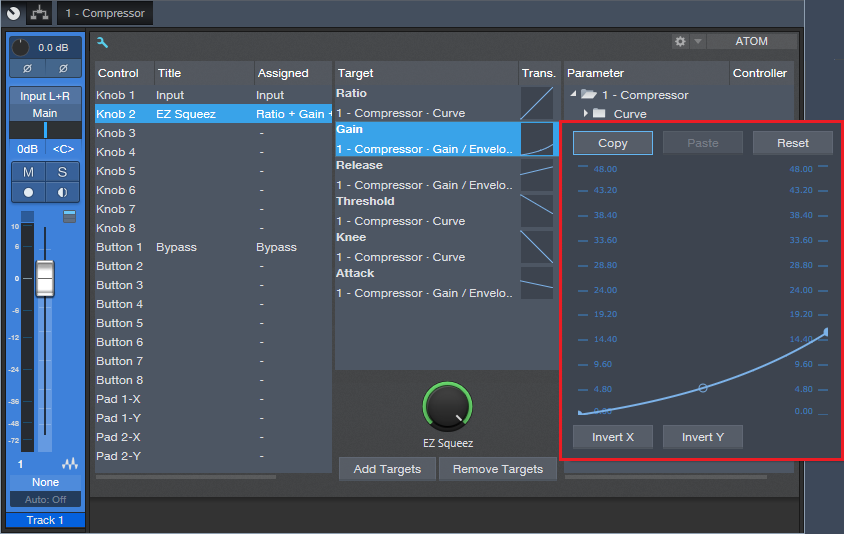
Figure 2: Bending the Transition line alters the “feel” of controls.
Where the Heck Are FX Chains Stored, Anyway?
Whenever a FX Chain tip provides a download link, there’s an inevitable comment in the Comments section along the lines of “Where do I store this after I download it”? The easiest way to find out is to go to the Browser, expand the FX Chains folder, expand a sub-folder if necessary, right-click on an FX Chain, and choose Show in Explorer (Windows) or Show in Finder (Mac). Now you’ll know where your FX Chains live. Note that you can also specify the location for your presets in Studio One > Options > Locations > User Data.