Category Archives: Studio One
Studio One 5.5 is here!
Studio One 5.5 has arrived, adding a ton of new mastering power to the Project Page — including Automation — as well as plenty of other features, including a strum notes feature, .MID file support for the Chord Track, Fast Ampire switching, and more!
Here’s our Studio One 5.5 video playlist below. But if you want the full story and all the nitty-gritty details…
…head on over to the What’s New Page to see it all!
Learn more about Studio One
Shop Studio One
“Talk Box” Emulator for Guitar
Although this isn’t an actual talk box, it does give humanized mouth sounds with Studio One Professional. This is possible because the human mouth is a filter, and Studio One has filters…so let’s do it! Check out the audio example, then download the .multipreset to try it out for yourself.
Talk Box.multipreset – Click to download
The Talk Box works by splitting the guitar (fig. 1). One split goes to a Pro EQ2, which uses a Channel Editor knob to sweep three bandpass filters simultaneously over the vocal range. The other split goes through a Mixtool that flips the phase, so it cancels all the audio from the Pro EQ2 except for the bandpass filter peaks.
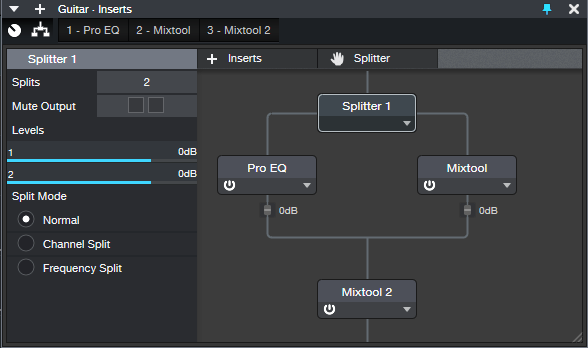
Figure 1: The Talk Box’s “block diagram.”
EQ Settings
The Pro EQ2 uses three stages (fig. 2). The LF stage, in Peaking mode, sweeps from about 250 to 500 Hz. The LMF stage sweeps from around 750 Hz to 1.5 kHz, while the MF stage sweeps from 1.5 to 3.0 kHz.
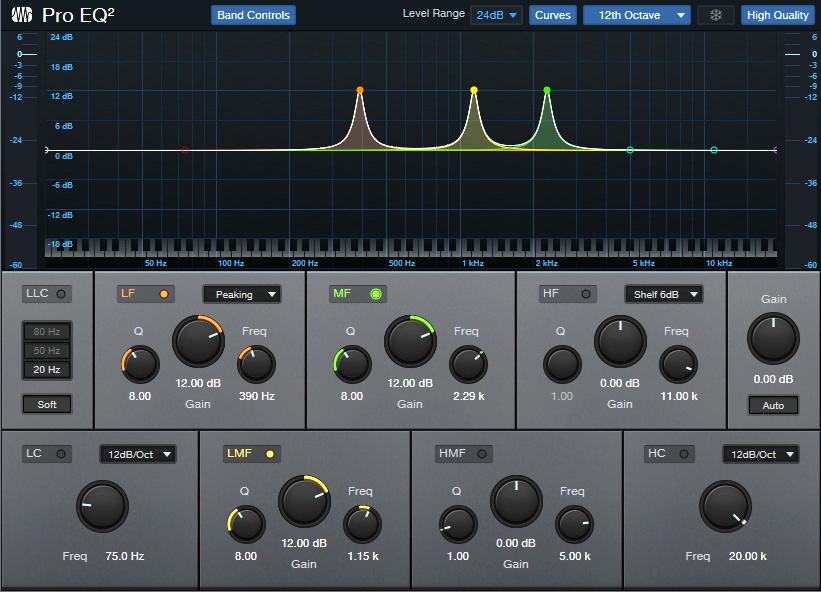
Figure 2: Pro EQ2 stages being used for the filtering.
Channel Editor Settings
Use the Channel Editor to assign the filter frequencies to a Macro control knob (fig. 3).
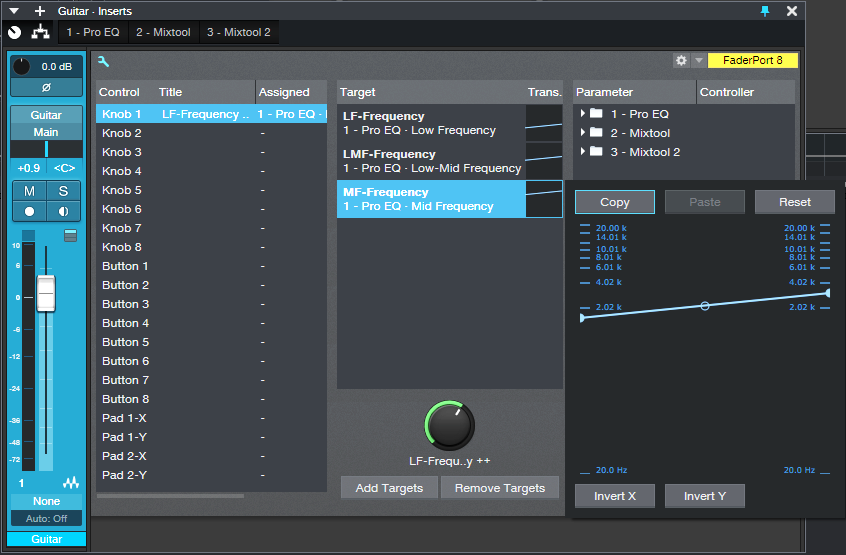
Figure 3: The Macro knob’s range has been edited to cover the Mid Frequency stage’s frequencies. Edit the other targets similarly
The second Mixtool at the output increases the level by 6 dB. This is necessary because one of the splits is out of phase. Because only the filter peaks come through, the output level is considerably lower than the input.
Everything described so far is included in the multipreset, but assigning the Macro knob to a MIDI controller or pedal is up to you. I did a blog post on a way to do this, and the information is also in The Huge Book of Studio One Tips and Tricks. (A heads-up for current owners of the book: a free update will be available soon with more tips, presets, and content, so stay tuned.)
Just remember that you can’t automate the Macro knob per se. You’ll need to add three Automation tracks, assigned to the Low, Low Mid, and Mid frequency parameters. Then, make sure they’re in Write mode when you move the Macro knob control, and they’ll automate the “talk box” changes.
Mix Referencing with Master Matching
Mix referencing, where you compare your mix to well-mixed music, can be a big help if you want a reality check on what you’re doing. There are even “curve-stealing” programs that can analyze the spectral response of one song and apply it to another one, but that won’t help train your ears, and you’ll usually need to make changes anyway. So, let’s explore how to customize the process in Studio One.
As examples, I chose two songs that are about as different as can be—”Kids of Summer” by Mayday Parade (rock), and “Spinback” by Comethazine (rap). The goal was to analyze each song’s spectral response, and come up with Pro EQ2 settings that could apply one spectrum to the other. Let’s hear now it turned out.
Fig. 1 shows the original spectra (the lower of the two lines in the graph is the most relevant). Kids of Summer is heavy on the upper mids around 1 to 2 kHz, where guitars and vocals live. Bass is relatively subdued, and the highs start rolling off above 5 kHz. Spinback is heavy on the bass, lighter on the lower mids, and spices up the treble from 5 to about 7 kHz.
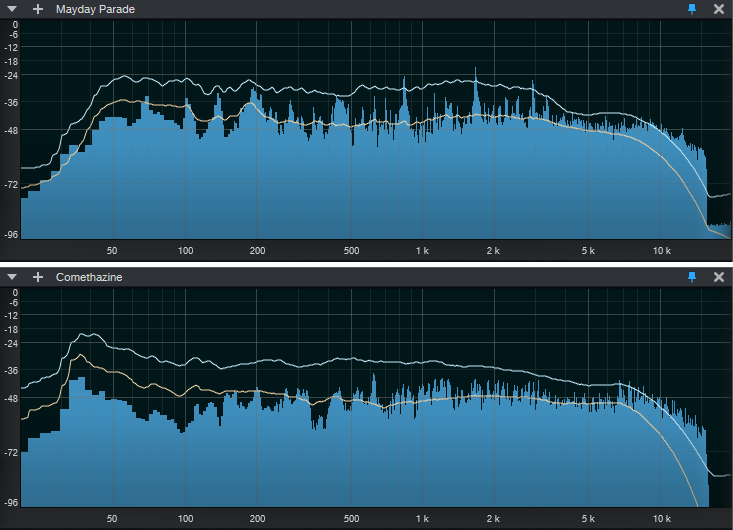
Figure 1: Spectra for Kids of Summer (top) and Spinback (bottom).
Let’s listen to the original songs that the spectra represent. Copyright-wise, I think we’re good to go from a fair use standpoint—the excerpts are under 30 seconds, used for educational purposes, transformative because the EQ is going to change them, and don’t diminish the value of the music.
Now let’s create a EQ to give Kids of Summer more of the Spinback spectral response. Fig. 2 shows the EQ settings.
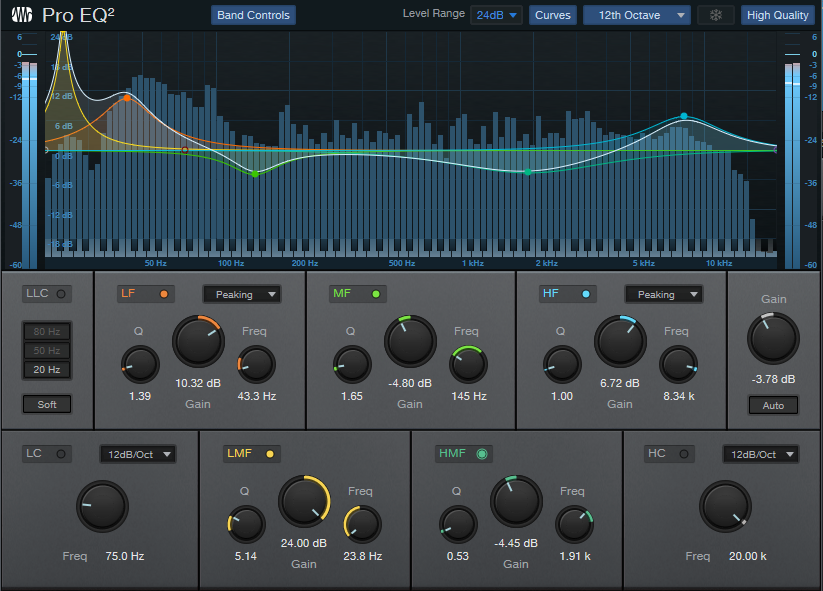
Figure 2: To come closer to the Spinback sound, this boosts lows and highs, and trims the mids.
Fig. 3 shows the spectral response for Kids of Summer after applying the EQ.
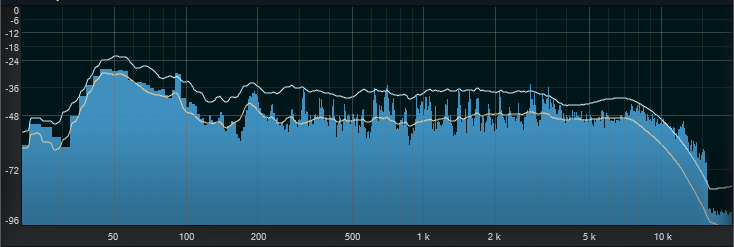
Figure 3: Kids of Summer spectra after EQ. Note how it’s much closer to the Spinback spectra.
And here’s what it sounds like.
I really like how this brings out the low-end fullness, although I’d definitely trim the highs a bit—still, it’s the start of a cool alternative. Note that for a fair comparison, the original and EQed versions were set to the same LUFS value.
Now let’s do the reverse. Figure 4 shows the Kids of Summer EQ curve we’ll apply to Spinback.

Figure 4: To approximate the Kids of Summer sound, this cuts the lows and highs, and boosts the mids.
Fig. 5 shows Spinback’s spectral response after applying the Kids of Summer EQ.
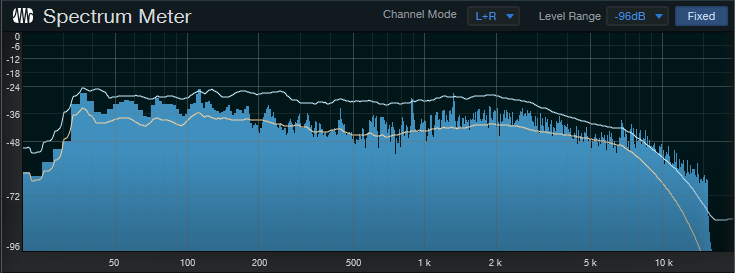
Figure 5: We’ve managed to make the Spinback spectrum much more like the one for Kids of Summer.
Let’s hear what Spinback sounds like now.
Again, the original and EQed versions were set for the same LUFS readings. The difference isn’t as dramatic as applying Spinback to Kids of Summer, because the Spinback arrangement is more sparse. However, the EQ’d version makes the vocals more prominent in comparison the more attenuated low and high frequencies, so the whole song comes more “forward” in the speakers compared to the original. This is something that would cut through better on AM radio and mobile device speakers, at the expense of the low-end fullness and high-end sizzle. Even if you’re an expert mixer, this technique can give you some fresh ideas, and new ways to look at music.
And finally, to all of you, thanks for your continued support of these blog posts—and a big thanks to all the behind-the-scenes folks at PreSonus, like Houston Dragna and Ryan Roullard, who turn them into reality. Have a happy, healthy, productive 2022—and make some great music, so we all can listen to it!
The Songwriter’s Assistant

It happens to everyone: creative blocks. You want to do something musical, but…you keep falling into the same old patterns, or you need something new and different to prod you into being creative. Well, that’s when it’s time to load the Songwriter’s Assistant preset into Studio One’s Chorder Note FX. And although this uses virtual instruments, you don’t even need to know how to play keyboards. Really!
Note FX Basics
A Note FX plug-in processes MIDI data coming from an external controller or Instrument track, before passing the data along to a virtual instrument. The Note FX inserts in an instrument track’s Inspector (fig. 1).
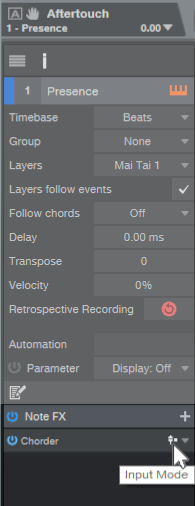
Figure 1: Insert Note FX in the Inspector, like you would insert an Event FX for audio. We’ll describe input mode later.
Studio One has several Note FX, but for assistance with smashing creative blocks, this tip uses Chorder as our Note FX of choice. And in the spirit of the holiday season, there’s a gift you can download—the Songwriter’s Assistant preset for Chorder.
Why Chorder Is Cool
Chorder can stack chords on a single key. This is why you don’t need to play keyboards—just hit a key, and a chord of whatever complexity you want will play. The Songwriter’s Assistant uses two keyboard octaves (fig. 2).
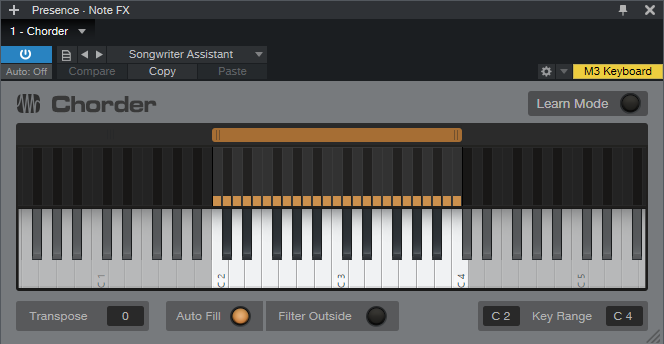
Figure 2: The Songwriter’s Assistant preset.
The range C2 – B2 plays major chords. C3 – C4 plays minor chords. So if you don’t know how to voice chords on a keyboard, no problem! And if you don’t even know what notes correspond to C2 through C4, no worries there, either. Just hit keys that sound good, and later on, we’ll deal with how to show what chords to play on guitar or other instruments.
Studio One’s Help file has plenty of information on how to create your own Chorder presets or modify existing ones (like adding more chord types, like 7ths, to other keyboard octaves), so we’ll just concentrate on using the Songwriter’s Assistant as a plug-and-play Note FX.
Using It
After downloading the Songwriter’s Assistant preset, import it into Chorder. Studio One saves Chorder presets in [drive]\Studio One\Presets\PreSonus\Chorder. Insert an instrument, and then insert Chorder as shown in fig. 1.
Now start playing notes, and come up with cool chord progressions. Record them in the Instrument track to build up your song’s chord progression. That’s all there is to it.
The instrument track can show the note(s) you played, or the notes Chorder generates. With Input Mode (fig. 1) set to “pre” (the same graphic as a send being pre), the track records Chorder’s output. With “post,” it records your original input, although you’ll still hear chords play back. If you selected post but want the track to include the Chorder-generated notes, right-click in the track, and choose Render Instrument Tracks. Now you’ll see what Chorder generated.
Finally, if you don’t play keyboards, just open the Chord Track and drag the instrument track up to it. Studio One will parse your chord progression, and show you the chord letters. Better yet, choose View > Chord Display to see giant chord letters marching across your screen.
And don’t overlook the factory presets, where you’ll find plenty more ideas for generating chord progressions. Is this cool, or what?
The Night Before Christmas (And All Through Studio One)
Check out renowned composer, Robin Hoffmann’s, rendition of “The Night Before Christmas” created exclusively in Studio One showcasing the use of Sound Variations prominently.
HAPPY HOLIDAYS to everyone!
Give yourself or someone you love the gift of music-making this holiday season.
Join PreSonus Sphere today!
Only $14.95 per month for Studio One Professional, Notion, and so much more.
Add Lookahead to the Fat Channel Compressors
The Fat Channel is a versatile channel strip plug-in that, because of all the other cool Studio One individual processors, is easy to overlook. But it has several outstanding features, including the ability to choose from a variety of compressors—sort of like plug-ins within a plug-in (fig. 1). Three are stock; the rest are optional at extra cost from the PreSonus shop.
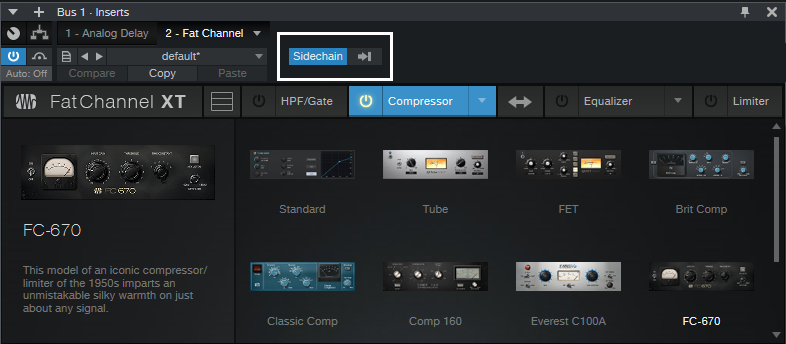
Figure 1: A fully loaded Fat Channel can choose from 11 compressors.
However, none of these compressors has a lookahead feature. Lookahead delays the audio we hear, but the compressor monitors the audio in real time. Thus, the compressor knows in advance when it needs to apply compression. Without lookahead, if you’re using heavy compression (like for guitar sustain), you’ll hear a nasty pop because the compression can’t kick in until the audio exceeds the threshold—and by that time, it’s too late. Some of the audio has already passed through uncompressed, which causes the pop. The first audio example exhibits this pop. Also note that the first and second audio examples are both normalized—but this one sounds really soft, because the pops are so loud you can’t raise the level any higher without bumping against the headroom.
The solution is simple. What’s more, it applies to not only the Fat Channel, but any dynamics processor, from any manufacturer, that doesn’t have lookahead.
Create a bus, and insert the Analog Delay. Edit the parameters for 2 ms of delay, delayed sound only, and no modulation (fig. 2). Insert the Fat Channel after the Analog Delay, and choose your favorite compressor.
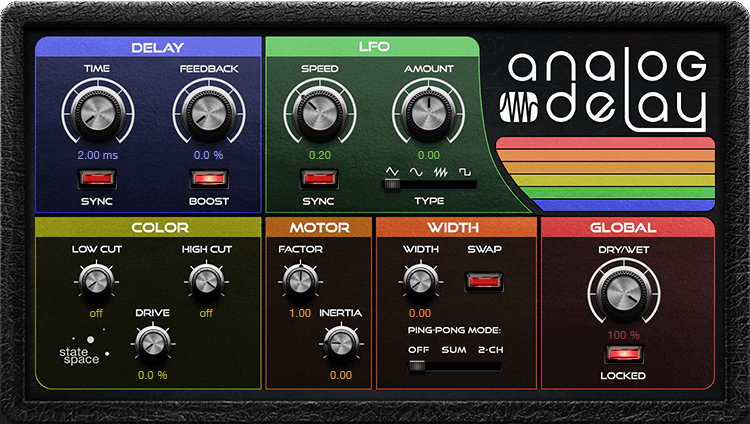
Figure 2: Analog Delay settings for the lookahead function.
At the audio track you want to process, create two pre-fader sends. One goes to the bus, and the other to the Fat Channel’s sidechain. Turn down the track’s fader so you hear only the audio coming from the bus. This accomplishes our goal: The audio applies compression to the Fat Channel 2 ms before the audio enters the compressor. So, the compressor is primed and ready to go when a transient hits (fig. 3).

Figure 3: Track and bus setup for Fat Channel lookahead.
Now compare the next audio example to the first one—the nasty pop is gone. Yeah! Also notice how it’s much louder, because the headroom doesn’t have to accommodate a pop.
However, there’s a catch. Studio One plug-ins with a lookahead function delay the signal by 1.5 ms, but apply plug-in delay compensation so that all the other tracks are delayed by 1.5 ms. This keeps the tracks in sync, and you don’t really notice a delay this short. However, our “faux lookahead” doesn’t have plug-in delay compensation.
Then, move the track forward on the timeline by 2 ms to align it with the other tracks. You can do this via the Delay setting in the Event Inspector (F4).
So…What’s the Deal with Aux Channels?
Hardware is making a comeback. Real-time, improvisation-based drum machines and synths are gaining popularity, and you can find occasional bargains for used synths that were top of the line only a few years ago. So, it makes sense that Studio One would want to simplify integrating external hardware synths (similarly to how Pipeline integrates external hardware effects).
When Version 5 introduced the Aux Channel, comments ranged from “So great—I’ve been wanting this for years!” to “why not just feed the instrument into audio tracks?” Well, they’re both right—Aux Channels are about workflow with external hardware synthesizers. But Aux Channels can streamline workflow and simplify setup, compared to assigning the instrument outs into audio tracks, which then route to the mixer.
Aux Channels monitor external audio interface inputs directly, not the outputs from recorded tracks, in the mixer. These external inputs can be any audio. For example, when mixing, you might want to listen to a well-mixed CD for comparison. You don’t need to record this as a track, just monitor the inputs it’s feeding as needed.
Aux Channel Benefits
My favorite feature is that you can add a hardware synthesizer to the External Instruments folder (located in the Browser’s Instruments tab), and drag and drop the hardware synth into the arrange view—just like a virtual instrument. This automatically creates the Aux Channel, and sets up the Instrument track as you saved it. Set up the external synth once, then use it any time you want.
Also, the external instrument needs only the Note data track in the Arrange view—audio tracks are unnecessary because you’re just going to mix them in the console anyway. This is consistent with Studio One’s design philosophy of dedicating the Arrange view to arranging, not mixing. Of course, you can show/hide audio tracks in the Arrange view, but it’s more convenient to have those audio tracks show up directly in the console, like your other audio sources.
How to Create an Aux Channel
First, your hardware sound generator needs to be set up as an external Instrument in the Options (Windows) or Preferences (Mac) window. Then, in the Console, click on External toward the lower left. Click the downward arrow for the desired External Device, and choose Edit. (Note that if it’s a workstation that combines a sound generator with a keyboard, you should have two entries—one for the Keyboard, and one for the Instrument. Choose the instrument.)
When the control mapping window appears, click on the Outputs button (the one with the right arrow; see fig. 1), and choose Add Aux Channel.
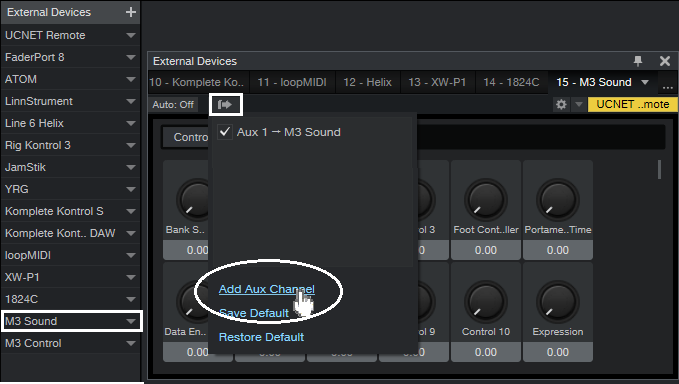
Figure 1: How to add an Aux Channel for an external device.
After the Aux Channel appears, assign its input to the audio input(s) being fed by the hardware synth. For example, if the synth’s audio is going to stereo input 3+4, then choose that stereo input. (If your existing Song Setup I/O doesn’t include an easily identifiable name for the inputs being used for the Aux track, considering doing some renaming.)
Next, save these default settings. If needed, click on Outputs again to bring up the controller mapping window, and click on Save Default. Saving it is what allows the hardware instrument to show up in the Browser.
All Ready!
In the Browser’s Instruments tab, look under External Instruments (toward the top, just under Multi Instruments). Drag your instrument into the Arrange view, and start playing. If you don’t hear anything, the likely causes are either that the keyboard being assigned to the synth isn’t the default keyboard (specify All Inputs for MIDI in, and it should work), or the Aux Channel input hasn’t been assigned to the correct audio interface inputs.
Also note that with workstations whose keyboard drives the sound generator, turn off the Local Control parameter (usually in the instrument’s MIDI setup menu). Otherwise, you’ll be playing the sound generator from the keyboard, and Studio One will also be feeding it notes. The result is note double-triggering.
Bouncing
To preserve what the Instrument track plays as an audio track, choose a track’s Transform to Audio Track option, or select the Event and bounce to a new track (fig. 2).

Figure 2: The bounce menu for hardware instruments.
When bouncing, make sure that the Record Input is assigned to the Aux Channel where the Instrument’s audio appears. Finally, Studio One knows that because the bounce involves external hardware, the bounce must be done in real-time (faster than real-time bouncing is possible only with virtual instruments that live inside the computer). Happy hardware, everyone!
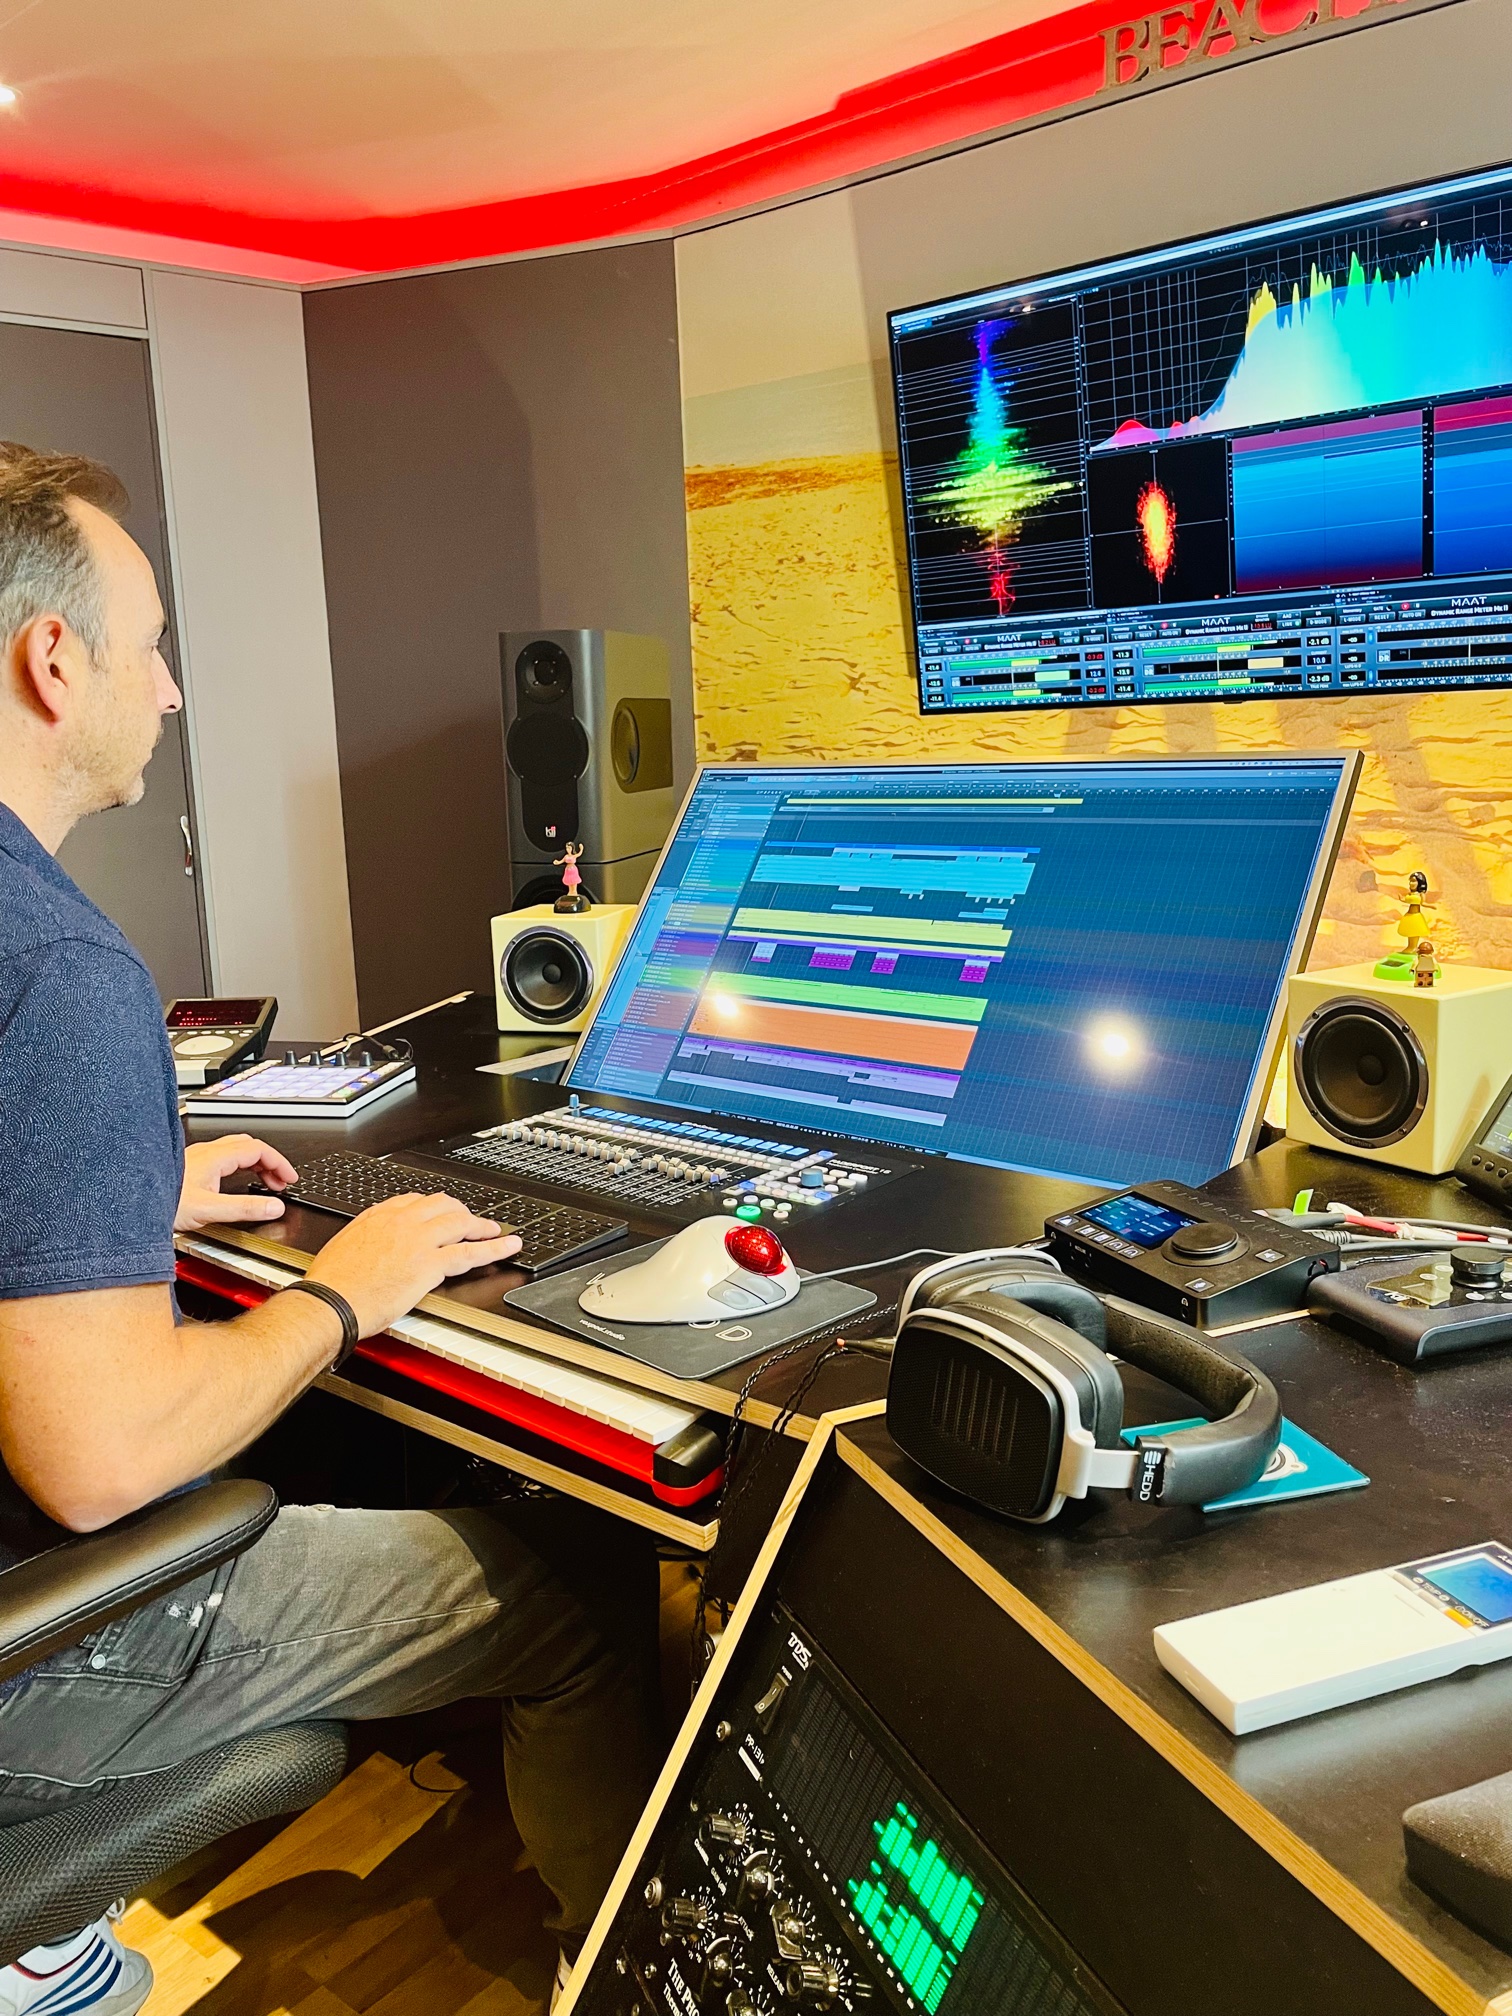
James F. Reynolds: VOXPOD Studios and Studio One
So why is BTS (방탄소년단) “Fake Love” official video shown above?
Because their hit song was mixed in Studio One Professional by our latest PreSonus Sphere Featured Artist, James F. Reynolds!
Let’s catch up with the man himself and find out more about what he’s been up to lately:
 I started off my mixing career mixing Tinie Tempah’s triple-platinum album Discovery. Prior to this I wrote and produced music and was signed to labels such as Virgin and Defected Records. Since mixing Tinie’s album I have been busy mixing records for many artist including BTS, Sigrid, Dua Lipa, Kodaline, The Disciples, Sigma and most recently Shane Cod and his platinum single, “Get Out Of My Head.”
I have been mixing in Studio One for six years now and it keeps getting better and better. PreSonus really listens to user feedback and implements suggested improvements frequently; I haven’t experienced this with any other DAW.
Studio One allows for a very fast workflow and because of it’s intuitive build and design I can easily focus on the mixing.
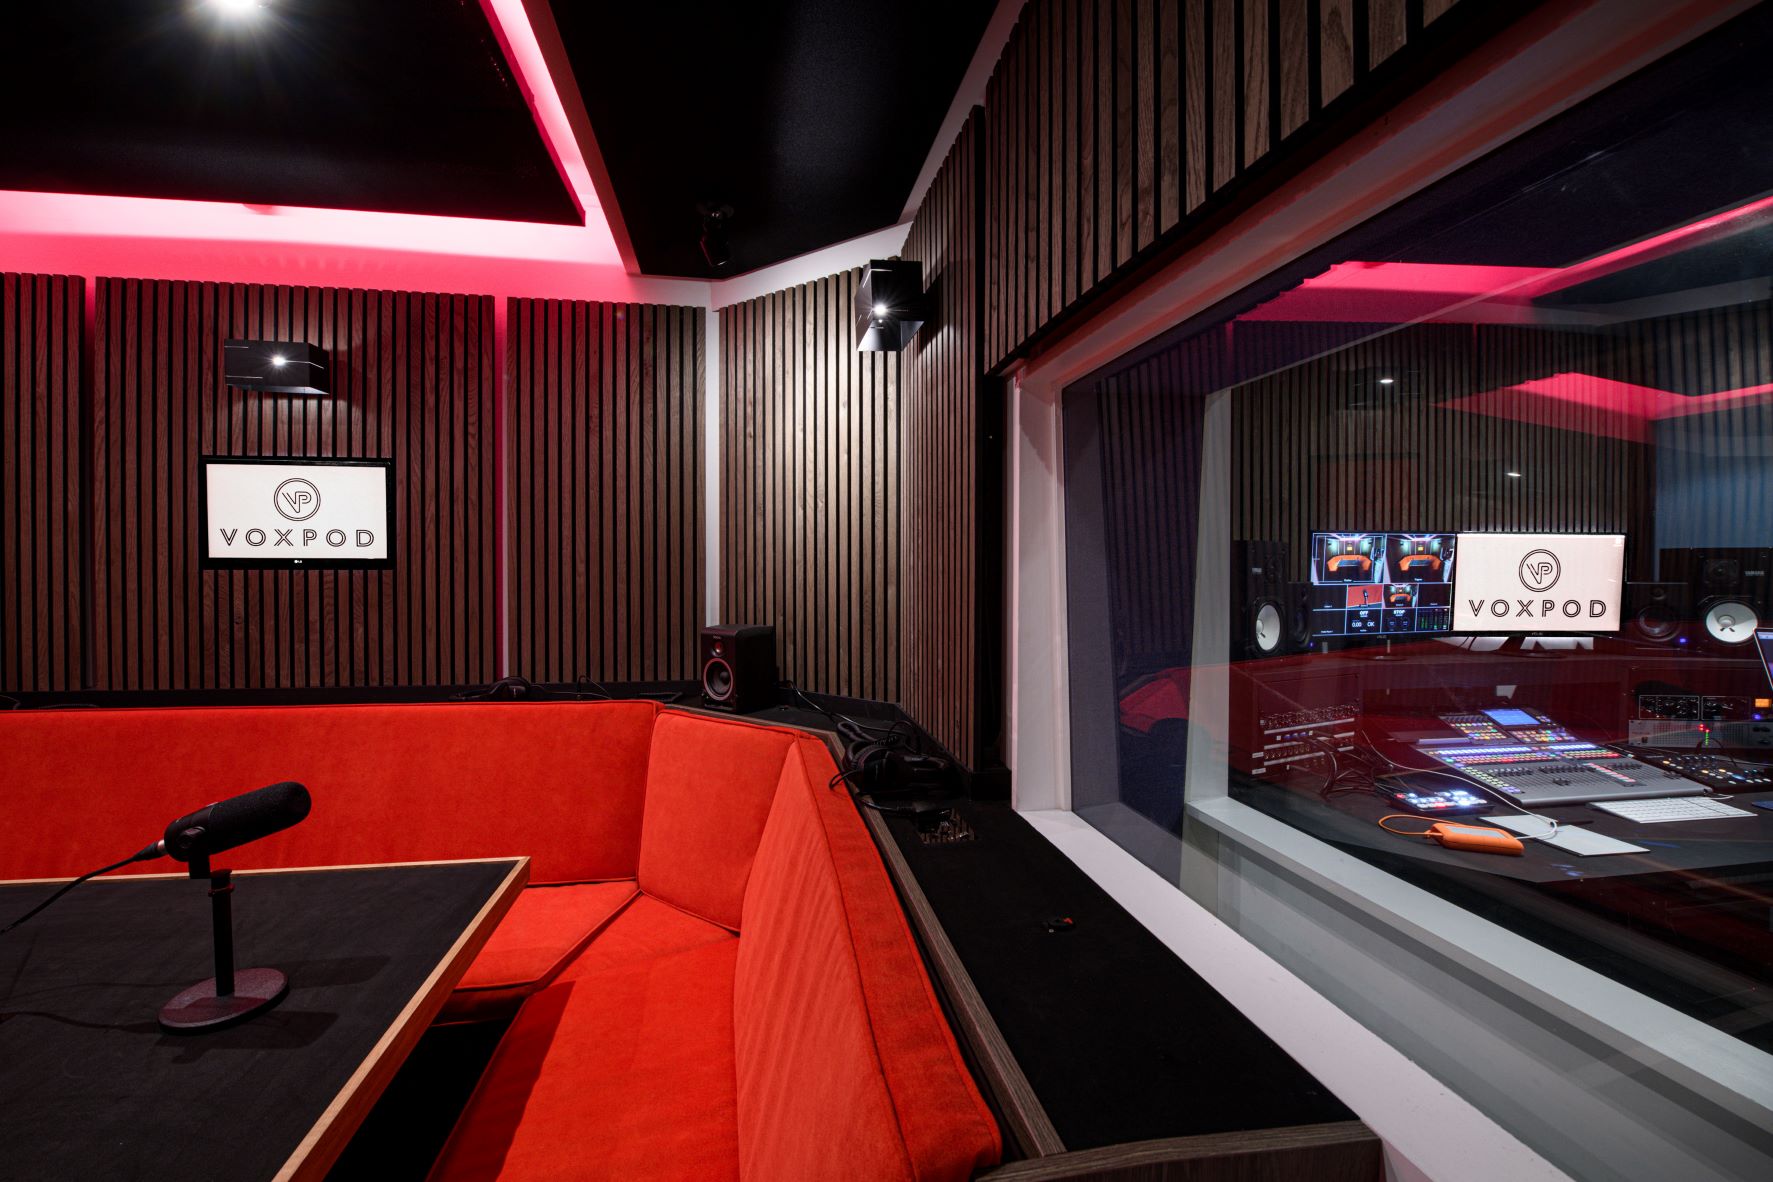
During lockdown in 2020, we decided that London was lacking in high-end state of the art podcast production facilities, so we built VOXPOD Studios. My podcast room can host up to eight people and also offers livestreaming and video recording of the shows on five video cameras placed around the room.
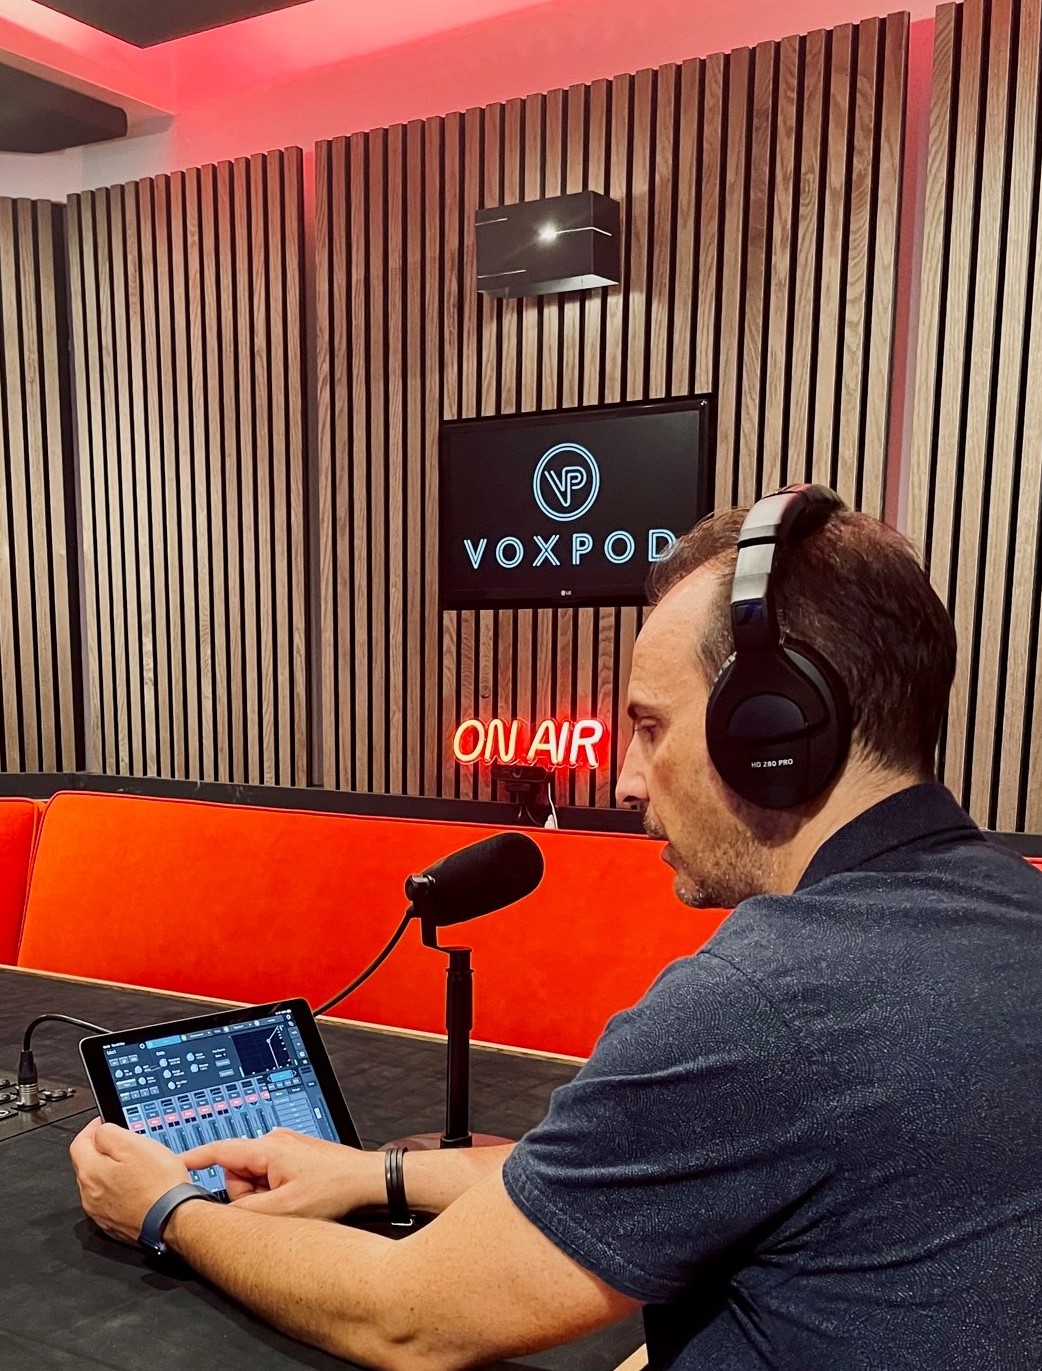 The PreSonus PD-70 dynamic mic has proven to be a game changer in VOXPOD studios. Its sound quality and tone set the bar above all the others on the market.
VOXPOD Studios has already started hosting shows for some big podcasts here in the UK, including the James Smith Podcast and Rugby’s leading podcast, “The Good The Bad and the Rugby.”
Lastly, another new positive feature of 2020 was the launch of PreSonus Sphere. It’s truly a brilliant way of connecting the rapidly growing number or Studio One users, world-wide. I love being able to try out suggested Presets and Studio One shared components from other engineers, writers and producers.
Join PreSonus Sphere today to check out James’ exclusive Presets and from those by other featured artists!
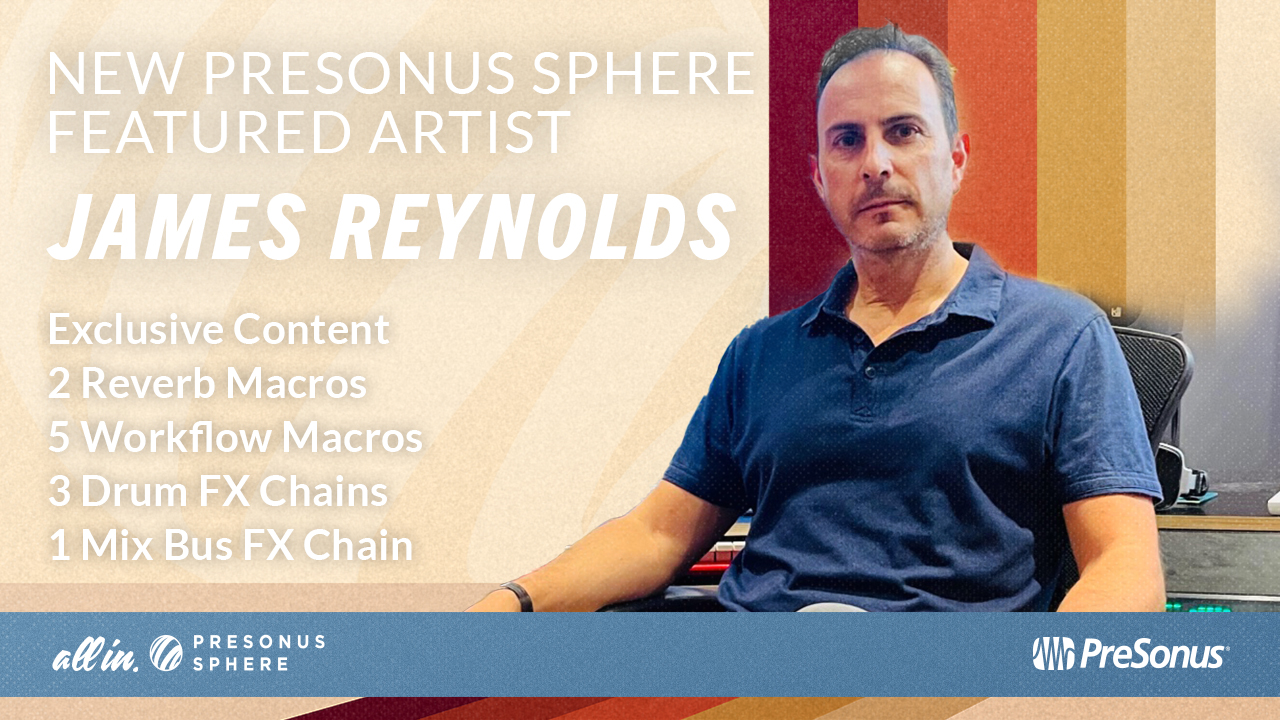
James F Reynolds: PreSonus Sphere Featured Artist
They include: two Reverb Macros, five Studio One Workflow Macros, three Drum FX Chains and a Mix Bus FX Chain for all PreSonus Sphere members to access and enjoy.
Only $14.95 per month for Studio One Professional, Notion, and so much more.
Amp Sims: Garbage In, Garbage Out

An astute Friday Tip reader commented that while the tip on how to level the outputs of amp sim presets was indeed useful, I should also write about the importance of input levels. Well, I do take requests—and yes, input levels are crucial with amp sims.
Physical amp sims are forgiving. They soak up transients, and chop off low and high frequencies. But amp sims tend to magnify the differences between guitars and playing styles. When going through the same preset, a player who uses a thin flat pick, 0.008 strings, and single coil pickups will sound totally different compared to a player who uses a thumbpick, 0.010 strings, and humbuckers. So, let’s look at four common mistakes people make when feeding amp sims.
- Dialing up presets created by someone else. You have no idea what kind of input level the amp sim expects, so you’ll almost certainly need to edit at least some parameters (particularly the input drive or level).
- Too much gain. Excessive gain generates nasty distortion, not the “good” distortion an amp creates. You’ll also have issues with decreased definition, potential aliasing, and a sound that splatters all over a mix. Check out the audio example, using Ampire’s Painapple amp.
The first half has the input set to 5 o’clock. Not only is the sound so distorted the playing is indistinct, listen to the very beginning, before the first note hits. All that gain is picking up noise, hum, and garbage that becomes part of your guitar signal. No wonder the amp sim sounds like garbage—it has plenty of garbage mixed in. The audio example’s second half has the input at 9 o’clock. The sound is not only more focused, but stronger.
- Inconsistent levels. Amp sim plug-ins are always re-amping—the guitar track is dry. Because amp sims are so dependent on levels, consistent sounds from presets require consistent track levels. I normalize my dry guitar tracks to -3 dB, and then my presets know what to expect. Also, note that Event level adjustments are before the amp sim. Sometimes all that’s needed to optimize the guitar sound is to lower the Event level in places where you want more definition, and raise it when you prefer heavier distortion.
- Too many low and high frequencies. Guitar amps were never about flat frequency response. Rolling off lows below the guitar’s range keeps out bass energy that has nothing to do with your playing, and rolling off the highs a bit simulates the high-frequency loss through long cables—something amp sims don’t emulate. In the next audio example, the first half is the same overly distorted sound as the previous audio example’s first half. The second half doesn’t change the input level, but rolls off the lows and highs with the Pro EQ, prior to the amp sim. Fig. 1 shows the Pro EQ settings.
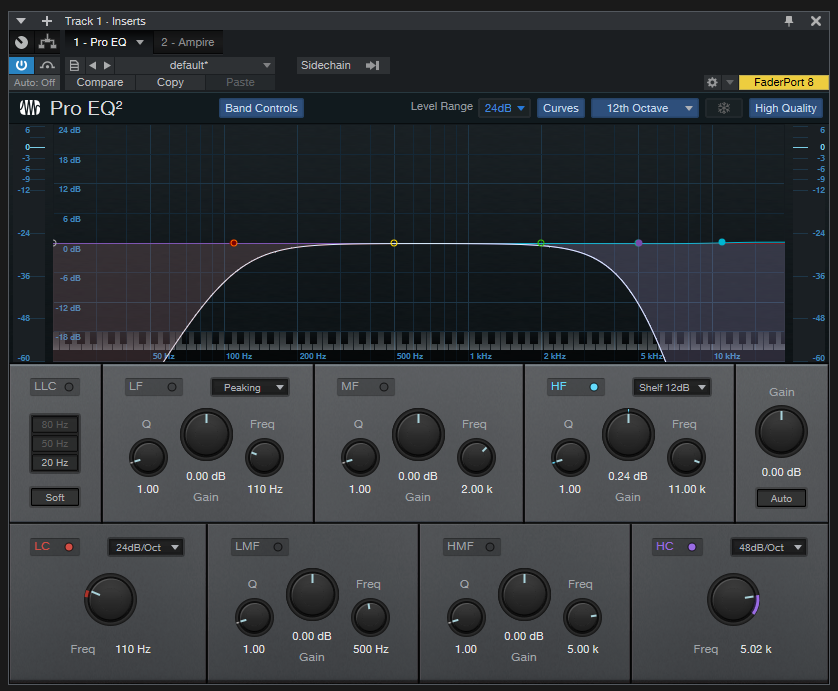
Figure 1: Rolling off the lows and highs before feeding an amp sim can clean up the sound.
In particular, listen to the spaces between notes. The version without EQ has a sort of bassy mud between notes that detracts from the part’s focus.
The bottom line is simple: If your amp sim doesn’t sound right, the quickest fix might be as simple as turning down the input level, and rolling off some lows and highs before the amp sim.
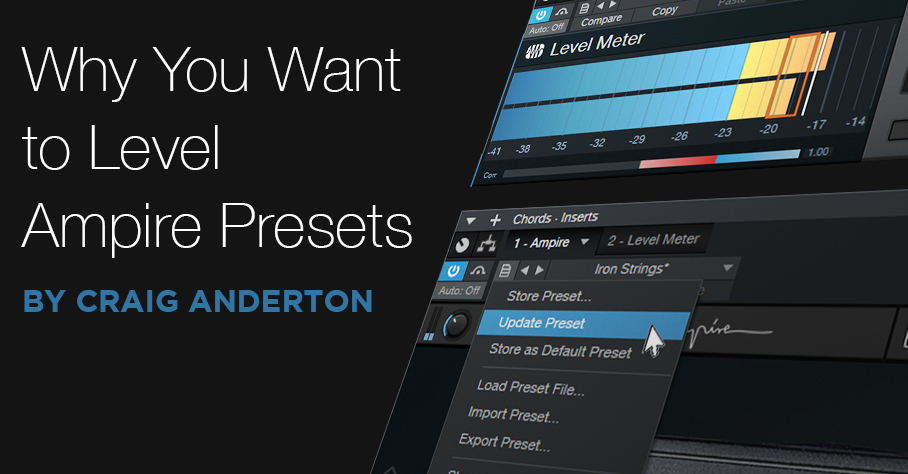
Why You Want to Level Ampire Presets
It’s great we can store presets, trade them with other users, and download free ones. But…when selecting different Ampire presets to decide how they fit with a track, you want their levels to match closely. Then, your evaluation of the sound will be based on the tone, not by whether the preset is softer or louder. However, consistent preset levels are not a given.
Having a baseline level for presets, so you don’t need to change the level every time you call up a new one, is convenient. You can’t really use VU meters for this, because you want sounds to have the same perceived level, which can be different from their measured level. For example, a brighter sound may measure as softer, but be perceived as louder because it has energy where our ears are most sensitive.
My standard of comparison is a dry guitar sound, because I want the same perceived level whether Ampire is enabled, or bypassed. You might prefer to have Ampire always be a few dB louder than your dry guitar—whatever makes you happy.
Enter LUFS
The LUFS (Loudness Unit Full Scale) measurement protocol measures perceived loudness. LUFS measurements allow streaming services like YouTube, Spotify, Apple Music, and others to adjust the volume of various songs to the same perceived level. This is why you don’t have to change the volume every time a different song shows up in a playlist. The system isn’t perfect, but it’s better than dealing with constant level variations. Fortunately, Studio One has a Level Meter plug-in that gives LUFS readings (fig. 1).
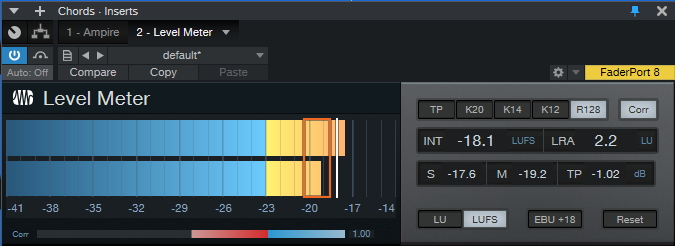
Figure 1: The Level meter can measure levels based on a variety of standards, including LUFS.
The Process
- Record at least two Events—one for chords, and one for single-note leads. If you use bass presets, you’ll also want an Event with a bass line. Record about a 15 second clip of continuous guitar chord progressions, and another clip with 15-30 seconds of single notes (and/or bass lines), also without pauses.
- Insert the Level meter after Ampire, and enable its LUFS and R128 buttons. Set the appropriate event to loop, and start playback.
- With Ampire bypassed, adjust the Event’s level for a nominal LUFS reading. I use -18 dB because that works well with Ampire, Helix, and other amp sims. After setting your standard level, it’s a good idea to lock the Events from editing (context menu > Toggle Edit Lock).
We interrupt these steps to bring you an important bulletin: The Level Meter reading that matters is the INT field. This averages out the audio, so you’ll see the reading change at first, and then settle down to a consistent LUFS reading. When you change levels, call up a different preset, or make any changes, click on the Reset button to re-start the averaging process. When doing any LUFS measurements, you can’t be sure the reading is correct until you’ve a) hit Reset, and b) played the event several times, which is why we want to loop it.
We now return to the step-by-step procedure.
- Enable Ampire, and call up a preset. Hit the Level Meter’s Reset button, and after the Event has played through a couple times, check the LUFS meter reading.
- In my case, an LUFS reading of -20 would mean the preset level is about 2 dB lower than my standard -18 dB level. So, I’d raise Ampire’s output control (fig. 2) by 2 dB. On the other hand, if the LUFS reading was -14 dB, it would be about 4 dB louder than my standard. I’d instead need to lower the output level control by 4 dB.

Figure 2: Use the output control to obtain similar levels from different presets.
- After adjusting the level, hit Reset on the Level Meter, and play the loop a few times. If the reading is the same as the nominal value…done! Otherwise, re-tweak.
- The final step is to click on Update Preset (fig. 3), so you don’t have to do this again.
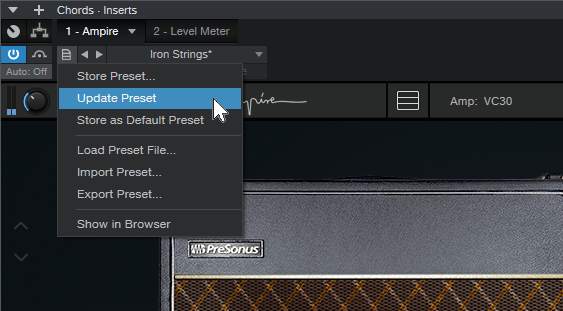
Figure 3: Save your work for future sessions.
And while you’re at it, save the Song you used to do this testing. Then you can call it up again in the future, when you want to match preset levels.
Okay, so it took a little time to balance all your presets. But when deciding what preset to use in the future, you’ll be glad you set them all to a baseline level.