Category Archives: Friday Tip of the Week
The Dynamic Brightener—Reloaded
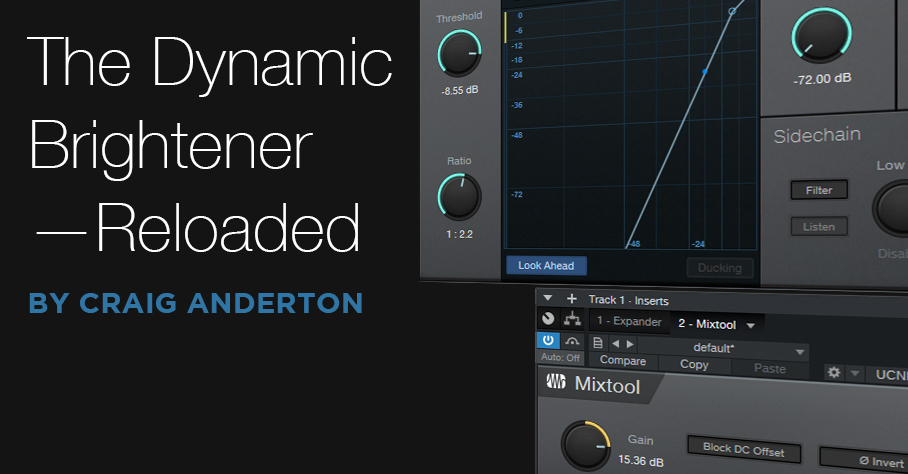
In April 2019, I did a Friday Tip called The Dynamic Brightener for Guitar. It’s kind of a cross between dynamic EQ and a transient shaper, and has been a useful FX Chain for me. In fact, it’s been so useful that I’ve used it a lot—and in the process, wanted to enhance it further. This “reloaded” version makes it suitable for more types of audio sources (try it with drums, bass, ukulele, piano, or anything percussive), as well as less critical to adjust. It also lessens potential high-frequency “smearing” issues—the original version applied large amounts of boost and cut, with a non-linear-phase EQ.
Although the original version could have been built using a Splitter, I did a bus-based implementation so that it would work with Studio One Artist. This new version needs to use the Splitter (sorry, Artist users), but that’s what allows for the improvements.
Another interesting aspect is that by using the effects’ expanded view in the channel inserts, you don’t even need to open the effect or Splitter interfaces, to do all the necessary tweaking. This makes the reloaded version much easier to edit for different types of tracks.
How It Works
Fig. 1 shows the FX Chain’s block diagram.
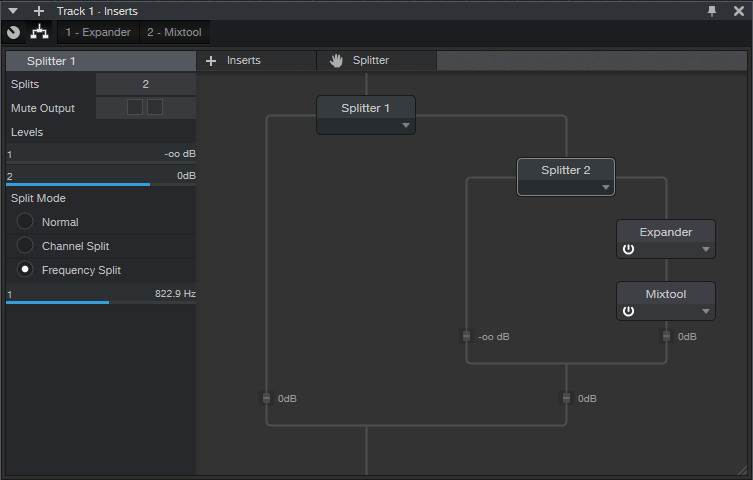
Figure 1: The Reloaded Dynamic Brightener’s block diagram.
Splitter 1 is a normal split. The left split provides the track’s dry sound, while the right split goes to Splitter 2, which is set up as a Frequency Split. The Frequency Split determines the cutoff for the high frequencies going into the right split. Splitter 2’s left split, which contains only the split’s lower frequencies, is attenuated completely. Basically, Splitter 2 exists solely to isolate the audio source’s very highest frequencies.
These high frequencies go to an Expander, which emphasizes the peaks. This is what gives both the transient shaping and dynamic EQ-type effects. Because the high frequencies aren’t very loud, the Mixtool allows boosting them to hit the desired level.
Fig. 2 shows the initial Expander and Mixtool settings. But, you won’t be opening the interfaces very much, if at all…you don’t even need Macro Controls.
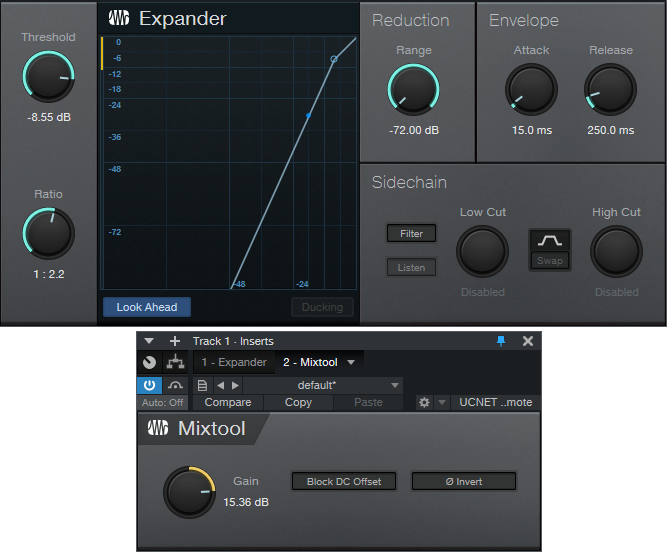
Figure 2: Initial parameter settings for the Expander and Mixtool.
Using the Reloaded Dynamic Brightener
In the short console view, open up the “sidecar” that shows the effects. Expand the effects, and set the mixer channel high enough to see the ones shown in fig. 3.
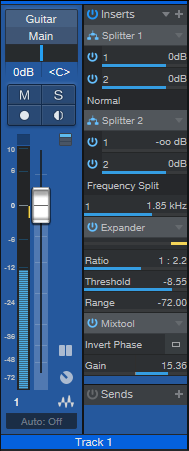
Figure 3: The Reloaded Dynamic Brightener controls.
Here’s how to optimize the settings for your particular application:
- Turn off Splitter 1’s output 1 power button. This mutes the dry signal, so we can concentrate on the brightener’s settings.
- Adjust Splitter 2’s Frequency Split to isolate the optimum high-frequency range for brightening. This can be as low as 1 kHz or less for guitars with humbucker pickups, on up to 6 kHz (or more) to emphasize drum transients.
- Set the Expander’s Ratio and Threshold parameters for the desired amount of brightening and transient shaping. Higher Threshold settings pick off only the top of the boosted high-frequency peaks; the Ratio parameter controls the transient shape. The higher the ratio, the “peakier” the transient.
- After editing the high frequencies, re-enable the dry signal by turning on Splitter 1’s output 1 button.
- Mix in the desired amount of brightening with the Mixtool Gain parameter. In extreme cases you may want to increase the level control at the end of the Splitter 2 branch, or the output level from Splitter 2 output 2, but this will be needed rarely, if at all.
- As a reality check to determine what the brightener contributes to the sound, turn off either Splitter 1 or Splitter 2’s output 2 power button to mute the brightened signal path.
This is a tidier, easier-to-adjust, and better-sounding setup than the original dynamic brightener. Download the FX Chain here—the default settings are for dry guitar, and assume a normalized overall track level. With lower track levels, you’ll need to lower the Expander Threshold, or boost output 2 from Splitter 1. But feel free to tweak away, and make the Reloaded Dynamic Brightener do your bidding, for a wide variety of different audio signals.
The Virtual “Back of the Tape Box.”
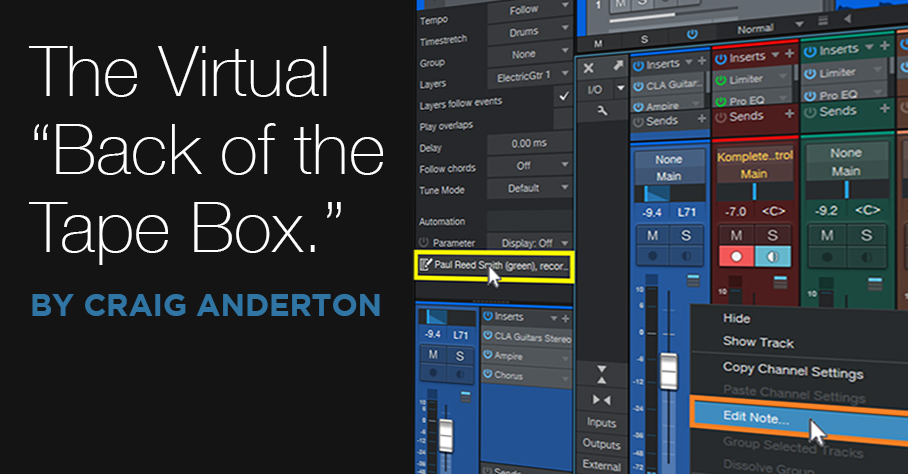
In the 20th century, tape reels came in boxes. Engineers wrote information about tracks, running order, timing, credits, and such on the back of the box. And because it was a box, you could fold up some sheets of paper and include lyrics, notes, and other information
These days, when you open a project, it’s just like you left it. But what mics did you use? How was the tone control set on the bass? And you got those loops from…which sample library? If you ever need to re-visit a track, fix a glitch, do an overdub, or weeks pass before you can finish a project, you’ll need to know these details. Let’s talk about taking notes, and while we’re keeping track of things, let’s also create a lyrics track.
Taking Notes
To access Studio One’s virtual “back of the tape box,” choose Song > Song Information.
- The Info tab shows selected meta data, info from the Song Notes tab, and any image you uploaded to Song Setup. The image can show an album cover, but also a miking setup, an analog processor’s control settings, or a cool picture that inspires you.
- For developing song lyrics, I keep the Song Notes tab open, and do my writing/editing there. Saving lyrics with a song is convenient. However, it’s also useful for other notes—session personnel, web site URLs with reference info, and so on.
- Track Notes (fig. 1) is where you can include all track-related information. It’s ideal for info that’s not included in a preset, like the vocal mic of choice, analog processor control settings, and which pickup you used on a guitar.

Figure 1: Track notes are key to documenting a session.
Track Notes Access Shortcuts
In addition to accessing track notes in the Song Information menu, you can scroll down in the Inspector to the field below automation, and click on it to open the corresponding Track Notes (fig. 2). Or, right-click anywhere within a Console channel, and select Edit Note from the context menu. This is the fastest way to view or edit Track Notes, compared to going to Song Information, selecting a tab, and then clicking on the track label.
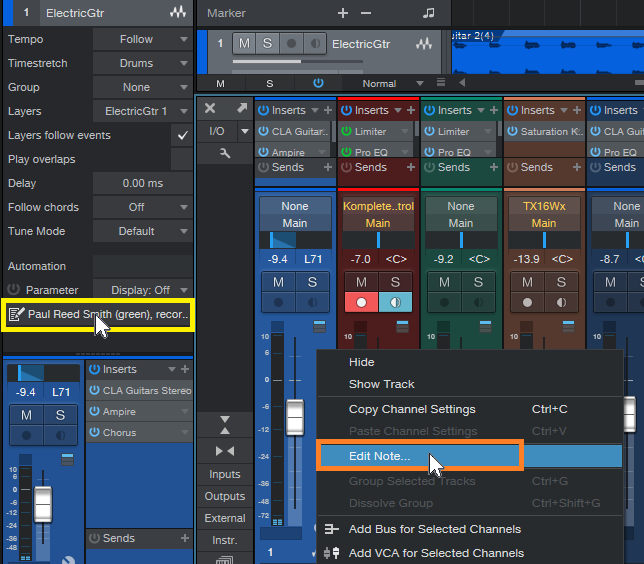
Figure 2: Open track notes from within the Inspector by clicking, or in a mixer Channel by right-clicking.
Furthermore, you can supplement Track Notes by entering information in the track name itself. Hovering over the name in the Arrange window or a mixer Channel (fig. 3) shows whatever you entered, which can be quite long if needed. This is useful for temporary notes, like if you recorded several similar parts, and need to differentiate among them.

Figure 3: You can see long track names by hovering over them.
Pipeline Docs
Analog processors…you love ‘em, right? But when they don’t have presets, and you’re using them with Pipeline, you’ll want to know how the controls were set. Pipeline’s image icon (lower left) allows uploading an image of control settings, while the pencil icon allows adding a note (fig. 4).
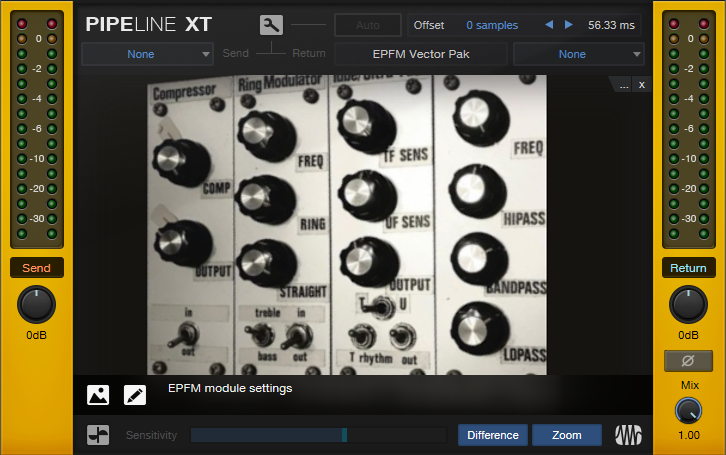
Figure 4: The rack of effects from my book “Electronic Projects for Musicians,” being used with Pipeline.
A photo larger than 1200 x 1200 will be scaled to fit the image space, but click on the image, and it expands to the original size. You may even be able to see all the controls on a rack-mount piece of gear.
If you have an analog synthesizer with so many controls they won’t fit in a picture, no problem. Pipeline doesn’t have to be used for its intended purpose. You can take a picture of the synth’s oscillators, another of the filters, another of the envelopes, Then, stack multiple Pipelines within a track, to be used solely as a picture gallery. However, each instance does add latency—when you don’t need to see the pictures, disable the track, and hide it to reduce clutter.
Of course, you could always put the images in a folder, and include that folder in your song folder. But it’s kinda cool that everything you need to know about a song can be stored within that song.
The Lyrics Track
A lyrics track is helpful, because you always know where you are in the song—not just in the “chorus” or “verse.” It can be located right above a vocal, so it’s easy to find and select a particular part that needs editing, overdubbing, deleting, etc. Although Studio One doesn’t have a lyric track per se, you can put one together in two ways (fig. 5). There are pros and cons to each approach.

Figure 5: Lyric track made with markers (top) and with a dedicated “lyrics track.”
Marker-based lyric track. Lyric markers are quite readable, and have useful songwriting functions:
- Select the Marker track, open the Inspector, and jump to a particular phrase by clicking on it. It’s a quick way to get where you want to go.
- Right-click on any marker, select “Create Arranger Sections from Markers,” and now you have the start of an Arranger Track based on the lyrics.
- Right-click on a marker, and choose “Stop at Marker” to make sure that playback won’t continue past that point.
Event-based lyric track. This might be best if you already have a lot of markers inserted, and don’t want to add more. Create a dummy track, and populate it with events whose lengths correspond to phrases. One advantage is that you can color-code the events to help guide you through a vocal by emphasizing certain phrases. Another advantage is that if you zoom in or out, the Event will continue to span the length of the chosen phrase. A Marker is always anchored to the beginning.
Make MIDI Guitar 2 Work with Windows
Jam Origin’s MIDI Guitar 2 (MG2) is a software-only, guitar-to-MIDI converter. It doesn’t require any special jacks, pickups, or multipin connectors—just give it your guitar’s audio output. MG2 works stand-alone, but can also insert as a plug-in into your guitar’s audio track, and generate a MIDI output. This shows up as an available MIDI input to an instrument track.
Unfortunately, when used as a plug-in, I encountered numerous issues—primarily degraded pitch bend performance and problems with VST3 instruments (apparently this is a common issue). I just couldn’t get it to work in a satisfying way.
However, there’s a workaround—and it works well. Pitch bends translate more smoothly, and it doesn’t matter whether the virtual instrument you’re driving is VST2 or VST3. Of course, like any MIDI guitar, you’ll need to clean up the data a bit but mostly, this involves just deleting notes shorter than a certain length. Pitch bending often needs editing, but on the other hand, MG2 handles vibrato very well.
The Solution: Virtual MIDI Ports
The solution is not to use MG2 as a plug-in. Instead, run it in stand-alone mode, assign its output to a virtual MIDI port, and set Studio One’s virtual instrument to that same virtual MIDI port. This approach bypasses any potential issues caused by taking MIDI data from an audio plug-in out, passing it through a DAW, and feeding it into an instrument.
Unlike the Mac, Windows doesn’t support virtual MIDI ports natively. However, the loopMIDI accessory program from Tobias Erichsen solves that. Download the program, and install it. The loopMIDI icon shows up in the taskbar. Right-click on it, and choose Configure loopMIDI (also check Autostart loopMIDI while you’re at it). Configuring just means hitting the + sign to create a port (fig. 1).
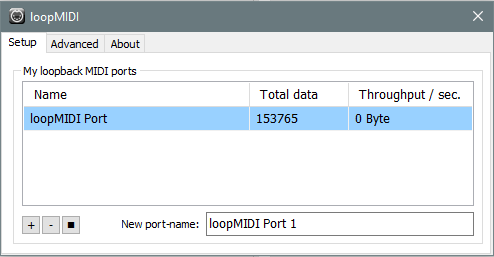
Figure 1: Configuring loopMIDI port.
After installing loopMIDI, we need to tell Studio One there’s a new MIDI control device. Open Studio One (because you checked Autostart, loopMIDI will already be running), and choose Studio One > Options > External Devices. Click the Add button, and set up loopMIDI as a MIDI keyboard (fig. 2).
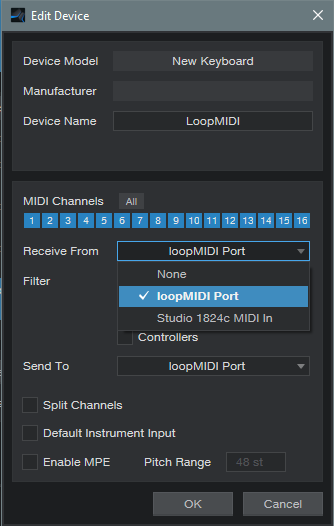
Figure 2: loopMIDI is being set up as a new MIDI controller.
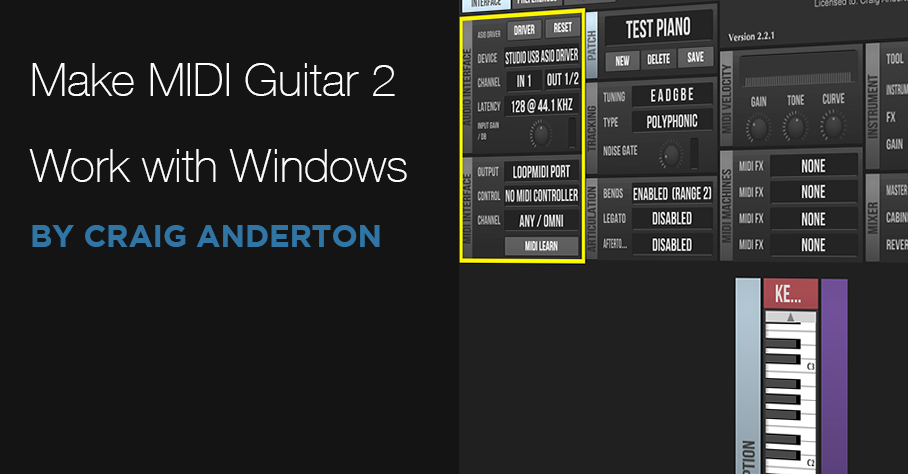
Next, set up MG2 in stand-alone mode (fig. 3). Note that there’s no problem with running MG2 and Studio One at the same time using a PreSonus ASIO interface (probably others as well).
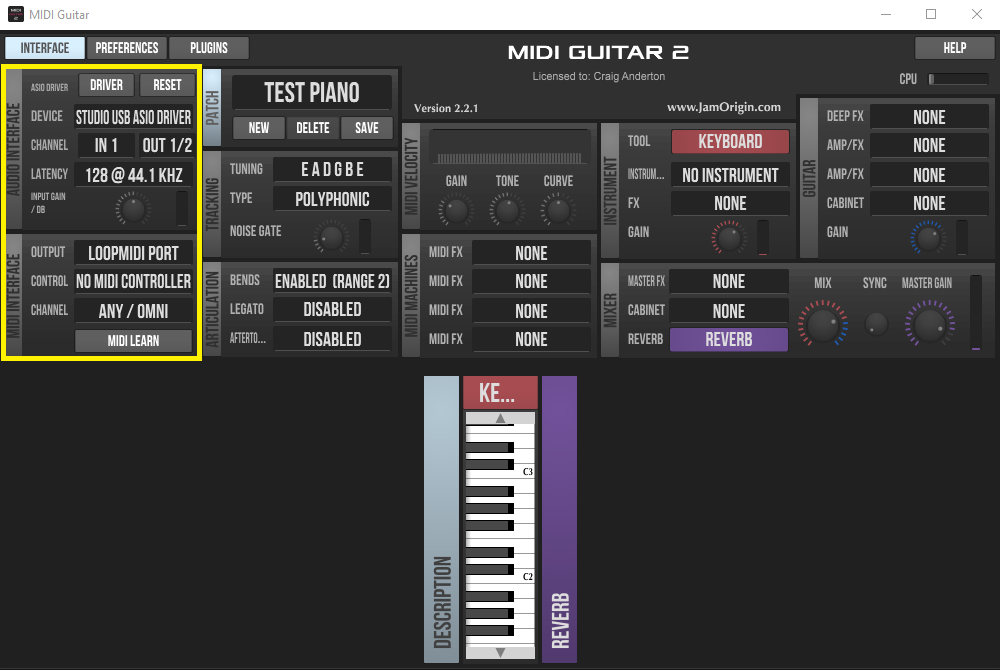
Figure 3: The sections outlined in yellow connect with your audio interface and Studio One.
In the Audio Interface section, specify the interface driver, and the input where MG2 will expect to find your guitar’s audio. Jam Origin recommends using 44.1 kHz with 128 samples of latency, and I didn’t argue. Set MG2’s MIDI Interface output to the loopMIDI port. This is where MG2 will send the MIDI data derived from your guitar.
For the final step, insert your virtual instrument into Studio One, and set its input to loopMIDI (fig. 4). Note that you don’t need to insert a guitar track, unless you want to record your guitar part as well as drive a virtual instrument. I insert a guitar track anyway, if for no other reason than to be able to use Studio One’s tuner—pitch-based guitar-to-MIDI converters seem to like accurate tuning.
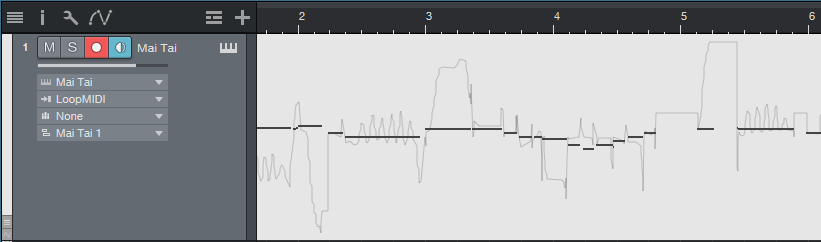
Figure 4: The Mai Tai input is set to loopMIDI. Note data (in monophonic mode), along with pitch bend, has been recorded.
Optimizing MIDI Guitar 2
To recap, your guitar goes into an audio interface input, MG2 in stand-alone mode listens to the audio input and converts it to MIDI, and then the MIDI data goes to your virtual instrument. However, we’re not quite done, because MG2 has various customization options.
The stand-alone version can play instruments, but we don’t need to do that because we’re triggering instruments in Studio One. So for the Instrument, choose No Instrument.
There’s a choice of polyphonic or monophonic tracking, depending on whether you want to play chords or single-note lines, and set bend to the same range in semitones as your instrument.
Experiment with Legato, which can even give infinite sustain. Gain and Curve help tailor your playing for the best triggering. In my experience, MG2 seems happiest when you don’t hit the strings too hard. In any event, those are the basics. Sorting out MG2’s settings in detail isn’t necessary, because you can go to the Jam Origin website and delve into the documentation there.
I must say that when I first tried using Jam Origin, I was frustrated, and felt I had just wasted $99. But after using the standalone/virtual port workaround, now I’m a happy camper. Sure, MIDI guitar isn’t perfect. But MG2 can lay down some tasty MIDI lines, and as to sawtooth-based power chords… well, let’s just say they sure are fun.
The Flanger Lab
The Flanger Lab FX Chain provides a wide variety of effects, from traditional flanging to psycho-acoustic panning, and can even incorporate some mid-side mojo—it all depends on how you set the controls. Originally, I had planned to include a control panel for Studio One Pro users, but there are simply too many options to fit into eight controls. It’s more fun just to open up all the effects, play with the knobs, and be pleasantly surprised.
The FX Chain itself is fairly straightforward (fig. 1): A split into two Flangers, one preceded by a Mixtool to invert the phase, and a Dual Pan at the end.

Figure 1: Flanger Lab FX Chain block diagram
Now let’s look at the effects (fig. 2).
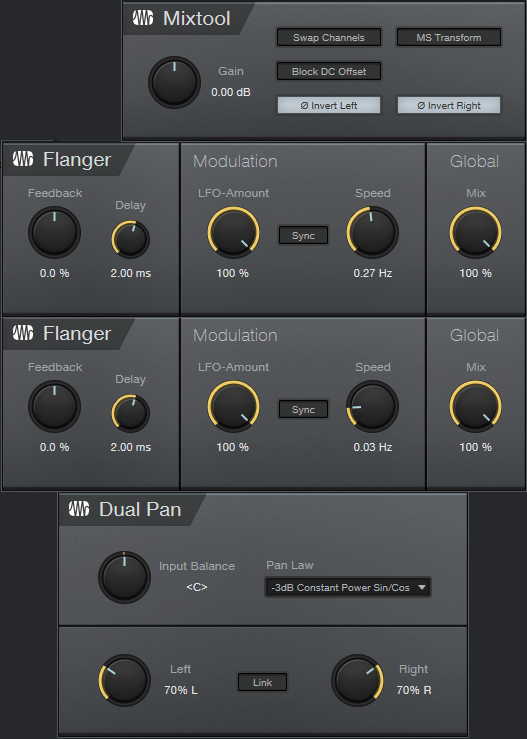
Figure 2: Effects used in the Flanger Lab FX Chain.
The audio example, with stereo program material, uses the settings shown in figures 1 and 2. However, this is just one possible sound. Flanger Lab is equally effective with mono distorted guitar, stereo string pads, and more.
Here are some tips on how different control settings affect the sound.
- Flanger Lab works with mono or stereo audio.
- Because the Mixtool is inverting the phase of one split, as the flangers approach the same audio in both channels, the mid cancels (which gives through-zero flanging), and you’re essentially just hearing the sides.
- Choosing Normal split mode instead of Channel Split accentuates the mid cancellation. This can produce a dreamy, ethereal effect with instruments that you want to have come in and out of the mix in interesting ways.
- Offsetting the Mixtool gain by even just a little bit will reduce the cancellation when the audio coincides.
- Offsetting the Flanger Delay controls changes the sound—for example, there’s quite a difference between having a delay of 1 ms for one Flanger and 5 ms for the other, compared to the default of 2 ms for each one.
- I prefer offsetting the Speed controls so that one is slow, and the other faster. This helps randomize the sweeping effect.
- LFO Amount and Mix do what you’d expect.
- Setting Feedback to the same negative percentage has less intensity than setting them both to the same positive percentage, but try setting one for negative feedback, and the other for positive feedback.
- Altering Input Balance on the Dual Pan, with both Pan controls centered, changes the proportion of the two flangers in the audio output. When set fully to the left or right, the sound is like traditional flanging, based on the flanger settings in the left or right channel respectively.
- Centering both Dual Pan controls gives a traditional, mono flanging sound, with through-zero cancellation. Spreading the controls out further products psycho-acoustic panning effects that will make your head spin on headphones, but translate to speakers as well. Also when spread fully to the left and right, mid cancellation doesn’t happen. With playback over a mono system, the panning goes away, and you just get flanging.
- The controls interact—for example, changing the delay time will change the effect of the panning mentioned in the previous tip.
The bottom line is you can play with the controls for hours. Well, at least I could! If you come up with a cool sound, save it as a custom FX Chain. Given the variables, you might not be able to find that sound again.
Finally, there seems to be persistent confusion about how to handle downloaded FX Chains, like where to store them, and how to put them in custom folders. For answers to these and other questions about FX Chains, please check out the Friday Tip Fun Facts about FX Chains.
Download the Flanger Lab.multipreset FX Chain preset here
The Ampire Sweetener

I work a lot with amp sims, and I love ’em. Well, except for one thing: Almost all of the ones that involve distortion exhibit what I call “the annoying frequency.” It’s hard to describe, but when it’s removed, you can definitely tell what’s missing—kind of a whistling sound, but without a sense of pitch. I have no idea why this particular type of artifact happens. It doesn’t go away if I increase the sample rate, choose a different pickup, switch guitars, or change my socks. And it’s worse with some amp sims than others; when reviewing a [particular amp sim by a PreSonus competitor] and I made the product manager aware of the annoying frequency, a subsequent expansion pack included a parametric equalizer so users could notch it out.
Granted, the 3rd gen Ampire is light years ahead of the 1st gen, as well as a lot of other amp sims out there. But we can still make it better, because the goal of the Friday Tip is to make things better, right?!? Besides, I’m an unreasonably picky guitar player.
Adding the EQ
Download the preset Ampire Sweetener.preset , and load it into the Pro EQ2 (Just open the .zip and double click the .preset file to install). It will now have the curve shown in Fig. 1. Insert the Pro EQ2 after your Ampire amp and cab of choice, and the sound will magically lose its artifact.

Figure 1: Insert these notch filters after Ampire and its cab.
You have every right to skeptical—after all, you are reading this on the internet—so let’s listen to an audio example. The first half is with the EQ following the MCM800 amp and 4×12 MFB cab. The second half is with the EQ bypassed, but everything else the same. Both examples in the audio file are normalized to the same level. I’m pretty sure you’ll hear the artifact in the second half. Another way to hear the difference is play some power chords, and bypass the EQ stages to hear what they contribute to the sound.
The EQ’s curve isn’t only about the dual notches. There’s no need for super-high or -low frequencies, so those are reduced as well. Also, because the notches are in the high frequencies, adding a slight treble shelf compensates for the reduced amount of highs.

Figure 2: Reduce the high-shelf level and the two notches to sound more like the original amp sim/cab tone.
Now, this doesn’t mean you’ll like the end result better. You might prefer the sound with the artifact, and that’s fine. However, the artifact persists through the various amps and cabs. Inserting the Ampire Sweetener EQ removes that common element, which emphasizes the unique character, and tonal quality, of the individual amps and cabs. However, you can also “split the difference” by dialing back the parameters outlined in white (Fig. 2).
Finally, if you use other amp sims, many (if not most) will also benefit from one or two steep notches at the output. They probably won’t be the same frequencies, but they’ll likely be pretty close. The bad news is quite a few of them have far more prominent artifacts than Ampire, but the good news is the higher level makes it easier to hear them, so you can dial in their frequencies more quickly to notch them out.
LCR Mixing and Panning Explained
Lately, it seems there’s an increasing buzz about “LCR” mixing. LCR stands for Left, Center, and Right, and it’s a panning technique where all panpots are set to either left, center, or right—nothing in between. Look it up on the internet, and you’ll find polarized opinions that vary from it’s the Holy Grail of mixing, to it’s ridiculous and vaguely idiotic. Well, I’m not polarized, so I’ll give you the bottom line: it can work well in some situations, but not so well in others.
Proponents of this style of mixing claim several advantages:
- The resulting mixes sound very wide without having to use image processing, because there’s so much energy in the sides.
- It simplifies mixing decisions, because you don’t have to agonize over stereo placement.
- Mixes translate well for those not sitting in stereo’s “sweet spot,” because the most important material is panned to the center.
- It forces you to pay attention to EQ and the arrangement, to make sure there’s good differentiation among instruments panned hard left and hard right.
- If an LCR mix leaves “holes” in the stereo field, then you can use reverb or other stereo ambience to fill that space. As one example, stereo overhead mics on drums can pan hard left and hard right, yet still fill in a lot of the space in the middle. Or, place reverb in the channel opposite of where a signal is panned.
There are plenty of engineers who prefer LCR mixes for the reasons given above. However, LCR is not a panacea, nor is it necessarily desirable. It also may not fit an artist’s goal. For those who think of music in more symphonic terms—as multiple elements creating a greater whole, to be listened to under optimal conditions—the idea of doing something like panning the woodwinds and brass far left and the violins full right, with orchestral percussion and double bass in the middle, makes no sense. Conversely, if you’re doing a pop mix where you want every element to be distinct, an LCR approach can work well, if done properly.
Then again, some engineers consider a mix to be essentially a variation on mono, because the most important elements are panned to center. They don’t want distractions on the left and right; those elements exist to provide a “frame” around the center.
Another consideration is according to all the stats I’ve seen, these days more people listen on headphones than component system speakers. LCR mixing can sound great at first on headphones due to the novelty, but eventually becomes unnatural and fatiguing. Then again, as depressing a thought as this may be, a disturbingly large part of the population listens to music on computer speakers. Any panning nuances are lost under those conditions, whereas LCR mixing can sound direct and unambiguous.
Help Is on the Way!
So what’s a mix engineer to do? Well, a good way to get familiar with LCR is to load up some of your favorite songs into Studio One, and listen to the mid and sides separately. Hearing instruments in the sides tends to imply an LCR mix; Madonna’s “Ray of Light” comes to mind. For a “pure” LCR mix, listen to the original version of Cat Stevens’ “Matthew and Son” on YouTube. It was recorded in 1966 (trivia fans: John Paul Jones, later of Led Zeppelin, played bass). Back then, the limited number of tracks, and mixing console limitations, almost forced engineers into doing LCR. In case you wondered why some songs of that era had the drums in one channel and the bass in the opposite channel…now you know why.
Anyway, it’s easy to do mid-side analysis in Studio One (Fig. 1).
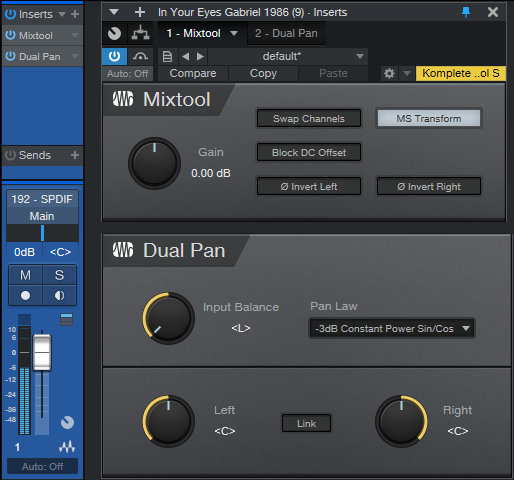
Figure 1: Setup for analyzing mid and side components of music.
The Mixtool, with MS Transform selected, encodes a stereo signal into mid (left channel) and sides (right channel). However, it’s difficult to do any meaningful analysis with the mid in one ear and the sides in the other. So, the Dual Pan’s Input Balance control chooses either the mid <L> or sides <R>. The panpots place the chosen audio in the center of the stereo field.
Once you start finding out whether your favorite songs are LCR or mixed more conventionally, it will help you decide what might work best for you. If you decide to experiment with LCR mixing, bear in mind that it kind of lives by its own rules, and it takes some experience to wrap your head around how to get the most out of it.
And the Verdict Is…
Well, you can believe whatever you like from what you see on the internet, and more importantly, choose what sounds best to you…but this is my blog post, so here’s what I think ?. Any and all comments are welcome!
As mentioned in a previous blog post, I always start mixes in mono. I feel this is the best way to find out if sounds mask either other, whether some tracks are redundant because they don’t contribute that much to the arrangement, and which tracks need EQ so they can carve out their own part of the frequency spectrum. That way, whether instruments are on top of each other or spread out, they’ll work well together.
But from there on, I split my approach. I still favor the center and use the sides as a frame, but also selectively choose particular elements (usually rhythm guitar, keyboards, and percussion) to pan off to the left or right so there’s a strong presence in the sides. For me, this gives the best of both worlds: a wide mix with good separation of various elements, but done in service of creating a full mix, without holes in the stereo field. Those who listen on headphones won’t be subjected to an over-exaggerated stereo effect, while those who listen over speakers will have a less critical “sweet spot” than if there was nuanced panning.
I came up with this approach simply because it fits the kind of music I make, and the way I expect most people will listen to it. Only later did I find out I had combined LCR mixing with a more traditional approach, and that underscores the bottom line: all music is different, and there are few—if any—“one-size-fits-all” rules.
Well, with the possible exception of “oil the kick drum pedal before you press record.”
Mid-Side Meets Reverb
The post on using mid-side processing with the CTC-1 garnered a good response, so let’s follow up with one of my favorite mid-side techniques: M-S reverb.
To recap, mid-side processing separates sounds in the center of a stereo file from sounds panned to the sides, processes them individually, then puts them back together again into stereo. It isn’t a perfect separation, because the mid is the sum of the left and right channels. Although this boosts the center somewhat, the mid still includes the sides. However, the side channel is quite precise, because it’s derived from putting the right and left channels out of phase—so the center cancels.
Applying Mid-Side Reverb
Before getting into how to make M-S reverb, here’s why it’s useful. Some productions have an overall reverb to provide ambiance, and a second reverb (often plate) dedicated to the vocal. The vocal is usually mixed to center, so it’s competing for space with the bass, snare, and kick. If they’re contributing to the overall reverb, and the vocal is creating its own reverb, that’s a lot of reverb in the center.
One popular fix is adding a highpass filter prior to the overall reverb, set to around 300 Hz. This keeps the bass and kick from muddying the reverb. However, it doesn’t take care of midrange or high-frequency sounds that are panned to center, like snare. These can compete even more with the vocal if they’re in the same frequency range.
While some reverbs let you tailor high- and low-frequency reverb times with a crossover, this doesn’t cover all the processing you might want to do, nor does Studio One’s Room Reverb include these parameters. Mid-side reverb, with different reverbs on the mid and sides, is a more flexible solution for customizing an overall reverb ambiance.
Assembling the Mid-Side Reverb
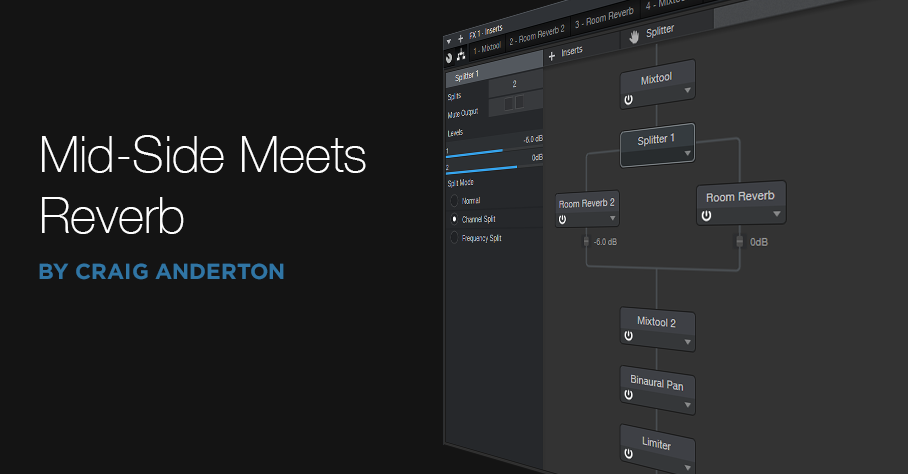
Download the FX Chain, or if you want to roll your own, start by dragging the MS-Transform FX Chain into a bus (of course, this also works for individual channels). Then drag a Room Reverb into each split (Fig. 1). The default reverb preset is a good place to start, but if the FX Chain is in a bus, remember to set the Mix controls for 100% wet sound. I also like to insert a Binaural Pan after the second MixTool to widen the overall stereo image.

Figure 1: Mid-Side Reverb FX Chain, which adds two Room Reverbs and a Binaural Pan to the MS-Transform FX Chain.
The reverb on the left handles the center, while the reverb on the right processes the sides. Lower the fader after the left reverb; Fig. 1 shows -6 dB, but adjust to taste. This alone will open up some space in the center for your vocal and its reverb. However, where this effect really comes into its own is when you tweak the reverb parameters for each reverb. For example…
- If you still want reverb on the kick and low end, vary the mid reverb’s Length parameter. Shorter lengths tighten the kick more, while longer lengths give that Kick of Doom reverb sound.
- Increase Length on the sides for a more atmospheric reverb sound.
- Increase pre-delay on the sides, to make space for attacks on the vocal track. Consonants benefit from the extra clarity.
- For this application, Eco mode sounds fine but try HQ as well.
- Turn up the Binaural Pan after the second Mixtool. I often turn it up all the way, because it sounds great in stereo, and there aren’t any phasey issues of the output collapses to mono.
By adjusting the two reverbs, you can sculpt them to give the desired overall reverb sound. If you then place a vocal in the center with a sweet plate, I think you’ll find that the vocal and overall reverb create a smooth, differentiated, and conflict-free reverb effect.
Recording ReWired Programs

I had a bunch of legacy Acid projects from my pre-Studio One days, as well as some Ableton Live projects that were part of my live performances. With live performance a non-starter for the past year, I wanted to turn them into songs, and mix them in Studio One’s environment.
Gregor’s clever video, Ableton Live and Studio One Side-by-Side, shows how to drag-and-drop files between Live and Studio One. But I didn’t want individual files, I needed entire tracks…including ones I could improvise in real time with Live. The obvious answer is ReWire, since both Acid and Live can ReWire into Studio One. However, you can’t record what comes into the Instrument tracks used by ReWire. Nor can you bounce the ReWired audio, because there’s nothing physically in Studio One to bounce.
It turned out the answer is temporarily messy—but totally simple. First, let’s refresh our memory about ReWire.
Setting Up ReWire
Start by telling Studio One to recognize ReWire devices. Under Options > Advanced > Services, make sure ReWire Support is enabled. In Studio One’s browser, under the Instruments tab, open the ReWire folder. Drag in the program you want to ReWire, the same way you’d drag in an instrument. (Incidentally, although you’re limited to dragging in one instance of the same ReWire client, you can ReWire two or more different clients into Studio One. Suitable clients includes Live, Acid Pro, FL Studio, Renoise, Reason before version 11, and others.)
After dragging in Ableton Live, open it. ReWired clients are supposed to open automatically, but that’s not always the case.
Now we need to patch Live and Studio One together. In Ableton Live, for the Audio To fields, choose ReWire Out, and a separate output bus for each track. In my project, there were 9 stereo tracks (Fig. 1).
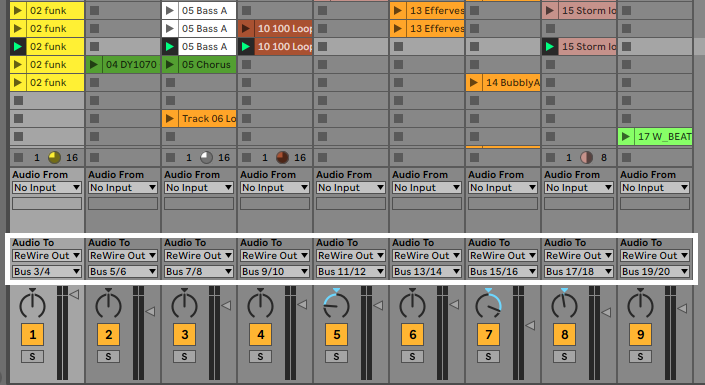
Figure 1: Assign Ableton Live’s ReWire outputs to buses. These connect to Studio One as track inputs.
Then, expand the Instrument panel in Studio One, and check all the buses that were assigned in Ableton Live. This automatically opens up mixer channels to play back the audio (Fig. 2). However, the mixer channels can’t record anything, so we need to go further.
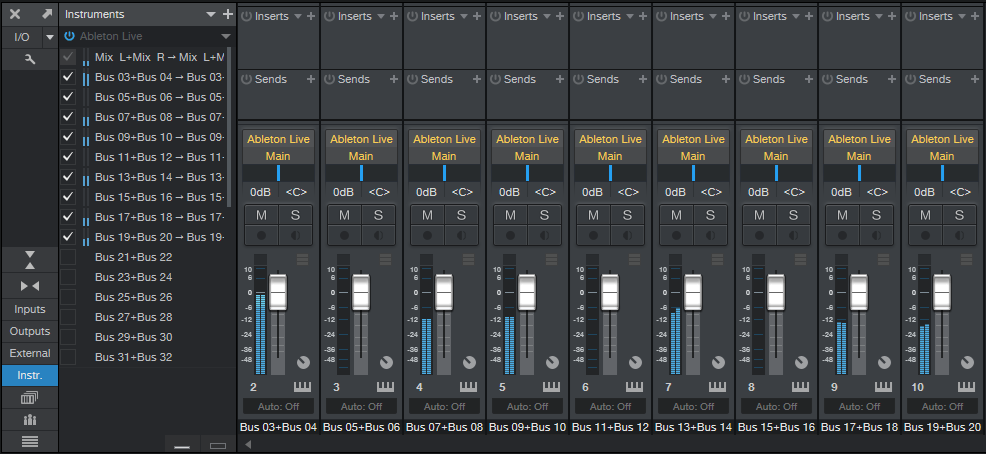
Figure 2: Ableton Live loaded into Studio One, which treats Ableton Live like a virtual instrument with multiple outputs.
Recording the ReWired Program
As mentioned, the following is temporarily messy. But once you’re recorded your tracks, you can tidy everything up, and your Live project will be a Studio One project. (Note that I renamed the tracks in Studio One as 1-9, so I didn’t have to refer to the stereo bus numbers in the following steps.) To do recording:
- In each Studio One track, go to its Send section and choose Add Bus Channel. Now we have Buses 1-9—one for each track.
- Our original instrument tracks have served their purpose, so we can hide them to avoid screen clutter. Now Studio One shows 9 buses (Fig. 3).
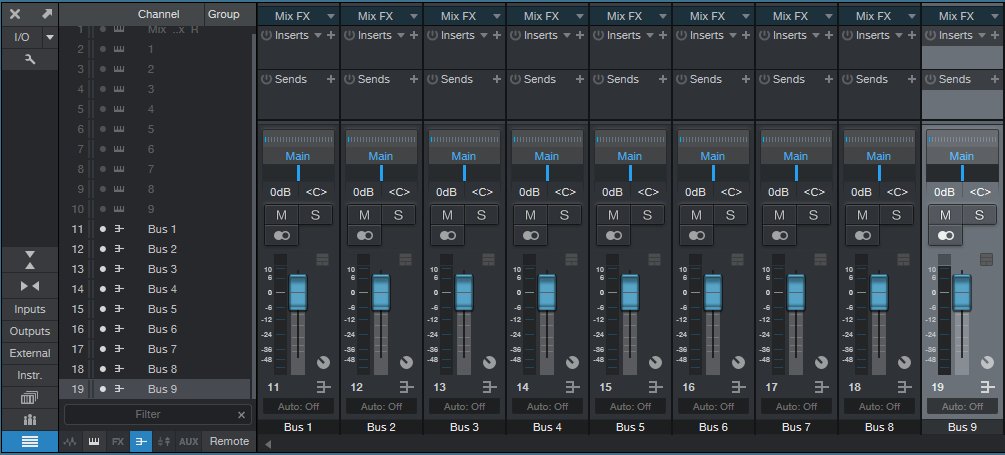
Figure 3: The buses are carrying the audio from Ableton Live’s outputs.
- Create 9 more tracks in Studio One (for my project, these were stereo). Assign each track input to an associated bus, so that each of the 9 buses terminates in a unique track. Now we can hide the bus tracks, and record-enable the new tracks to record the audio (fig. 4).
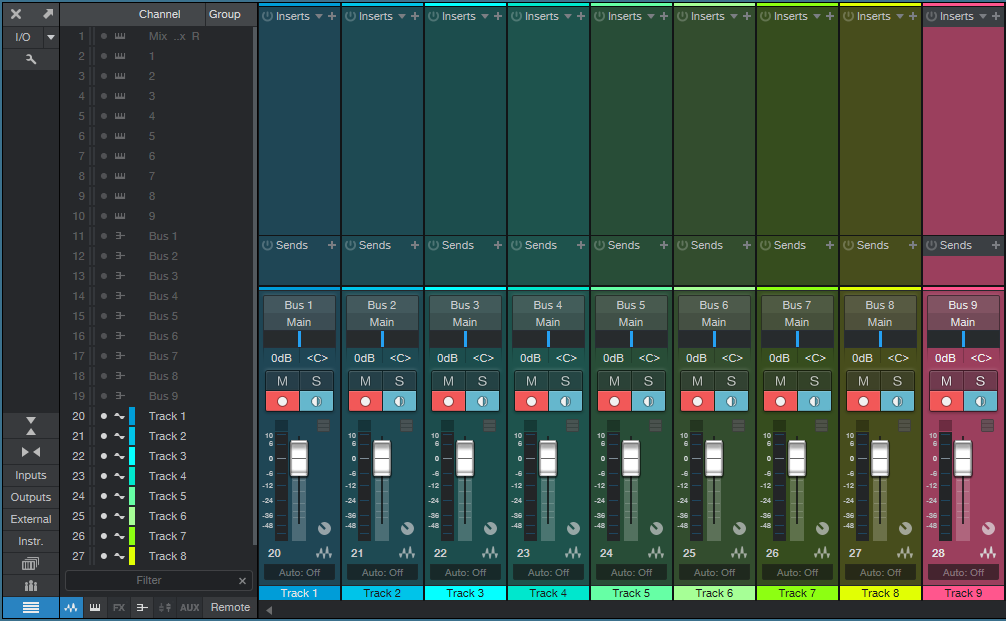
Figure 4: Studio One is set up to record the audio from Ableton Live.
- Now you’re ready to record whatever is in Ableton Live over to Studio One, in real time.
- Fig. 5 shows the results of unhiding everything, narrowing the channels, and hitting play. At this point, if everything transferred over correctly, you can delete the ReWired tracks, remove the buses they fed, close Ableton Live, and you’re left with all the Live audio in Studio One tracks. Mission accomplished!
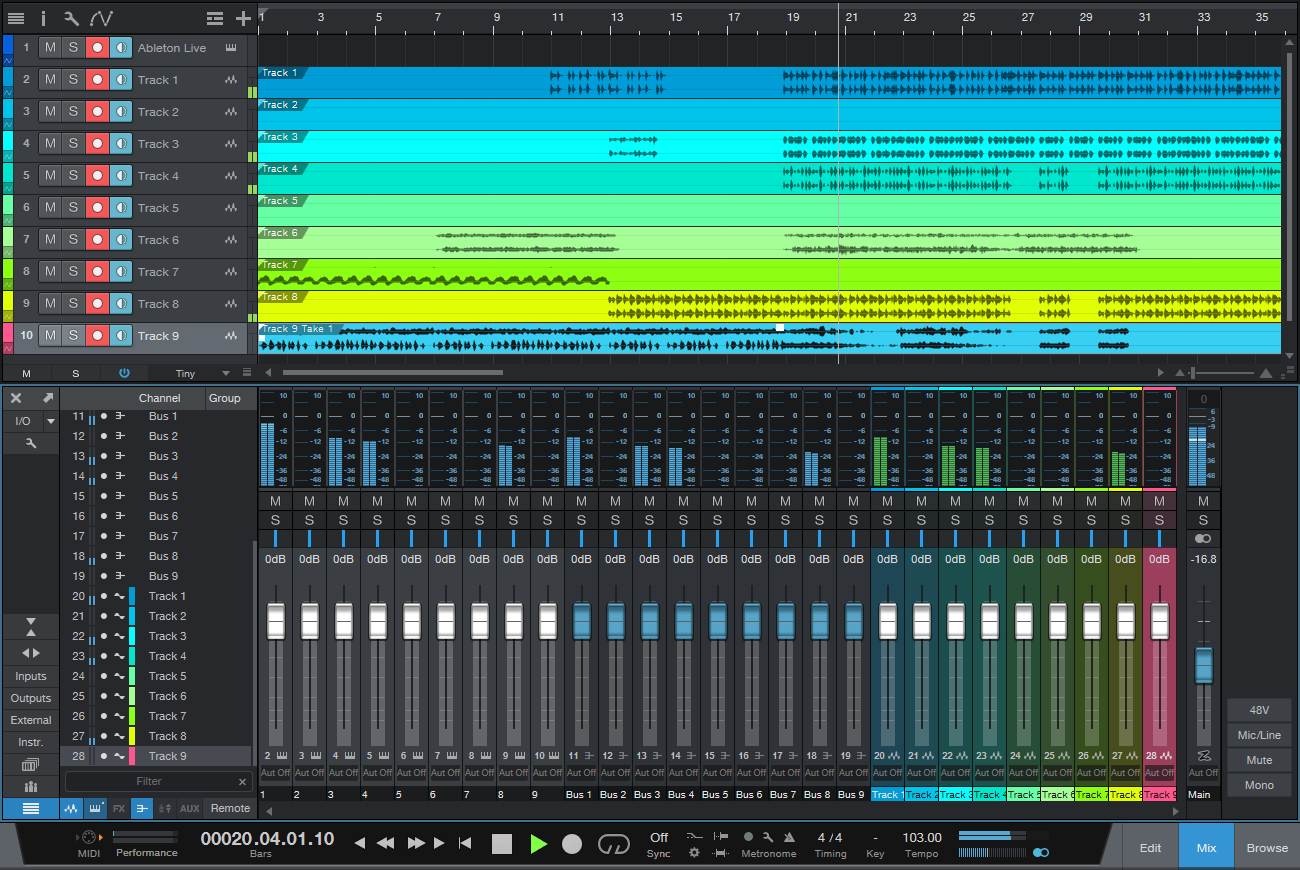
Figure 5: The Ableton Live audio has completed its move into Studio One. Now you can delete the instrument and bus channels you don’t need any more, close Ableton Live, return the U-Haul, and start doing your favorite Studio One stuff to supplement what you did in Live. Harmonic Editing, anyone?
Bonus tip: This is also the way to play Ableton Live instruments in real time, especially through Live’s various tempo-synched effects, while recording them in Studio One. And don’t forget about Gregor’s trick of moving Studio One files over to Live—this opens up using Live’s effects on Studio One tracks, which you can then record back into Studio One, along with other tracks, using the above technique.
Granted, I use Studio One for most of my multitrack projects. But there’s a lot to be gained by becoming fluent in multiple programs.
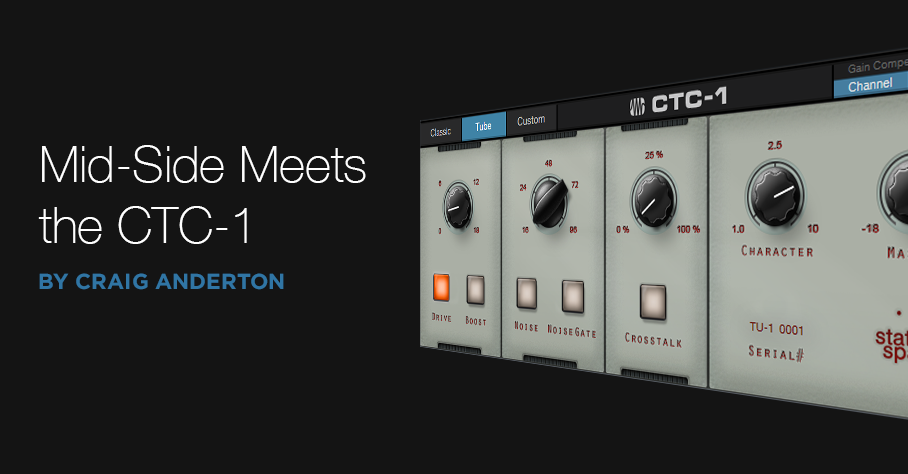
Mid-Side Meets the CTC-1
I’ve often said it’s more fun to ask “what if I…?” than “how do I?” “What-if” is about trying something new, while “how do I” is about re-creating something that already exists. Well, I couldn’t help but wonder “what if” you combined the CTC-1 with mid-side processing, and sprinkled on a little of that CTC-1 magic? Let’s find out. (For more information on mid-side processing, check out my blog post Mid-Side Processing Made Easy. Also, note that only Studio One Professional allows using Mix Engine FX.)
One stumbling block is that the CTC-1 is designed to be inserted in a bus, and the Mid-Side Transform FX chain won’t allow inserting Mix Engine FX. Fortunately, there’s a simple workaround (see Fig. 1).
- Copy the stereo track you want to process, so you have two tracks with the same stereo audio. One will provide the Mid audio, and the other, the Sides audio.
- Insert an MS-Transform FX Chain into each track (you’ll find this FX Chain in the Browser’s Mixing folder, under FX Chains)
- Create a bus for each track.
- Assign each track output to its own bus (not the main out). However, the bus outputs should go to the Main out.
- Add a CTC-1 Mix Engine FX in each bus.
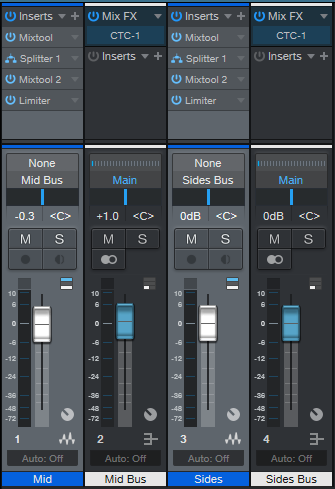
Figure 1: Setup for adding mid-side processing with the CTC-1 to a mixed stereo file.
- To dedicate one bus to the mid audio, and the other to the sides, open up the Splitters in the MS-Transform FX Chains.
- Mute the sides output for the Mid track (top of Fig. 2, outlined in orange). Then, mute the mid output for the Sides track (bottom of Fig. 2, also outlined in orange).

Figure 2: One bus is Mid only, the other is Sides only.
Now you can add the desired amount of CTC-1 goodness to the mids and sides. And of course, you can vary the bus levels to choose the desired proportion of mid and sides audio.
Audition Time!
The following example is an excerpt from the original file, without the CTC-1.
Next up, CTC-1 with the Custom option on the Mid, and the Tube option on the Sides. Fig. 3 shows their settings—a fair amount of Character, and a little bit of Drive.
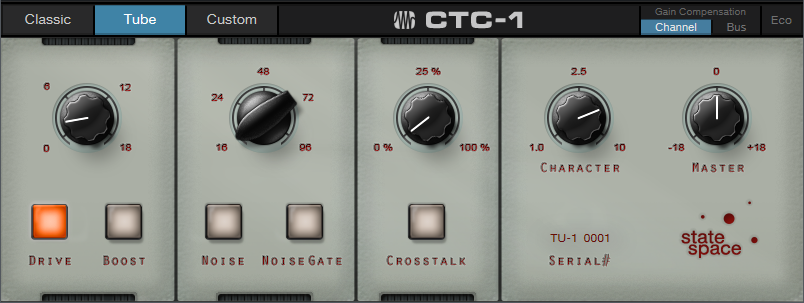
Figure 3: CTC-1 settings for the audio example.
If you didn’t hear much difference, trying playing Audio Example 1 again after playing Audio Example 2. Sometimes it’s easier to tell when something’s missing, compared to when something’s been added.
The more you know about the CTC-1, the more effectively you can use it. The bottom line is I now know the answer to my “what if” question: get some buses into the picture, and the CTC-1 can be hella good for processing mid and sides!
The Multiband X-Trem
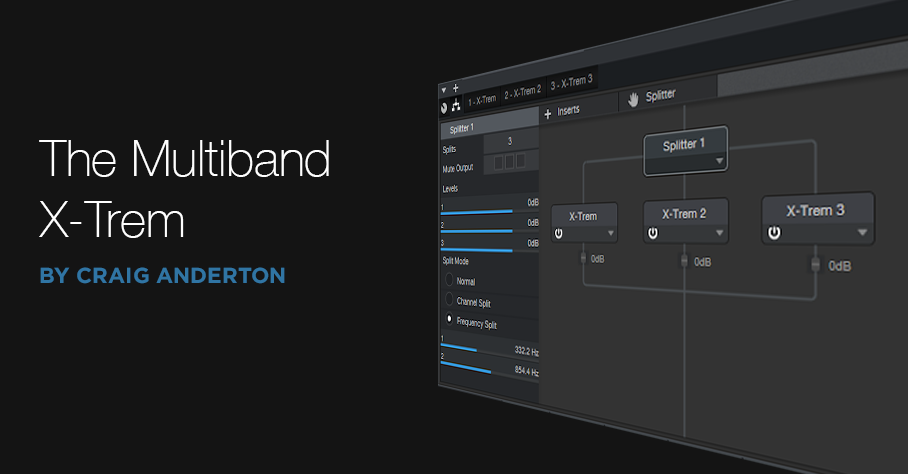
Finally! People are becoming aware of the Splitter. Although the Splitter can act like a Y-cord or split based on channel, the coolest Splitter feature for me is being able to split based on frequency. This is what makes creating multiband FX Chains in Studio One sooo easy.
Check out the audio example to hear a taste of what this can do with a pad and drum part. The first four measures are unprocessed, while the second four measures use the same Multiband X-Trem settings on the pad and the drums.
The block diagram (Fig. 1) is pretty simple—the Splitter creates three bands, Lo, Mid, and Hi, with crossovers at 332 and 854 Hz. (There’s nothing magical about those particular frequencies, choose what works best for the audio you’re putting through it.)

Figure 1: Block diagram for the Multiband X-Trem.
The real magic in this FX is the way the crucial parameters are brought out to the control panel that’s available in Studio One Pro (Fig. 2). However, Studio One Artist users can still load the FX Chain, and edit individual parameters. Although it’s more time-consuming, you can end up with the same sonic results.

Figure 2: Multiband X-Trem control panel.
How to Use It
This FX Chain assumes you’re going to sync it to tempo. Each of the three bands has a control to choose the Beat (tremolo rhythm) and Waveform, along with buttons to choose each band’s mode (Pan or Tremolo) and waveform Phase Flip. So far, that’s pretty simple.
The Mix section toward the right, with two knobs and their associated switches, is a little more complex. There aren’t enough control panel knobs to have a Depth control for each band, however in use, I’ve found that I usually adjust the depth for the Mid and Hi bands together, and the Lo band by itself. So, the Lo band has its own Depth control, while the Mid and Hi bands share a Depth control. There are also buttons to bypass the X-Trem for the Mid and/or Hi band. This is almost as good as having individual Depth controls, because you can remove depth for either band as needed.
We’ll close out with some additional tips…
- The sawtooth wave defaults to positive-going (i.e., the level ramps up from nothing to full). Flipping the phase makes a more percussive effect.
- A slow rhythm for the Lo band gives a sort of “rolling” effect. Faster speeds seem to work best for the Mid and Hi bands.
- Feel free to jump in and do tweaks—like change the Gate or Step waveform levels, vary the levels of the bands within the Splitter module, or change the crossover frequencies.
Happy download! Grab the Multiband X-Trem FX Chain preset here.