Slick Tricks for Stack and Strum
Version 5.5 introduced Chord Stack and Strum features, which are pretty cool (for the basics on how they work, check out Gregor Beyerle’s YouTube video). We’ll warp these functions in some novel ways.
Chord Stack Meets Arpeggio
You can combine creating a Chord Stack and arpeggiating it at the same time.
- Start by selecting the desired Key, Scale mode, note length, and clicking the Scale check box (fig. 1). I find the most reliable option is to click Q, which follows the current quantization setting (quantization doesn’t have to be enabled).
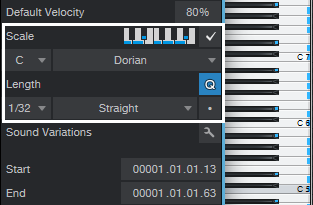
Figure 1: Select the appropriate parameters circled in white before proceeding.
- Choose the Paint tool.
- Hold down Alt (Windows) or Option (Mac).
- While still holding down Alt or Option, click where you want the note to start, and drag right (dragging left doesn’t work), while dragging up or down.
- The further you drag to the right, away from where you started, the more notes you’ll generate.
Past a certain point, some notes will repeat before moving on to the next note. The repeating is most likely to happen when using scales with few notes, like a Major Triad. The repeating notes can be a fun effect with sounds that have a fast decay.
When doing arpeggios, I like to drag up to the scale note just before the octave, and then create a second, downward arpeggio (fig. 2). You can turn this into an Event, and hit D to create as many iterations of the arpeggio as you want.
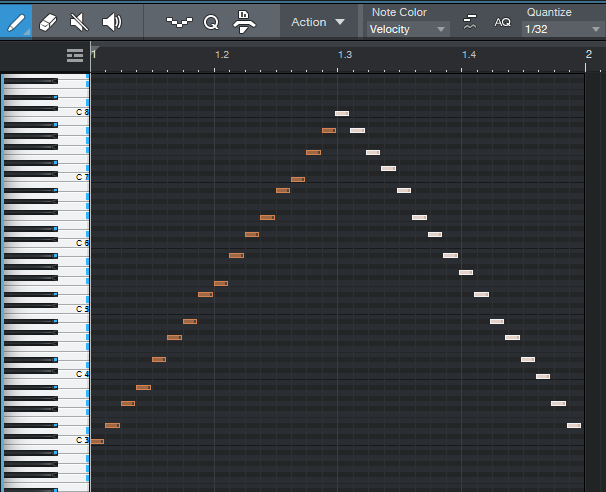
Figure 2: An arpeggio created by stretching a chord shape up, then creating a second arpeggio that stretches the chord shape down.
Strum Fun
Let’s turn our attention to strumming. One of my favorite alternatives to a conventional strum is that you don’t have to strum from the top or bottom of a chord, you can strum from the “inside out.” It sounds more like fingerstyle picking than strumming.
- Create your chord of choice.
- Select all the chord notes.
- Click somewhere toward the middle of the note where the strum should end (fig. 3 shows what happened when I chose the middle of the 7 notes) and hold down the mouse button.
- While still holding down the mouse button, hold down Alt+Ctrl (Windows) or Option+Cmd (Mac), and drag left or right. This is a wonderful effect—try it!

Figure 3: Inside-out strum.
Even better, we can take advantage of another new 5.5 editing feature. Set the end of the Event to where you want the notes to end. Select all the notes, right-click on one of them, and choose Musical Functions > Process > Extend to Note End. Now you’ll have a lovely, strummed attack, and all the notes will end at the same time.
More strum fun tips:
- You don’t need to strum all the notes of a chord. You can select, for example, just the top three chord notes, and strum those.
- Don’t overlook downstrokes. Click on the lowest note of a chord, hold the mouse button down, then hold down the Alt+Ctrl or Opt+Cmd and drag right. Now the top note will stay in place, and the strum will progress downward in pitch. If you want to end on the lowest note, choose the highest note instead of the lowest one, and drag left.
- Anyone who’s been following this blog knows I’m a fan of 12-string guitars and Nashville tuning. So, copy your strum, move it up an octave, and offset it slightly late compared to the original strum (see fig. 4, which once again takes advantage of the Extend to Note End function so that all the notes end at the same time).
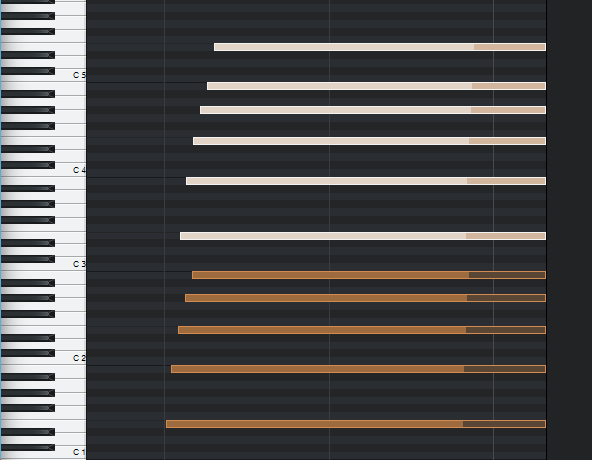
Figure 4: Octave strums have a different character when you offset the higher-octave notes.
Finally, it gets even better when you combine these techniques. For example, in fig. 4, you could strum the octave notes from outside in, and the lower notes from the inside out…or make one a downstroke, and one an upstroke.
Are we having fun yet?