Why You Want to Level Ampire Presets
It’s great we can store presets, trade them with other users, and download free ones. But…when selecting different Ampire presets to decide how they fit with a track, you want their levels to match closely. Then, your evaluation of the sound will be based on the tone, not by whether the preset is softer or louder. However, consistent preset levels are not a given.
Having a baseline level for presets, so you don’t need to change the level every time you call up a new one, is convenient. You can’t really use VU meters for this, because you want sounds to have the same perceived level, which can be different from their measured level. For example, a brighter sound may measure as softer, but be perceived as louder because it has energy where our ears are most sensitive.
My standard of comparison is a dry guitar sound, because I want the same perceived level whether Ampire is enabled, or bypassed. You might prefer to have Ampire always be a few dB louder than your dry guitar—whatever makes you happy.
Enter LUFS
The LUFS (Loudness Unit Full Scale) measurement protocol measures perceived loudness. LUFS measurements allow streaming services like YouTube, Spotify, Apple Music, and others to adjust the volume of various songs to the same perceived level. This is why you don’t have to change the volume every time a different song shows up in a playlist. The system isn’t perfect, but it’s better than dealing with constant level variations. Fortunately, Studio One has a Level Meter plug-in that gives LUFS readings (fig. 1).
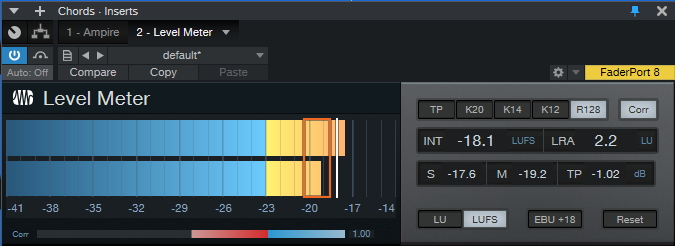
Figure 1: The Level meter can measure levels based on a variety of standards, including LUFS.
The Process
- Record at least two Events—one for chords, and one for single-note leads. If you use bass presets, you’ll also want an Event with a bass line. Record about a 15 second clip of continuous guitar chord progressions, and another clip with 15-30 seconds of single notes (and/or bass lines), also without pauses.
- Insert the Level meter after Ampire, and enable its LUFS and R128 buttons. Set the appropriate event to loop, and start playback.
- With Ampire bypassed, adjust the Event’s level for a nominal LUFS reading. I use -18 dB because that works well with Ampire, Helix, and other amp sims. After setting your standard level, it’s a good idea to lock the Events from editing (context menu > Toggle Edit Lock).
We interrupt these steps to bring you an important bulletin: The Level Meter reading that matters is the INT field. This averages out the audio, so you’ll see the reading change at first, and then settle down to a consistent LUFS reading. When you change levels, call up a different preset, or make any changes, click on the Reset button to re-start the averaging process. When doing any LUFS measurements, you can’t be sure the reading is correct until you’ve a) hit Reset, and b) played the event several times, which is why we want to loop it.
We now return to the step-by-step procedure.
- Enable Ampire, and call up a preset. Hit the Level Meter’s Reset button, and after the Event has played through a couple times, check the LUFS meter reading.
- In my case, an LUFS reading of -20 would mean the preset level is about 2 dB lower than my standard -18 dB level. So, I’d raise Ampire’s output control (fig. 2) by 2 dB. On the other hand, if the LUFS reading was -14 dB, it would be about 4 dB louder than my standard. I’d instead need to lower the output level control by 4 dB.

Figure 2: Use the output control to obtain similar levels from different presets.
- After adjusting the level, hit Reset on the Level Meter, and play the loop a few times. If the reading is the same as the nominal value…done! Otherwise, re-tweak.
- The final step is to click on Update Preset (fig. 3), so you don’t have to do this again.
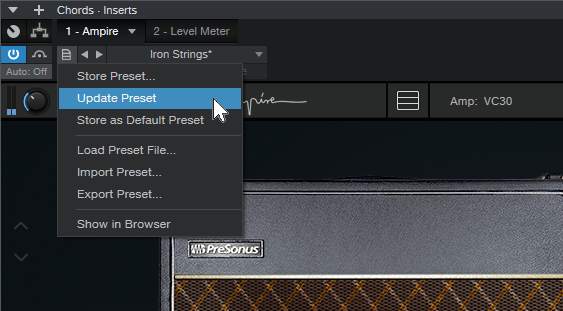
Figure 3: Save your work for future sessions.
And while you’re at it, save the Song you used to do this testing. Then you can call it up again in the future, when you want to match preset levels.
Okay, so it took a little time to balance all your presets. But when deciding what preset to use in the future, you’ll be glad you set them all to a baseline level.