Combi-Band Processing
I’m a big fan of multiband processing, and setting the Splitter to split by frequency makes this easy. However, there’s more to life than bi-amping or multiband processing—so let’s look at what I call “combi-band processing.” It gets its name because although the signal is split into three frequency bands, the low and high bands are combined, and processed by a single effect. Meanwhile, a second effect processes the mid band.
Bi-amping is great for amp sims (choose the best amp for lows, and the best for highs). I find it doesn’t work so well for effects, because when you split an instrument (like guitar) into only lows and highs, many effects aren’t all that useful for low frequencies. But if you raise the crossover frequency so that the low effect covers a wider range of frequencies, then there aren’t enough high frequencies for the effect that processes the highs.
With the combi-band approach, one effect handles the all-important midrange frequencies, while the other processes the low and highs. As a result, both effects have an obvious impact on the sound—as you’ll hear in the audio example. This also results in a simpler setup than three or more discrete bands of processing.
Combi-Band Processing FX Chain
Apologies to Artist aficionados…this one requires Studio One Pro, because of the Splitter’s frequency-split talents. However, I’m trying to figure out an easy way to do this in Artist. If it works, you’ll see it in a future tip.
The FX Chain starts with a Splitter in Normal Mode, which feeds two Splitters in Frequency Split mode (fig. 1)
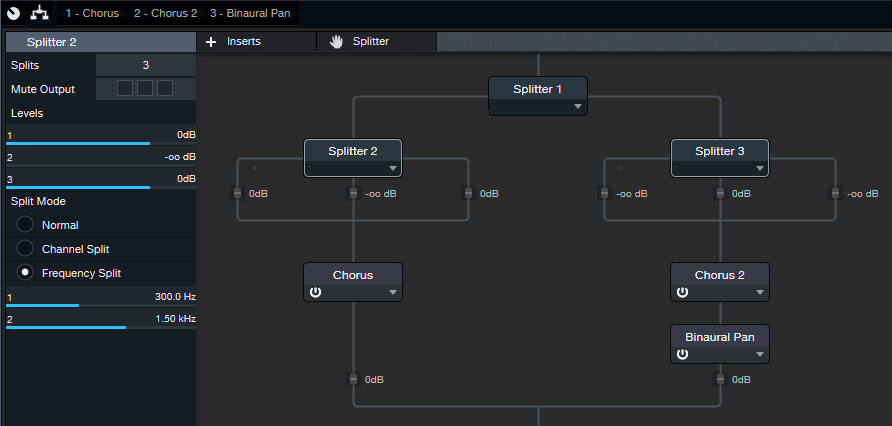
Figure 1: The FX Chain for Combi-Band Processing. The Chorus and Pan effects aren’t part of the process, but are the ones used in the audio example. Of course, other effects are just as suitable.
Both Splitters have almost identical parameters, including the split frequencies. In this case, they’re set to 300 Hz and 1.5 kHz, which seem to work well with guitar. Tweak the split frequencies as needed to optimize them for different instruments.
The parameters that differ are the various level controls. The level is pulled down for the middle band in Splitter 2, so its output consists of only the low and high frequency bands. Meanwhile for Splitter 3, the level for the low and high frequency bands is pulled all the way down, so its output consists of only the middle band. Fig. 2 shows what happens when you inject pink noise into the effects chain, and monitor the outputs of the two splitters.
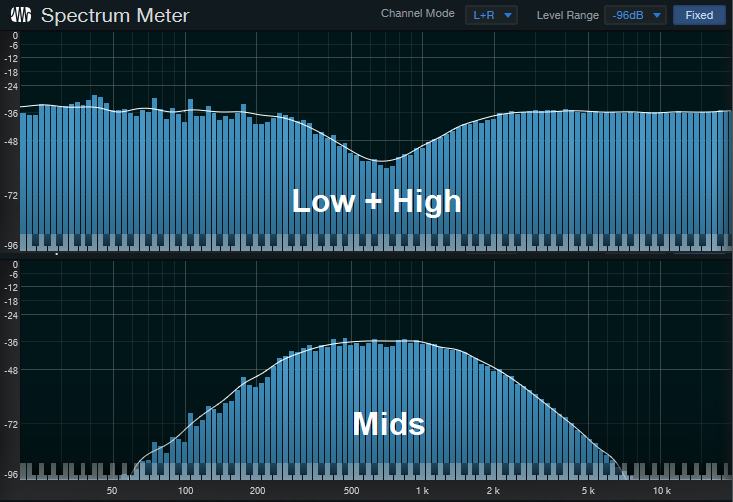
Figure 2: The top view shows Splitter 2’s frequency response, while the bottom view shows Splitter 3’s frequency response. If you sum these together, the response is flat.
About the Audio Example
Let’s listen to an example of Combi-Band Processing in action. There are three audio snippets. The first one is the midrange frequencies only, going through the Chorus, which is set to a fairly fast speed. The second snippet is the low and high frequencies only. It also goes through a Chorus, but set to Doubler mode. A Binaural Pan follows this to widen out the highs and lows.
The final snippet is the sound of combining the two paths together, which creates a gorgeous, rich chorusing sound. But plenty of other effects work well, like tempo-synched tremolos set to different LFO frequencies or waveforms, echoes with different delay times or feedback amounts, reverb on only the mids and echo on the highs and lows…you get the idea. So combi-up, and check out a different twist on signal processing.