Super-Simple Mono-to-Stereo Conversion

It may be a stereo world, but we still have a lot of mono signal sources. Although some people use delay to convert mono to stereo, this can be fraught if the stereo needs to collapse back to mono eventually. EQ can do an effective, albeit not as dramatic a job, and I wrote a blog post about How to Create Delay-Free Stereo from Mono using two Multiband Dynamics processors. This is a very flexible setup because you can automate the Multiband Dynamics parameters, as well as add in compression selectively if desired.
However, it’s also possible to convert mono into stereo within a single track—no buses needed—with a Splitter and some pan controls. While not as editable as the previous approach, it does the job, is simple to use, requires virtually no CPU power, and the stereo signal collapses back to mono with no problems.
How It Works
The mono-to-stereo conversion process works by splitting the incoming signal into five frequency bands (Fig. 1). A Dual Pan follows each band, with Link enabled and Width set to 0%. So, you can use the Pan controls (which are brought out to the Macro Controls panel) to place each band wherever you want in the stereo field. This is what creates the stereo image.

Figure 1: Block diagram for the Super-Simple Mono-to-Stereo Converter.
The Macros Control Panel
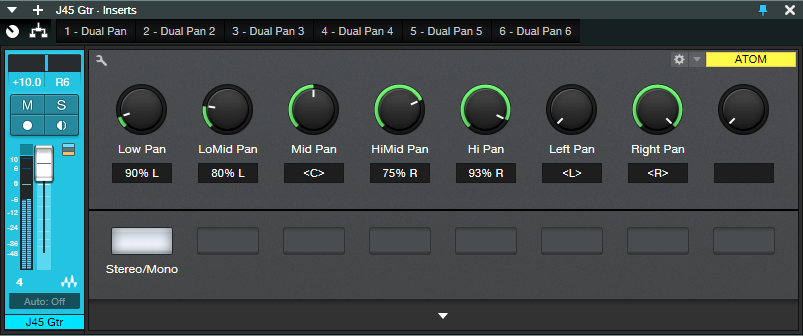
Figure 2: Macro Control knob panel.
There’s a downloadable FX Chain, which takes care of the parameter assignments for the Macro Controls (Fig. 2). However, it would be pretty easy to do it yourself. The five Pan knobs vary the Pan parameters in the five Dual Pans (one for each frequency band). The two right-most controls are tied to a Dual Pan at the output, and serve as “master pan” controls.
How to Use the Super-Simple Mono-to-Stereo Converter
The track being processed has to be in Stereo channel mode. It’s okay if you recorded the track in mono; just make sure Channel Mode is stereo when you play back, or convert the mono to “dual mono” by selecting the Event while the Channel Mode is stereo, and typing Ctrl+B.
The five left-most knobs control panning for the five bands. Pan the frequency bands as desired in the stereo field. Also note the Stereo/Mono switch. When dimmed, it de-activates all the Dual Pans, so it’s easy to compare the synthesized stereo and original mono sounds.
For the full stereo effect, set the Left Pan fully counter-clockwise, and Right Pan fully clockwise. To “tilt” the image more to one side or the other, bring the appropriate Pan control more toward center. For example, if you want to tilt the stereo spread toward the right channel, turn the Left Pan knob more clockwise.
One of my favorite applications is creating a stereo image from an acoustic guitar that was miked with a single mic (to avoid potential phase issues) or taken direct—you can still have a stereo “feel.” It’s also fun to follow Ampire with this FX Chain when you want to splatter a distorted rhythm guitar part across the stereo fiels, or give an old mono synth a stereo facelift.
As I said in the beginning, it’s a stereo world…but now your mono signal sources can be part of it a little more easily.