The Vocal QuickStrip
This tip is excerpted from the updated/revised 2nd Edition of How to Record and Mix Great Vocals in Studio One. The new edition includes the latest Studio One 5 features, as well as some free files and Open Air impulses, but also has 35% more content than the first edition—it’s grown from 121 to 194 pages. And as a “thank you” to those who bought the original version, you’re eligible for a 50% discount on the 2nd edition. There’s also a bundle with the book and my complete set of 128 custom impulses for Open Air…but so much for how I spent my summer vacation, LOL. Let’s get to the tip.
Suppose you’ve laid down your raw vocal—great! Now it’s time to overdub some instrumental parts and background vocals. Unfortunately, though, that raw vocal is kind of…uninspiring. So you start browsing effects, tweaking them, trying different settings—and before you know it, you’re going down a processing rabbit hole in the middle of your session.
Next time, open up the Vocal QuickStrip. Insert this vocal processing’s “greatest hits” FX Chain in your vocal track, tweak a few settings, admire how wonderful the vocal sounds, and then carry on with your project.
There’s a download link for the Vocal QuickStrip.multipreset file, so you don’t need to assemble the chain yourself. It works with Studio One 4 as well as 5 (note that the Widen button for the Doubler is functional only in Studio One 5).
The Effects
The Fat Channel (Fig. 1) is the heart of the chain. Of its three available compressors, the Tube Comp model emulates the iconic LA-2A compressor—the go-to vocal compressor for many engineers.
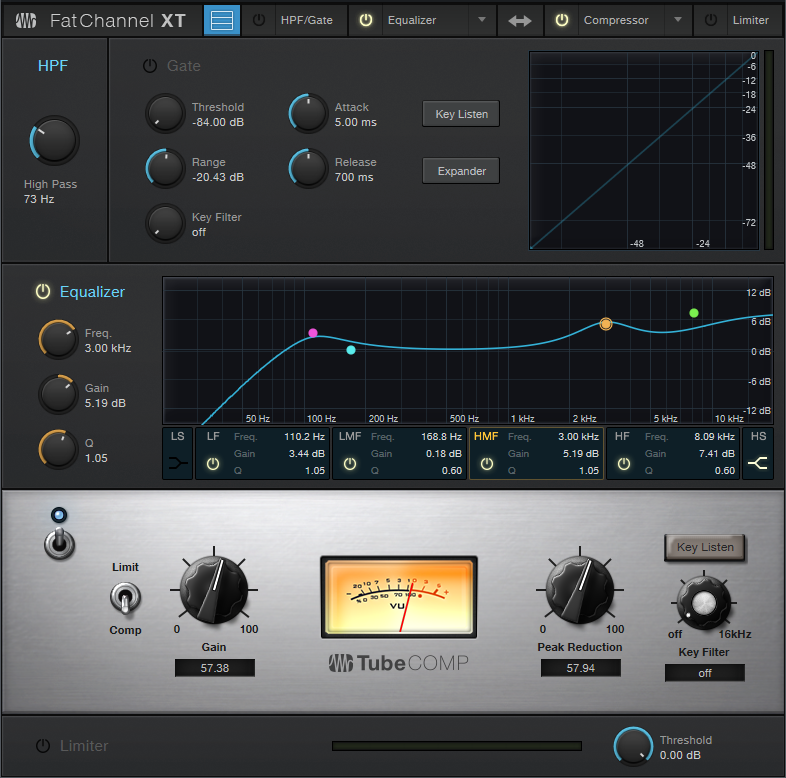
Figure 1: Fat Channel settings for the Vocal QuickStrip FX Chain.
The Fat Channel also includes a built-in high-pass filter. You can place the EQ either before or after the compressor; here, the EQ is before the compressor because boosting certain frequencies “pushes” the compressor harder. This contributes to the Vocal QuickStrip’s character.
The EQ uses all four stages. The most interesting aspect is how the Low Frequency and Low-Mid Frequency stages interact subtly when you edit the Bottom control. The Low-Frequency stage is fixed at 110 Hz with 1 dB of gain, but its Q tracks the Low-Mid Frequency stage’s Gain control. So, when you pull the LMF Gain down, the LF stage’s Q gets broader; increase Gain, and the Q goes up somewhat.
The High-Mid Frequency stage sits at 3 kHz, because boosting in this frequency range can improve intelligibility. The High-Frequency section adds “air” around 10 kHz. However, as you increase the Top control, the frequency goes just a bit lower so that the boost covers a wider section of the high-frequency range. This makes the effect more pronounced.
The Chorus is the next processor in the chain, but it’s used for doubling, not chorusing (Fig. 2).

Figure 2: The Chorus provides a voice-doubling ADT effect.
The parameters are preset to a useful doubling effect, and there are only two control switches—one to enable/bypass the effect, the other to increase the stereo spread.
For echo/delay effects, the Analog Delay comes next (Fig. 3). Although many of the parameters are well-suited to being macro controls, there had to be a few tradeoffs to leave enough space for the crucial controls from other effects.
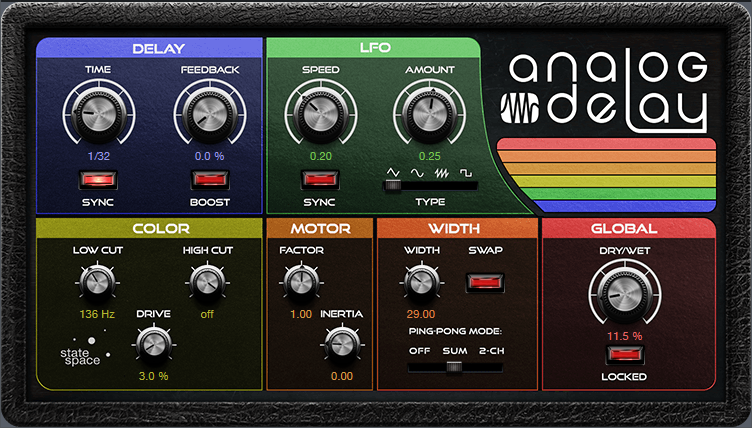
Figure 3: The Analog Delay is set up for basic echo functionality.
For example, the Delay Time controls beats rather than being able to choose between beats and sweeping through a continuous range. Feel free to change the Macro control assignment. Also, the LFO isn’t used, so if you want to modify the ping-pong effects, you’ll need to open the interface and do so manually. In any event, the Delay Beats, Feedback, and Mix parameters cover what you need for most vocal echo effects.
The final link in the chain is the Open AIR reverb (Fig. 4). Normally I use my own impulse responses (see the Friday Tip Synthesize Open AIR Reverb Impulses in Studio One for info on how to create your own impulse responses), but of the factory impulses, for vocals I’m a big fan of the Gold Plate impulse. (If you have my Surreal Reverb Impulse Responses pack that’s available from the PreSonus shop, I’d recommend using the 1.2 Fast Damped, 1.5 Fast Damped, or 2.25 Fast Damped vocal reverbs. However, note that these three files are also included for free with the second edition of the Vocals book)
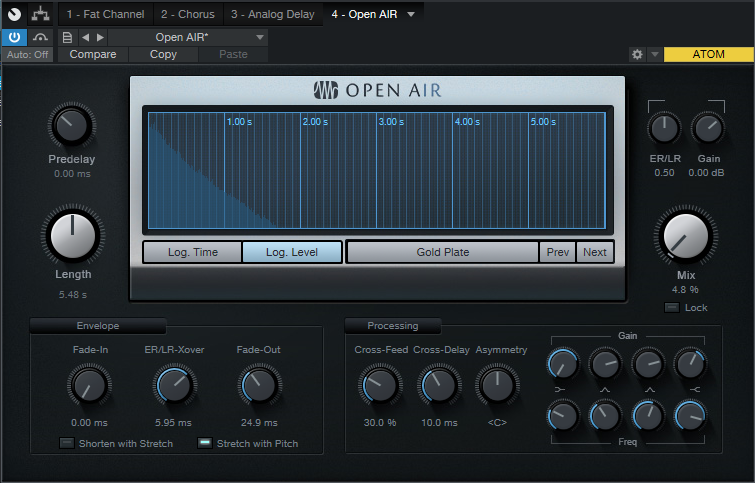
Figure 4: The Open AIR reverb plug-in’s Gold Plate impulse response is one of my favorite factory impulses for vocals.
The Macro Controls
When designing an FX Chain with so many available parameters, you need to choose which parameters (or combinations of parameters) are most important for Macro controls (Fig. 5).
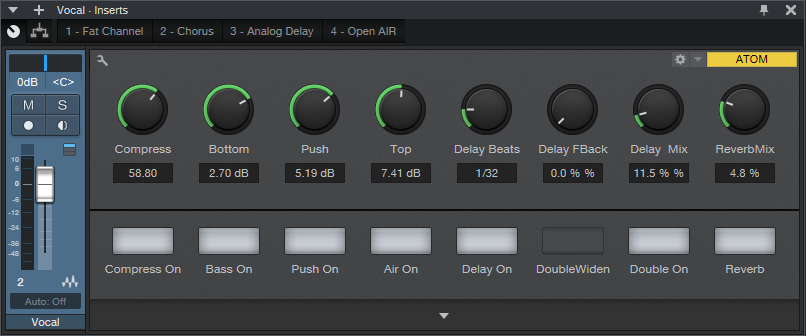
Figure 5: The Vocal QuickStrip Macro controls.
Compress varies both the Peak Reduction and Gain to maintain a fairly constant output—an old trick (see the EZ Squeez One-Knob Compressor tip), but a useful one. Bottom, Push, and Top control three EQ stages. All of these, and the Compressor, have bypass switches so it’s easy to compare the dry and processed settings.
Delay also has a bypass switch, as well as controls for delay time in beats, delay feedback, and dry/wet delay mix. The only switches for the chorus-based doubling function are bypass and narrower/wider. Reverb includes a bypass button and dry/mix control, because that’s really all you need when you have a gorgeous convolution reverb in the chain.
So go ahead and download the Vocal QuickStrip, use it, and have fun. But remember that an FX Chain like this lends itself to modifications—for example, insert a Binaural Pan after the Open AIR reverb, or optimize some EQ frequencies to work better with your mic or voice. Try the other two compressors in the Fat Channel (or if you’re a PreSonus Sphere member, then try the other eight compressors—they all have different characters). With a little experimentation, you can transform an FX Chain that works for me (and will hopefully work well for you) to an FX Chain that’s perfect for you. Go for it!
Download the Vocal QuickStrip FX Chain here
Purchase How to Record and Mix Great Vocals in Studio One here