Big Fun with Tape Resampler
Tape Resampler, a new Studio One 5 feature, replicates an “old school” time-stretch technique that varied pitch and tempo simultaneously and proportionately. Today’s DSP can change pitch and tempo independently, which is cool. But the price you pay is artifacts, because when changing tempo or pitch, you need to either delete or add data.
With resampling, the data stays the same—so there are no artifacts, and the sound is natural. Although extreme speedups give the “Chipmunks” sound and extreme slowdowns evoke Darth Vader on tranquilizers, subtler speed changes were used all the time with tape. It was common to speed up a master tape by a few per cent to give the tempo a slightly faster, “peppier” sound, as well as some added brightness. (If you’ve ever tried to play along with a song that was several cents sharp, it was probably sped up a bit.)
The manual mentions using Tape Resampler to fit loops to tempo (assuming accurate pitch isn’t crucial), but there’s another application that at least to me, is worth the update price by itself. With tape, it was common to slow the tape down or speed it up, play along with the part, and then return the speed to normal. This produced a timbral and formant shift, and was popular for background vocals. For example, if a song was in the key of A, you’d slow down to the key of G, sing along with it in G, then return the tape to normal. The vocal would have a brighter formant change that often worked well. This could also help you hit notes that were just out of your range. (We covered similar techniques in the blog post Varispeed-Type Formant Changes, but because they used DSP, at least some artifacts were unavoidable.)
How to Do It
- Create a premix of the song from start to finish. The premix must begin at the start of the timeline, even if the actual tracks don’t come in until later. An easy way to create a premix is with Song > Export Mixdown, and under Options in the dialog box, choose Import to Track.
- Solo the premix and select the track. In the Inspector, choose Timestretch, and Tape for the Timestretch method.
- Look at the handy transposition chart that lists how to edit the Speedup parameter to transpose an Event up or down a specific number of semitones. For example, suppose you want to lower the premix pitch two semitones down so you can sing along with it. Select it, then enter 0.89 for the Speedup.
The Handy Transposition Chart
| Semitones | Pitch Up | Pitch Down |
| 1 | 1.06 | 0.94 |
| 2 | 1.12 | 0.89 |
| 3 | 1.19 | 0.84 |
| 4 | 1.26 | 0.79 |
| 5 | 1.33 | 0.75 |
| 6 | 1.41 | 0.70 |
| 7 | 1.50 | 0.67 |
| 8 | 1.59 | 0.63 |
| 9 | 1.68 | 0.59 |
| 10 | 1.78 | 0.56 |
| 11 | 1.89 | 0.53 |
| 12 | 2.00 | 0.50 |
- Sing along with the premix, which is now playing back two semitones lower and somewhat slower.
- When you’re done, extend the overdub’s beginning to the start of the timeline (e.g., use the Pencil to draw an event from the beginning to the start of the overdub, select them both, then type Ctrl+B to glue them together).
- Select the overdub, and again, choose Tape for the Timestretch method. This time, set the Speedup value to 1.12 to transpose the pitch up 2 semitones so it will match the song’s original pitch (Fig. 1).
- You no longer need the premix, so either remove it, or change its speedup value back to 1.00 to return it to its normal pitch. (If you select the overdubbed Event and type Ctrl+B, the new pitch will become a destructive edit, and the Speedup value will return to 1.00.)
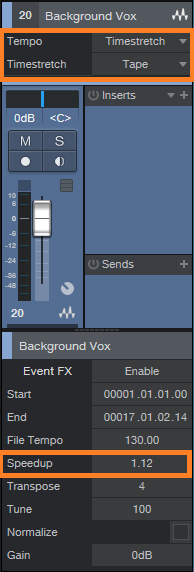
Figure 1: The overdub is being raised two semitones.
Calling All Rocket Scientists!
Note that the transpose numbers relate to the 12th root of 2. This irrational number (its numerical value has been taken out to over twenty billion decimal digits, but it still doesn’t repeat!) sets the ratio between semitones of the even-numbered scale. Fortunately, three significant digits covers our needs.

Learn more about Studio One 5 here!