Four VCA Channel Applications
A VCA Channel has a fader, but it doesn’t pass audio. Instead, the fader acts like a gain control for other channels, or groups of channels. In some ways, you can think of a VCA Channel as “remote control” for other channels. If you assign a VCA to control a channel, you can adjust the channel gain, without having to move the associated channel’s fader. The VCA Channel fader does it for you.
Inserting a VCA channel works the same way as inserting any other kind of channel or bus. (However, there’s a convenient shortcut for grouping, as described later.) To place a channel’s gain under VCA control, choose the VCA Channel from the drop-down menu just below a channel’s fader…and let’s get started with the applications.
APPLICATION #1: EASY AUTOMATION TRIM
Sometimes when mixing, you’ll create detailed level automation where all the moves and changes are perfect. But as the mix develops, you may find you want to increase or decrease the overall level. There are several ways to do this, like inserting a Mixtool and adjusting the level independently of the automation, or using the automation’s Trim control. However, a VCA control is sometimes easier, and besides, it can control several channels at once if desired, without having to feed them to a bus. The VCA fader can even offset automation for multiple tracks that are located within a Folder Track (Fig. 1)
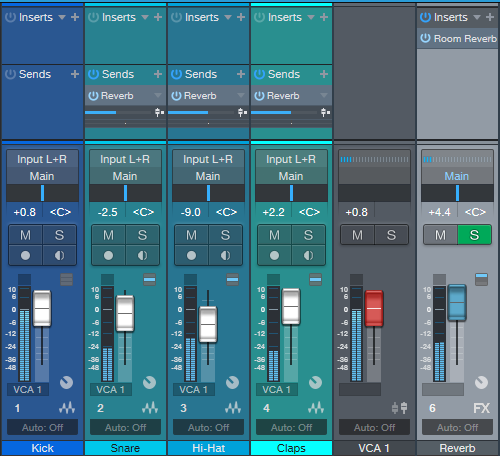
- Figure 1: Note how the label below each fader says VCA 1. This means each channel’s gain is being controlled by the VCA 1 fader on the right. If all these tracks have their own automation, VCA 1 can bring the overall level up or down, without altering the automation shape, and without needing to send all their outputs to the same bus.
If the automation changes are exactly as desired, but the overall level needs to increase or decrease, offset the gain by adjusting the VCA Channel’s fader. This can be simpler and faster than trying to raise or lower an entire automation curve using the automation Trim control. Furthermore, after making the appropriate adjustments, you can hide the VCA Channel to reduce mixer clutter, and show it only if future adjustments are necessary.
APPLICATION #2: NESTED GROUPING
One of the most common grouping applications involves drums—when you group a drum kit’s individual drums, once you get the right balance, you can bring their collective levels up or down without upsetting the balance. Studio One offers multiple ways to group channels. The traditional option is to feed all the outputs you want to group to a bus, and vary the level with the bus fader. For quick changes, a more modern option is to select the channels you want to group, so that moving one fader moves all the faders.
But VCAs take this further, because VCA groups can be nested. This means groups can be subsets of other groups.
A classic example of why this is useful involves orchestral scoring. The first violins could be assigned to VCA group 1st Violins, the second violins to VCA group 2nd Violins, violas to VCA group Violas, and cellos and double basses to VCA group Cellos+Basses.
You could assign the 1st Violins and 2nd Violins VCA groups to a Violins Group, and then assign the Violins group, Violas group, and Cellos+Basses group to a Strings group. Now you can vary the level of the first violins, the second violins, both violin sections (with the Violins Group), the violas, the cellos and double basses, and/or the entire string section (Fig. 2). This kind of nested grouping is also useful with choirs, percussion ensembles, drum machines with multiple outputs, background singers, multitracked drum libraries, and more.
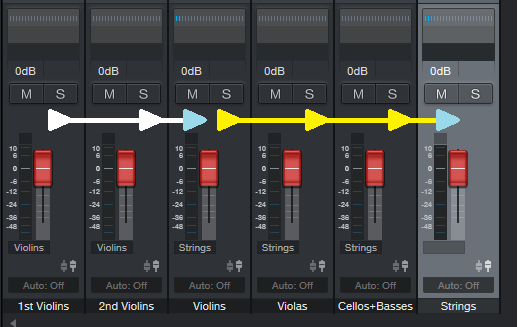
Figure 2: The 1st Violins and 2nd Violins have their own group, which are in turn controlled by the Violins group. Furthermore, the Violins, Violas, and Cellos+Basses groups are all controlled by the Strings group.
Although it may seem traditional grouping with buses would offer the same functionality, note that all the channel outputs would need to go through the same audio bus. Because VCA faders don’t pass audio, any audio output assignments for the channels controlled by the VCA remain independent. You’re “busing” gain, not audio outputs—that’s significant.
If you create a group, then all the faders within that group remain independent. Although with Studio One you can temporarily exclude a fader from a group to adjust it, that’s not necessary with VCA grouping—you can move a fader independently that’s controlled by a VCA, and it will still be linked to the other members of a VCA group when you move the VCA fader.
Bottom line: The easiest way to work with large numbers of groups is with VCA faders.
APPLICATION #3: GROUPS AND SEND EFFECTS
A classic reason for using a VCA fader involves send effects. Suppose several channels (e.g., individual drums) go to a submix bus fader, and the channels also have post-fader Send controls going to an effect, such as reverb. With a conventional submix bus, as you pull down the bus fader, the faders for the individual tracks haven’t changed—so the post-fader send from those tracks is still sending a signal to the reverb bus. Even with the bus fader down all the way, you’ll still hear the reverb.
A VCA Channel solves this because it controls the gain of the individual channels. Less gain means less signal going into the channel’s Send control, regardless of the channel fader’s position. So with the VCA fader all the way down, there’s no signal going to the reverb (Fig. 3)
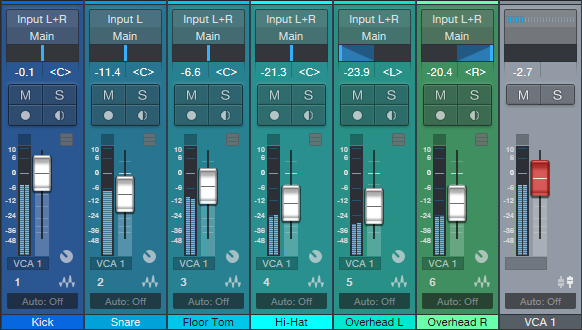
- Figure 3: The VCA Channel controls the amount of post-fader Send going to a reverb, because the VCA fader affects the gain regardless of fader position. If the drum channels went to a conventional bus, reducing the bus volume would have no effect on the post-fader Sends.
APPLICATION #4: BUS VS. VCA
There’s a fine point of using VCAs to control channel faders. Suppose individual drums feed a bus with a compressor or saturation effect. As you change the channel gain, the input to the compression or saturation changes, which alters the effect. If this is a problem, then you’re better off sending the channels to a standard bus. But this can also be an advantage, because pushing the levels could create a more intense sound by increasing the amount of compression or saturation. The VCA fader would determine the group’s “character,” while the bus control acts like a master volume control for the overall group level.
And because a VCA fader can control bus levels, some drums could go to an audio bus with a compressor, and some drums to a bus without compression. Then you could use the VCA fader to control the levels of both buses. This allows for tricks like raising the level of the drums and compressing the high-hats, cymbals, and toms more, while leaving the kick and snare uncompressed…or increasing saturation on the kick and snare, while leaving other drum sounds untouched.
Granted, VCA Channels may not be essential to all workflows. But if you know what they can do, a VCA Channel may be able to solve a problem that would otherwise require a complex workaround with any other option.