Up Your Expressiveness with Upward Expansion
Many people don’t realize there are two types of expansion. Downward expansion is a popular choice for minimizing low-level noise like hiss and hum. It’s the opposite of a compressor: compression progressively reduces the output level above a certain threshold, while a downward expander progressively reduces the output level below a certain threshold. For example, with 2:1 compression, a 2 dB input level increase above the threshold yields a 1 dB increase at the output. With 1:2 expansion, a 1 dB input level decrease below the threshold yields 2 dB of attenuation at the output.
Upward expansion doesn’t alter the signal’s linearity below the threshold—if the input changes by 2 dB, the output changes by 2 dB. But above the threshold, levels increase. For example, with 1:2 expansion, a 1 dB increase above the threshold becomes 2 dB of increase at the output. Fig. 1 shows the difference between downward and upward expansion.

Figure 1: The top screen shot shows how downward expansion attenuates levels below a threshold, while the lower one shows how upward expansion increases levels above a threshold.
That’s Nice…So What?
Upward expansion is a useful tool for drums, hand percussion, and other percussive instruments. One function is transient shaping, to emphasize attacks. Suppose you have a drum loop with too much room sound. Traditional expansion can make the room sound decay faster, but using upward expansion brings the peaks above the room sound, while leaving the characteristic room sound alone.
Another use is with percussion parts, like hand percussion, that are playing along with drums. A lot of times you don’t want the percussion hits to be too uniform in level, but instead, the most important hits should be a little louder compared to the rest of the part. Again, that’s where upward expansion shines. Dip the threshold just a tiny bit below the peaks—the peaks will stand out, and sound more dynamic.
Let’s listen to an audio example. The first two measures use no upward expansion with a drum track. The next two measures add a subtle amount of upward expansion. You’ll hear that the peaks from the kick and snare are still prominent, but the room sound and cymbals are a bit lower by comparison. The final two measures use the settings shown in Fig. 2. The kick and snare peaks are still there, but the rest of the part is more subdued, and the overall sound is “tighter,” with more dynamics.
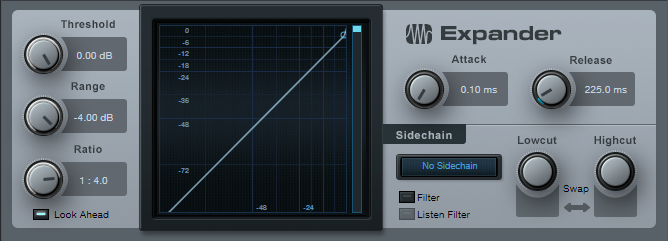
Figure 2: Expander settings for the Upward Expansion Demo.
The only difference among the two-measure sections is the Range control setting. For the first two measures, it’s 0.00 dB; nothing can be above the threshold, because there is no threshold. In the second two measures, the Range is -2.00, so anything above that threshold goes through 1:4 expansion. In the final two measures, the range is -4.00 (I rarely take it lower, as long as the Event hits close to 0 on peaks).
Here’s the coolest part: Automating the Range parameter lets you alter a drum part’s dynamics and feel, without having to change the part itself. This is particular wonderful for compressed drum loops, because you can lower the range to keep the peaks, while making the rest of the loop less prominent. When you want a big sound, slam the Range back up to 0.00.
But Wait! There’s More!
The Multiband Dynamics processor can do frequency-selective upward expansion. You can isolate just the high frequencies where a drum stick hits, and emphasize only that frequency. Another use is making acoustic guitars sound more percussive, as in this audio example.
The first two measures are the original acoustic guitar track, and the next two use Multiband Dynamics to accent the strums (Fig. 3).
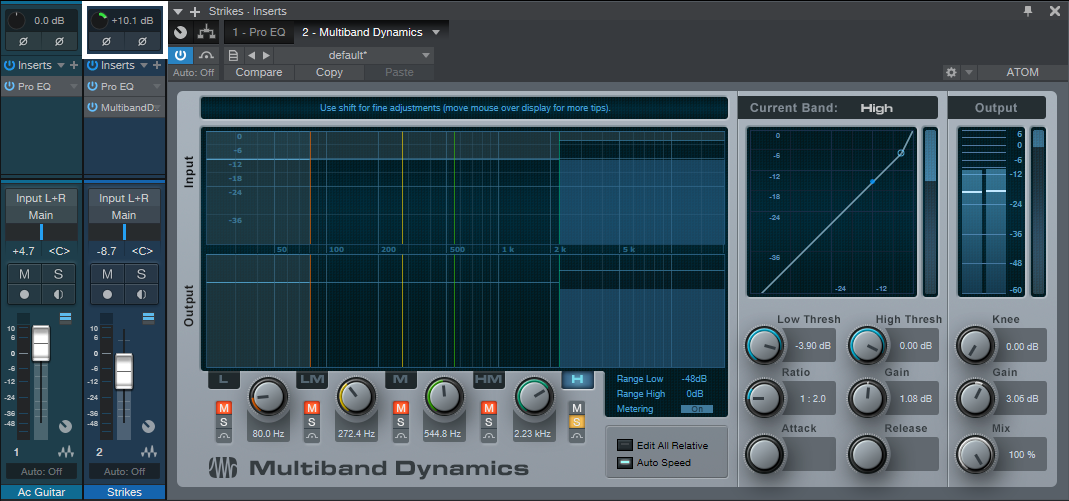
Figure 3: This setup takes advantage of the Multiband Dynamics’ ability to add upward expansion to a specific frequency range. Note the Input level control adding gain (outlined in white).
The Multiband Dynamics are in a separate, parallel track (you could build this into an FX Chain, but I think showing this in two channels illustrates the process better). Because the Multiband Dynamics is listening to only the high frequencies, which are quite weak and not sufficient to go over the expander threshold, the Input control is adding +10 dB of gain. Alternately, you could insert a Mixtool before the Multiband Dynamics.
This effect is best when used subtly, but next time you want to reach for a transient shaper, try this instead. It’s a flexible way to emphasize percussive hits and strums.