Taming the Wild Autofilter
I think the Autofilter is a great effect—which you probably already figured out if you saw my blog posts The Best Flanger Plug-In?, Attack that Autofilter, and Studio One’s Secret Equalizer. But the one effect that has always eluded me was the Autofilter effect itself, when used with guitar or bass. It never seemed to cover quite the right range—like it wouldn’t go high enough if I hit the strings hard, but if I compensated for that by turning up the filter cutoff then it wouldn’t go low enough. Furthermore, the responsiveness varied dramatically depending whether I was playing high up on the neck, or hitting low notes on the E and A strings. So basically, I’ve never really used the Autofilter for its intended purpose—until now, because I’ve finally figured out the recipe. Hey, better late than never!
This technique involves dedicating two tracks to the same guitar audio—the Autofilter processes one of the tracks, while the other track provides a pre-fader send to the Autofilter’s sidechain (Fig. 1). By processing the send, we can make the Autofilter respond pretty much any way we want.

Figure 1: Both tracks are being fed from the guitar audio. The track on the right processes the audio to control the sidechain of an Autofilter, which is inserted in the track on the left.
The Autofilter (Fig. 2) has a lower filter cutoff than what I would normally use, were it not for this technique; the envelope amount slider is up all the way (the LFO is at zero, so it doesn’t influence the envelope effect).
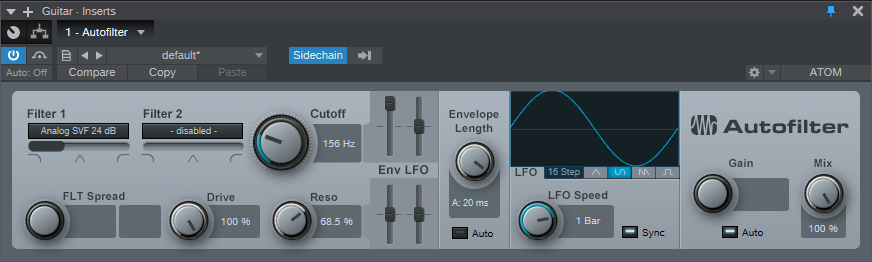
Figure 2: Initial Autofilter settings, when controlled by a processed sidechain signal.
As to what’s conditioning the send to make the Autofilter happy, it’s the underappreciated Channel Strip plug-in (Fig. 3). The strip is both compressing and expanding because, well, that’s what ended up sounding right. But the key here is also the EQ. The higher-output low strings are attenuated, so that the filter response for the lower strings is consistent with the upper strings—thanks to the massive high-frequency boost. Meanwhile, the Gain is slammed all the up, so that it drives the Autofilter to a suitably high frequency with strong input signals.

Figure 3: The Channel Strip is ideal for conditioning the signal controlling the Autofilter sidechain.
Here’s another tip: The technique of duplicating a track, and processing it to provide a custom sidechain signal, has a lot more uses than just this. Try using the X Trem as a step sequencer and control the sidechain in a compressor…or the Autofilter’s sidechain, for that matter.
Remember, if you want to come up with something novel, ask “what if?”—not so much “how to?” I guarantee you won’t find a single, click-bait YouTube video called “SECRET AUTOFILTER PRO TRICK YOU MUST KNOW!” I’d never claim this is a tip the pros use; the only reason I came up with it is because I was frustrated that I couldn’t get the Autofilter to do what I wanted, and thought “What if I process the signal going to sidechain?” I can’t help but wonder how many other “what ifs” are waiting to be discovered…well, see you next week!