How to Save CPU Power with Amp Sims

You’ll often see this kind of comment in forums: “There must be something wrong with Studio One! I can run only a couple amp sim instances before the program can’t handle any more!” But you’ll also see this comment about other DAWs—because the “problem” isn’t the DAW, it’s the amp sims and current computer technology. Fortunately, Studio One has anticipated these issues, and offers three effective solutions.
Remember, an amp sim is processing a dry guitar track in real time—not playing back processed audio. Amp sim sound quality has improved dramatically over the past few years, but the trade-off is the CPU power needed to do the serious number-crunching required for realistic amp sounds. Studio One’s CPU-saving options are great with virtual instruments, which can sometimes suck even more power than amp sims—but guitar players who are discovering the fun of amp sims need to know about these options, too.
The Old-School Fix
Although some people recommend the general-purpose, old-school fix of increasing latency to reduce stress on your CPU, that makes playing guitar much less fun. Another solution is to buy a much faster computer. Studio One’s solutions work at lower latencies, as well as older, slower computers.
Solution 1: Bounce to New Track
Select one or more Events. Right-click on any of them, and choose Event > Bounce to New Track (Fig. 1). This creates a new audio track that incorporates the sound created by the original track’s processing, but without any inserted plug-ins—the sound is “baked into” the new audio track. Audio tracks require far less CPU power than a track whose effects are being created in real time. Bouncing leaves the original track in place but mutes it, so you can unmute it to return to the original track’s audio and effects if needed.

Figure 1: If you use Bounce to Track (outlined in white) as much as I do, it will show up in the Recent Items section of your right-click context menu.
To conserve the CPU used by the original track’s effect(s), either turn off power to the effect(s), or right-click on the original track in the track column and choose Disable Track. To return the track to its initial status, right-click on the track in the Track column, and choose Enable Track.
Note that when signing off on a project, this is also an excellent way to “future-proof” the project against future operating system (or other) changes that may render a plug-in unusable. If the sound has been preserved as an audio file, you’ll at least be able to open the processed sound.
Solution 2: Transform to Rendered Audio
Right-click on the track in the Track column, or choose Track > Transform, and then choose Transform to Rendered Audio. This renders the effect sound so that it becomes part of the existing audio track. Unlike bouncing, this operation doesn’t create a new track, and it automatically disconnects the effect from the CPU to save power.
When you choose Transform to Rendered Audio, a dialog box appears with two options (Fig. 2).
![]()
Figure 2: The Transform to Rendered Audio dialog box.
You can always undo if you change your mind, but Preserve Realtime State (which I highly recommend checking) preserves the original, real-time state so you can always return to the original track settings and effects. Preserve Realtime State also persists through saves and copies. To return to the original track, right-click on the track in the Track column, or choose Track > Transform, and then choose Transform to Realtime Audio.
The second dialog box option renders any effects tail, such as a long trail of echoes or delay, that extends past the length of the existing Events. You can choose Auto Tail, where Studio One detects how long the tail lasts and renders according, or specify a fixed tail of a particular length. (A fine point: Studio One fades out the Event over the tail’s duration, but it’s an editable envelope.)
Render Event FX
Event FX, as accessed through an Event’s Inspector, are invaluable. With Ampire XT (and many other amp sims), you can’t automate amp or cabinet changes—only parameters within amps and cabinets. So, if the verse’s guitar part is one Event and the chorus’s guitar part is a different Event, each can have its own amp sim sound.
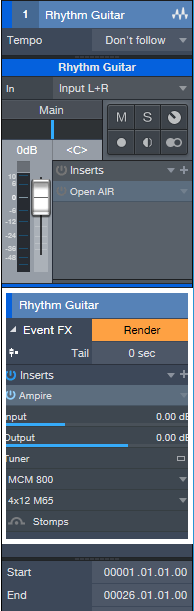
Figure 3: Here, Ampire XT is an Event FX, and can be rendered to save CPU power. Note that you can also choose different amps and cabinets, see a tuner thumbnail, and turn the Stomps section on or off.
The trade-off is that more amp sims draw more CPU power. Fortunately, Event FX have a Render button (Fig. 3). Immediately upon rendering, the sound becomes part of the audio, the effect itself disconnects from the CPU, and the Render button changes to Restore. Similarly to transforming an audio track, you can revert to the original state at any time by clicking Restore.
Multiple Renders in One Operation
Suppose a track has two Events, each with their own Ampire XT inserted via an Event FX, and there’s a CPU-hungry reverb processing the entire track. If you apply Transform to Rendered Audio to the track, it will Render the Event FX and the Track effect automatically. But if you then need to make changes and transform the Track back to realtime audio, the Track and Event FX will be restored to their initial states.
Bounce to New Track with both Events selected will produce the same results in the bounced track, i.e., all the effects will be rendered. If you want to return from where you started, delete the bounced Track, and unmute the two Events in the original Track (which will still have its effects inserted).
Once you bounce or transform tracks and reclaim all that CPU power, you can continue going cRazY with amp sims—without stressing out your computer, or Studio One.