All About Ampire’s Virtual Miking
A physical guitar amp is more than a box with a speaker—it’s a box with a speaker being picked up by a mic in a room. Both the mic and room contribute to the overall sound. To better emulate the sound of a physical guitar amp, Ampire includes a Mic Edit Controls panel that allows making a variety of virtual mic adjustments.
Ampire doesn’t include room emulation, because you can emulate room sound with several of Studio One’s plug-ins—Room Reverb, Open Air Reverb, Mixverb, and Analog Delay. However, it’s best to avoid adding ambiance until most other tracks have been cut, so that the ambiance achieves the right balance. Too much ambiance can clutter the mix, or hog the stereo field.
The mics you choose, their levels with respect to each other, and whether you add delay can make a major difference in your amp’s sound. So, let’s investigate the Mic Edit Controls panel (Fig. 1).
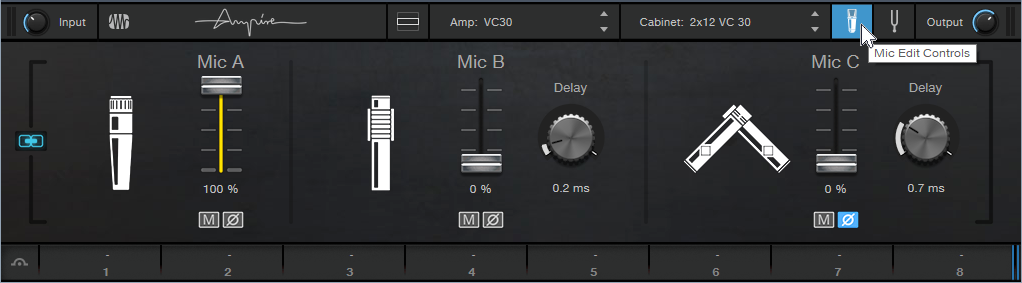
Figure 1: The Mic Edit Controls in Ampire XT.
Choosing the Mic Type
Many guitarists record with their amp cranked to really high levels, to get their “sound.” Dynamic mics are ideal because they can handle high levels, and the inexpensive Shure SM57 is the classic guitar cabinet mic—many engineers choose it even when cost is no object. Although dynamic mics may lack brightness compared to condenser mics (as modeled by Mic C), this doesn’t matter much with amp cabinets, which typically don’t have much energy above 5 kHz or so anyway. Mic A in the Mic Edit Controls panel has the SM57’s sonic character, and will likely be your go-to mic.
Mic B produces the sound associated with ribbon mics, which shows one of Ampire’s benefits: older ribbon mics tended to be fragile—but you can’t blow up a virtual mic. Ribbon mics have an inherently warm midrange. Royer’s R-121 mic is popular for miking cabs, and Mic B models its overall sonic character.
Mic C emulates the PreSonus PM-2 matched pair of condenser microphones. Condenser mics are often too sensitive for close-miking loud amps, but when moved a bit back from the cab, they can give a brighter, more “open” response that handles note attacks well. They’re also commonly used as room mics, which is why these two virtual mics are arranged in an X-Y miking configuration to give a stereo image.
Wait a Minute—Did You Say Stereo?
Guitars are mono signal sources, but taking full advantage of Ampire’s mics, as well as room ambiance plug-ins, requires a stereo signal. To convert the mono guitar into a dual mono signal (i.e., stereo, but with the same audio in the left and right channels), record the guitar with the Channel Mode set to Mono (one circle showing to the right of the Record Input selector). Although this means that any plug-ins will be in mono, that’s acceptable when tracking. After recording the track, change the Channel Mode to stereo (i.e., two circles showing to the right of the Record Input selector), select the event, and bounce it to itself (ctrl+B). Now the mono guitar is dual mono.
Mic Control Applications
Each mic has three controls: level, mute button (which makes it easy to evaluate what a particular mic contributes to the overall sound), and phase switch (the Ø button). Also, Mics B and C have Delay controls.
Often when miking a physical amp with more than one mic, you’ll vary their blend to find the right mix. The Mic Mix Link button toward the extreme left simplifies this process. When enabled, altering one mic’s level adjusts the levels of the other mics oppositely. For example, turning up Mic A turns down Mics B and C, or turning up Mic B turns down Mics A and C.
The Phase buttons and Delay controls can make major differences in the overall sound. There’s no right or wrong phase or delay setting; use whatever sounds best to you. Try the following to hear how these controls affect the sound. (Bear in mind that amp sims do a lot of calculations, so moving the controls will sound “choppy.” This is because Ampire has to recalculate constantly to reflect the changing settings.)
- Turn off Mic Mix Link.
- Mute Mic C.
- Set Mic A’s Level up full, and Mic B’s Level down all the way.
- Enable Mic Mix Link.
- Lower Mic A’s level. Mic B’s level will increase. Note the difference in sound as the levels change.
- Alter Mic B’s Delay time, and again, change Mic A’s level. You’ll hear a sound that’s somewhat like flanging, due to the comb filtering caused by Mic B being out of phase.
- Enable the Phase reverse switch for Mic B, and again, alter Mic A’s level. You’ll hear a wide tonal variation.
Now check out how Mic C creates a stereo spread. With Mic Mix Link off, adjust Mic A and/or Mic B for the desired sound. Bring up Mic C’s Level control slowly, and you’ll hear the stereo image bloom. Again, the Delay control and Phase reverse button make a big difference in the sound.
Clean Sounds, Too
One of my favorite mic applications is with clean guitar sounds (cabinet only, no amp). Mic C is particularly useful, because its brightness gives the cabinet’s tone a useful lift, and creates a stereo image. Finally, note that if you change the Channel Mode from mono to stereo (or the reverse), the sound may mute. Varying one of the Mic level controls restores the sound. Of course, it’s easy enough to call up an Ampire preset, and just start playing… but becoming proficient with the Mic Edit Controls opens up a wealth of possibilities.