Komplete Kontrol Integration in Studio One, Part 1/3
Studio One 4.53 introduced integration with Native Instruments’ Komplete series of keyboards, which is a big deal. Although these keyboards are theoretically dedicated to NKS-compatible plug-ins and mixer/transport hands-on control, with Windows systems (Mac fans, there’s more on this later) you can use the keyboard as a general-purpose, hands-on MIDI controller for non-NKS plug-ins, including all bundled PreSonus effects and instruments (as well as plug-ins from other manufacturers). Also, unlike standard NKS, you’ll be able to control effects, regardless of whether or not they’re inserted in an instrument track.
There’s a lot to cover, and since this is more like a tutorial than a tip, it’s split into three parts: DAW control with Studio One, creating custom templates for plug-ins, and how to apply the templates in your workflow.
INTEGRATING THE KEYBOARD
Choose Studio One > Options > External Devices, and click Add. Scroll to the entry for Native Instruments, unfold it, and select either your A/M or S series keyboard for Receive From and Send To. I’m using an S49 (Fig. 1).
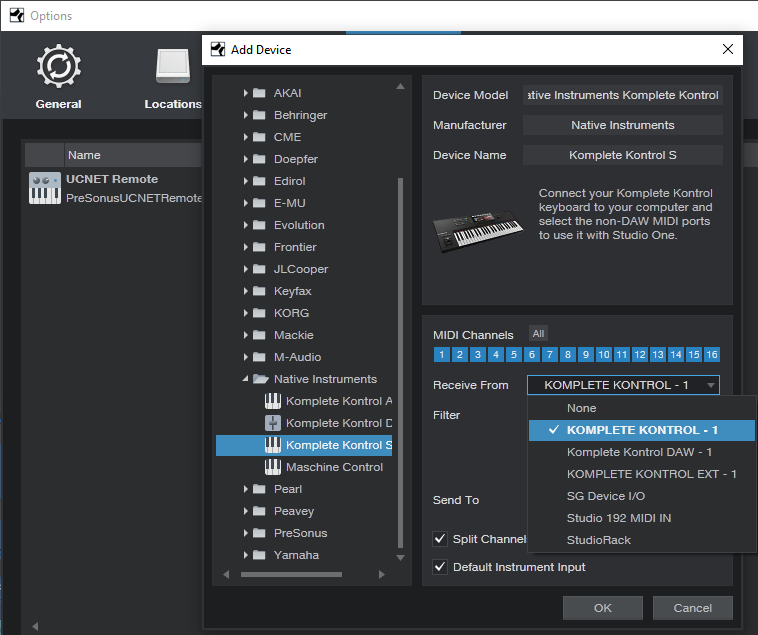
Figure 1: Komplete is selected as the keyboard, with Split Channel selected for more convenient use with multitimbral instruments, like IK Multimedia’s Syntronik.
INTEGRATING THE CONTROL SURFACE
Now let’s set up the Komplete keyboard as a new control surface. Again, choose Studio One > Options > External Devices, click Add, and scroll down to the entry for Native Instruments. Unfold it, and select Komplete Kontrol DAW – 1 for both Receive From and Send To (Fig. 2).
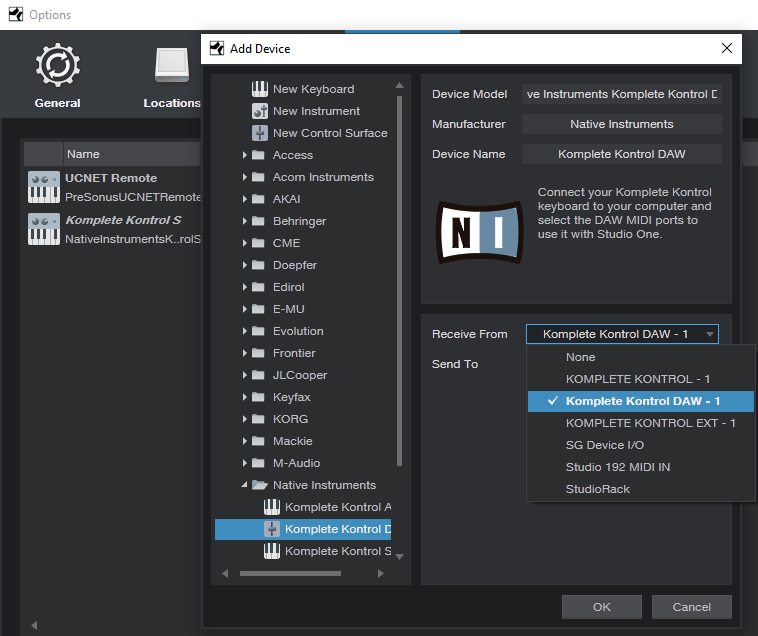
Figure 2: How to add the Komplete keyboard as a control surface for DAW integration.
CHOOSING THE MODE OF OPERATION
To edit NKS plug-ins, press the PLUG-IN mode button in the keyboard’s cluster of six buttons, toward the upper right. Controls that don’t relate to a synth or effect, such as the Transport, Metronome, Tape Tempo, and the like remain active. When it’s time to mix and you want full integration with Studio One’s mixer, press the MIXER button.
The following describes how the control surface for the current S-series Mk2 keyboards integrates currently with Studio One; click here for information from PreSonus on suitability with other NI keyboards, and updates.
Transport. The Play, Rec, and Stop buttons do what you’d expect, but there’s more to the story than that—there are several nuanced options. The following assumes you’re starting from a stopped transport.
- Press Play to begin from the Play Start marker. If there’s no Play Start marker, playback starts from the cursor’s current position. If you stop and re-initiate playback, playback re-starts from the cursor’s original position.
- Return to zero: When the transport is stopped, press Stop again to return to zero.
- Pushing on the big navigation knob toward the right initiates playback from the Play Start marker. (Note that this involves pushing downward into the knob, not left/right or up/down.) If there’s no Play Start marker, playback begins from the Loop Start, whether the loop is active or not.
- Push downward on the navigation knob during playback to jump to the Loop Start, which resumes playback automatically from there.
- Pressing Shift+Play operates the same way as using the navigation knob for playback control.
- With any scenarios involving the Play Start marker, it doesn’t matter if it’s before or after the Loop Start, or within the loop itself.
- Press Rec to initiate or punch-in recording. Press again to end or punch out recording. If you don’t record audio or MIDI while recording is active, there’s no blank event—it’s like nothing ever happened.
- Shift+Rec toggles the count-in between on and off. When you press Shift and count-in is enabled, the Rec button letters light bright red. Otherwise, the rec button letters are dimmed.
- Loop toggles the loop between on and off. To move the loop (whether enabled or not), hold the Loop button down, and rotate the navigation knob. For example, if the loop extends for four measures, moving the knob 1 click clockwise moves the loop forward to the next four measures. Moving the knob 1 click counter-clockwise moves the loop backward to the previous four measures.
- Metronome toggles between on and off.
Mixer
- The display for each visible channel shows the channel’s name, fader level, pan, metering (but not overloads), and status of a channel’s Record, Solo, and Mute buttons.
- Track select buttons. The eight buttons above the display select a track, however, moving the navigation dial left or right moves from one track to the adjacent track (left or right respectively).
- Hold Mute, and then select a channel with its track select button, to mute/unmute. The keyboard’s corresponding select button glows yellow.
- Hold Solo, and then select a channel with its track select button, to solo/unsolo. The keyboard’s corresponding select button glows blue.
- Shift+navigation knob move down (not push inward) selects level for the selected track. This mode remains selected until changed. Both the associated track knob, and the navigation knob, alter the selected track’s level. Holding Shift while moving either knob provides finer resolution. The individual track knobs provide the finest resolution.
- Shift+navigation knob move up (not push inward) selects pan for the selected track. This mode remains selected until changed. Similarly to level selection, both the track knob and navigation knob alter the selected track’s pan, and holding Shift while moving either knob provides finer resolution. The individual track knobs provide the finest resolution. Note: The Pan control for the Main channel is always shown panned full left. You can ignore this, because the Main channel doesn’t have a pan control anyway. The pan is centered properly.
- Auto toggles between Read and Touch (write) automation for the selected track. Be aware that you can’t choose automation off with Auto.
- Left/right arrow buttons select channels in groups of 8. However, if the last bank of eight has fewer than eight channels, the display will fill with the last eight channels. For example, if you expect the last bank to be channels 17-24 but only 22 channels are in use, the keyboard will display channels 15-22. This is by design, because it makes sure there aren’t any blank channels—you can always see eight channels at a time. If you hit the left arrow button, it won’t go back to channel 9, but be offset by the same amount as the previous bank. To “reset” the banks, hit the left arrow button until you’re back at the beginning.
Miscellaneous Functions
- Undo and Redo. For Redo, hold Shift and press Undo.
- Quantize. This quantizes whatever is selected, at the current quantize value.
- Tap this, even if not lit, for tap tempo. I love this feature when starting a song.
This takes care of the mixer and transport functions. Next week, we’ll cover how to create custom MIDI control setups using the Komplete Kontrol application, and that will prepare us for Part 3, which describes how to create “faux NKS” control surface capabilities for PreSonus instruments and effects. Yes, it really is possible…