10 Mai Tai Percussion Presets
We’re still in September, it’s still Studio One’s 10th anniversary, and so once again the Friday Tip is 10 Tips! This week, the accent is on percussion—which is an essential part of any decent mix. We’re going to get down and dirty in percussion-land, so load the Mai Tai synthesizer, and let’s get started.
If you just can’t stand the suspense, then scroll to the end and download the 10 presets (put them in a Drum folder under Studio One Songs and Projects\Presets\PreSonus\Mai Tai). I still recommend that you look at the text and images, and play around with the sounds—those with an adventuresome spirit will find that there are a lot of variations available in these presets.
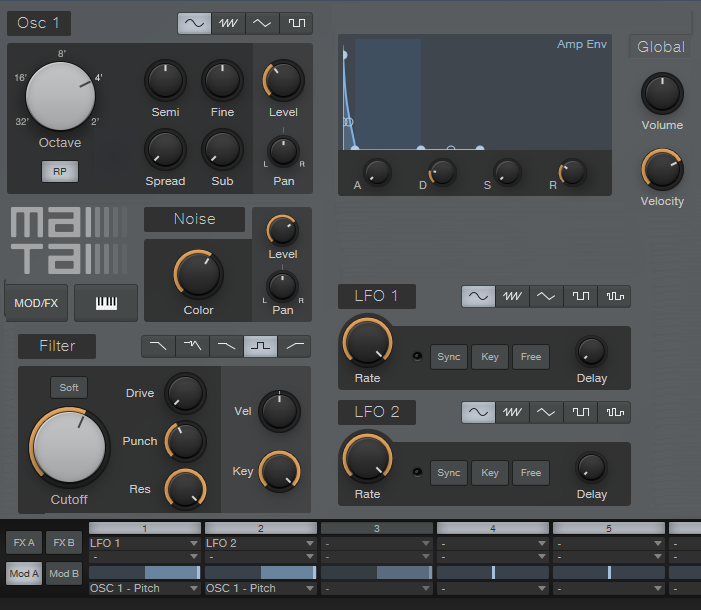
Note: To save graphics space and make the concepts clearer, the screenshots include only the relevant modules. We’ll be starting from the Default preset for each tip, however for a clean slate, click on Mod A and de-assign all the mod sources (choose [–] for the source from the pop-up menu, or turn off the numbered modulation strip). Also, note that the default includes Reverb and Delay enabled in FX A—bypass or leave-in, according to taste.
- The Virtual High-Hat
Real drummers work the high-hat from open to closed, and we can do that too.
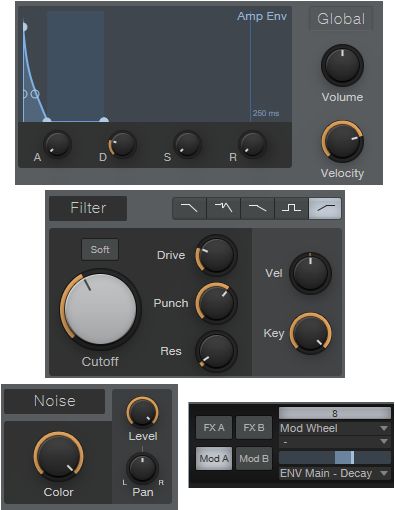
Adjust the Noise Color control for the desired timbre. Make sure you experiment with the filter; I prefer the HP mode, with some Drive and Punch…but tailor to suit. The only relevant Amp Env control is Decay. Adjust the decay time to give the closed hi-hat sound; turn up Velocity for more dynamics.
The key to getting the most out of this preset is modulation. Click on Mod A, and for modulation source, select Mod Wheel. For the modulation destination, choose the ENV Main – Decay parameter. Turn the Mod Wheel up full, hit some keys, and set the ENV Main – Decay slider in the modulation sectoin for the open hi-hat decay time.
Now you can use the Mod wheel to open and close the high-hat—just remember to “open” the high-hat before you hit the note. Bonus: There’s an additional amount of expressiveness based on how long you hold your finger down on the key.
- Disco Drums

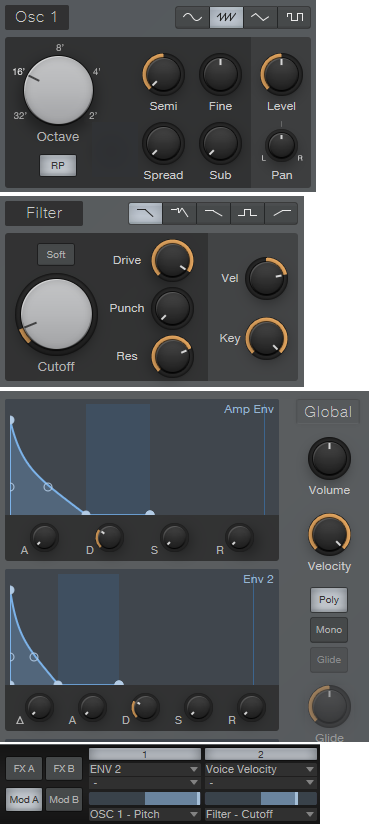
Doooo-doooo-dooo! I probably can’t use the drum company’s name without getting lawyers on my case, but if you like persimmons, you’ll know the drums I’m talking about. For this tip, we only need one oscillator. Set the Amp Env and Env 3 parameters to no Attack, Sustain, or Release and no Delay for Env 3. The Decay controls are all that matter, and they should be identical.
For the modulation, Env 3 controls OSC 1 – Pitch. Set the modulation slider for the desired frequency range covered by the dooo-dooo-dooo.
- Shaker

This is something you’ll probably want to use with 1/8 note-based rhythmic patterns.
Load the default, then turn off both oscillators, Filter, and Character…all we want is Noise. For the Amp Env, set an Attack time around 40 to 100 ms, and the Decay around 125 ms, but adjust to taste.
- Talking Drums

After loading the default preset and resetting the modulators, nuke every module except Osc 1. For this effect, although velocity is tied to pitch to make life easier, you’ll need some manual dexterity: the only way to emulate the true talking drum effect is by working the pitch bend wheel after you hit the drum.
- Ode to Kraftwerk
Let’s face it, Kraftwerk is one of the most influential bands ever. They jettisoned guitars and drums in favor of drum machines and synths long before it was fashionable. Bowie, Depeche Mode, and Aphex Twin were influenced by them. Electro and several variants of club music wouldn’t even exist without them. U2 recorded a version of “Neon Lights” and so did Simple Minds. They’ve been sampled by R.E.M., Coldplay, and Jay-Z. The sound they created is the sound of pop 30 years ago…and today.
Okay, enough about the awesomely amazing and innovative Kraftwerk. They made a lot of their own instruments, and had some cool percussive sounds. This is a tribute to one of those sounds, and it’s also a little more complex than the previous ones.
Load the default preset, and after de-assigning the modulation sources, turn off everything except Osc 1 and Filter. Env 2 influences the Osc 1 pitch, while Velocity controls Filter Cutoff.
- Electronic Snare
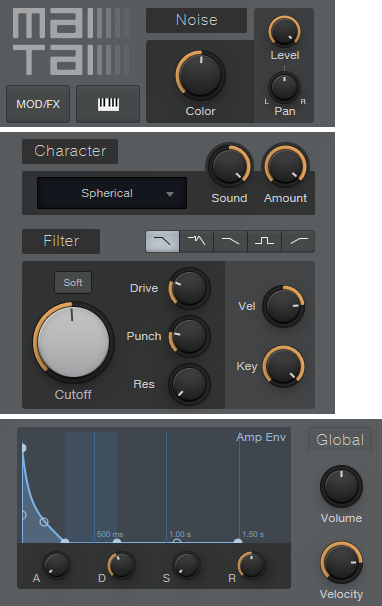
Mai Tai’s Character option is a gold mine for electronic snares, from the 80s and beyond. Pump some noise into the filter with its controls as shown, give the Amp Env a short decay, turn up the Character section’s Sound and Amount controls all the way, and then try out the different characters from the Character drop-down menu. Expect to be surprised—and also experiment with turning up Punch.
- Hum Drum Kick
And here’s the sound that makes sure you don’t fall asleep when you’re stopped at an intersection: the infamous hum drum kick, as immortalized in hip-hop and dance music.
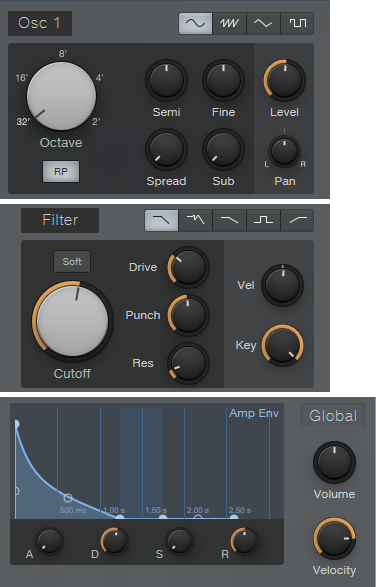
It’s very simple: a low-frequency sine wave oscillator with a Filter and Amp Env. The Filter settings are the crucial ones here, because they determine the attack’s aggressiveness. Experiment with the Drive and Punch control for the best results…a little distortion probably won’t hurt, either.
- Clave
It’s ironic that the simplest sound gets the most complicated preset, but life is full of twists and turns, isn’t it? Also, this one wants a fairly specific pitch: hit C4 for the most clave-like sound using the downloaded preset. However, once you get a feel for this preset, there’s much room for experimentation. Perhaps surprisingly, altering the LFO control parameters, or enabling/disabling them, has a major effect on the sound.
- Giant Thud Explosion
This gives the sound of distant cannon fire, an explosion, impressionistic thunder, or other low, large sounds. It’s based on using white noise with the filter pulled way back, and there are two articulations: hold a key down to have the sound run through the more percussive decay envelope, or tap a key to trigger the longer release time. Use this as a cinematic-type effect sound when transitioning from one song section to another—and you want to start the next section off with a bang. Or a thud.
- Ethic Percussion

This is kind of a tuned, log, bongo kind of thing. Both oscillators and noise are in play, and the filter settings are somewhat crucial because they depend on Drive, Punch, and Res for their sound. Only the Amp Env is needed, and there are no modulation sources—velocity for the filter does all the needed modulation.
Download the 10 presets here!