10 Not-Hitting-Drums ATOM Tips
It’s easy to assume ATOM is an MPC-type pad controller, and ignore it if that’s not of interest. But ATOM is tightly integrated with Studio One for navigation, editing, and more, and also works with third-party software—which even applies to third-party software (like virtual instruments) running inside Studio One.
1. The Auxiliary Keyswitch Keyboard
The problem: you have a 4-octave keyboard, but you’re using a program like SampleTank or Kontakt that uses lower-octave keys for keyswitching. The solution: Add ATOM as an auxiliary keyboard for triggering keyswitches (Fig. 1).

Figure 1: IK SampleTank’s lower keys trigger loops (as identified with arrows), while the upper keys play one-shots. You can set up ATOM to play the lower, keyswitched notes, and play the one-shots from your main keyboard.
1. Select the Instrument track and set it to All Inputs, so it receives notes from the main keyboard and from ATOM.
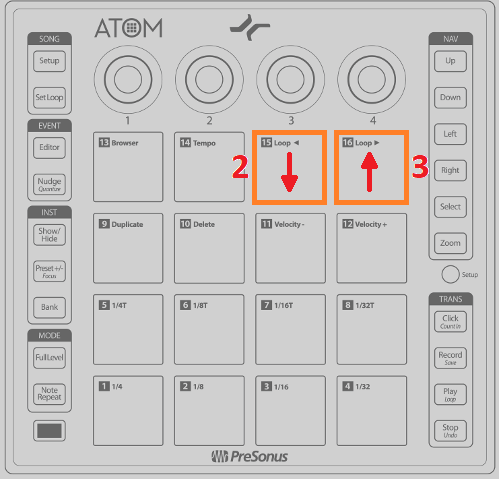
Figure 2: Use Pads 15 and 16 to cover the desired keyboard range for keyswitching.
2. Tap Pad 15 to transpose down an octave (Fig. 2). Each tap transposes down another octave. To keep track of how far down you’ve transposed, Pad 15 is orange at the default octave, tan = -1 octave, purple = -2 octaves, and red = -3 octaves.
3. Tap Pad 16 to transpose up an octave. Each tap transposes up another octave.
Considerate Bonus Feature: ATOM remembers the octave settings for different instrument tracks, even if they’re not instruments bundled with Studio One.
2. “Feel Factor” Changes
Leading or lagging rhythms by only a few milliseconds can make a major difference in the “feel,” the mix, and therefore, the music’s emotional impact (for more about the “feel factor,” please check out this article on my educational site, craiganderton.org). But how can you do that with Studio One, whose highest resolution goes to 64th notes? It’s easy with ATOM—and frankly, this feature alone justifies ATOM to me. The following works with both note and audio data.
1. In Studio One, turn off snap.
2. Select the notes (or audio Events) whose timing you want to shift.

Figure 3: You can lead or lag events in 1 millisecond increments with ATOM.
3. On ATOM, press and hold Nudge (Fig. 3).
4. Tap the Left button to move the selected notes or Events ahead (lead) by 1 ms, and the Right button to move the selected notes late (lag) by 1 ms (Fig. 4).
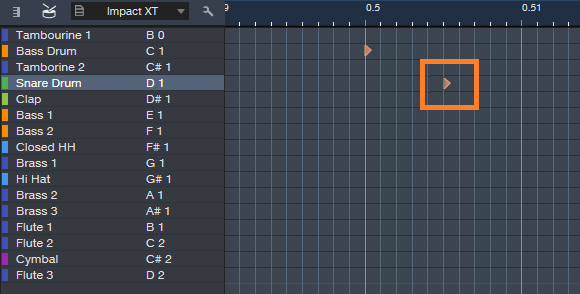
Figure 4: The timeline shows seconds. The note outlined in orange has been nudged 5 ms later.
This is huge. Try moving percussion a few milliseconds ahead of the beat to give a more “urgent” feel, or a snare a few milliseconds after the beat for a “bigger” sound.
3. Don’t Panic!
Stuck notes? No problem—see Fig. 5. (Note: the upper left Setup button needs to be off.)

Figure 5: It’s easy to nuke stuck notes with ATOM.
1. Press and hold the Quick Setup button, and select the track with the stuck notes.
2. Tap Pad 4 to send an All Notes Off command.
4. Tap Your Tempo
This is one of my favorite features for songwriting, because it’s a lot easier to tap a tempo (Fig. 6) than tweak it when you have a song idea.
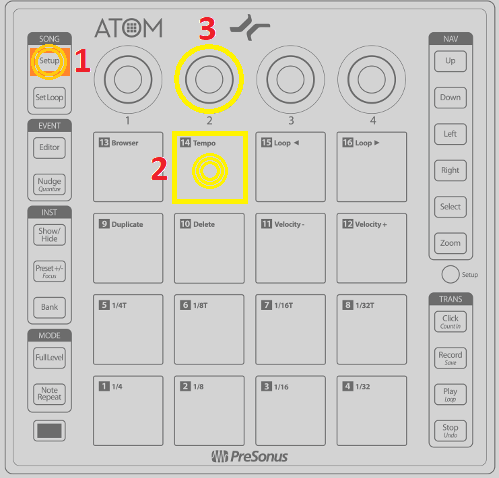
Figure 6: It’s easy to capture a song’s “feel” when songwriting by using tap tempo.
1. Tap the Song Setup button in the upper left.
2. Tap Pad 2 at the desired song tempo; this sets the tempo in the control bar.
3. To fine-tune the tempo, turn Knob 2.
5. The Hands-On Instrument Browser
You can call up instruments and presets quickly with ATOM (Fig. 7).
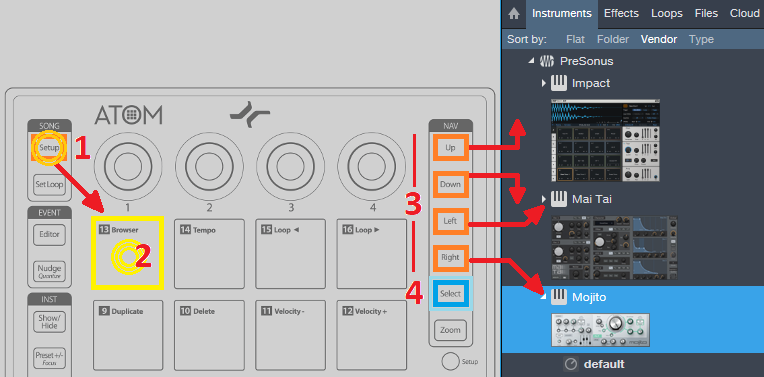
Figure 7: ATOM plays well with the Browser.
1. Press Setup, and it glows orange.
2. Toggle the Browser show/hide by tapping Pad 13 (Browser).
3. When the Browser is open, use the Up and Down buttons to go up and down through the list of instruments and presets. Use the Right button to open a preset list, and the Left button to close the list.
4. When you have the preset or instrument you want, press Select. This creates an Instrument track with the currently selected preset, or the instrument itself if no preset is selected.
6. Wicked Fast Exclusive Solo
There are many times—especially when proofing tracks before mixing–that I want to be able to select tracks quickly, and go into exclusive solo mode (i.e., only that track will be soloed—even other tracks that are soloed will be muted). It’s super fast if the Arrange View or Console has the focus (Fig. 8).
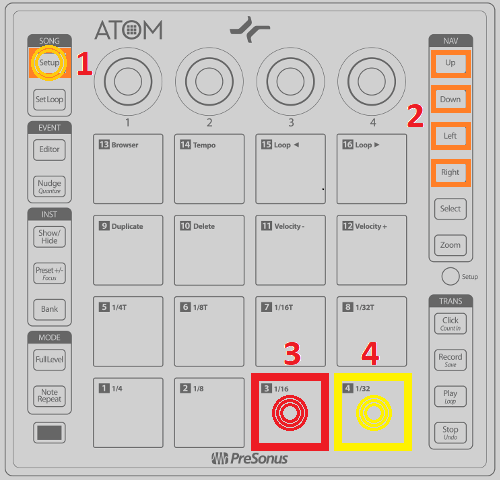
Figure 8: Step through tracks quickly, and “exclusive solo” them, with ATOM.
1. Tap Setup, and it glows orange.
2. Use the Up button or Left button to step up through tracks, and the Down or Right button to step down through tracks. (That’s kinda cool that either one Up/Down or Left/Right works, because it’s natural to use Up/Down in the Arrange view, and Left/Right on the Console).
3. Tap Pad 3 to mute the selected track.
4. Tap Pad 4 to solo the selected track, or Alt+Pad 4 for exclusive solo.
7. Control FX Chain Macro Knobs

Figure 9: Want hands-on control over the various FX Chains I’ve presented in these Friday Tips? ATOM can do it.
This is an easy one. Call up an FX Chain. Move the ATOM knob you want to assign to a Macro control. Right click on the Macro control. Assign it to the ATOM knob (Fig. 9).
8. Faking Studio One as a Third-Party Application
ATOM is happiest when playing with Studio One, because of the tight integration. But I still use Cakewalk’s Rapture Pro in a lot of tracks; I sampled a ton of Gibson basses, and made what I think are some really cool instruments with them. Unfortunately, in theory you can’t use ATOM’s aftertouch or knobs as a generic control surface when running in Studio One…but hey, we laugh at theory around here! You can, by faking Studio One into not recognizing ATOM as ATOM.
1. Go to Studio One > Options > External Devices, and remove ATOM.
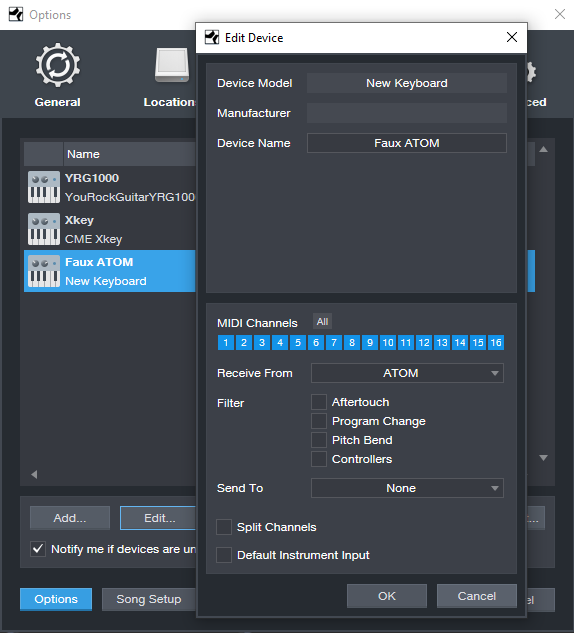
Figure 10: How to fool ATOM into thinking Studio One is a third-party application.
2. Click Add, and choose New Keyboard (I named it Faux ATOM; see Fig. 10). You don’t need to Send To anything. ATOM’s status light at the top will glow green to indicate ATOM isn’t under Studio One’s control.
3. If your instrument has MIDI learn, assign the four controls or aftertouch however you want, and record as you would any automation from a control surface (Fig. 11).
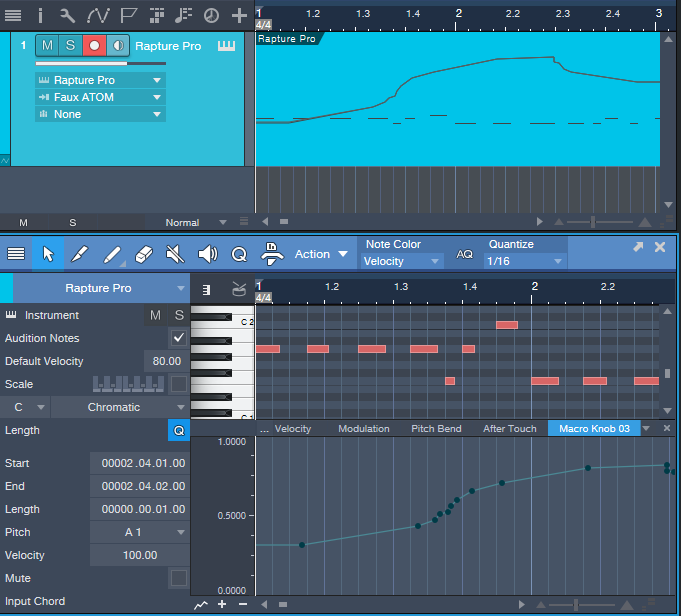
Figure 11: The screen shot shows the results of recording ATOM’s Macro Knob 3 as a control source for a third-party synthesizer.
Don’t worry, you haven’t lost ATOM. Go Studio One > Options > External Devices, and remove Faux ATOM. Click on Reconnect; Studio One finds ATOM, and lists it as an external device. Another option is to close and re-open Studio One (ATOM gets added automatically).
9. Cool Event Editor Stuff
The documentation seems to imply that you can do cool event editor things only with the Instrument track, but that’s not quite true—you can do plenty with audio tracks as well.
1. Press the Editor button (in the left side, under Event). It doesn’t matter if Song Setup is on, because if it is, hitting Editor turns it off. The Edit view appears.
2. To hide the Edit view, hold Shift and tap Editor.
While in the Editor (or with audio tracks, the Arrange view):
10. The More Ways to Undo, the Better
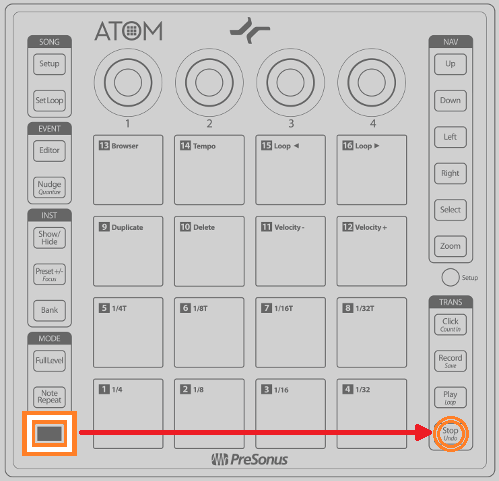
Figure 12: No one will ever know you made that horrible mistake if you undo.
Hold Shift and tap Undo (Fig. 12) to undo your last mistake…because there are never enough ways to undo!