Monthly Archives: June 2019
Friday Tips: The Best Flanger Plug-In?
Well…maybe it actually is, and we’ll cover both positive and negative flanging (there’s a link to download multipresets for both options). Both do true, through-zero flanging, which sounds like the vintage, tape-based flanging sound from the late 60s.
The basis of this is—surprise!—our old friend the Autofilter (see the Friday Tip for June 17, Studio One’s Secret Equalizer, for information on using its unusual filter responses for sound design). The more I use that sucker, the more uses I find for it. I’m hoping there’s a dishwashing module in there somewhere…meanwhile, for this tip we’ll use the Comb filter.
Positive Flanging
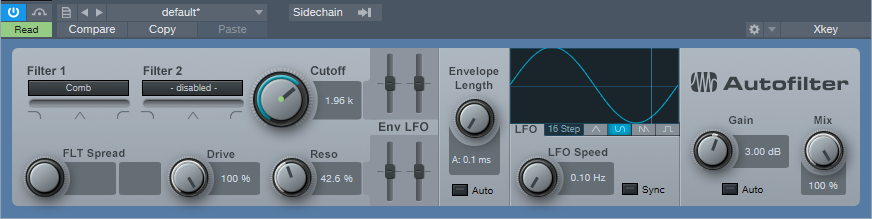
Figure 1: When set properly, the Autofilter’s comb filter can make a superb flanger.
Flanging depended on two signals playing against each other, with the time delay of one varying while the other stayed constant. Positive flanging was the result of the two signals being in phase. This gave a zinging, resonant type of flanging sound.
Fig. 1 shows the control settings for positive flanging. Turn Auto Gain off, Mix to 100%, and set both pairs of Env and LFO sliders to 0. Adding Drive gives a little saturation for more of a vintage tape sound (or follow the May 31 tip, In Praise of Saturation, for an alternate tape sound option). Resonance is to taste, but the setting shown above is a good place to start. The Gain control setting of 3 dB isn’t essential, but compensates for a volume loss when enabling/bypassing the FX Chain.
Varying the Cutoff controls the flanging effect. We won’t use the Autofilter’s LFO, because real tape flanging didn’t use an LFO—you controlled it by hand. Controlling the flanging process was always inexact due to tape recorder motor inertia, so a better strategy is to automate the Cutoff parameter, and create an automation curve that approximates the way flanging really varied (Fig. 2)—which was most definitely not a sine or triangle wave. A major advantage of creating an automation curve is that we can make sure that the flanging follows the music in the most fitting way.
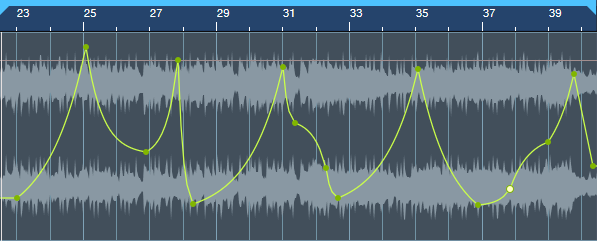
Figure 2: The Cutoff frequency automation curve used for the audio examples.
Negative Flanging
Throwing one of the two signals used to create flanging out of phase gave negative flanging, which had a hollower, “sucking” kind of sound. Also, when the variable speed tape caught up with and matched the reference tape, the signal canceled briefly due to being out of phase. It’s a little more difficult to create negative flanging, but here’s how to do it.
- Set up flanging as shown in the previous example, and then Duplicate Track (Complete), including the Autofilter.
- Turn Resonance all the way down in both Autofilters (original and duplicated track). This is important to obtain the maximum negative flanging effect. Because of the cancellation due to the two audio paths being out of phase, there’s a level drop when flanging. You can compensate by turning up both Autofilters’ Gain controls to exactly 6.00 dB (they need to be identical). This gain increase isn’t strictly necessary, but helps maintain levels between the enabled and bypassed states of the Negative Flanging FX Chain.
- In the duplicated track’s Autofilter, turn off the Autofilter’s Automation Read, and turn Cutoff up all the way (Fig. 3).
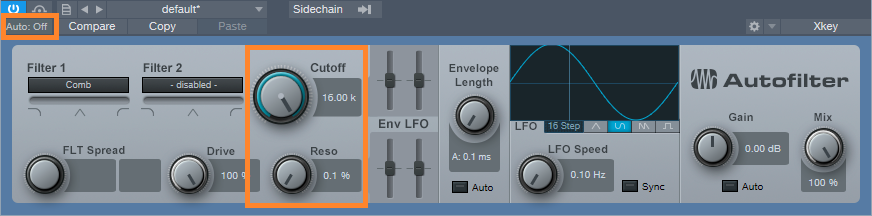
Figure 3: Settings for the duplicated track’s Autofilter.
- Insert a Mixtool after the Autofilter in the duplicated track, and enable both Invert Left and Invert Right (Fig. 4). This throws the duplicated track out of phase.

Figure 4: Mixtool settings for the duplicated track.
- Temporarily bypass both Autofilters (in the original and duplicated tracks). Start playback, and you should hear nothing because the two tracks cancel. If you want to make sure, vary one of the track faders to see if you hear anything, then restore the fader to its previous position.
- Re-enable both Autofilters, and program your Cutoff automation for the original track (the duplicated track shouldn’t have automation). Note that if you mute the duplicate track, or bring down its fader, the sound will be positive flanging (although with less level than negative flanging, because you don’t have two tracks playing at once).
So is this the best flanger plug-in ever? Well if not, it’s pretty close…listen to the audio examples, and see what you think.
Both examples are adapted/excerpted from the song All Over Again (Every Day).
The Multipresets
If you like what you hear, download the multipresets. There are individual ones for Positive Flanging and Negative Flanging. To automate the Flange Freq knob, right-click on it and choose Edit Knob 1 Automation. This overlays an automation envelope on the track that you can edit as desired to control the flanging.
Download the Positive Flanging Multipresets Here!
Download the Negative Flanging Multipresets Here!
And here’s a fine point for the rocket scientists in the crowd. Although most flangers do flanging by delaying one signal compared to another, most delays can’t go all the way up to 0 ms of delay, which is crucial for through-zero flanging where the two signals cancel at the negative flanging’s peak. The usual workaround is to delay the dry signal somewhat, for example by 1 ms, so if the minimum delay time for the processed signal is 1 ms, the two will be identical and cancel. The advantage of using the comb filter approach is that there’s no need to add any delay to the dry signal, yet they can still cancel at the peak of the flanging.
Finally, I’d like to mention my latest eBook—More Than Compressors – The Complete Guide to Dynamics in Studio One. It’s the follow-up to the book How to Record and Mix Great Vocals in Studio One. The new book is 146 pages, covers all aspects of dynamics (not just the signal processors), and is available as a download for $9.99.
Artist Denny White Discusses Career and Studio One!
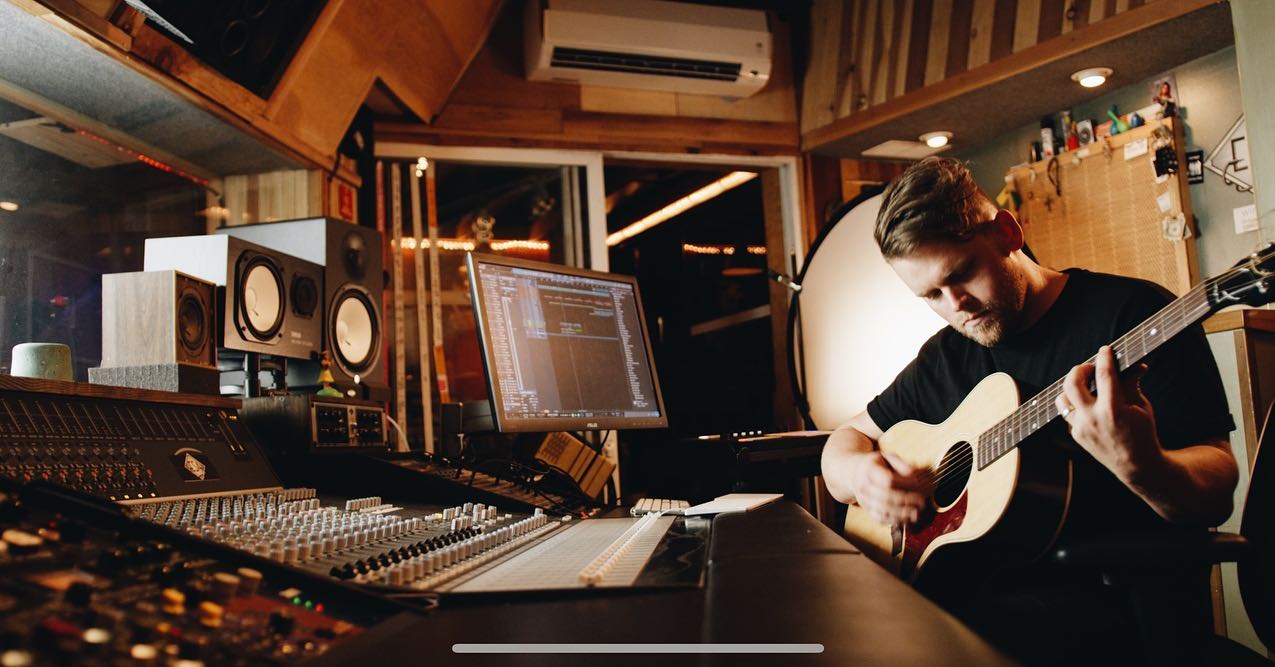
We were recently introduced to Denny White via his artist bro and Studio One fan Josh Cumbee. Denny combines pop and electronic beats, soulful blues vocals, and a singer/songwriter style that takes listeners on a trip! Living in Los Angeles has awarded him opportunities to play alongside acts such as Young the Giant, Dawes, and Tove Styrke. He JUST released some vocal sample packs with our friends at Splice, and he’s currently working on a collection of singles leading up to his debut full-length album coming out soon! We recently had the opportunity to chat with him about his career and his gear.
Give us some background on yourself. How long have you been making music?
I grew up in a sleepy California suburb called Hemet and music was always at the centerpiece of everything we did. I fell slowly into making music as a career, and still find it crazy that I call this my “job.” My freshman year of college, I met my good buddy Brent Kutlze, who produced my first solo EP and mentored me early on. I saw first hand how he wrote & produced for other artists, while also being a full-time one himself in his band OneRepublic. Releasing that first EP led to me meeting a manager, doing hundreds of co-writes, moving to LA, and eventually signing a publishing deal with Warner Chappell.
How has the music industry changed since your early days?
It’s such a catch-22… everything’s changed while nothing has at the same time. I was technically streaming music in high school with Limewire and MySpace, but couldn’t have dreamed it would morph into streaming as we know it today. On the recording side, I’m still producing on a laptop like I was in college, but everything is light years better and faster than anything I could have imagined then. One of the biggest changes is the vast amounts of knowledge and resources available to everyone now. The industry once sounded like some mysterious faraway place that only a few had access to, but now that glass ceiling has been shattered. I’ve written with kids who know about publishing, licensing, producing, and even their own frequency preferences on a vocal, thanks to amazing resources like Pensado’s Place, or podcasts like Ross Golan’s And the Writer is.
 Describe the first time you wrote a song.
My first song was written for a school talent show, and I hope to find a dusty VHS tape someday with a little me on it, most likely singing a mid-tempo Ben Folds-esque piano tune.
Who has been an influence in your life?
Hands down my wife’s been the biggest influence in my life. Musically, I’ve been the benefactor of so many talented friends and collaborators who’ve had an influence on me as well over the years, Brent Kutlze, Michael Brun, David Hodges, Alex Delicata, Steve Wilmot, and Jeff Sojka to name a few!
Have you ever wanted to give up on music? What keeps you going?
I’ve never wanted to give up on music per se, but have definitely contemplated other career paths, as this one has the propensity to drive you mad; you really have to love it despite the wild ebb and flow of the industry and embrace the process daily. My faith and family keep me going on days I don’t want to.
How did you first hear of PreSonus?
I’ve always known about PreSonus but knew little about the products until really hearing about Studio One from my freakishly talented friend Josh Cumbee last year.

What do you like about PreSonus? What caught your eye?
I remember being in Josh’s studio and was immediately intrigued when I saw the Start Page of Studio One. It felt so unique and custom to Josh. The first feature that caught my eye was the window in the middle where you can upload your own art, that prints on every mixdown. Also, the organization of seeing all recent files on the left, without having to scroll through a list or search your hard drive immediately spoke to my OCD-ness.
What PreSonus products do you use?
I use Studio One, Monitor Station v2, and just snagged the newest FaderPort for even more control!
What features are you most impressed with in Studio One?
I really dig Console Shaper, and the immediate vibe it can give to any blank start. The hybrid dual buffer engine is insane and makes it possible to work in large projects that historically would have been a cluster cuss, and allows me to use instances of soft synths that are taxing on CPU like Kontact or Vengeance Avenger up until the finish line. Tracklist organization, Fat Channel, and “Candleblower” bass in Mai Tai are a few of the other million things I love in it.
Any user tips or tricks or interesting stories based on your experience with Studio One?
Recently I released a Vocal pack on Splice, and Sample One XT made all my vocal chops feel so much more creative and important-sounding than anything I could have accomplished in my sad old DAW’s sampler. First I’d record pass of adlibs, tune with the integrated Melodyne (insanely fast,) then map individual samples across 3-5 keys and quickly explore new melody ideas. Another huge lifehack is I have “W” set to “Locate Mouse Cursor.” It’s insane how much time these things have saved me, and now I’m able to be creative almost immediately.
How easy/difficult was Studio One to learn?
The transition was so easy. I was very reluctant at first, thinking It’d take way too much time, but after doing a few sessions in it I was back at full speed with a whole new perspective on producing.


Where do you go for support?
From the Knowledgebase to millions of videos on YouTube, or texting one of my friends about Studio One, there’s never a shortage of support.
Recent projects? What’s next for you?
Last week I released my first Vocal Sample Pack on Splice that I’m really proud of. Currently, I’m in the middle of writing for my album, while also producing a record for Gabriel Conte!
Keep up with Denny on Instagram!
Check out his work on Spotify!
Buy his Vocal Sample Pack from Splice Here!

Studio One’s Percussion Part Generator
Shakers, tambourines, eggs, maracas, and the like can add life and interest to a song by complementing the drum track. But it’s not always easy to play this kind of part. It has to be consistent, but not busy; humble enough to stay in the background, but strong enough to add impact…and this sounds like a job for version 4.5’s new MIDI features.
We’ll go through the process of creating a cool, 16th-note-based percussion part, but bear in mind that this is just one approach. Although it works well, there are many ways you can modify this process (which we’ll touch on at the end).
First, Choose Your Sound
Ideally, you’ll have a couple different samples of the percussion instrument you want to use. But if you don’t, there’s a simple workaround. I use Impact for these kinds of parts, and if there’s only one sample of something like a shaker, I’ll drag it to two pads, and detune one of the pads by -1 semitone so they sound different. In the following example, we’ll call the original sample Sound 1, and detuned sample, Sound 2.
The Process
Let’s create a two-bar percussion loop to start. Grab the Draw tool, and set the Quantize value to 1/4. Drag across the two measures to create a hit at every quarter note for Sound 1 (Fig. 1).
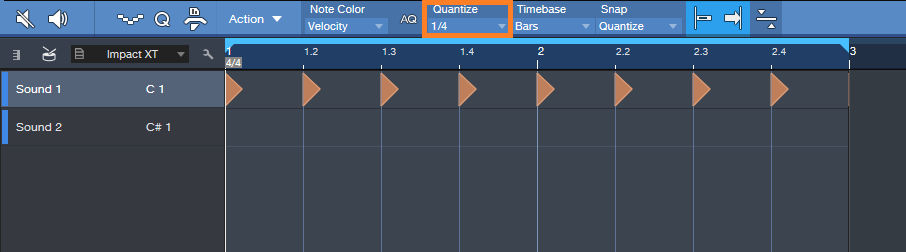
Figure 1. Having a constant series of 1/4-note hits anchors the rhythm so we can alter other hits.
Next, set the Quantize value to 1/16. Drag across the two measures to create a hit at every 16th note for Sound 2 (Fig. 2). Hit Play, so you can marvel at how totally unmusical it sounds.
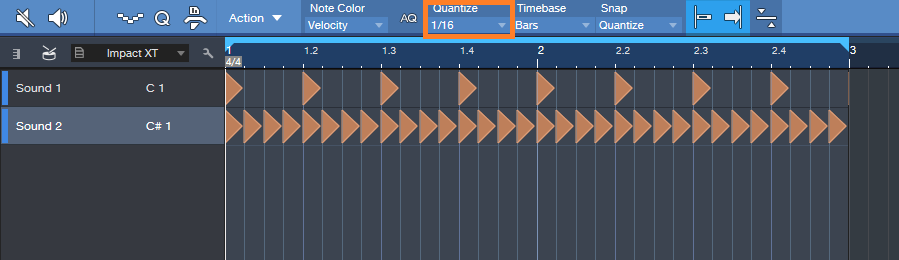
Figure 2: We’ll be modifying the series of 16th notes to add interest.
Now let’s make the part sound good. The key here is not to alter the 1/4 note hits—we want them rock solid, so that the rhythm won’t get pulled too far astray when we start adding variations to the 16th notes.
Select only the 16th notes for Sound 2, and let’s use version 4.5’s new Thin Out Notes command. I’m a fan of Delete notes randomly, and we’ll delete 40% of the notes. Choose the 1/16 grid, since that matches the part. Click OK, and now the part isn’t quite so annoyingly constant (Fig. 3).
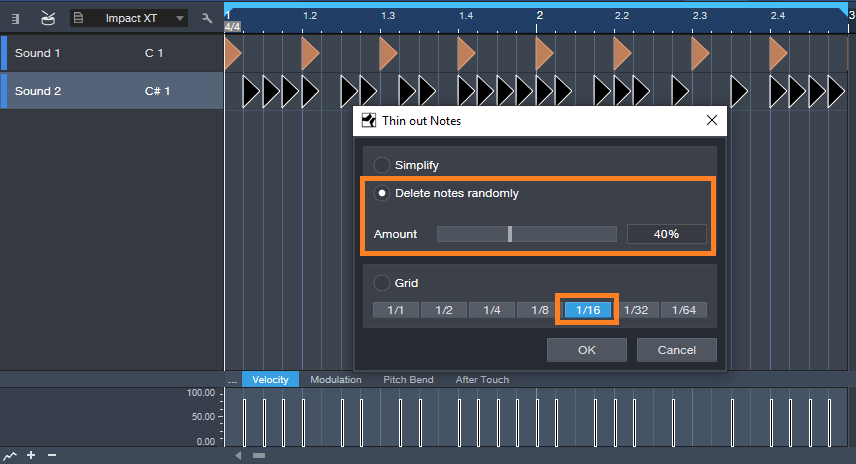
Figure 3: Dropping out the occasional random note adds interest.
But we still need to do something about the velocity, which is way too consistent—the real world doesn’t work that way. Select the string of 16th notes again, and this time, choose Humanize. Set a Velocity range and Note start range (like -40/40% and -.0015/0.0015 respectively), and then click OK (Fig. 4). Now look at the velocity strip: it’s a lot more interesting. The timing changes are also helpful, but they don’t have the “drunken percussion player” quality that you get a lot with randomized timings, because those rock-solid quarter note hits are still establishing the beat.
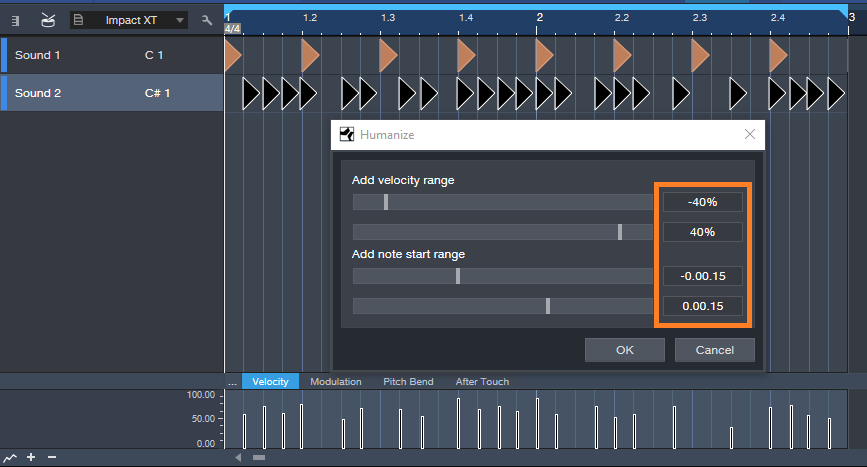
Figure 4: Humanizing velocity and start times for only the 16th notes adds variations that make the part more lively.
So now we have an interesting two-measure loop, but let’s not loop it—instead, we’ll create a part that lasts as long as we want, and it will still be interesting. Here’s how.
Duplicate the two measures for as long as you want. Select all the notes in the Sound B row, and choose Randomize notes. Uncheck everything except Shuffle Notes. Click on OK. All the notes will stay in the same position, and because there are no other candidate notes for shuffling, the timing won’t change. What will Shuffle is velocity. If you created a Shuffle Macro for the May 24 tip on End Boring MIDI Drum Parts, it will come in handy here—keep hitting that macro until the pattern is the way you want. After you de-select the notes, if you’ve chosen Velocity for note color, you’ll have a pretty colorful velocity strip (Fig. 5).
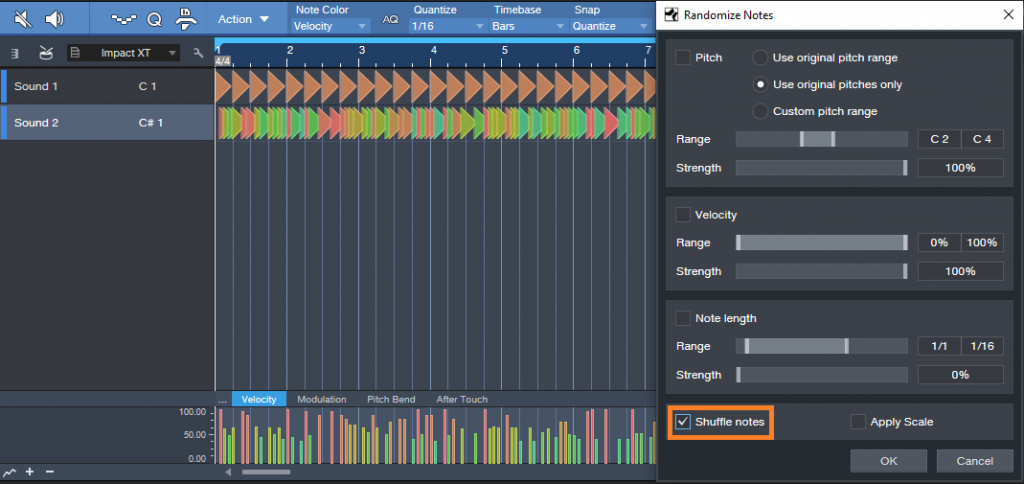
Figure 5: Shuffling velocity in a longer part adds more interesting dynamics.
Now you have a part that sounds pretty good, and once you become familiar with the process, you’ll find it takes less time to generate a part than it does to read this. Here are some options to this technique.
- Instead of creating a short loop, duplicating it, and then shuffling velocity, you can start off with a much longer event using the same basic principle (a row of quarter notes and another of sixteenth notes). Then, when you drop out notes randomly, there will be more variations within the pattern compared to dropping out notes for a couple measures and duplicating them.
- Another way to do something similar to dropping notes is with the Randomize function—set the lower end of the velocity range to 0. This can even be useful to thin out a part further after dropping random notes, for example, if there’s a lot going on with other instruments in a section.
- Some percussion instruments have samples of multiple hits. This allows using the Shuffle function, as described in the May 24 tip, to mix up the pitches a bit.
- A little processing can also be cool—like the Analog Delay, set for a dotted 8th-note delay, mixed in the background…or a little reverb.
- Re-visit Humanizing, with more drastic velocity changes.
The bottom line: there are a lot of possibilities!
The “QuickStrip” Bass FX Chain
Sometimes when you get inspired, you don’t have time to wait before laying down some tracks. But then you want a compressor, and maybe a bit of dirt for an amp sound, some EQ, and a little doubling for flavor…maybe a touch of funk…and by the time you’ve inserted and tweaked everything, you’ve forgotten what you were going to play. No more! The Bass QuickStrip FX Chain is here to help you dial up a sound in seconds.
Rather than go through all the backstory on how it’s done, just download the FX Chain, and reverse-engineer it to your heart’s content. Here are the highlights, along with crucial controls you can customize to make the chain your own.
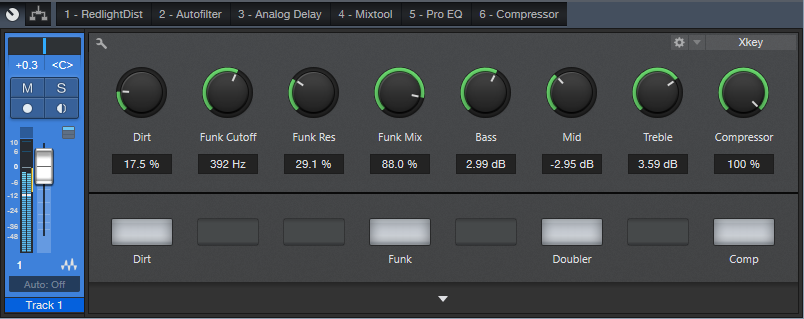
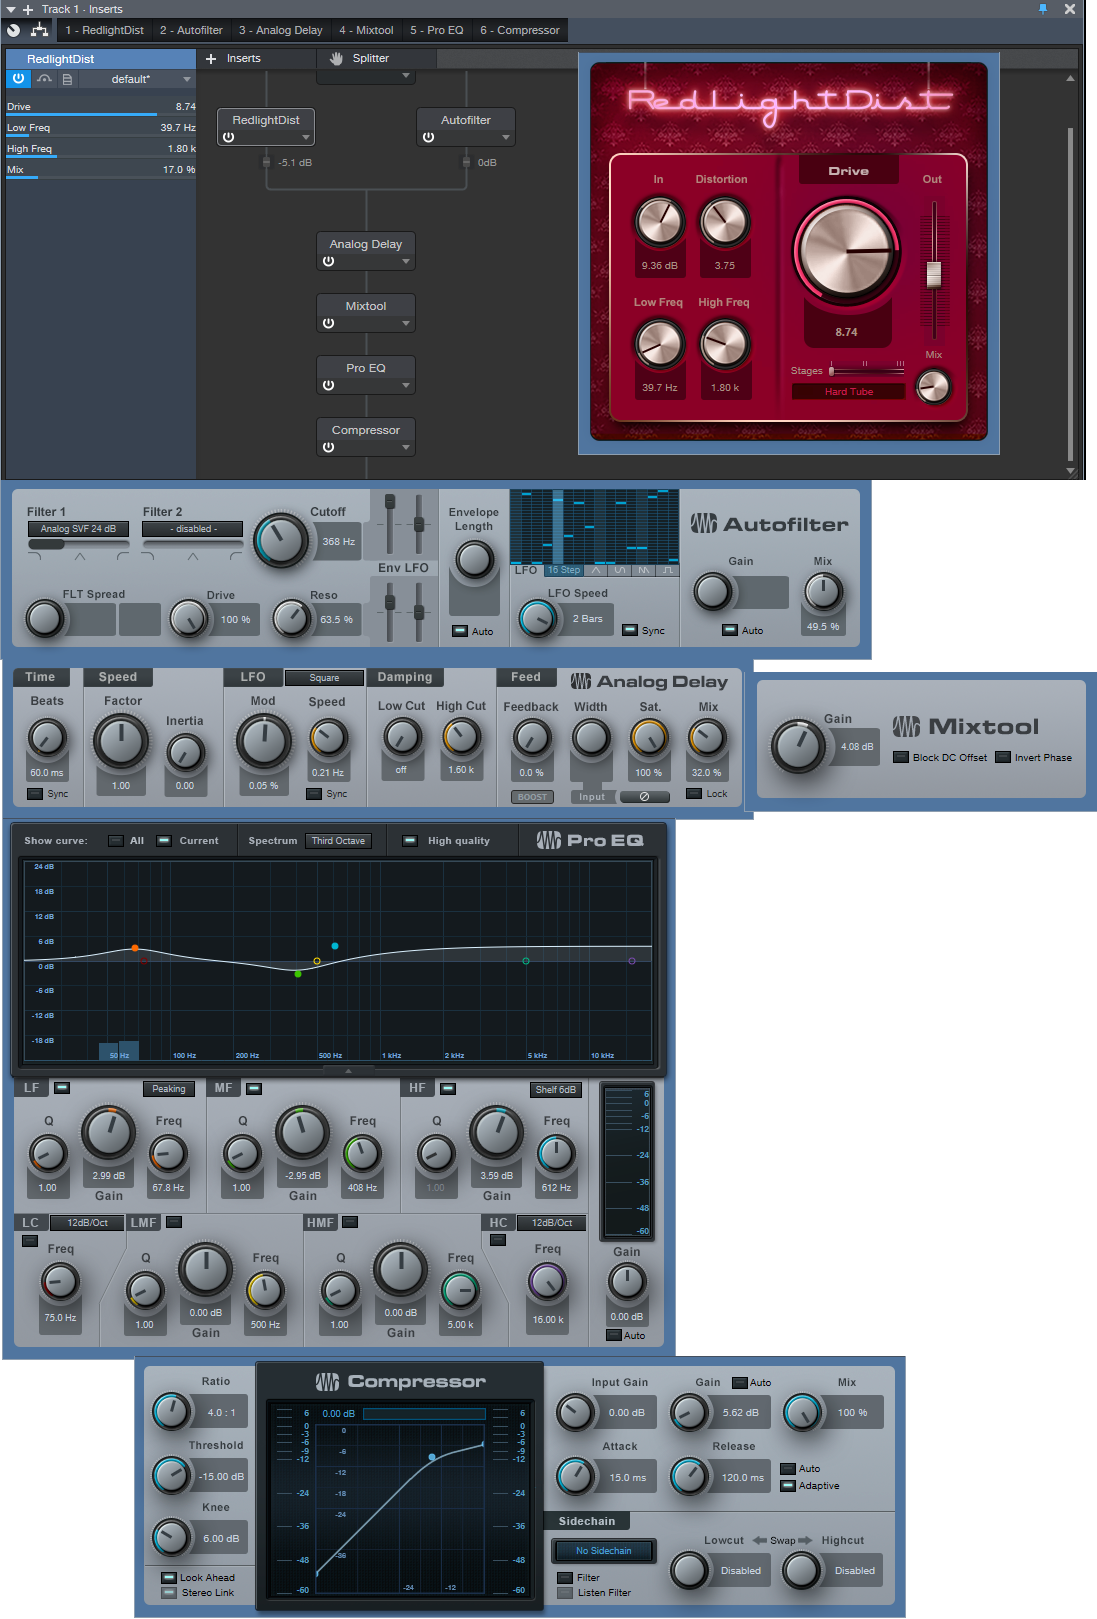
Dirt Control: This is the Mix control for the RedLightDist processor, whose settings have been optimized for bass. For more highs, turn up the processor’s High Freq control, or turn down for a bassier growl. This stage has an associated enable/bypass button.
Funk Cutoff, Funk Res, and Funk Mix: These are the essential Autofilter controls for when you want to lay some funk on your bass. Cutoff covers the general range to match your playing, Res is the filter resonance, and because envelope filters are best for bass when placed in the parallel, Mix controls the dry/filter balance. It has an associated enable/bypass switch.
Note that the RedLightDist and Autofilter are fed off a split, so they do parallel processing. This is in addition to the parallel processing done within the processors themselves.
Bass, Mid, and Treble: This “tone stack” for the Bass QuickStrip controls parameters in the Pro EQ. They don’t cover the full boost/cut range, but if you want to get more extreme, be my guest.
Compressor: The compression is optimized for bass, so the single control is a dry/compressed mix, paired with an enable/bypass switch. Any customization would be to taste—for example, a lower Threshold, or higher Ratio, for a more compressed sound. But if you want more variation and the ability to change the compression from light to heavy, another option is to use the settings for the EZ Squeez one-knob compressor, which was the subject of the Friday tip for August 24, 2018.
Doubler: This switch brings in a doubling effect, courtesy of the Analog Delay. It also bumps up the gain a bit using the Mixtool, so that the doubled and dry sounds have the same apparent level.
So download away—and lay down the low.
DOWNLOAD THE BASS QUICKSTRIP HERE!
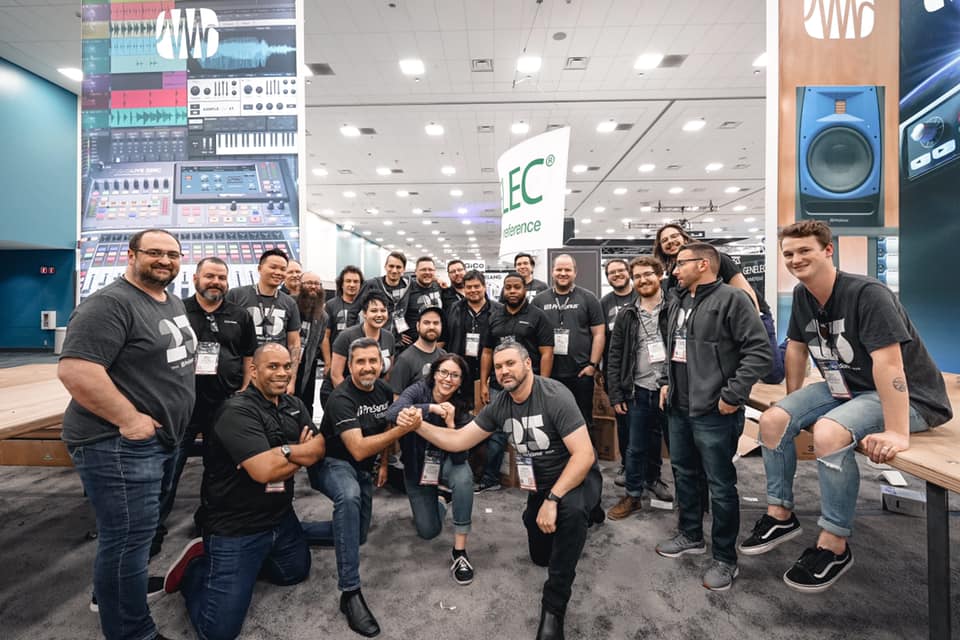
PreSonus Fam Friday with Perry Tee!
Our Artist & Influencer Relations Manager, Perry Tee (and all around coolest guy in the world) is up for PreSonus Fam Friday!
How long have you worked for PreSonus?
I joined the company in 2012.
What’s your favorite thing about your job? Why did you choose to work here?
Being able to develop meaningful relationships with influential and creatively successful people to showcase real-world use cases of our product line in action; ultimately bringing humans together from different backgrounds in life who share a common love of expressing themselves through sound and vision.
So I moved out to Louisiana from California to get away for a bit; a sabbatical from the L.A. hustle, if you will. Being the birthplace of Jazz, New Orleans to this day still has a vibrant live music scene compared to other cities and I had enough $$$ saved up to live for at least 6 months. So I went from one L.A. to another LA.
For those who aren’t aware, PreSonus is based an hour northwest of New Orleans and they were hiring so I applied, got hired and ended up moving to Baton Rouge. Even though I no longer live in Louisiana, I’m still very lucky to be working daily with such amazing talented people. No other company is quite like us in terms of camaraderie and dedication to making things happen, world-wide.
What instruments do you play?
Keyboard, guitar, drums, trumpet, sax and flute. Studio One is the DAW environment is where I record and produce tangible recorded audio assets for others to use. But playing *live* with other musicians has always been my greatest strength and main love, in terms of collaborative creative events.
Of all of them, what’s your favorite?
They’re all enjoyable to play and sonically express my emotions with. It just depends on the musical framework I’m in at the moment. But it’s got to be executed live or not at all for me. And unintended human mistakes are typically the moments that makes music most interesting to me.
What is it that you love about “live” performance?
It’s fun, brings people together and a very instantaneous source of joy. When everyone is in sync with each other, it’s magical. I believe it showcases positivity in humanity.
Who has influenced your own playing or approach?
Everyone I’ve played music with onstage or worked alongside in recording studio sessions.
Everyone has a side gig, what’s yours? OR when you’re not at PreSonus, what are you up to?
Recording instrumental tracks for singers, producers and working on sound design. Teaching applied music theory, ear training plus improvisation to students young and old. Diving deeper into modular synthesis. Updating my coding skills. But most of all, being the best Dad possible.
Choose a movie title for the story of your life.
“Interstellar”. I constantly travel between different ‘worlds’ and can access experiences from all points in the timeline of my life’s stored memory banks to find viable solutions and resolving issues effectively. Never journeyed through a wormhole, though.
What’s your go-to Karaoke song?
“Regulate Ft. Nate Dogg” by Warren G.
Got any tips for working with Studio One?
Yes! Check out my Studio One “1-Minute Tip” videos:
Tell us about a successful event you worked with PreSonus products. InfoComm, NAMM, or an Install somewhere.
Every January, we congregate for a week in Anaheim to demo our Products and field questions like a tightly-knit family at The NAMM Show. Stop by and visit us at Booth #18801 in the North Building.
What are you currently working on at PreSonus? What’s next for you?
Finding more relevant product/use case resonant relationships for the company. We’re really interested in content creators and livestreamers with strong online audience engagement in addition to Artists, Producers, FOH Engineers, Studio Mix Engineers, and Mastering Engineers. Continuing to develop my Studio One chops as there’s always new improvements to our DAW happening regularly from user base input. Helping to make our products better every day for you all to enjoy and benefit from.
What’s the strangest talent you have?
I used to be able to perform the Doctor Who theme (lead synth melody line) using a cello bow on the edge of a standard hand saw; all while having gulped an entire packet of grape-flavored Pop Rocks and not letting the chaos inside my mouth affect my musical performance. That talent came to an end when all the bow hair frayed out… GAME OVER.
Anything else you want to share?
“No amount of money ever bought a second of time” (Howard Stark, The Avengers Endgame) really resonates the older I get and I hope that others will take that quote to heart too, as we make decisions that will inevitably shape the reality of what future generations will inherit from us.
Basically, choose wisely what you do with every moment of your lifetime and don’t take anything for granted!
Connect with PERRY TEE
Friday Tips: Studio One’s Secret Equalizer
[Announcement: the follow-up book to “How to Record and Mix Great Vocals in Studio One” is now available—hop on over to the PreSonus Shop to check out “More than Compressors: The Complete Guide to Dynamics in Studio One.” Thank you! We now return to our regularly scheduled programming.]
Pop quiz: How many EQ plug-ins ship with Studio One Pro?
If you answered seven, congratulations! Then you know about the Pro EQ, the three different Fat Channel EQs, Ampire’s Graphic Equalizer, the Channel Strip, and using the Multiband Dynamics as a really hip graphic EQ. But actually, the correct answer is eight.
If you turn off the “auto” aspects of the Autofilter, you can take advantage of two filters, each with multiple filter topologies: three “rhymes-with-vogue”-style lowpass Ladder filters (sorry, if I mention the actual synthesizer name, I get hassled), two analog state-variable filters (yes, the same topology as the infamous Project #17, the “Super Tone Control,” in my book Electronic Projects for Musicians), one digital state-variable filter, a comb filter, and a zero-delay, 24/dB octave low-pass filter. Furthermore, you can route the two filters in series, or in parallel, as well as offset their cutoff frequencies from each other by up to 2 octaves.
The state-variable filters are particularly interesting because you can alter the response continuously from lowpass, to bandpass, to highpass, all with variable cutoff and resonance. This gives responses that are difficult, if not impossible, to obtain any other way.
So who cares about different filter types, anyway—other than guitar players who want to get totally rad wah effects? Well, these are invaluable for sound design, FX and breaks for DJs, synthesizer sweeps, and to add spice to tracks that sound just too darn normal. Don’t think of these filters necessarily as standard EQ, but more like EQ-based special effects. These parameters are automatable too, which opens up even more possibilities.
Using the testing procedure described in the Testing, Testing tip from May 16, let’s look at some of the spectral responses this exceptionally versatile pair of filters can produce.
But First, Turn Off Everything that Says Auto
To use the Autofilter as a filter, we need to turn off the automated aspects. Ctrl+click on both pairs of Env and LFO sliders to zero them out. Now we’re left with only the filters, not the modulators trying to control them. Also turn off the gain’s Auto function, because in some of the unusual ways we’ll be using the filter, overloading and nasty distortion can result from Auto gain.
Filtering Time
Fig. 1 shows the response for the 24 dB/octave ladder filter, with resonance turned up. Note that the Pro EQ high cut (lowpass) and low cut (highpass) filters can’t create this kind of curve, because they don’t have resonance controls. This is very much like the response of the classic rhymes-with-“vogue” filter, and you can automate the filter cutoff for grandiose filter sweeps.
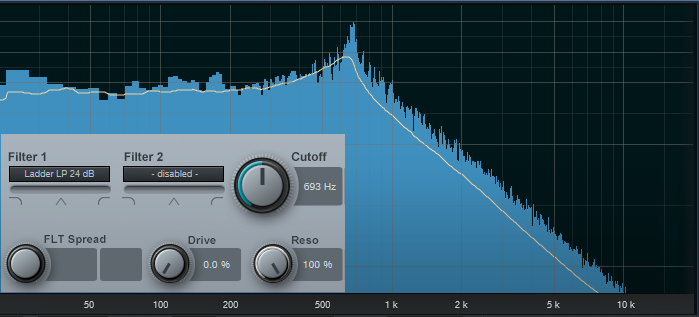
Figure 1: 24/dB ladder response, with resonance.
But wait! There’s more—because there are two different filter sections, you can offset the resonant frequencies to create double peaks. In Fig. 2, the frequencies are offset by two octaves, and the filters are in parallel (see the section outlined in orange). So now we have a double-peak ladder filter…cool.
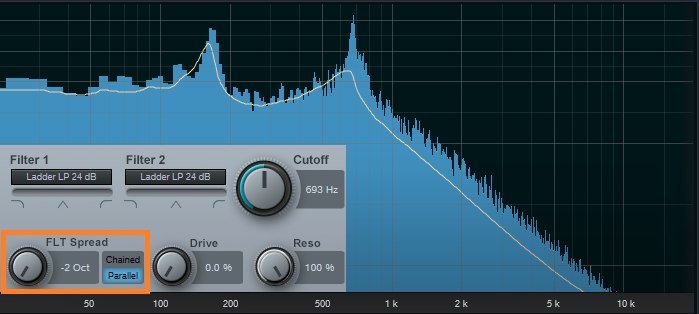
Figure 2: Double-peak ladder filter.
We can also do the “twin peaks” type of filter effect with the state-variable filters set to bandpass mode (Fig. 3). Here the filters are in parallel, and as with the above curve, they’re offset two octaves apart.
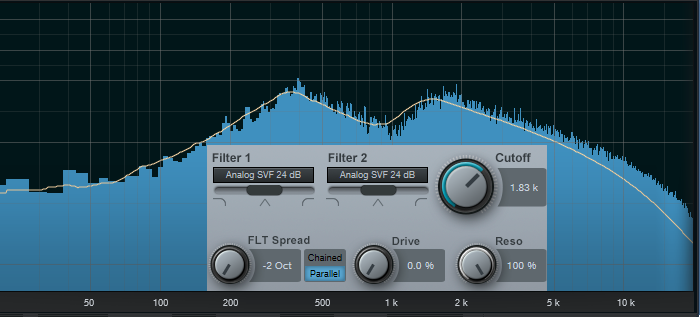
Figure 3: Dual bandpass filters in parallel can create twin peak filter responses, with fairly steep “skirts” on both sides of the peaks.
If you chain the two state-variable filters in series, set them to bandpass mode, don’t offset them, and boost the resonance, the filter curve makes a wonderful wah pedal (Fig. 4). The peak is sharp, with a steep rolloff on either side.
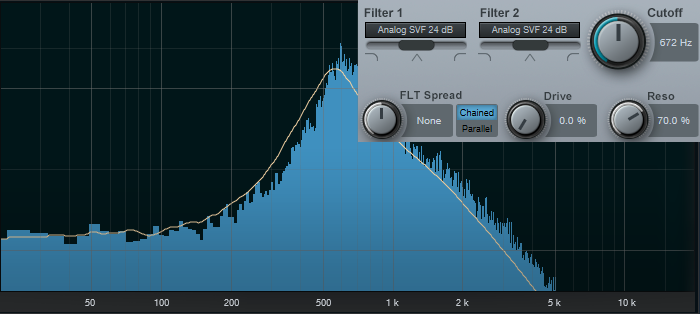
Figure 4: If you’re looking for a wah pedal sound…start here.
This also produces a strong sense of pitch with white or pink noise. One cool trick is using this setting to add a “tuned” aspect to snare drums, and other percussion instruments. Edit Studio One’s Tone Generator plug-in to generate pink noise, feed that into the above filter configuration, turn up the resonance, tune the cutoff to the desired pitch, then gate the noise with a snare hit. Mix in the desired amount of noise to give the drum a sense of pitch.
The highpass setting is useful as well, because you can obtain what’s popularly called the “voice of the Gods” effect for announcing and narration. Using a highpass filter gets rid of the super-low-frequency p-pops, but the resonance adds a boost in the bass range above the nasty stuff, so the voice still sounds full and big (Fig. 5).
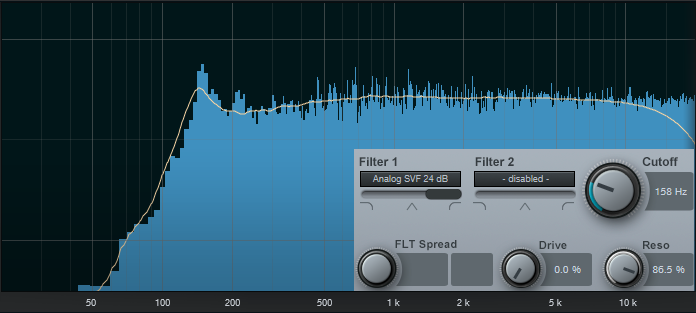
Figure 5: A high-pass filter with resonance can do wonders for narration.
It’s also possible to create responses that are just plain unusual, like this notch + double peak outside of the notch (Fig. 6). For some sound-design type wind sounds, drop the resonance to around 30%, and sweep the cutoff between 2 kHz and 6 kHz. Modulating randomly around a relatively low cutoff frequency can also give good rain and downpour sounds. Besides, who doesn’t like a curve that looks like Batman.
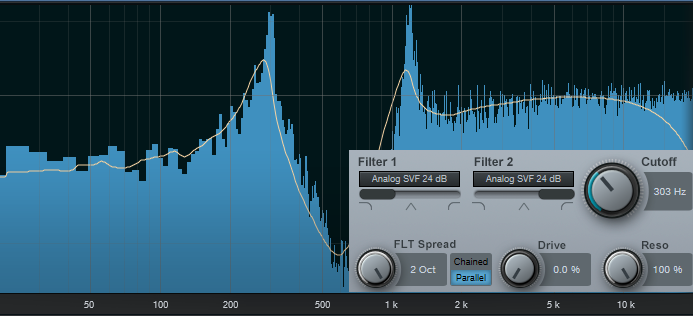
Figure 6: This unusual filter response has various uses for sound design.
Combining two different filter topologies can also give interesting results. Fig. 7 shows a ladder filter in parallel with a state variable filter, along with considerable amounts of resonance. If you really want to scope out this configuration’s flexibility, vary the Filter 2 slider to alter the topology, and/or vary the Filter Spread to change the offset between the two filter types. Of course, changing resonance alters the sound even further.
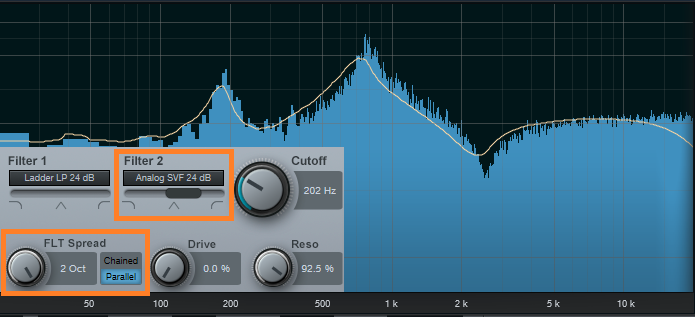
Figure 7: This filter configuration is in love with sound design and automation.
And finally…this is going to sound ridiculous, but bear with me. I often augment sampled female choir presets; octave lower sine waves mixed in subtly can give the illusion of a male choir combined with a female choir. But that’s not all—noise can be a powerful enhancer for choirs, and it’s possible to set the Autofilter to impart vocal-like qualities to pink noise.
For this application, the Zero Delay LP 24 dB is the filter of choice to insert after the Tone Generator’s pink noise output, because the filtering has a smooth kind of quality, even with high resonance. To concentrate the spectrum on voice, a Pro EQ follows the Autofilter to take off the highs and lows outside of the vocal range (Fig. 8).
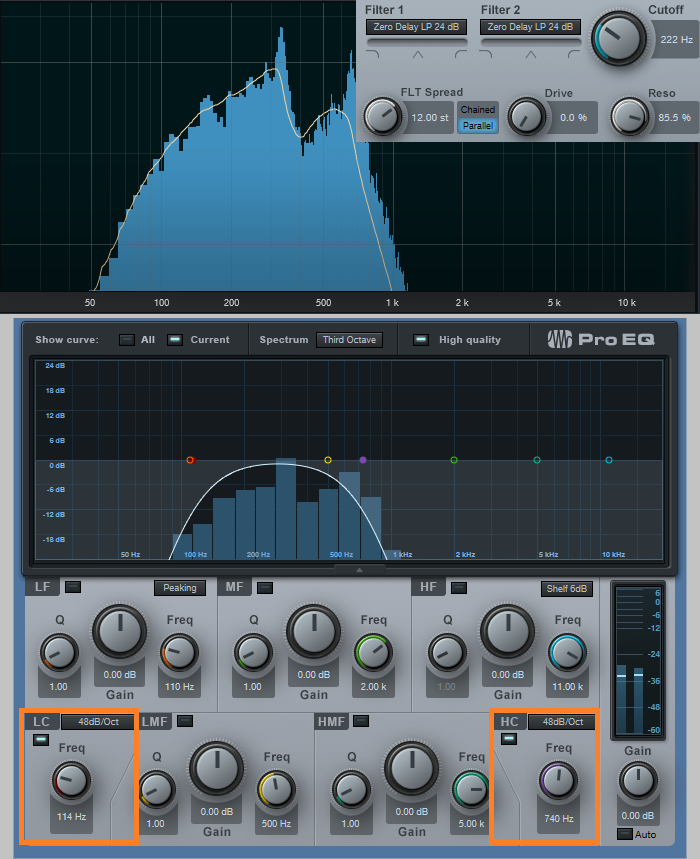
Figure 8: The Pro EQ shapes the pink noise into more of the vocal range.
Okay, now for the bummer: You can’t control the Autofilter cutoff, and therefore the pitch, with notes—only controllers. That’s not a problem if you just need a kind of pedal point choir addition; tune the cutoff to the desired pitch, and use volume automation to bring it in and out.
One workaround is to sample the resulting choir-like noise at different pitches, and load them into Sample One XT (or Impact XT) so you can create envelopes that match the envelope of whatever choir sound you’re using, and play the notes from a keyboard. The result is uncanny—in some ways, it makes a sampled choir sound more like a real choir than if it consisted only of samples. And finally, for sound design, don’t forget that filtered white noise can also augment crowd sounds.
Autofilter? Okay, yeah, well…I guess. But there’s a lot more to the story than just wah pedals and funk bass.
Grab a copy of Craig’s latest eBook here!
New Low Price on Eris MTM Monitors!
 Great news! We’ve got an instant rebate going on the Eris E44 and E66 Monitors! That means no rebate form, no PDFs, no filling out paperwork—just lower prices on checkout!
The Eris E44 and E66 deliver an expanded and highly accurate frequency response and the widest stereo field available in their class. The nested Midwoofer-Tweeter-Midwoofer (MTM, also known as “D’Appolito”) configuration offers improved off-axis response and spatial resolution. The result is a more consistent listening experience, smoother frequency response, and an ultra-wide, detailed stereo soundstage.
“There is plenty of sonic depth while maintaining clarity, regardless of the audio source.”
—Chris Devine, Performer Magazine
Pricing will vary a little bit regionally, but in the USA, the E44 is now $199, and the E66 is now $299.
StudioLive Mixer Comparison Chart 2019
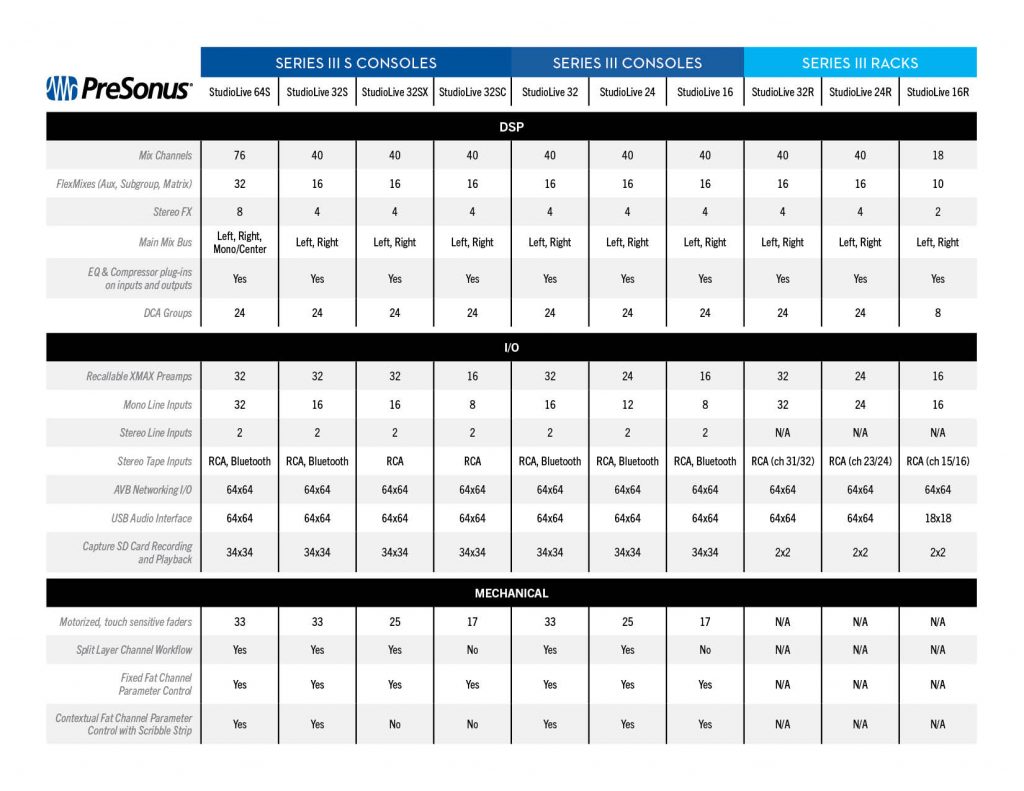
Click to download PDF
Nektar Technology Integration for Studio One is here!
NektarTech just announced their new DAW Integration for Studio One!
The new integration delivers a completely transparent control experience including features such as display of track and parameter names, extended transport control, project navigation, mixer operation, tweaking of virtual instruments and instant control of any selected parameter in Studio One.
Being able to tweak virtual instruments like hardware synths or mixing with full parameter feedback considerably speeds up the workflow. Dedicated “Mixer” and “Instrument” mode buttons switch Panorama’s control surface to take over the corresponding parameters in Studio One at the press of a button, literally.
Users can now log in to their Nektar account and download the required files. Not only are the integrations for the Panorama T4 and T6 available now, they’ve also added integration software for the Panorama P1, P4 and P6. In fact, ALL Nektar controllers now have DAW integration for Studio One, from their smallest controller (the SE25), to Impact GX, Impact LX+, Pacer (!) and Panorama.
The Panorama support is for version 4 and higher, all other products also support version 3 (with Panorama obviously having the most features also due to the displays.)
- Get the integration software from your NektarTech User Account.
- NektarTech T-series Product Page
- NektarTech P-series Product Page
Full features and specifications:
- Extended transport control including setting locators, metronome, automation and undo.
- Project navigation including switching channels, opening windows, zooming and more.
- Full parameter feedback on Panorama display
- Encoders control Pan, sends, macro, automation and more.
- Patch browsing for all internal instruments
- Open/close mixer view and instrument windows
- Maps customizable by using Studio One Learn
- All maps structured in the same way:
- Faders 1-4 commonly mapped to amp envelope
- Faders 5-8 commonly mapped to filter envelope
- Fader 9/Motor Fader controls instrument main volume
- “Data” encoder click-control any visible parameter
- Control 8 channels at the same time, Bank -/+ to control more channels (1-8 / 9-16 etc.)
- Current track controlled by fader 9 (or motor fader on P4 and P6)
- Master Volume Control
- Volume assigned to faders 1-8. Solo, mute and channel selection via fader buttons
- Pan, sends or channel macros assignable to encoders
- Panorama P series offers additional control over channel inserts and insert plugins
- Soft Take-Over mode eliminates parameter value jumping
- Supports Nektarine PlugIn host for deep instrument mapping