Monthly Archives: March 2018
Using FaderPort With Pro Tools
Want to use your FaderPort 8 or FaderPort 16 with Pro Tools? Check out this new series from Richard Gaspard!
Friday Tip of the Week: The “Harmonic Tremolo” FX Chain
I did a Harmonic Tremolo as a Sonar FX Chain tip, and it was very popular—so here’s a Studio One-specific version. For those not familiar with the term, some of the older, Fender “brown” amps used a variation on the standard, amplitude-oriented tremolo which the company called “harmonic tremolo.” It splits the signal into high and low bands, and then an LFO amplitude-modulates them out of phase so that the while the highs get louder, the lows get softer and vice-versa. The sound is quite different from a standard tremolo, and many players feel the sound is “sweeter.” But unlike a guitar amp, you can sync this tremolo to the rhythm—and that makes it a useful addition to groove-oriented music as well.
Here’s the FX Chain “schematic.”
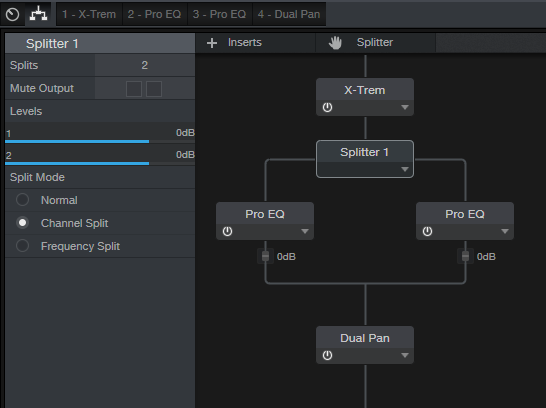
X-Trem needs to be in Pan Mode or this won’t work. As a result, this FX Chain must be inserted in a stereo track—a mono track switches X-Trem to Tremolo Mode (although a mono file inserted in a track set to stereo will work). If you switch a stereo track to mono accidentally and then switch it back to stereo, you’ll need to click on the Reset button in the FX Chain to return X-Trem to Pan Mode.

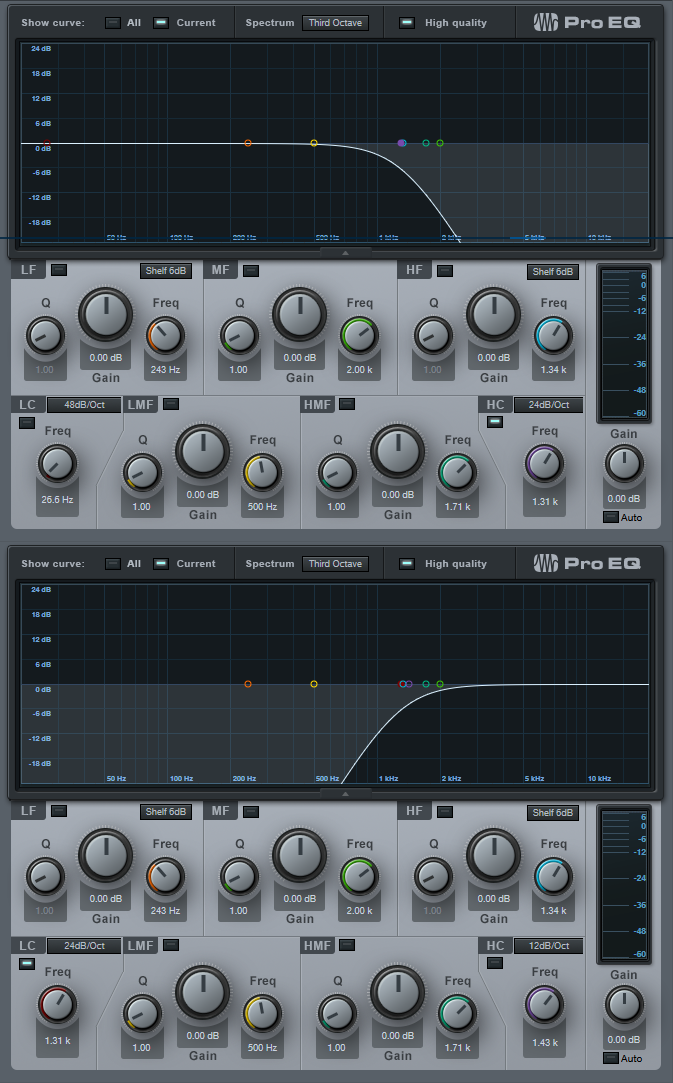
In Pan mode, while the left X-Trem channel gets louder, the other becomes softer and vice-versa. The Splitter (in Channel Split mode) sends the left split to a Pro EQ set to High Cut, while the right split goes to a Pro EQ set to Low Cut; their frequencies track to set the split point between the high and low bands.
Finally the two outputs go to a Dual Pan, which provides several functions.

Creating the FX Chain:

Crossover links the Pro EQ HC and LC Freq controls so you can adjust the split frequency between the high and low bands. At either the full clockwise or counter-clockwise position, the Harmonic Tremolo acts like a conventional tremolo.
Reset connects to the X-Trem Mode so you can reset it to Pan if needed.
LFO Speed controls the X-Trem speed from minimum to about 15 Hz. This control is inactive if the LFO Sync switch is on.
LFO Beats chooses the X-Trem sync rhythm and requires that the LFO Sync switch be on.
LFO Depth controls the X-Trem depth.
LFO Type chooses among the four standard waveforms (triangle, sine, sawtooth, square).
Lo/Hi Balance ties to the Dual Pan’s Input Bal knob. Fully counter-clockwise gives only the low band, clockwise gives only the high band, and the settings in between set the balance between the two bands.
Width controls the Dual Pan’s Width control. For the most authentic sound, leave this centered for mono operation (the Dual Pan should have Link enabled, and Pan set to <C>.
After assigning the controls, congratulations! You have your own Harmonic Tremolo… no soldering or guitar amps required!
Click here to download the effects chain described above. Just drag and drop it directly into a channel in Studio One!
Friday Tip of the Week: Through-Zero Flanging
Flanging that Actually Sounds Like Vintage Tape Flanging
Personal bias alert: I like digital flangers, but most can’t do what true, analog-based, tape flanging could do. Back in the day, the sessions for my band’s second album were booked following Jimi Hendrix’s sessions for Electric Ladyland. His flanging setup remained after the session, so we took advantage of it and used it on our album… and the sound of true, tape-based flanging was burned into my brain. This tip is about obtaining that elusive sound.
The tape flanging process used two tape recorders, one with a fixed delay and one with variable speed. As you sped up and slowed down one recorder, it could lag or lead the other recorder, and the time difference produced the flanging effect. If the audio path for one of them was out of phase, as one tape recorder pulled ahead of the other one (or fell behind after pulling ahead), the audio passed through the “through-zero” point where the audio canceled. This left a brief moment of silence when the flange hit its peak.
To nail “that sound,” first you need two delays. One has to be able to go forward in time, but since that’s not possible without violating the laws of physics (which can lead to a hefty fine and up to five years in jail), a second delay provides a fixed delay so the other can get ahead of it. Second, don’t use LFO control—if you don’t control the flanging effect manually, it sounds bogus.

In this implementation, a Splitter in normal mode feeds two Analog Delays. One of them goes through the Mixtool to flip the phase for the through-zero effect. Start with the Analog Delay settings shown in the screen shot; they’re identical for both delays, except for the Factor control on the delay that feeds the Mixtool.
To hear the tape flanging effect, move the Factor control from full counter-clockwise to clockwise. At the center point, you’ll hear the through-zero effect as the signals cancel. (Actually you can move either Factor control as long as the other one is pointing straight up.)
Variations on a Theme
It’s also fun to make an FX chain to allow for more variations. The left-most knob controls the Factor knob, whose parameter is called Delay Speed. Delay Time chooses how low the flanger goes. It’s scaled to a range from 1 ms to 13 ms; I find 4 – 9 ms about right (copy this curve for the second Analog Delay, because you want their times to track). Delay Inertia uses the control on the same Analog Delay as the Factor knob being controlled. This adds a bit of “tape transport inertia vibe” when you move the Factor knob.
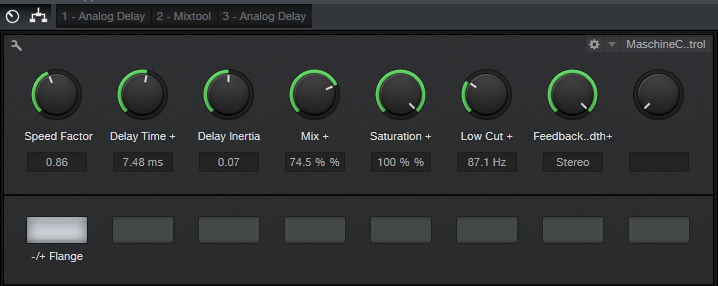
The Mix knob controls the mix on one of the delays from 0% to 100%. (Note that if the Mix controls on both delays are at 0%, the audio should cancel; if it doesn’t, adjust the Mixtool Gain knob until it does.) 100% gives the most dramatic flanging effect, but back in the day, cancellations weren’t “digitally perfect” so setting Mix for one delay to 60-75% gives a smoother through-zero sound. Saturation controls the Saturation parameter on both delays when you want a little more grit, and a Low Cut control for both Analog Delays reduces some of the muddiness that can occur with long Delay Time settings. The Feedback control also ties to both Analog Delays. You’ll usually want to leave this in the stereo position (full clockwise). Finally, -/+ Flange controls the Invert Left and Invert Right buttons on the Mixtool module. Enable them for through-zero (“negative”) flanging, disable for positive flanging.
So does it really sound like tape flanging? Listen for yourself. I took an excerpt from a song on my YouTube channel, applied flanging to it, and posted it as an audio example on craiganderton.com (click on the Demos tab).
Bonus fun: Stick Binaural Pan after the two splits mix back together, and set Width to 200%. If Feedback is set to stereo, this produces a variation on the flanging effect.
Click here to download the preset described in this post! (Updated 4-10-18 with multipreset link)
Did you know the PreSonus family tree has some Irish roots?
St Patrick.
Everyone has heard the story of Saint Patrick—the patron saint that came to Ireland in the AD 400s and converted Ireland to Christianity. Each year on the 17th of March, it appears that everyone has a little bit of Irish in them when St. Patrick’s Day is celebrated! This is especially true here at PreSonus, where we can proudly say we have our own Irish relations based in Co. Cavan where our EMEA office PreSonus Europe Limited is based.
Two well-established Irish bands who have recently started using PreSonus gear are Le Boom and The Lost Brothers. We will be tracking their progress with them over the coming months… but see a quick intro into both bands below.
Le Boom
Le Boom is an indie-electro-house-pop duo based in Dublin, Ireland. They are known for their energetic live performances which feature a frenzy of glass-bottle beats, layered loops, catchy vocal hooks and sweaty fans who dance like no other fans in the world. Their song, “What We Do,” has featured in a number of ad campaigns for TV. According to the US’ Paste Magazine, Le Boom are “Breaking into America in a big way.”
Le Boom use a PreSonus Quantum thunderbolt interface in their live shows and in the studio. Learn more about them at their website.

“I recently started using Quantum in our live shows to run my drum samples through VST effects in real time. The lightning-fast latency is essential for this to go smoothly. So far I’ve been really impressed and the drivers have been rock solid.” —Aimie, Le Boom
The Lost Brothers
Irish band The Lost Brothers are Oisin Leech from Meath and Mark Mccausland from Omagh. They have just released their fifth album to huge critical acclaim. In 2018 they tour UK, Ireland, Australia, and the US.
“With emotionally wrenching and confessional songwriting they have the remarkable ability of making a large room feel very intimate indeed. With a masterful blend of careful songwriting and tuneful harmonies, the Lost Brothers make a lasting impact.”
—The Huffington Post (live review)

Oisin of the lost brothers uses a Studio 68 interface to record demos in his home studio and while on the road.
“I just started out using the PreSonus Studio 68 and Studio One to record demos at home. I love the great clear sound from the XMAX preamps, and Studio One’s workflow has been really easy to adapt to.” – Oisin, The Lost Brothers
Friday Tip of the Week—How to Gain Better Vocals
Vocals are the most direct form of communication with your audience—so of course, you want your vocal to be a kind of tractor beam that draws people in. Many engineers give a more intimate feel to vocals by using dynamics control, like limiting or compression. While that has its uses, the downside is often tell-tale artifacts that sound unnatural.
The following technique of phrase-by-phrase gain edits can provide much of the intimacy and presence associated with compression—but with a natural, artifact-free sound. Furthermore, if you do want to compress the vocal further, you won’t need to use very much dynamics control because the phrase-by-phrase gain edits will have done the majority of the work the compressor would have needed to do.
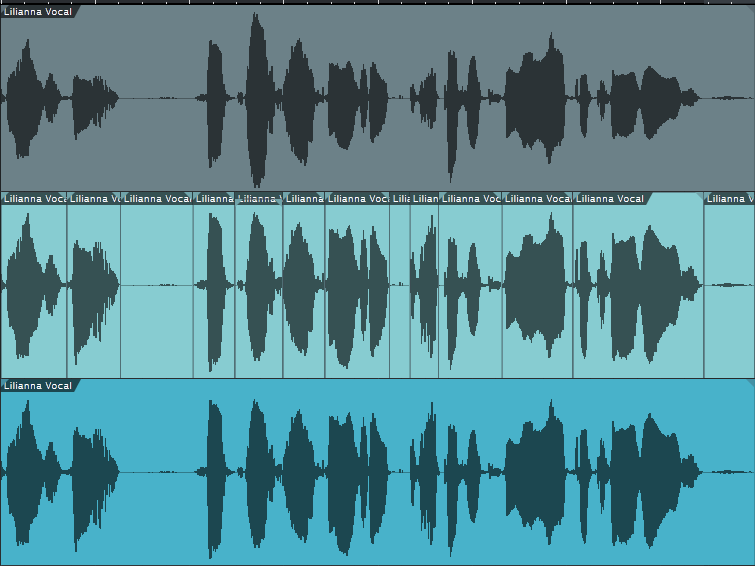
The top track shows the original vocal. In the second track, I used the split tool to isolate sections of the vocal with varying levels (snap to grid needs to be off for this). The next step was clicking on the volume box in the center of the envelope, and dragging up to increase the level on the sections with lower levels. Although you can make a rough adjustment visually, it’s crucial to listen to the edited event in context with what comes before and after to make sure there aren’t any continuity issues—sometimes soft parts are supposed to be soft.
The third track shows the finished vocal after bouncing all the bits back together. Compared to the top track, it’s clear that the vocal levels are much more consistent.
There are a few more tricks involved in using this technique. For example, suppose there’s a fairly loud inhale before a word. A compressor would bring up the inhale, but by splitting and changing gain, you can split just after the inhale and bring up the word or phrase without bringing up the inhale. Also, I found that it was often possible to raise the level on one side of a split but not on the other, and not hear a click from the level change. Whether this was because of being careful to split on zero crossings, dumb luck, or Studio One having some special automatic crossfading mojo, I don’t know…but it just works and if it doesn’t, you can always add crossfades.
That’s all there is to it. If you want to hear this technique in action, here’s a link to a song on my YouTube channel that uses this vocal normalization technique.
New Loops from MVP!
New MVP Loops at Shop.PreSonus.com!
MVP Loops offers nothing but the best in sample sounds, loop libraries and music software. Their team are responsible for millions of records sold worldwide and have worked on some of the biggest projects of this generation.
Lust & Loyalty from MVP Loops is a modern R&B product that gives you the best of both worlds. Whether you are looking to make a modern ballad or something a little more trap dirty, Lust & Loyalty has what you need: 12 melodic construction kits with 625 amazing loops, riffs, and samples. The sounds have all been processed through the best gear and converters to give you the sound that you have come to expect from MVP Loops.
All keys and tempos have been provided, and the sounds are amazing. In the style of modern day hit makers such as Chris Brown, Rihanna, Beyonce, and more, Lust & Loyalty has what you need to make modern R&B and modern R&B trap.
Get Lust and Loyalty here.
Sound Mob- Live Edition – Vol. 2 
Sound Mob Live Edition Vol. 2 is here from MVPLoops! Following up on the huge success of the Sound Mob series, this version boasts 2.51 gigs of sounds containing 1,449 loops, riffs, one-shots and samples in an incredible package. Recorded at our facility in Los Angeles using the best musicians and gear, Sound Mob Live Edition Vol. 2 is a special product. Whether you are looking to create a hit like “It’s a Vibe” from 2 Chainz, Jhene Aiko, Trey Songz, and Ty Dollar Sign or a classic sample-based Jay-Z style hit like “Show Me What You Got,” Sound Mob Live Edition Vol. 2 has what you need.
Get Sound Mob Vol. 2 here.
Looking to produce a big song to grab the Top 40 crowd, get placed in a movie, or expand an album? Look no further than DREAM, a new product from MVP Loops that represents the current drama-drenched, Top 40, uplifting sound! Music is coming back to the forefront of productions, and artists are looking to bring in as many people as possible—whether it’s Beyonce, Adelle, Wiz Khalifa, Sam Smith, or many other chart-toppers—they have found a formula for making a hit for the masses. DREAM represents this style.
DREAM contains construction kits, loops, samples, riffs, and multi-formatted kits in Audioloops and Impact kits. The sounds are big, featuring bold piano melodies, strings, huge synths, leads, basses, and cracking drums. DREAM is perfect for collaborations of hip-hop and R&B.
Get Dream here.
Welcome back to the West Coast. Smoke Shop features ten modern West Coast construction kits in the style of Kendrick Lamar, SchoolboyQ and YG.Smoke Shop is filled with tons of content including drum one-shots, riffs, full mixes, drum and instrument mixes, giving you the flexibility to sample grooves or individual instruments to create your next masterpiece.
Get Smoke Shop here.
Friday Tip of the Week: Strums Made Easy with Step Recording
One of the main differences between guitar and keyboard is chord voicing. Guitar chords typically have six widely separated notes, whereas keyboard notes tend cluster around two areas accessible by each hand. For example, check out the notes that make up an E major chord on guitar.

If you’re a keyboard player using chords to define a chord progression, it’s easy enough to have chords hit on, for example, the beginning of a measure. But “strumming” the chord can add interest and a more guitar-like quality. Although you can edit the notes in a chord so that successively higher notes of the chord have increasing delay compared to the start of the measure, that’s pretty time-consuming. Fortunately, there’s an easy way to do guitar voicings—and strum them.
Stepping Out. The core of this technique is step recording, which is easy to do in Studio One once you’ve inserted a virtual instrument. Steps are keyed to numbers on the screen shot. This assumes the strummed chord will start on the beat.
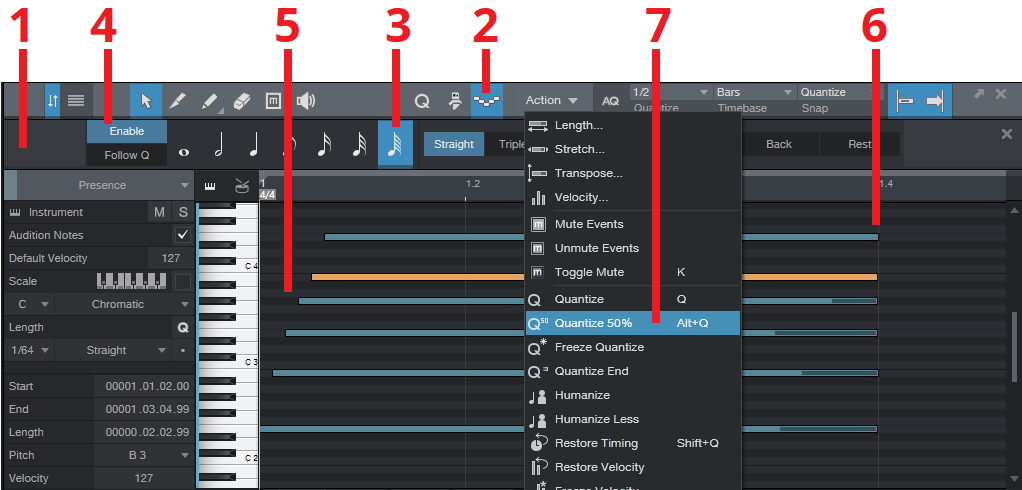
- Define your MIDI region, then open it in the Editor (F2).
- Click on the Editor’s Step Recording button—the one that looks like stairs going down and up.
- Choose a note length value of 64th notes.
- Click Enable.
- Play the notes of the chord, from low to high (or strum down from high to low), starting from the beginning of a measure.
- You’ll probably want to extend the note lengths.
- This will be a fairly slow strum, and there may be too much time between notes. No problem: select the notes, set quantization as appropriate to move the strummed notes closer to the first note (e.g., a half-note in the example above), and then choose Action > Quantize to 50%. Moving the notes closer to the first note speeds up the strum.
The moral of the story is that chord notes don’t always need to hit right on the beat—try some strumming, and add variety to your music.
Friday Tip of the Week: Studio One’s Other Equalizer
The Pro EQ isn’t the only equalizer in Studio One: there’s also a very flexible graphic equalizer, but it’s traveling incognito. Although the Pro EQ can create typical graphic equalizer responses, there are still situations where a good graphic equalizer can be the quickest and easiest way to dial in the sound you want—and the one in Studio One has some attributes you won’t find in standard graphic EQs. Once you start realizing the benefits of this technique, you just may wish you had discovered it sooner.
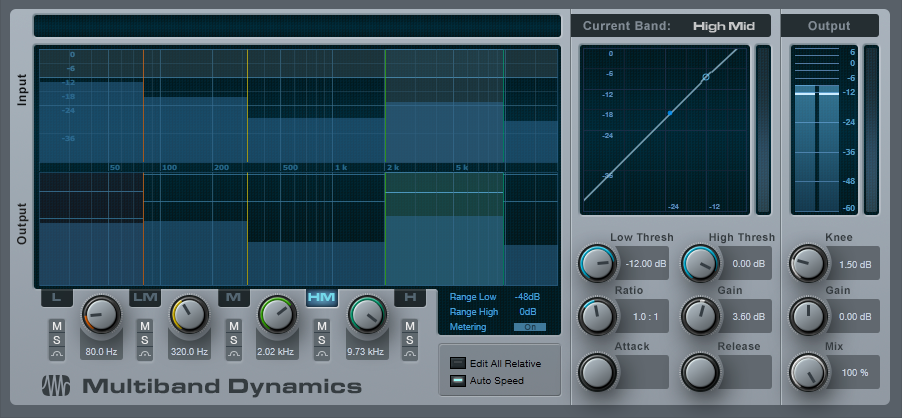
The secret is the Multiband Dynamics processor. A multiband dynamics processor is basically a graphic EQ with individual dynamics control for each band, but we can ignore the dynamics control aspect and use just the equalization.
The reason why setting up this EQ can be so fast is because of being able to solo and mute individual bands, and move the band’s upper and lower limits around freely to focus precisely on the part of the spectrum you want to affect. Of course you can enable/disable individual bands in the Pro EQ, but you’ll still hear the unprocessed sound at all times. With the Multiband Dynamics serving as a graphic EQ, the ability to focus on a specific band of frequencies is something that’s not possible with standard parametric-based EQs.
The first step is to defeat the compression, so set the Ratio for all bands to 1.0. Attack, Release, Knee, and Thresholds don’t matter because there’s no compression.
Now you can adjust the frequency ranges and level for individual bands, and this is where being able to mute and solo bands is incredibly helpful. For example, suppose you want to zero in on the part of a vocal that adds intelligibility. With a parametric EQ you would need to go back and forth between the frequency, bandwidth, and gain to find the “sweet spot.” With the Multiband Dynamics processor, just solo the HM band and move the range dividers until you focus on the vocal frequencies with the most articulation, then boost that band’s gain. Simple.
Even better, the Multiband Dynamics processor has a Mix control so you can blend the processed and unprocessed sound to make the overall effect of the EQ more or less drastic. And speaking of drastic, the Gain control does ±36 dB so you have more control over level than most parametric EQs.
Being able to define individual bands, solo them, and adjust their gain and frequency ranges precisely can be a very useful technique that supplements what you can do with the Pro EQ. For general tone-shaping, try the Multiband Dynamics processor—you might be surprised at how fast you can dial in just the right sound.

