Monthly Archives: February 2018
Friday Tip of the Week: Synthesize OpenAIR Reverb Impulses in Studio One
Convolving white noise with audio produces reverb but frankly, the results aren’t all that inspiring compared to the impulses obtained from “sampling” real rooms. However, there are ways to make white noise impulses that provide a unique, “idealized” sound compared to standard impulses.

- You need a noise source, so insert Mai Tai and create a noise-only preset.
- Sculpt the noise to emulate a “room.” Suppose you want a 2.0 second reverb from a highly damped room. Use the amplitude envelope to provide a 2 second fadeout, and the filter envelope to damp the sound. I also add a little delay to make the noise a wider image.
- Transform the instrument sound to an audio track.
- Normalize the audio, then bring the peak level down by about 7 or 8 dB. Open Air seems happiest with impulses that don’t use up all the available headroom.
- Export the WAV file.
Now bring the WAV file you just saved into Open Air, and check out the clarity and smoothness of the sustain—it has an “idealized” quality, sort of like how CGI is an idealized version of an image. Listen to the audio example processing some percussive sounds from Impulse, and you’ll hear what I mean.
Here are a few other hints:
- When you shorten the reverb in Open Air, it sounds more gated. Once you find an impulse you like, generate versions at different lengths, and then you can choose the length that’s appropriate for the music.
- Create short reverb impulses and reverse them—you’ll hear the best reverse reverb sounds ever.
- Make a bright, sparkly vocal reverb by filtering out the lows, or to create the Taiko Drum of Doom, create a long impulse but filter out all the highs.
- Try different effects, like “chopping” the noise for rhythmic effects.
The bottom line is this is an incredibly flexible way to come up with reverb sounds…and you can end up with different reverb sounds than any other reverb processor on your hard drive. Have fun!
A Hockey Stick and a StudioLive Leap into a Studio…
The one and only Leo from Frog Leap Studios shares metal covers, tutorials, how-to videos and other fun, super rad stuff with his audience of over 2.3 MILLION subscribers. He’s also a PreSonus user! We recently caught up with Leo at NAMM this year and partnered with him for his next adventure, the StudioLive 32 Series III!
Watch him open and set up his new StudioLive and then make music with a Hockey Stick… yep!
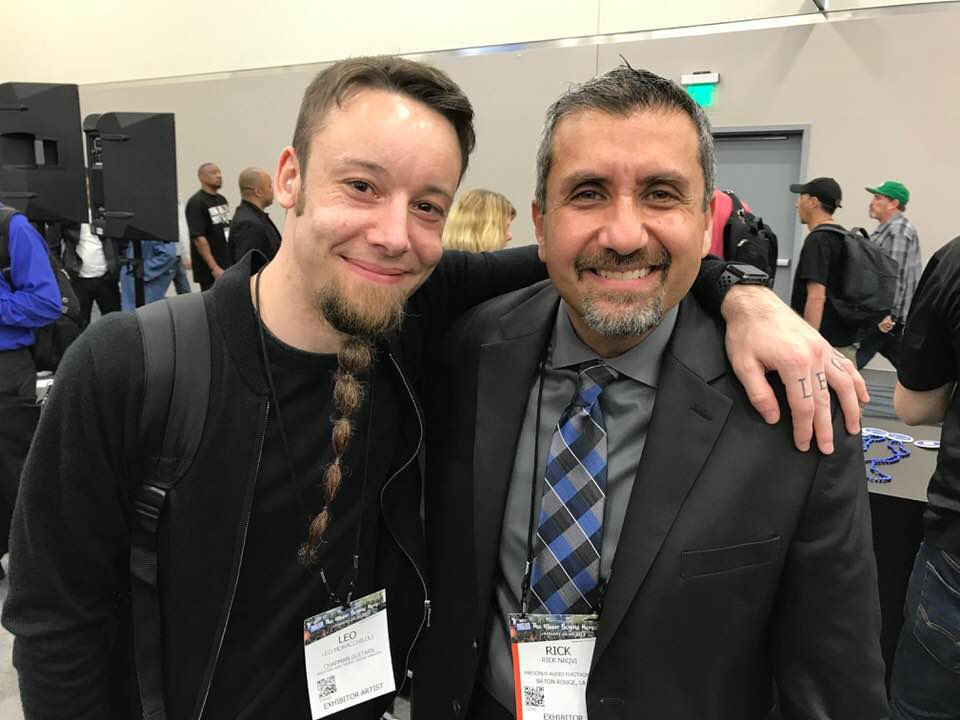
Leo and Rick at NAMM!
Friday Tip of the Week: The Ultra-Tight Rhythm Section
Last week, we used the Gate for drum replacement. This week, let’s use it to tighten up an electric bass part—and end up with a rhythm section that’s tighter than a comic book superhero’s costume.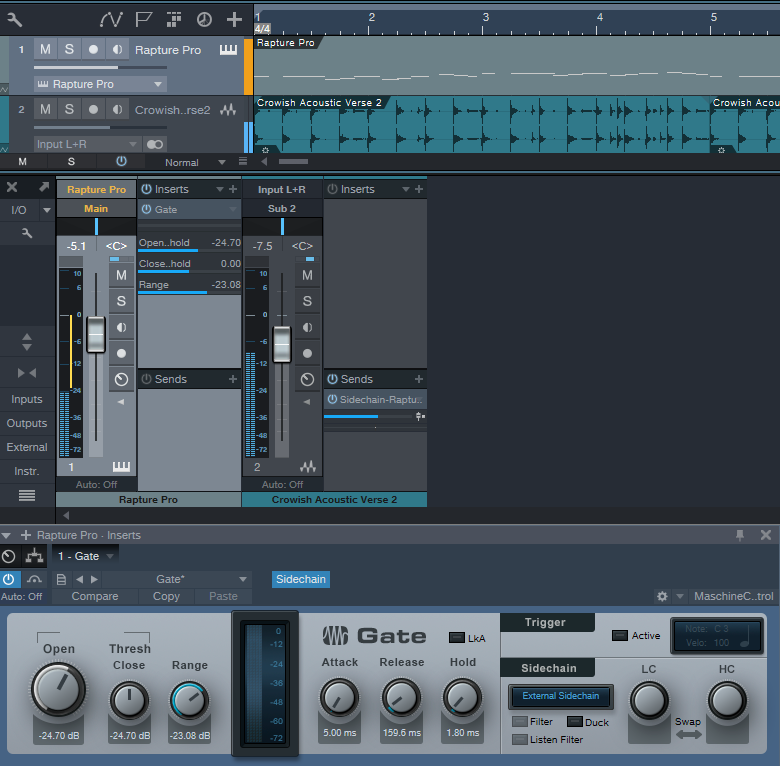
We’ll use a fairly basic example of sidechaining to create this tightness. While most people understand the principles behind sidechaining, I haven’t heard very many people actually use this particular application. But with electric bass, using a drum sidechain signal to gate the bass adds a percussive overlay to the bass’s melodic character that fits perfectly with drums.
For the bass sound, in this example I’m using my bass expansion pack for Cakewalk’s Rapture Pro (I’ll be porting the samples over to Presence XT soon). The drum loop track has a send that drives a Gate inserted in the bass track, with the Gate’s sidechain set to External so it’s triggered by the drum’s audio.
Although different situations call for different Gate settings, I find the key to getting good results with electric bass is the Gate’s Release control. Because bass has a natural decay, a little release time prevents the bass from sounding too percussive—the attacks are all properly in place, but the bass note trails off gracefully, even though the drum transient may be long gone.
However with more electro-oriented material, using a sharp decay with an electric bass provides an unusual type of effect—you have the organic, natural sound of the electric bass modulated by the clipped, percussive decays caused by gating with the drums. As always, experimentation can yield interesting—and sometimes delightfully unexpected—results. Try it!
It’s Not Voodoo—it’s PreSonus Studio Magic 2018

We’ve updated Studio Magic Plug-in Suite for Mac and Windows! Worth more than $400 but provided free to new and existing registered owners of any currently available PreSonus audio interface or mixer, the 2018 Studio Magic Plug-in Suite software bundle includes seven popular plug-ins in VST, AU (Mac), and AAX formats. All you have to do to get Studio Magic 2018 is register your qualifying hardware at my.presonus.com!
Learn more about Studio Magic 2018 here:
Take a closer look at each plug-in in the YouTube playlist below!
Friday Tip of the Week: Get Your Kicks with Kick Drum Replacement
I admit it…I’m very picky about kick drums. But I also like using drum loops, so I often want to replace the kick. Fortunately, it’s not hard to do with Studio One, and you don’t need a dedicated drum replacement application to do it.
In this example, the audio track with the drum loop (Acoustic Verse 2 in the screen shot, toward the left) has two pre-fader sends. One goes to the Main Drums bus, which carries the drum loop audio. The reason for having a separate bus with the drum audio (and for turning down the original drum audio track) is because we want to reduce the level of the loop’s kick as much as possible. So the loop’s audio has two Pro EQs in series—both set to 48 dB Low Cut at around 100 Hz—to create a super-steep slope and get rid of most of the kick.
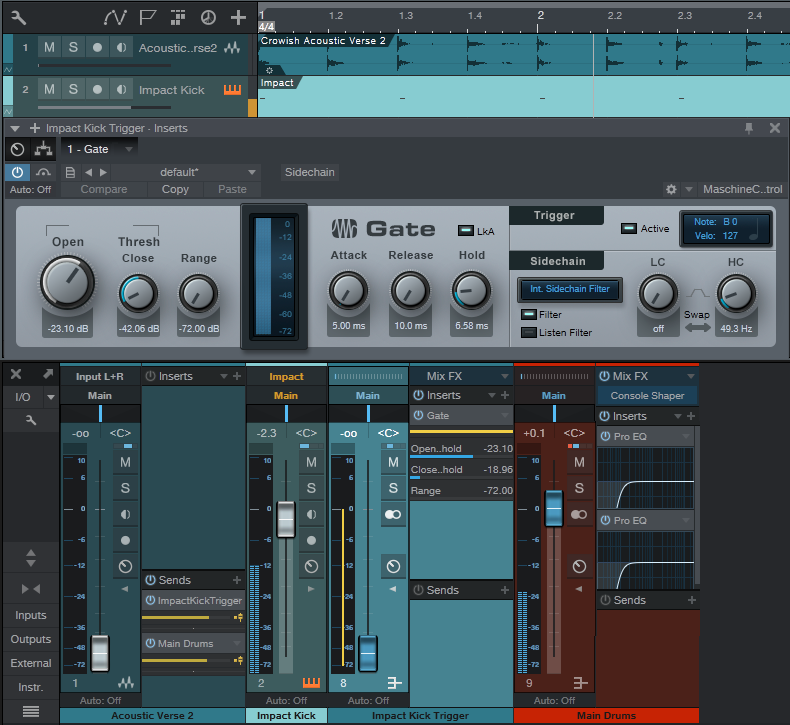
The other send goes to the Impact Kick Trigger bus, which exists only to hold a Gate (that’s why the bus fader is all the way down—we don’t want to hear the audio). To isolate the kick for triggering, turn down the Gate’s HC control so that the Gate responds only the lowest frequencies where the kick drum lives. Whenever the Gate opens, it can send out a MIDI note with your choice of note and a fixed velocity (you’ll have to add any dynamics yourself), and an instrument track can respond to that note. I set up an instance of Impact with a suitable kick drum, and assigned the Gate trigger to it. So, Impact provides the replacement kick drum sound and the Main Drums bus has the original drum loop without the kick. You can listen to the kick in real time as you trigger it, but you can also record the MIDI trigger in the instrument track.
The only caution is that the Gate parameter settings for Threshold and Attack/Release/Hold are critical for reliable triggering. For example if there are 16th-note kicks, you have to make sure that hold is short enough to allow retriggering; and you want Threshold high enough to it’s triggered only by the kick.
There are many variations on this theme…you may want to double an existing kick with the kick replacement, rather than reduce the original kick’s level as much as possible, or use the Pro EQ Low Cut filters to take out only the very lowest frequencies, so the original kick provides the higher-frequency beater sounds…whatever sounds best.
Of course if the drums are on individual tracks, then it’s easy to replace the drum sounds. But even with a mixed drum loop, it’s often possible to isolate at least the kick and snare to give drum loops a whole new character.
Mapping Another Program’s Shortcuts to Studio One
Studio One comes with keyboard shortcut mappings for Cubase, Logic, and Pro Tools, so those switching to Studio One can use the keyboard shortcuts with which they’re familiar—as well as navigate the trial version without having to learn a lot of new shortcuts. To add to that list, I mapped Sonar’s shortcuts to Studio One; these mappings are included as an alternate key scheme in the most recent update. What I learned in the process might be useful if you want to create mappings for a program you were using prior to migrating to Studio One.
Spoiler alert: Ultimately I think it’s best to learn Studio One’s keyboard shortcuts unless you use multiple DAWs and don’t want your brain to explode learning all the variations. Many of Sonar’s shortcuts are based on the traditional Windows approach of using control keys to navigate quickly through menus rather than calling up functions directly. Also, many functions for which Sonar has few or no keyboard shortcuts (e.g., automation) have shortcuts in Studio One, and assigning some shortcuts to Sonar can overwrite useful Studio One shortcuts, so you need to create a new shortcut for any you remove. For example, Studio One’s reverse audio shortcut is Ctrl+R—the same as Sonar’s shortcut to refresh the Media Browser. A Sonar user will more likely want the refresh function, although that means creating a new shortcut for reverse audio.

Another example is for Sonar users who miss its ProChannel. Yet Studio One has a functionally similar Console feature when you open the channel—you see what effects are inserted, and a thumbnail of their settings. So I mapped Studio One’s Open Channel to Ctrl+I (the screenshot shows assigning this in the process of creating the key scheme), Sonar’s shortcut for opening the ProChannel. Although this overwrote Studio One’s shortcut for Invert Selection, I think Sonar users will be willing to sacrifice Invert Selection for having something similar to opening up the ProChannel. The shortcut I is another conflict, which opens Sonar’s Inspector. In Studio One, I enables auto-punch, which you can also enable by clicking on a transport button—but since Sonar users have always enabled auto-punch via a Control Bar button anyway, it made sense to give up I for the Inspector.
Then there are the design differences. For inserting effects in clips (Events), Sonar includes an FX rack that behaves like the one in its Track or Console view. In Studio One, the equivalent appears in the Event’s Inspector. However, having already mapped a Sonar shortcut to open the Inspector, I assigned Studio One’s Insert Event FX to Sonar’s Open Clip FX Rack shortcut. Sonar users can use that to insert an Event FX quickly, and hopefully they’ll realize they can open up the Inspector to see all the options for Event FX.
Nudge is another example of accommodating a common Sonar function. In Studio One, the number keypad is more for navigation and marker recall and with Sonar, nudge operations. So I assigned Sonar’s “greatest hits” nudge functions to the keypad.
Then again, sometimes you get lucky. For example, Studio One’s Audio Bend panel relates to what Sonar’s AudioSnap does, so I just assigned the AudioSnap shortcut to it. And while there’s a shortcut to hide selected tracks in Studio One, I find Studio One’s Track List the most convenient way to manage track hide/show. Sonar’s Track Manager handles show/hide well, so I used its shortcut to open the Track List. Another sneaky trick is that
Studio One doesn’t have a dedicated Navigator pane like Sonar, but if you reduce the track heights to the absolute minimum, the visual representation of a song is very similar.
Studio One doesn’t have screensets per se, but the five Console Scenes for which shortcuts exist are similar, so I assigned number keys 1-5 (which Sonar uses for screensets) to the scenes. Only problem is the tool shortcuts also use number keys, so I changed them to Ctrl+Shift+[function key] because Sonar users are familiar with using function keys to call up tools.
Finally, note that Sonar has many functions that aren’t assigned to default keyboard shortcuts, yet some of these functions do have default keyboard shortcuts in Studio One. So if you’ve created your own custom shortcuts in Sonar or another DAW, if Studio One has a similar function it may already have a default shortcut. If not, you can create similar (if not identical) custom shortcuts in Studio One. Another nice touch: When you open the list of keyboard shortcuts from Help, they reflect whichever mapping you’ve chosen—not just the Studio One defaults. And don’t forget you can create Macros to re-create another DAW’s workflow in Studio One, and then assign the Macro to a shortcut.
Still, after spending way too many hours going over the similarities and differences between Sonar’s and Studio One’s keyboard shortcuts, I have to say that I’ll be learning Studio One’s shortcuts. It’s clear a lot of thought went into choosing and assigning them, so I believe a little effort spent now will save a lot of time overall. My recommendation for learning shortcuts is to print out the list, and learn a new one every few days—you won’t regret it.
Click here for further notes on Sonar’s Shortcut Mappings in Studio One. [PDF]