Become a Grouping Groupie

Recently, I did some mix consulting on a 60-track project centered around Ukrainian relief—and as someone who usually works with far fewer tracks, it reminded me just how valuable grouping can be. Although Studio One’s grouping in early days was basic, over the years it has grown up, gone to graduate school, and gotten a high-paying job. In the process, I’ve become a groupie for grouping.
Creating Groups
This process hasn’t changed—control+click on the channels you want to group, or shift+click for contiguous channels. This applies to both the Mix and Arrangement views. Then, right-click and choose Group Selected Tracks.
Working with Groups
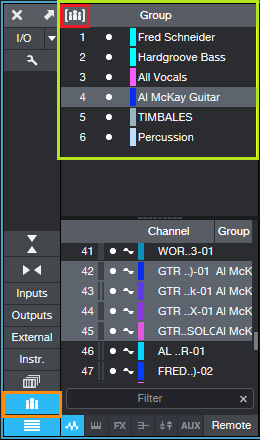
Click on the Group icon (the three little people, outlined in orange in fig. 1), and the Groups appear (lime-green outline) at the top of the Channels List. Clicking on a Group highlights the grouped tracks in the Channel List, and shows the Group’s name to the right of the Channel. (Note that in wide console view, a Group icon appears above the faders of grouped tracks.)
The group button in brackets (red outline) toward the upper left of the Group box turns grouping on and off. For example, if you want to make some quick edits to a couple of channels without affecting other channels in any group, turn off grouping, make your edits, and turn grouping back on again. Another way to suspend grouping is to hold Alt (Windows) or Option (Mac) while you change a parameter in a Group.
In the Channel List, clicking the white dot next to a Group suspends only that Group. However, if the Group is nested within another “master” group, then the rules change. In the example above, the Timbales are a Group, and Percussion—which includes the Timbales—is another Group. With Timbales turned off, any changes made to channels in the Percussion Group will still affect the Timbales, because Timbales are part of the Percussion Group. However, turning off grouping for the Percussion Group allows editing the Timbales independently.
Choosing Group Attributes
Right-click on a Group to choose the Group’s attributes. These include color, Rename Group, Dissolve Group, and 6 different parameters—Volume, Pan, Mute/Solo, Record/Monitor, Inserts, and Sends (fig. 2).
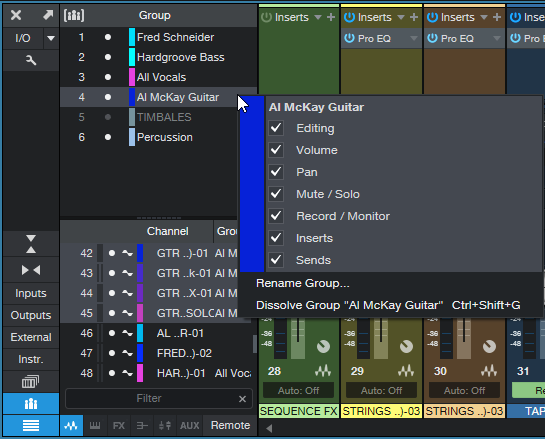
The Editing attribute isn’t a “parameter” per se, but covers editing operations. This is powerful, because edit operations affect all members of the Group—split an event in one grouped track, and it splits events at the same place in all grouped tracks. The same is true for move, quantize, normalize, transpose, tune, etc. However, for instruments with individual outputs, note that edit operations apply only to audio when you group their Console channels. To have edits operations apply to the instrument tracks for individual outs, you need to group the instrument tracks separately, in the Arrange view.
Being able to choose attributes selectively is great. For example, I often Group Solo/Mute and Editing, and leave the other parameters alone while I’m setting up the mix. Then, I’ll add in Volume. (Note that if you use Insert to add an effect to all Grouped tracks, the effect parameters aren’t grouped, but you can Expand, Bypass, Remove, and Disable all grouped effects in the Console view.)
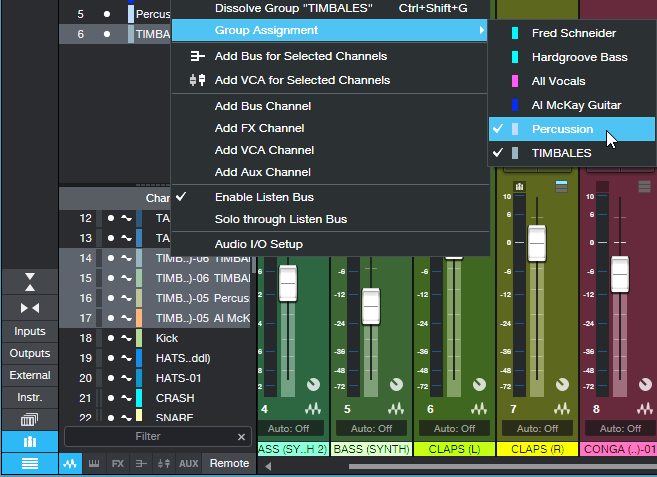
You can also edit the Group to which a channel belongs. In the Channel List, right-click on one of the grouped tracks, select Group Assignment, then check or uncheck a Group, as appropriate (fig. 3).
So, there you have it: everything you need to become a groupie. Grouping is a great feature, so be sure to take advantage of it.