Frequency Splitting in Artist
The Splitter is one of Studio One Professional’s coolest features, because it can split by frequency and do multiband processing. I’m a huge fan of the focused, smooth distortion sound you get by splitting guitars into low, mid, and high-frequency bands, and then distorting each one with its own amp sim. But multiband processing is also cool with delay, chorusing, reverb…you name it.
That’s the good news. The bad news: the Artist version doesn’t include the Splitter. However, there is a way to split your audio into three frequency bands. Let’s listen to the sound of single-band distortion, which uses the Ampire default setting (MCM 800).
Compare this to the multiband setting. The amp sounds are also the Ampire default, with a few minor tone knob edits.
If you like the second sound better, keep reading.
Console Setup
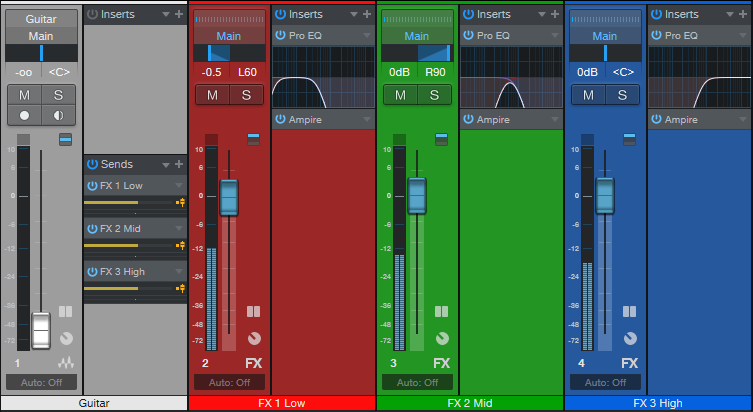
Create three pre-fader sends for the track you want to process, and assign them to three FX Channels or Buses (fig. 1). With pre-fader sends, you can turn down the main channel’s fader to hear only the processed sound, or turn it up to mix in dry sound for additional parallel processing. Fig. 1 shows the setup used for the 3-band audio example. At the end of this post, there’s a download link for a song file that contains this setup.
Pro EQ2 Settings
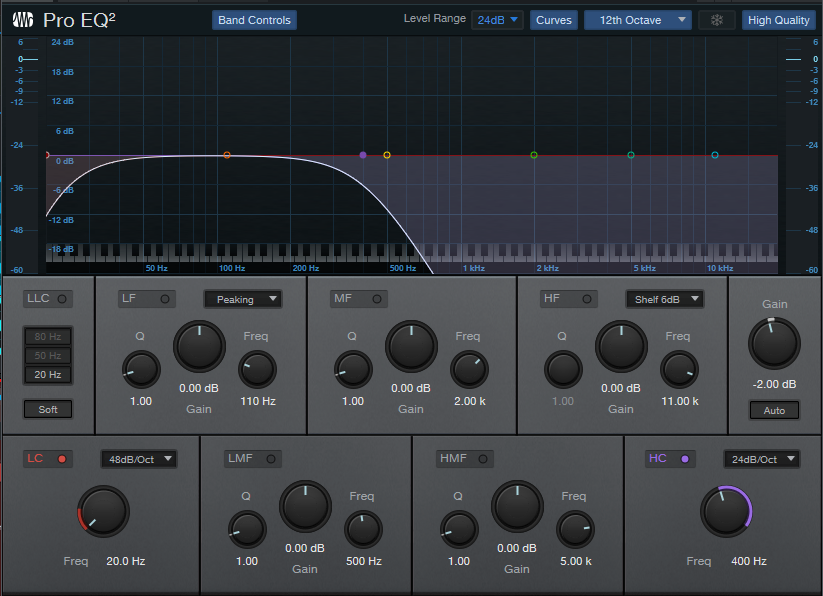
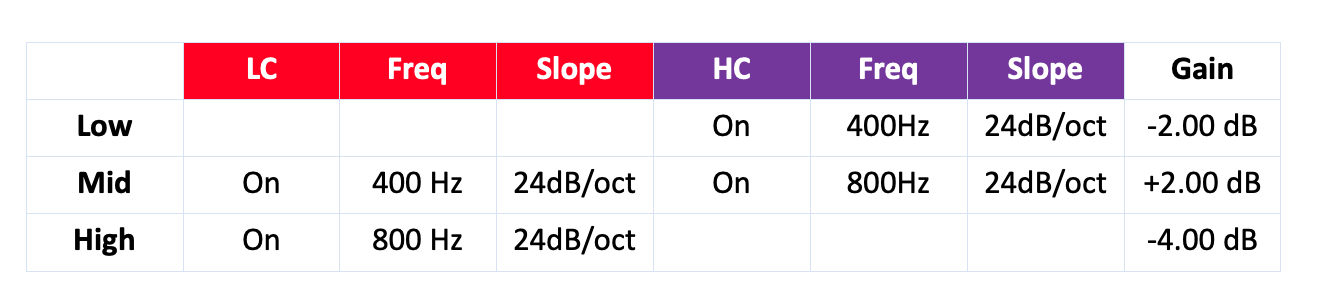
The Pro EQ2 settings start with the default. Only the LC, HC, and Gain parameters need changing. The table shows suggested frequency bands for guitar, but feel free to alter them. The main consideration is that the Low band’s HC frequency should equal the Mid band’s LC frequency, and the Mid band’s HC frequency should equal the High band’s LC frequency. All the slopes are 24 dB/octave.
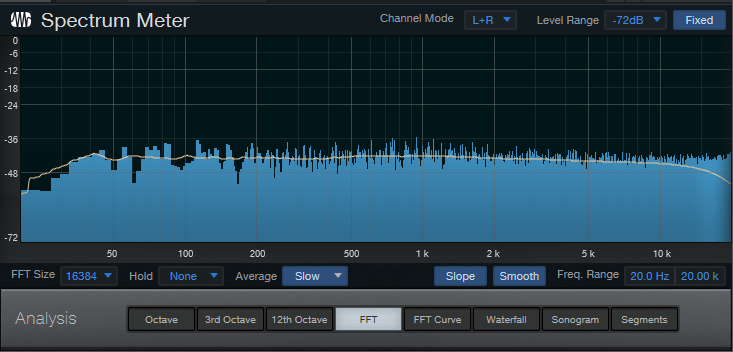
The slight gain control differences compensate for the phase issues inherent in splitting with non-linear-phase filters. Fig. 3 shows white noise going through the splits, and summed at the output—the frequency response is almost perfectly flat. The slight bass rolloff is due to my preference mentioned above for rolling off the Low Band’s LC filter (20 Hz, with a 48 dB/octave slope). Similarly, the High band’s HC filter rolls off at 20 kHz, with a 48 dB/octave slope. Amp sims don’t need those high frequencies anyway.
Time for Tweakage!
Multiband setups are highly customizable. Pan the bands differently to create a stereo image, alter the band levels, tweak the amp settings to optimize them for a specific band, and so on. The only caution is that because of the heavy filtering, there’s less audio going to the amp inputs. So, you may need to turn up the amp gain (or Pro EQ2 gain for one or more bands) to get the sound you want. And of course, this isn’t just about amp sims, because multiband chorusing, delay, reverb, and effects combinations are also very cool.
Download the .song file, and you’ll have all the EQs and splitting set up…so plug in an instrument or load a track, and start playing around.
Download the multiband template in Fig. 1 here.