Monthly Archives: September 2021
Retro Mix Legends 1.1: Now with more Boost!

Due to popular demand, we’ve added new functionality to two Retro Mix Legends Mix Engine Effects: Alpine Desk and Brit Console. This is a free update to existing owners of either (or both) plug-ins.
The #1 user request we received after releasing Alpine Desk and Brit Console was simple: more Boost!
The Boost option was originally intended to accurately recreate the grit and saturation inherent in driving the gain stages of popular consoles. Of course it makes sense that modeling clean, accurate, high-quality consoles would result in sonic artifacts that can be pretty subtle. It just turned out that Boost was too subtle for some users.
But hey, you asked for it, so we’re glad to announce: Alpine Desk and Brit Console now each have two different levels of Boost available: “on,” and “crank!” This makes the overall range of Boost available via the Drive control very wide indeed! It ranges from barely audible to… well, to borderline ridiculous.
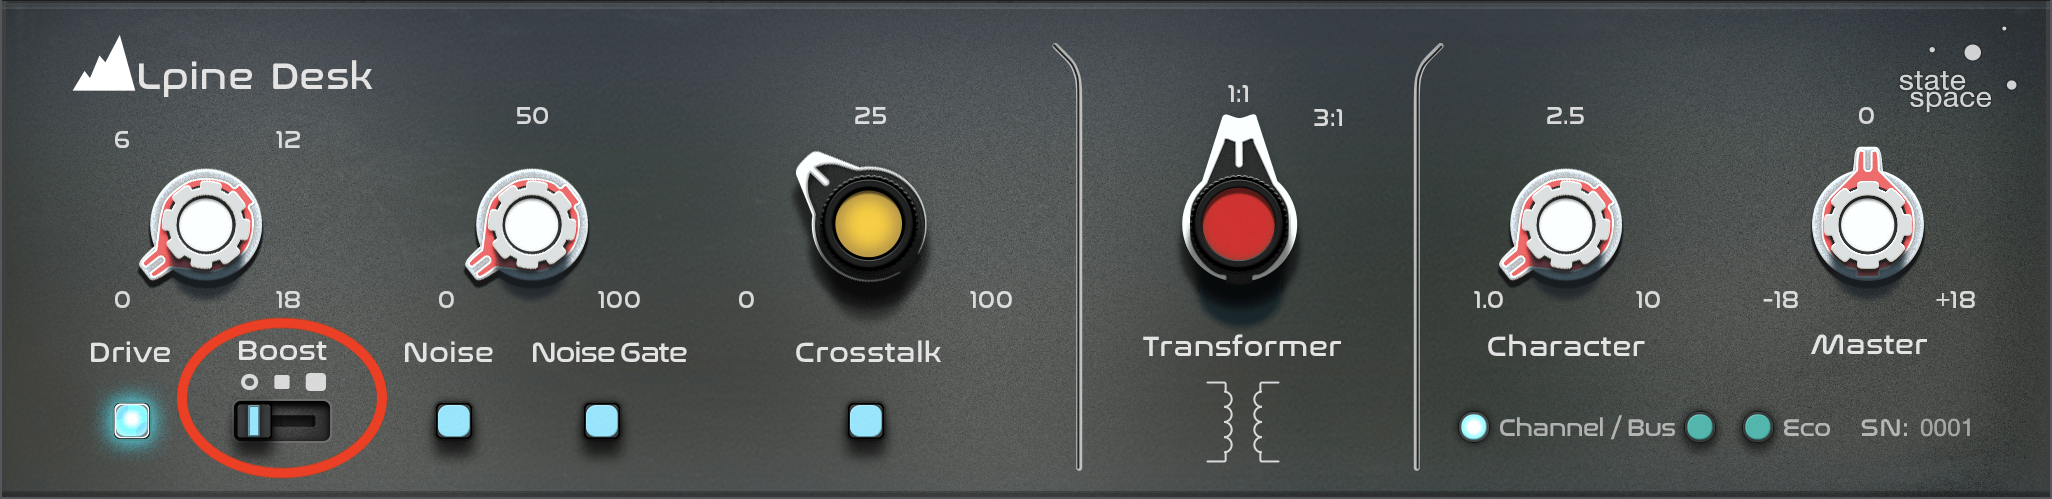
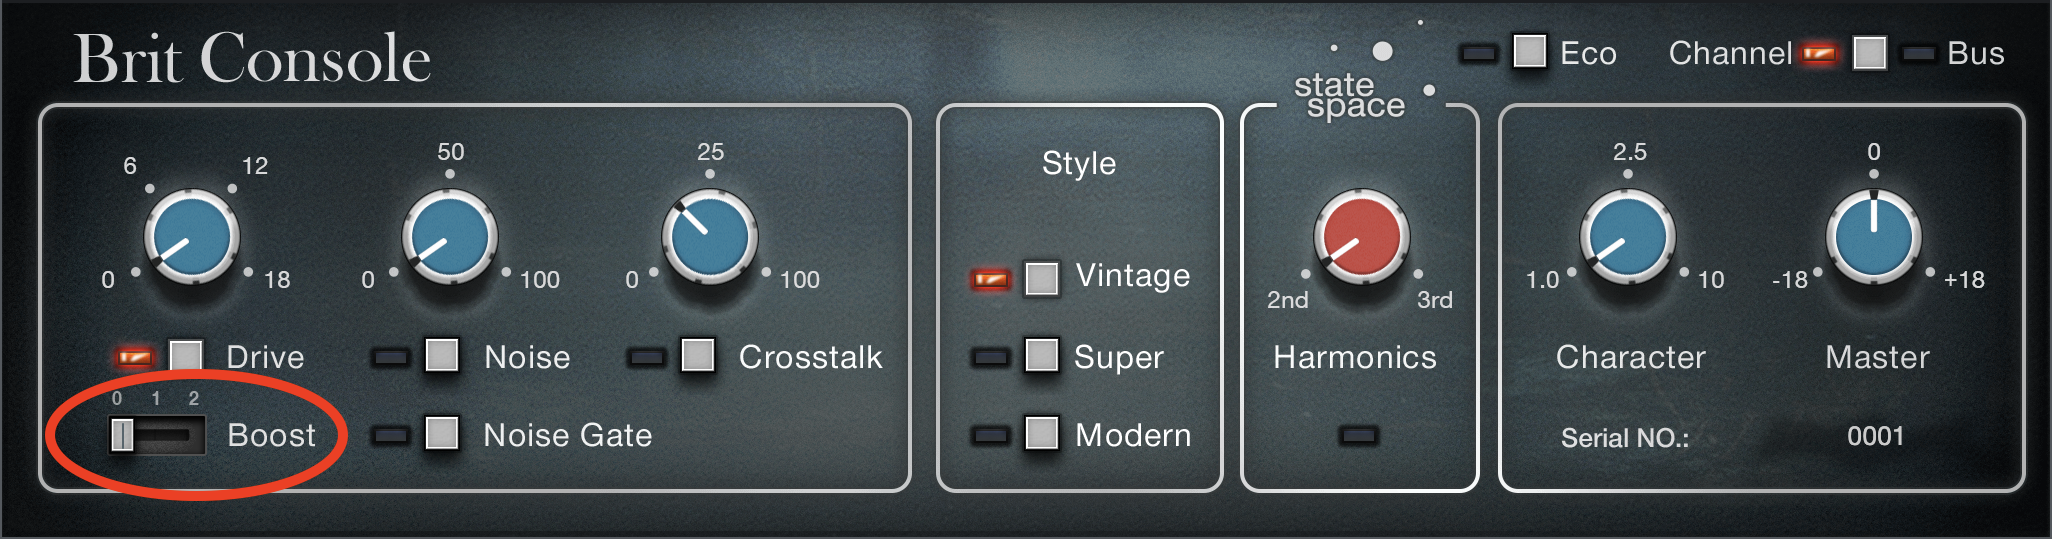
Look, we understand that consoles aren’t stompboxes. But we also understand the impulse to throw accuracy out the window and just get loud once in a while.
Additionally, as of Studio One 5.4, Retro Mix Legends plug-ins (including Porta Cassette) feature the same performance improvements as CTC-1 and other Mix Engine Effects—their processing is selectively paused when channels aren’t processing audio—making for more efficient use of your CPU.
To update your Brit Console and/or Alpine Desk, choose “Studio One Extensions” from the drop-down menu, followed by “Check for Updates.”
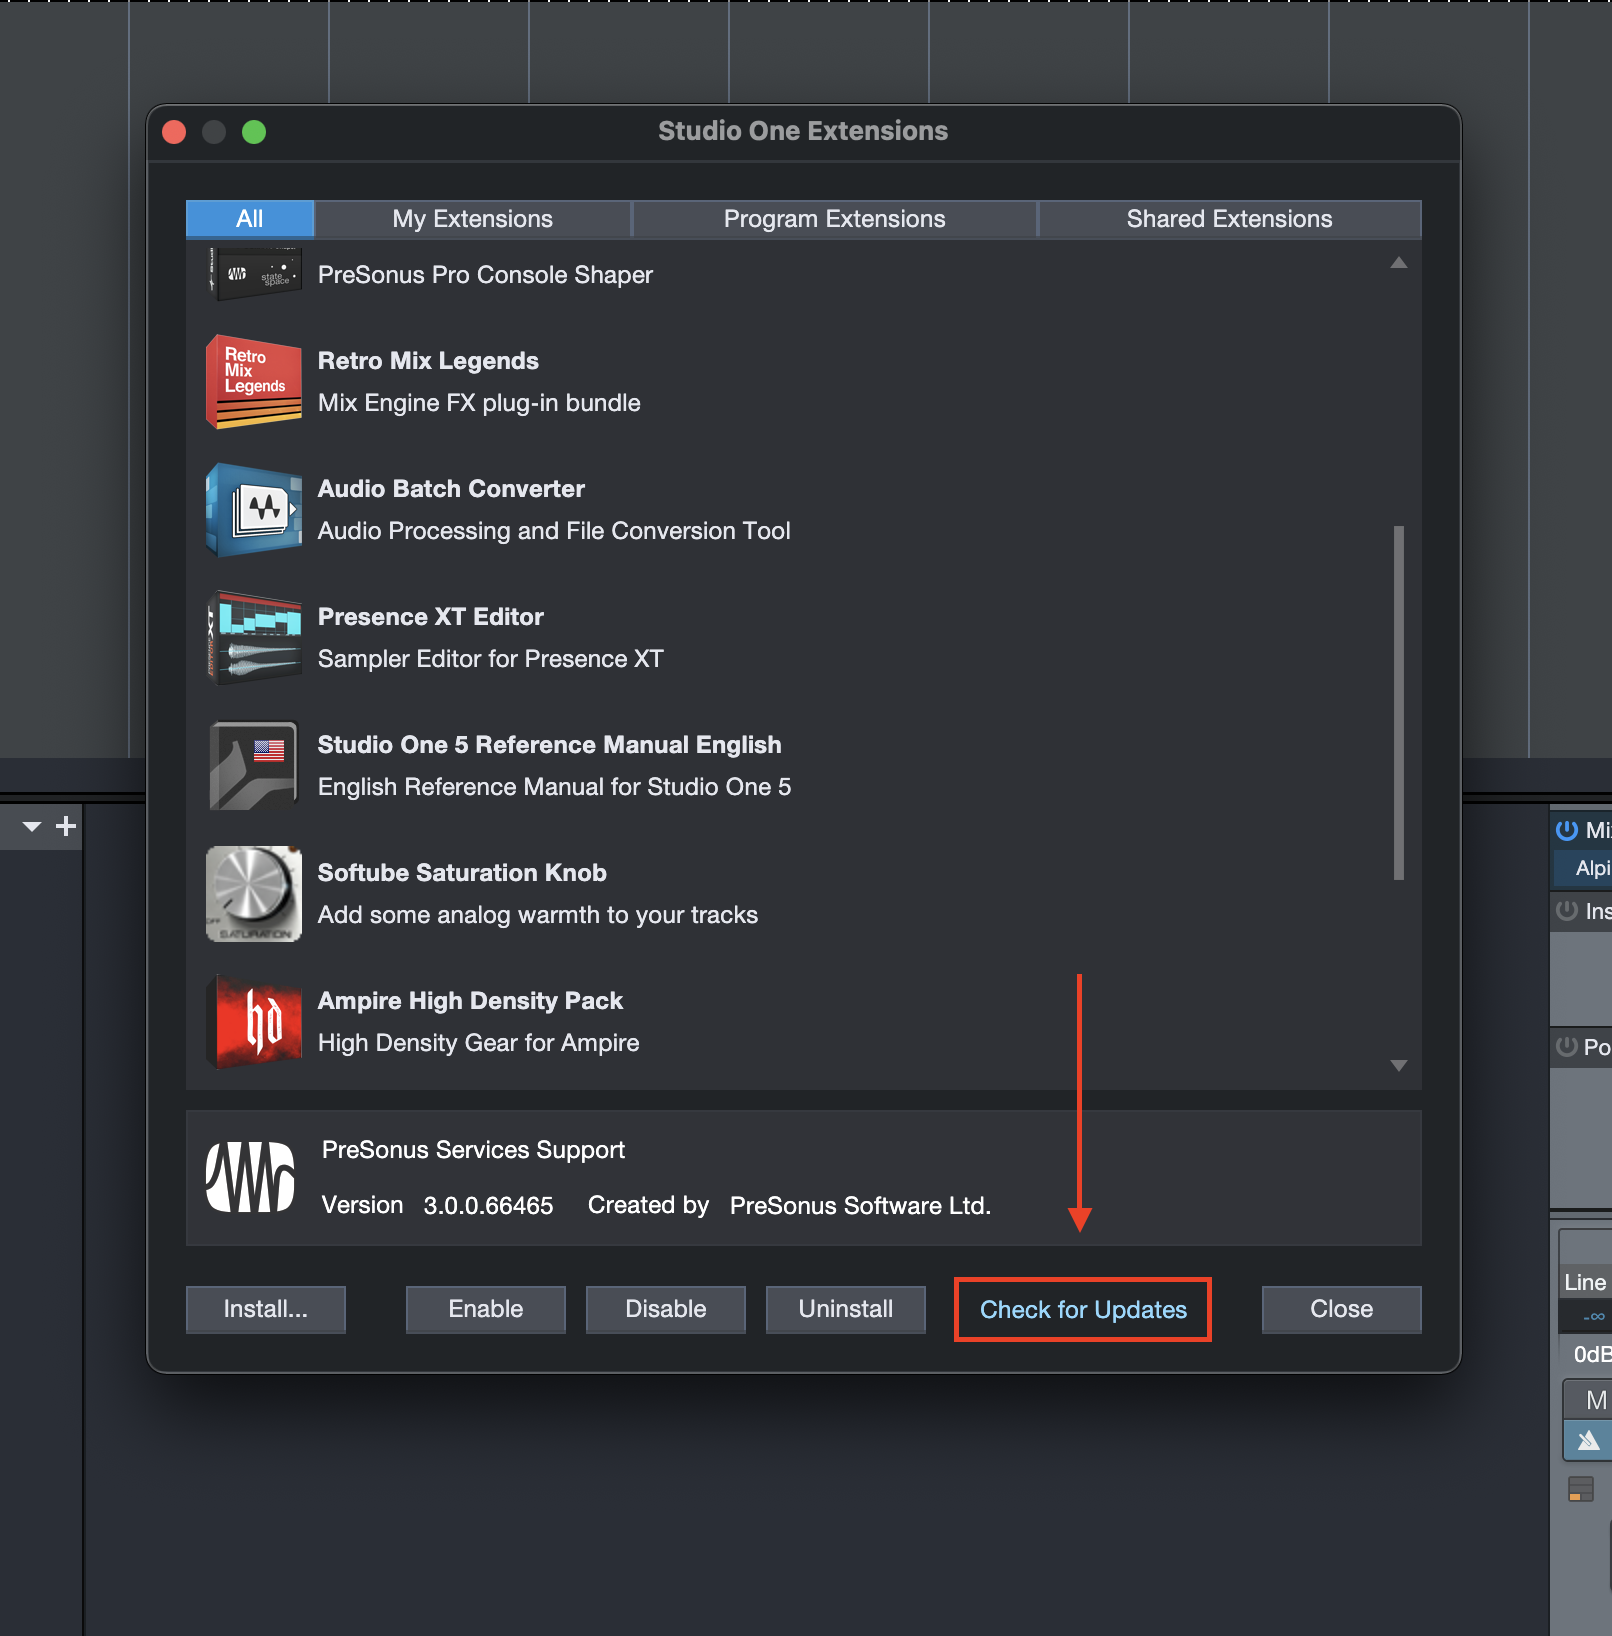
Check for Updates
If you do not already own the Retro Mix Legends Mix FX Plug-ins, you can pick them up HERE
Or you can get them included in PreSonus Sphere here for only $14.95/month.
Studio One 5.4 is here!

Studio One 5.4 adds new features, enhancement, and powerful workflow improvements to Studio One 5. This is a free update for Studio One 5 users and PreSonus Sphere members. Click “Check for Updates” from Studio One’s Start Page to get it!
Native support for Apple Silicon (M1) processors
![]()
With Studio One 5.4, PreSonus introduces native support for M1-based Apple computers. Native mode for Studio One 5.4 offers additional CPU optimization for better overall CPU performance. To achieve optimal performance, Native mode requires all VST plug-ins, instruments, and hardware drivers to also provide Native support. To that end, nearly all PreSonus application software, plug-ins, and hardware drivers now support full native compatibility with M1-based Macs.
Plug-in Nap

Studio One 5.4 introduces a new Plug-in Nap option that improves overall CPU performance by pausing processing for any plug-ins that are not currently passing audio. The status for each plug-in can be monitored in the updated Performance Monitor.
Plug-in Nap is automatically suspended when the plug-in window is opened. With this new option enabled, you can run more plug-ins in your session. Plug-in Nap does not currently support virtual instruments.
Export multiple formats in one pass
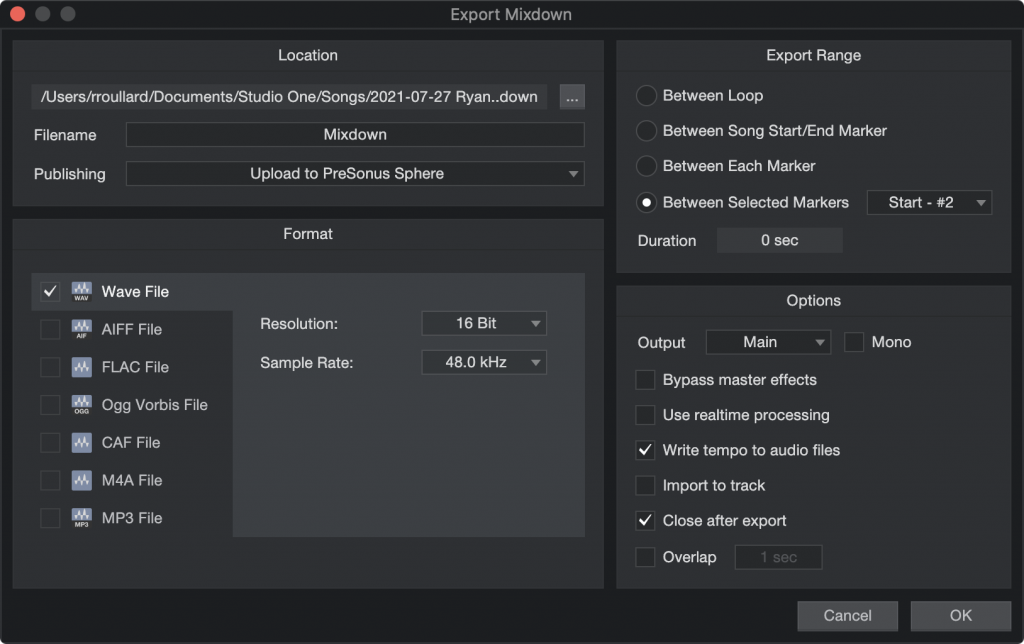
With only a single format selected, switching formats is as easy as clicking on a different format. Checking additional formats adds them to the selection. When a Publisher is selected (such as “Send to Notion,”) Studio One ensures that the default format of that publisher is part of the selection. Settings are now remembered when closing the “Export Mixdown” window. PreSonus Sphere members are able to export multiple formats simultaneously into a single PreSonus Sphere Workspace.
Realtime chord display in editor
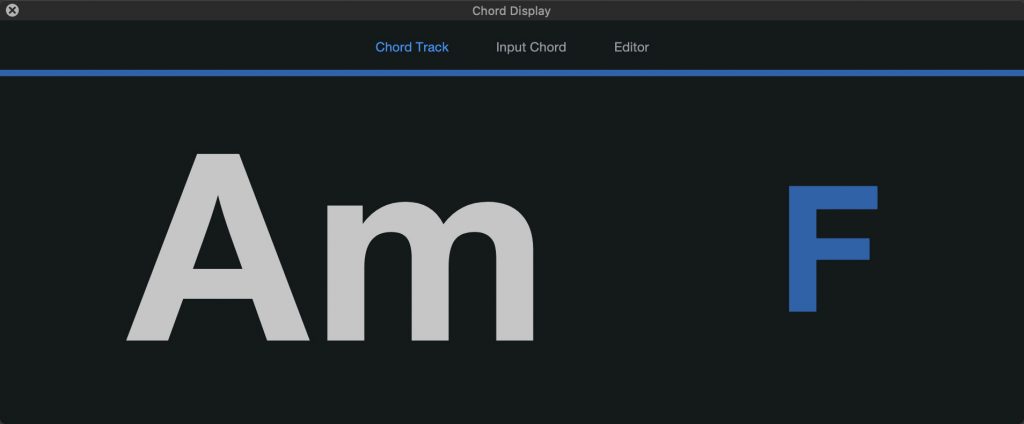
A new Chord display for notes from the editor has been added to the Note Editor inspector underneath the existing Input Chord display. This display has two states, depending on the context:
“Current Chord” shows the chord detected from notes at the current play position, as well as the next upcoming chord.
“Selected Chord” shows the chord detected from the current note event selection. For multiple selected notes, the chord is determined from exactly these notes (can also be an arpeggio). For a single selected note, the detection looks for overlapping notes to determine the chord.
The current chord is displayed inside the tooltip, as well as on mouseover when editing notes.
The floating Chord Display can be set to show the current chord from the Chord Track, the input chord, or the currently selected chord in the editor. When showing chords from the Chord Track, the window shows both the current and next chord, as well as a progress bar to indicate the time to the next chord change–making it a great tool for recording and performing artists, as well as teachers and students.
Updated Plug-in Manager
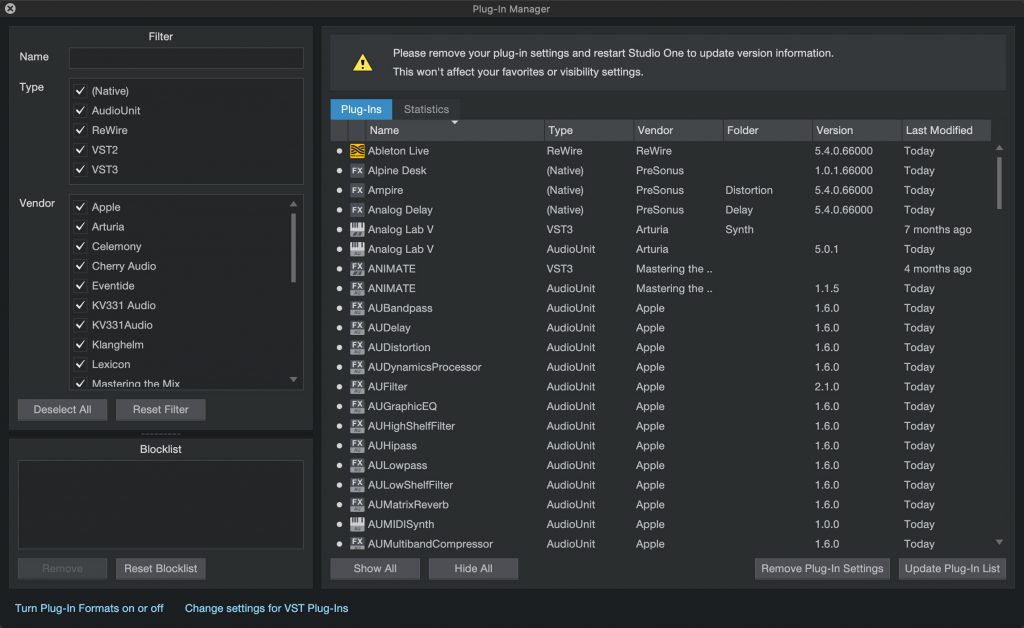
The Plug-in Manager in Studio One 5.4 has a new Version column so you can make sure your plug-in library is always up to date; and a new Statistics tab provides useful information.
Third-party plug-ins that fail during the Studio One launch scan are now moved to a Blocklist inside the Plug-in Manager so they don’t interfere with your session. You have the ability to manually reset the blocklist, remove individual plug-ins, or move problematic plug-ins manually to the Blocklist by simply dragging and dropping them.
Performance optimization for Mix Engine FX
Like Plug-in Nap, Studio One Mix Engine FX plug-ins from PreSonus also now use less CPU processing when channels are silent. This improvement is available for all Mix Engine FX version 1.1 or newer and is automatically active on any session using Mix Engine FX.
Autosave just got better
New in version 5.4, Autosave will wait to complete until playback is no longer in progress. In addition, Autosave now takes less time by always using cached plug-in data. The “Use cached plug-in data on save” option now affects manual Save only.
Improved chord detection
Detecting chords from audio in Studio One 5.4 now delivers more accurate results and improved timing. Chords detected from note events are now more accurate as well. The full set of chords that are available in the Chord Selector can be recognized from music parts.
This produces more consistent results when dragging chord events from the Chord Track to the arrangement and back.
“Copy external files” option for Songs, Projects, and Shows
The option “Ask to copy external files when saving Song…” has been renamed to “Ask to copy external files when saving Document” and now also works for Projects and Shows, as it did before for Songs: When a document is saved, a dialog offers to copy all “external” files (outside the Song/Project/Show) folder that have been added since the last save. This question only appears once for each file.
An essential file management feature—now available for all Studio One document formats!
“Remove all” option for sends
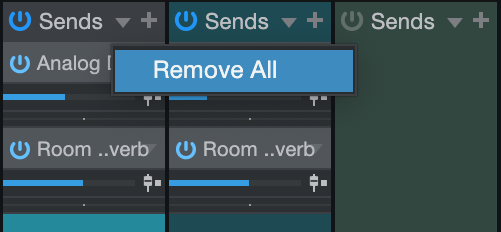
A convenient “Remove all” option for sends is now available in the Console. Click on the drop-down arrow next to Sends to access the new command. This command can also be applied to groups of Channels simultaneously.
Full Studio One 5.4 video playlist:
Learn more about Studio One
Shop Studio One
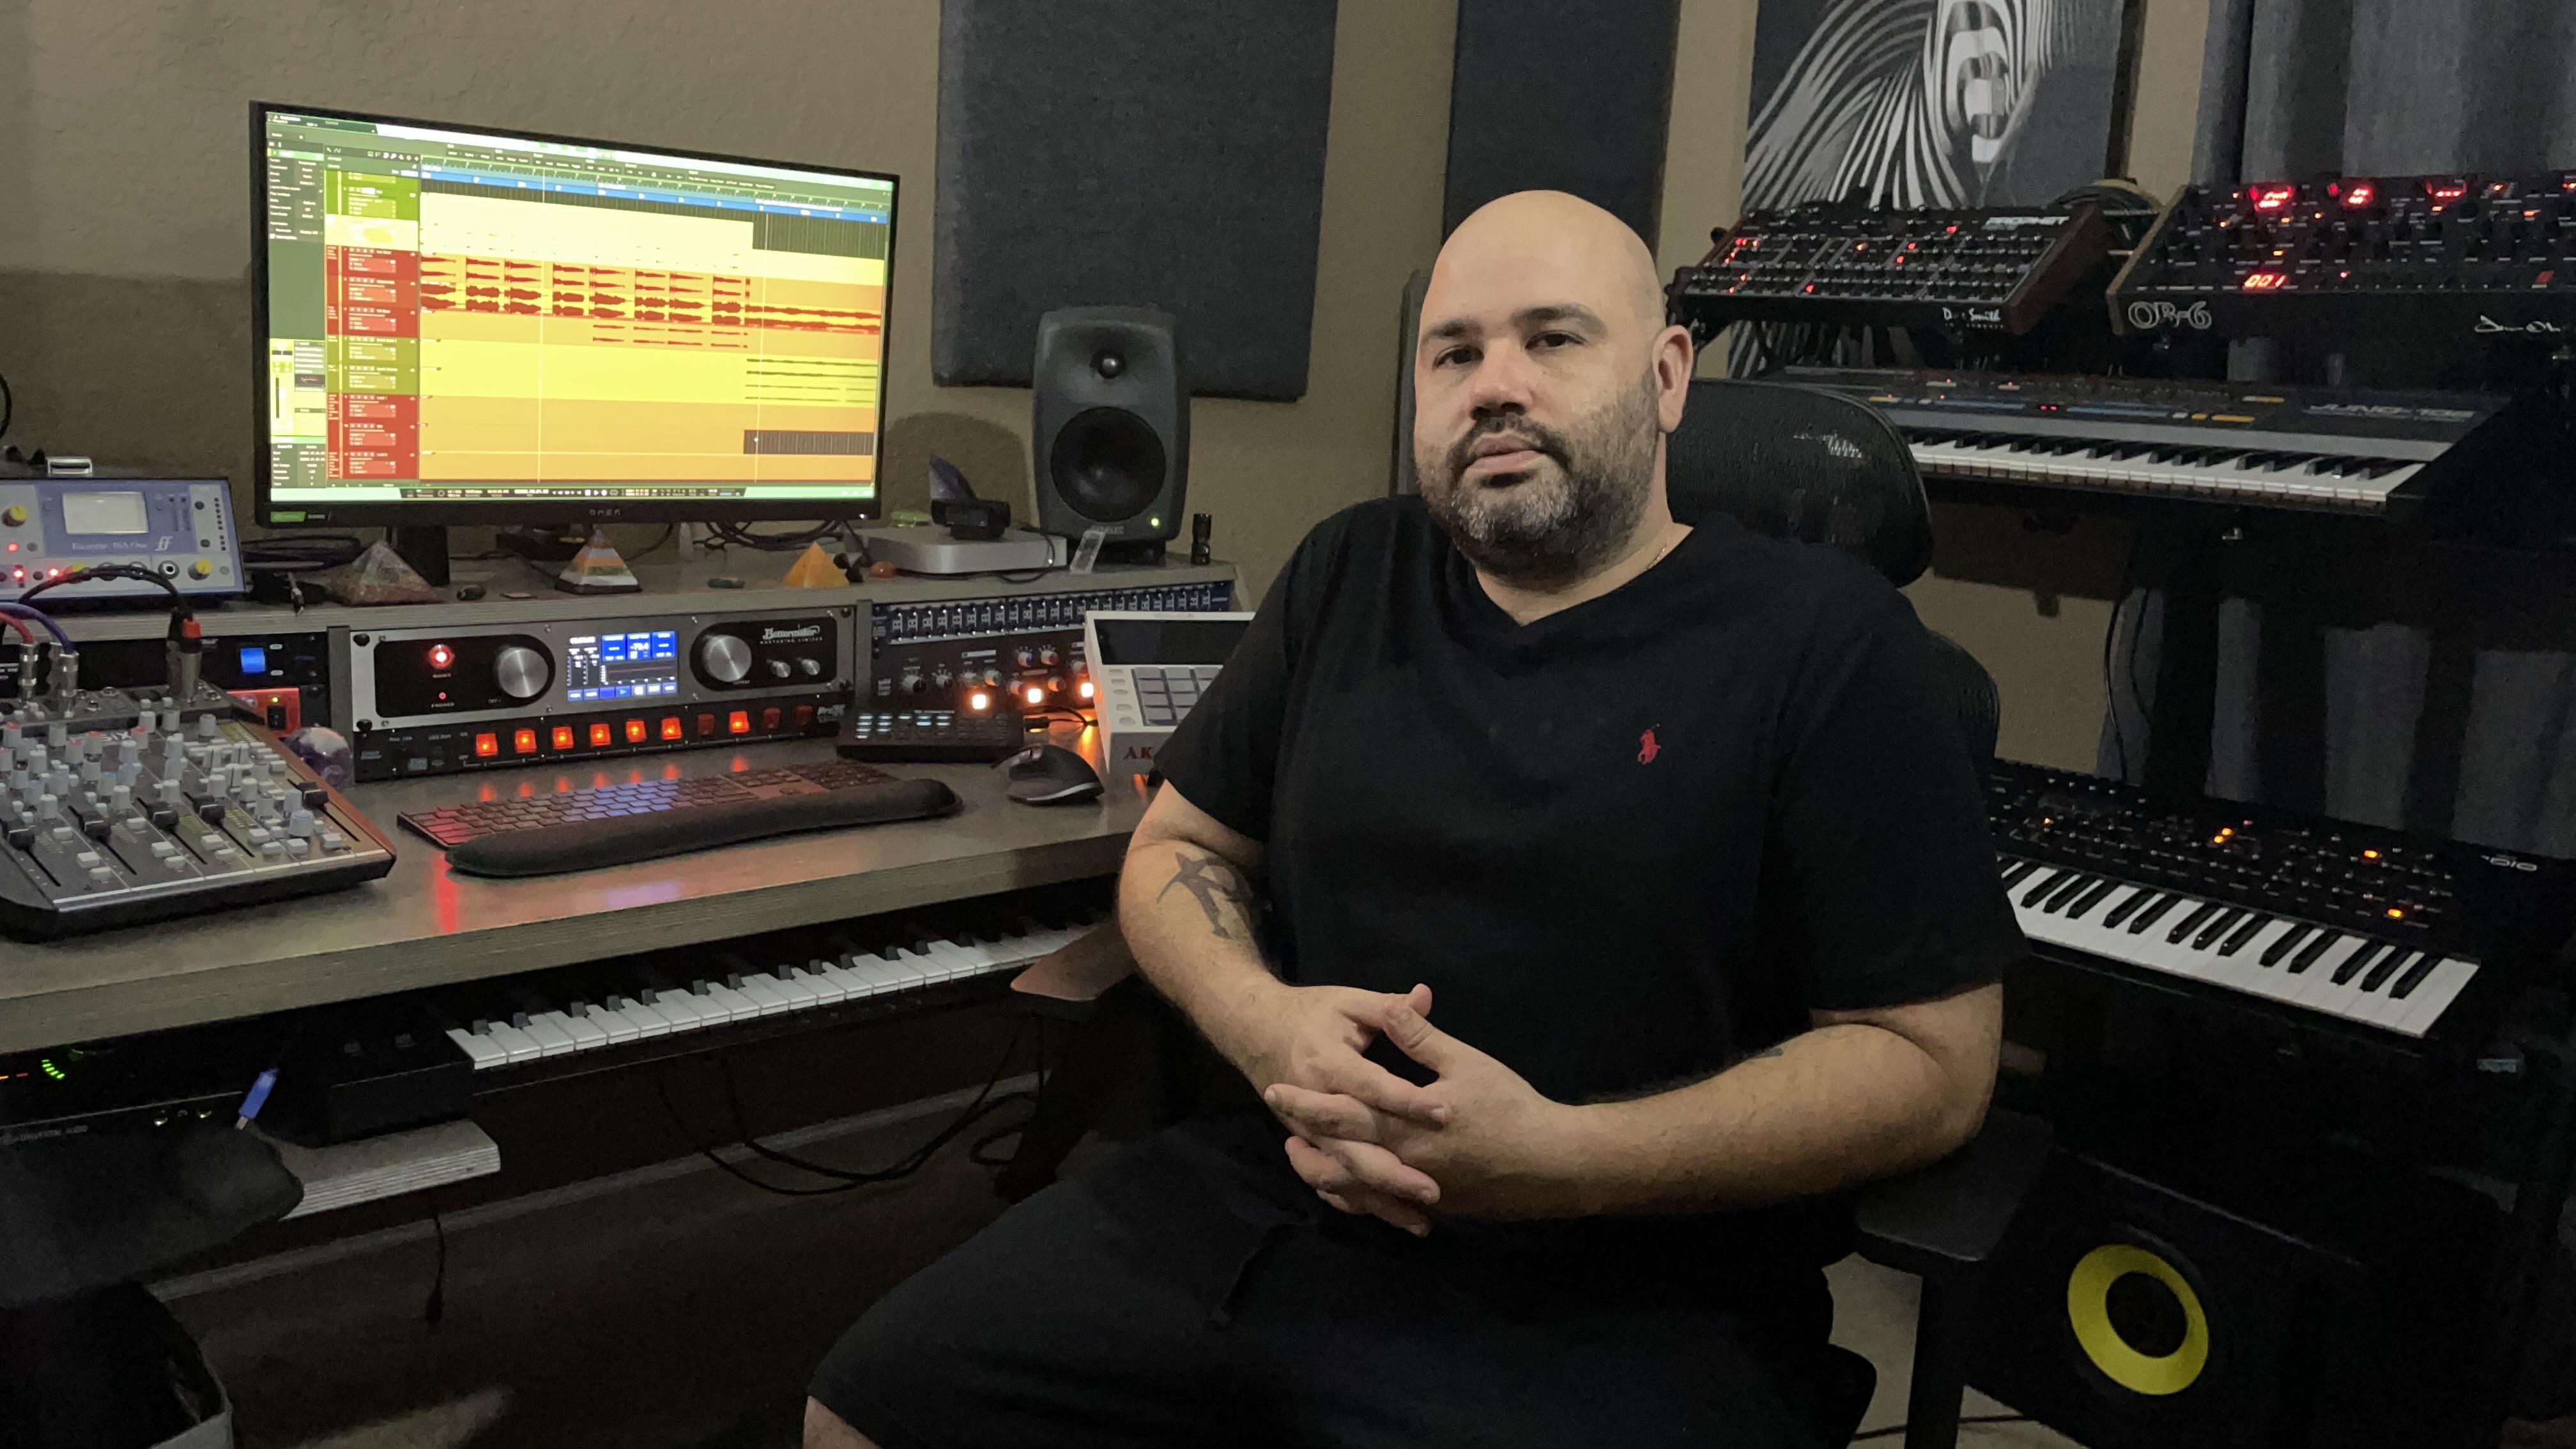
CMP (Craftmaster Productions): BOOST KNOB & Studio One
CMP is a sample creator and music producer from Miami, Florida.
He was introduced to Studio One via version 2 back in 2010, after being victim to a home invasion where his studio was picked apart clean. Newly-armed with a PC laptop gifted from one of his sympathetic colleagues, he went straight to Guitar Center where Studio One was sold to him on the promise that he could use familiar key commands from Logic.
After installing the software and navigating around for a day, Studio One was his primary choice moving forward. CMP had used Cubase and Pro Tools previously, so there were features that instantly felt very familiar yet noticeably improved upon. From the Zoom In/Out functions, to the streamlined bus routing and the linear drag ‘n’ drop workflow… everything in Studio One seemed to work the way he wished it would have worked in other DAWs.
CMP now brings his excitement for Studio One with him to every studio session. As a producer in the hip-hop community, he started his Craftmaster Productions YouTube Channel in 2015 to showcase his passion for Studio One, and immediately began attracting the interest of other Studio One users online.
After a year of amazing feedback and growth on the platform, he created StudioOneTutorials.com, a place where the Studio One community could come and directly request content and courses from CMP. He also offers custom templates for Studio One via CMPKits.com along with compositions for producers to sample and flip, as well as his various MIDI products.
If you’re a Studio One user with even a passing interest in beatmaking production, subscribe to CMP on YouTube.
He’s been heavily supporting Studio One for a long time, and we’re all the better for it!
Hi-Hat Humanizing
Nothing is more bothersome to me than a 16th note hi-hat pattern with a constant velocity—like the following.
Audio Example 1
“Humanizing,” which usually introduces random changes, attempts to add more interest. But human drummers don’t really randomize (unless they’ve had too many beers). Even if the beats are off a little bit, there’s usually some conscious thought behind the overall timing.
So, what works for me is a mix of deliberate tweaking and what I call “successive humanization,” which applies humanization more than once, in an incremental way. With hi-hats, my goal is rock solid downbeats to maintain the timing, slightly humanized offbeats, and the most humanizing on everything that’s not the downbeat or offbeat. This adds variety without negatively impacting the rhythm.
Let’s fix that obnoxious 16th-note pattern. To start, select all the notes, and bring them down to just below 30% (fig. 1).
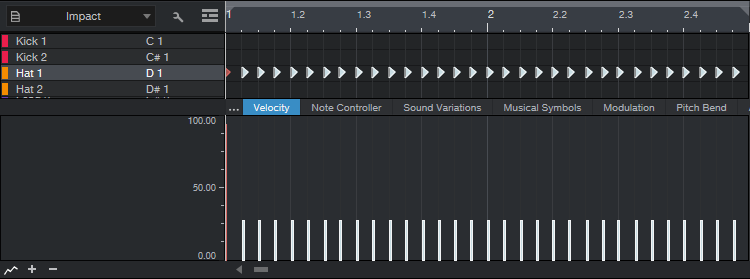
Figure 1: All the velocities are slightly below 30%.
Next, we’ll use Macros to select specific notes for editing. Select all the notes, click on the Macro View button (between Q and Action), click Action in the Macro Edit menu, and choose Note Selection > Select Notes Downbeat. Raise all the downbeats to just below 95% or so. Then, choose Note Selection again, but this time select Offbeat, and raise the offbeats to just below 50%. Now your notes look like fig. 2.

Figure 2: The downbeats are just below 95%, and the offbeats are just below 50%.
The part sounds like this…we’re on our way.
Audio Example 2
Close the Macro view. Now we’ll humanize the lowest-velocity notes a little bit. Select all the notes. Click on Action, and under Global, choose Select Notes. Choose Range, set Velocity from 1% to 30%, and click OK (fig. 3). This is why we wanted to set the notes slightly below 30%—to make sure we caught all of them in this step.
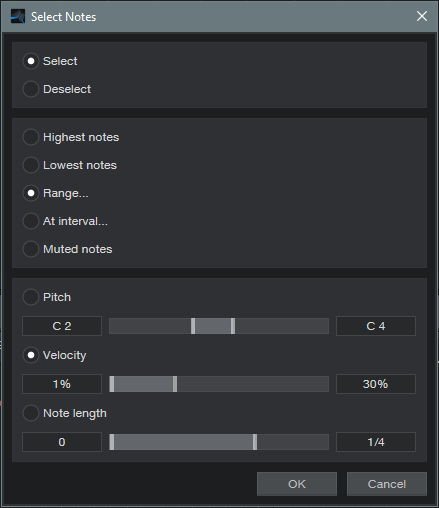
Figure 3: Getting ready to humanize notes with velocities under 30%.
Choose Action > Humanize. We’re going to Humanize the notes downward a bit, so set Add Velocity Range to -10% and 0% (fig. 4).
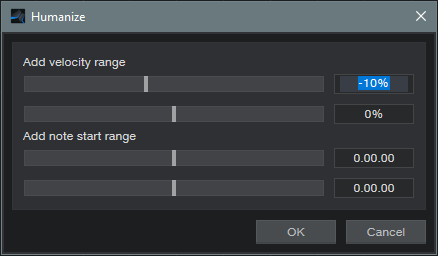
Figure 4: Humanizing has been restricted to lowering velocities somewhere between 0% and -10%, but only for notes with velocities under 30%.
Let’s introduce some successive humanization. Click on Action, and again, Select Notes. Choose Range, set Velocity from 1% to 50%, and click OK. Now we’ll humanize velocity for the notes that were originally under 50% and also those that were under 30%. Humanize again to -10%, as done in the previous step. There’s a little more variety in the following audio example.
Audio Example 3
Now let’s humanize the start times a bit, but only for the notes below 50%—we want rock-solid downbeats. Select the notes under 50% as you did in the previous step, but this time, for the Humanize menu don’t alter velocity. Just humanize the start time between -0.00.10% and 0.00.10% (fig. 5).
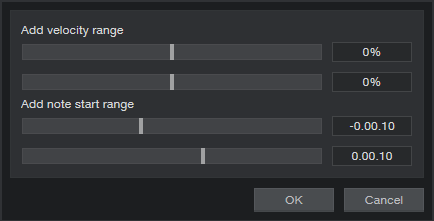
Figure 5: This will humanize start times for all notes currently below 50%.
Now our notes look like fig. 6. Look closely to see the changes caused by humanization.

Figure 6: The sequence now has humanized start times.
And it sounds like…
Audio Example 4
At this point, the Macros and humanization options have added some much-needed variations. Although I feel drum parts always need at least a little of the human touch, thanks to Studio One doing most of the work, at this point only a few small changes are needed. Also, a little filtering can make the harder hits brighter. (Tip: When editing the filter parameters, turning the Resonance way up temporarily makes the range that’s being covered far more obvious.) Fig. 7 shows the final sequence.
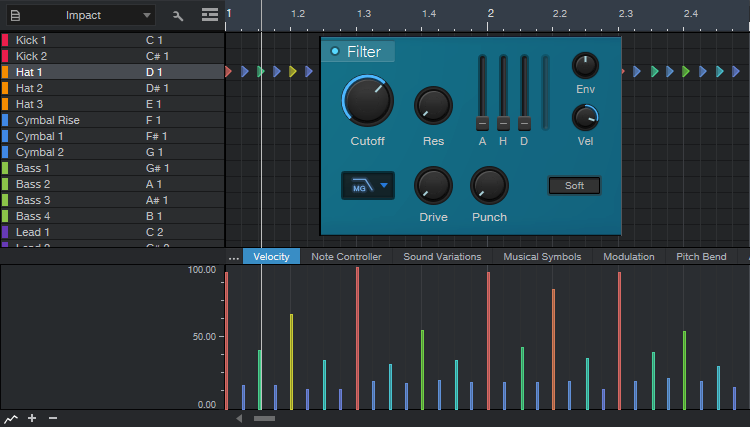
Figure 7: This adds a few manual velocity tweaks, along with filter editing to make higher-velocity sounds brighter.
The point of the filter was to give a more subdued hi-hat sound, as you’ll hear in the next audio example. If you want a more metronomic effect, you’d probably prefer the previous audio example…but of course, it all depends on context.
Audio Example 5
You can even try one final humanize on everything—a little velocity, and little start time—and see what happens. If you don’t like it…well, that’s why “undo” exists!
Add More Inputs to Your Audio Interface

I never liked patch bays. I certainly didn’t like wiring them, and I didn’t like having to interrupt my creative flow to patch various connections. In my perfect world, everything would patch to its own input and be ready to go, so that you never had to re-patch anything—just assign a track to an input, and hit record.
With enough audio interface inputs, you can do that. But many audio interfaces seem to default to 8 line/mic ins. This makes it easy to run out of inputs, especially as synth fanatics gravitate toward re-introducing hardware to their setups (and want to take advantage of Studio One 5’s Aux Channels). We’ll assume you don’t actually want to get rid of your interface with 8 mic/line ins…you just want more. There are three main solutions:
- Use a mixer with audio interfacing capabilities. A StudioLive will certainly do the job, but it could be overkill for a home studio, unless it’s also what you use for gigs.
- Aggregate interfaces. We’re getting closer—simply add another interface to work alongside your existing one. It’s easy to aggregate interfaces on the Mac using Core Audio, but with Windows, ASIO almost never works for this. So, you need to use Windows’ native drivers. The newer WASAPI drivers have latency that’s close to Core Audio, but aren’t widely supported. So, you may be stuck with the older (slooooow) drivers. Another issue is needing to give up another USB port for the second interface, and besides, using different applets to control different interfaces can be a hassle.
- ADAT optical interface. This is my preferred solution, which works with both Mac and Windows. It’s especially appropriate if you record at 44.1 or 48 kHz, because then you can add another 8 inputs per ADAT optical port. (At 88.2 or 96 kHz, you’re limited to 4 channels per port, and not all audio interfaces are compatible with higher sample rates for optical audio.)
Why ADAT Optical Is Cool
I started with a PreSonus Studio 192 interface, graduated to a PreSonus 1824c, but kept the Studio 192 as an analog input expander. The 192 has two ADAT optical ports, so it can send/receive 16 channels at 44.1 or 48 kHz over a digital audio “light pipe” connection. The 1824c has one ADAT port for input and one for output, so patching one of the Studio 192’s optical outs to the 1824c’s optical in gave a total of 16 analog inputs. This accommodates my gear without having to re-patch.
Another advantage is that the Studio 192 has +48V available for individual mic inputs, whereas the 1824c’s +48V option is global for all inputs. So, I can easily use a mix of ribbon, dynamic, and condenser mics with the 192, while leaving +48V off for the 1824c.
The interface being used as an “expander” doesn’t require a permanent USB connection to your computer (although you may need a temporary connection to change the interface’s default settings, if you can’t do that from the front panel). And, you don’t need an interface with lots of bells and whistles—just 8 inputs, and an ADAT out. A quick look at the used market shows plenty of ways to add another 8 channels to your audio interface for a few hundred dollars, although this could also be a good reason to upgrade to a better interface, and use the older one as an expander.
Because the 1824c has an ADAT input, both interfaces show up in the Song Setup menu. The inputs from the ADAT light pipe look, act, and are assigned like any other inputs (Fig. 1).
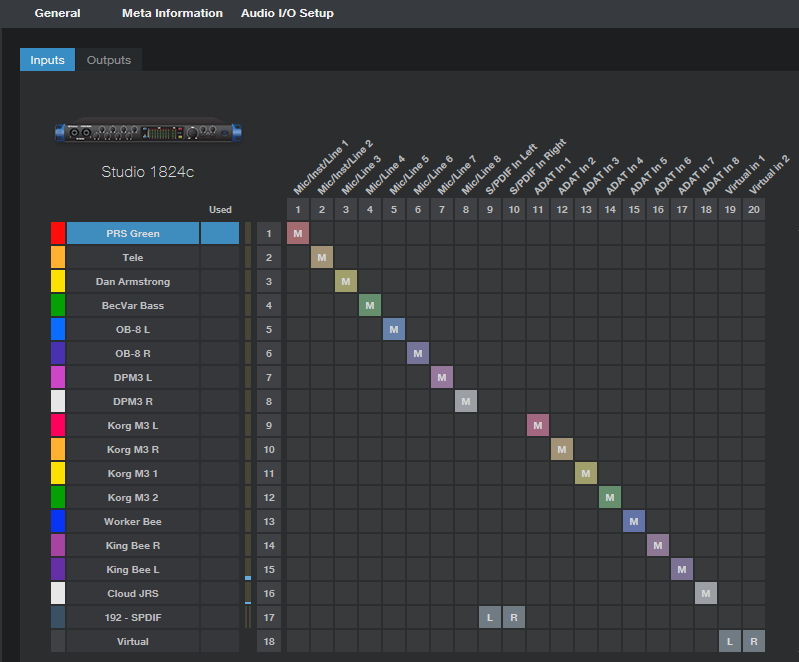
Figure 1: It even kind of looks like a patch bay, but I never have to patch any physical connections.
Time for a Caution…
…and that caution involves timing. Always set the ADAT expander as the master clock, so that it’s transmitting clock signals to the main interface, which is set to receive the clock (Fig. 2). If the main interface is the master, then the expander will be free-running and unsynchronized. The audio will seem to work, but you’ll get occasional pops and clicks when the units drift out of sync (which they will do over time).
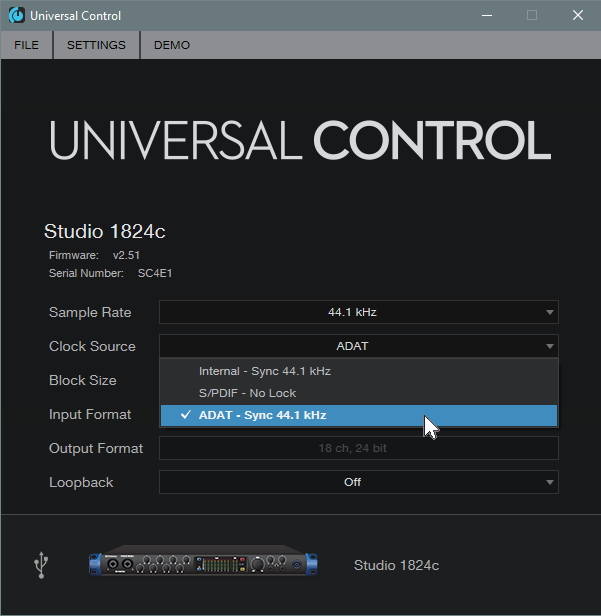
Figure 2: Make sure the main interface syncs to the expander’s clock.
Patch bays? Who needs ’em? I like virtual patch bays a lot more.