Make a Splitter for Studio One Artist
One of my favorite Studio One Professional features is the Splitter, and quite a few of my FX Chains use it. If you own Studio One Artist, which doesn’t have a Splitter, you may look longingly at these FX Chains and think “If only I could do that…”
Well, you can implement most splitter functions in Studio One Artist, by using buses. All the following split options are based on having a track that provides the audio to be split, along with pre-fader sends to additional buses. Note that the track’s fader should be turned all the way down.
Normal Split
The Splitter’s Normal mode sends the input to two parallel paths, which is ideal for parallel processing. For Artist, we’ll duplicate this mode with two buses, called Split 1 and Split 2 (fig. 1).
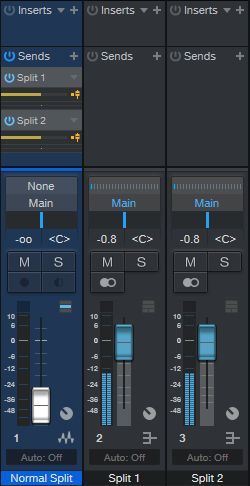
Figure 1: How to create a Normal split in Artist.
The sends to the buses are pre-fader, and panned to center. One send goes to Split 1, and the other to Split 2. Now you can insert different effects in Splits 1 and 2 to do parallel processing.
Channel Split
The Channel Split mode also splits the input into two parallel paths. One path is for the left channel, while the other path is for the right channel.
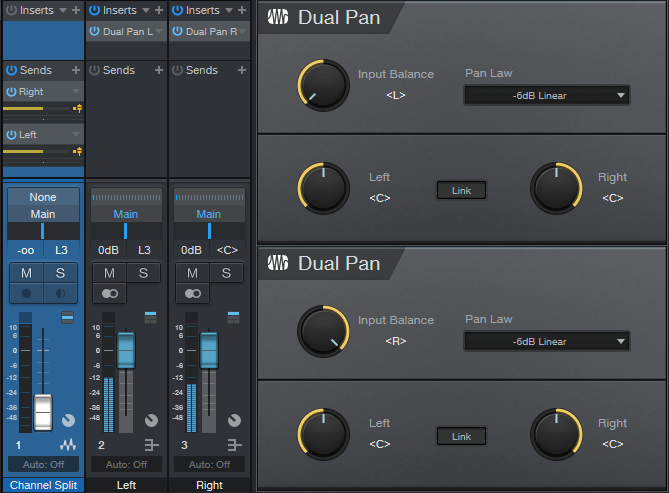
Figure 2: How to create a Channel Split in Artist.
The setup is the same as for the Normal Split (fig. 2), except that each bus has a Dual Pan inserted. The Dual Pan for the left channel has the Input Balance set to <L>, while the Dual Pan for the right channel has the Input Balance set to < R>. I recommend the -6dB Linear Pan law so that if you pan either of the buses, the level remains constant as you pan from left to right.
Frequency Split
This is tough to duplicate, because the Splitter can split incoming audio into five frequency bands. If other DAWs don’t do it, we can’t expect Artist to do it. But, we can do a three-way, tri-amped split into low, mid, and high frequencies (fig. 3).
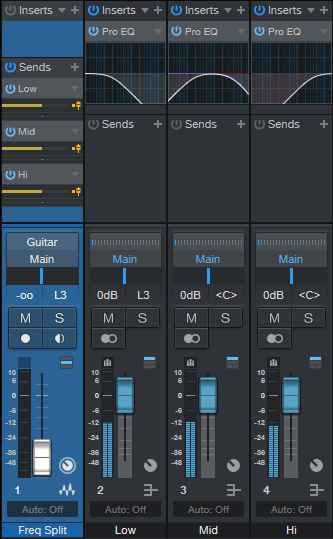
Figure 3: Tri-Amp Frequency Split.
This split is like the Normal Split, except that there are three buses and pre-fader sends instead of two, and each bus has a Pro EQ2 inserted. Each EQ covers its own part of the frequency spectrum—low, mid, and high (fig. 4). Using 6 dB/octave slopes doesn’t provide as much separation between frequency ranges as steeper slopes, but the gentler slopes are necessary to make sure the frequency response is flat when you mix the three channels together.

Figure 4: (Top to bottom) low, mid, and high curves.
The only filter sections we need to use are High Cut and Low Cut—you can ignore everything else. Fig. 5 shows the settings. All bands have 6 dB/octave slopes.
Enable the Low band’s Pro EQ2 HC (High Cut) filter, and choose 200 Hz for frequency. Enable the Mid band’s Pro EQ2 LC (Low Cut) filter, and set it to 200 Hz; also enable the HC filter, and set it to 4.00 kHz. Finally, enable the High band’s Pro EQ2 LC filter, and set it to 4.00 kHz. These frequencies are a good starting point, but you may want to modify the split frequencies for different types of audio sources. Just make sure that the low band HC frequency is the same as the mid band’s LC frequency, and the Mid band’s HC frequency is the same as Hi band’s LC frequency.
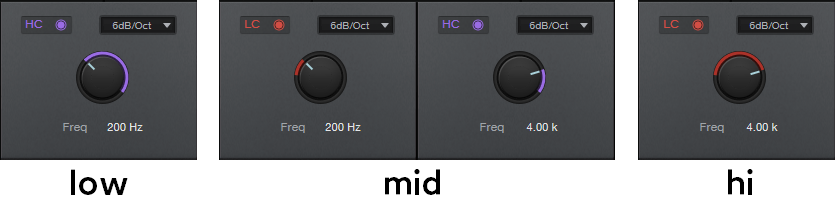
Figure 5: Filter control settings.
Granted, setting up these splits takes more effort than dragging a Splitter plug-in into a channel, but the result is the same: cool parallel processing options.