Transient Shaper FX Chain
![]()
As you can probably tell, I’m a fan of FX Chains—they satisfy my inner DIY impulse to put things together, and result in some cool, useful, new processor I didn’t have before. For this Friday’s tip, let’s put together a Transient Shaper designed specifically for drums and percussion. It can emphasize the attack, the post-attack section (called “Girth” in the FX Chain), or both, as well as mix any blend of them. Of course, there’s a download link for the multipreset—but first, let’s listen to what transient shaping can do.
The first two measures are the straight Crowish Acoustic Bridge 2 w. Fill drum loop from Studio One’s sound library. The next two measures add Attack shaping, the next two add Girth only, and the final two measures combine Attack and Girth, with 1 dB of limiting. All examples are normalized to the same peak level.
How it Works
Fig. 1 shows the block diagram. Mixtool 3 adjusts the input level, because when feeding any dynamics processors, you need to find the sweet spot where the processors act as expected. In this case, you want the input level to provide a signal that uses up most of the headroom.
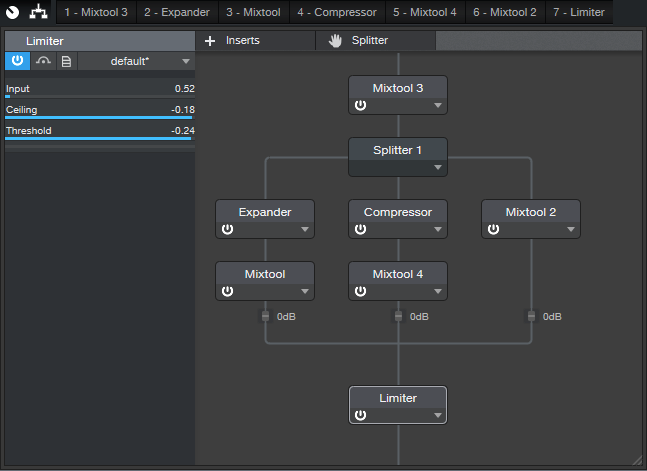
Figure 1: Block diagram for the Transient Shaper FX Chain.
The incoming audio splits into three paths. The left path is an expander, set up to provide upward expansion. This is what emphasizes the attack. The Mixtool adjusts the path’s level.
The middle path is a compressor, set for the shortest attack time possible to reduce any existing attack to a minimum. Some compression brings up the post-attack part of the audio. Mixtool 4 adjusts this path’s level.
The right-most path sets the dry signal’s level. This is an important parameter, because you can take out the dry signal and be left with only what’s contributed by the Attack and Girth paths, or use them to enhance the dry sound.
The Macro Controls
It takes a little effort to get familiar with the controls. The Attack shaper is the main point of this FX Chain, so to acquaint yourself with what the Attack parameters do, load up a drum loop of your choice, and then do the following.

Figure 2: Default control settings for the Transient Shaper FX Chain.
- Turn Girth, Dry, and Limiting down all the way.
- Turn off all switches except Attack Enable.
- If the drum loop doesn’t use up the available headroom, normalize it, or turn up the input control.
- Turn the three attack-related controls up about 2/3 of the way. Vary Attack Width; turning it clockwise shortens the attack transient.
- Set Attack Width to around 1:4.5. Now, vary the Attack Amount. Turning it counter-clockwise raises the level below the attack. This provides a smoother transition if the enhanced attacks sound too isolated.
- Turn up the Dry control about 2/3 of the way. Mix in the desired amount of attack with the Attack Level control.
- Next, disable Attack, enable Girth, and vary the Girth control to find out how it affects the sound. As with Attack, you can vary the proportion of the Girth and Dry sounds.
- The Inv Phase button inverts the Dry path phase. It’s not something you’d normally enable, unless you’re in search of bizarre special effects…but you’re a creative bunch, so I figured I might as well put it in.
- If you want to perk up those drums even further, go ahead and slam the limiter.
One final comment: It’s easy to go overboard with transient shaping, but after the novelty wears off, you’ll find that even a little bit of enhanced attack can make a track sound more lively. And while we’ve covered this only with drums, it also works for bass attacks, plucked strings, and strange percussion instruments…basically if something has an attack, this FX Chain can shape it.
Download the preset here!