Use the Listen Bus for Dim Solo
Any time you want to do detailed edits in context with a mix, Dim Solo is your friend. When you solo a track with a Dim Solo function enabled, the non-soloed tracks aren’t muted but instead play back at a lower (dimmed) level. I find this essential for many workflows, particularly comping. When you use the Listen Tool to audition various comps, normally you don’t hear them along with the rest of the mix. So one of the comps might sound wonderful, but when you play it back in context, find the timing was off. Dim Solo provides an immediate reality check.
I wanted this function so much in Studio One that my second “Friday Tip” blog post was about how to kludge a Dim Solo function by adding a Sub bus. But kludges are no longer needed, because V5’s new Listen Bus provides an efficient, flexible Dim Solo solution.
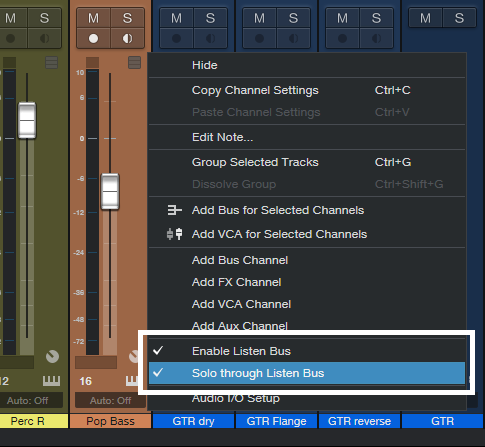
This technique works best with interfaces that have a mixer applet (like Universal Control) with virtual outs. I’ve tested this with the 1824c and Studio 192; just make sure you don’t bypass the Universal Control mixer. Start by right-clicking in a channel, enabling the Listen Bus, and checking Solo through Listen Bus (Fig. 1).
Now go to the Audio I/O setup and choose the Listen Bus output (Fig. 2). Although the line outs can feed physical outs, with the Universal Control mixer they can also feed virtual outs. The Main bus can feed the usual 1+2 outs, while the Listen Bus feeds the 3+4 outs.
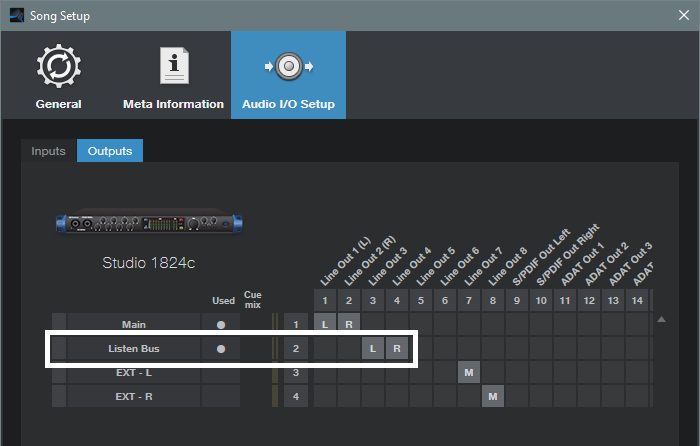
Figure 2: Audio I/O Setup for the 1824c or Studio 192.
As another example, Universal Audio’s Apollo Twin USB also creates virtual outs. Fig. 3 shows the Audio I/O setup.
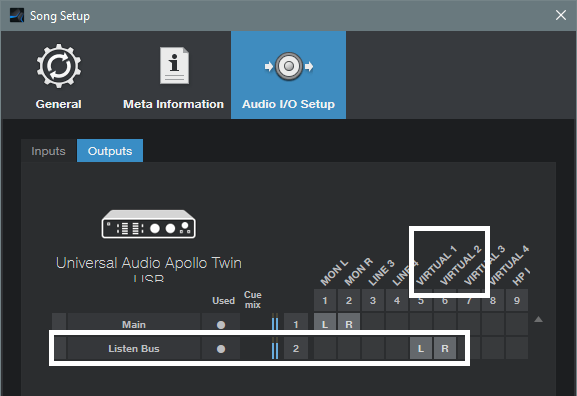
Figure 3: In Universal Audio’s Apollo Twin USB, the Listen Bus goes to a set of virtual outputs.
With the Listen Bus assigned to a virtual output, you can hear both the Main and Listen buses within your usual monitoring system. If virtual outputs aren’t available, then the Listen Bus needs to go to a hardware output, which requires a way to monitor the Listen Bus audio. For example, the Listen Bus could go to a Monitor Station input.
Now it’s time for the Dim part. Insert a Mixtool in your Main Bus, and lower the Gain to whatever creates an ideal balance for listening to the soloed track compared to the rest of the mix (Fig. 4).
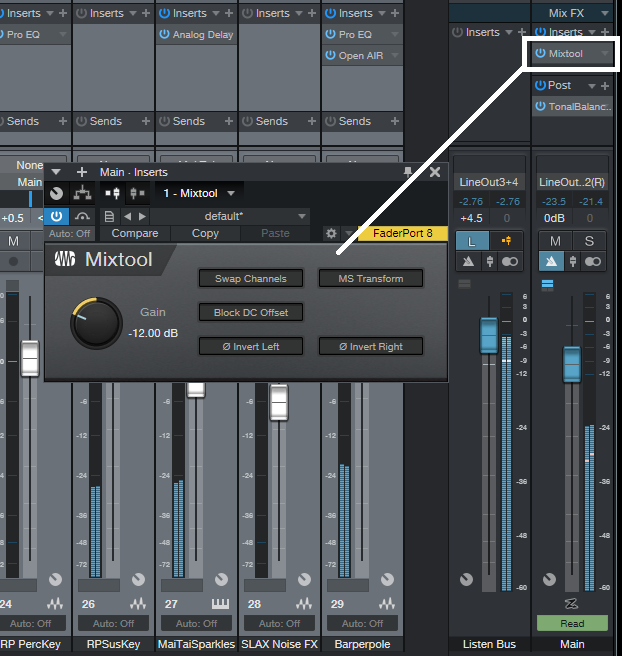
Figure 4: The Mixtool controls the Main bus level.
I usually choose about -12 dB of attenuation. To Dim the mix, enable the Mixtool. Bypass it to return the mix to its normal level. (Sometimes I even insert two Mixtools, one set to -6 dB and the other to -12 dB.)
So now we have the option of a continuously variable amount of dimming, down to -24 dB. But, Studio One V5 has a couple other tricks up its sleeve.
The Listen bus has a pre-/post-fader option. The soloed track will still appear in the dimmed mix if its fader is up, but this probably won’t matter because the Listen Bus level will be louder. However if you do need to excise the soloed sound from the dimmed mix, pull down the fader on the channel you’re soloing, and set the Listen Bus pre/post fader switch to pre-fader.
Another small but useful feature is that if there’s a fadeout on the Main bus, the Listen bus isn’t affected by the fade, so it’s easy to hear your edits even as a song fades out. Also, if you want to hear the track feeding the Listen Bus in isolation, no problem—just mute the Main bus.
Dim Solo improves workflow considerably when comping and editing, and thanks to the Listen Bus, it’s now easy to do.