Tag Archives: #TeamPreSonus
10 Not-Hitting-Drums ATOM Tips
It’s easy to assume ATOM is an MPC-type pad controller, and ignore it if that’s not of interest. But ATOM is tightly integrated with Studio One for navigation, editing, and more, and also works with third-party software—which even applies to third-party software (like virtual instruments) running inside Studio One.
1. The Auxiliary Keyswitch Keyboard
The problem: you have a 4-octave keyboard, but you’re using a program like SampleTank or Kontakt that uses lower-octave keys for keyswitching. The solution: Add ATOM as an auxiliary keyboard for triggering keyswitches (Fig. 1).

Figure 1: IK SampleTank’s lower keys trigger loops (as identified with arrows), while the upper keys play one-shots. You can set up ATOM to play the lower, keyswitched notes, and play the one-shots from your main keyboard.
1. Select the Instrument track and set it to All Inputs, so it receives notes from the main keyboard and from ATOM.
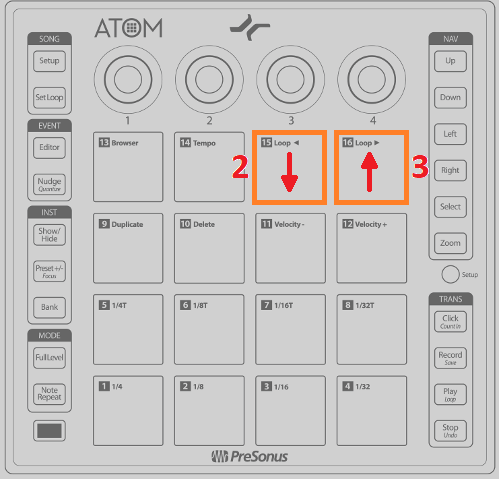
Figure 2: Use Pads 15 and 16 to cover the desired keyboard range for keyswitching.
2. Tap Pad 15 to transpose down an octave (Fig. 2). Each tap transposes down another octave. To keep track of how far down you’ve transposed, Pad 15 is orange at the default octave, tan = -1 octave, purple = -2 octaves, and red = -3 octaves.
3. Tap Pad 16 to transpose up an octave. Each tap transposes up another octave.
Considerate Bonus Feature: ATOM remembers the octave settings for different instrument tracks, even if they’re not instruments bundled with Studio One.
2. “Feel Factor” Changes
Leading or lagging rhythms by only a few milliseconds can make a major difference in the “feel,” the mix, and therefore, the music’s emotional impact (for more about the “feel factor,” please check out this article on my educational site, craiganderton.org). But how can you do that with Studio One, whose highest resolution goes to 64th notes? It’s easy with ATOM—and frankly, this feature alone justifies ATOM to me. The following works with both note and audio data.
1. In Studio One, turn off snap.
2. Select the notes (or audio Events) whose timing you want to shift.

Figure 3: You can lead or lag events in 1 millisecond increments with ATOM.
3. On ATOM, press and hold Nudge (Fig. 3).
4. Tap the Left button to move the selected notes or Events ahead (lead) by 1 ms, and the Right button to move the selected notes late (lag) by 1 ms (Fig. 4).
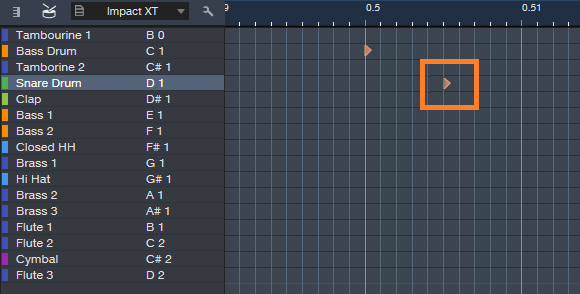
Figure 4: The timeline shows seconds. The note outlined in orange has been nudged 5 ms later.
This is huge. Try moving percussion a few milliseconds ahead of the beat to give a more “urgent” feel, or a snare a few milliseconds after the beat for a “bigger” sound.
3. Don’t Panic!
Stuck notes? No problem—see Fig. 5. (Note: the upper left Setup button needs to be off.)

Figure 5: It’s easy to nuke stuck notes with ATOM.
1. Press and hold the Quick Setup button, and select the track with the stuck notes.
2. Tap Pad 4 to send an All Notes Off command.
4. Tap Your Tempo
This is one of my favorite features for songwriting, because it’s a lot easier to tap a tempo (Fig. 6) than tweak it when you have a song idea.
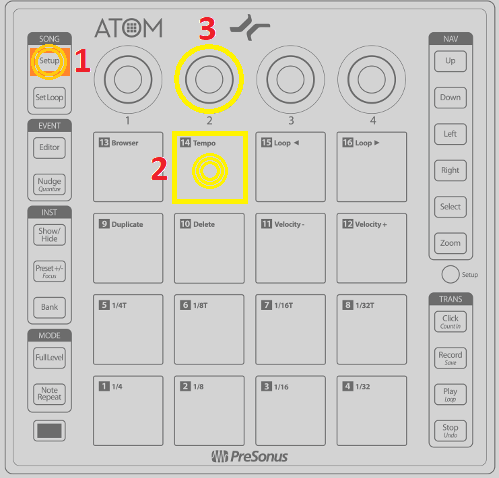
Figure 6: It’s easy to capture a song’s “feel” when songwriting by using tap tempo.
1. Tap the Song Setup button in the upper left.
2. Tap Pad 2 at the desired song tempo; this sets the tempo in the control bar.
3. To fine-tune the tempo, turn Knob 2.
5. The Hands-On Instrument Browser
You can call up instruments and presets quickly with ATOM (Fig. 7).
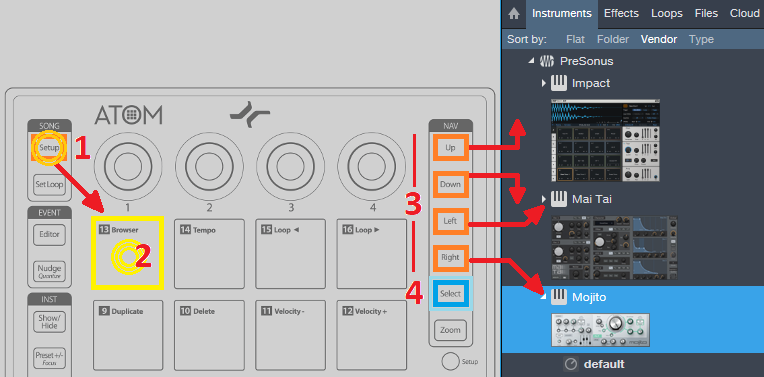
Figure 7: ATOM plays well with the Browser.
1. Press Setup, and it glows orange.
2. Toggle the Browser show/hide by tapping Pad 13 (Browser).
3. When the Browser is open, use the Up and Down buttons to go up and down through the list of instruments and presets. Use the Right button to open a preset list, and the Left button to close the list.
4. When you have the preset or instrument you want, press Select. This creates an Instrument track with the currently selected preset, or the instrument itself if no preset is selected.
6. Wicked Fast Exclusive Solo
There are many times—especially when proofing tracks before mixing–that I want to be able to select tracks quickly, and go into exclusive solo mode (i.e., only that track will be soloed—even other tracks that are soloed will be muted). It’s super fast if the Arrange View or Console has the focus (Fig. 8).
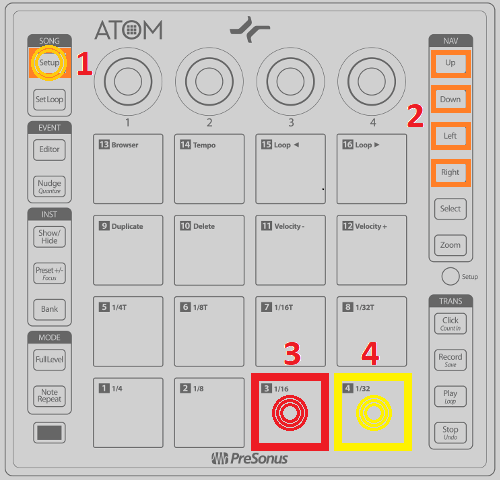
Figure 8: Step through tracks quickly, and “exclusive solo” them, with ATOM.
1. Tap Setup, and it glows orange.
2. Use the Up button or Left button to step up through tracks, and the Down or Right button to step down through tracks. (That’s kinda cool that either one Up/Down or Left/Right works, because it’s natural to use Up/Down in the Arrange view, and Left/Right on the Console).
3. Tap Pad 3 to mute the selected track.
4. Tap Pad 4 to solo the selected track, or Alt+Pad 4 for exclusive solo.
7. Control FX Chain Macro Knobs

Figure 9: Want hands-on control over the various FX Chains I’ve presented in these Friday Tips? ATOM can do it.
This is an easy one. Call up an FX Chain. Move the ATOM knob you want to assign to a Macro control. Right click on the Macro control. Assign it to the ATOM knob (Fig. 9).
8. Faking Studio One as a Third-Party Application
ATOM is happiest when playing with Studio One, because of the tight integration. But I still use Cakewalk’s Rapture Pro in a lot of tracks; I sampled a ton of Gibson basses, and made what I think are some really cool instruments with them. Unfortunately, in theory you can’t use ATOM’s aftertouch or knobs as a generic control surface when running in Studio One…but hey, we laugh at theory around here! You can, by faking Studio One into not recognizing ATOM as ATOM.
1. Go to Studio One > Options > External Devices, and remove ATOM.
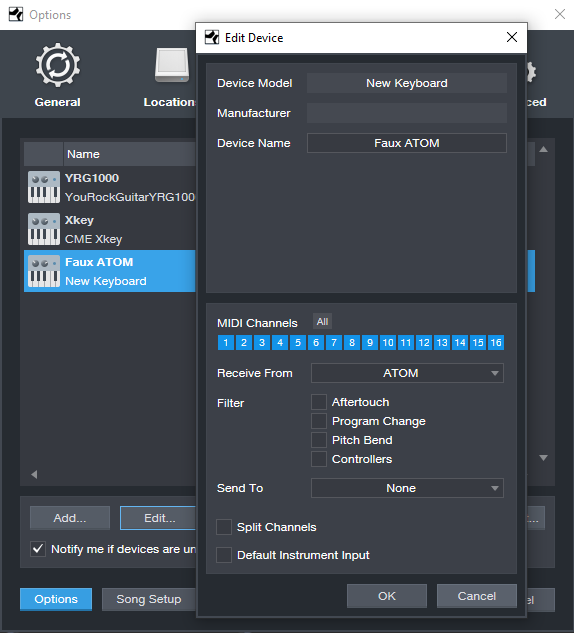
Figure 10: How to fool ATOM into thinking Studio One is a third-party application.
2. Click Add, and choose New Keyboard (I named it Faux ATOM; see Fig. 10). You don’t need to Send To anything. ATOM’s status light at the top will glow green to indicate ATOM isn’t under Studio One’s control.
3. If your instrument has MIDI learn, assign the four controls or aftertouch however you want, and record as you would any automation from a control surface (Fig. 11).
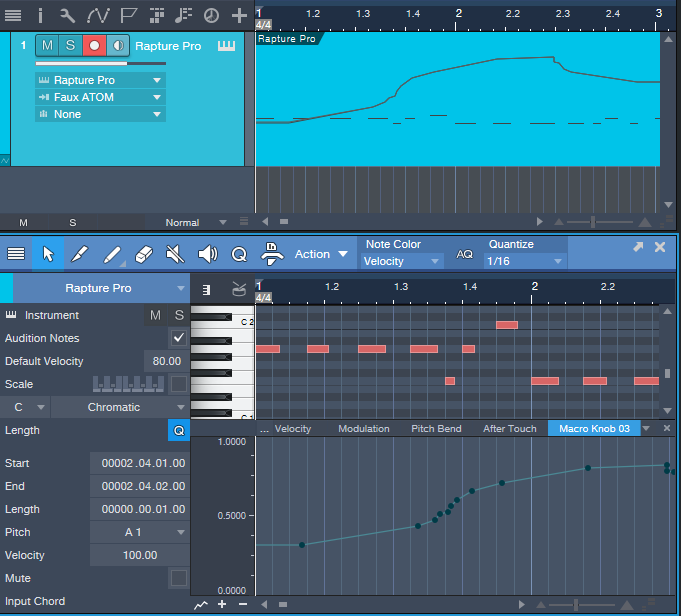
Figure 11: The screen shot shows the results of recording ATOM’s Macro Knob 3 as a control source for a third-party synthesizer.
Don’t worry, you haven’t lost ATOM. Go Studio One > Options > External Devices, and remove Faux ATOM. Click on Reconnect; Studio One finds ATOM, and lists it as an external device. Another option is to close and re-open Studio One (ATOM gets added automatically).
9. Cool Event Editor Stuff
The documentation seems to imply that you can do cool event editor things only with the Instrument track, but that’s not quite true—you can do plenty with audio tracks as well.
1. Press the Editor button (in the left side, under Event). It doesn’t matter if Song Setup is on, because if it is, hitting Editor turns it off. The Edit view appears.
2. To hide the Edit view, hold Shift and tap Editor.
While in the Editor (or with audio tracks, the Arrange view):
10. The More Ways to Undo, the Better
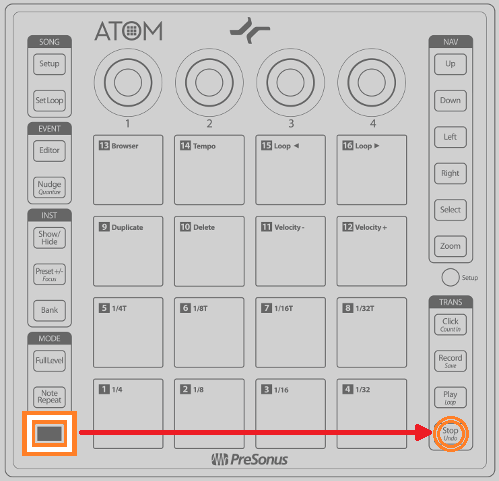
Figure 12: No one will ever know you made that horrible mistake if you undo.
Hold Shift and tap Undo (Fig. 12) to undo your last mistake…because there are never enough ways to undo!
PreSonus Fam Friday with Perry Tee!
Our Artist & Influencer Relations Manager, Perry Tee (and all around coolest guy in the world) is up for PreSonus Fam Friday!
How long have you worked for PreSonus?
I joined the company in 2012.
What’s your favorite thing about your job? Why did you choose to work here?
Being able to develop meaningful relationships with influential and creatively successful people to showcase real-world use cases of our product line in action; ultimately bringing humans together from different backgrounds in life who share a common love of expressing themselves through sound and vision.
So I moved out to Louisiana from California to get away for a bit; a sabbatical from the L.A. hustle, if you will. Being the birthplace of Jazz, New Orleans to this day still has a vibrant live music scene compared to other cities and I had enough $$$ saved up to live for at least 6 months. So I went from one L.A. to another LA.
For those who aren’t aware, PreSonus is based an hour northwest of New Orleans and they were hiring so I applied, got hired and ended up moving to Baton Rouge. Even though I no longer live in Louisiana, I’m still very lucky to be working daily with such amazing talented people. No other company is quite like us in terms of camaraderie and dedication to making things happen, world-wide.
What instruments do you play?
Keyboard, guitar, drums, trumpet, sax and flute. Studio One is the DAW environment is where I record and produce tangible recorded audio assets for others to use. But playing *live* with other musicians has always been my greatest strength and main love, in terms of collaborative creative events.
Of all of them, what’s your favorite?
They’re all enjoyable to play and sonically express my emotions with. It just depends on the musical framework I’m in at the moment. But it’s got to be executed live or not at all for me. And unintended human mistakes are typically the moments that makes music most interesting to me.
What is it that you love about “live” performance?
It’s fun, brings people together and a very instantaneous source of joy. When everyone is in sync with each other, it’s magical. I believe it showcases positivity in humanity.
Who has influenced your own playing or approach?
Everyone I’ve played music with onstage or worked alongside in recording studio sessions.
Everyone has a side gig, what’s yours? OR when you’re not at PreSonus, what are you up to?
Recording instrumental tracks for singers, producers and working on sound design. Teaching applied music theory, ear training plus improvisation to students young and old. Diving deeper into modular synthesis. Updating my coding skills. But most of all, being the best Dad possible.
Choose a movie title for the story of your life.
“Interstellar”. I constantly travel between different ‘worlds’ and can access experiences from all points in the timeline of my life’s stored memory banks to find viable solutions and resolving issues effectively. Never journeyed through a wormhole, though.
What’s your go-to Karaoke song?
“Regulate Ft. Nate Dogg” by Warren G.
Got any tips for working with Studio One?
Yes! Check out my Studio One “1-Minute Tip” videos:
Tell us about a successful event you worked with PreSonus products. InfoComm, NAMM, or an Install somewhere.
Every January, we congregate for a week in Anaheim to demo our Products and field questions like a tightly-knit family at The NAMM Show. Stop by and visit us at Booth #18801 in the North Building.

What are you currently working on at PreSonus? What’s next for you?
Finding more relevant product/use case resonant relationships for the company. We’re really interested in content creators and livestreamers with strong online audience engagement in addition to Artists, Producers, FOH Engineers, Studio Mix Engineers, and Mastering Engineers. Continuing to develop my Studio One chops as there’s always new improvements to our DAW happening regularly from user base input. Helping to make our products better every day for you all to enjoy and benefit from.
What’s the strangest talent you have?
I used to be able to perform the Doctor Who theme (lead synth melody line) using a cello bow on the edge of a standard hand saw; all while having gulped an entire packet of grape-flavored Pop Rocks and not letting the chaos inside my mouth affect my musical performance. That talent came to an end when all the bow hair frayed out… GAME OVER.
Anything else you want to share?
“No amount of money ever bought a second of time” (Howard Stark, The Avengers Endgame) really resonates the older I get and I hope that others will take that quote to heart too, as we make decisions that will inevitably shape the reality of what future generations will inherit from us.
Basically, choose wisely what you do with every moment of your lifetime and don’t take anything for granted!
Connect with PERRY TEE
PreSonus Fam Friday with Mike Cole!

I started on May 29, 2018. So 29,203,200 seconds.
I’m a Software Engineer.
What’s your favorite thing about your job? Why did you choose to work here?
It was destiny that I came to work here. I’m from Baton Rouge, first of all, so it’s awesome to be home. I started playing music when I was 13 or so and my dad bought me a 4 track tape recorder to record myself with after watching me play with our answering machine for hours. I wanted to post my recordings on the internet, so I figured out that you could plug the headphone jack of the tape recorder into the mic input of a computer, and then I downloaded a little program called “Kristal” to record with. Turns out, that program eventually became Studio One. This experience was the gateway to a 10-year stint as a sound guy with various production companies, and eventually a degree in computer engineering. PreSonus sponsored my senior design project. I was thrilled when I got an email from Jim Odom after graduating. It really feels like I’ve finally found a permanent place in the world. Never been around so many people who will nerd out on audio like me, and I love it!
“UFO dreams: The Man Who Wears Alien Shirts”
What was the first 8 track, cassette, CD or digital download you purchased?
In 2001, I bought P.O.D’s “Satellite” because I was a youth of the nation at that particular time.
Who’s your go-to band or artist when you can’t decide on something to listen to?
I’m a big fan of Ice JJ Fish. He’s really pushing boundaries.
I always do “Last Resort” by Papa Roach. It’s a crowd pleaser.
Everyone has a side gig, what’s yours? OR when you’re not at PreSonus, what are you up to?
I’ve been a sound guy for the past decade or so, and I also write and play music. I’m between bands at the moment if anyone is looking for someone to jam.
Drums, bass, guitar, vocals, and am terrible at keys and brass.
The amount of I/O you can get with the StudioLive 64S for this price point is truly remarkable. I think it is an incredible value and has the potential to be very disruptive.
Why did you choose this as your favorite?
The StudioLive 64S was the first big release I had a significant role in here at PreSonus. I’m proud of the work we did!
Got any tips for working with the StudioLive 64S?
The user layer is probably the best feature of the console. Use it!
Getting my design feet wet on secret projects (mwahaha) and also helping to refine some important engineering processes like automated product testing and other things most people would find boring.
I am able to pogo stick with no hands while making up jingles for local businesses.
Yeah, I just want to say that knowledge is knowing that a tomato is a fruit, but wisdom is knowing not to put it in a fruit salad.
Friday Tip: MIDI Guitar Setup with Studio One
I was never a big fan of MIDI guitar, but that changed when I discovered two guitar-like controllers—the YRG1000 You Rock Guitar and Zivix Jamstik. Admittedly, the YRG1000 looks like it escaped from Guitar Hero to seek a better life, but even my guitar-playing “tubes and Telecasters forever!” compatriots are shocked by how well it works. And Jamstik, although it started as a learn-to-play guitar product for the Mac, can also serve as a MIDI guitar controller. Either one has more consistent tracking than MIDI guitar retrofits, and no detectable latency.
The tradeoff is that they’re not actual guitars, which is why they track well. So, think of them as alternate controllers that take advantage of your guitar-playing muscle memory. If you want a true guitar feel, with attributes like actual string-bending, there are MIDI retrofits like Fishman’s clever TriplePlay, and Roland’s GR-55 guitar synthesizer.
In any case, you’ll want to set up your MIDI guitar for best results in Studio One—here’s how.
Poly vs. Mono Mode
MIDI guitars usually offer Poly or Mono mode operation. With Poly mode, all data played on all strings appears over one MIDI channel. With Mono mode, each string generates data over its own channel—typically channel 1 for the high E, channel 2 for B, channel 3 for G, and so on. Mono mode’s main advantage is you can bend notes on individual strings and not bend other strings. The main advantage of Poly mode is you need only one sound generator instead of a multi-timbral instrument, or a stack of six synths.
In terms of playing, Poly mode works fine for pads and rhythm guitar, while Mono mode is best for solos, or when you want different strings to trigger different sounds (e.g., the bottom two strings trigger bass synths, and the upper four a synth pad). Here’s how to set up for both options in Studio One.
- To add your MIDI guitar controller, choose Studio One > Options > External Devices tab, and then click Add…

Figure 1: Check “Split Channels” if you plan to use a MIDI guitar in mono mode.
- To use your guitar in Mono mode, check Split Channels and make sure All MIDI channels are selected (Fig. 1). This lets you choose individual MIDI channels as Instrument track inputs.
- For Poly mode, you can follow the same procedure as Mono mode but then you may need to select the desired MIDI channel for an Instrument track (although usually the default works anyway). If you’re sure you’re going to be using only Poly mode, don’t check Split Channels, and choose the MIDI channel over which the instrument transmits.
Note that you can change these settings any time in the Options > External Devices dialog box by selecting your controller and choosing Edit.
Choose Your Channels
For Poly mode, you probably won’t have to do anything—just start playing. With Mono mode, you’ll need to use a multitimbral synth like SampleTank or Kontakt, or six individual synths. For example, suppose you want to use Mai Tai. Create a Mai Tai Instrument track, choose your MIDI controller, and then choose one of the six MIDI channels (Fig. 2). If Split Channels wasn’t selected, you won’t see an option to choose the MIDI channel.
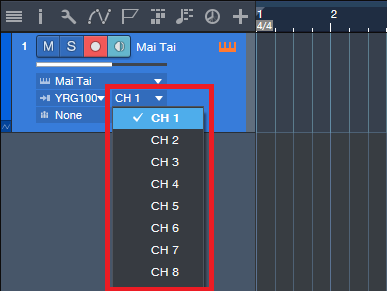
Figure 2: If you chose Split Channels when you added your controller, you’ll be able to assign your instrument’s MIDI input to a particular MIDI channel.
Next, after choosing the desired Mai Tai sound, duplicate the Instrument track five more times, and choose the correct MIDI channel for each string. I like to Group the tracks because this simplifies removing layers, turning off record enable, and quantizing. Now record-enable all tracks, and start recording. Fig. 3 shows a recorded Mono guitar part—note how each string’s notes are in their own channel.
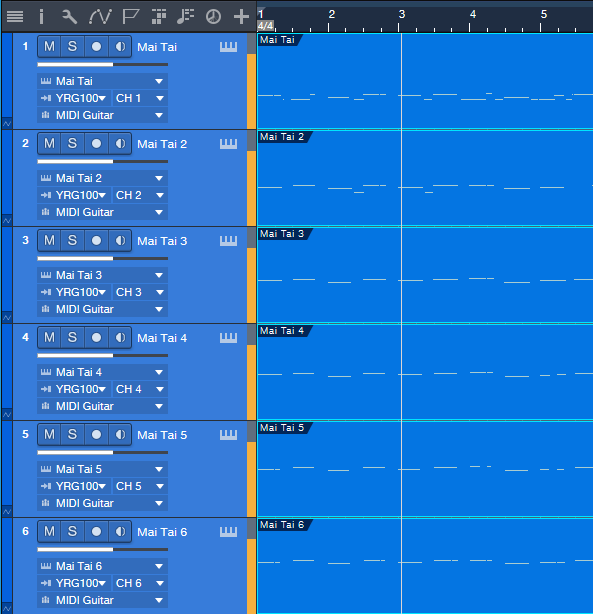
Figure 3: A MIDI guitar part that was recorded in Mono mode is playing back each string’s notes through its own Mai Tai synthesizer.
To close out, here are three more MIDI guitar tips.
- In Mono mode with Mai Tai (or whatever synth you use), set the number of Voices to 1 for two reasons. First, this is how a real guitar works—you can play only one note at a time on a string. Second, this will often improve tracking in MIDI guitars that are picky about your picking.
- Use a synth’s Legato mode, if available. This will prevent re-triggering on each note when sliding up and down the neck, or doing hammer-ons.
- The Edit view is wonderful for Mono mode because you can see what all six strings are playing, while editing only one.
MIDI guitar got a bad rap when it first came out, and not without reason. But the technology continues to improve, dedicated controllers overcome some of the limitations of retrofitting a standard guitar, and if you set up Studio One properly, MIDI guitar can open up voicings that are difficult to obtain with keyboards.
In Mono mode with Mai Tai (or whatever synth you use), set the number of Voices to 1 for two reasons. First, this is how a real guitar works—you can play only one note at a time on a string. Second, this will often improve tracking in MIDI guitars that are picky about your picking.
Friday Tips: The Melodyne Envelope Flanger
This isn’t a joke—there really is an envelope-controlled flanger hidden inside Melodyne Essential that sounds particularly good with drums, but also works well with program material. The flanging is not your basic, boring “whoosh-whoosh-whoosh” LFO-driven flanging, but follows the amplitude envelope of the track being flanged. It’s all done with Melodyne Essential, although of course you can also do this with more advanced Melodyne versions. Here’s how simple it is to do envelope-followed flanging in Studio One.
- Duplicate the track or Event you want to flange.

- Select the copied Event, then type Ctrl+M (or right-click on the Event and choose Edit with Melodyne)
- In Melodyne, under Algorithm, choose Percussive and let Melodyne re-detect the pitches.

- “Select all” in Melodyne so that all the blobs are red, then start playback.
- Click in the “Pitch deviation (in cents) of selected note” field.
- Drag up or down a few cents to introduce flanging. I tend to like dragging down about -14 cents.
As with any flanging effect, you can regulate the mix of the flanged and dry sounds by altering the balance of the two tracks.
Note that altering the Pitch Deviation parameter indicates an offset from the current Pitch Deviation, not an absolute value. For example if you drag down to -10 cents, release the mouse button, and click on the parameter again, the display will show 0 instead of -10. So if you drag up by +4 cents, the pitch deviation will now be at -6 cents, not +4. If you get too lost, just select all the blobs, choose the Percussion algorithm again, and Melodyne will set everything back to 0 cents after re-detecting the blobs.
And of course, I don’t expect you to believe that something this seemingly odd actually works, so check out the audio example. The first part is envelope-flanged drums, and the second part applies envelope flanging to program material from my [shameless plug] Joie de Vivre album. So next time you need envelope-controlled flanging, don’t reach for a stompbox—edit with Melodyne.
Friday Tips: Studio One’s Hybrid Reverb
The previous tip on creating a dual-band reverb generated a fair amount of interest, so let’s do one more reverb-oriented tip before moving on to another topic.
Studio One has three different reverbs—Mixverb, Room Reverb, and OpenAIR—all of which have different attributes and personalities. I particularly like the Room Reverb for its sophisticated early reflections engine, and the OpenAIR’s wide selection of decay impulses (as well as the ability to load custom impulses I’ve made).
Until now, it never occurred to me how easy it is to create a “hybrid” reverb with the best of both worlds: using the Room Reverb solely as an early reflections engine, and the OpenAIR solely for the reverb decay. To review, reverb is a continuum—it starts with silence during the pre-delay phase when the sound first travels to hit a room’s surfaces, then morphs into early reflections as these sounds bounce around and create echoes, and finally, transforms into the reverb decay—the most complex component. Each one of these components affects the sound differently. In Studio One, these components don’t all have to be from the same reverb.
THE EARLY REFLECTIONS ENGINE
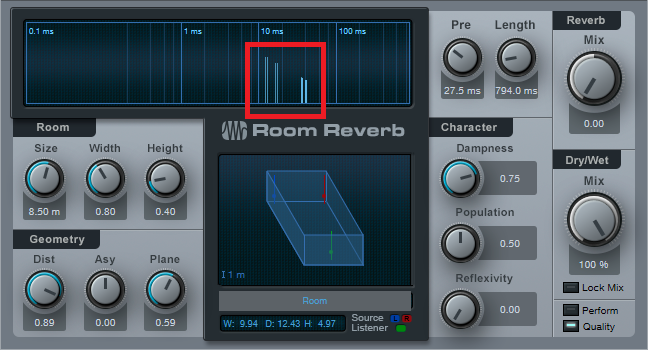
Start by inserting the Room Reverb into an FX Channel, and calling up the Default preset. Then set the Reverb Mix to 0.00 and the Dry/Wet Mix to 100%. The early reflections appear as discrete vertical lines. They’re outlined in red in the screen shot below.
If you haven’t experimented with using the Room Reverb as a reflections engine, before proceeding now would be a good time to use the following evaluation procedure and familiarize yourself with its talents.
- From the Browser, load the loop Crowish Acoustic Chorus 1.wav (Loops > Rock > Drums > Acoustic) into a stereo track. This loop is excellent for showcasing the effects of early reflections.
- Create a pre-fader send from this track to the FX Channel with the Room Reverb, and bring the drum channel fader all the way down for now so you hear only the effects of the Room Reverb.
- Let’s look at the Room parameters. Vary the Size parameter. The bigger the room, the further away the reflections, and the quieter they are.
- Set the Size to around 3.00. Vary Height. Note how at maximum height, the sound is more open; at minimum height, the sound is more constricted. Leave Height around 1.00.
- Now vary Width. With narrower widths, you can really hear that the early reflections are discrete echoes. As you increase width, the reflections blend together more. Leave Width around 2.00.
- The Geometry controls might as well be called the “stand here” controls. Turning up Distance moves you further away from the sound source. Asy varies your position in the left-right direction within the room.
- Plane is a fairly subtle effect. To hear what it does, repeat steps 3 and 4, and then set Size to around 3.00, Dist to 0.10, and Asy to 1.00. Plane spreads the sounds a bit more apart at the maximum setting.
Now that you know how to set up different early reflections sounds, let’s create the other half of our hybrid reverb.
THE REVERB DECAY
To provide the reverb decay, insert the OpenAIR reverb after the Room Reverb. Whenever you call up a new OpenAIR preset, do the following.
- Set ER/LR to 1.00.
- Set Predelay to minimum (-150.00 ms).
- Initially set Envelope Fade-in and Envelope ER/LR-Xover to 0.00 ms.
There are two ways to make a space for the early reflections so that they occur before the reverb tail: set an Envelope Fade-in time, an Envelope ER/LR-Xover time, or both. Because the ER/LR control is set to 1.00 there are no early reflections in the Open AIR preset, so if you set the ER/LR-Xover time to (for example) 25 ms, that basically acts like a 25 ms pre-delay for the reverb decay. This opens up a space for you to hear the early reflections before the reverb decay kicks in. If you prefer a smoother transition into the decay, increase the Envelope Fade-in time, or combine it with some ER/LR-Xover time to create a pre-delay along with a fade-in.
The OpenAIR Mix control sets the balance of the early reflections contributed by the Room Reverb and the longer decay tail contributed by the OpenAIR reverb. Choose 0% for reflections only, 100% for decay only.
…AND BEYOND
There are other advantages of the hybrid reverb approach. In the OpenAIR, you can include its early reflections to supplement the ones contributed by the Room Reverb. When you call up a new preset, instead of setting the ER/LR, Predelay, Envelope Fade-In, and Envelope ER/LR-Xover to the defaults mentioned above, bypass the Room Reverb and set the Open AIR’s early reflections as desired. Then, enable the Room Reverb to add its early reflections, and tweak as necessary.
It does take a little effort to edit your sound to perfection, so save it as an FX Chain and you’ll have it any time you want it.
Friday Tips: Keyswitching Made Easy
As the quest for expressive electronic instruments continues, many virtual instruments incorporate keyswitching to provide different articulations. A keyswitch doesn’t play an actual note, but alters what you’re playing in some manner—for example, Presence’s Viola preset dedicates the lowest five white keys (Fig. 1) to articulations like pizzicato, tremolo, and martelé.
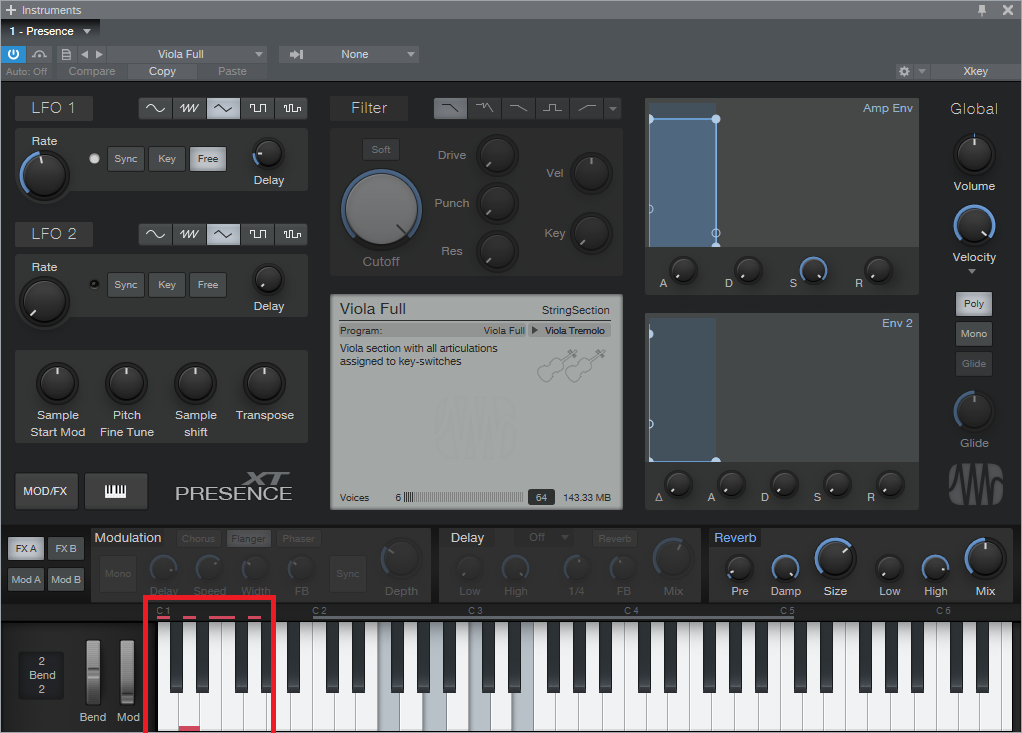
Fig. 1: The five lowest white keys, outlined in red, are keyswitches that provide articulation options. A small red bar along the bottom of the key indicates which keyswitch is active.
This is very helpful—as long as you have a keyboard with enough keys. Articulations typically are on the lowest keys, so if you have a 49-key keyboard (or even a 61-note keyboard) and want to play over its full range (or use something like a two-octave keyboard for mobile applications), the only way to add articulations are as overdubs. Since the point of articulations is to allow for spontaneous expressiveness, this isn’t the best solution. An 88-note keyboard is ideal, but it may not fit in your budget, and it also might not fit physically in your studio.
Fortunately, there’s a convenient alternative: a mini-keyboard like the Korg nanoKEY2 or Akai LPK25. These typically have a street price around $60-$70, so they won’t make too big a dent in your wallet. You really don’t care about the feel or action, because all you want is switches.
Regarding setup, just make sure that both your main keyboard and the mini-keyboard are set up under External Devices—this “just works” because the instrument will listen to whatever controllers are sending in data via USB (note that keyboards with 5-pin DIN MIDI connectors require a way to merge the two outputs into a single data stream, or merging capabilities within the MIDI interface you’re using). You’ll need to drop the mini-keyboard down a few octaves to reach the keyswitch range, but aside from that, you’re covered.
To dedicate a separate track to keyswitching, call up the Add Track menu, specify the desired input, and give it a suitable name (Fig. 2). I find it more convenient not to mix articulation notes in with the musical notes because if I cut, copy, or move a passage of notes, I may accidentally edit an articulation that wasn’t supposed to be edited.
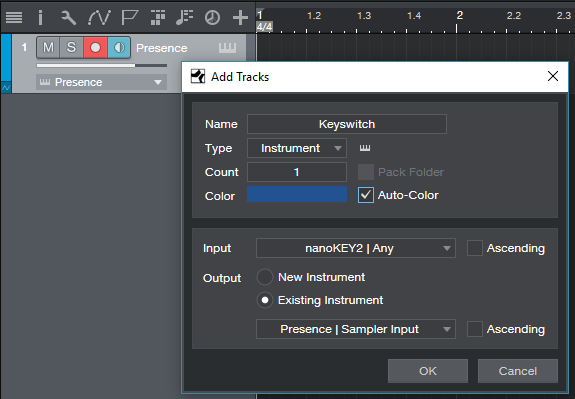
Fig. 2: Use the Add Track menu to create a track that’s dedicated to articulations.
So until you have that 88-note, semi-weighted, hammer-action keyboard you’ve always dreamed about, now you have an easy way take full advantage of Presence’s built-in expressiveness—as well as any other instrument with keyswitching.
Friday Tips: Studio One’s Transient Shaper for Kick and Snare
As with so many aspects of audio, the subject of compression presets polarizes people. The purists say there’s no point in having presets, because every signal is different, and the same compressor settings will sound very different on different sources. On the other hand, software comes with presets, and there are plenty of recording blogs on the web that dispense advice about typical preset settings. So who’s right?
And as with so many aspects of audio, they all are. If a preset works “out of the box,” that’s just plain luck. However, there are certain ranges of settings that work well in many cases for particular types of signals. In any case, the effects of compression are totally dependent on the input signal level anyway—if the threshold is set to -10, then signals that peak at 0 will sound very different compared to signals that peak at -10.
The most effective way to approach compression is to decide what effect you want the compression to accomplish, then adjust the compression settings accordingly. It’s also important to remember that compression isn’t just some monolithic effect that “squashes things.” For example, with kick and snare, compression can act just like a transient/decay shaper due to a drum’s rapid decay.
The usual goal for compressing kick is an even sound, yet one that doesn’t reduce punch. However, you have a great deal of latitude in deciding how to implement that goal.
Figure 1: A starting point for kick (and snare) compression.
The preset in Fig. 1 uses a fairly high ratio, and hard knee, to even out the highest levels. You want the compression to take hold relatively rapidly, but not take away from the punch. The best option is to start with the attack time at 0, and increase it until you hear the initial hit clearly (but don’t go past that point). Because a kick decays fast, release can be fast as well.
For transient shaping, slowing the attack time softens the attack. Raising the ratio increases the sustain somewhat, while making space for the attack (assuming an appropriate attack time). Between the attack and ratio controls, you can pretty much tailor the kick drum’s attack and sustain characteristics, as well as even out the overall sound. A higher threshold is another way to emphasize the attack, by letting the decay occur naturally. Lowering the threshold reduces the level difference between the attack and decay.
Snare responds similarly to kick, however with an acoustic drum kit, the kick is more isolated physically than the snare. As a result, compressing the snare has the potential to emphasize leakage. Fortunately, the snare is often the focus of a drum part. As a result, you can simply compress the snare, and accept that leakage is part of the deal. With individual, multitracked drums (including electronic drums) where leakage is not a problem, it’s still usually the snare and kick that get compression.
With snare, you may want to use a lower ratio (2:1 – 3:1) for a fuller snare sound. Or, increase the ratio to emphasize the attack more. Again, use the attack time to dial in the desired attack characteristics.
With both kick and snare, you’ll usually want a hard knee. However, the knee control is a fantastic way to fine-tune the attack—and once you have that dialed in, you’ll be good to go.
Friday Tips: Rhythmic Reverb Splashes
Summer may be over in the northern hemisphere, but we can still splash around. This is one of those “hiding in plain sight” kind of tips, but it’s pretty cool.
The premise: Sometimes you don’t want reverb all the time, so you kick up the send control to push something like a snare hit into the reverb for a quick reverb “splash” (anyone who’s listened to my music knows this is one of my favorite techniques). The reverb adds a dramatic emphasis to the rhythm, but is short enough that it doesn’t wear out its welcome—listen to the audio example, which demos this technique with Studio One’s Crowish Acoustic Chorus 1 drum loop.
However, although this technique is great with drums, it also works well with rhythm guitar, hand percussion, synths, you name it… even kick works well in some songs. I’m not convinced about bass, but aside from that, this has a lot of uses.
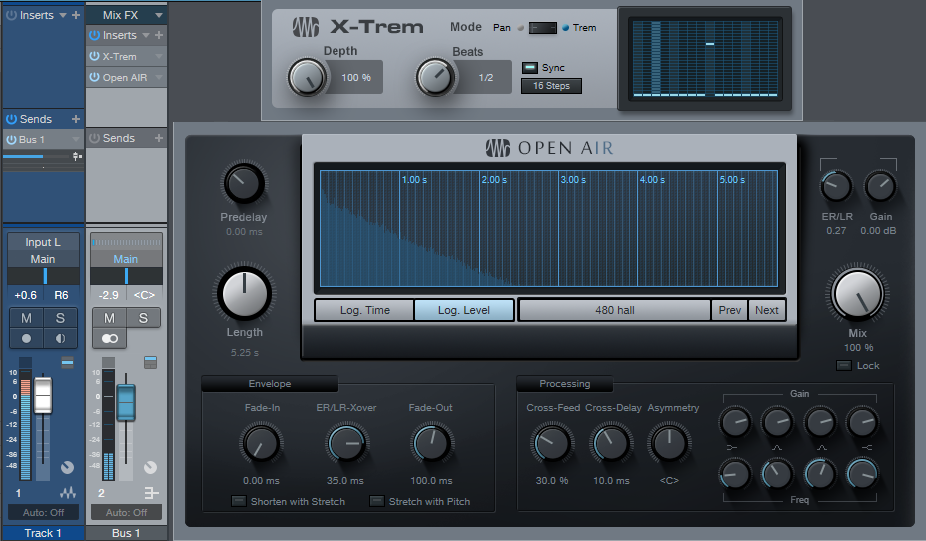
Studio One offers an easy way to produce regular splashes automatically (like on the second and fourth beats of a measure, where an emphasizing element hits). Insert X-Trem before the reverb, select 16 Steps as the “waveform,” click Sync, and choose your rhythm. The screenshot shows Beats set to 1/2 so that the reverb splash happens on 2 and 4, which in the case of the audio example, adds reverb to the snare on 2, and to the closed high-hat on 4.
And that’s pretty much it. Because the reverb is in a bus, set Mix to 100%. The 480 Hall from Halls > Medium Halls is one of my faves for this application, but hey… use whatever ’verb puts a smile on your face.
Friday Tips: What’s a Phase Meter—And Why Should I Care?
I’ve always appreciated Studio One’s analytics—the spectrum analyzer, the dynamic range meter in older versions and the more modern LUFS metering in Studio One 4, the K-Scale meters based on Bob Katz’s research, the strobe tuner, and the ability to stretch the faders in the Mix view when you want to couple high resolution with long fader travel. But I wonder if the Phase Meter and its companion Correlation Meter get the props they deserve, so let’s look at what this combo can do for you.
Phase Meters—Not Just for Mixdowns!
Most people consider a tool like the Phase Meter as being only for checking final mixes. However, one very useful technique is putting it in the master output bus, and soloing one track at a time (remember, you can Alt+click on a track’s Solo button for an “exclusive solo” function). This gives some insights into the phase, level, and stereo spread of individual tracks in a way that’s more revealing than just looking over panpots.
Correlation Meter Basics
In brief, the Correlation meter (the bar graph at the Phase meter’s bottom) indicates a stereo signal’s mono compatibility. This was of crucial importance when mastering for vinyl, because it could indicate if there were out-of-phase audio components in the audio that could possibly cause the stylus to jump out of its groove. These days, it’s largely a stereo world but it’s still important to check for mono compatibility—after all, when listening to speakers, you don’t have perfect stereo separation. You’ll usually monitor correlation in the master bus, but for individual tracks, it can indicate whether (for example) a signal processor is throwing a track’s left and right channels out of phase.
The Correlation meter reading spans the range between -1 (the right and left channels are completely out of phase, with no correlation) and +1 (the right and left channels are identical, and correlate completely). With most mixes, the bar graph will fluctuate between 0 and +1.
Mono Readings
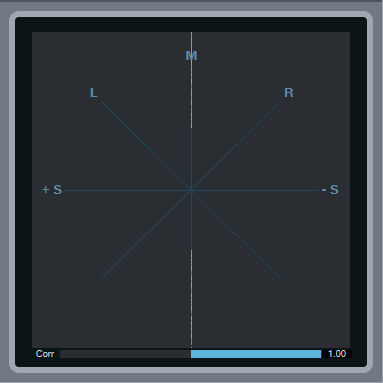
If the Phase meter displays a single vertical line, then the left and right channels are identical, and the track is mono. The Correlation bar graph meter at the bottom confirms this with its reading of 1.00, which means the left and right channels correlate completely—in other words, they aren’t just similar, but identical.
Left and Right Readings
If there’s a single, diagonal line on the L axis, that means that all the signal’s energy is concentrated in the left channel. Similarly if there’s a single, diagonal line on the R axis, then all the signal’s energy is concentrated in the right channel. If you pan a track where the left and right channels are identical (as shown by the Correlation meter displaying 1.00), then the line will move from one channel to the other.
Stereo Signals
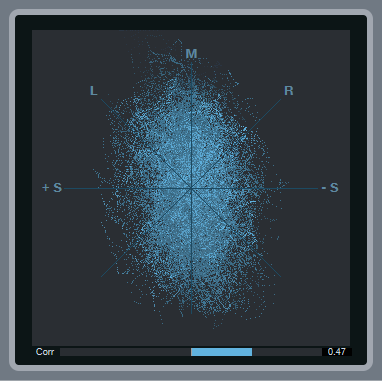
With stereo, you’ll see an excellent visual representation of how much the signal extends into the stereo field. The vertical size indicates the level. As you pan the signal left or right, the stereo field will become narrower around the line that moves from left to right until at one extreme or the other, you’ll see only a diagonal line on the L or R axis.
Note the correlation meter is showing +0.47. This means that there’s about an equal amount of similarity between the left and right channels as there are differences, but nothing is out of phase.
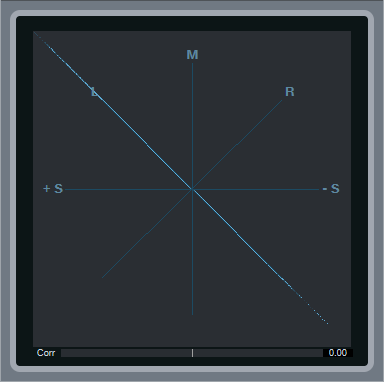
Mid-Side Encoded Audio

With Mid-Side encoded audio, you’ll see amplitude around the L and R axes, as well as along the M axis. Because the L signal is the center and the R signal the sides, you’ll see a lot more level along the L axis. Also, note the Correlation meter setting of 0.00—this means that there’s no similarity between the right and left channels, which is what you’d expect with a Mid-Side encoded signal.
Binaural Pan Signal

Studio One’s Binaural Pan processor widens the stereo image so that there’s much more energy in the right and left sides than in the center; this image shows what happens when you set the widening to maximum. Compare this to the reading for stereo signals—you can see that in this case, the energy extends further out to the right and left. Furthermore, the Correlation meter shows that there are no significant similarities between the right and left channels, which is a result of the Binaural Pan processor being based on Mid-Side processing.
Phase Issues
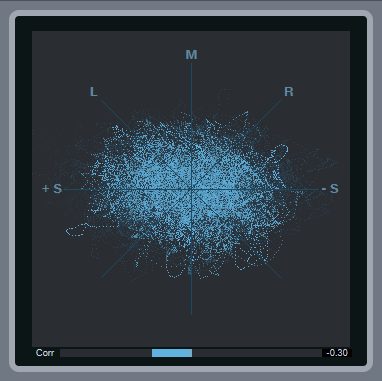
Here, the Correlation meter shows a negative number, which means there are out-of-phase elements within the stereo mix. Occasional negative blips aren’t a problem, but if the Correlation meter spends a substantial amount of time to the left of 0, then there’s a phase issue that will interfere with mono compatibility.