Tag Archives: Studio One
LA Based Singer-Songwriter Talks Studio One: Luke Sital-Singh
Luke Sital-Singh is a British singer-songwriter based in Los Angeles. He sings and writes songs of love, loss, longing, grieving, hope, and basically the whole gamut of the human experience. His voice is haunting and personal… and his lyrics? Profound. With three studio albums, one live album, seven EPs, a ton of singles and a TED Talk in 2018, Luke’s gift is exceptional and rare, and we’re glad he’s sharing it with us.
We connected with Luke on Instagram and immediately became huge fans. What’s made this friendship better is that he’s new to the Studio One family. We took some time to get to know him better and hear how his experience with Studio One has been so far.

Give us some background on yourself. How long have you been making music?
I’m an artist and songwriter from the UK currently based in LA. I released my first EP in 2012 and have been making and releasing music ever since. My latest album came out in 2019, and right now I’m currently working on writing my fourth album whilst trying my hand as a songwriter working with other artists and writers on their projects.
How has the music industry changed since your early days?
In so many ways but I think the most obvious to me day-to-day at the moment is the impact of social media and keeping your online persona updated every second of the day. It’s a horror show and if I were starting out again today it would be enough to send me running for the hills.

Watch Luke’s TED Talk
Describe the first time you wrote a song? Produced it?
Hmm, I don’t remember details but I can imagine it was an easy, pure, uncomplicated. I most probably thought nothing of it. It was almost definitely a rip off of the Goo Goo Dolls (who were my favs at the time). I never had a lightbulb moment in where I knew I was gonna write songs. It was such a gradual process. I just wanted to give it a try, and I kept trying and trying… and I’m still trying today.
Who has been a musical influence in your life?
I would say my eldest brother Matt was the first major musical influence in my life. He introduced me to some cool music when he was a teenager and it was his guitar I stole when I started learning. He was also a bit of a computer geek so he helped me record some early demos and covers in his bedroom. I still have some of those recordings. Truly awful songs! But it got the ball rolling.
Have you ever wanted to give up on music? What keeps you going?
Yes, many times. It’s often overwhelming and ever-changing. So you once you feel like you get a handle on a way forward, the industry changes and you’re left scrambling around again. Also the pressures of always being on. I always feel guilty when I’m not writing or gigging or posting on social media. It’s hard to find downtime without feeling like you’re losing time and opportunities. Unfortunately and fortunately it still pays all my bills and I’ve got no other life skills to fall back on. Also when it’s good. It’s really good.
 So you’re new to Studio One. When did you first hear about Studio One?
I was looking for a change from the DAW I was using. And I started to see a lot more people talking about Studio One online. I found myself watching loads of YouTube videos about the features and reasons why it’s better than the other DAWs. It piqued my interest enough to try a demo and see what I thought of it myself.
What features are you most impressed with?
As a jobbing artist, the price was pretty compelling, for one thing. Perhaps that sounds a little unexciting, but it matters for people like me. I don’t have tons of cash to drop on all this software whenever I want.
I’m still learning Studio One, but I’m finding it a lot faster than what I’ve used before. The drag and drop functionality is so great. In general, and incoming from another DAW, I’m just finding it more intuitive. Studio One is faster and compliments the workflow habits I’ve developed using other software. As I use it more I’m excited to see how my workflow develops around Studio One’s unique functionally. As of now, I’ve only produced a handful of tracks using it and I’m loving it and I’m excited to keep learning.
I also find the chord track functionality brilliant for songwriting and trying out ideas I would never think of on the guitar.
 How easy/difficult was Studio One to learn?
Very easy. I especially found that the ability to map the keyboard shortcuts to match other DAWs made it so much faster to get up and running. Now I’m slowly transitioning to the Studio One keyboard shortcuts.
Where do you go for support?
I haven’t had to yet! Knocks on wood…
Any other thoughts on Studio One or PreSonus gear?
I just think PreSonus is great! For whatever reason, it’s not the sexiest name in music gear but it should be. I feel like I wish I’d tried Studio One years ago. I find I go into sessions with other people these days and tell them I use Studio One and they turn their nose up. When I tell them the kind of functionality it offers, everyone is impressed and surprised. It’s one of those unfortunate things about the music recording culture and I suppose just general culture when it comes to brands etc. People like the cool stuff even if it’s actually no better or perhaps it’s worse than lesser-known brands. I hope more people start to see how great Studio One is and PreSonus in general!
Recent projects? What’s next for you?
I’ve got a new EP dropping in April, a few tracks are available online. Also, I’m going on tour in Europe and the UK in April/May and I’m hoping to play some more shows around the US later this year. Other than that I’m busy writing my next record and working with other artists as a songwriting collaborator.
Check out Luke’s Tour Dates
Follow Luke on Instagram here
Subscribe to Luke’s YouTube here
Stream Luke’s Music
Watch Luke’s TED Talk!
Join the Studio One family today!
Into the Esoteric: Unveiling the World of Oriental Percussion
[This guest blog post comes to us from EarthMoments.]
To journey into the realm of Middle Eastern music is to unveil a tradition that is inextricably linked to religion—a uniting factor that brought together people of several different countries, languages and cultures.
The prevalence of Islam enabled the Arabic influence to spread across areas including Morocco, Iran, Egypt, Turkey and North Africa from the 7th century onward—a cultural influence that also permeated the region’s musical framework. There are various elements that give Arabic music its distinctly otherworldly quality—the music often features quarter tones between notes, the Arabic scale is based on various maqamat or modes, and complex rhythmic patterns play an essential role in the tradition.

In order to connect producers to this region’s exotic spectrum of instruments and rich sonic diversity, EarthMoments has released a bundle that grants them exclusive access to an otherwise elusive musical tradition.
EarthMoments’ Hamsa Vol. 02 – Arabic Percussion showcases several percussion instruments from the Middle East, North Africa, and Arabic musical traditions.
Forming the mainstay of the percussive practice are a variety of hand drums, instruments like the dumbek—a classic goblet-shaped drum traditionally made of ceramic clay and with a deeply resonant sound; the darbuka – also ‘goblet’ shaped, and said to be a modern variation of the dumbek; and the riq—a frame drum with 5 sets of cymbals, usually skinned with goat or fish skin – all of which are included in the bundle.

These traditions are heavily steeped in rhythmic patterns that perhaps at first listen are unusual to the Western-trained ear—complex time signatures that evoke a sense of the mystical realm from which these sounds emerged. In creating the bundle, the EarthMoments team made it a point to go beyond a surface level depiction of the ‘exotic Orient’—and chose instead to showcase both traditional commonly heard rhythms, as well as less conventional, rare folk rhythms that stray far from the mainstream.

Included are rhythms like the Malfuf—a fast pattern that originates in Egypt and Lebanon and is often played as an intro for classical orchestral compositions, specially created for a belly dancer’s entrance and exit;
the Baladi – an urban folk rhythmic style, a derivative of which is the Maqsoum rhythm (the most common rhythm in Arabic belly dance music);
the Shiftateli – a hypnotic rhythm often used for the sensuous movements of the belly dancer such as undulations of the torso, floor work, or when the dancer moves with snake like arms;
and the Karachi – a fast rhythm that originated in Pakistan but is commonly found in modern Egyptian and North African music.
In unlocking this enigmatic world of sound, new doorways open up for the curious producer looking for unusual creative leads – and herein lies great potential to create truly unique, offbeat compositions.
Hamsa Vol. 02 – Arabic Percussion Bundle
The “Table” Filter Response
There are a lot of filter responses: notch, bandpass, peak, allpass, high pass, lowpass, shelf…now let’s add the “table” response to the collection.
Parametric EQs can add peaks and cuts that are broad, narrow, or anywhere in between, but they all have slopes on either side of the filter frequency. The table response described here can boost or cut over a range of frequencies, with a flat response over that range. This avoids having to dedicate several overlapping parametric stages, which still doesn’t achieve quite the same result. The key to this response is combining shelving EQs.
Table Response Boost
To boost a frequency range, set the low- and high-shelf frequencies to the lowest and highest frequencies in the range (Fig. 1). Use the Shelf setting to determine how quickly the boosted section returns to the flat response. I’ve found the 12 and 24 dB settings works well, because the Q control comes into play. This can provide additional modifications to the response, which we’ll cover later. However, for the gentlest effect, 6 dB is valid in many situations as well.
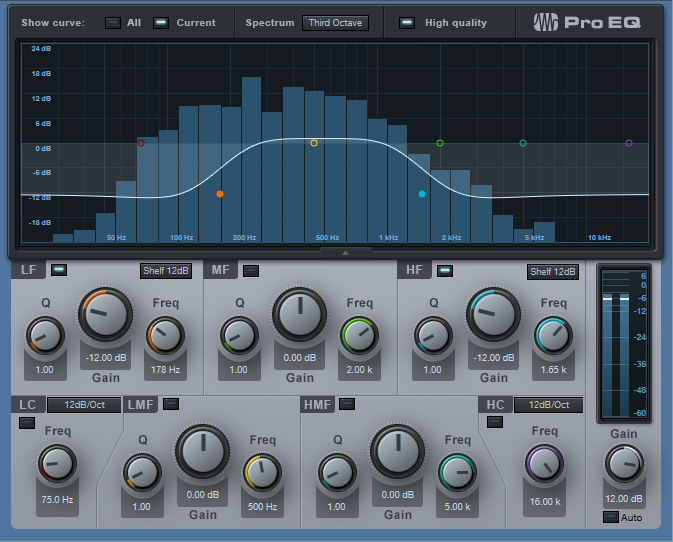
Figure 1: This table response, inserted before a high-distortion amp sim, gives greater sensitivity to midrange notes and also trims the highs and lows for a “tighter” sound.
But we’re not done quite yet. To provide an actual boost, increase the output Gain control for the desired amount of boost. For example, if you want the table response to boost +12 dB, set the high and low shelf Gain settings to -12 dB, and the output Gain control to +12.
Table Response Cut
Similarly to the boost option, set the low- and high-shelf frequencies to the lowest and highest frequencies in the range you want to cut (Fig. 2). Again, use the Shelf setting to determine how quickly the boosted section returns to the flat response; the same general comments about how the shelf slope works with boosting apply here too.
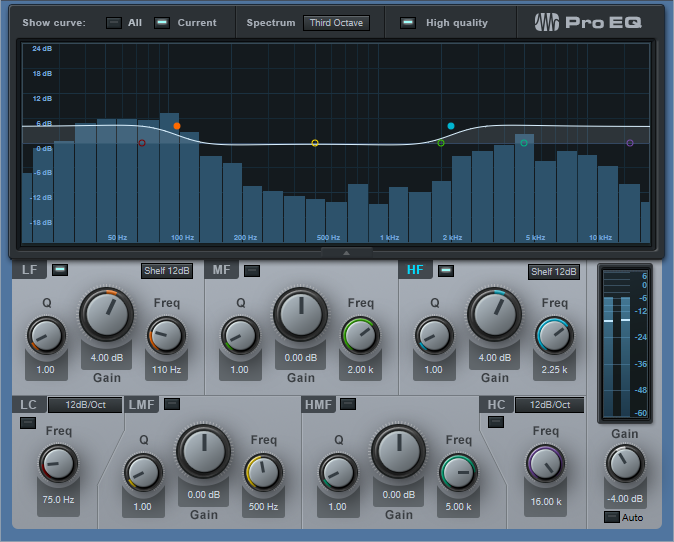
Figure 2: This table response for a drum loop cuts back on the midrange a bit to help emphasize the kick and the snap/sizzle of the share and high-hats; it also reduces any “midrange mud,” and makes space in that frequency range for other instruments.
Cutting requires an equal and opposite approach to what we did for boosting. If you want the table response to cut 4 dB, then boost the shelf controls by +4 dB. Then, set the output gain control to -4 dB. This restores the shelf boosts to flat, and adds the desired amount of cut for the specified frequency range.
Using Q
When cutting with the low shelf or boosting with the high shelf, increasing resonance by turning up the Q control adds a peak just above the shelf’s corner frequency, and a dip below the corner frequency. When boosting with the low shelf or cutting with the high shelf, increasing Q adds a peak just below the shelf’s corner frequency, and a dip above the corner frequency. This emphasizes the extremes of the chosen frequency range, while also increasing the depth of the cuts near the corner frequency. Try adding resonance to the low shelf when using this technique for vocals, particularly narration (Fig. 3).
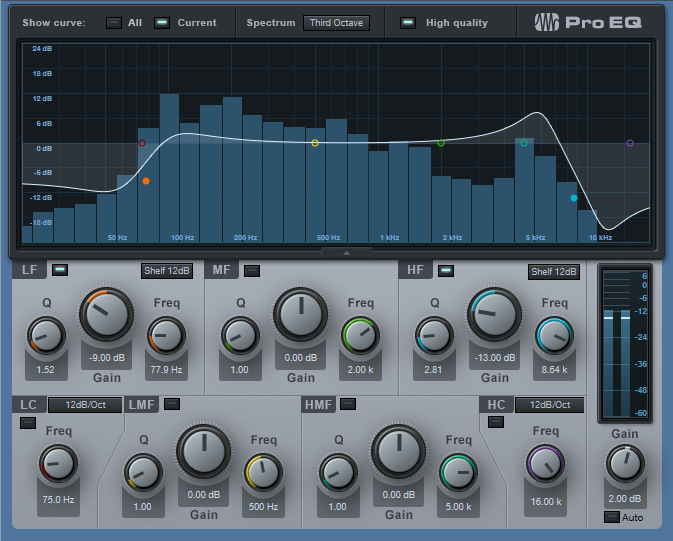
Figure 3: The table response adds a bit of a low-frequency boost (with Q) to give the “late night FM DJ sound,” but also cuts lower frequencies to reduce p-popping. Meanwhile, the high-frequency shelf emphasizes the voice’s articulation, while reducing extraneous highs, hiss, and sibilance.
Of course, the table response doesn’t replace a parametric. But sometimes, it might be just the response you need, and you’ll find it faster to dial in the right frequency range by moving the shelf controls than trying to make multiple stages of peak/boost EQ do what you want.
All About Ampire’s Virtual Miking
A physical guitar amp is more than a box with a speaker—it’s a box with a speaker being picked up by a mic in a room. Both the mic and room contribute to the overall sound. To better emulate the sound of a physical guitar amp, Ampire includes a Mic Edit Controls panel that allows making a variety of virtual mic adjustments.
Ampire doesn’t include room emulation, because you can emulate room sound with several of Studio One’s plug-ins—Room Reverb, Open Air Reverb, Mixverb, and Analog Delay. However, it’s best to avoid adding ambiance until most other tracks have been cut, so that the ambiance achieves the right balance. Too much ambiance can clutter the mix, or hog the stereo field.
The mics you choose, their levels with respect to each other, and whether you add delay can make a major difference in your amp’s sound. So, let’s investigate the Mic Edit Controls panel (Fig. 1).
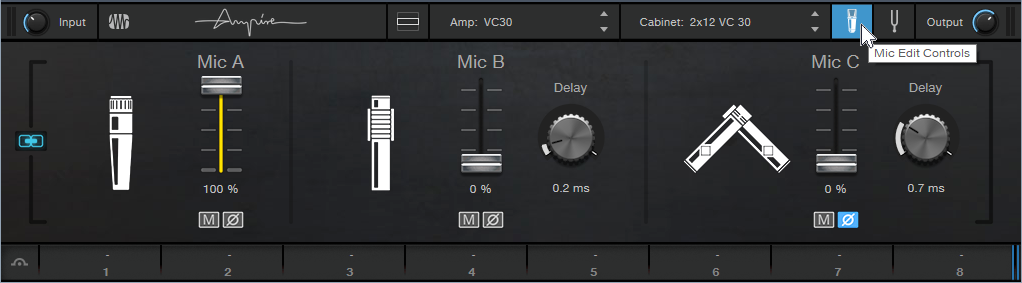
Figure 1: The Mic Edit Controls in Ampire XT.
Choosing the Mic Type
Many guitarists record with their amp cranked to really high levels, to get their “sound.” Dynamic mics are ideal because they can handle high levels, and the inexpensive Shure SM57 is the classic guitar cabinet mic—many engineers choose it even when cost is no object. Although dynamic mics may lack brightness compared to condenser mics (as modeled by Mic C), this doesn’t matter much with amp cabinets, which typically don’t have much energy above 5 kHz or so anyway. Mic A in the Mic Edit Controls panel has the SM57’s sonic character, and will likely be your go-to mic.
Mic B produces the sound associated with ribbon mics, which shows one of Ampire’s benefits: older ribbon mics tended to be fragile—but you can’t blow up a virtual mic. Ribbon mics have an inherently warm midrange. Royer’s R-121 mic is popular for miking cabs, and Mic B models its overall sonic character.
Mic C emulates the PreSonus PM-2 matched pair of condenser microphones. Condenser mics are often too sensitive for close-miking loud amps, but when moved a bit back from the cab, they can give a brighter, more “open” response that handles note attacks well. They’re also commonly used as room mics, which is why these two virtual mics are arranged in an X-Y miking configuration to give a stereo image.
Wait a Minute—Did You Say Stereo?
Guitars are mono signal sources, but taking full advantage of Ampire’s mics, as well as room ambiance plug-ins, requires a stereo signal. To convert the mono guitar into a dual mono signal (i.e., stereo, but with the same audio in the left and right channels), record the guitar with the Channel Mode set to Mono (one circle showing to the right of the Record Input selector). Although this means that any plug-ins will be in mono, that’s acceptable when tracking. After recording the track, change the Channel Mode to stereo (i.e., two circles showing to the right of the Record Input selector), select the event, and bounce it to itself (ctrl+B). Now the mono guitar is dual mono.
Mic Control Applications
Each mic has three controls: level, mute button (which makes it easy to evaluate what a particular mic contributes to the overall sound), and phase switch (the Ø button). Also, Mics B and C have Delay controls.
Often when miking a physical amp with more than one mic, you’ll vary their blend to find the right mix. The Mic Mix Link button toward the extreme left simplifies this process. When enabled, altering one mic’s level adjusts the levels of the other mics oppositely. For example, turning up Mic A turns down Mics B and C, or turning up Mic B turns down Mics A and C.
The Phase buttons and Delay controls can make major differences in the overall sound. There’s no right or wrong phase or delay setting; use whatever sounds best to you. Try the following to hear how these controls affect the sound. (Bear in mind that amp sims do a lot of calculations, so moving the controls will sound “choppy.” This is because Ampire has to recalculate constantly to reflect the changing settings.)
- Turn off Mic Mix Link.
- Mute Mic C.
- Set Mic A’s Level up full, and Mic B’s Level down all the way.
- Enable Mic Mix Link.
- Lower Mic A’s level. Mic B’s level will increase. Note the difference in sound as the levels change.
- Alter Mic B’s Delay time, and again, change Mic A’s level. You’ll hear a sound that’s somewhat like flanging, due to the comb filtering caused by Mic B being out of phase.
- Enable the Phase reverse switch for Mic B, and again, alter Mic A’s level. You’ll hear a wide tonal variation.
Now check out how Mic C creates a stereo spread. With Mic Mix Link off, adjust Mic A and/or Mic B for the desired sound. Bring up Mic C’s Level control slowly, and you’ll hear the stereo image bloom. Again, the Delay control and Phase reverse button make a big difference in the sound.
Clean Sounds, Too
One of my favorite mic applications is with clean guitar sounds (cabinet only, no amp). Mic C is particularly useful, because its brightness gives the cabinet’s tone a useful lift, and creates a stereo image. Finally, note that if you change the Channel Mode from mono to stereo (or the reverse), the sound may mute. Varying one of the Mic level controls restores the sound. Of course, it’s easy enough to call up an Ampire preset, and just start playing… but becoming proficient with the Mic Edit Controls opens up a wealth of possibilities.
Komplete Kontrol Integration in Studio One, Part 2/3: General-Purpose MIDI Control
In Part 1 (“A New Hope”) of the NI Kontroller trilogy, we covered how to integrate the DAW functions from Native Instruments’ Komplete Kontrol keyboards with Studio One. Let’s take this another step further.
In theory, Komplete Kontrol’s MIDI control surface application is only for stand-alone use, and requires using both an external power supply and the keyboard’s 5-pin DIN MIDI connectors for I/O. With a live rig, this makes sense; for use with a DAW, you have the NKS spec communicating over USB. But wouldn’t it be great to be able to use the Komplete keyboard’s control surface with non-NKS instruments, and even effects, in Studio One over USB? Well, you can.
GETTING STARTED
For Windows, install MIDI-OX. This utility is key to letting us re-direct the MIDI messages at the Komplete keyboard’s external output to Studio One.
For Macs running Catalina, I currently don’t know of any way to use the MIDI Patchbay utility. This is similar to MIDI-OX, but hasn’t been updated since 2008, and system requirements stop at Mac OS X 10.14. You can try using it with pre-Catalina systems; if Apple’s Gatekeeper blocks the installation, you’ll need to allow it under Security & Privacy. Once you get it installed, it should work similarly to MIDI-OX if you choose Komplete Kontrol S-Series Port 1 for the MIDI input option (and consider that equivalent to Komplete Kontrol -1 in the following description), and choose Komplete Kontrol S-Series Port 2 for the MIDI output option (it should work similarly to Komplete Kontrol EXT-1, below). Mac users, please feel free to comment below about what does and does not work with the Mac.
Back to Windows…
- Turn on the Komplete keyboard.
- After the keyboard boots, open MIDI-OX. Under MIDI-OX’s Options > MIDI Devices, choose Komplete Kontrol – 1 for MIDI Input and Komplete Kontrol EXT-1 for MIDI output (Fig. 1). Click OK to close the MIDI Devices screen.
- Open Studio One, but leave MIDI-OX open while Studio One is open.
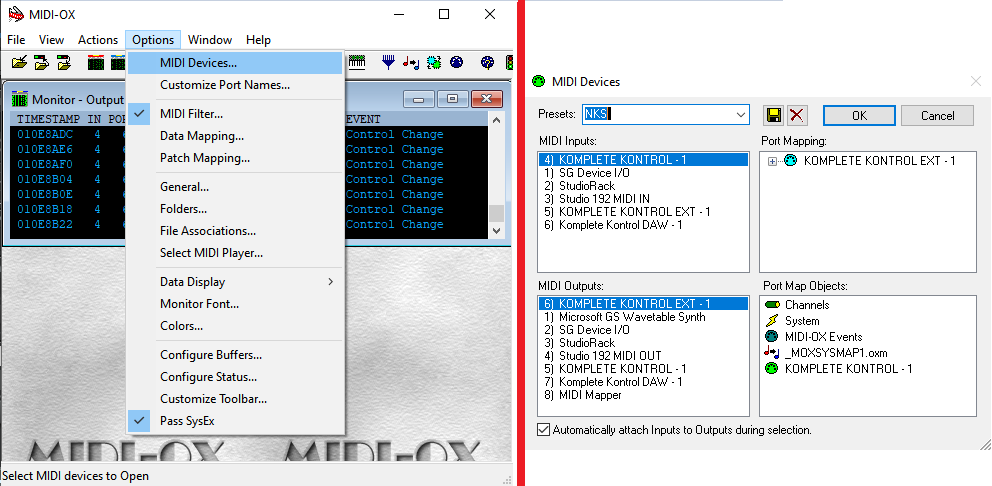
Figure 1: How to set up the MIDI-OX utility so that NI keyboards can control non-NKS instruments over USB.
- Now we need to tell Studio One that MIDI-OX is a new keyboard, even though it isn’t really. Choose Studio One > Options > External Devices, click Add, and choose New Keyboard (Fig. 2).

Figure 2: How to add MIDI-OX as a pseudo-keyboard.
- For Receive From, choose Komplete Kontrol – 1. Studio One will warn you not to do this, but just ignore the warning. For Send To, choose Komplete Kontrol Ext – 1. You’ll have another warning to ignore—but I promise you, no harm will come to Studio One.
- Click OK, then click OK again to get out of the options screen. We’ll cover when/how to use MIDI-OX later.
A WORD OF CAUTION
At the moment, the Komplete Kontrol application’s template management is somewhat primitive. Any changes you make are saved when you close the MIDI controller application; there’s no “Save” or “Save as” command, nor can you manage individual templates—they’re all saved in a single .dat file.
However, if saving-by-closing doesn’t work for you, and you can’t seem to save new templates, there may be an esoteric Windows problem. This is particularly likely for those who upgraded to Windows 10 from an earlier version, because the folder holding the templates may be write-protected due to inheriting permissions. Here’s the fix.
- Open the C: ProgramData folder. (This is a hidden folder, so if you don’t see it, type Windows key+R, and then type Control Panel in the Open box. In the Control Panel, click on Appearance and Personalization, then choose File Explorer Options. Click on View, and then select Show Hidden Files, Folders, and Drives.)
- In ProgramData, locate the Native Instruments folder, and right-click on it.
- Click on the Security tab, then click Edit.
- Choose Users, check all the Allow boxes, and click Apply. Also, do this for any other Group or User names that let you click the Allow boxes (Creator Owner may not…no worries). After applying everything, click OK.
Okay, now that’s out of the way. Hey!! Don’t blame me! It’s a Windows thing.
CREATING A STUDIO ONE-FRIENDLY TEMPLATE
You access the MIDI control surface when you push the Komplete keyboard’s MIDI button, which also defaults to opening if the Komplete keyboard doesn’t see an NKS instrument. The following procedure describes how to create the kind of template we want for Studio One’s plug-ins.
- Open the Komplete Kontrol application (Komplete Kontrol.exe) in stand-alone mode, not as a plug-in. This is the only mode that lets you do MIDI assignments. Then, click on the MIDI 5-pin DIN symbol in the upper right (Fig. 3).
- Create a new template by clicking on the + button under templates. Right-click on it to rename it.
- The template will default to two pages of controls (16 knobs total), but of course, we want more! Click on the + sign to the right of a page, and you can add up to two more pages.

Figure 3: The important items needed to create and customize a template are circled in white. From right to left: MIDI button that opens the MIDI assignment editor, + sign for adding more pages, and + sign for adding more templates (in this case, it’s adding one for the Fat Channel).
- Now comes the tedious part. Each knob and button needs to have a unique MIDI continuous controller (CC) number, so that each one can control a unique parameter. Page 1 defaults to CC14-CC21, and page 2 covers CC22-CC29. However, pages 3 and 4 just duplicate the assignments for page 1, and all the buttons default to CC112-CC119. So it’s time to program some additional controls.
- Click on one of the virtual knobs, and you’ll see its number assignment in the MIDI field toward the lower middle. Change this number to the desired controller number. The label will still reflect the old number, but that’s okay—we’ll be re-naming the labels anyway for specific synth and effects parameters. Here’s how I assigned the controllers.
Knobs
- Page 1: 14-21 (the default)
- Page 2: 22-29 (the default)
- Page 3: 30-37
- Page 4: 38-45
Switches
- Page 1: 88-95
- Page 2: 96-103
- Page 3: 104-111
- Page 4: 112-119 (the default)
Note that you can choose whether the knobs cover an absolute range, as specified by the Range From and To controls, a Relative Range, or a Relative Offset. Since I don’t like my head to explode any more than necessary, I left this option on Absolute to start, knowing that I could change it later. You can also program keyboard parameters, pedals, the touchstrip, and the keyboard key colors—16 color choices in all. So, different templates can color the keys differently for visual confirmation that you’ve chosen the desired template (of course, I chose the color “mint” for the Mojito template).
So to recap, we’ve set up a general-purpose template, with a separate controller for each knob and switch, that we can use to create a custom control surface for non-NKS instruments and effects… as we’ll find out in part 3 of the NKS trilogy, Rise of the Controller.
Paul Drew + The Studio (One) Rats
The Studio Rats
The Studio Rats are a band hailing from the UK, led by none other than our good friend Mr. Paul Drew; a longtime Studio One user.
About the man and the project: 
Starting off as a session guitar player with a small recording setup at home, Paul quickly got the bug for recording in a more serious way and moved on to having a commercial studio for artists to come in and record. While he was in the process of developing this, he got asked to write some songs for some pop acts. One of the bands were then taken on by a record company, and Paul was asked to be their in-house producer. There he met his business partners and formed DWB Music, Limited. DWB has sold songs all over the world and currently are at about 40 million sales and 100 million streams.
About a year ago, Paul got a bit tired of just working on programmed pop music and wanted to take a break to just work with live musicians. He now gets to do this with his current project The Studio Rats.
The core members are:
- Paul Drew on guitars/production and mixing
- James Ivey on drums
- Dan Hawkins on bass
Having worked with many great singers and co-writers over the years, Paul invited a few of them to perform and co-write the songs. He also wanted to find a way to provide free content for music production, mixing and guitar playing online, so The Studio Rats YouTube Channel was created.
About the PreSonus audio tools that he employs:
Paul has been using Studio One DAW since version 2 for composing, recording and mixing, along with the Faderport controller and a Quantum audio interface that he uses for any sessions away from his home studio in Surrey, UK. Prior to adopting Studio One, he had a Pro Tools HDX System.
Studio One features that Paul enjoys:
- The ability to change tempo to the audio while still sounding great means that he can be in a writing session and record audio parts without having to worry about the tempo being fixed before a recording session begins—super important when working with live musicians.
- The AAF Import and Export is also a big time-saver for when working on film and TV projects.
- Customizable Keyboard Shortcuts.
- The Arranger track feature, coupled with Scratchpad (independent and alternate timelines) within the primary Song makes for a breezy writing session.
A closing thought from the leader of The Studio Rats:
“PreSonus has been amazing with user feature requests. You don’t get this from the other DAW companies. I wholeheartedly recommend that people give Studio One a trial, you won’t look back.”
[Official Website] | [Podcast]
Komplete Kontrol Integration in Studio One, Part 1/3
Studio One 4.53 introduced integration with Native Instruments’ Komplete series of keyboards, which is a big deal. Although these keyboards are theoretically dedicated to NKS-compatible plug-ins and mixer/transport hands-on control, with Windows systems (Mac fans, there’s more on this later) you can use the keyboard as a general-purpose, hands-on MIDI controller for non-NKS plug-ins, including all bundled PreSonus effects and instruments (as well as plug-ins from other manufacturers). Also, unlike standard NKS, you’ll be able to control effects, regardless of whether or not they’re inserted in an instrument track.
There’s a lot to cover, and since this is more like a tutorial than a tip, it’s split into three parts: DAW control with Studio One, creating custom templates for plug-ins, and how to apply the templates in your workflow.
INTEGRATING THE KEYBOARD
Choose Studio One > Options > External Devices, and click Add. Scroll to the entry for Native Instruments, unfold it, and select either your A/M or S series keyboard for Receive From and Send To. I’m using an S49 (Fig. 1).
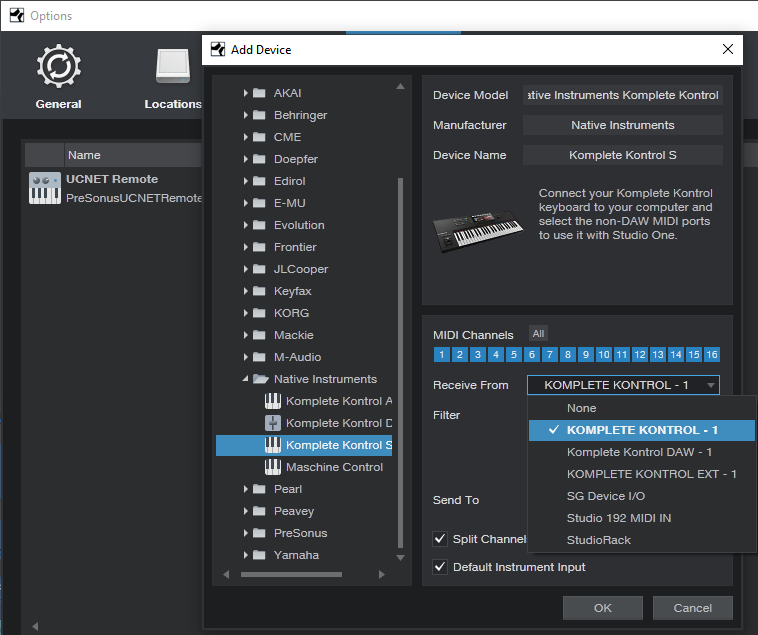
Figure 1: Komplete is selected as the keyboard, with Split Channel selected for more convenient use with multitimbral instruments, like IK Multimedia’s Syntronik.
INTEGRATING THE CONTROL SURFACE
Now let’s set up the Komplete keyboard as a new control surface. Again, choose Studio One > Options > External Devices, click Add, and scroll down to the entry for Native Instruments. Unfold it, and select Komplete Kontrol DAW – 1 for both Receive From and Send To (Fig. 2).
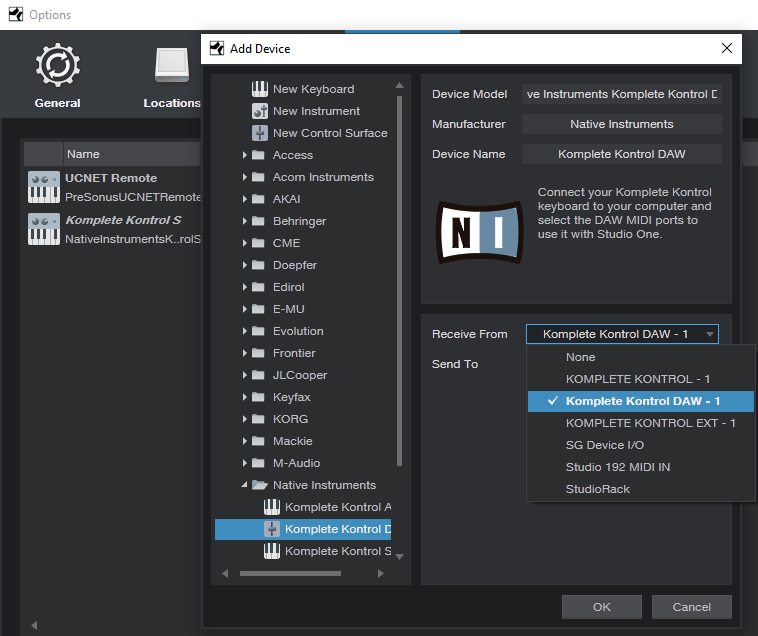
Figure 2: How to add the Komplete keyboard as a control surface for DAW integration.
CHOOSING THE MODE OF OPERATION
To edit NKS plug-ins, press the PLUG-IN mode button in the keyboard’s cluster of six buttons, toward the upper right. Controls that don’t relate to a synth or effect, such as the Transport, Metronome, Tape Tempo, and the like remain active. When it’s time to mix and you want full integration with Studio One’s mixer, press the MIXER button.
The following describes how the control surface for the current S-series Mk2 keyboards integrates currently with Studio One; click here for information from PreSonus on suitability with other NI keyboards, and updates.
Transport. The Play, Rec, and Stop buttons do what you’d expect, but there’s more to the story than that—there are several nuanced options. The following assumes you’re starting from a stopped transport.
- Press Play to begin from the Play Start marker. If there’s no Play Start marker, playback starts from the cursor’s current position. If you stop and re-initiate playback, playback re-starts from the cursor’s original position.
- Return to zero: When the transport is stopped, press Stop again to return to zero.
- Pushing on the big navigation knob toward the right initiates playback from the Play Start marker. (Note that this involves pushing downward into the knob, not left/right or up/down.) If there’s no Play Start marker, playback begins from the Loop Start, whether the loop is active or not.
- Push downward on the navigation knob during playback to jump to the Loop Start, which resumes playback automatically from there.
- Pressing Shift+Play operates the same way as using the navigation knob for playback control.
- With any scenarios involving the Play Start marker, it doesn’t matter if it’s before or after the Loop Start, or within the loop itself.
- Press Rec to initiate or punch-in recording. Press again to end or punch out recording. If you don’t record audio or MIDI while recording is active, there’s no blank event—it’s like nothing ever happened.
- Shift+Rec toggles the count-in between on and off. When you press Shift and count-in is enabled, the Rec button letters light bright red. Otherwise, the rec button letters are dimmed.
- Loop toggles the loop between on and off. To move the loop (whether enabled or not), hold the Loop button down, and rotate the navigation knob. For example, if the loop extends for four measures, moving the knob 1 click clockwise moves the loop forward to the next four measures. Moving the knob 1 click counter-clockwise moves the loop backward to the previous four measures.
- Metronome toggles between on and off.
Mixer
- The display for each visible channel shows the channel’s name, fader level, pan, metering (but not overloads), and status of a channel’s Record, Solo, and Mute buttons.
- Track select buttons. The eight buttons above the display select a track, however, moving the navigation dial left or right moves from one track to the adjacent track (left or right respectively).
- Hold Mute, and then select a channel with its track select button, to mute/unmute. The keyboard’s corresponding select button glows yellow.
- Hold Solo, and then select a channel with its track select button, to solo/unsolo. The keyboard’s corresponding select button glows blue.
- Shift+navigation knob move down (not push inward) selects level for the selected track. This mode remains selected until changed. Both the associated track knob, and the navigation knob, alter the selected track’s level. Holding Shift while moving either knob provides finer resolution. The individual track knobs provide the finest resolution.
- Shift+navigation knob move up (not push inward) selects pan for the selected track. This mode remains selected until changed. Similarly to level selection, both the track knob and navigation knob alter the selected track’s pan, and holding Shift while moving either knob provides finer resolution. The individual track knobs provide the finest resolution. Note: The Pan control for the Main channel is always shown panned full left. You can ignore this, because the Main channel doesn’t have a pan control anyway. The pan is centered properly.
- Auto toggles between Read and Touch (write) automation for the selected track. Be aware that you can’t choose automation off with Auto.
- Left/right arrow buttons select channels in groups of 8. However, if the last bank of eight has fewer than eight channels, the display will fill with the last eight channels. For example, if you expect the last bank to be channels 17-24 but only 22 channels are in use, the keyboard will display channels 15-22. This is by design, because it makes sure there aren’t any blank channels—you can always see eight channels at a time. If you hit the left arrow button, it won’t go back to channel 9, but be offset by the same amount as the previous bank. To “reset” the banks, hit the left arrow button until you’re back at the beginning.
Miscellaneous Functions
- Undo and Redo. For Redo, hold Shift and press Undo.
- Quantize. This quantizes whatever is selected, at the current quantize value.
- Tap this, even if not lit, for tap tempo. I love this feature when starting a song.
This takes care of the mixer and transport functions. Next week, we’ll cover how to create custom MIDI control setups using the Komplete Kontrol application, and that will prepare us for Part 3, which describes how to create “faux NKS” control surface capabilities for PreSonus instruments and effects. Yes, it really is possible…
How to Play Faster—By Playing Slower
In the comments for last week’s tip on varipseed-type formant changes, reader Randy Hayes asked if it was possible to change the tempo similarly so that you could play along with something at a slower tempo, then speed it back up (while still being the correct key). This was a common technique with tape, but because pitch and speed were locked together, there would be formant changes—whether you wanted them or not—when you returned the slowed-down track to pitch.
One of the MIDI’s great features is that you can sloooooooow down the tempo, play along with the slowed-down track, then speed it up to make it seem like you have lightning-fast technique. The good news is that with audio, you can slow down Studio One’s tempo without changing pitch, which sounds great in theory. The bad news is that this isn’t always a painless solution, because Events recorded at a slower tempo will likely need to be time-stretched when you return to the original tempo, and you may also need to call up the Inspector for Events or Tracks to specify how the Events should relate to tempo. Also, if there’s a Tempo Track with tempo changes, then you have to offset all the tempo data, as well as make sure you restore it to the proper tempo when you’re done.
Fortunately, there’s an easy way to record along with a song at a slowed-down tempo, and have the correct timing for the recorded part when you restore the song to its original tempo. This complements last week’s formant-changing trick; the technique starts off similarly but ends up quite differently.
- Create a premix of your existing tracks with the Export Mixdown function. In the dialog box, check Import to Track and Close after Export (Fig. 1; outlined in white).
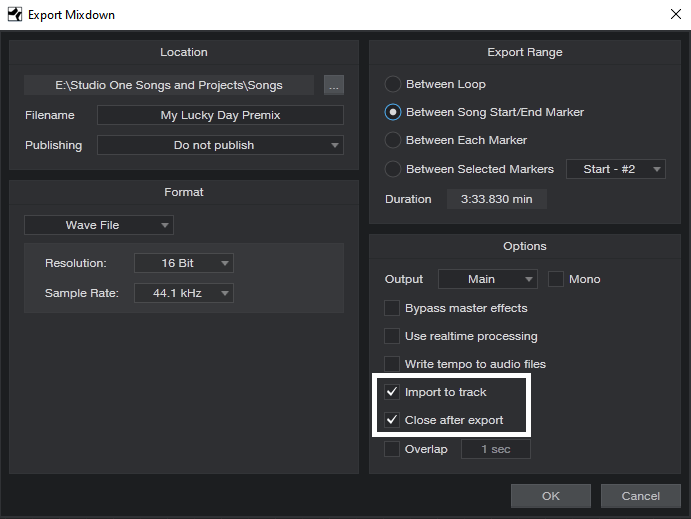
Figure 1: Use the Export Mixdown function to create a premix.
- After the premix is imported, mute all other tracks except for the Imported premix track.
- Select the premixed track, and right-click on it (Fig. 2), or open its Inspector (F4), to access the Speedup parameter. Note that this parameter can also slow down the speed, by entering a value less than 1.00.
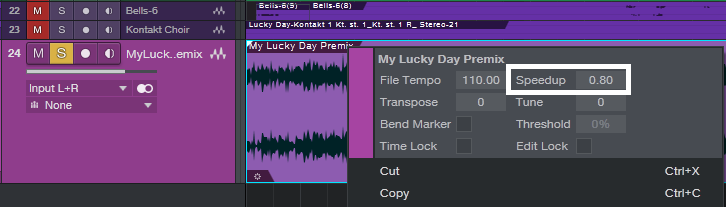
Figure 2: Access the Speedup parameter by right-clicking on the premix.
- Slow down the premix to the desired tempo with the Speedup parameter. For example, a Speedup reading of 0.80 means the song’s tempo is 80% as fast as it had been previously. Bear in mind that you can’t do a ridiculous amount of slowing down without affecting the audio quality of the track you’re recording, but overall, Studio One is quite forgiving.
- Record the new track as you listen to the premix’s slowed-down tempo.
- Before restoring the original tempo, the track you recorded has to start at the song’s beginning. If that’s where you started recording, fine. Otherwise, use the Paint tool to draw an Event between the start of the song and the start of your part, select them both, and type Ctrl+B to merge them together (Fig. 3).
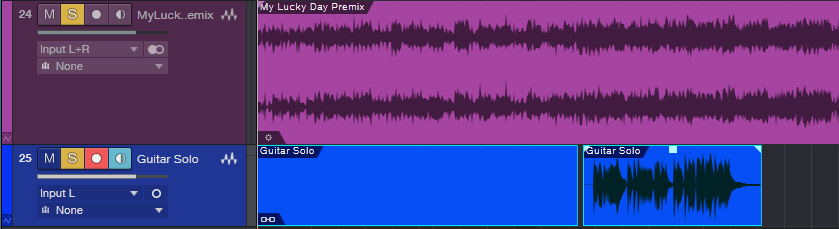
Figure 3: The recorded guitar solo, with an added “dummy” Event that starts at the beginning of the song, prior to merging them together.
- Now, right-click on the overdub you recorded so you can access its Speedup parameter.
- Open up your calculator to determine how much you need to speed up the overdub. Divide 1 by the slowdown amount to obtain the correct Speedup amount. For example, if you slowed down to 0.80, then 1/0.80 = 1.25. So, set the recorded track’s Speedup parameter to 1.25 (Fig. 4).
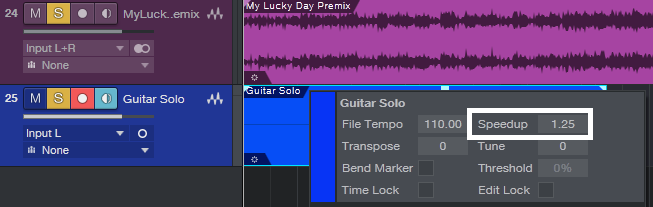
Figure 4: Once the newly recorded track goes to the start of the song, change the Speedup parameter to compensate for the slowdown.
- Delete the premix (or mute it if you plan to do more recording at the slower tempo), and unmute the other tracks. The part you recorded should now match the Song’s overall tempo, even if there are tempo changes.
Note that any vibrato will be sped up when you restore the new part to the original tempo. This may be something you want, but if not, just remember to apply a slower vibrato than usual. Also, the timing will be tighter—a note that’s off the beat by a bit will hit closer to the beat when sped up.
Sure, some people might think this is cheating. But back when recording studios started adding EQ or reverb to vocalists, that was considered cheating too. The technique is the skill with which we use our tools, and having “Studio One technique” can be just as important—and valid—as having technique on your chosen instrument.
Just remember, all that matters about music is the emotional impact on the listener. They don’t care what you did to produce that emotional impact!
Varispeed-Type Formant Changes
Back in the days of tape, when dinosaurs ruled the earth and gas station attendants checked your oil, variable-speed tape recorders allowed changing the pitch of all the tracks with a single control. This was useful for many applications. The most common were speeding up masters a bit to make them a little brighter and tighter, doing tape flanging, and perhaps the most popular, changing vocal formants. If you transposed the recorder’s pitch down a little bit, recorded a vocal as you sang along with the lower pitch, and then transposed back up again on playback, the vocal formant would be higher and brighter. Similarly, for a darker, warmer sound, you could transpose up, sing along with that, and transpose back down again. The same principle worked with other instruments, but vocals were the most popular candidates for this technique.
The main limitation (although it could also be an advantage in some situations) is that the tempo and pitch were interdependent—a higher pitch meant a faster speed, and a lower pitch, a slower speed. This was useful for masters, because you could speed up and brighten a track by upping the speed by 2% or so. The Friday tip for June 8, 2018 covered how to emulate true, variable speed tape effects when working on a final stereo mix.
A major advantage of today’s digital audio technology is that pitch and tempo can be independent, and one of Studio One’s attributes is that the audio engine retains its sound quality with reasonable pitch changes (e.g., a few semitones). This makes it very easy to do the old tape trick of changing vocal formants; here’s how.
- First, create a premix of your existing tracks with the Export Mixdown function. In the dialog box, check Import to Track and Close after Export (Fig. 1).
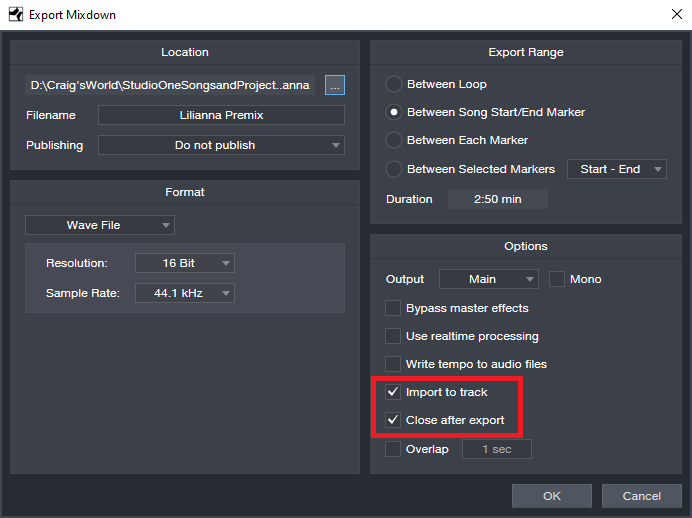
Figure 1: Use the Export Mixdown function to create a premix.
- After the premix is imported, mute all other tracks except for the Imported premix track.
- Select the premixed track, and right-click on it (Fig. 2), or open its Inspector (F4), to access the Transpose and Tune parameters.
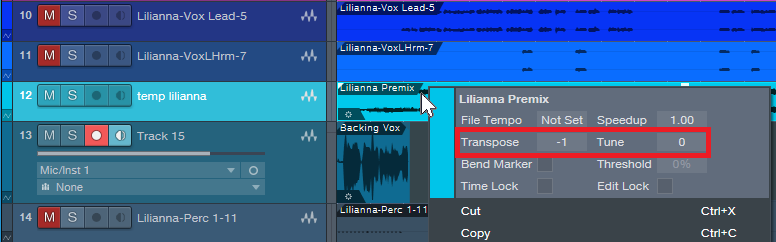
Figure 2: You can access the Transpose and Tune parameters by right-clicking on the premix.
- To brighten the vocal formant, use the Tune and/or Transpose function to lower the pitch.
- Record the vocal track as you listen to the premix.
- After recording the vocal track, right-click on the vocal Event, or open its Inspector, and tune it up by as much as you tuned the premix track down. For example, if you tuned the premix down a semitone, tune the vocal track up a semitone.
- Delete the premix (or mute it if you plan to do more formant-shifted tracks), unmute the other tracks, and enjoy your formant-shifted vocal.
This is especially useful when doubling parts, because the double can have a slightly different timbre. And with background vocals, shift some formants up, and some formants down, for a bigger, more interesting sound. And of course, if you just can’t quite hit that high note…you’re covered. I promise I won’t tell.
I also like using this with guitar and other instruments. I’ve gotten away with pitching guitar up 7 semitones for a bright sound that splits the difference between a standard guitar sound, and one that’s more like “Nashville” tuning (as described in the Friday Tip for December 1, 2019). At the other end of the tonal spectrum, playing along with the premix tuned up, and pitching back down, is like using a low tuning on a guitar—great for those massive metal guitar sounds.
—————————————
As we enter 2020, thank you very much for your support of these blog posts, and your comments. Also, thank you for supporting the Studio One book series that I’m writing. When I wrote the first book, I wondered if there would be any demand for it, or whether I was just wasting my time. Well, you’ve answered that question… so now I’m working on book #5 of the series, about how to record great guitar sounds with Studio One. It won’t be done for a while, but it wouldn’t have been done at all without your support (or the great-sounding new amp sims, for that matter).
Finally, let’s all thank Ryan Roullard and Chad Schoonmaker, who wrangle the blog and social media each week to get this blog posted and promoted. It’s not like they don’t already have enough to do at PreSonus, which makes their involvement just that much more appreciated. Thanks guys!
The Force Is (Studio) One With Maarten Vorwerk
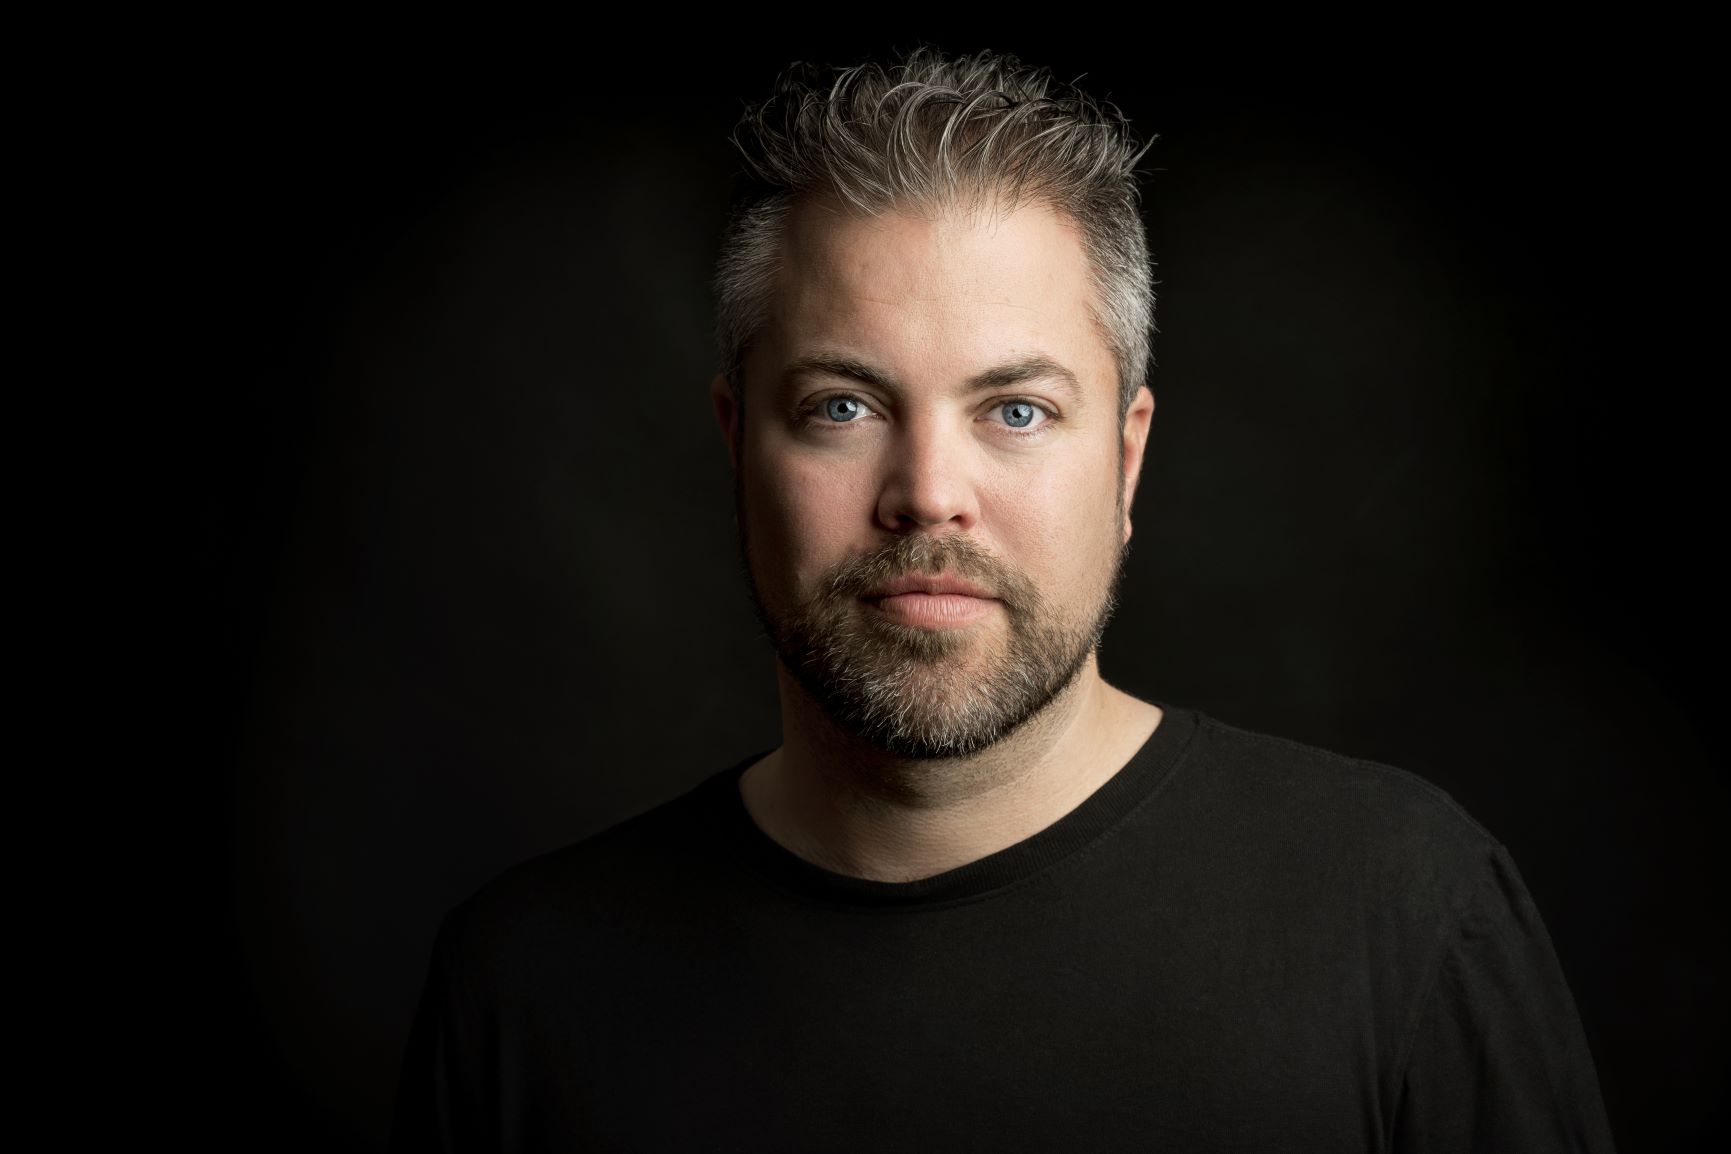
We had the recent opportunity to talk with Maarten Vorwerk about how he’s been using Studio One for his studio work and he was kind enough to share these insights with us. Read more from Maarten himself here.
During the early 2000s, I had some success in The Netherlands and Europe with Hard and Jumpstyle productions, including a Number 1 and several Top 10 hits. Back then I was awarded for being the best dance act in the Netherlands under the pseudonym Jekyll & Hyde. Later on, I veered more into the commercial side of dance music as a ‘ghost’ producer for other artists for whom I’ve produced lots of tracks.
After releasing official remixes for artists like Will.I.Am, Jennifer Lopez, Pitbull, Major Lazor, Deadmau5 and Shakira among others, I started dedicating some more time towards educating the new generation of producers in 2017 and released a best-selling book full of practical studio tips, with a second book on the way.
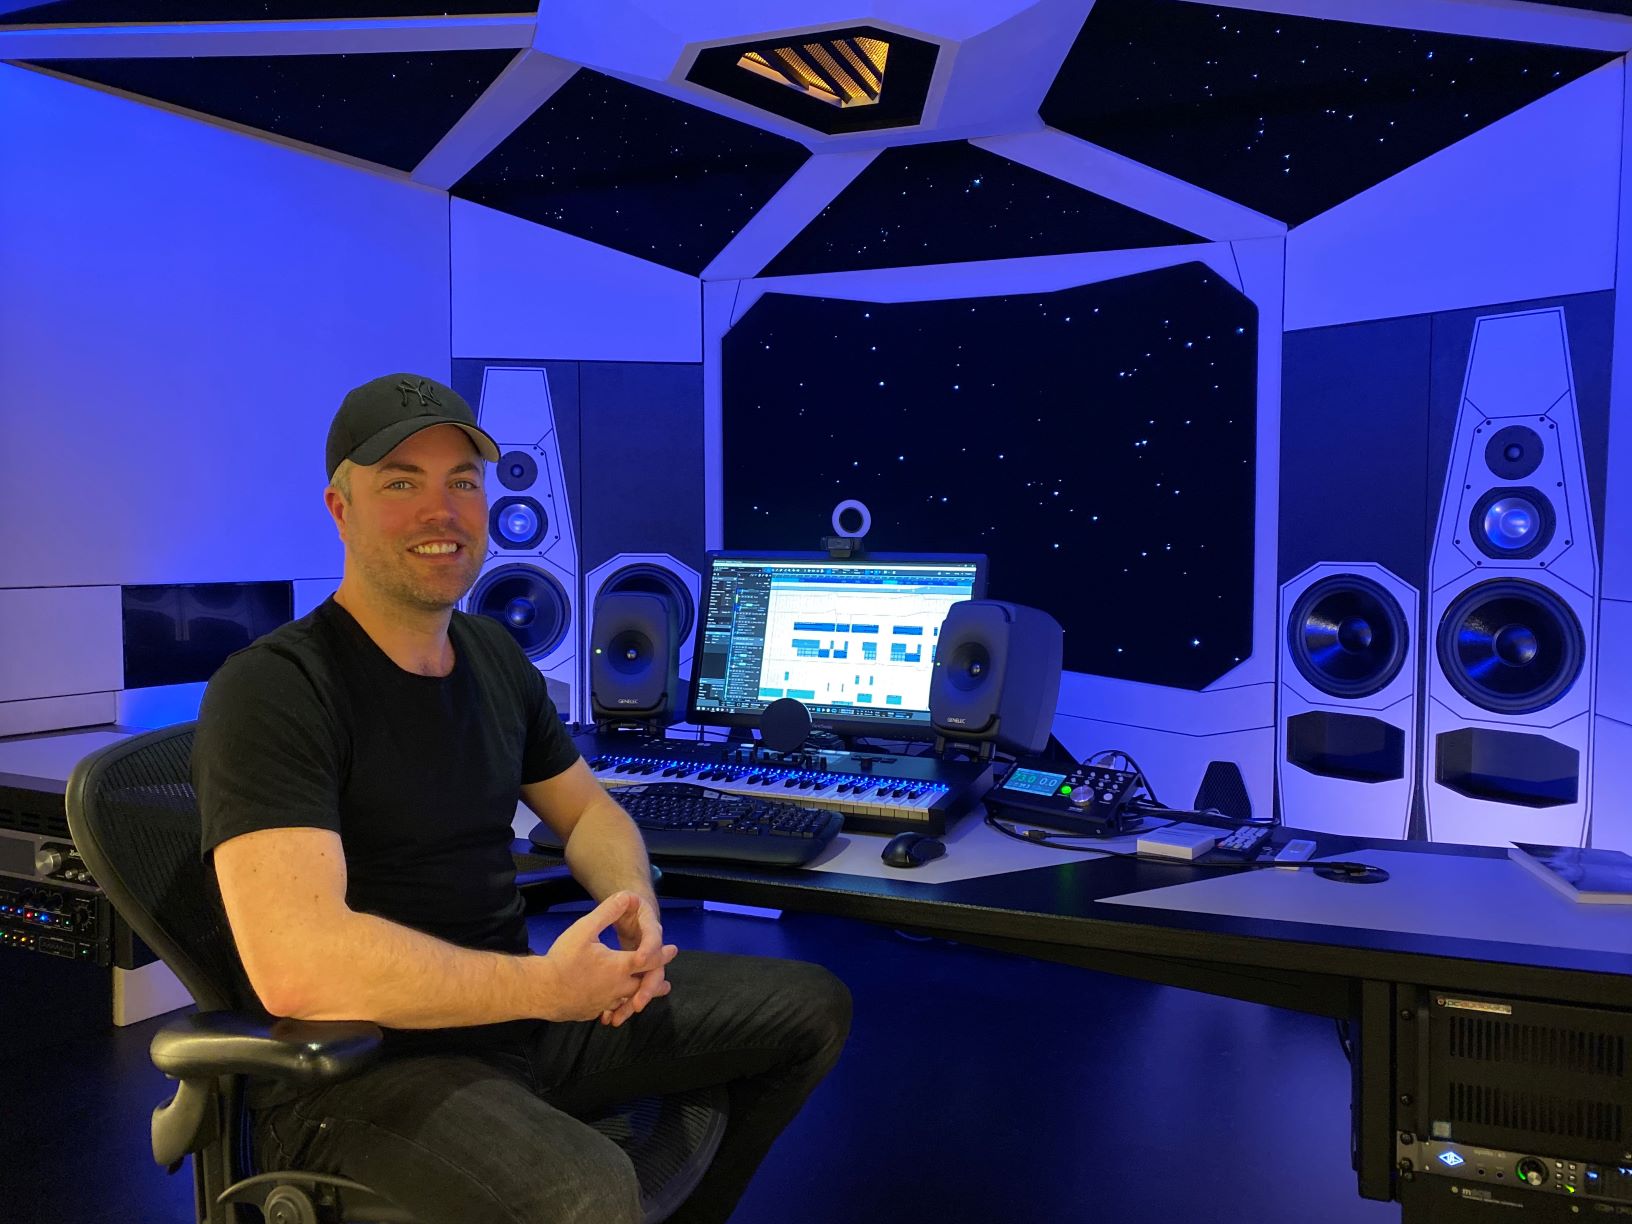
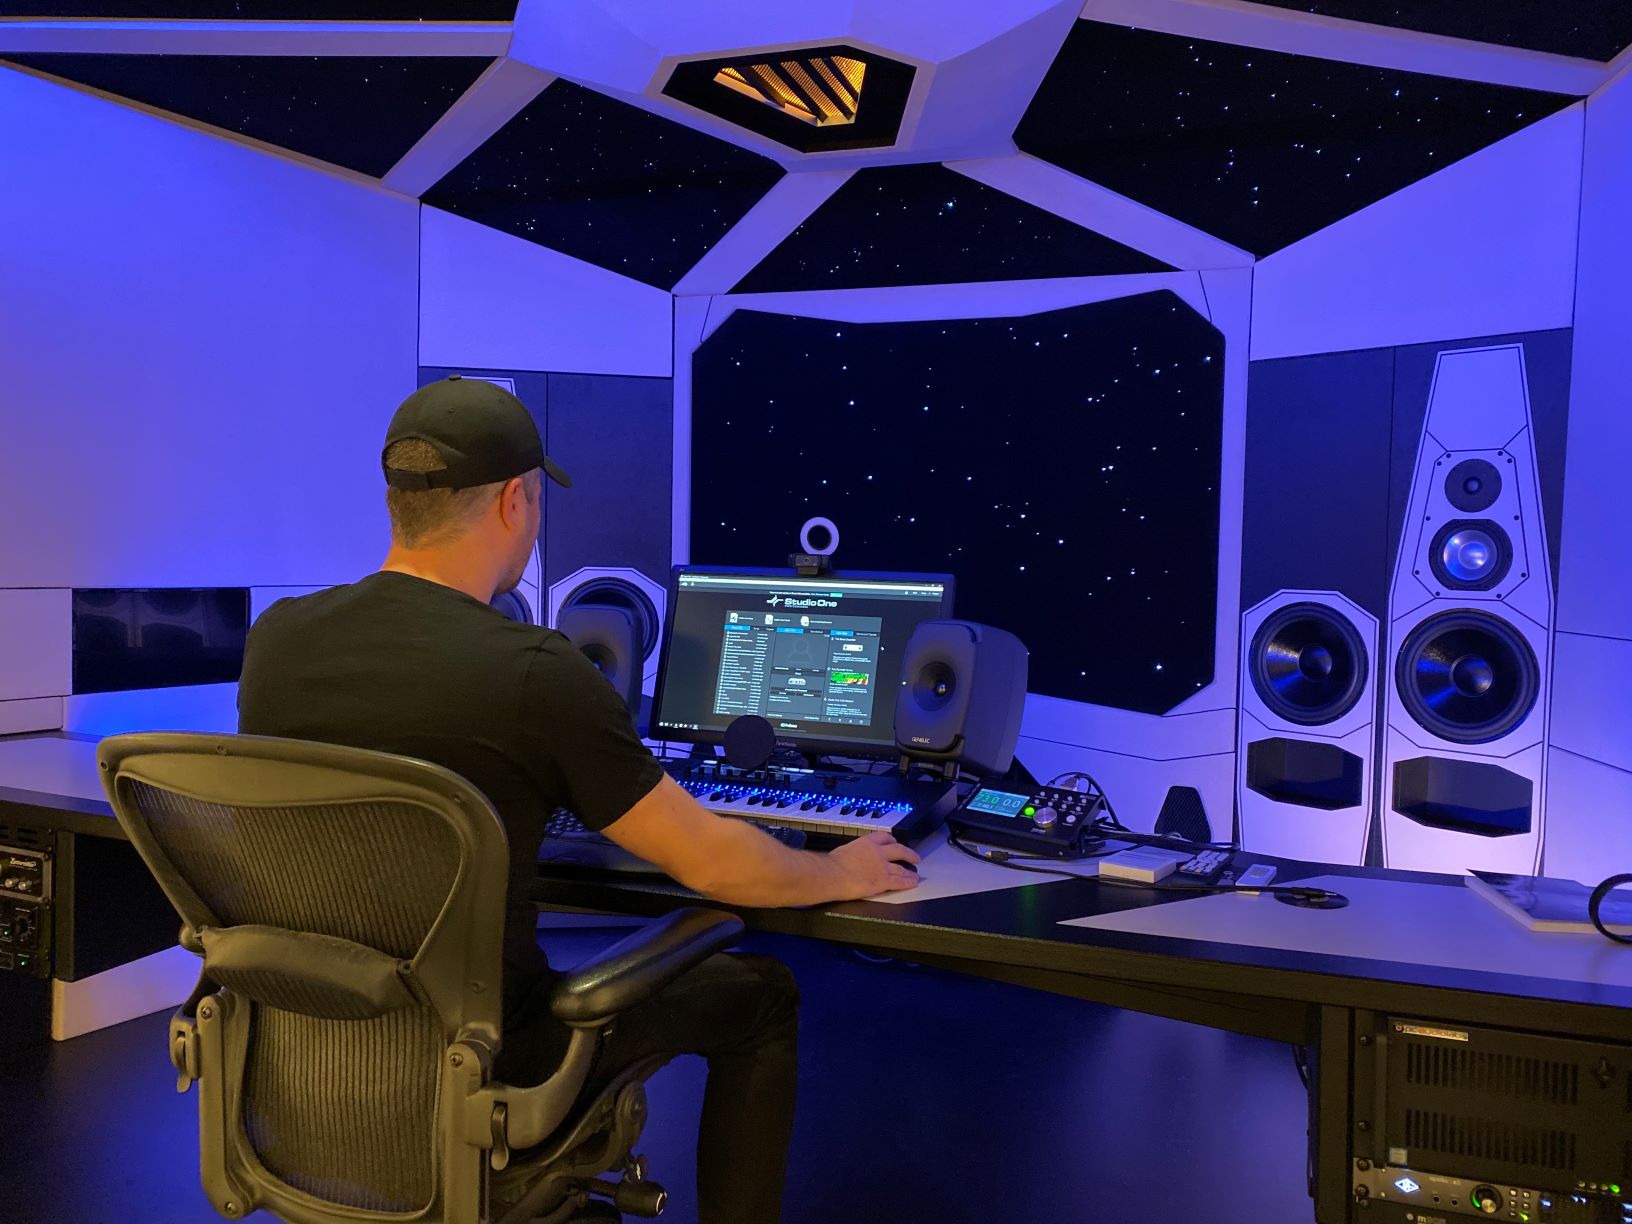
Maarten piloting Studio VRWRK
So I’ve been currently using Studio One as my main production DAW… and purely for Electronic Dance Music production in my home studio. I don’t do much live recording anymore.
I was a Cubase user for all my production career, but I got fed up with the workflow speed. Then I saw a demonstration of Studio One back in 2014. The ease of use and the speed of the workflow really made me want to try it out and I have used it ever since. The transition was easier than I’d expected!
Every DAW has certain features that make them unique. But for me personally, Studio One has the most to offer. It looks good in the sense that you can have everything on 1 screen: Arrangement, Mixer, Browser, Inspector, and it’s still easy to work. So it gives me speed in an easy view space, which means I can fully focus on being creative!
- “Drag and Drop” workflow is a clear winner: you want to save a mixed bass line? Just grab and drag it to the side and it saves everything (Inserts, Melody, Instrument).
- Audio: transposing pitch, time-stretching is right there, withing the Inspector options. Melodyne integration is built-into the engine. Right-click on an Audio clip and send to Sample One XT or Impact XT. All that kind of stuff makes my life a lot easier.
- Automation: you click on a parameter and you’re already editing automation right away.
- The Arranger track view is brilliant. Copying and re-arranging sections including all the automation have never been more easy for me.
There’s one particular feature I really love. Sometimes in the begin stages of the track, my project looks like a mess. So finding a specific track in a mixer can prove to be difficult. In Studio One I just double-click on the track and the mixer pops open with that track highlighted and I can make adjustments right away.
Also, the fact that you can analyze a groove from a specific loop. And then apply that same groove to all your other stuff.

Design and Build by Mischa Jacobi
One important feature that is a bit hidden is the use of ‘ghost notes’. Let’s say I made a chord progression that I want to use as a non-editable overlay for reference, while I’m making the melody. I would go in the piano roll, click on the 4 horizontal lines in the left upper corner and then click on the reference track, making sure to click the pencil tool OFF so it can not be edited but only used as a reference. I know this is a feature that is loved by a lot of dance producers. But I didn’t know Studio One had that until recently!
All in all, I think Studio One has done a great job creating a solid DAW. Looking forward to future versions!!!
Instagram: @maartenvorwerk
Facebook: vorwerkmaarten
Official Website