Tag Archives: Studio One
No Downtime with Studio One and Yang Tan

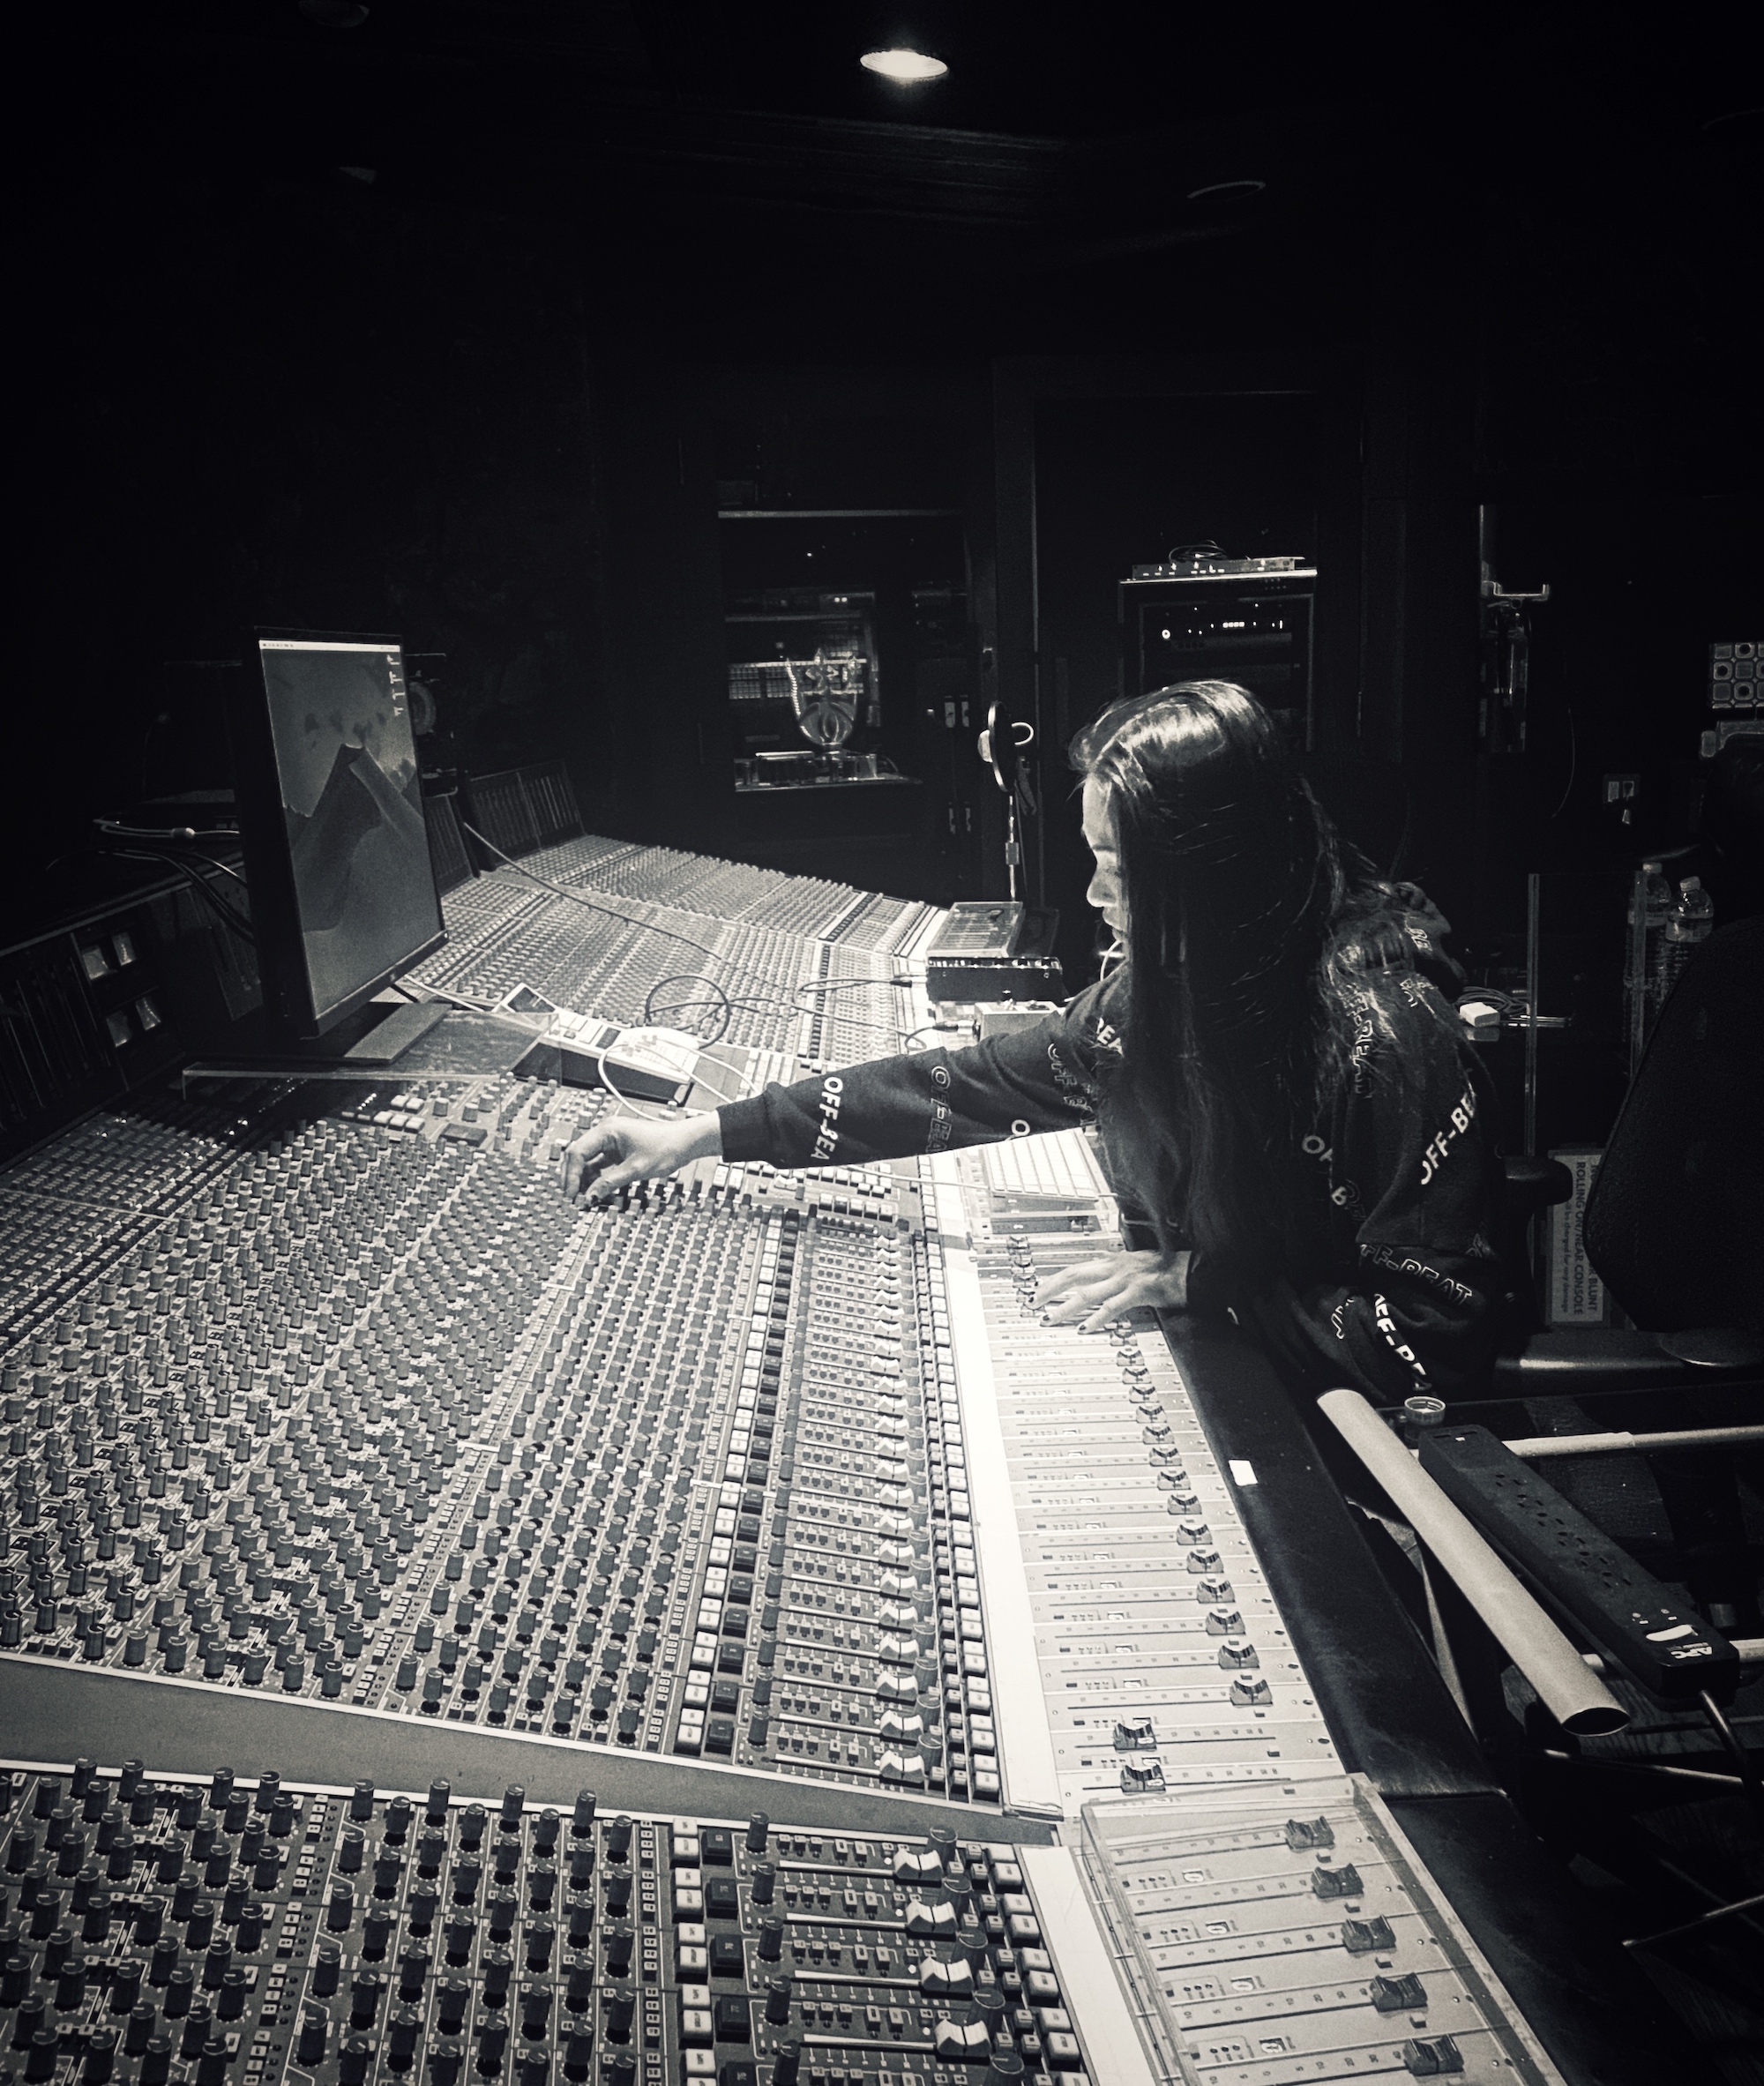
Yang Tan is the Founder and Engineer for Absolute Magnitude Entertainment (AME) Records, based in Los Angeles, California.
Her client list includes: YG, Jackson Wang, Nipsey Hussle, Bia, Kris Wu, Migos, A$AP Ferg, J Cole, Kanye West, Maddi Jane and Kid Cudi… to name a few. Let’s find out more about this rising young creative who paints with sound, and also happens to be a PreSonus Sphere member—and a featured artist as well!
 I am from Guangzhou, China, a metropolitan city close to Hong Kong where many imports and exports occur. As a child, I didn’t have the luxury of accessing music at the touch of my fingertips, like I do now. I remember going to secret spots on the weekends to pick out records among piles and piles of CDs with broken cases, which were smuggled in from overseas and were damaged by the customs. My mom had a Sony stereo set with a CD player and two cassette slots… it was pretty fancy in the ’90s. I was obsessed with recording my favorite songs to the cassette tapes. And then my mom bought a Walkman with recording ability through its built-in mic—I figured out how to play music in the background with my mom’s stereo and record bedtime stories I wrote. I paid for all of those CDs, but none of the profits went to the creators.
My family wanted me to follow in their footsteps and become a visual artist or a designer, but I was already obsessed with music. I always wanted to play the piano. So at the age of 16, I decided to pursue music secretly. I found two incredible music teachers on the Internet and started taking lessons, unbeknownst to my family. I learned how to read, play, and study music with strict and intense classical training. It was really difficult at the time because I didn’t know if anything would come from it, and I had to make money on the side to pay for the lessons. Looking back, I’m glad I took that risk. It was totally worth it. A year later, I was accepted to the Communication University of China, the best music and technology program in China, to study music. My music career began.
 The next part of my journey called for a relocation to the states, so I moved to Los Angeles after college. I started at Paramount Recording Studios and climbed the career ladder there. The learning never stops in Los Angeles; every day I pick up something new and practice until it becomes a habit. I am so inspired by the music culture in L.A., everyone I meet is just so talented, driven and inspiring. You don’t have to learn how to read music to be able to create music. How it sounds and how it connects with people is the most important part of the business.
The PreSonus audio products that I’ve been using are the StudioLive 16.0.2 digital mixer and their award-winning Digital Audio Workstation (DAW) software Studio One Professional, which I mostly use for producing.
 Its ease of use, flexibility and Macros are among the top features that led me to choose working creatively in this environment. Other DAWs usually require third-party software to program Macros, whereas with Studio One it is integrated natively as part of the DAW workflow itself.
Another particularly useful feature about Studio One that I find useful is the ARA integration (with Melodyne pitch correction) to the Studio One software engine. It saves so much time and I can edit vocal audio clips in real time at any stage of the process.
I love the quick-nudge capability inside of an audio clip. It’s a fast workflow and I don’t have to clean up the edit point or cross-fades every time I make an edit.
In short, Studio One flows really well, it’s quick and intuitive. No downtime for creativity. Truly amazing!
PreSonus Sphere Members: check out Yang Tan’s exclusive Vocal FX Chain Presets here
Visit her Website | Instagram
Recording ReWired Programs

I had a bunch of legacy Acid projects from my pre-Studio One days, as well as some Ableton Live projects that were part of my live performances. With live performance a non-starter for the past year, I wanted to turn them into songs, and mix them in Studio One’s environment.
Gregor’s clever video, Ableton Live and Studio One Side-by-Side, shows how to drag-and-drop files between Live and Studio One. But I didn’t want individual files, I needed entire tracks…including ones I could improvise in real time with Live. The obvious answer is ReWire, since both Acid and Live can ReWire into Studio One. However, you can’t record what comes into the Instrument tracks used by ReWire. Nor can you bounce the ReWired audio, because there’s nothing physically in Studio One to bounce.
It turned out the answer is temporarily messy—but totally simple. First, let’s refresh our memory about ReWire.
Setting Up ReWire
Start by telling Studio One to recognize ReWire devices. Under Options > Advanced > Services, make sure ReWire Support is enabled. In Studio One’s browser, under the Instruments tab, open the ReWire folder. Drag in the program you want to ReWire, the same way you’d drag in an instrument. (Incidentally, although you’re limited to dragging in one instance of the same ReWire client, you can ReWire two or more different clients into Studio One. Suitable clients includes Live, Acid Pro, FL Studio, Renoise, Reason before version 11, and others.)
After dragging in Ableton Live, open it. ReWired clients are supposed to open automatically, but that’s not always the case.
Now we need to patch Live and Studio One together. In Ableton Live, for the Audio To fields, choose ReWire Out, and a separate output bus for each track. In my project, there were 9 stereo tracks (Fig. 1).
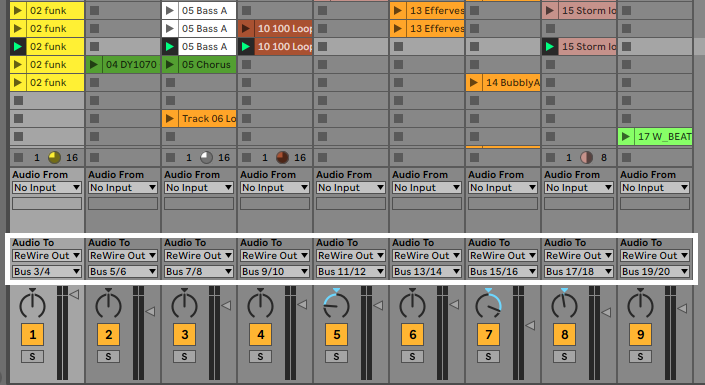
Figure 1: Assign Ableton Live’s ReWire outputs to buses. These connect to Studio One as track inputs.
Then, expand the Instrument panel in Studio One, and check all the buses that were assigned in Ableton Live. This automatically opens up mixer channels to play back the audio (Fig. 2). However, the mixer channels can’t record anything, so we need to go further.
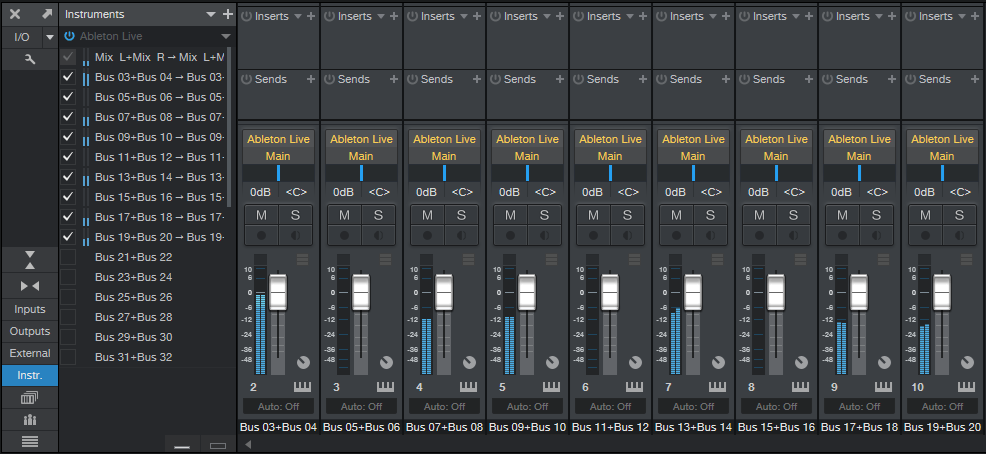
Figure 2: Ableton Live loaded into Studio One, which treats Ableton Live like a virtual instrument with multiple outputs.
Recording the ReWired Program
As mentioned, the following is temporarily messy. But once you’re recorded your tracks, you can tidy everything up, and your Live project will be a Studio One project. (Note that I renamed the tracks in Studio One as 1-9, so I didn’t have to refer to the stereo bus numbers in the following steps.) To do recording:
- In each Studio One track, go to its Send section and choose Add Bus Channel. Now we have Buses 1-9—one for each track.
- Our original instrument tracks have served their purpose, so we can hide them to avoid screen clutter. Now Studio One shows 9 buses (Fig. 3).
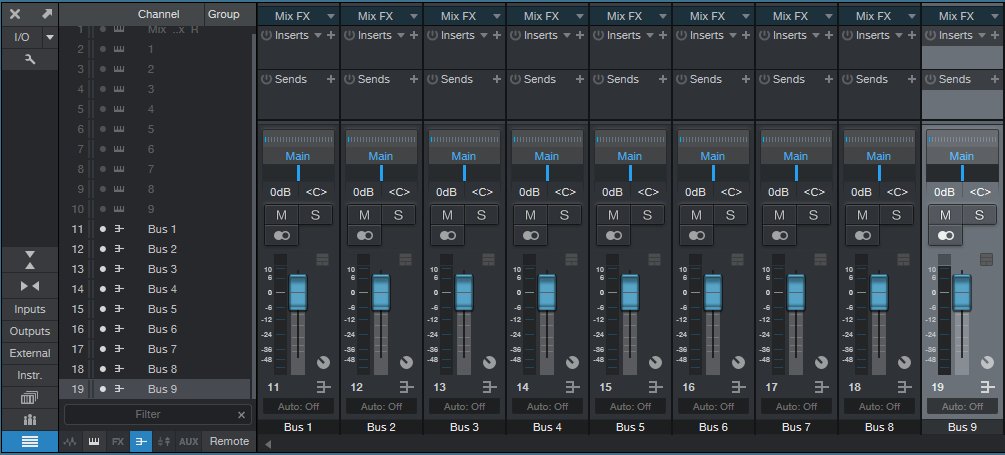
Figure 3: The buses are carrying the audio from Ableton Live’s outputs.
- Create 9 more tracks in Studio One (for my project, these were stereo). Assign each track input to an associated bus, so that each of the 9 buses terminates in a unique track. Now we can hide the bus tracks, and record-enable the new tracks to record the audio (fig. 4).
Figure 4: Studio One is set up to record the audio from Ableton Live.
- Now you’re ready to record whatever is in Ableton Live over to Studio One, in real time.
- Fig. 5 shows the results of unhiding everything, narrowing the channels, and hitting play. At this point, if everything transferred over correctly, you can delete the ReWired tracks, remove the buses they fed, close Ableton Live, and you’re left with all the Live audio in Studio One tracks. Mission accomplished!
Figure 5: The Ableton Live audio has completed its move into Studio One. Now you can delete the instrument and bus channels you don’t need any more, close Ableton Live, return the U-Haul, and start doing your favorite Studio One stuff to supplement what you did in Live. Harmonic Editing, anyone?
Bonus tip: This is also the way to play Ableton Live instruments in real time, especially through Live’s various tempo-synched effects, while recording them in Studio One. And don’t forget about Gregor’s trick of moving Studio One files over to Live—this opens up using Live’s effects on Studio One tracks, which you can then record back into Studio One, along with other tracks, using the above technique.
Granted, I use Studio One for most of my multitrack projects. But there’s a lot to be gained by becoming fluent in multiple programs.
How to use PreSonus Sphere Workspaces with Jacob Lamb

If you’re a musician working with other artists, or working alone and trying to keep your folders organized and neat, the PreSonus Sphere Workspaces tab is an indispensable tool for file sharing and organization.
Collaboration has never been easier; share whole songs or individual instrument stems, with quick listening right inside the Workspaces page—no downloading needed! In this Sphere episode, Jacob Lamb takes us through some of his thoughts on how Workspaces can be utilized in his studio, for both song creation and teaching students.
Join PreSonus Sphere today! Only $14.95 per month for Studio One Professional, Notion, and so much more.
Follow Jacob on Instagram
Mid-Side Meets the CTC-1
I’ve often said it’s more fun to ask “what if I…?” than “how do I?” “What-if” is about trying something new, while “how do I” is about re-creating something that already exists. Well, I couldn’t help but wonder “what if” you combined the CTC-1 with mid-side processing, and sprinkled on a little of that CTC-1 magic? Let’s find out. (For more information on mid-side processing, check out my blog post Mid-Side Processing Made Easy. Also, note that only Studio One Professional allows using Mix Engine FX.)
One stumbling block is that the CTC-1 is designed to be inserted in a bus, and the Mid-Side Transform FX chain won’t allow inserting Mix Engine FX. Fortunately, there’s a simple workaround (see Fig. 1).
- Copy the stereo track you want to process, so you have two tracks with the same stereo audio. One will provide the Mid audio, and the other, the Sides audio.
- Insert an MS-Transform FX Chain into each track (you’ll find this FX Chain in the Browser’s Mixing folder, under FX Chains)
- Create a bus for each track.
- Assign each track output to its own bus (not the main out). However, the bus outputs should go to the Main out.
- Add a CTC-1 Mix Engine FX in each bus.
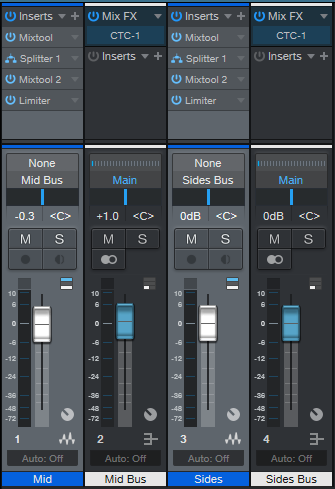
Figure 1: Setup for adding mid-side processing with the CTC-1 to a mixed stereo file.
- To dedicate one bus to the mid audio, and the other to the sides, open up the Splitters in the MS-Transform FX Chains.
- Mute the sides output for the Mid track (top of Fig. 2, outlined in orange). Then, mute the mid output for the Sides track (bottom of Fig. 2, also outlined in orange).

Figure 2: One bus is Mid only, the other is Sides only.
Now you can add the desired amount of CTC-1 goodness to the mids and sides. And of course, you can vary the bus levels to choose the desired proportion of mid and sides audio.
Audition Time!
The following example is an excerpt from the original file, without the CTC-1.
Next up, CTC-1 with the Custom option on the Mid, and the Tube option on the Sides. Fig. 3 shows their settings—a fair amount of Character, and a little bit of Drive.
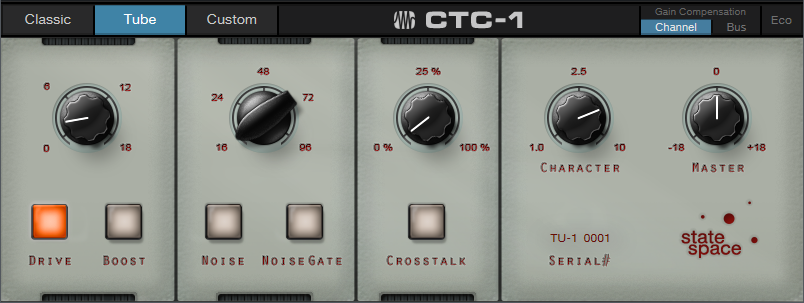
Figure 3: CTC-1 settings for the audio example.
If you didn’t hear much difference, trying playing Audio Example 1 again after playing Audio Example 2. Sometimes it’s easier to tell when something’s missing, compared to when something’s been added.
The more you know about the CTC-1, the more effectively you can use it. The bottom line is I now know the answer to my “what if” question: get some buses into the picture, and the CTC-1 can be hella good for processing mid and sides!
The Multiband X-Trem
Finally! People are becoming aware of the Splitter. Although the Splitter can act like a Y-cord or split based on channel, the coolest Splitter feature for me is being able to split based on frequency. This is what makes creating multiband FX Chains in Studio One sooo easy.
Check out the audio example to hear a taste of what this can do with a pad and drum part. The first four measures are unprocessed, while the second four measures use the same Multiband X-Trem settings on the pad and the drums.
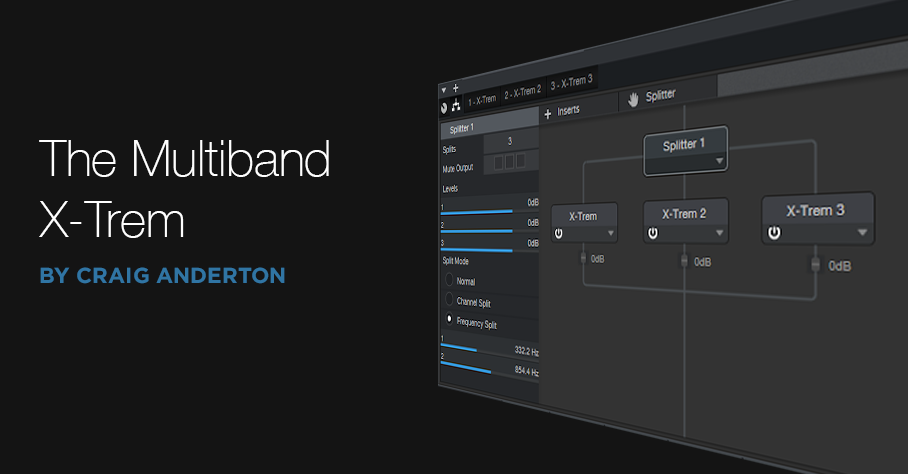
The block diagram (Fig. 1) is pretty simple—the Splitter creates three bands, Lo, Mid, and Hi, with crossovers at 332 and 854 Hz. (There’s nothing magical about those particular frequencies, choose what works best for the audio you’re putting through it.)

Figure 1: Block diagram for the Multiband X-Trem.
The real magic in this FX is the way the crucial parameters are brought out to the control panel that’s available in Studio One Pro (Fig. 2). However, Studio One Artist users can still load the FX Chain, and edit individual parameters. Although it’s more time-consuming, you can end up with the same sonic results.

Figure 2: Multiband X-Trem control panel.
How to Use It
This FX Chain assumes you’re going to sync it to tempo. Each of the three bands has a control to choose the Beat (tremolo rhythm) and Waveform, along with buttons to choose each band’s mode (Pan or Tremolo) and waveform Phase Flip. So far, that’s pretty simple.
The Mix section toward the right, with two knobs and their associated switches, is a little more complex. There aren’t enough control panel knobs to have a Depth control for each band, however in use, I’ve found that I usually adjust the depth for the Mid and Hi bands together, and the Lo band by itself. So, the Lo band has its own Depth control, while the Mid and Hi bands share a Depth control. There are also buttons to bypass the X-Trem for the Mid and/or Hi band. This is almost as good as having individual Depth controls, because you can remove depth for either band as needed.
We’ll close out with some additional tips…
- The sawtooth wave defaults to positive-going (i.e., the level ramps up from nothing to full). Flipping the phase makes a more percussive effect.
- A slow rhythm for the Lo band gives a sort of “rolling” effect. Faster speeds seem to work best for the Mid and Hi bands.
- Feel free to jump in and do tweaks—like change the Gate or Step waveform levels, vary the levels of the bands within the Splitter module, or change the crossover frequencies.
Happy download! Grab the Multiband X-Trem FX Chain preset here.
A Slick Trick for Thick Kicks
Imagine if you had a mold for sound, the same way you can have a mold for Jell-O—and whatever you poured into your “sonic mold” took on those particular characteristics. Well, that’s pretty much what convolution processors do. When they load their “mold,” which is called an impulse response, it shapes whatever sound they’re processing.
Studio One has two convolution processors. Ampire uses one to load speaker cabinet impulse responses. For example, when Ampire wants to sound like it’s going through a 2 x 12 speaker cabinet, it loads a 2 x 12 cabinet impulse response. The other convolution processor, Open Air, is optimized for creating acoustic spaces. So if the impulse is of a concert hall, sound processed through Open Air sounds like it’s in a concert hall. If the impulse is a blues club, the the sound takes on the characteristics of being in a blues club.
What’s perhaps not as well known is that you can load pretty much any WAV file into Open Air and use that as your sonic mold. So, this month’s tip is for the EDM and hip-hop crowd, because we’re going to load big-sounding kick drums into Open Air. Then, we’ll use them as molds to turn wimpy kicks into giant, thick kicks that smash through a mix, while leaving a trail of sophisticated destruction in their wake. But don’t take my word for it—check out the audio example, which has no EQ or compression.
There are five two-measure examples. The first example is from a kick track. The second, third, and fourth examples process the kick using this technique. The fifth example repeats the first example, as a reminder of how the sound started.
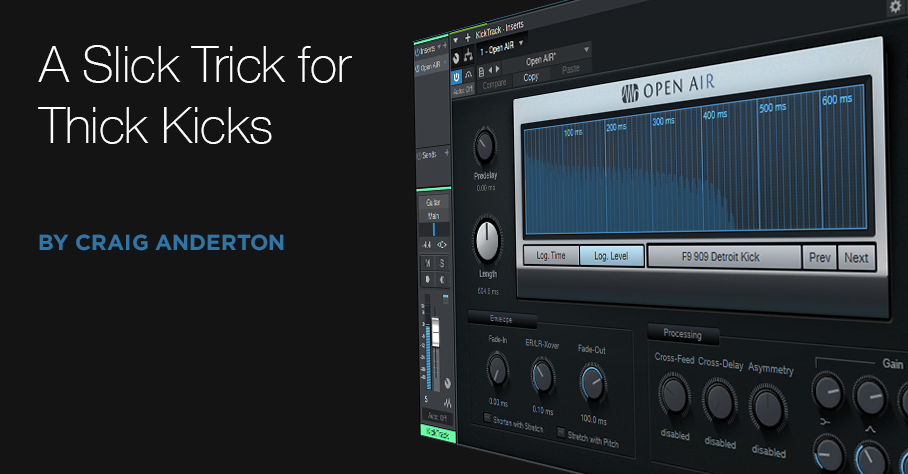
The secret is processing the kick track through the Open Air reverb, using a kick drum sample as the impulse (Fig. 1). Just like how a cabinet impulse response imparts the sound of a cabinet onto a guitar amp, these kick drum impulses shape the kick track to have an entirely different character.

Figure 1: The Open Air reverb has a kick impulse loaded, and imparts that sound to the kick track.
Studio One’s Sound Sets have lots of kick drum samples. Here are the ones I used for the second, third, and fourth two-measure examples. The Open Air Mix control hovered around 30% for these.
Acoustic Drum Kits and Loops > Samples > TM Pop Rock Kit > DW 20.24 Pop Rock Kick > DW 20.24 Pop Rock Kick 1.wav
Acoustic Drum Kits and Loops > Samples > TM Thuddy 70’s Kit > Gretsch 14×22 Vintage Thuddy Kick > Gretsch 14×22 Vintage Thuddy Kick 1.wav
909 Day Studio One Kits > Samples > F9 909 Detroit Kick.wav
So What’s the Catch?
Kick drum impulses can overload the Open Air pretty easily. The first two examples used the softest-velocity kick, but the F9 909 Detroit Kick was way too loud (well, unless you like horrific distortion). Most convolution reverbs are happiest with impulses that peak at around -12 dB.
So, the solution is simple. Drag the kick drum impulse into a Studio One track, use the gain envelope to cut the gain to about -12 dB peak, hit ctrl+B to make the change permanent, and then you can drag this impulse from the Studio One track right into the Open Air reverb.
Of course, you don’t have to limit yourself to kick, but it does seem kicks are where this technique shines the brightest. I also fooled around with using a floor tom as an impulse, and open hi-hat impulses on closed hi-hat tracks. The results aren’t always predictable…but that’s what makes it fun, right?
Fun Facts about FX Chains

Whenever I write a blog post with a downloadable FX Chain, it seems there are always questions about how to load it, save it, or use it. Well, there’s no time like the present to consolidate a bunch of answers.
Artist vs. Pro
An FX Chain combines several effects, which for convenience, you can save and load as a single “virtual multi-effects.” For example, if you come up with a cool kick drum sound based on limiting, EQ, and saturation, you can save the combination of effects as an FX Chain. The next time you want that sound, instead of loading the three effects and tweaking them, just load the FX Chain.
Studio One Professional enhances FX Chains with the ability to bring out macro controls to a control panel (Fig. 1).

Figure 1: Control panel for the Vintage Tape Flanging FX Chain.
Macro controls are extremely powerful—they can control multiple parameters at once, as well as scale control ranges. If you have Artist and see that one of my FX Chains has a control panel, you can still tweak the parameters, but you’ll have to do so at the chain’s individual effects. Often, a lot of effort goes into programming the macro controls, so using these FX Chains in Artist can be a challenge. However, I do try to save FX Chains so that the default settings are useful, and may not require too much tweaking.
Where FX Chains Live
FX Chains are stored in two locations, but the Browser combines these. So, it appears there’s only one place where FX Chains are stored. The factory default FX Chains are located in:
- [Windows] C:\Program Files\PreSonus\Studio One 5\Presets\PreSonus\FX Chains
- [macOS] Applications\Studio One 5 (right-click, and choose Show Package Contents)\Contents\Presets\PreSonus\FX Chains
The User Presets section in this location is for preferences like color schemes and such, not FX Chains. Don’t store your custom FX Chains in the factory default location, because it’s overwritten when you install a new version of Studio One. Instead, store your FX Chains in the location specified in the program’s options for User Data. To find this location from within Studio One:
- [Windows] Studio One > Options > Locations tab > User Data tab
- [macOS] Studio One > Preferences > Locations tab > User Data tab
The default for the user data is:
- [Windows] C:\Users\[user name]\Documents\Studio One\Presets\PreSonus
- [macOS] Macintosh HD\Documents\Studio One\Presets\PreSonus
In either case, the PreSonus folder has a folder for user FX Chains. When you save an FX Chain (click on the down arrow to the right of “Inserts”), you’ll have the opportunity to save it to a particular folder. Any folders you created for your chains in User Data will be shown, and so will the factory default folders. However, if you save into what appears to be a factory default folder, like Drums, your preset will not go into that factory folder. Instead, it will be placed in a Drums folder in your user FX Chain folder (if a Drums folder doesn’t exist in there, Studio One will create it). But remember, only one Drums folder will appear in the Browser, because it’s smart enough to group together the default and user FX Chains from their respective folders.
Moving Your User Data
With either Windows or Mac, I prefer not to keep too much stuff on the main system drive. For example, with Windows I avoid saving to the C drive’s Documents folder. I’ve dedicated drive D: to music, so everything relating to music—songs, projects, and custom presets—is in one place, for easy backup. So, I cut the Studio One folder from the default user location given above, pasted it at the root of my music drive, and re-directed the User Data tab in Studio One’s Options [Windows] or Preferences [macOS] to this new location (Fig. 2).
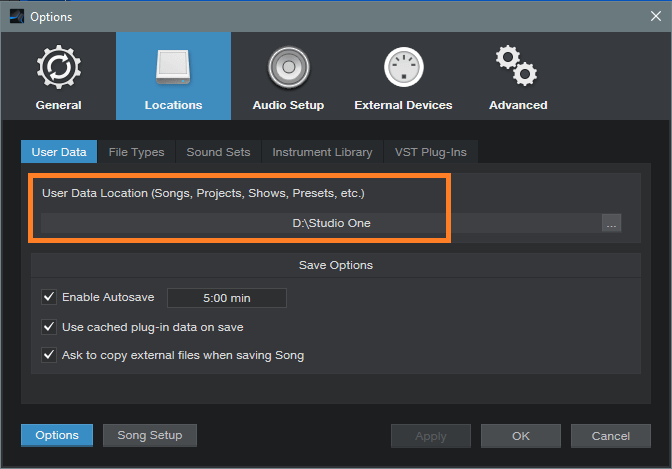
Figure 2: All my user data is now in the Studio One folder at the root of my music drive.
For Windows, my custom FX Chains now live at:
- D:\Studio One\Presets\PreSonus\FX Chains\CA Chains
Is that a User or Factory FX Chain?
If you’re not sure whether an FX Chain is a factory one or a user one, right-click on the FX Chain and choose Show in Explorer [Windows], or Show in Finder [macOS]. You’ll then see whether the FX Chain lives in your User Data folder, or the factory defaults folder.
How to Evaluate an FX Chain
You might not want to add one of my FX Chains to your permanent collection, unless you think it’s something you’ll use. To evaluate an FX Chain after downloading it, drag the chain from the download folder to a Channel, Bus, or FX Channel insert. Check it out and if you want to keep it, store it in your User Data folder, as described above.
Here’s Where to Get My Friday Tip FX Chains
You won’t have to go through years of blog posts anymore! Thanks to the unceasing efforts of Ryan Roullard and the web team to make life easier, they’ll soon be posting my FX Chains on PreSonus Exchange, and you’ll be able to drag and drop them into your Songs right from Studio One’s Browser.
The Presence 12-String Electric Guitar
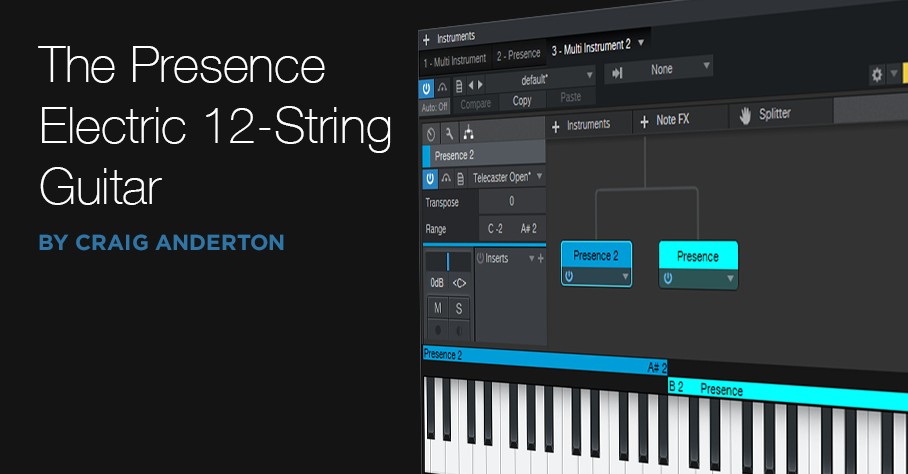
It’s difficult to sample a 12-string. The core Presence content includes a 12-string acoustic guitar, but there are no 12-string electrics—so let’s construct one.
One of my favorite guitars ever is the Rickenbacker 360 12-string. Back in my touring days, it travelled tens of thousands of miles with me (Fig. 1).
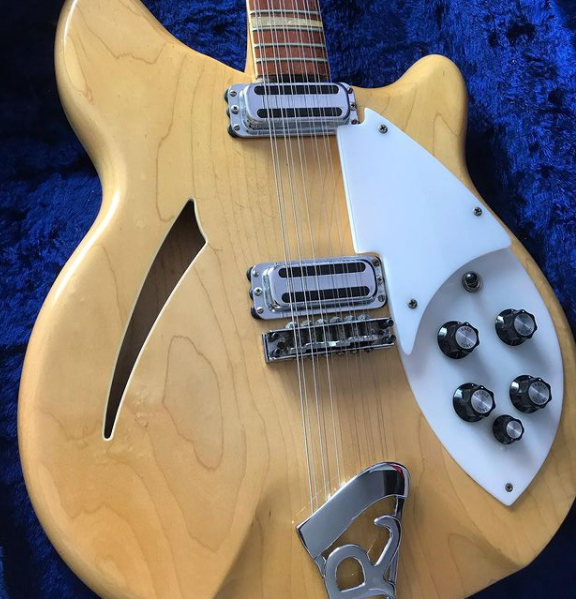
Figure 1: The mighty Rickenbacker 360 12-string guitar. Nothing else sounds like it.
I thought it would be a challenge to try and emulate that iconic sound with Presence. Listen to the audio example, and hear the results.
How It Works
The sound starts with one Presence instance, which uses a 6-string electric guitar preset. Then, we create a second, multi-instrument track with two Presence instances that use the same electric guitar preset. Transposing one of the instances up creates the octave above sound; however, a real 12-string guitar doesn’t have octaves on the 1st and 2nd strings. So, we use the final Presence for a unison sound, and edit the ranges in the multi instrument so they don’t overlap.
Step-by-Step Guitar Construction
- Create an Instrument track with Presence, and load the Guitar > Telecaster > Telecaster Open preset. This guitar sound is closest to a Rickenbacker, but we’ll do some EQ tricks later to get it closer.
- Create a new Instrument track with Presence, and load the same preset. Drag a second instance of Presence into the same track. When asked whether you want to “load the instrument or combine the instrument Presence,” choose Combine. This opens the Multi Instrument window. Load the same preset into the new Presence instance as well.
- In the multi instrument, drag the upper end of one Presence key range down to A#2 (we’ll call this the “Octave Presence”). Drag the lower end of the other Presence key range up to B2 (we’ll call this the “Unison Presence”). Fig. 2 shows the multi instrument window.

Figure 2: The multi instrument window has two instances of Presence—one for the octave above strings, and the other for the unison strings.
- Open the Octave Presence preset. Set Transpose to +12, and Pitch Fine Tune to +5 cents. Then open the Unison Presence preset, and change Pitch Fine Tune to -2 cents.
- Insert an Analog Delay in the multi Instrument channel , with the settings shown in Fig. 3. The reason for the 20 ms delay is because the higher string in a pair of strings gets hit just a little bit late. (We can’t use the Delay in Presence itself, because the mix needs to be 100% delay—no dry sound.) Without this delay, the emulated 12-string doesn’t sound right.
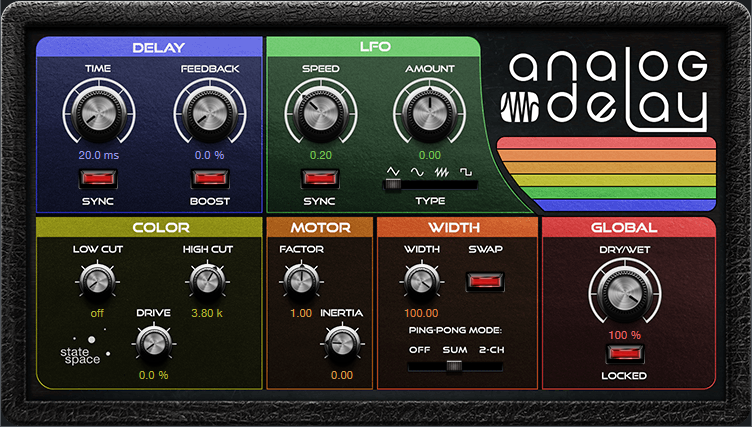
Figure 3: The Analog Delay emulates the delay caused by hitting the octave strings just a little bit later.
Note the High Cut setting—this reduces some of the brightness caused by transposition. The Width settings give a big stereo image, but for a more “normal” sound, turn ping-pong mode to Off.
Your mixer should look like Fig. 4, with two channels (basic guitar, and multi preset).
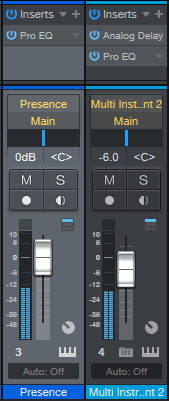
Figure 4: Mixer channels for the 12-string guitar.
Additional Tweaks
The Pitch Fine Tune settings in the multi instrument instances emulate the reality that a 12-string is seemingly never in tune, which accounts for that beautiful shimmering effect. Feel free to adjust your virtual 12-string so that it’s more or less in tune.
Another important tweak is to set the multi instrument channel’s fader about -6 dB below the main guitar sound. The octave strings on a 12-string are thinner than the strings with standard pitch, so they generate less output. This isn’t true of the 1st and 2nd strings, but that’s fine. With the octave strings a little lower, there’s a better balance.
Bring on the EQ
And finally…the coup de grâce to get us closer to the iconic Ric sound. On the main Presence instance, use the EQ in the Bass range. Boost 3 dB 3200 Hz, and pull the lowest slider down all the way. On both multi instrument instances, pull down the highest and lowest sliders (Fig. 4). Then, insert a Pro EQ in each mixer channel.
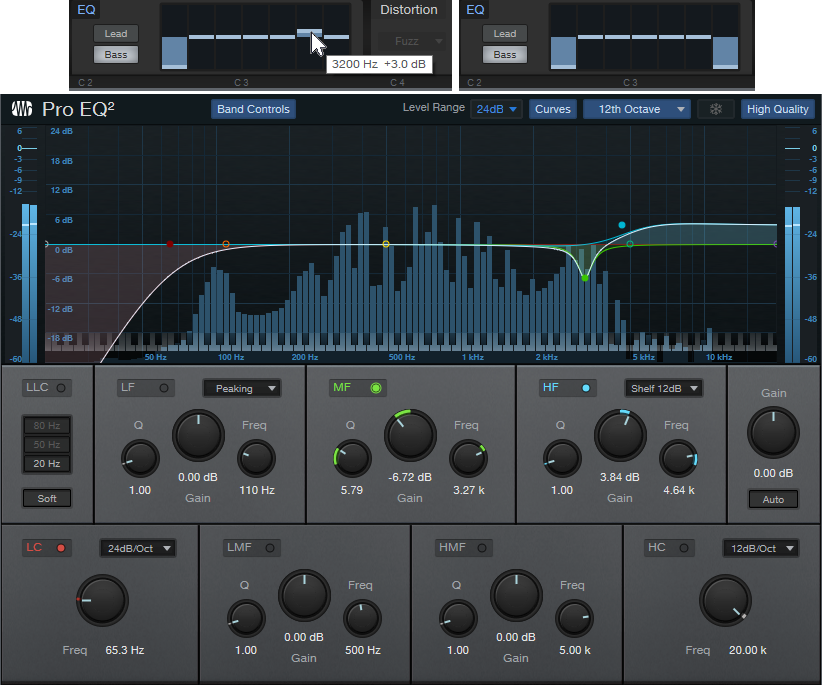
Figure 5: These EQ settings help get “the” sound. Clockwise from top: EQ on main Presence, EQ on the two multi instrument Presence instances, and Pro EQ placed on both mixer channels.
The narrow cut in the Pro EQ at 3.27 kHz helps reduce what sounds like some bridge “ping” in the original Telecaster samples. But all the EQ settings shown are suggestions. Between the broad EQ in Presence and the surgical nature of the Pro EQ, you can shape the sound however you want.
Studio One 5.2 has arrived. Here’s what’s new!

Driven by a one-two combo of user requests and PreSonus Software innovation, Studio One 5.2 boasts over 30 new features and improvements… here’s a quick ten, with a full changelog linked below. This is a free update to PreSonus Sphere members and Studio One 5 owners, and can be obtained from your my.presonus account or by clicking “Check for Updates” on Studio One’s start page.
Arrange your songs live from the Show Page or Song Page
Use Studio One’s Arranger Track on the Show page to trigger different song sections during playback without missing a beat! You can even control your arrangement from the soon-to-be-updated Studio One Remote… and, actually, multiple Studio One Remote users will be able to control different elements of the same Show simultaneously.
You can also use Live Arranging on the Song Page to experiment with new song structures and arrangements without dropping the beat.
Sound Variations
Extensive support for articulations in orchestral libraries has arrived in Studio One via Sound Variations, with a powerful but intuitive mapping editor that provides tools for managing complex articulation maps. Trigger your Sound Variations from remote commands, key switches, hardware controllers, macros, and more. Furthermore, the new Dynamic Mapping API lets third-party developers enable their VST2 and VST3 instruments’ articulations to be queried by Studio One so that Sound Variation maps are automatically generated. Vienna Symphonic Library and UJAM are already on board.
Score View Improvements
We’ve added Drum Notation and Tablature to the Score view! Tablature supports multiple instruments and multiple tunings, for everything from Strats to baritone ukuleles, and you can even view tablature and standard notation simultaneously. Drum Notation has new symbols for open/closed/half-open techniques to be added as well.
And in standard Score View, notes can be entered into multiple voices for a single instrument; up to four voices can be created per staff.
PreSonus Sphere Workspaces in the Browser
PreSonus Sphere workspaces are also now available directly from the Studio One Browser for easy bidirectional file transfer. Drag and drop stuff from Studio One’s Edit window to your PreSonus Sphere workspace folders.
Splitter is now a plug-in
The Splitter—our powerful parallel processing tool in the Channel Editor—now lives alongside other Native Effects Plug-ins in Studio One’s Browser. If you haven’t experimented with this powerful processing option in the past, you should—and now it’s hard to miss!
Arrow tool Improvements
Genius updates to the Arrow tool make it easier than ever to edit Note Events in the Piano Roll.
Hardware Controller Improvements
ATOM SQ and FaderPort 8 and 16 now play better than ever with Studio One. ATOM SQ now supports Studio One’s Autofill command for plug-in control. Furthermore, you now get up to 8 pages of controls in Control Link for up to 64 individual controls. You can also now edit details of individual Pattern Steps with ATOM SQ.
FaderPort 8 and 16 users will be excited to know we’ve implemented grouping! Use multiple FaderPort 8/16s to create a robust mix setup that’s ideal for your space and process! You can also now deactivate Sends from your FaderPort as well as toggle the metronome and control volume level. Lastly, Studio One’s Channel visibility settings will now also be reflected accurately on your FaderPort(s).
Clip Versions
Now you can make edits to an Audio Clip that don’t affect every instance of the Clip in your Song; apply clip-based edits in Gain Envelopes or Melodyne independently!
New Safety Features
Studio One’s new “Boot with options” menu on launch allows you to troubleshoot problematic plug-ins and other culprits by selectively disabling them after a crash.
M1 Mac compatibility
Studio One 5.2 is compatible with M1 Macs running Rosetta 2.
And more…
Mastering: What LRA Means to You
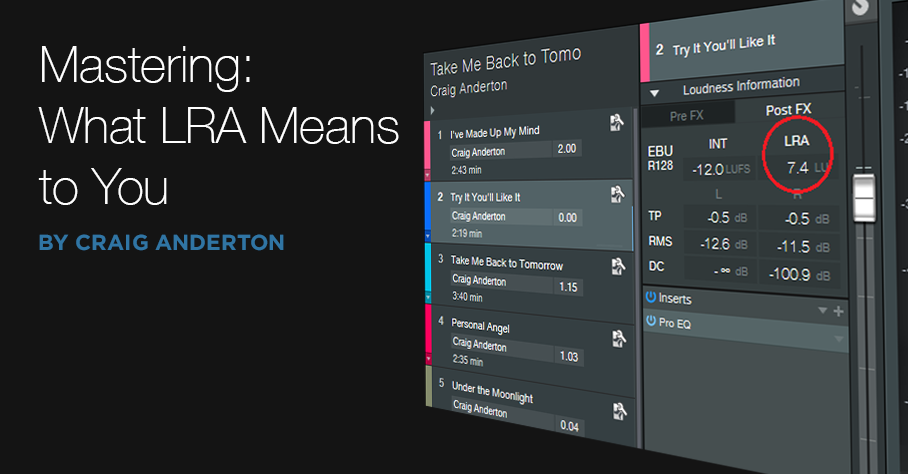 Studio One offers multiple diagnostic tools. We covered the LUFS loudness measurement (based on the R128 loudness standard), in the context of creating consistent levels in a collection of songs. But what about that mysterious LRA reading to its right?
LRA stands for Loudness Range. A complex algorithm measures loudness, analyzes how it’s distributed throughout a song, determines a song’s dynamics properties, and represents that with a number. The lower the number, the less dynamics. (Note that this is not about dynamic range, but rather, musical dynamics.)
Dynamics don’t reflect recording quality. Some songs have lots of dynamics, some don’t. Dynamics may or may not relate to whether the music is compressed or limited—heavily compressed music can still have major loudness differences, whereas music with light compression may not have much dynamics at all.
An Artistic Measurement—Not So Much a Technical One
LRA is more interesting from an artistic standpoint than a technical one. There’s really no “typical” LRA reading for various genres, aside from broad generalities: Classical music is most dynamic, so you can expect LRA readings of 9 or more. Country or jazz will have less dynamics; a reading of 6 to 8 is typical. Rock and EDM often hit around 5 to 6, and hip-hop, 5 or less. But again, LRA readings vary all over the place within any specific genre, as well as within an album. On my most recent album, LRA readings varied from 4 for a slamming, full-tilt track up to 10 for a longer, more nuanced song.
My main use of LRA is checking out soundtracks intended to go behind narration or industrial videos, because excessive dynamics can distract from the messaging. If there’s a high LRA reading, I’ll tweak the level automation as needed to smooth out variations. (Of course, I’d hear any problem variations when assembling the video, but prepping a track beforehand saves time.)
Conversely, if I want some sections in a rock track to really pop in contrast to sections that are more sedate, the LRA reading will confirm whether that goal has been met. If not, I might want to re-consider making the parts that are supposed to be quiet quieter, and then supercharge the dramatic sections. This isn’t only about changing levels. For example, the part that’s supposed to hit harder might benefit from a screaming lead guitar overdub, and more drums.
Do Dynamics Really Matter?
People might assume EDM doesn’t have a lot of dynamics, because they think of four-on-the-floor kick drums. But while researching various pieces of music for this post, I found that my favorite EDM artists tended to make music with more dynamic range—often more than typical rock songs. Coincidence? I’m not sure. But it makes sense that if a DJ wants to take you on a journey over the course of a set, that would involve dynamic variations.
Dynamics are a part of music. If all your songs have LRA readings of 3 or 4, there may not be enough changes in dynamics to keep listeners engaged for more than a few songs…but maybe your intention is to create a hypnotic groove, in which case a low LRA reading could be totally appropriate.
Ultimately, LRA isn’t about rules, but about data. How you use that data is up to you, but I hope you now have a better understanding of what that data means.