Tag Archives: Studio One 4
Friday Tips: Studio One’s Amazing Robot Bassist
When Harmonic Editing was announced, I was interested. When I used it for the first time, I was intrigued. When I discovered what it could do for songwriting…I became addicted.
Everyone creates songs differently, but for me, speed is the priority—I record scratch tracks as fast as possible to capture a song’s essence while it’s hot. But if the tracks aren’t any good, they don’t inspire the songwriting process. Sure, they’ll get replaced with final versions later, but you don’t want boring tracks while writing.
For scratch drums on rock projects, I have a good collection of loops. Guitar is my primary instrument, so the rhythm and lead parts will be at least okay. I also drag the rhythm guitar part up to the Chord Track to create the song’s “chord chart.”
Then things slow down…or at least they did before Harmonic Editing came along. Although I double on keyboards, I’m not as proficient as on guitar but also, prefer keyboard bass over electric bass—because I’ve sampled a ton of basses, I can find the sound I want instantly. And that’s where Harmonic Editing comes in.
The following is going to sound ridiculously easy…because it is. Here’s how to put Studio One’s Robot Bassist to work. This assumes you’ve set the key (use the Key button in the transport, or select an Instrument part and choose Event > Detect Key Signature), and have a Chord Track that defines the song’s chord progression.
- Play the bass part by playing the note on a MIDI keyboard that corresponds to the song’s key. Yes, the note—not notes. For example, if the song is in the key of A, hit an A wherever you want a bass note.
- Quantize what you played. It’s important to quantize because presumably, the chord changes are quantized, and the note attack needs to fall squarely at the beginning of, or within, the chord change. You can always humanize later.
- Open the Inspector, unfold the Follow Chords options, and then choose Bass (Fig. 1).

Figure 1: Choose the Bass option to create a bass part when following chords.
- Now you have a bass part! If the bass part works, choose the Edit tab, select all the notes, and choose Action > Freeze Pitch. This is important, because the underlying endless-string-of-notes remains the actual MIDI data. So if you copy the Event and paste it, unless you then ask the pasted clip to follow chords, you have the original boring part instead of the robotized one.
- After freezing, turn off Follow Chords, because you’ve already followed the chords. Now is the time to make any edits. (Asking the followed chords to follow chords can confuse matters, and may modify your edits.)
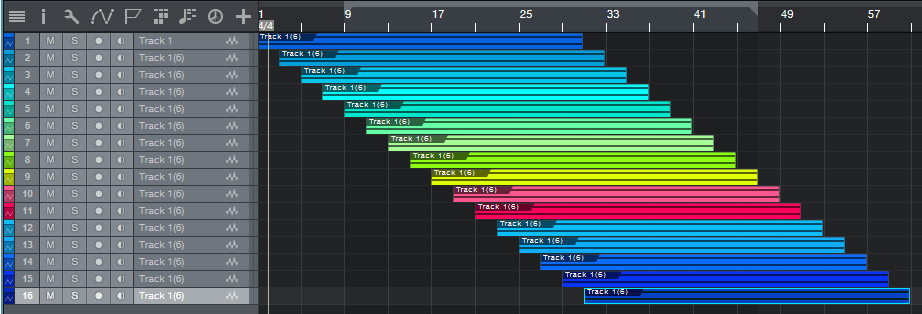
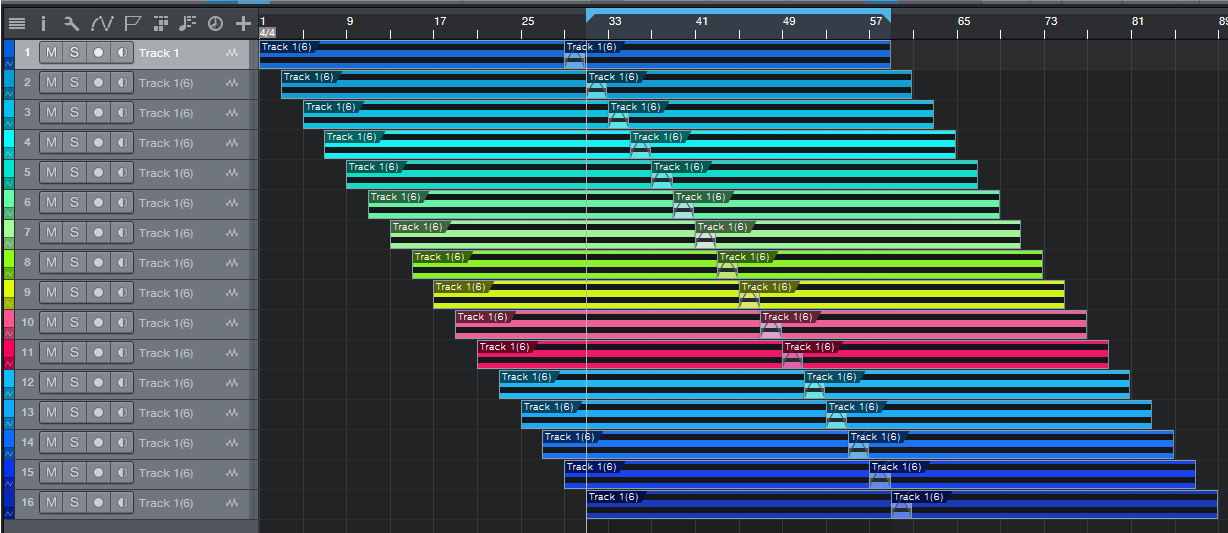
The bottom line: with one take, a few clicks, and (maybe) a couple quick edits—instant bass part (Fig. 2).
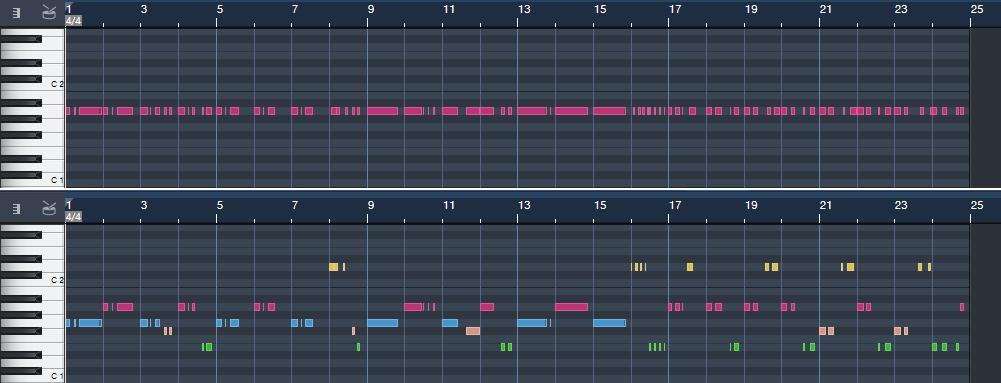
Figure 2: The top image is the original part, and yes, it sounds as bad as it looks. The lower image is what happened after it got robotized via Harmonic Editing, and amazingly, it sounds pretty good.
Don’t believe me? Well, listen to the following.
You’ll hear the bass part shown in Fig. 2, which was generated in the early stages of writing my latest music video (I mixed the bass up a little on the demo so you can hear it easily). Note how the part works equally well for the sustained notes toward the beginning, and well as the staccato parts at the end. To hear the final bass part, click the link for Puzzle of Love [https://youtu.be/HgMF-HBMrks]. You’ll hear I didn’t need to do much to tweak what Harmonic Editing did.
But Wait! There’s More!
Not only that, but most of the backing keyboard parts for Puzzle of Love (yes, including the piano intro) were generated in essentially the same way. That requires a somewhat different skill set than robotizing the bass, and a bit more editing. If you want to know more (use the Comments section), we’ll cover Studio One’s Robot Keyboardist in a future Friday Tip.
Friday Tips—Blues Harmonica FX Chain
If you’ve heard blues harmonica greats like Junior Wells, James Cotton, Jimmy Reed, and Paul Butterfield, you know there’s nothing quite like that big, brash sound. They all manage to transform the harmonica’s reedy timbre into something that seems more like a member of the horn family.
To find out more about the techniques of blues harmonica, check out the article Rediscovering Blues Harmonica. It covers why you don’t play blues harp in its default key (e.g., you typically use a harmonica in the key of A for songs in E), how to mic a harmonica, and more. However, the secret to that big sound is playing through the distortion provided by an amp, or in our software-based world, an amp sim. I don’t really find the Ampire amps suitable for this application, but we can put together an FX Chain that does the job.
Check out the demo to hear the desired goal. The first 12 bars are unprocessed harmonica (other than limiting). The second 12 bars use the FX Chain described in this week’s tip, and which you can download for your own use.
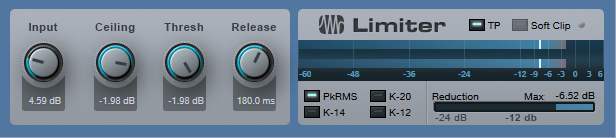
The chain starts with a Limiter to provide a more sustained, consistent sound.
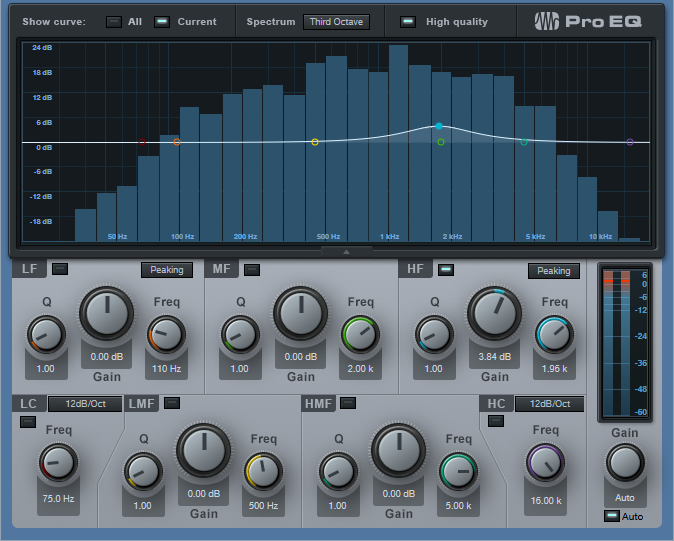
Next up: A Pro EQ to take out all the lows and highs, which tightens up the sound and reduces intermodulation distortion. (When using an amp sim, blues harmonica is also a good candidate for multiband processing, as described in the February 1 Friday Tip.)

Now it’s time for the Redlight Dist to provide the distortion. For the cabinet, this FX Chain uses the Ampire solely for its 4 x 10 American cabinet—no amp or stomps.
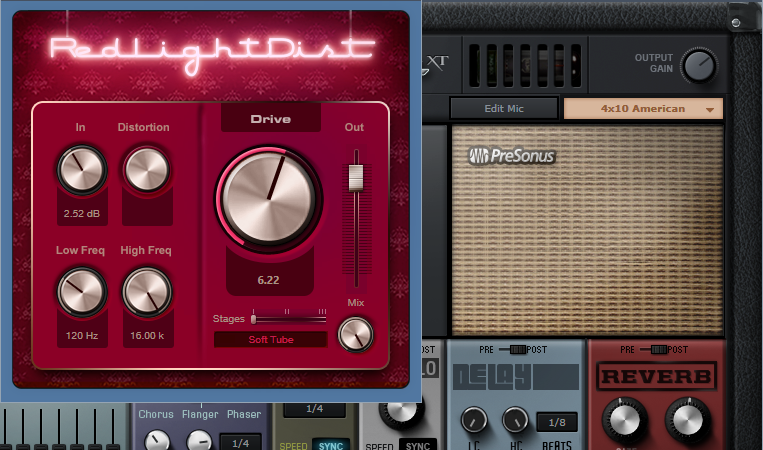
After the distortion/cabinet combo, a little midrange “honk” makes the harmonica stand out more in the mix.
For a final touch, blues harp often plays through an amp with reverb—so a good spring reverb effect adds a vintage vibe.
You can download the Blues Harp.multipreset and use it as it, but I encourage playing around with it—try different types of distortion and amps, mess with the EQ a bit, and so on. For an example of a finished song with amp sim blues harmonica in context, check out I’ll Take You Higher on YouTube.
Click here to download the multipreset!
Friday Tip: MIDI Guitar Setup with Studio One
I was never a big fan of MIDI guitar, but that changed when I discovered two guitar-like controllers—the YRG1000 You Rock Guitar and Zivix Jamstik. Admittedly, the YRG1000 looks like it escaped from Guitar Hero to seek a better life, but even my guitar-playing “tubes and Telecasters forever!” compatriots are shocked by how well it works. And Jamstik, although it started as a learn-to-play guitar product for the Mac, can also serve as a MIDI guitar controller. Either one has more consistent tracking than MIDI guitar retrofits, and no detectable latency.
The tradeoff is that they’re not actual guitars, which is why they track well. So, think of them as alternate controllers that take advantage of your guitar-playing muscle memory. If you want a true guitar feel, with attributes like actual string-bending, there are MIDI retrofits like Fishman’s clever TriplePlay, and Roland’s GR-55 guitar synthesizer.
In any case, you’ll want to set up your MIDI guitar for best results in Studio One—here’s how.
Poly vs. Mono Mode
MIDI guitars usually offer Poly or Mono mode operation. With Poly mode, all data played on all strings appears over one MIDI channel. With Mono mode, each string generates data over its own channel—typically channel 1 for the high E, channel 2 for B, channel 3 for G, and so on. Mono mode’s main advantage is you can bend notes on individual strings and not bend other strings. The main advantage of Poly mode is you need only one sound generator instead of a multi-timbral instrument, or a stack of six synths.
In terms of playing, Poly mode works fine for pads and rhythm guitar, while Mono mode is best for solos, or when you want different strings to trigger different sounds (e.g., the bottom two strings trigger bass synths, and the upper four a synth pad). Here’s how to set up for both options in Studio One.
- To add your MIDI guitar controller, choose Studio One > Options > External Devices tab, and then click Add…

Figure 1: Check “Split Channels” if you plan to use a MIDI guitar in mono mode.
- To use your guitar in Mono mode, check Split Channels and make sure All MIDI channels are selected (Fig. 1). This lets you choose individual MIDI channels as Instrument track inputs.
- For Poly mode, you can follow the same procedure as Mono mode but then you may need to select the desired MIDI channel for an Instrument track (although usually the default works anyway). If you’re sure you’re going to be using only Poly mode, don’t check Split Channels, and choose the MIDI channel over which the instrument transmits.
Note that you can change these settings any time in the Options > External Devices dialog box by selecting your controller and choosing Edit.
Choose Your Channels
For Poly mode, you probably won’t have to do anything—just start playing. With Mono mode, you’ll need to use a multitimbral synth like SampleTank or Kontakt, or six individual synths. For example, suppose you want to use Mai Tai. Create a Mai Tai Instrument track, choose your MIDI controller, and then choose one of the six MIDI channels (Fig. 2). If Split Channels wasn’t selected, you won’t see an option to choose the MIDI channel.
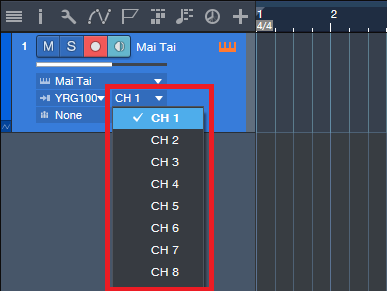
Figure 2: If you chose Split Channels when you added your controller, you’ll be able to assign your instrument’s MIDI input to a particular MIDI channel.
Next, after choosing the desired Mai Tai sound, duplicate the Instrument track five more times, and choose the correct MIDI channel for each string. I like to Group the tracks because this simplifies removing layers, turning off record enable, and quantizing. Now record-enable all tracks, and start recording. Fig. 3 shows a recorded Mono guitar part—note how each string’s notes are in their own channel.
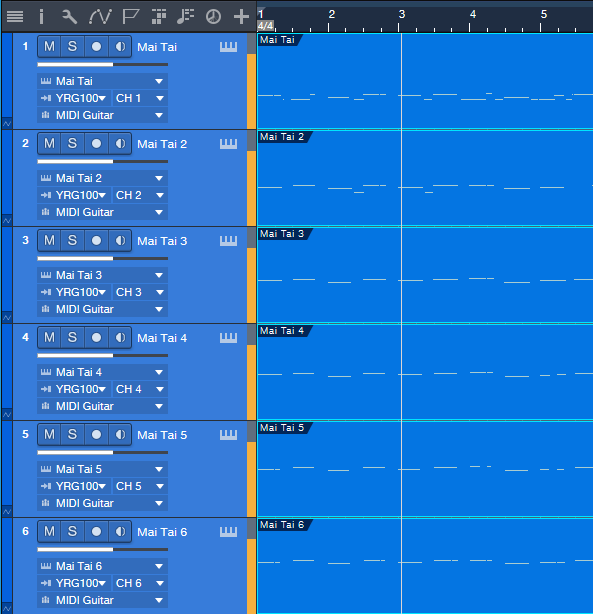
Figure 3: A MIDI guitar part that was recorded in Mono mode is playing back each string’s notes through its own Mai Tai synthesizer.
To close out, here are three more MIDI guitar tips.
- In Mono mode with Mai Tai (or whatever synth you use), set the number of Voices to 1 for two reasons. First, this is how a real guitar works—you can play only one note at a time on a string. Second, this will often improve tracking in MIDI guitars that are picky about your picking.
- Use a synth’s Legato mode, if available. This will prevent re-triggering on each note when sliding up and down the neck, or doing hammer-ons.
- The Edit view is wonderful for Mono mode because you can see what all six strings are playing, while editing only one.
MIDI guitar got a bad rap when it first came out, and not without reason. But the technology continues to improve, dedicated controllers overcome some of the limitations of retrofitting a standard guitar, and if you set up Studio One properly, MIDI guitar can open up voicings that are difficult to obtain with keyboards.
In Mono mode with Mai Tai (or whatever synth you use), set the number of Voices to 1 for two reasons. First, this is how a real guitar works—you can play only one note at a time on a string. Second, this will often improve tracking in MIDI guitars that are picky about your picking.
Friday Tips: Keyswitching Made Easy
As the quest for expressive electronic instruments continues, many virtual instruments incorporate keyswitching to provide different articulations. A keyswitch doesn’t play an actual note, but alters what you’re playing in some manner—for example, Presence’s Viola preset dedicates the lowest five white keys (Fig. 1) to articulations like pizzicato, tremolo, and martelé.
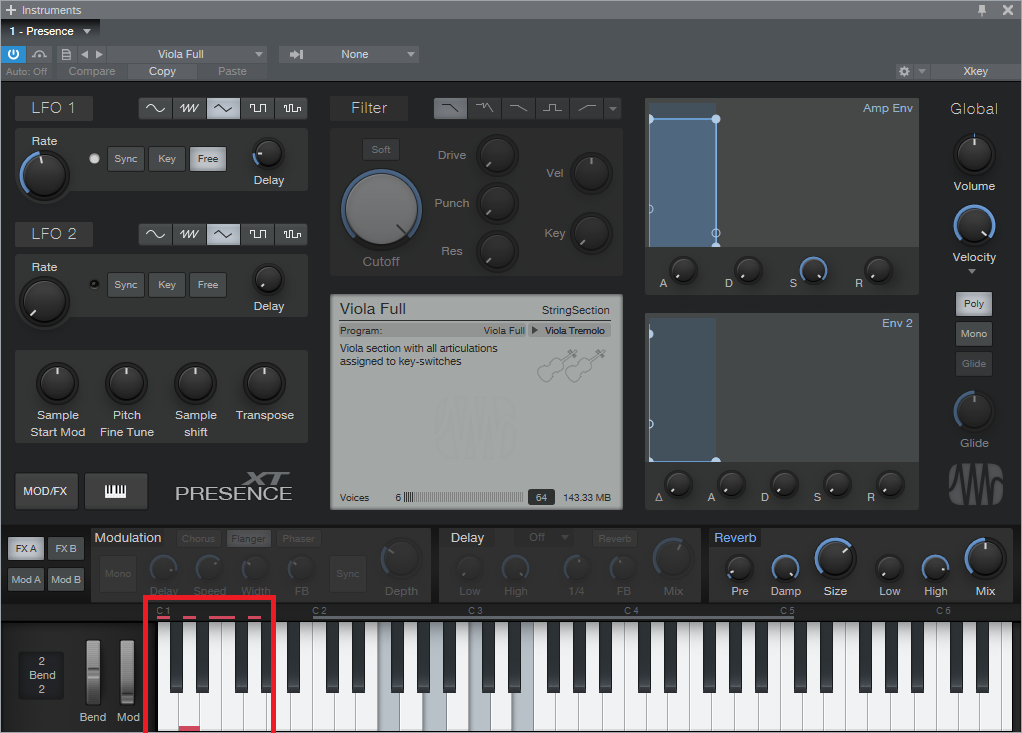
Fig. 1: The five lowest white keys, outlined in red, are keyswitches that provide articulation options. A small red bar along the bottom of the key indicates which keyswitch is active.
This is very helpful—as long as you have a keyboard with enough keys. Articulations typically are on the lowest keys, so if you have a 49-key keyboard (or even a 61-note keyboard) and want to play over its full range (or use something like a two-octave keyboard for mobile applications), the only way to add articulations are as overdubs. Since the point of articulations is to allow for spontaneous expressiveness, this isn’t the best solution. An 88-note keyboard is ideal, but it may not fit in your budget, and it also might not fit physically in your studio.
Fortunately, there’s a convenient alternative: a mini-keyboard like the Korg nanoKEY2 or Akai LPK25. These typically have a street price around $60-$70, so they won’t make too big a dent in your wallet. You really don’t care about the feel or action, because all you want is switches.
Regarding setup, just make sure that both your main keyboard and the mini-keyboard are set up under External Devices—this “just works” because the instrument will listen to whatever controllers are sending in data via USB (note that keyboards with 5-pin DIN MIDI connectors require a way to merge the two outputs into a single data stream, or merging capabilities within the MIDI interface you’re using). You’ll need to drop the mini-keyboard down a few octaves to reach the keyswitch range, but aside from that, you’re covered.
To dedicate a separate track to keyswitching, call up the Add Track menu, specify the desired input, and give it a suitable name (Fig. 2). I find it more convenient not to mix articulation notes in with the musical notes because if I cut, copy, or move a passage of notes, I may accidentally edit an articulation that wasn’t supposed to be edited.
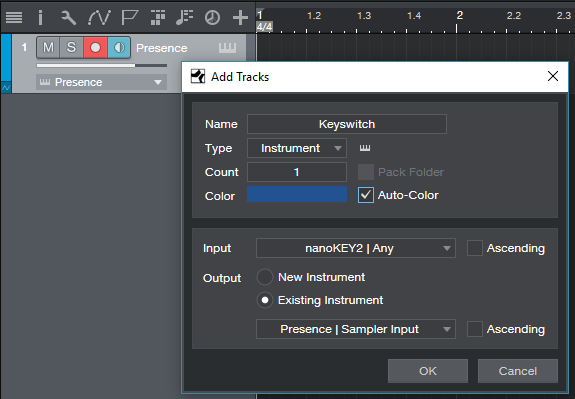
Fig. 2: Use the Add Track menu to create a track that’s dedicated to articulations.
So until you have that 88-note, semi-weighted, hammer-action keyboard you’ve always dreamed about, now you have an easy way take full advantage of Presence’s built-in expressiveness—as well as any other instrument with keyswitching.
Andrea Bocelli and Studio One at the Top of the Billboard Charts!

“In 2017, I was invited by Pierpaolo Guerrini of PPG Studios to be a part of the preproduction of Sí alongside guitarist Daniele Bonaviri,” he continues. “The album production was given to the great producer Bob Ezrin who’s worked with Pink Floyd, KISS and Peter Gabriel.”

“We met several times in my studio—JGRStudio in Rome—and Pierpaolo’s Studio PPGStudio in Tuscany for the sound design process with Studio One and Pro Tools. During these sessions, I recorded all the acoustic guitars and sound design for the pre-production process of several tracks on the record. I also used Studio One for drum editing for some yet-unreleased acoustic versions… and we were quite impressed by how fast and accurate drum editing with Studio One is.”
“So now, Studio One is officially our DAW of choice and the most active in PPGStudio—Andrea’s main recording studio. It’s been an honor to work with Bob Ezrin, and I’m so proud to work with Andrea Bocelli, the most famous singer ever.”
Follow Jurij on Facebook here!
Join the Studio One Family here!

Friday Tips: Humbucker to Single-Coil Conversion with EQ
Humbuckers are known for a big, beefy sound, while single-coil pickups are more about clarity and definition. If you want the best of both worlds, you can warm up a soldering iron, ground the junction of the humbucker’s two coils, and voilà—a single coil pickup. But there’s an easier way: use the Pro EQ, which gives the added benefit of not losing the pickup’s humbucking characteristics.
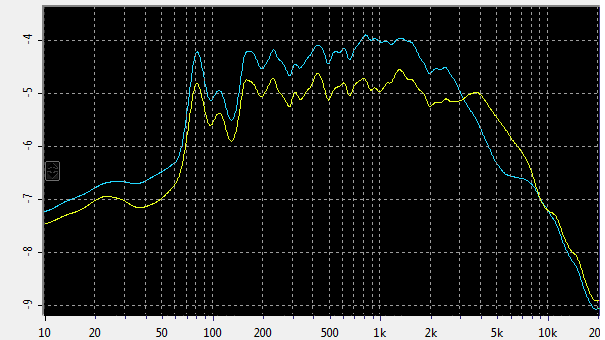
Fig. 1: Humbucker and single-coil response compared.
The main difference between humbucker and single coil pickups is the frequency response. The blue line in Fig. 1 shows a humbucker’s spectral response, while the yellow line shows the same humbucker split for single-coil operation. Unlike the single-coil’s response, which is essentially flat from 150 Hz to 3 kHz, the humbucker has a bump in the 500 Hz to 2 kHz range that contributes to the “beefy” sound. Starting at 3 kHz the humbucker response drops off rapidly, while the single coil produces more high-frequencies than the humbucker from 3 kHz to 9 kHz.
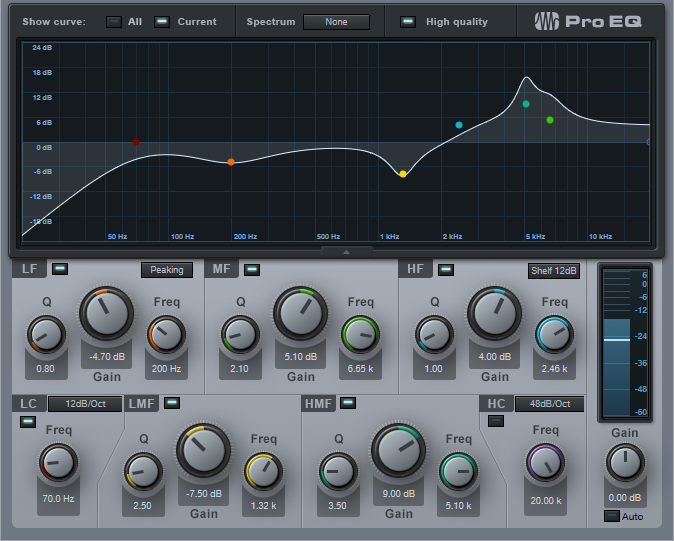
Fig. 2: Bridge humbucker to single-coil conversion EQ curve.
Fig. 2 shows an equalizer curve that modifies a bridge humbucker for more of a single-coil response. Of course different humbucker and different single-coil pickups sound different, so this kind of EQ-based “modeling” is an inexact science. However, I think you’ll find that the faux single-coil sound delivers the distinctive, glassy character you want from a single-coil pickup. Feel free to tweak the EQ further—you can come up with variations on the single-coil sound, or “morph” between the humbucker and single-coil characteristics.
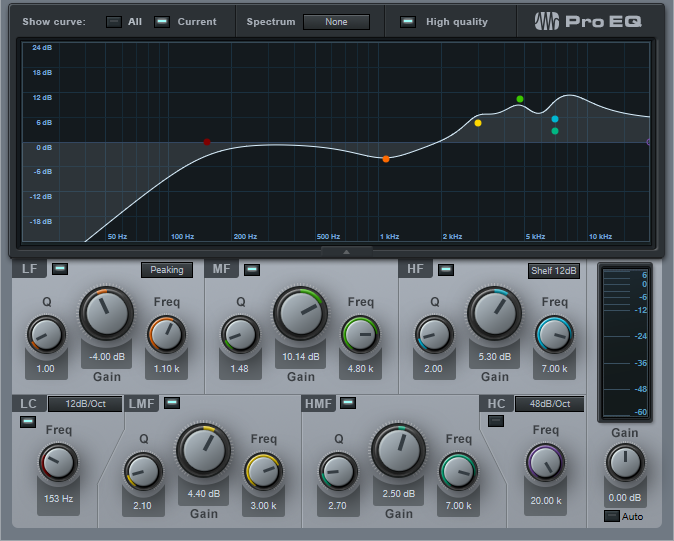
Fig. 3: Neck humbucker to single-coil conversion EQ curve.
The difference between a neck humbucker and single-coil response isn’t as dramatic, but the curve in Fig. 3 replicates the neck single-coil character, and provides yet another useful variation for your guitar tone.
The bottom line is that you don’t need to break out a soldering (or void your guitar’s warranty) to make your humbucker sound more like a single-coil type—all you need is the right kind of EQ.
Friday Tips: What’s a Phase Meter—And Why Should I Care?
I’ve always appreciated Studio One’s analytics—the spectrum analyzer, the dynamic range meter in older versions and the more modern LUFS metering in Studio One 4, the K-Scale meters based on Bob Katz’s research, the strobe tuner, and the ability to stretch the faders in the Mix view when you want to couple high resolution with long fader travel. But I wonder if the Phase Meter and its companion Correlation Meter get the props they deserve, so let’s look at what this combo can do for you.
Phase Meters—Not Just for Mixdowns!
Most people consider a tool like the Phase Meter as being only for checking final mixes. However, one very useful technique is putting it in the master output bus, and soloing one track at a time (remember, you can Alt+click on a track’s Solo button for an “exclusive solo” function). This gives some insights into the phase, level, and stereo spread of individual tracks in a way that’s more revealing than just looking over panpots.
Correlation Meter Basics
In brief, the Correlation meter (the bar graph at the Phase meter’s bottom) indicates a stereo signal’s mono compatibility. This was of crucial importance when mastering for vinyl, because it could indicate if there were out-of-phase audio components in the audio that could possibly cause the stylus to jump out of its groove. These days, it’s largely a stereo world but it’s still important to check for mono compatibility—after all, when listening to speakers, you don’t have perfect stereo separation. You’ll usually monitor correlation in the master bus, but for individual tracks, it can indicate whether (for example) a signal processor is throwing a track’s left and right channels out of phase.
The Correlation meter reading spans the range between -1 (the right and left channels are completely out of phase, with no correlation) and +1 (the right and left channels are identical, and correlate completely). With most mixes, the bar graph will fluctuate between 0 and +1.
Mono Readings
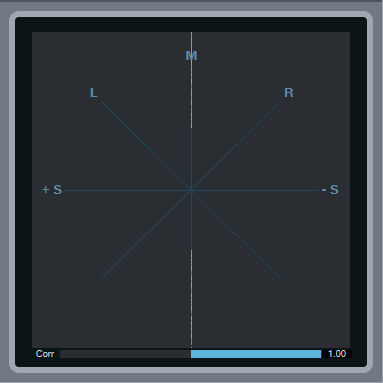
If the Phase meter displays a single vertical line, then the left and right channels are identical, and the track is mono. The Correlation bar graph meter at the bottom confirms this with its reading of 1.00, which means the left and right channels correlate completely—in other words, they aren’t just similar, but identical.
Left and Right Readings
If there’s a single, diagonal line on the L axis, that means that all the signal’s energy is concentrated in the left channel. Similarly if there’s a single, diagonal line on the R axis, then all the signal’s energy is concentrated in the right channel. If you pan a track where the left and right channels are identical (as shown by the Correlation meter displaying 1.00), then the line will move from one channel to the other.
Stereo Signals
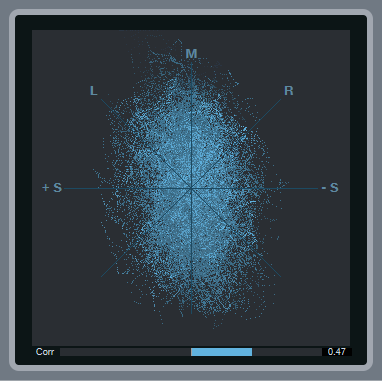
With stereo, you’ll see an excellent visual representation of how much the signal extends into the stereo field. The vertical size indicates the level. As you pan the signal left or right, the stereo field will become narrower around the line that moves from left to right until at one extreme or the other, you’ll see only a diagonal line on the L or R axis.
Note the correlation meter is showing +0.47. This means that there’s about an equal amount of similarity between the left and right channels as there are differences, but nothing is out of phase.
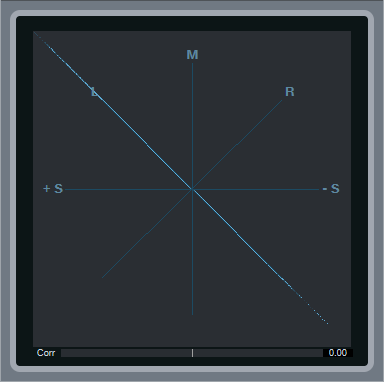
Mid-Side Encoded Audio

With Mid-Side encoded audio, you’ll see amplitude around the L and R axes, as well as along the M axis. Because the L signal is the center and the R signal the sides, you’ll see a lot more level along the L axis. Also, note the Correlation meter setting of 0.00—this means that there’s no similarity between the right and left channels, which is what you’d expect with a Mid-Side encoded signal.
Binaural Pan Signal

Studio One’s Binaural Pan processor widens the stereo image so that there’s much more energy in the right and left sides than in the center; this image shows what happens when you set the widening to maximum. Compare this to the reading for stereo signals—you can see that in this case, the energy extends further out to the right and left. Furthermore, the Correlation meter shows that there are no significant similarities between the right and left channels, which is a result of the Binaural Pan processor being based on Mid-Side processing.
Phase Issues
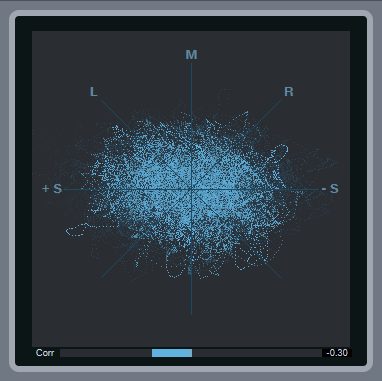
Here, the Correlation meter shows a negative number, which means there are out-of-phase elements within the stereo mix. Occasional negative blips aren’t a problem, but if the Correlation meter spends a substantial amount of time to the left of 0, then there’s a phase issue that will interfere with mono compatibility.
Friday Tips: Create the “Barberpole” Audio Illusion
The Shepard Tone (aka Barberpole) is an audio illusion where a tone always seems to keep rising (or falling). You may have heard it before—to build tension in music by Swedish House Mafia, Beatsystem, Data Life, and Franz Ferdinand, as the sound effect for the endless staircase in Super Mario 64, for the sound of constant acceleration for the Batpod in The Dark Knight and The Dark Knight Rises, at the end of Pink Floyd’s “Echoes” from the Meddle album, or in the soundtrack for the film Dunkirk in sections where the goal was to produce a vibe of increasing intensity. Check out the audio example, and you’ll hear how the tone just goes on forever.
Thanks to Studio One’s Tone Generator, it’s easy to produce a Shepard Tone loop—just follow the step-by-step instructions, in a song with the tempo set to 120 BPM.

- Insert the Tone Generator in the Input L+R insert section so that you can record its tone, and edit the Tone Generator generator’s settings as shown in the screen shot. The goal is the longest possible sine wave sweep from 20 Hz to 22 kHz.
- Start recording, then click the Tone Generator’s On button. After recording the file, trim the beginning and end respectively to just before and just after you can hear a tone, and add a short fade in and fade out.
- As shown above, copy the track, and offset each track’s beginning by two measures compared to the track above it. Keep copying and offsetting until the start of the last track is at the same measure as the end of the first track.
- Now select all, and drag the entire group to the right so that there’s a bit of an overlap between the two groups. Select everything, then type X to turn the overlap into a crossfade with a linear curve. Next, create a loop that extends from the start of the lowest track to the end of the highest track.
- Choose Song > Export Mixdown, set the Export Range to Between Loop, and under Options, check Import to Track and Close After Export. Solo the mixed track, and play it—you’ll hear a continuously rising tone. Now we need to turn it into a loop.

- Follow the instructions in the July 27 Friday Tip of the Week on how to create pads that loop perfectly. The above screen shot shows the basic concept; Track 1 shows the first steps. Copy the clip, move the copy to the right so it overlaps the last four measures of the original clip, and then crossfade the overlap with a linear crossfade.
- Track 2 in the screen shot shows the next step. Bounce the two clips together, then split at the end of measure 4 to remove the first four measures, and at the end of the crossfade to remove everything after the crossfade. Loop the section that remains, and you have your never-ending upward Shepard Tone, as a glitchless loop. Note that when you bring it into a project, don’t stretch it to conform to tempo—there is no tempo. And if you want it to go on forever…just keep typing D!
Bonus Tips:
- I recommend adding a Pro EQ—reduce the high frequencies somewhat with the HC (High Cut) filter, and boost the low frequencies with a bit of a shelf, to increase the illusion’s effectiveness.
- The “classic” Shepard Tone requires that the tones be one octave apart. However, offsetting them by 2 measures at 120 BPM seems close enough.
Studio One 4 User, James Reynolds, at the Top of the Charts!
Currently sitting in the no.1 and no.2 slot on the USA iTunes Charts are two songs mixed by mix engineer, music producer and songwriter James Reynolds who also is a Studio One user!

As a huge fan of the DAW, Reynolds worked with us on the development of the new Studio One 4, and it’s his go-to DAW for many reasons.
Reynolds was recently interviewed for Sound on Sound Magazine. Check out some of the article here. Here are just a few things he had to say about Studio One:
“I was on Cubase for a while, and then I switched to Logic. I stayed in Logic for a long time, rather than moving to Pro Tools, because I found Logic more creative. But when I discovered Studio One I really liked it, and today it is absolutely perfect!”
“Pro Tools and Studio One are very similar, because Studio One is designed to make it very easy to convert to for Pro Tools users, who would find it a piece of cake. Where it differs is in the drag‐and‐drop workflow, which is super‐fast. You have a sidebar with all your plug‐ins listed in your folders, and you just pull a plug‐in on the channel or the bus, and it will set up the routing for you. It is designed to be super‐quick. It has also taken a leaf out of Ableton’s book, so all your samples can be previewed real‐time and will automatically loop in time. Plus it has gone next level, for example in that you can create splits of your plug‐in signals within your channels. So let’s say you have a lead vocal, and you want to do a parallel bus for it within that channel, you do the split inside the plug‐in, and this gives you a lot of control very easily. It is all very well thought‐out and the automation is fantastic, and so is the MIDI.”
Click here to read more
Here’s more on what he has to say on Studio One. He’s basically the expert.
One more thing…. BTS’s latest release “IDOL” mixed by James, now holds the record for the biggest music video debut in YouTube’s history with over 45 million views in the first 24 hours! So that’s awesome.
Huge congrats to James and we’re so stoked for your success! Keep up with his success here.
Join the Studio One family here!
Friday Tip of the Week – EZ Squeez: the One-Knob Compressor!
Sometimes you just want a compressor that’s quick and easy. Maybe you’re tracking and need to compress the vocals, or hear what the bass will sound like when you add some compression on mixdown. But you know what happens—you adjust the threshold, and then the ratio, but now realize you need to re-adjust the threshold, which means the output gain needs adjusting…and maybe the knee…
If you have a bunch of ready-to-go presets, great. But here’s another option: The EZ Squeez compressor. It uses an FX Chain macro to alter six compressor parameters at once, so that a single knob sweeps from no compression, to some compression, to compression that’s more like a guitar sustainer stompbox. Although there’s a downloadable preset, I’d recommend reverse-engineering this to learn the power of the FX Chain’s Macro Controls. The principles used in this FX Chain apply to many other processors.
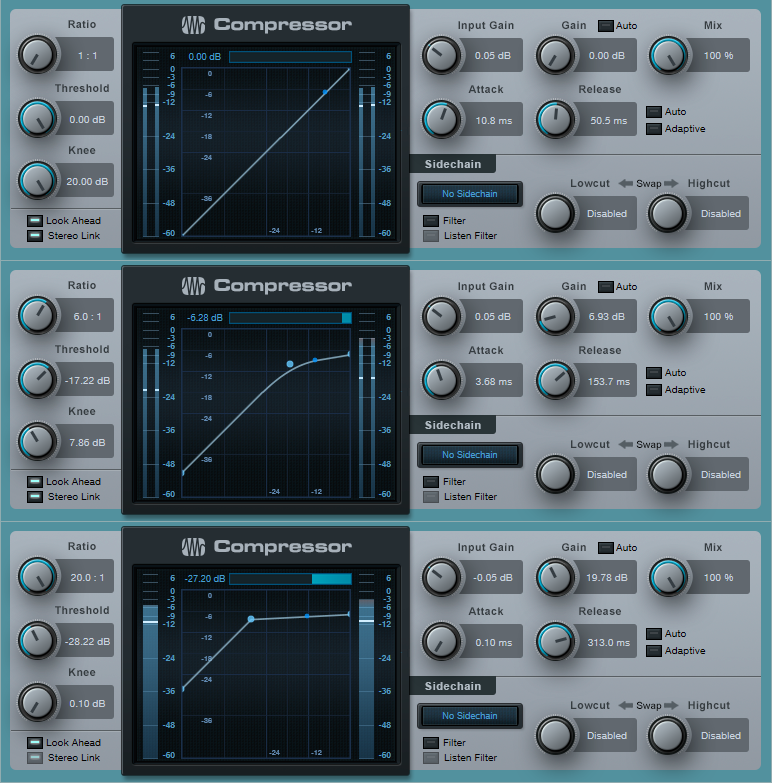
Figure 1: Three different Macro Control settings.
Figure 1 (top) shows the compressor settings with the EZ Squeez knob turned all the way counter-clockwise (minimal compression). As you turn up the EZ Squeez control, the Ratio, Release, and Gain increase, while the Threshold, Knee, and Attack decrease. The middle image shows the EZ Squeez knob turned up about 60% of the way. Turned up all the way, the parameter values become more extreme, as shown in the lower part of the screen shot.
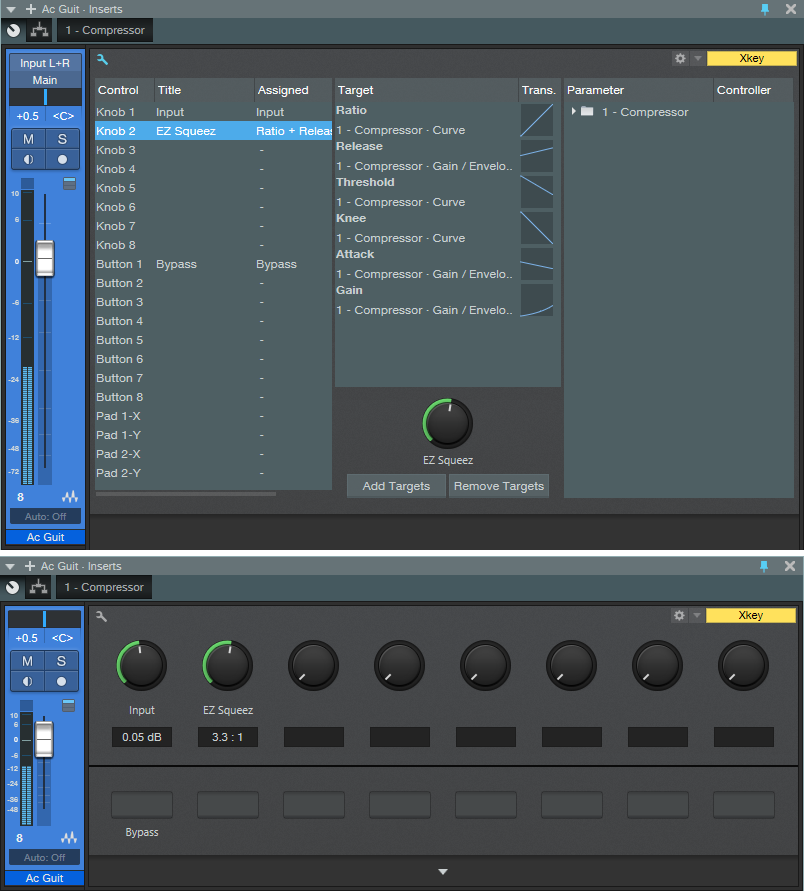
Figure 2: (Top) Macro Controls parameters and (bottom) Macro Controls interface.
Figure 2 shows the Macro Controls. Rather than expose the control settings, it’s easier just to download the Multipreset, and then click on the curves for yourself. Note the curves on the Gain and Release parameters. Given that there’s only one node on the curve you can’t get too sophisticated, but these are close enough to give a fairly even response as you move the knob from fully counter-clockwise to fully clockwise.
Because compressors are so dependent on the input signal level, I did cheat on the “one-knob” concept and added an input level control. This allows trimming the input level so that it falls in the compressor’s “sweet spot.” There’s also a bypass button so you can compare the compressed and uncompressed sounds.
As to applications, you’ll probably find that EZ Squeez knob settings of 30% to 65% will work for a variety of signal sources. Past that point, the compressor gets into a more extreme territory that pumps mixed drums, and acts more like a sustainer for guitar. But it’s easy enough to find what works the best—just turn the knob until the compression sounds right. After all, that’s the whole point!
Download the EZ Squeez.multipreset