Tag Archives: “Studio One”
Mid-Side Meets Reverb
The post on using mid-side processing with the CTC-1 garnered a good response, so let’s follow up with one of my favorite mid-side techniques: M-S reverb.
To recap, mid-side processing separates sounds in the center of a stereo file from sounds panned to the sides, processes them individually, then puts them back together again into stereo. It isn’t a perfect separation, because the mid is the sum of the left and right channels. Although this boosts the center somewhat, the mid still includes the sides. However, the side channel is quite precise, because it’s derived from putting the right and left channels out of phase—so the center cancels.
Applying Mid-Side Reverb
Before getting into how to make M-S reverb, here’s why it’s useful. Some productions have an overall reverb to provide ambiance, and a second reverb (often plate) dedicated to the vocal. The vocal is usually mixed to center, so it’s competing for space with the bass, snare, and kick. If they’re contributing to the overall reverb, and the vocal is creating its own reverb, that’s a lot of reverb in the center.
One popular fix is adding a highpass filter prior to the overall reverb, set to around 300 Hz. This keeps the bass and kick from muddying the reverb. However, it doesn’t take care of midrange or high-frequency sounds that are panned to center, like snare. These can compete even more with the vocal if they’re in the same frequency range.
While some reverbs let you tailor high- and low-frequency reverb times with a crossover, this doesn’t cover all the processing you might want to do, nor does Studio One’s Room Reverb include these parameters. Mid-side reverb, with different reverbs on the mid and sides, is a more flexible solution for customizing an overall reverb ambiance.
Assembling the Mid-Side Reverb
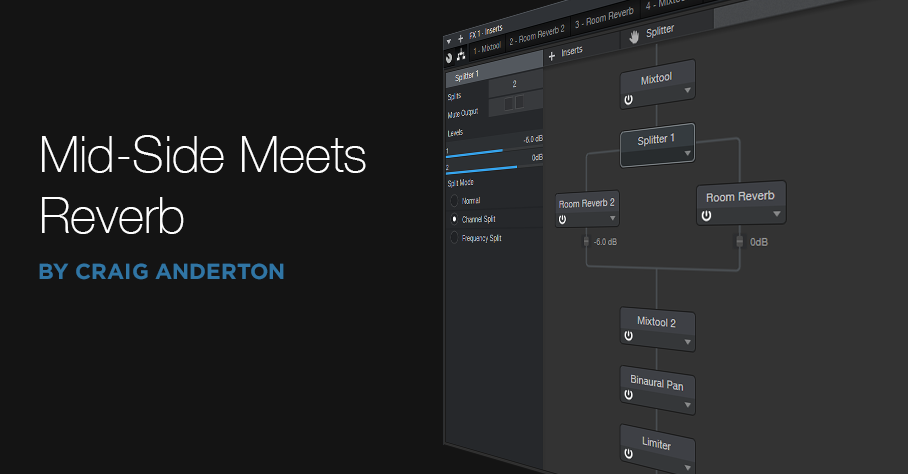
Download the FX Chain, or if you want to roll your own, start by dragging the MS-Transform FX Chain into a bus (of course, this also works for individual channels). Then drag a Room Reverb into each split (Fig. 1). The default reverb preset is a good place to start, but if the FX Chain is in a bus, remember to set the Mix controls for 100% wet sound. I also like to insert a Binaural Pan after the second MixTool to widen the overall stereo image.

Figure 1: Mid-Side Reverb FX Chain, which adds two Room Reverbs and a Binaural Pan to the MS-Transform FX Chain.
The reverb on the left handles the center, while the reverb on the right processes the sides. Lower the fader after the left reverb; Fig. 1 shows -6 dB, but adjust to taste. This alone will open up some space in the center for your vocal and its reverb. However, where this effect really comes into its own is when you tweak the reverb parameters for each reverb. For example…
- If you still want reverb on the kick and low end, vary the mid reverb’s Length parameter. Shorter lengths tighten the kick more, while longer lengths give that Kick of Doom reverb sound.
- Increase Length on the sides for a more atmospheric reverb sound.
- Increase pre-delay on the sides, to make space for attacks on the vocal track. Consonants benefit from the extra clarity.
- For this application, Eco mode sounds fine but try HQ as well.
- Turn up the Binaural Pan after the second Mixtool. I often turn it up all the way, because it sounds great in stereo, and there aren’t any phasey issues of the output collapses to mono.
By adjusting the two reverbs, you can sculpt them to give the desired overall reverb sound. If you then place a vocal in the center with a sweet plate, I think you’ll find that the vocal and overall reverb create a smooth, differentiated, and conflict-free reverb effect.
Quad Image Enhancer
Studio One’s Binaural Pan processor can widen, or narrow, an instrument’s stereo image. Aside from making “bigger” sounds that fill out the stereo spread, it also has practical applications. For example, you can spread out a thick stereo synth pad, or a guitar feeding two cabs in stereo, by turning the width control clockwise from the center position. This opens up more room for vocals, kick, snare, bass, and other centered elements. Binaural Pan can also do the reverse—like narrowing a wide, stereo synth bass part to focus it more—by turning the Width control counter-clockwise from the center position.
For mastering, Binaural Pan can make mixes seem larger than life. However, it’s not necessarily a “one-size-fits-all-frequencies” solution, because you might want to spread the highs as far as possible, but narrow the bass, and add only a little bit of spreading to the upper mids—so let’s make ourselves a multiband image enhancer.
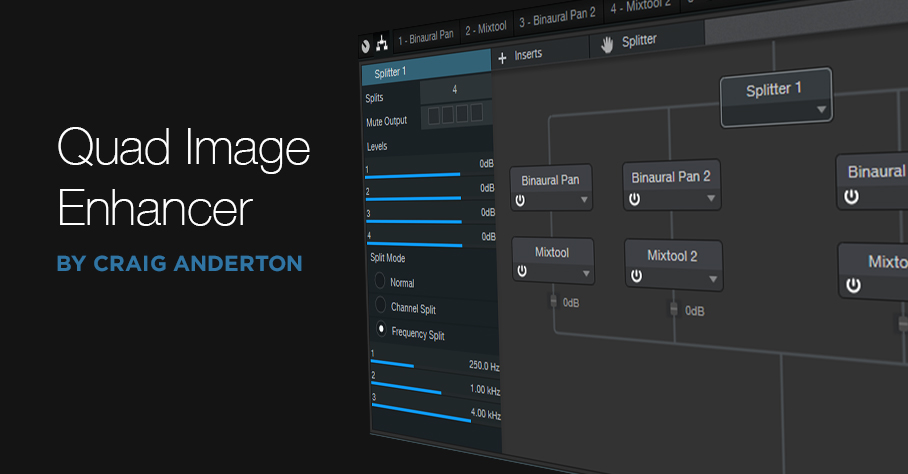
This Quad Image Enhancer FX Chain is ideal for mastering, as well as for working with individual instruments. Fig. 1 shows the modules. The Splitter splits the audio into four bands: Low (below 250 Hz), Low Mid (250 Hz – 1 kHz), Hi Mid (1 kHz – 4 kHz), and High (above 4 kHz). Each of these goes to a Binaural Pan to control the image, and a Mixtool to trim the level (-6 dB to +6 dB).
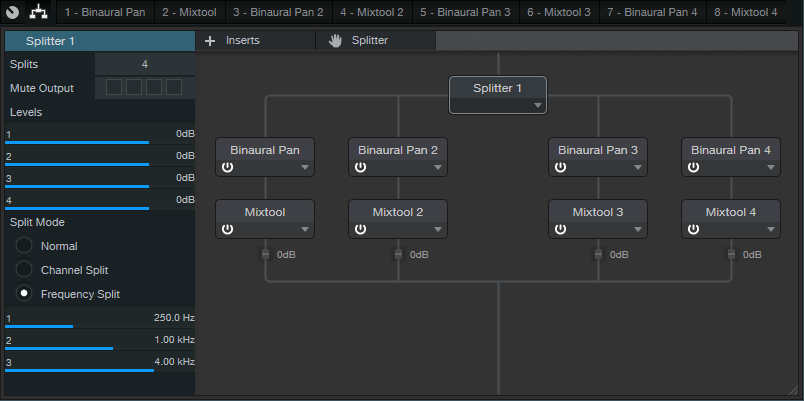
Figure 1: Modules used in the Quad Image Enhancer multipreset.
The split frequencies are arbitrary. You might want to move them around, although the ones in the default multipreset work well with a variety of music.
The Control Panel (Fig. 2) accesses all the needed parameters. Enabling the Mono button is like turning Width fully counter-clockwise, but being able to switch this provides a convenient diagnostic tool for quickly comparing a band’s sound in stereo or mono. Similarly, enabling Bypass makes it easy to hear the effect that widening (or narrowing) has on a particular band. If you need to mute individual bands so you focus completely on one or two bands while editing them, open up the FX Chain, select the Splitter, and mute the desired output(s) in the edit window’s upper-left corner.
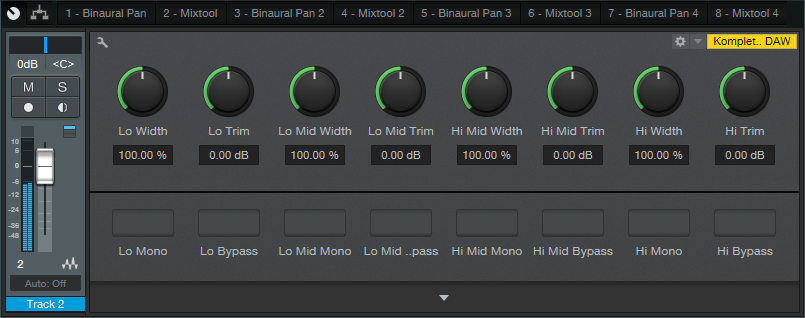
Figure 2: Quad Image Enhancer control panel.
How to Use It
When the Width controls are centered, they don’t affect the sound. You can crank up the widths for a wider sound, but you can also be a little more strategic. The following audio example plays an excerpt of mixed but unmastered audio, followed by the same excerpt going through the Quad Image Enhancer. For this application, the Lo band is narrowed, Lo Mid unchanged, Hi Mid widened slightly, and Hi widened all the way.
Note that unlike some delay-based widening solutions, this FX Chain doesn’t cause any comb filtering-induced “phaseyness” if collapsed to mono.
To widen a sound even further, turn up the Trim control for the Hi Mid or Hi bands by 1-2 dB. Because high frequencies are more directional than low frequencies, emphasizing the high frequencies increases the illusion of width.
Although there are some excellent third-party multiband imaging plug-ins available, you don’t need to go outside the Studio One ecosystem—just download the multipreset, and you’ll be ready to widen, or narrow, your stereo image.
DOWNLOAD THE QUAD IMAGE ENHANCER PRESET HERE
RMB Justize: Music Of The (PreSonus) Sphere
Discovering new sonic universes to explore is what being a musical artist is all about!
Let’s dive into RMB Justize’s discussion about his worlds of sound, and how he does it all with PreSonus Sphere:

“Versatility and persistence are a deadly combination of characteristics. They are much-needed weapons to have in an artist’s arsenal.”
Based in Chicago, IL with ties to the DMV area… Taylor Gang’s in-house producer Ryan “RMB Justize” Baker grew up in a musical household, his mother being a classical violinist for the Chicago Sinfonietta, exposing RMB’s ears as early as six years old.
“I caught the music bug from Mom, for sure. I remember turning 11 or 12 and having nothing but a voice recorder and a Yamaha DJX keyboard. Skateboarding was the thing back then, with influences ranging from Sum 41 to Incubus to The Neptunes and Noreaga. A couple of years later I finally dove into making music with computers, using every piece of software I could get my hands on until now. But… then came PreSonus Studio One, which changed it all for me.
“The interest came from an artist I worked with at the time—he wouldn’t stop mentioning it! After spending countless months into years on ProTools, FL Studio and Reason, I wanted a program that could do it all. I’m a religious template maker, as most are, so the workflow determines the imagination most if not all of the time and Studio One takes care of the madness with ease. Let’s just focus on the music and pushing envelopes more than finding where to click certain stuff. PreSonus did it right, ranging from AudioBox interfaces I’ve owned in the past, all the way to the new Quantum which gives me more than enough power to control the room.”
Since the premiere of Studio One version 5 in July of 2020, RMB has become a power user… eventually convincing a few fellow producers and artists to try it, if not make a full switch.
“There have been times where I’ve walked into big label studio sessions and people look confused because they’ve never seen Studio One in person! Once I show my way of doing certain things, using certain plug-ins in certain ways, they’re overly surprised. It’s hands-down the fastest program, which lets me flex my mind-work and turn my rough thoughts (even voice notes) into full records. I’ve had people come to my studio for sessions and look surprised when they ask why I use it. You have to try for yourself to find your workflow.”

Honorably noted, PreSonus Sphere has made his processes for online collaboration, recording, mixing, and mastering an album-quality one-stop-shop, helping the migration become a breeze. Especially during times of a pandemic where people can’t communicate like they normally would, it’s a necessity.
“I think all DAWs should have an ecosystem such as PreSonus Sphere, whether you’re just getting started or an A-list musician. The tools available make it seamless to share files and keep up to date on things like deadlines and most recent notes/mixes, rather than scrambling through emails and hard drives (which we can all relate to, I’m sure). Having that system in one spot, one site, one page, actually kept me in line when finishing a label record and staying up to date without confusion.” (Chevy Woods—Since Birth)
Recently focusing more on production and audio engineering as well, the AAF import feature has been a godsend.
“I still find myself walking people through how to convert sessions to AAF rather than tracking out. There is no other program that will line the session up identically with automation and fades, to say the least, which saves more time than I expected. That’s just a small piece of my realization, of how capable this DAW is. Cheers, PreSonus!”
Since the start of the COVID-19 pandemic, RMB’s main focus is to create cutting-edge music, knowing he has the perfect DAW to do so, with no issues.
RMB Justize @ PreSonus Sphere
Orchestral Scoring in Studio One 2, Part 4. Reverb!
PART 4: Reverb!
Now, the most difficult and most-discussed theme on orchestral composition forums is applying reverbs. This is the most important part of the orchestral mixing process as far as I’m concerned. I’ve watched and listened to loads of tutorials and lectures on reverbs for orchestra—which one is better? Why?. There is a lot of controversy on impulse response reverbs vs. algorythmic reverbs. Whatever you pick, the most important thing is that it sounds good to you. My main reverb is Altiverb and sometimes I use Lexicon PCM Native. Here’s how I apply them to my orchestra sections:
Every section has its own reverb that processes it. I like to use Altiverb’s IRs of stages like Todd-AO or FOX Scoring Stage. I like the fact that it has three different mic positions that were used to capture the impulse responses, so I can use them on individual close-miked sections of the orchestra. There are three IR patches of wide mic setups that I use. The closest one is for strings, the middle one is for brass and woodwinds, and the farthest one is for percussion and choir. I apply very little reverb on close mic sections just to give them air, and I apply more of it to stage mic sections to give them room.

- Close Reverb

Here’s an example of proper reverb settings using Lexicon PCM Native:
I use two instances of Lexicon. The first one is for close mic setup with a very small pre-delay and short reverb time. I use only 50% of the mix.

- Lexicon Close

The second instance emulates stage and far-miked setups, which requires a sizeable pre-delay and long reverb time. Its mix is set to 100%.

- Lexicon Far

If I have a solo vocalist in my session, I usually use any vocal plate preset for it.
This covers the reverb for the orchestra. Next up we’ll look at using the Studio One Video Player for scoring.
[Update! For your convenience, here’s the rest of the blogs in this series:
- Part One: Intro and DAW setup
- Part Two: Panning and placement of instruments
- Part Three: EQ
- Part Four: Reverb
- Part Five: Video
Join PreSonus Live from InfoComm!
Las Vegas, NV, June 2012… Join PreSonus for a very special live webcast, direct from the InfoComm Show in Las Vegas.

Tune in for Connecting Your Customers with StudioLive, a 30-minute presentation that will cover the broad range of advanced control and connectivity between PreSonus StudioLiveTM consoles and laptop computers, iPads®, iPhones®, and iPod touches®.
From iPad-based wireless mixer control with StudioLive-Remote and iPhone/iPod touch monitor control via QMixTM, to multitrack recording and production with CaptureTM and Studio OneTM Artist, PreSonus is the only compact digital mixer that offers such a wide range of software integration – for free!
The presentation will also take a look into the ever-expanding integration between PreSonus products and Rational Acoustics’ acclaimed SmaartTM audio-analysis technologies. Optimizing system EQ has never been this fast and easy.
Four 30-minute presentations will be broadcast live from the PreSonus Demo Room (N105) at InfoComm on Thursday, June 14, at 9:00 AM, 11:00 AM, 1:00 PM, and 3:00 PM. (All times are Pacific Daylight Time) A live Q&A from attendees will follow each session.
A special bonus for those attending the show in person: PreSonus will give away a free seven-port USB hub and free 2GB USB drive to attendees at the end of each presentation.
So join us online at http://livestream.com/
To schedule an email reminder, visit us at http://presonus.com/community/
