Tag Archives: PreSonus Audio
Unlock the Power of Impact XT’s Multiple Outs
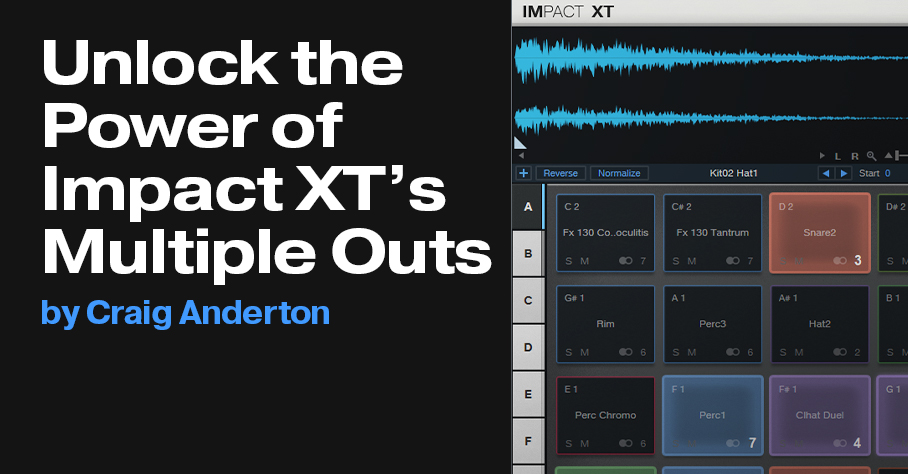
We all know Impact XT is cool—but it’s at its coolest when you use the individual audio outputs, because then you can add exquisite effects to individual drums.
How Multiple Outputs Work, Part 1: Impact Setup
Let’s zoom out. Impact has 16 potential outputs, which can be mono or stereo. The reason for saying “potential” is that you can use as many as you want, in whatever configuration you want—all stereo, all mono, or a mix of mono and stereo outputs.
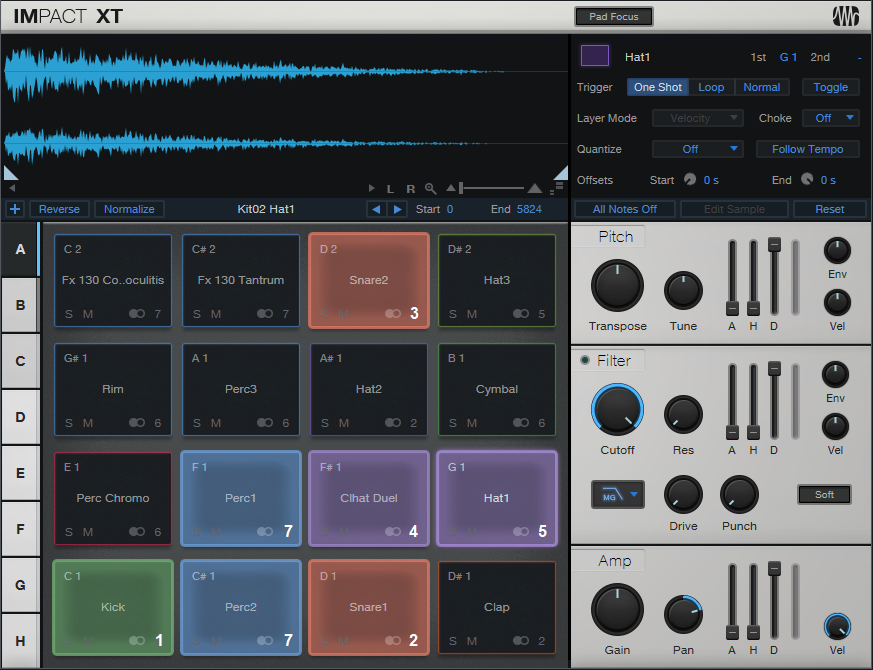
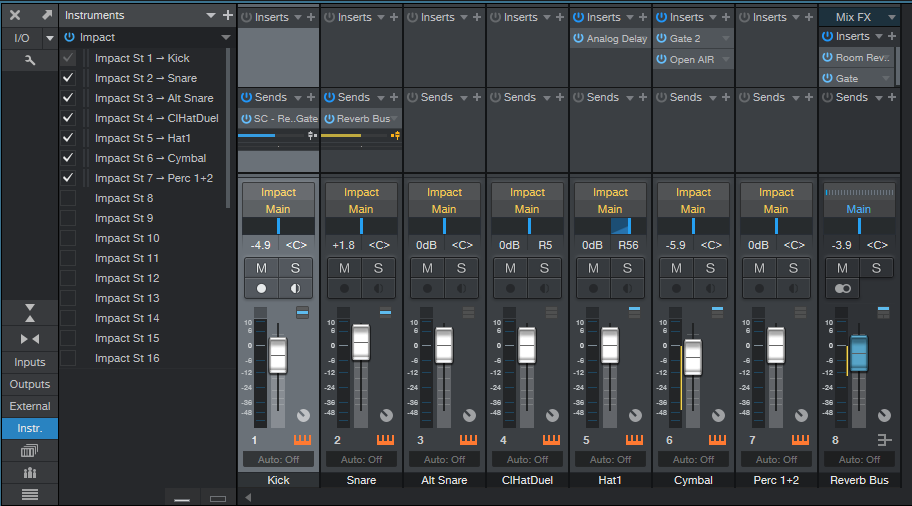
You assign a drum to one of the 16 outputs by clicking on the little number in a pad’s lower right, and choosing from one of the 16 outputs, either stereo or mono. More than one drum can feed a single output. For example, fig. 1 shows an Impact layout for a recent song. All the drums go to their own outputs, except that Perc1 and Perc2 feed the same output because they’re going to be processed, and have their levels adjusted, simultaneously.
Part 2: Console Setup
Now we’ll have the drums show up in the console. Open the Instruments panel, click on the downward arrow, and choose Expand to see Impact XT’s outputs. You’ll see all the Impact outputs (you may have to scroll to see more than the 16 stereo outputs). They’ll have an St (stereo) or M (mono) prefix, followed by the output number. Check the box that corresponds to each output that you’re using. It doesn’t hurt to check outputs you’re not using, but they’ll take up space in the console, and serve no purpose.
Next, simplify your life by renaming the console channels to reflect the drum names (fig. 2). The names will then show up in the Instruments panel. This lets you think of the console channels as sounds instead of just outputs.
Part 3: The Payoff
So why bother doing all this instead of just using a stereo output? Because we can do all kinds of fun processing. In this example:
- The Snare channel is going to a bus with Room Reverb, set for a loooong decay. It’s followed by a Gate.
- The Kick channel has a send that feeds the Gate’s sidechain, so when the kick hits, it lets through the snare’s reverb.
- The Hat1 sound’s Analog Delay adds some motion.
- The Cymbal goes through another Gate, set for a long attack time to give an attack delay effect. This is followed by the Open Air convolution reverb, which uses the “8.00s Thin” idealized reverb impulse from my Surreal Reverb Impulse Responses pack.
This processing transforms a dancehall-type beat into something more chill. The audio example’s first half plays what the loop would be like without processing, while the second half includes the processing—and that’s just the tip of the iceberg of what multiple outputs can do.
Pro Tools Multi-Mono Mode with Studio One
A fundamental difference between Pro Tools and Studio One is effects handling, which can be confusing for Pro Tools users switching to Studio One (and yes, this tip is based on a true story). When you add an effect with Pro Tools’ mixer insert, you’ll see options for Multichannel and Multi-Mono effects—which Studio One doesn’t have.
Or does it? Actually, not only can Studio One emulate the Pro Tools Multi-Mono mode for people who’ve switched, but there are some advantages that are relevant to Studio One users.
In Pro Tools, Multichannel effects are like what we’re used to in Studio One (and other programs), where the effect processes a mono or stereo track. However, Multi-Mono effects insert separate effects for a stereo track’s left and right channels. Normally this is transparent to the user because the effects are linked, and have a single interface, so they seem like a Multichannel effect. However, Multi-Mono’s particular talent is that you can unlink the effects from each other, switch between the two channels in the interface, and process the two channels (or more, for surround) separately.
My Pro Tools friend was disappointed, because he would often use this feature when mastering, restoring tracks, working with two-track audio sources, and the like. For example, when prepping a file for mastering, he sometimes limited one channel to tame peaks, left the other channel with minimal limiting, then added a master limiter at the output to provide overall limiting (this isn’t the same as using a conventional stereo limiter, and unlinking the two channels). On occasion, the different channels needed different EQ as well.
He knew about my Stereo to Virtual Mono blog post, but wanted to have everything in a single track, like Pro Tools. Fortunately, there’s a simple solution (Fig. 1). As an example, let’s use his scenario of wanting different limiters in each channel.
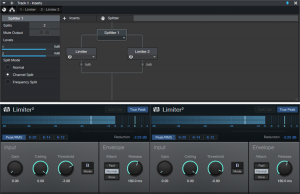
Figure 1: How to implement Pro Tools’ Multi-Mono effects functionality in Studio One.
- Open the Channel Editor, then click on the Routing button.
- Drag a Splitter into the Routing window.
- Set the Split Mode to Channel Split.
- Insert a Limiter2 into each split.
- (Optional) Insert a Limiter2 at the output, to provide the final limiting function.
Done! Now the left and right channels have their own limiters. But the Pro Tools guy also realized there was an advantage to Studio One’s pseudo-Multi-Mono mode: he didn’t have to switch between Limiter interfaces. Instead, he could pin them, and see both at the same time. When I reminded him he could bring out the Gain, Threshold, Ceiling, and Release controls for each Limiter to Macro knobs, save that as an FX chain, and use less screen real estate…let’s just say he was a happy camper.
This isn’t to diss Pro Tools, which (like any DAW) does some things well, and some things not so well. But it does show that when switching from one program to another, concerns you may have about needing to give up a favorite feature could be irrelevant.
Control Ableton as a ReWire Client with ATOM SQ
It’s not surprising a lot of Studio One users also have Ableton Live, because they’re quite different. I’ve always felt Studio One is a pro recording studio (with a helluva backline) disguised as software, while Ableton is a live performance instrument disguised as software.
Fortunately, if you like working simultaneously with Live’s loops and scenes and Studio One’s rich feature set, Studio One can host Live as a ReWire client. Even better, ATOM SQ can provide full native integration with Ableton Live when it’s ReWired as a client—once you know how to set up the MIDI ins and outs for both programs.
Studio One Setup
- Under Options > Advanced > Services, make sure ReWire Support is enabled.
- Insert Ableton Live (from Instruments > ReWire). Click “Open Application” in the dialog box, but if Live won’t open (it doesn’t for me), open Live manually. Note that Live must be version 10.1.15 or higher.
- In Studio One, go Options > External Devices. Click on ATOM SQ, and then click on Edit.
- Select None for both Receive From and Send To. Click OK, then click OK again to leave the Options menu.
- In the ReWire track, set the MIDI input to ATOM SQ so that ATOM SQ’s knobs can control Ableton Live.

Ableton Live Setup
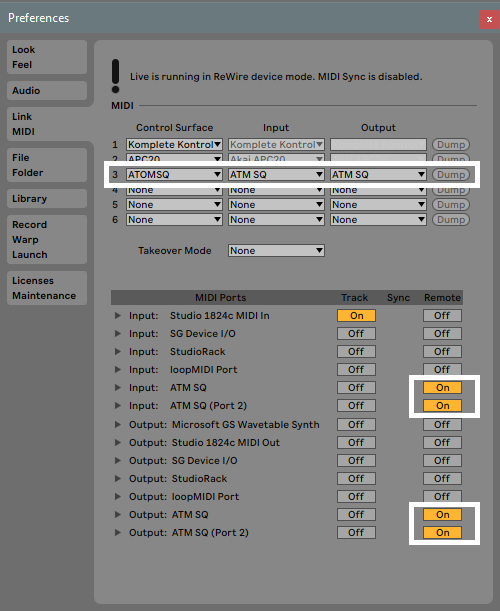
- Choose Options > Preferences > Link MIDI tab.
- Set the MIDI and Ports connections as shown.
Now ATOM SQ will act as an integrated controller with Ableton Live while it’s ReWired into Studio One. Cool, eh?
Returning to Studio One
To return control to Studio One, reverse the process—in Live, set Control Surface to None, and toggle the MIDI Ports that relate to ATOM SQ from On to Off. In Studio One’s Options > External Devices, For ATOM SQ, reconnect ATOM SQ to Receive From and Send To.
Note that with ATOM SQ controlling Studio One, the Transport function still controls both Live and Studio One. Also, if Live has the focus, any QWERTY keyboard assignments for triggering Clips and Scenes remain valid. So even while using ATOM SQ in the native mode for Studio One, you can still trigger different Clip and Scenes in Live. If you switch the focus back to Studio One, then any QWERTY keyboard shortcuts will trigger their assigned Studio One shortcuts.
Note: When switching back and forth between Live and Studio One, and enabling/disabling Studio One and Ableton Live modes for ATOM SQ, to return to Live you may need to “refresh” Live’s Preferences settings. Choose None for the Control Surface and then re-select ATOM SQ. Next, turn the various MIDI Port options off and on again.
Sweet Multiband Chorus
 Full disclosure: I’m not a big fan of chorusing. In general, I think it’s best relegated to wherever snares with gated reverbs, orchestral hits, DX7 bass presets, Fairlight pan pipes, and other 80s artifacts go to reminisce about the good old days.
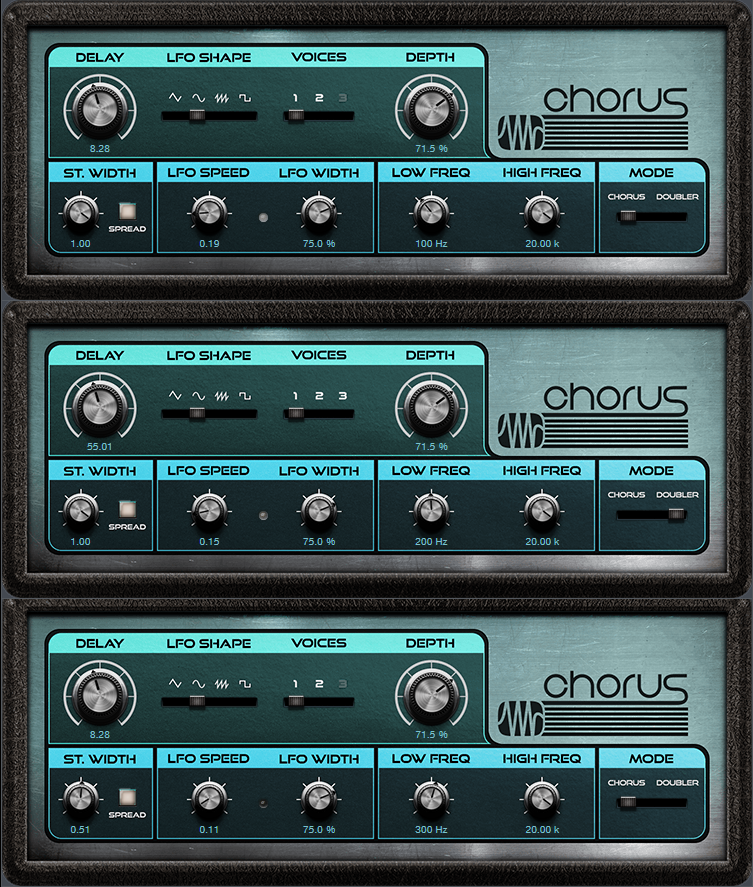
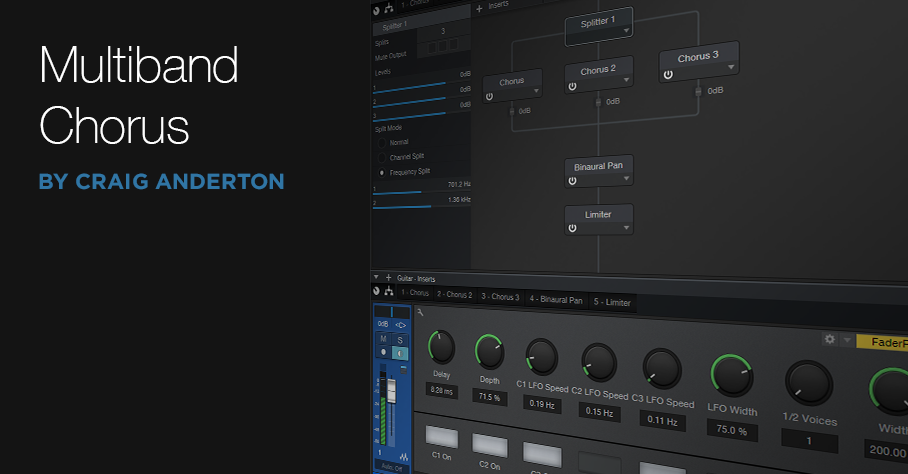
But sometimes it’s great to be wrong, and multiband chorusing has changed my mind. This FX Chain (which works in Studio One Version 4 as well as Version 5) takes advantage of the Splitter, three Chorus plug-ins, Binaural panning, and a bit of limiting to produce a chorus effect that covers the range from subtle and shimmering, to rich and creamy.
There’s a downloadable .multipreset file, so feel free to download it, click on this window’s close button, bring the FX Chain into Studio One, and start playing. (Just remember to set the channel mode for guitar tracks to stereo, even with a mono guitar track.) However, it’s best to read the following on what the controls do, so you can take full advantage of the Multiband Chorus’s talents.
Anatomy of a Multiband Chorus
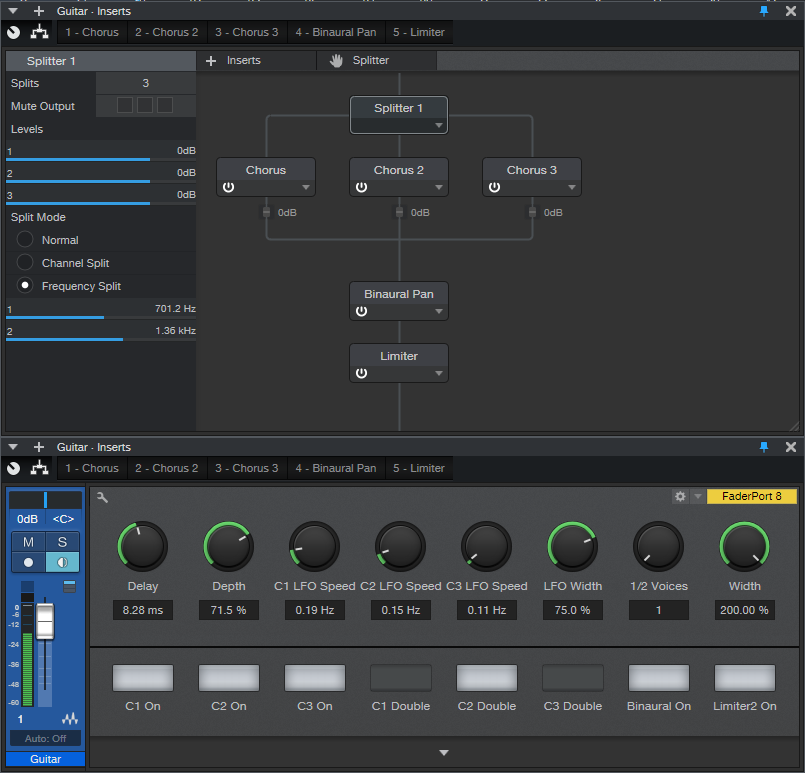
The Splitter creates three splits based on frequency, which in this case, are optimized for guitar with humbucking pickups. These frequencies work fine with other instruments, but tweak as needed. The first band covers up to 700 Hz, the second from 700 Hz to 1.36 kHz, and the third band, from 1.36 kHz on up (Fig. 1).
Figure 1. FX Chain block diagram and Macro Controls panel for the Multiband Chorus.
Each split goes to a Chorus. The mixed output from the three splits goes to a Binaural Pan to enhance the stereo imaging, and a Limiter to make the signal “pop” a little more.
Regarding the control panel, the Delay, Depth, LFO Width, and 1/2 Voices controls affect all three Choruses. Each Chorus also has its own on/off switch (C1, C2, and C3), Chorus/Double button (turning on the button enables the Double mode), and LFO Speed control. You’ll also find on/off buttons for the Binaural Pan and Limiter, as well as a Width control for the Binaural Pan. Fig. 2 shows the initial Chorus settings when you call up the FX Chain.
Figure 2. Initial FX Chain Chorus settings.
The Multiband Advantage
Because chorusing occurs in different frequency bands, the sound is more even and has a lusher sound than conventional chorusing. Furthermore, setting asynchronous LFO Speeds for the three bands can give a more randomized effect (at least until there’s an option for smoothed, randomized waveform shapes in Studio One).
A major multiband advantage comes into play when you set one of the bands to Doubler mode instead of Chorus. You may need to readjust the Delay and Width controls, but using Doubler mode in the mid- or high-frequency band, and chorusing for the other bands, gives a unique sound you won’t find anywhere else. Give it a try, and you’ll hear why it’s worth resurrecting the chorus effect—but with a multiband twist.
Download the .multipreset here.
Craig Anderton’s Big Book Round-Up
If you’ve spent a couple of spare evenings at home poking around the web for tips on music and audio production, it’s really very likely that you’ve run into some posts, articles, or comments from Craig Anderton. In fact, you may have had to update your search criteria to sort by “most recent,” because it’s fairly common for Google to show you some Craig Anderton posts from the dawn of the internet age, which—while cool—may not be particularly full of insight on Studio One version 4.
Fact is Craig is our industry’s most acclaimed writers, and he’s spoken about Studio One in-person at more events than I can count, and is of course responsible for the Friday Tips section of this very blog. In short, Craig’s contributions to the success and proliferation of Studio One can’t really be counted.
But his Studio One books? Those can be counted. There are five.
We wanted to take a minute to thank Craig for all of his hard work, broadly-reaching creative output, and continued support of PreSonus and Studio One. Let’s take a closer look at what he’s got over at shop.presonus.com. Chances are one or more of these will prove valuable to you and your process. Note that these are eBooks, not hardcover books, and will be downloaded as PDFs.
How to Record and Mix Great Guitar Sounds in Studio One
Essential reading for anyone who records guitars in Studio One, this definitive book covers invaluable production and engineering techniques.
- 274-page, beautifully-illustrated eBook is the fifth book in this acclaimed series of how to get the absolute most out of Studio One
- Covers all aspects of recording and mixing guitar, from how to choose the right strings for a particular tone, to advanced techniques that bring out the best in amp modeling plug-ins
- Applicable to all genres, from acoustic folk to heavy metal
- Links from contents page to topics—find specific subjects quickly
- Find out how to use DSP, effects, real-time control, and much more
 The Big Book of Studio One Tips and Tricks
Consolidates, updates, expands on, and categorizes 130 tips from Craig’s popular “Friday Tip of the Week” blog posts that you probably have been checking out right here. Essential reading. This massive book includes tips on how solve problems, enhance sound quality, improve workflow, achieve greater expressiveness, create signature sounds, and much more.
- 289 pages with 278 four-color illustrations to help streamline the learning process
- Includes 39 free presets (28 Multipresets, 10 Mai Tai presets, 1 Presence XT preset) that support the tips
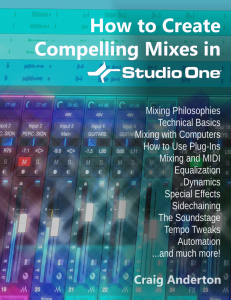 How to Create Compelling Mixes in Studio One
A comprehensive, practical, and above all inspiring guide on how to use Studio One’s sophisticated toolset to craft the perfect mix.
- 258-page eBook with over 180 four-color illustrations
- Downloadable PDF format, with links from the contents to book topics
- “Key Takeaways” section for each chapter summarizes chapter highlights
- “Tech Talk” sidebars do deep dives into selected topics
- Covers all aspects of mixing with Studio One
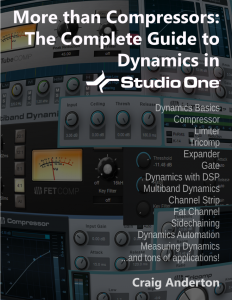 More than Compressors: The Complete Guide to Dynamics in Studio One
The ultimate guide to becoming an expert on Studio One’s dynamics processors and dynamics-oriented features.
- 258-page eBook with over 180 four-color illustrations
- Downloadable PDF format, with links from the contents to book topics
- “Key Takeaways” section for each chapter summarizes chapter highlights
- “Tech Talk” sidebars do deep dives into selected topics
- Covers all aspects of mixing with Studio One
 How to Record and Mix Great Vocals in Studio One
The ultimate guide to capturing, producing, and mixing superb vocal performances in Studio One.
- Profusely illustrated, 121-page eBook
- Covers everything from microphones to the final mix
- Tips on creating compelling vocal performances
- Links from contents page to topics
- Filled with practical, real-world examples
SuperKick—Tune and Enhance Your Kick Drum
If you do hip-hop or EDM, you’re in the right place.
This tip turns wimpy kicks into superkicks, using a different technique compared to drum replacement (see the Friday Tip for February 9, 2018). Listen to the audio example, and you’ll hear why this is cool.
Audio Example: The second four measures add the SuperKick effect to the loop in the first four measures. The added kick is 40 Hz…so don’t expect to hear anything on laptop speakers!
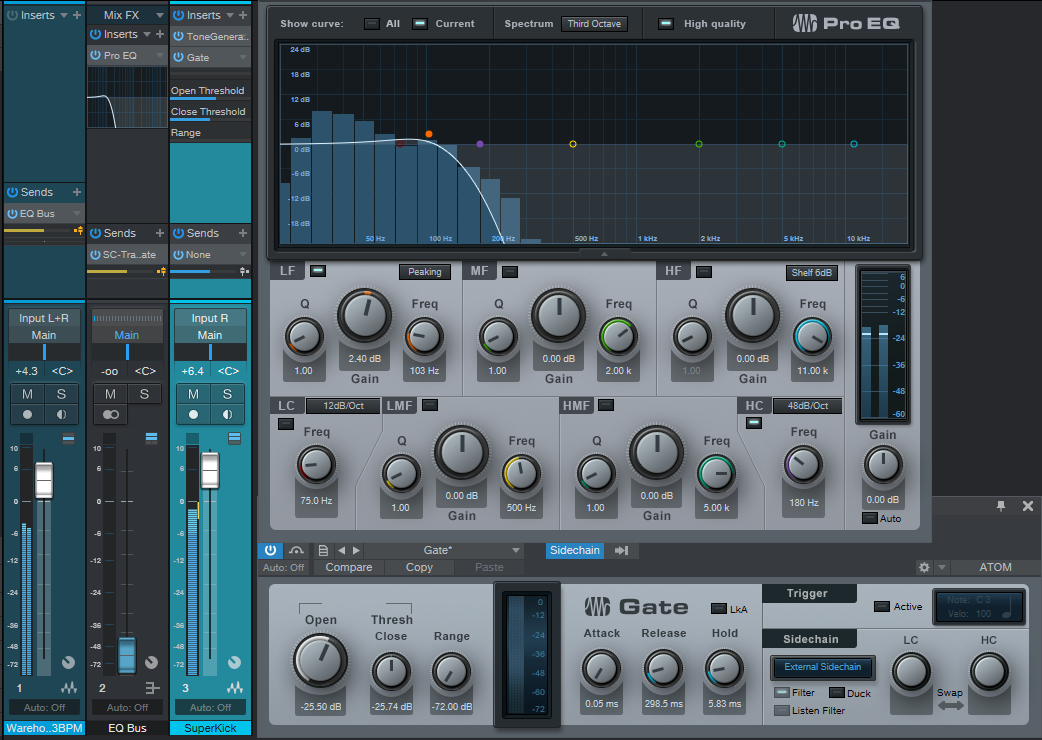
The basic concept is to add another track with a low-frequency sine wave, tuned to your pitch of choice. This can be a WAV file, but this example uses the highly-underrated, and extremely useful, Tone Generator plug-in set to a floor-shaking 40 Hz sine wave. A Bus “listens” to the loop, and uses EQ to filter out everything except the kick; you don’t hear this audio, but it gates the Tone Generator’s sine wave so that it tracks the kick. Fig. 1 shows the setup.
Figure 1: Setup to tune and enhance the kick in an existing loop.
- Track 1 is your drum loop; the audio example uses the Warehouse Tech Musicloop included in Studio One. Insert a pre-fader Send that goes to a Bus (named “EQ Bus” in this example). The reason for a pre-fader send is you’ll want to turn the Track fader down when tweaking the EQ and Gate responses covered later.
- Insert the Pro EQ into the EQ Bus. Tweak the response to filter out everything but the kick. The High Cut’s 48 dB/octave slope will probably do the job, although if there’s a lot of other bass action (like floor toms or bass) you may need to add an additional Peaking stage. Zero in on the kick’s lowest audible frequency, and apply a narrow boost.
- Add a Track, and insert the Tone Generator. Turn it on, then set it to produce a constant, low-frequency sine wave. Follow the tone Generator with a Gate.
- Add a pre-fader send from the EQ Bus to the Gate’s sidechain.
- To produce the most reliable triggering, the Gate settings and the Send level going to the Gate’s sidechain are crucial. Set the Threshold Close just slightly lower than the Open setting. Release determines how long the kick will last; 5 to 10 ms of hold minimizes “chattering.” Start by setting the Open and Threshold controls as shown, and adjust the Send to the sidechain for the most reliable triggering. If the kick tone doesn’t trigger, even with the Send to the sidechain turned up, lower the Open and Threshold close controls. If the kick tone stays on all the time, lower the Send level.
With the loop fader down so you’re not distracted, play with the Tone Generator frequency, EQ frequency to isolate the kick sound, and Gate settings until there’s reliable kick triggering. How you set the gate provides various options: extend the Release for a “hum drum” effect, or for more expressiveness, automate the release time. Increasing the Hold time alters the character as well.=
And after everything is set up…stand back while the floors shake!
The De-Stresser FX Chain
Feeling a little bit stressed?
I’m not surprised. Or do you ever have one of those days? Of course you do! Wouldn’t it be great to go down to the beach, listen to the waves for a while, and chill to those soothing sounds? The only problem for me is that going to the beach would involve a 7-hour drive.
Hence the De-Stresser FX Chain, which doesn’t sound exactly like the ocean—but emulates its desirable sonic effects. If you’re already stressed out, then you probably don’t want to take the time to assemble this chain, so feel free to go to the download link. Load the FX Chain into a channel, but note that you must enable input monitoring, because the sound source is the plug-in Tone Generator’s white noise option.
About the FX Chain
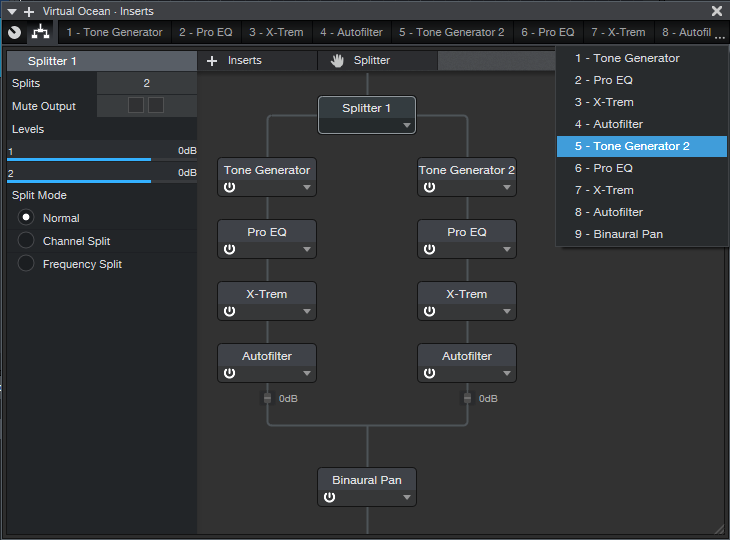
Figure 1: Effects used to create the De-Stresser’s virtual ocean.
Fig. 1 shows the FX Chain’s “block diagram.” The Splitter adds variety to the overall sound by feeding dual asynchronous “waves,” as generated by the X-Trems (set for tremolo mode). The X-Trem LFO’s lowest rate is 0.10 Hz; this should be slow enough, but for even slower waves, you can sync to tempo with a long note value, and set a really slow tempo.
Waves also have a little filtering as they break on the beach, which the Autofilters provide. The Pro EQs tailor the low- and high-frequency content to alter the waves’ apparent size and distance.
And of course, there’s the ever-popular Binaural Pan at the end. This helps create a more realistic stereo image when listening on headphones.
Macro Controls
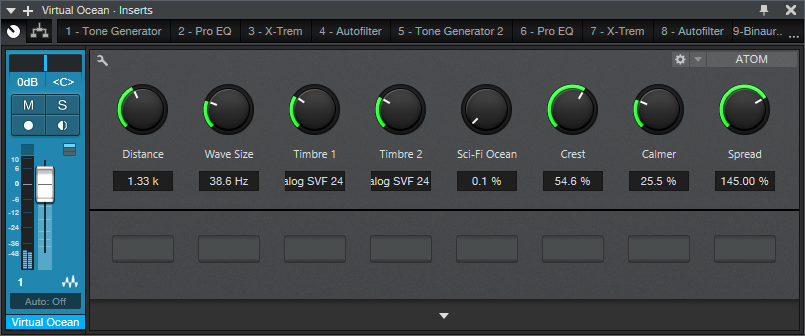
Figure 2: The Macro Controls panel.
Regarding the Macro Controls panel (Fig. 2), the two Timbre controls alter the filter type for the two Autofilters. This provides additional variety, so choose whichever filter type combination you prefer. Crest alters the X-Trem depth, so higher values increase the difference between the waves’ peaks and troughs.
The Sci-Fi Ocean control adds resonance to the filtering. This isn’t designed to enhance the realism, but it’s kinda fun. Another subtle sci-fi sound involves setting the two Timbre controls to the Comb response.
As you move further away from real waves, the sound has fewer high frequencies. So, Distance controls the Pro EQ HC (High Cut) filters. Similarly, Wave Size controls the LC filter, because bigger waves have more of a low-frequency component. The Calmer control varies the Autofilter mix; turning it up gives smaller, shallower waves.
When you want to relax, this makes a soothing background. Put on good headphones, and you can lose yourself in the sound. It also makes a relaxing environmental sound when played over speakers at a low level. If your computer has Bluetooth, and you have Bluetooth speakers, try playing this in the background at the end of a long day.
Son of the Beach
This is just one example of the kind of environmental sounds and effects you can make with Studio One, so let me know if this type of tip interests you. I’ve also done rain, rocket engines, howling gales, the engine room of an interstellar cargo ship, cosmic thuds, various soundscapes, and even backgrounds designed to encourage theta and delta brain waves. I made the last one originally for a friend of mine whose children had a hard time going to sleep, and burned it to CD. When I asked what he thought, he said “no one has ever heard how it ends.” So I guess it worked! Chalk up another unusual Studio One application.
Download the De-Stresser FX Chain here!
Into the Archives, Part 2
After last week’s thrilling cliff-hanger about how to preserve your WAV files for future generations, let’s look at how to export all your stereo audio tracks and have them incorporate effects processing, automation, level, and panning. There are several ways to do this; although you can drag files into a Browser folder, and choose Wave File with rendered Insert FX, Studio One’s feature to save stems is much easier and also includes any effects added by effects in Bus and FX Channels. (We’ll also look at how to archive Instrument tracks.)
Saving as stems, where you choose individual Tracks or Channels, makes archiving processed files a breeze. For archiving, I choose Tracks because they’re what I’ll want to bring in for a remix. For example, if you’re using an instrument where multiple outputs feed into a stereo mix, Channels will save the mix, but Tracks will render the individual Instrument sounds into their own tracks.
When you export everything as stems, and bring them back into an empty Song, playback will sound exactly like the Song whose stems you exported. However, note that saving as stems does not necessarily preserve the Song’s organization; for example, tracks inside a folder track are rendered as individual tracks, not as part of a folder. I find this preferable anyway. Also, if you just drag the tracks back into an empty song, they’ll be alphabetized by track name. If this is an issue, number each track in the desired order before exporting.
SAVING STEMS
Select Song > Export Stems. Choose whether you want to export what’s represented by Tracks in the Arrange view, or by Channels in the Console. Again, for archiving, I recommend Tracks (Fig. 1).
Figure 1: The Song > Export Stems option is your friend.
If there’s anything you don’t want to save, uncheck the box next to the track name. Muted tracks are unchecked by default, but if you check them, the tracks are exported properly, and open unmuted.
Note that if an audio track is being sent to effects in a Bus or FX Channel, the exported track will include any added effects. Basically, you’ll save whatever you would hear with Solo enabled. In the Arrange view, each track is soloed as it’s rendered, so you can monitor the archiving progress as it occurs.
In Part 1 on saving raw WAV files, we noted that different approaches required different amounts of storage space. Saving stems requires the most amount of storage space because it saves all tracks from start to end (or whatever area in the timeline you select), even if a track-only has a few seconds of audio in it. However, this also means that the tracks are suitable for importing into programs that don’t recognize Broadcast WAV Files. Start all tracks from the beginning of a song, or at least from the same start point, and they’ll all sync up properly.
WHAT ABOUT THE MAIN FADER SETTINGS?
Note that the tracks will be affected by your Main fader inserts and processing, including any volume automation that creates a fadeout. I don’t use processors in the Main channel inserts, because I reserve any stereo 2-track processing for the Project page (hey, it’s Studio One—we have the technology!). I’d recommend bypassing any Main channel effects, because if you’re going to use archived files for a remix, you probably don’t want to be locked in to any processing applied to the stereo mix. I also prefer to disable automation Read for volume levels, because the fade may need to last longer with a remix. Keep your options open.
However, the Main fader is useful if you try to save the stems and get an indication that clipping has occurred. Reduce the Main fader by slightly more than the amount of clipping (e.g., if the warning says a file was 1 dB over, lower the Main channel fader by -1.1 dB). Another option would be to isolate the track(s) causing the clipping and reduce their levels; but reducing the Main channel fader maintains the proportional level of the mixed tracks.
SAVING INSTRUMENT AUDIO
Saving an Instrument track as a stem automatically renders it into audio. While that’s very convenient, you have other options.
When you drag an Instrument track’s Event to the Browser, you can save it as a Standard MIDI File (.mid) or as a Musicloop feature (press Shift to select between the two). Think of a Musicloop, a unique Studio One feature, as an Instrument track “channel strip”—when you bring it back into a project, it creates a Channel in the mixer, includes any Insert effects, zeroes the Channel fader, and incorporates the soft synth so you can edit it. Of course, if you’re collaborating with someone who doesn’t have the same soft synth or insert effects, they won’t be available (that’s another reason to stay in the Studio One ecosystem when collaborating if at all possible). But, you’ll still have the note events in a track.
There are three cautions when exporting Instrument track Parts as Musicloops or MIDI files.
- The Instrument track Parts are exported as MIDI files, which aren’t (yet) time-stamped similarly to Broadcast WAV Files. Therefore, the first event starts at the song’s beginning, regardless of where it occurs in the Song.
- Mutes aren’t recognized, so the file you bring back will include any muted notes.
- If there are multiple Instrument Parts in a track, you can drag them into the Browser and save them as a Musicloop. However, this will save a Musicloop for each Part. You can bring them all into the same track, one a time, but then you have to place them properly. If you bring them all in at once, they’ll create as many Channels/Tracks as there are Instrument Parts, and all Parts will start at the Song’s beginning…not very friendly.
The bottom line: Before exporting an Instrument track as a Musicloop or MIDI file, I recommend deleting any muted Parts, selecting all Instrument Parts by typing G to create a single Part, then extending the Part’s start to the Song’s beginning (Fig. 2).
Figure 2: The bottom track has prepped the top track to make it stem-export-friendly.
You can make sure that Instrument tracks import into the Song in the desired placement, by using Transform to Audio Track. As mentioned above, it’s best to delete unmuted sections, and type G to make multiple Parts into a single Part. However, you don’t need to extend the track’s beginning.
- Right-click in the track’s header, and select Transform to Audio Track.
- Drag the resulting audio file into the Browser. Now, the file is a standard Broadcast WAV Format file.
- When you drag the file into a Song, select it and choose Edit > Move to Origin to place it properly on the timeline.
However, unlike a Musicloop, this is only an audio file. When you bring it into a song, the resulting Channel does not include the soft synth, insert effects, etc.
Finally…it’s a good idea to save any presets used in your various virtual instruments into the same folder as your archived tracks. You never know…right?
And now you know how to archive your Songs. Next week, we’ll get back to Fun Stuff.
25 Years of WHABAM!
If there’s one word to sum up the man, the myth, the legend, Rick Naqvi… it’s: WHABAM!
Rick is as much of a staple to PreSonus as drag and drop is to Studio One. He loves his team, music, and his job! After spending a quarter-century serving the PreSonus family, he is the expert when it comes to selling PreSonus with passion and enthusiasm. If you’ve met him, you love him (and you’re probably still hypnotized by the Rick Effect.) And if you haven’t met him, here’s your chance to get to know him better.
How long have you worked for PreSonus?
This coming October will be my 25th year at PreSonus. I was employee #5 or #6 I believe.
What was your job title when you started? What is your job title now?
Well, I was the first guy in sales so I guess my title would have been “Rick Naqvi, Sales Guy.” Today my role is Senior Vice President of Global Sales.
What were you doing before working at PreSonus?
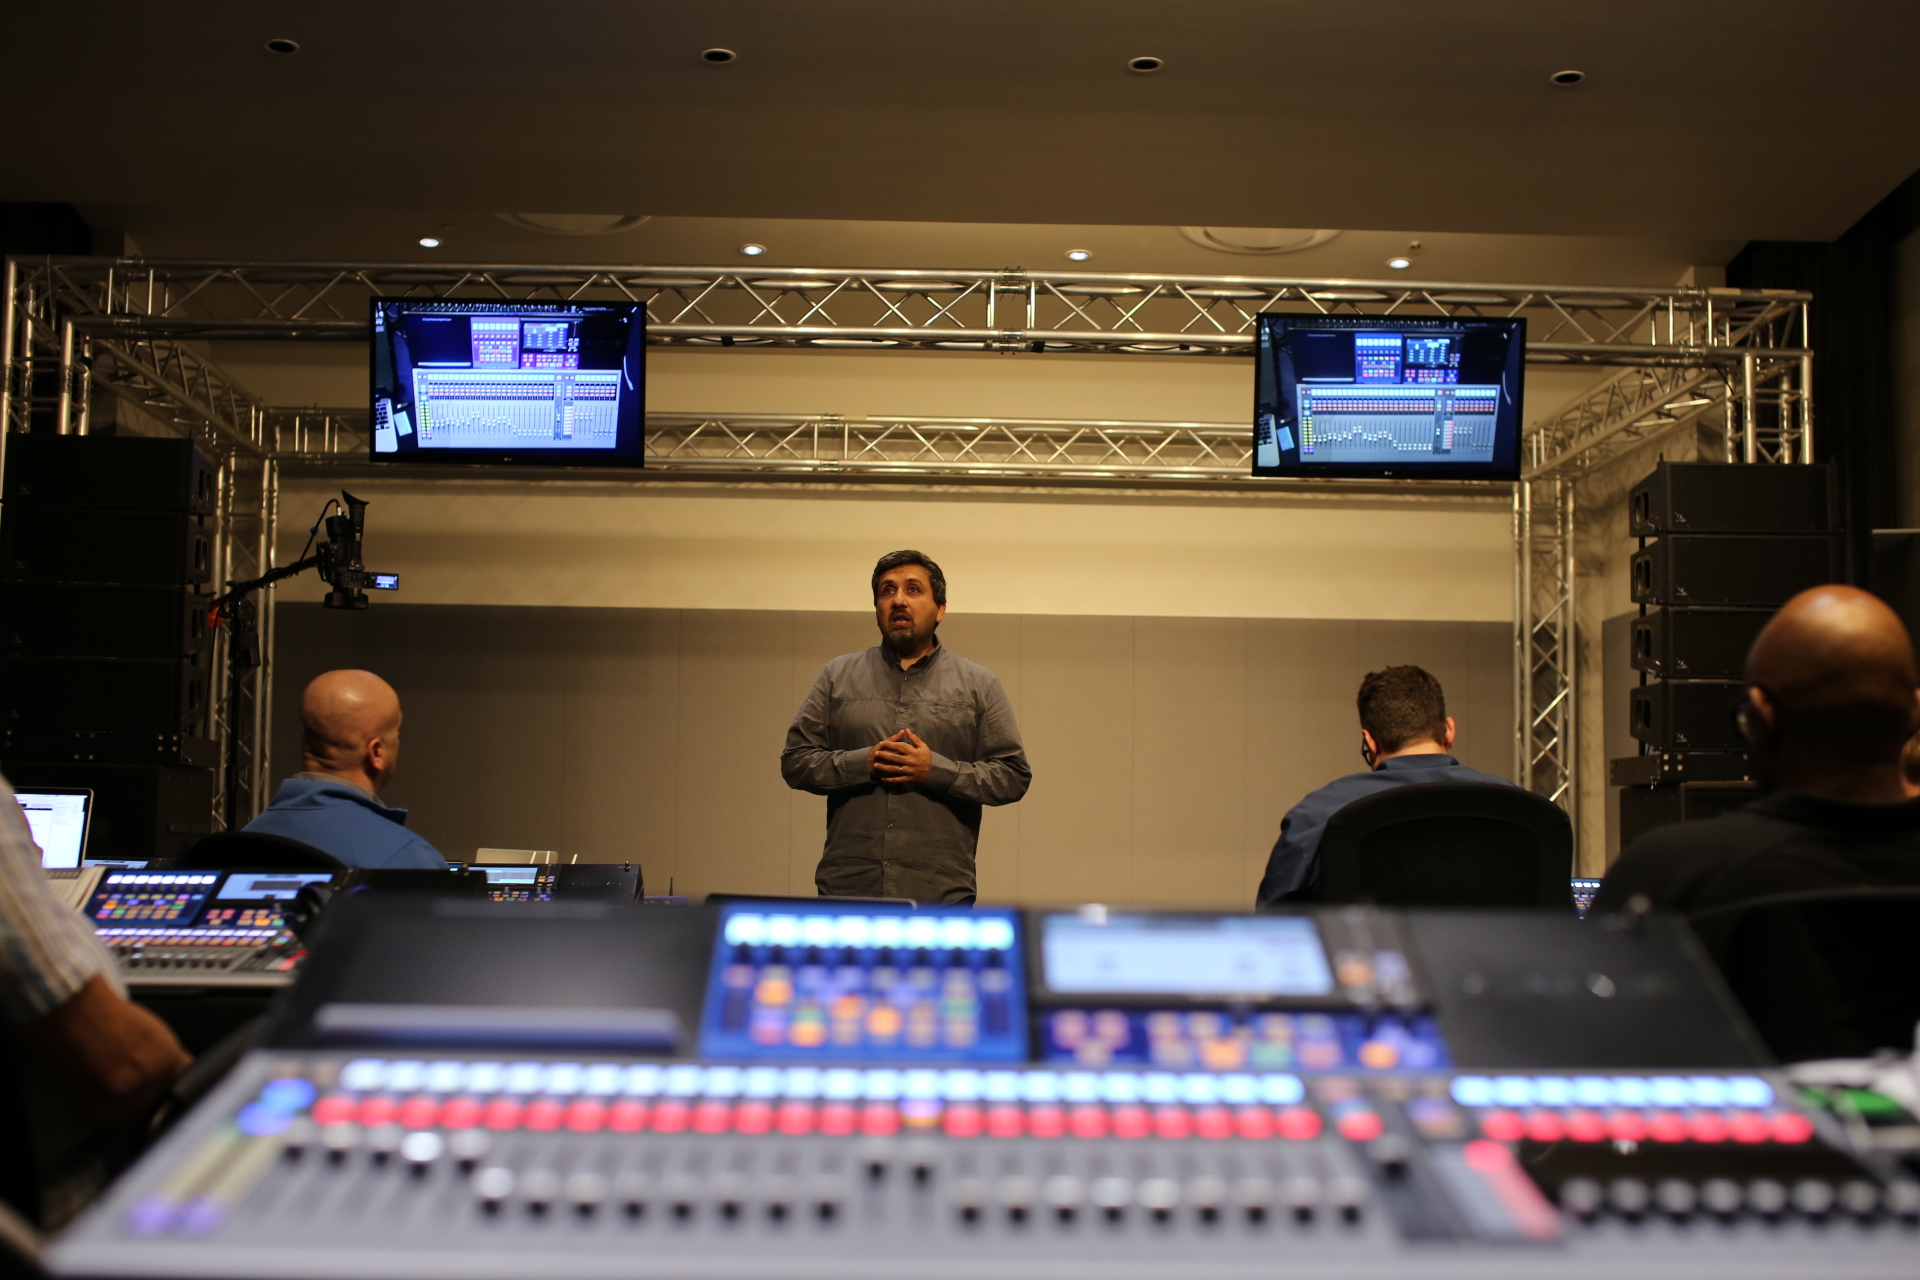
In my early 20s, I was playing in two bands (Zaemon and Chris LeBlanc Band), running a recording studio and working in a music store called BeBop Music Shop. I was finishing a Marketing degree at LSU at that time as well.
 What about PreSonus made you want to work here at the time?
I knew Jim Odom from the local music scene. He was one of our hometown guitar heroes and although he was a few years older than me, we went to the same high school and even took guitar lessons from the same guy. I did a recording session with him in the early ’90s and he used to come into the music store I worked at. I remember him bringing in the prototype of the very first PreSonus product, the DCP-8, about a year before PreSonus started. When Jim approached me about being a part of a startup company, it was a no-brainer for me.
Let’s talk about the Rick Naqvi Effect. People LOVE you and recognize you as the face of PreSonus. How did this come to be? How has it helped you?
Haha!! LOL. Well, I guess since this year will be my 25th year of working at PreSonus, I’m definitely one of the blessed people that found something to do with their lives that has spanned pretty much my entire adulthood. I’ve always been passionate about music and technology and I love people. So PreSonus has been the perfect place for me. I’m in awe of the fact that people use our products to share and experience music together with each other. That’s the part of this job that never gets old. I love being part of a team whose mission is to help people make music.
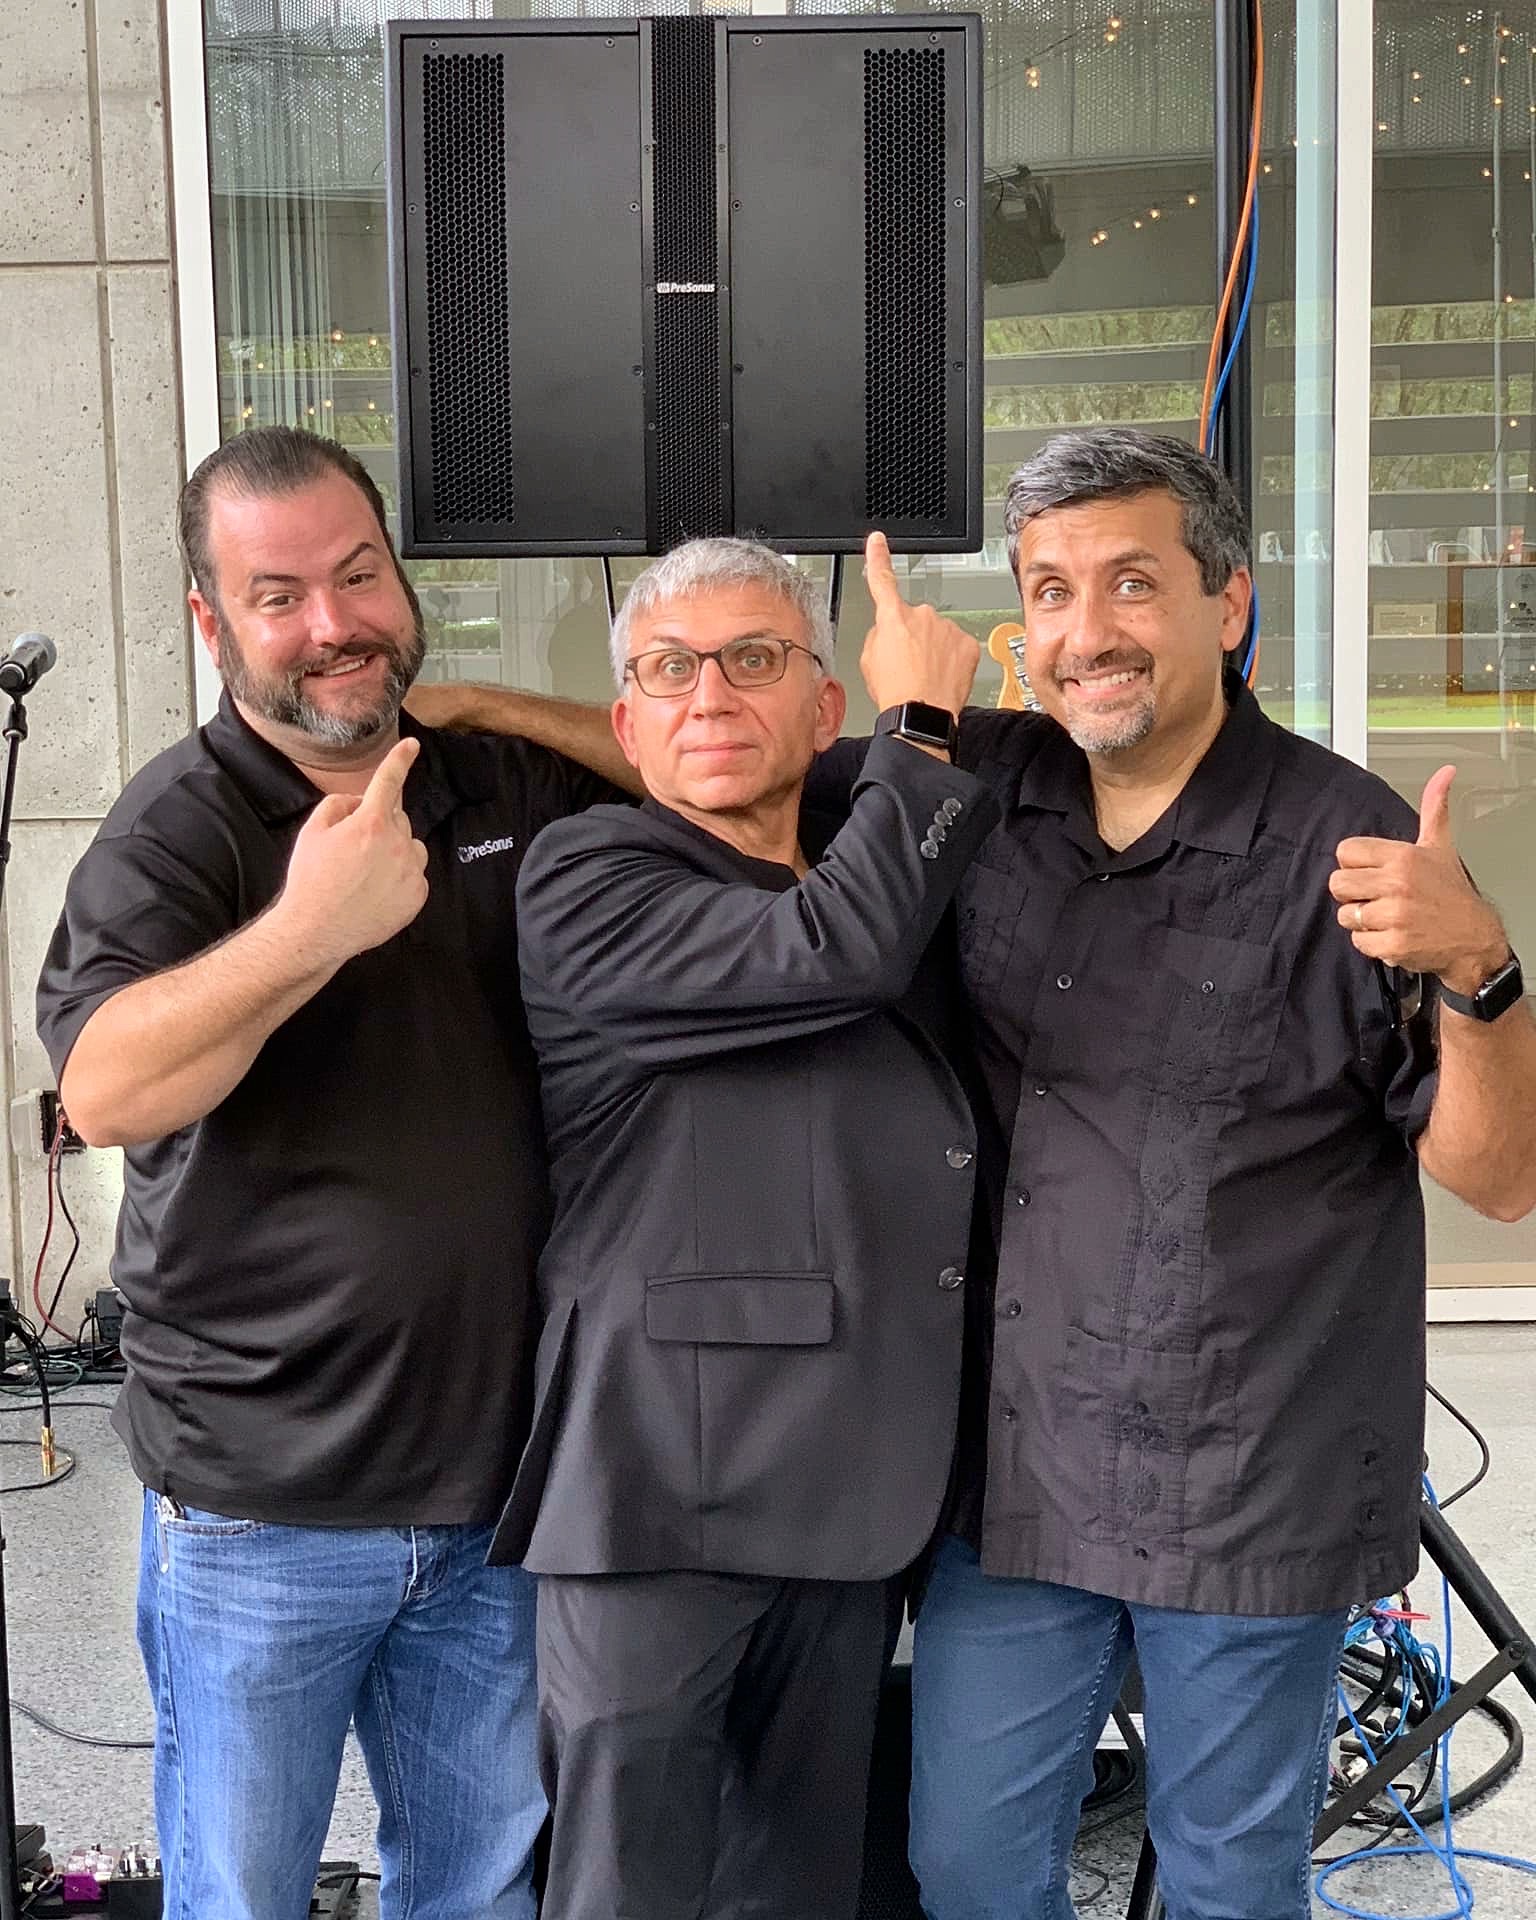 The FirePod was one of PreSonus’ first major products. What need was the FirePod supposed to meet?
The Firepod was the first recording interface with eight microphone preamps in 1U. So you could basically mic an entire drumkit at once. Or record a small rhythm section. It was also one of the first interfaces that allowed for multiple units to be used at the same time. So if you needed 16 simultaneous inputs, you could chain two of them together, and so on.
Any fun stories about the FirePod?
Here’s a true story. The original design for the FirePod had eight inputs but only two mic preamps. Jim Odom was beta testing one of the early prototypes and took it home to record his son’s band. When he realized it was going to be a hassle to hook up additional outboard preamps, he came to work the next day and changed the design of the Firepod to include the other six preamps. We literally had to reshoot images for a tradeshow launch that was happening a few months later. However, putting eight preamps on the Firepod solved a huge need, not only for Jim but for tons of customers. It was one of our most successful products without a doubt.
What has been one of the biggest challenges of working at PreSonus? Major roadblocks?
Working for a technology company has its ups and downs. There have been good years and not so good ones too. Sometimes you create a product that really resonates with people and other times there are challenges that keep a product from its full potential. There’s nothing more important to us than delighting our customers. And when we can’t do that, it is a major bummer for us. Thankfully, our mistakes give us the experience to get better and that’s what we strive to do every day.
In 1995, how did you define success?
One of my first job tasks was to contact dealers and try to tell them about our product. I had a copy of Music Trades that had a list of the Top 100 US Dealers. So I literally picked up the phone and started cold calling people! It was so hard to tell people about a brand new product from a brand new company that they had never heard of. It was amazing just to get someone on the phone who would give me the time of day. Amazingly a bunch of people that got called by a 25-year-old Rick Naqvi are still in the business and are some of our most trusted dealers and life-long friends.
Tell us a cool NAMM story. Or any other PreSonus story.
One time at a NAMM Show I had to give a DigiMax demo to Steven Seagal. Turns out he’s a musician and had a studio at the time. It might have been one of the strangest demos of my life. He was super serious and never cracked a smile. When I told him you could only do 96k using AES outputs, not ADAT, I thought he might judo chop me or something.
When you think about the last 25 years, how does it make you feel seeing how far PreSonus has come?
It really doesn’t seem like I’ve worked for one company. It seems like I’ve worked for about 5 different companies. I’ve been through three building moves and I’ve seen tons of people come and go. I’ve seen kids of our employees grow up and start families of their own. It’s truly humbling to have been a part of this great journey.
Heartcast Media in Washington, DC and the StudioLive 16
 Heartcast Media is a dedicated full-service studio in Washington, D.C. that works with clients to create high quality, authentic podcast content that inspires, educates and connects. Molly Ruland and her team specialize in working with entrepreneurs, visionaries, and businesses of all sizes who have an impactful point-of-view.
Woman-owned Heartcast Media is the vision of Molly Ruland who is dedicated to helping individuals and organizations bring their authentic, original content to life through podcasts. A sister-company to One Love Massive, Heartcast Media clients range from go-go bands to conservative political commentators.
They’re also PreSonus users—and have recorded 85 bands and 150 podcasts in the past 11 months alone!
We think Molly’s business idea is genius, and of course we’re glad that they’ve chosen the StudioLive 16 for their time-sensitive workflow. From the Heartcast website:
We have fully embraced technology and have figured out how to eliminate post production with real time video editing and audio mastering. We deliver all files within 48 hours of recording, typically within 3-4.
We’re proud to be a part of their process, so we wanted to hear more about how this whole operation works. Read all about Molly and Heartcast Media….
Tell us about your background. How long have you been in the audio industry?
I have owned and operated a multimedia company for the last 20 years. I was primarily focused on artist bookings and events. Creating an aesthetic has always been my passion.
How has the audio industry changed since your early days?
Everything is so streamlined now, and the gatekeepers have been removed. I love the idea of accessibility and practicality. Information is readily available which has opened doors for people who weren’t always welcome at the table, and I think that’s great.
How did Heartcast Media come about?
After recording 85 bands and 150 podcasts in 11 months, I realized that my passion and vision align perfectly through podcast production. I love amplifying voices, I always have. I saw a need in the market for high-quality turnkey podcast production, so I created the business to solve that problem. We do things differently—we embrace technology, and by doing so we are able to eliminate the need for a lot of post-production. This saves people time and money and our clients love that.
What’s your favorite podcast right now? Are you allowed to have a favorite?
Tom Bilyeu’s Impact Theory. No question, hands down. Game changer for me.
Tell us about your podcast. Where did the idea for your podcast come from? How does your first podcast compare to your most recent?
I have just launched The Lower Third Podcast because I know so many amazing people whom I garner so much inspiration from, and I wanted to interview and talk to them about mindset and passion. It’s a work in progress. I am looking forward to producing more episodes. However, my passion is producing other people’s podcast and helping them be successful.
There are so many podcasts these days. How do you stand out?
Having a plan for your podcast is imperative. Every podcaster should examine how and if their podcast is providing value. If there isn’t a clear answer, you don’t have a podcast yet.
What challenges do you face recording a podcast?
I am positive that most people don’t understand how much work goes into creating and producing a podcast. It’s a lot of work. It’s not cheap either, and anyone who tells you can start a podcast for $100 is delusional. If you are going to start a podcast you have to have a lot of resilience and a strong sense of self, because it will be a heavy rock to push uphill until you get momentum. It will not happen overnight.
What advice do you have for someone who wants to start a podcast?
Have a plan, understand the workload, and always be open to being wrong.
How did you first hear of PreSonus?
I learned about PreSonus through Adam Levin at Chuck Levin’s Music Center in Wheaton, Maryland. It’s legendary.
 What PreSonus products do you use?
I have the StudioLive 16 in my studio, and we love it. It’s a little more than we need for podcasts, but we also produce live music events so it’s great to have a board that can do both. It’s a solid piece of equipment with really great features that fit our needs. It’s a beautiful board, what’s not to love?
Recent projects? What’s next for you?
My goal is to produce the best podcasts coming out of the East Coast by elevating and amplifying voices in my community that will make the world a better place, one conversation at a time. Every city should have a Heartcast Media.
Stay connected with Heartcast Media on Instagram!
Learn more about the StudioLive family here!
