Tag Archives: Mastering
Mastering: What LRA Means to You
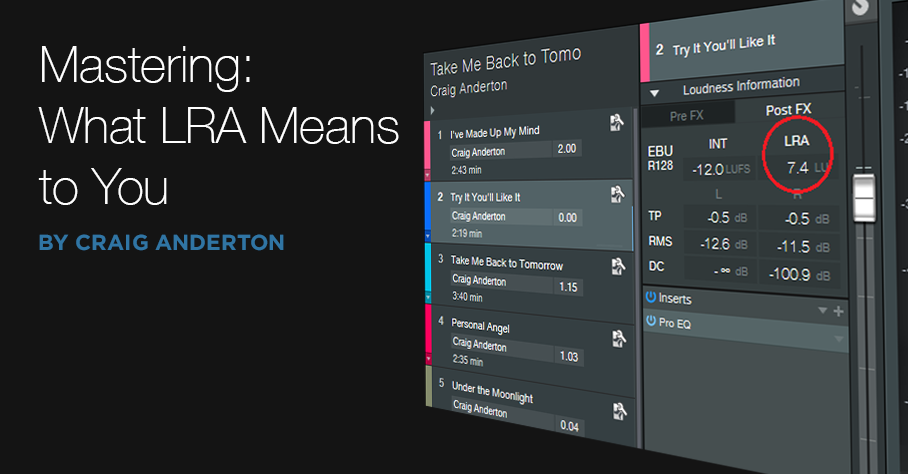 Studio One offers multiple diagnostic tools. We covered the LUFS loudness measurement (based on the R128 loudness standard), in the context of creating consistent levels in a collection of songs. But what about that mysterious LRA reading to its right?
LRA stands for Loudness Range. A complex algorithm measures loudness, analyzes how it’s distributed throughout a song, determines a song’s dynamics properties, and represents that with a number. The lower the number, the less dynamics. (Note that this is not about dynamic range, but rather, musical dynamics.)
Dynamics don’t reflect recording quality. Some songs have lots of dynamics, some don’t. Dynamics may or may not relate to whether the music is compressed or limited—heavily compressed music can still have major loudness differences, whereas music with light compression may not have much dynamics at all.
An Artistic Measurement—Not So Much a Technical One
LRA is more interesting from an artistic standpoint than a technical one. There’s really no “typical” LRA reading for various genres, aside from broad generalities: Classical music is most dynamic, so you can expect LRA readings of 9 or more. Country or jazz will have less dynamics; a reading of 6 to 8 is typical. Rock and EDM often hit around 5 to 6, and hip-hop, 5 or less. But again, LRA readings vary all over the place within any specific genre, as well as within an album. On my most recent album, LRA readings varied from 4 for a slamming, full-tilt track up to 10 for a longer, more nuanced song.
My main use of LRA is checking out soundtracks intended to go behind narration or industrial videos, because excessive dynamics can distract from the messaging. If there’s a high LRA reading, I’ll tweak the level automation as needed to smooth out variations. (Of course, I’d hear any problem variations when assembling the video, but prepping a track beforehand saves time.)
Conversely, if I want some sections in a rock track to really pop in contrast to sections that are more sedate, the LRA reading will confirm whether that goal has been met. If not, I might want to re-consider making the parts that are supposed to be quiet quieter, and then supercharge the dramatic sections. This isn’t only about changing levels. For example, the part that’s supposed to hit harder might benefit from a screaming lead guitar overdub, and more drums.
Do Dynamics Really Matter?
People might assume EDM doesn’t have a lot of dynamics, because they think of four-on-the-floor kick drums. But while researching various pieces of music for this post, I found that my favorite EDM artists tended to make music with more dynamic range—often more than typical rock songs. Coincidence? I’m not sure. But it makes sense that if a DJ wants to take you on a journey over the course of a set, that would involve dynamic variations.
Dynamics are a part of music. If all your songs have LRA readings of 3 or 4, there may not be enough changes in dynamics to keep listeners engaged for more than a few songs…but maybe your intention is to create a hypnotic groove, in which case a low LRA reading could be totally appropriate.
Ultimately, LRA isn’t about rules, but about data. How you use that data is up to you, but I hope you now have a better understanding of what that data means.
Mastering the low end with BASSROOM

Tom Frampton
This blog post will tell you how to get the perfect amount of bass when mastering audio using BASSROOM.
This is where so many potentially awesome tracks fail. Too much bass and your track will sound bloated and lack clarity. Not enough bass and your track will sound weak.
I have a process that helps me set the perfect amount of bass for my clients every time. Since I implemented this technique I can honestly say that my mastering business has dramatically improved (more than doubled!)
I hope that this technique helps you too, whether it’s growing your studio business or simply nailing the master of a track that will further your career as an artist.
Let’s start with why nailing the low-end is so difficult:
- Monitors with great low-end response are super expensive.
- Acoustic treatment is expensive BUT essential for any monitors (expensive or not) to be effective.
- Even when we have great monitors and acoustic treatment how can we be sure of what the perfect low-end level is?
So we’re up against a few hurdles here, but the technique I’ll explain will improve the low- end of your masters, even in the most basic studio set-ups.
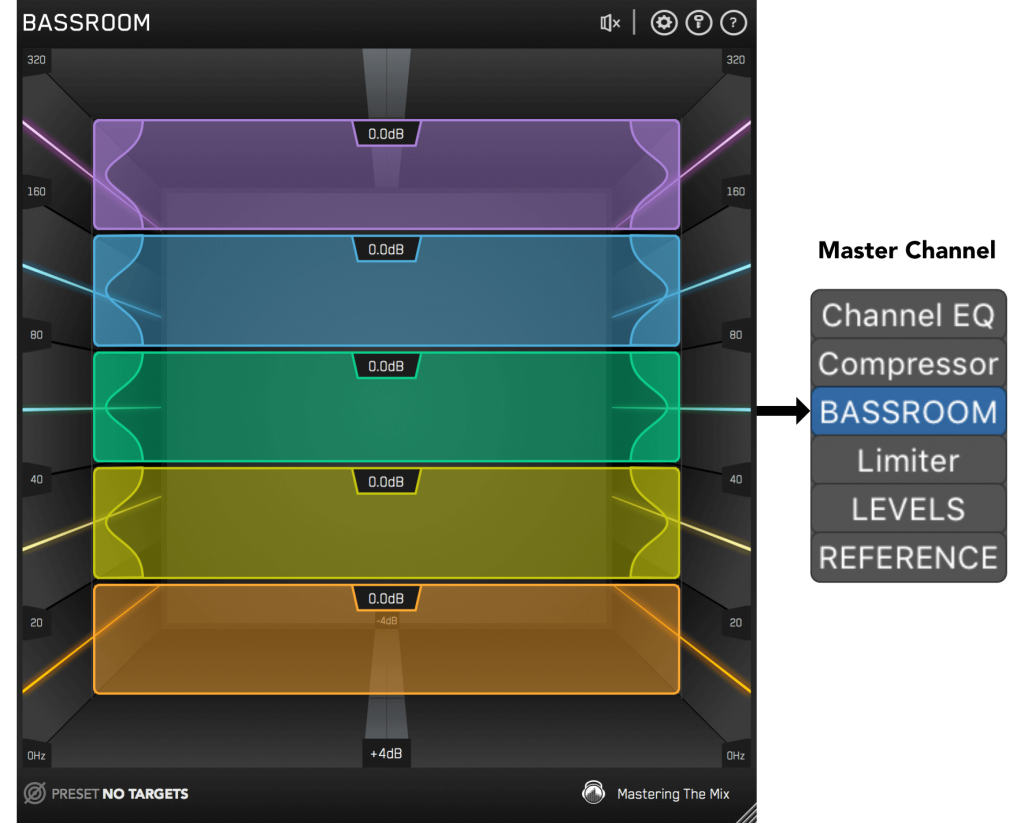
Step 1: Load Up Our Mixing and Mastering EQ BASSROOM on The Master Channel
BASSROOM uses complex algorithms that accurately identifies how the human ear perceives low-frequencies relative to the balance of the whole mix. For that reason it should be loaded on your master channel so it can analyse and be applied to your whole mix.
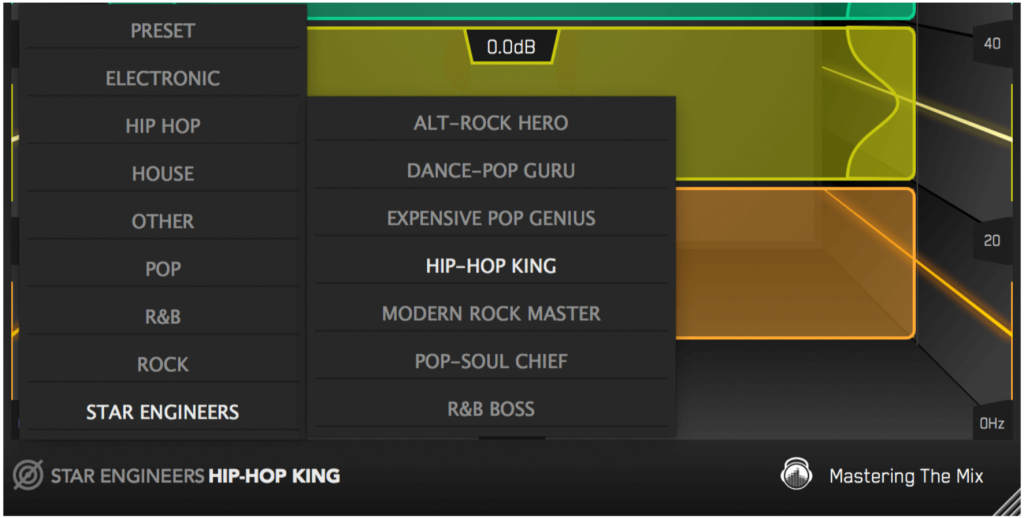
Step 2: Choose A Preset
To get the most value from BASSROOM, start by selecting a preset that best suits the material you’re working on.
Step 3: Create A Target
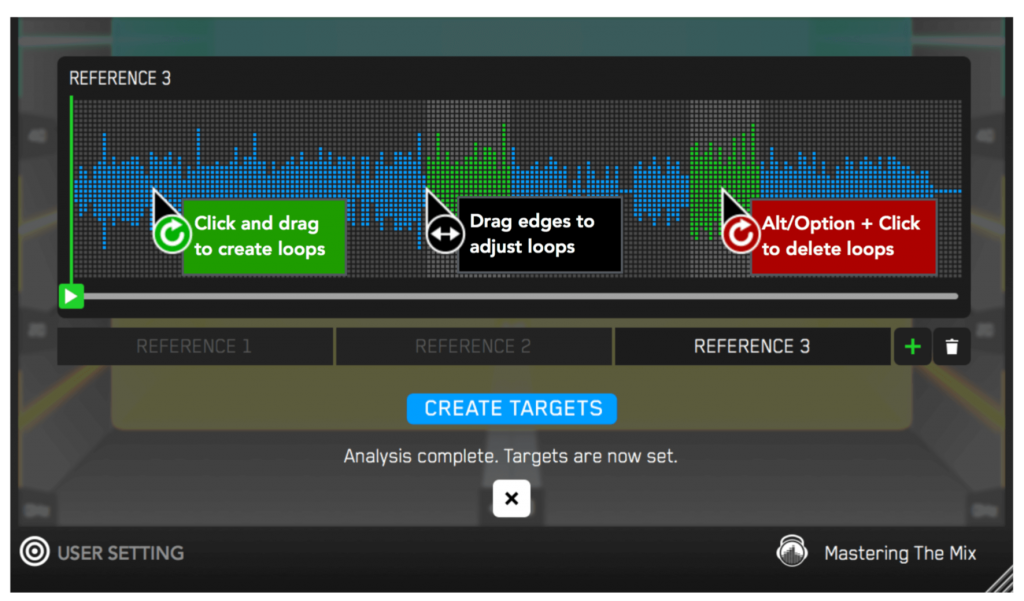
Rather than choosing a preset, you can create your own target values by clicking the target icon in the bottom left corner and importing reference tracks. If you’re creating targets, we recommend clicking and dragging on the waveform to select the drop or chorus for the analysis, as this is usually the material with the best representation of the bass in the track. BASSROOM will create targets based on all the tracks loaded into the analysis window.
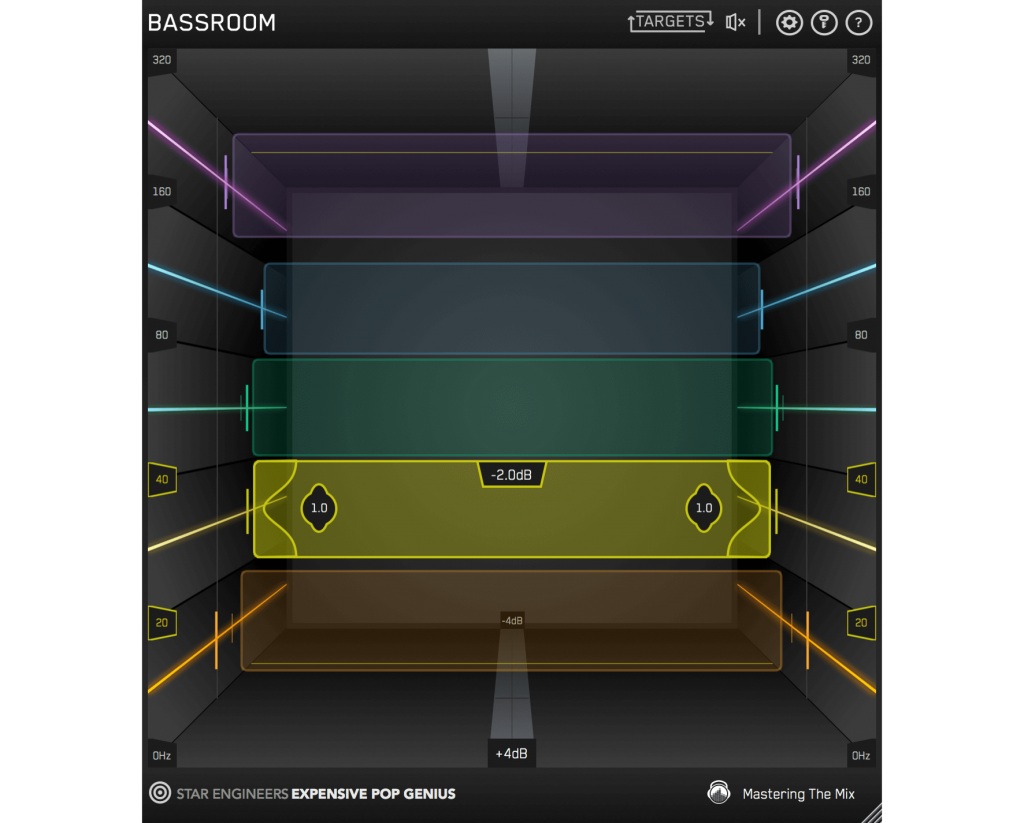
Step 4: Shape Your Low End
Now monitor a bass heavy section of your production (i.e. the drop or chorus), and you’ll see the targets move to the suggested EQ positions based on the tonal balance of your mix compared to the tonal balance of your preset. Use the targets to get a great starting point, then adjust by ear to tweak your low-end to perfection. The algorithm accounts for differences in loudness, so the targets will be accurate and relevant whether you’re mixing or mastering.
Step 5: The Level Match
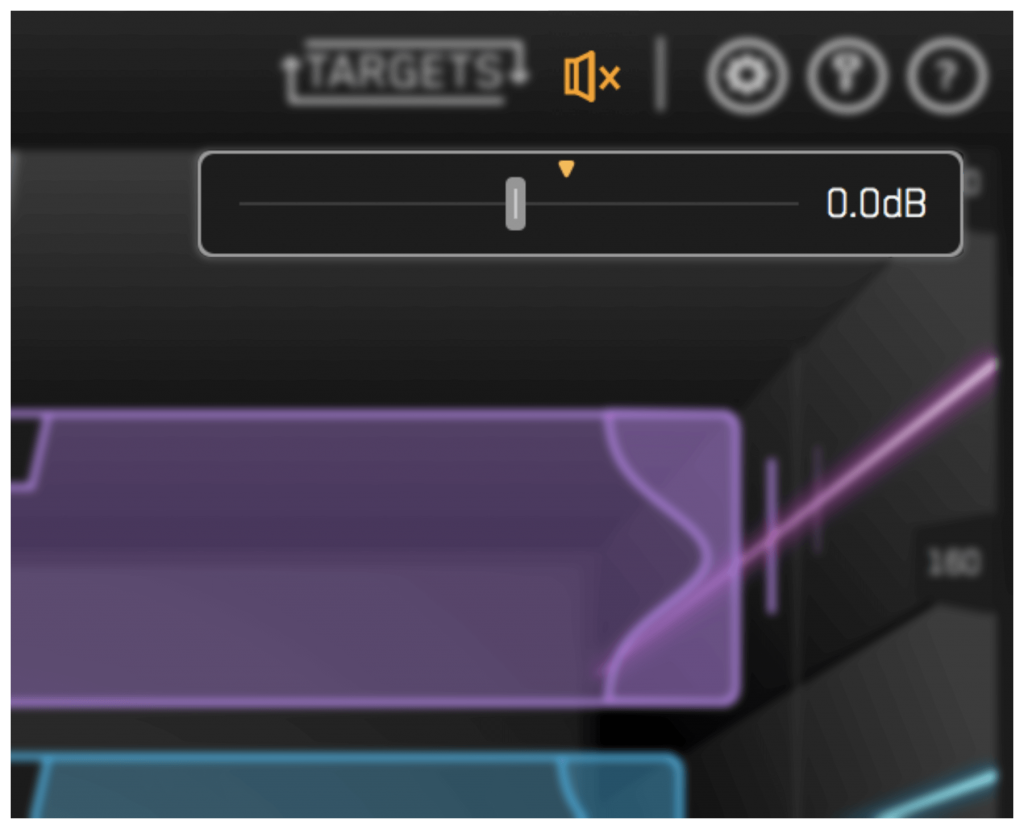
The EQ adjustments may have changed the overall gain of your audio. If the gain has changed by more than 2dB the speaker icon will turn orange. Hover your mouse over the bypass icon to open the output gain and level match pointer. Match the gain slider to the level match pointer to match the perceived loudness of your audio before it passed through BASSROOM.
HEAR THE DIFFERENCE!!
Not only will your low-end fall into place, but the level matching will give you a well-balanced sound across the whole frequency spectrum. Toggle bypass on and off to hear the difference.
Click here to get BASSROOM!
#TeamPreSonus Spotlight: Graham Cochrane of The Recording Revolution!

Who are you, where are you, and what do you do?
My name is Graham Cochrane. I am a producer, engineer, songwriter, and worship leader based in Tampa, FL. I’m also the founder of The Recording Revolution, a popular audio training resource.
How were you introduced to PreSonus?
Word of mouth, years ago.
What PreSonus software/hardware do you use and for what purpose?
I currently have a Eureka and ADL 700 in my rack. Both are excellent preamps and channel strips that make recording easy and fun. I’m using the Central Station Plus for monitoring. I also do all of my mastering in Studio One Professional. Love that project page!
What’s so great about PreSonus, anyhow?
You guys make great products, and make them available at real-world prices, and you have an obvious passion for making music. What more could you want?
What’s the last big project that you worked on using PreSonus gear?
I tracked my band’s most recent EP using just about nothing but the Eureka on the front end. Everything I’ve mastered this year has been exclusively in Studio One.
What are you working on now—or next?
Mixing for a few bands this summer. Also writing a new solo album. I’m always making content for The Recording Revolution including a recent video series called Mastering With Stock Plug-ins that was done all in Studio One. It’s free, you should check it out!
Where can our readers learn more about you online?
Mastering with Stock Plugins in Studio One from @RecordingRev!
Good old Graham. We can always count on this guy to create some of the best audio tutorials available online. This time around, he’s created a pair of videos focusing on mastering in Studio One using stock plug-ins, including Studio One’s Compressor and ProEQ. Watch and learn!
Compression:
ProEQ:
Sweet Project Studio Mastering Master Masters Project in-Studio, in Studio One’s Mastering Project Suite
[This just in from Graham Cochrane, Grand Mixologist and WhizAdult over at The Recording Revolution. He put Studio One 2.5 Professional’s mastering features into an opinion toaster, and a few minutes later this tasty, crispy review video popped out. Dig in, but bacon is extra.]
Hey PreSonus…
Hope you are well. Just a heads up that I posted a video review of mastering in Studio One with the Project Page. Enjoy! Really enjoying working with S1 for mastering. You all have done an excellent job with this! Hope to see some of you at NAMM.